This article is Assisted Injection With Dagger and Hilt For the translation of blog, students with good English can read the original text directly without climbing over the wall, and the source code in the article is also in the original blog.
The following is the translation of the original text.
Assisted injection using Dagger and Hilt
This article studies the use and principle of auxiliary injection and how to add auxiliary injection to your app through Dagger's new construction method.
preface
Using dagger for dependency injection is a hot topic in the Android community. Dagger and its new expansion, Hilt, are open source projects that are constantly improved. New functions and enhancements are added every day. Assisted Injection is a new feature added by dagger since version 2.31.
In this tutorial, you will learn:
- What is assisted injection and why is it useful
- At dagger2 How to use auxiliary injection through AutoFactory before version 31
- Dagger2. Working principle of auxiliary injection in 31 +
- How to use assisted injection through Hilt and ViewModels
Tip: this tutorial assumes that you are familiar with Android development and the use of Android Studio. If not, please read the introduction to Android development first
And Kotlin tutorial for Android.
This tutorial is part of the Dagger series. If you are not familiar with Dagger, please read these resources first:
- Dagger2 tutorial in Android: Advanced
- Dagger2 tutorial in Android: advanced 2
- Migrate from Dagger to Hilt
- New Dagger tutorial
Now let's start learning!
start
First, download the latest version of the project by clicking the download matrix rails button at the top or bottom of this tutorial, and then open it in Android Studio. You will see the following resource directory:

This is the architecture of the assisted Gallery Project. Through this project, you will learn assisted injection, Build and Run this app, and you will see how it works. In the app, you will see the following:
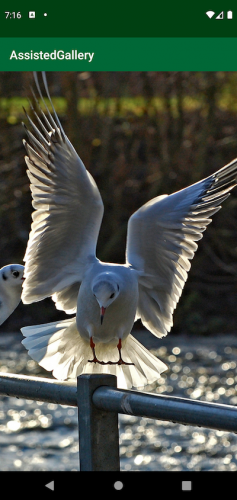
Tip: pictures may be different on your device. This is because the application uses placeimg Com service, which provides a simple interface, which can obtain random pictures according to the provided size and topic.
Now that the project is set up, let's take a look at the architecture of the app
AssistedGallery App architecture
Assisted gallery is a simple application, which internally implements and uses ImageLoader.
Before looking at the code, take a look at the diagram below, which describes the dependencies between different components. When you want to discuss dependency injection, it is necessary to understand the dependencies between the main components of the app.

In this picture, you can see:
- ImageLoader class: download images and load them into ImageView through the URL provided
- ImageLoader is implemented based on BitmapFetcher, which is used to process Bitmap data obtained from the network. How this part is implemented is not important in this tutorial.
- Access to the network and other intensive IO operations must be put into the background thread, so ImageLoader depends on two coroutinedipathcer instances.
- Finally, another one in the table is implemented through different ImageFilter interfaces to perform the operation of Bitmap transformation. The implementation of this part of the filter is not important.
Read on to learn how to express this in your code.
ImageLoader class
To understand how ImageLoader works, first open ImageLoader.com under the bitmap package KT file and view the code. It consists of two main parts:
- Use constructor injection to manage dependencies.
- Realize the loadImage function.
The previous figure helps you understand how to implement constructor injection.
Managing dependencies using constructor injection
Constructor injection is a good way to inject dependencies into a class. This method will inject when you create an instance and make the parameters immutable. For example, the main constructor of ImageLoader:
class ImageLoader constructor(
  private val bitmapFetcher: BitmapFetcher, // 1
  @Dispatchers.IO private val bgDispatcher: CoroutineDispatcher, // 2
  @Dispatchers.Main private val uiDispatcher: CoroutineDispatcher, // 2
  @DrawableRes private val loadingDrawableId: Int = R.drawable.loading_animation_drawable, // 3
  private val imageFilter: ImageFilter = NoOpImageFilter // 4
) {
  // ...
}
The above code has many noteworthy points:
- ImageLoader relies on an implementation class of BitmapFetcher interface as the first parameter received by its constructor. Like all parameters, it is private val, private read-only
- You need two different CoroutineDispatcher implementations. The first one uses @ dispatchers IO annotation, you can use it for background operations, such as accessing the network or converting Bitmap The second one uses @ dispatchers Main annotation, which you can use to interact with the UI.
- The previous parameters are required parameters. loadingDrawableId is the first optional parameter, which represents the Drawable to be displayed when the background job is in progress.
- Finally, there is an optional ImageFilter parameter for converting bitmaps loaded from the network.
Note: the optional parameter here means that the parameter is not forced to be passed, because it has a default value.
Implement loadImage method
Although this part is not necessary, it is also useful to check the code implemented by loadImage below for completeness:
class ImageLoader constructor(
 // ...
) {

  suspend fun loadImage(imageUrl: String, target: ImageView) =
      withContext(bgDispatcher) { // 1
        val prevScaleType: ImageView.ScaleType = target.scaleType
        withContext(uiDispatcher) { // 2
          with(target) {
            scaleType = ImageView.ScaleType.CENTER
            setImageDrawable(ContextCompat.getDrawable(target.context, loadingDrawableId))
          }
        }
        val bitmap = bitmapFetcher.fetchImage(imageUrl) // 3
        val transformedBitmap = imageFilter.transform(bitmap) // 4
        withContext(uiDispatcher) { // 5
          with(target) {
            scaleType = prevScaleType
            setImageBitmap(transformedBitmap)
          }
        }
      }
}
In this part of the code, you can:
-
Use withContext to run the included code in the context of the background thread.
-
Switch to the UI thread to set the corresponding drawable when loading and converting Bitmap
-
In the context of the background thread, get the data of Bitmap from the network.
-
Transform Bitmap Since this is an expensive operation, it needs to be executed in the context of the background thread.
-
Return to the UI thread to display the Bitmap
Now, how to provide and use the dependencies required by ImageLoader?
Using the ImageLoader class
Open mainactivity. In the ui directory KT file, view the following code:
@AndroidEntryPoint
class MainActivity : AppCompatActivity() {

  @Inject
  @Dispatchers.IO
  lateinit var bgDispatcher: CoroutineDispatcher // 1

  @Inject
  @Dispatchers.Main
  lateinit var mainDispatcher: CoroutineDispatcher // 2

  @Inject
  lateinit var bitmapFetcher: BitmapFetcher // 3

  @Inject
  lateinit var imageUrlStrategy: ImageUrlStrategy // 4

  lateinit var mainImage: ImageView

  override fun onCreate(savedInstanceState: Bundle?) {
    super.onCreate(savedInstanceState)
    setContentView(R.layout.activity_main)
    mainImage = findViewById<ImageView>(R.id.main_image).apply {
      setOnLongClickListener {
        loadImage()
        true
      }
    }
  }

  override fun onStart() {
    super.onStart()
    loadImage()
  }

  fun loadImage() { // 5
    lifecycleScope.launch {
      ImageLoader(
          bitmapFetcher,
          bgDispatcher,
          mainDispatcher
      )
          .loadImage(imageUrlStrategy(), mainImage)
    }
  }
}
In the code, you can see
- Used @ dispatchers IO is used as qualifier to inject CoroutineDispatcher of background thread.
- Use @ dispatchers Main is used as a qualifier to modify the CoroutineDispatcher of the main thread.
- Inject a BitmapFetcher
- Inject an ImageUrlStrategy object that creates the URL of the image to be downloaded.
- Create an ImageLoader instance with all dependencies and load the image into ImageView.
This code is obviously too much, especially when using dependency injection. Do you really need to inject all dependencies into MainActivity?
Just inject what you need
To simplify the code, you don't need to inject all the dependencies required by ImageLoader into MainActivity Instead, you can just inject the ImageLoader itself and let Dagger complete the difficult part.
Create a new one named imageloadermodule in the di package KT file, write the following code:
@Module
@InstallIn(ActivityComponent::class)
object ImageLoaderModule {

  @Provides
  fun provideImageLoader(
      @Dispatchers.IO bgDispatcher: CoroutineDispatcher,
      @Dispatchers.Main mainDispatcher: CoroutineDispatcher,
      bitmapFetcher: BitmapFetcher
  ): ImageLoader = ImageLoader(
      bitmapFetcher,
      bgDispatcher,
      mainDispatcher
  )
}
In the code, add an instance of ImageLoader to the dependency of activity scope.
Then you can add mainactivity The code in KT is updated to the following:
@AndroidEntryPoint
class MainActivity : AppCompatActivity() {

  @Inject
  lateinit var imageLoader: ImageLoader // 1

  @Inject
  lateinit var imageUrlStrategy: ImageUrlStrategy

  lateinit var mainImage: ImageView

  override fun onCreate(savedInstanceState: Bundle?) {
    super.onCreate(savedInstanceState)
    setContentView(R.layout.activity_main)
    mainImage = findViewById<ImageView>(R.id.main_image).apply {
      setOnLongClickListener {
        loadImage()
        true
      }
    }
  }

  override fun onStart() {
    super.onStart()
    loadImage()
  }

  fun loadImage() {
    lifecycleScope.launch {
      imageLoader.loadImage(imageUrlStrategy(), mainImage) // 2
    }
  }
}
As you can see, in the new code:
- Inject imageloader directly into the imageloader instance variable.
- Use imageLoader to load the image to be displayed.
Build and run, and then check that everything still works as expected.

Note: as before, you will see the random images provided by the API.
What about other parameters?
So far everything has been fine, but... Yes, there is another but.:] ImageLoader also has two optional parameters. If you want ImageLoader to inject as just now, how to pass the values of loadingDrawableId and imageFilter?
One solution is to make the parameters loadingDrawableId and imageFilter in loadImage as follows:
suspend fun loadImage(
    imageUrl: String,
    into: ImageView,
    @DrawableRes loadingDrawableId: Int = R.drawable.loading_animation_drawable,
    imageFilter: ImageFilter = NoOpImageFilter) { /*... */ }
This is a completely feasible solution, but it has no meaning for dependency injection. This is because you need to pass the Drawable and ImageFilter parameters every time you load a new image. A better way is to pass it when ImageLoader is first created.
You want to create an instance of ImageLoader and use some parameters managed by dagger for you. At the same time, you can pass in some parameters when creating the instance. This is called assisted injection. Dagger has native support since version 2.31. However, many code bases are not up-to-date, so you need to first understand how to use assisted injection in earlier versions of dagger.
Assisted injection using AutoFactory
Before Dagger 2.31, you can implement assisted injection through AutoFactory, which is a code generator created for Java.
But it also applies to Kotlin, with some limitations.
Before looking at the code, it is necessary to understand the role of AutoFactory and other auxiliary injection tools. Suppose you have a class that is exactly the same as the previous ImageLoader and has some dependencies:
class ImageLoader constructor(
  private val bitmapFetcher: BitmapFetcher,
  @Dispatchers.IO private val bgDispatcher: CoroutineDispatcher,
  @Dispatchers.Main private val uiDispatcher: CoroutineDispatcher,
  @DrawableRes private val loadingDrawableId: Int = R.drawable.loading_animation_drawable,
  private val imageFilter: ImageFilter = NoOpImageFilter
) {
 // ...
}
This class has five main constructor parameters. As shown earlier, Dagger can provide examples for the first three. This means that if you want to create an instance of ImageLoader, you only need to pass in the last two parameters. What would you do? This is where the Factory Method works.
You can inject one Factory instead of the whole ImageLoader, as shown below:

Now convert it to code:
class ImageLoaderFactory @Inject constructor( // 1
  private val bitmapFetcher: BitmapFetcher, // 2
  @Dispatchers.IO private val bgDispatcher: CoroutineDispatcher, // 2
  @Dispatchers.Main private val uiDispatcher: CoroutineDispatcher // 2
) {

  fun create(
    @DrawableRes private val loadingDrawableId: Int = R.drawable.loading_animation_drawable, // 3
    private val imageFilter: ImageFilter = NoOpImageFilter // 3
  ) = ImageLoader(bitmapFetcher, bgDispatcher, uiDispatcher, loadingDrawableId, imageFilter) // 4

}
In this part of the code, you can see:
- The main constructor of ImageLoaderFactory has an @ Inject annotation: Dagger needs to know how to create an instance of it.
- The parameters that Dagger needs to provide are the parameters of the main constructor of ImageLoaderFactory.
- The dependency you need to provide is the parameter of create()
- create() combines all parameters to create an ImageLoader
Now you have specified which parameters are provided by Dagger and which parameters are passed by you when you call create(). AutoFactory will generate Factory code for you based on this information.
Configure AutoFactory
AutoFactory uses annotation processing to generate code.
Open build.com in app Gradle and add the following lines to dependencies
  implementation 'com.google.auto.factory:auto-factory:1.0-beta5@jar' // 1
  kapt 'com.google.auto.factory:auto-factory:1.0-beta5' // 2
  compileOnly 'javax.annotation:jsr250-api:1.0' // 3
In this part of the code, you:
- Added the dependency of the annotation used in the code.
- Using kapt, set up the annotation processor, which will generate code for auxiliary injection.
- Add some comments that AutoFactory Generated code will use (for example, @ Generated). compileOnly is used here because these are required only during compilation.
In the same build In the gradle file, add the following definition above the dependencies block:
This allows error type inference in stubs. This is useful because the AutoFactory annotation processor relies on the exact type in the declaration signature. Without this definition, Kapt will replace each unknown type with NonExistentClass. When this problem occurs during code generation, debugging will become very difficult.
Using AutoFactory in the AssistedGallery application
Add the dependency to build. Net in the app After the gradle file,
The following comments will be available in the project:
- @AutoFactory: mark the type you want to provide with auxiliary injection.
- @Provided: tag the parameters provided by the Dagger when creating an instance.
Note: of course, don't forget to select Sync Project with Gradle files from the File menu of Android Studio
Prepare the course for assisted injection
Using AutoFactory in ImageLoader is simple. Open ImageLoader.com in the bitmap package kt
And change the class and constructor as follows to keep the code of the internal implementation unchanged
@AutoFactory // 1
class ImageLoader constructor(
    @Provided
    private val bitmapFetcher: BitmapFetcher, // 2
    @Provided
    @Dispatchers.IO private val bgDispatcher: CoroutineDispatcher, // 2
    @Provided
    @Dispatchers.Main private val uiDispatcher: CoroutineDispatcher, // 2
    @DrawableRes private val loadingDrawableId: Int = R.drawable.loading_animation_drawable, // 3
    private val imageFilter: ImageFilter = NoOpImageFilter // 3
) {
  // ...
}
In this code. You can:
- Annotate the class name with @ AutoFactory so that AutoFactory can process it and generate code.
- Use @ Provided to annotate the parameters of the three constructors bitmapFetcher, bgDispatcher and uiDispatcher. In this way, they are marked as the parameters that Dagger needs to provide.
- Do not comment loadingDrawableId and imageFilter. These are the constructor parameters you need to provide when using the factory to create an ImageLoader instance.
View generated code
To understand how to use ImageLoader, you need to build the application and check the generated code in the build/generated/source/kapt/debug directory, as shown in the following figure:
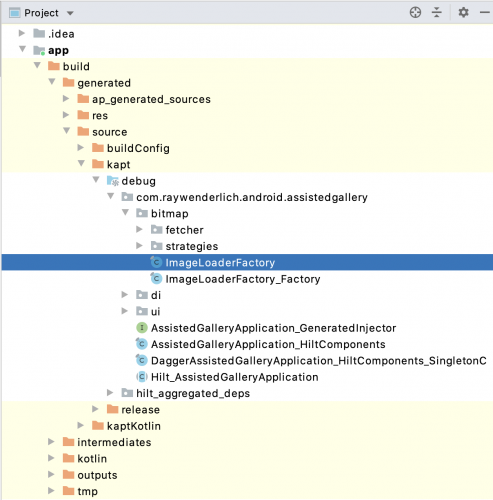
Note: switch to the Project view to see the build folder.
If you open imageloaderfactory Java, you will see the following:
If you open imageloaderfactory Java, you will see the following:
@Generated( // 1
  value = "com.google.auto.factory.processor.AutoFactoryProcessor",
  comments = "https://github.com/google/auto/tree/master/factory"
)
public final class ImageLoaderFactory {
  private final Provider<BitmapFetcher> bitmapFetcherProvider; // 2
  private final Provider<CoroutineDispatcher> bgDispatcherProvider; // 2
  private final Provider<CoroutineDispatcher> uiDispatcherProvider; // 2

  @Inject // 4
  public ImageLoaderFactory(
      Provider<BitmapFetcher> bitmapFetcherProvider, // 3
      @Schedulers.IO Provider<CoroutineDispatcher> bgDispatcherProvider, // 3
      @Schedulers.Main Provider<CoroutineDispatcher> uiDispatcherProvider) { // 3
    this.bitmapFetcherProvider = checkNotNull(bitmapFetcherProvider, 1);
    this.bgDispatcherProvider = checkNotNull(bgDispatcherProvider, 2);
    this.uiDispatcherProvider = checkNotNull(uiDispatcherProvider, 3);
  }

  public ImageLoader create(int loadingDrawableId, ImageFilter imageFilter) { // 5
    return new ImageLoader(
        checkNotNull(bitmapFetcherProvider.get(), 1),
        checkNotNull(bgDispatcherProvider.get(), 2),
        checkNotNull(uiDispatcherProvider.get(), 3),
        loadingDrawableId,
        checkNotNull(imageFilter, 5));
  }
  // ...
}
The Java code generated by AutoFactory contains many interesting things:
-
@The Generated annotation provides metadata about the Generated file.
-
Each constructor parameter annotated with @ Provided is decorated with a final field, which is initialized when the factory constructor is used.
-
The @ Inject annotation on the constructor means that Dagger will create an instance of ImageLoaderFactory.
-
AutoFactory generates the create() method, and the parameters of the method are parameters that are not marked with @ Provided. The implementation within the method is very simple. It creates an ImageLoader instance using the value of the constructor and the value of its own parameter of create().
Now it's time to use ImageLoaderFactory in MainActivity.
Use generated factory
Open mainactivity. In the ui package KT and make the following changes:
@AndroidEntryPoint
class MainActivity : AppCompatActivity() {

  @Inject
  lateinit var imageLoaderFactory: ImageLoaderFactory // 1

  // ...
  fun loadImage() {
    lifecycleScope.launch {
      imageLoaderFactory
          .create( // 2
              R.drawable.loading_animation_drawable,
              GrayScaleImageFilter()
          ).loadImage(imageUrlStrategy(), mainImage)
    }
  }
}
In this part of the code, you:
- Inject ImageLoaderFactory instead of ImageLoader.
- Call create() and pass in Drawable and ImageFilter to create an instance of ImageLoader. In this example, you use GrayScaleImageFilter as the ImageFilter implementation.
Note: since you have injected ImageLoaderFactory, you can delete the imageloadermodule in the di package kt.
Build and run the application to see how the new grayscale filter works.

This means that Dagger provides some dependencies through Factory, and you provide the remaining dependencies as parameters of create()
Note: you may think that the parameter ImageFilter displayed during Drawable loading once had a default value. Where did those go? Java does not have the concept of parameter default values, so the annotation processor does not know that they exist. You may think that using @ JvmOverloads will generate different create() overloaded methods for, but unfortunately, it is not yet supported.
Dagger2. Auxiliary injection of 31 +
If you use dagger2 31 or later, you can benefit from secondary injection without any other dependencies.
As you will see next, you can get the same result as @ AutoFactory by using different annotations.
To migrate using Dagger's assisted injection, you need to:
- Remove the dependency of AutoFactory and update the version of Dagger/Hilt.
- Use @ AssistedInject and @ Assisted instead of @ AutoFactory and @ Provided, respectively.
- Define a Factory implementation and annotate it with @ AssistedFactory.
Now you can migrate the auxiliary injection of AutoFactory on ImageLoader to the auxiliary injection on Dagger.
Update dependencies
As the first step, open the build. Of the application module Gradle and delete the previously added definition:
  // START REMOVE
  implementation 'com.google.auto.factory:auto-factory:1.0-beta5@jar'
  kapt 'com.google.auto.factory:auto-factory:1.0-beta5'
  compileOnly 'javax.annotation:jsr250-api:1.0'
  // END REMOVE
After that, upgrade the version of Hilt. At the time of writing, this is 2.33-beta. You can also check Maven central for the latest available version.
To update the version of the Hilt, change the Hilt_ android_ The value of version. Open project level build Gradle file and updated version:
buildscript {
  ext.kotlin_version = "1.4.31"
  ext.hilt_android_version = "2.33-beta" // Update this value
  repositories {
    google()
    mavenCentral()
  }
  // ...
}
// ...
Note: in building After making changes to the Gradle file, don't forget to sync your project with Gradle.
Before starting, open applicationmodule KT, and then replace the references of the two applicationcomponent:: classes
Replace with SingletonComponent::class. Because this piece was renamed in the new version of Dagger.
@Module(includes = arrayOf(Bindings::class))
@InstallIn(SingletonComponent::class) // Check this line
object ApplicationModule {
  // ...
  @Module
  @InstallIn(SingletonComponent::class) // Check this line
  interface Bindings {
    // ...
  }
}
Your code should look like this.
Using @ AssistedInject and @ Assisted
Now you need to tell Dagger which classes use assisted injection and which parameters should be provided by Dagger.
Open imageloader.com under the bitmap package KT, and then modify its constructor, as follows:
// 1
class ImageLoader @AssistedInject constructor( // 2
    private val bitmapFetcher: BitmapFetcher,
    @Dispatchers.IO private val bgDispatcher: CoroutineDispatcher,
    @Dispatchers.Main private val uiDispatcher: CoroutineDispatcher,
    @Assisted
    @DrawableRes private val loadingDrawableId: Int = R.drawable.loading_animation_drawable, // 3
    @Assisted
    private val imageFilter: ImageFilter = NoOpImageFilter // 3
) {
  // ...
}
In the code above, you:
- @ AutoFactory has been deleted. This annotation is unnecessary
- Annotate the main constructor with the @ AssistedInject tag
- Removed the @ Provided annotation and added the @ Assisted annotation for the constructor parameters you want to provide.
Please note that you used to use the parameters Provided by the @ Provided tag Dagger. Now it's the opposite: use @ Assisted to mark the parameters you want to provide.
If you try to build and run the project now, you will encounter some errors. This is because using Dagger for adjuvant injection needs another step to complete.
Create a Factory using @ AssistedFactory
Tell Dagger what the factory method should look like.
In the di package, create a named imageloaderfactory using the following code KT's new file:
@AssistedFactory // 1
interface ImageLoaderFactory {

  fun createImageLoader( // 2
    @DrawableRes loadingDrawableId: Int = R.drawable.loading_animation_drawable,
    imageFilter: ImageFilter = NoOpImageFilter
  ): ImageLoader // 3
}
In this part of the code, you:
- Create an ImageLoaderFactory and annotate it with @ AssistedFactory.
- Define the createImageLoader() method, which contains the parameters you previously annotated with @ Assisted in the ImageLoader constructor. Note that you can name this method as you like - or call it create().
- Specify ImageLoader as the return type.
If you build the application now, the Hilt annotation processor will generate the code of ImageLoaderFactory. However, the build will eventually fail because you still need to integrate new code in MainActivity.
Use adjuvant injection where appropriate
As you did with AutoFactory, you can now inject the ImageLoaderFactory generated by Hilt into MainActivity Open MainActivity KT and make the following changes:
@AndroidEntryPoint
class MainActivity : AppCompatActivity() {

  @Inject
  lateinit var imageLoaderFactory: ImageLoaderFactory // 1
  // ...
  fun loadImage() {
    lifecycleScope.launch {
      imageLoaderFactory
          .createImageLoader( // 2
              R.drawable.loading_animation_drawable,
              GrayScaleImageFilter()
          ).loadImage(imageUrlStrategy(), mainImage)
    }
  }
}
In this part of the code, you:
- Inject an ImageLoaderFactory. In this case, you need to update the package where the ImageLoaderFactory is located. Now it's in the di package.
- Use the new createImageLoader factory method you defined in the interface.
Build and run the application and see if it works.

Everything looks normal, but what about using AutoFactory as the default parameter for restrictions?
Use default parameters in Dagger assisted injection
The good news is that when using Dagger assisted injection, you can still use optional parameters. This is because the code generated by Dagger is an interface annotated by @ AssistedFactory, which is a Kotlin interface. Open mainactivity KT and change it like this:
@AndroidEntryPoint
class MainActivity : AppCompatActivity() {
  // ...
  fun loadImage() {
    lifecycleScope.launch {
      imageLoaderFactory
          .createImageLoader( imageFilter = GrayScaleImageFilter() // HERE
          ).loadImage(imageUrlStrategy(), mainImage)
    }
  }
}
As you can see, you passed an imageFilter parameter and used the default value of loadingDrawableId.
Build and run the application to check that everything is still working as expected.

Assisted injection and ViewModels
A common use case for assisted injection is to inject ViewModel
Google is still working on this, and what you learn now may change in the future. To understand how this works, you will move the code that loads and transforms a Bitmap to a ViewModel through the following steps:
- Add some required dependencies.
- Implement the new ImageLoaderViewModel
- Provide an @ AssistedFactory for ImageLoaderViewModel.
- Using ImageLoaderViewModel in MainActivity
It's time to code together.
Add the required dependencies
Open the build. Of the application module Gradle and add the following:
  implementation "androidx.hilt:hilt-lifecycle-viewmodel:1.0.0-alpha03" // 1
  implementation "androidx.activity:activity-ktx:1.2.2" // 2
These dependencies include:
- Hilt support for ViewModel.
- Kotlin extension on Activity, which allows you to use viewModels() to get ViewModel
Now you can start implementing ImageLoaderViewModel.
Implement ViewModel
To show how auxiliary injection works with ViewModel,
You need to create an ImageLoaderViewModel,
It will implement the same functions as ImageLoader.
Create a new package named viewmodels and create a new package named imageloaderstate New file for KT
Use the following code:
sealed class ImageLoaderState
data class LoadingState(@DrawableRes val drawableId: Int) : ImageLoaderState()
data class SuccessState(val bitmap: Bitmap) : ImageLoaderState()
This is a sealed class that represents different contents that you can put in ImageView according to different states
A Drawable is displayed when you acquire and convert images, and a Bitmap is displayed as the result.
In the same package, create another one called imageloaderviewmodel KT and add the following code:
class ImageLoaderViewModel @AssistedInject constructor( // 1
    private val bitmapFetcher: BitmapFetcher, // 2
    @Dispatchers.IO private val bgDispatcher: CoroutineDispatcher, // 2
    @Assisted private val imageFilter: ImageFilter, // 3
    @Assisted private val loadingDrawableId: Int // 3
) : ViewModel() {

    private val _bitmapLiveData = MutableLiveData<ImageLoaderState>()
    val bitmapLiveData: LiveData<ImageLoaderState>
        get() = _bitmapLiveData

    fun loadImage(imageUrl: String) { // 4
        viewModelScope.launch(bgDispatcher) {
            _bitmapLiveData.postValue(LoadingState(loadingDrawableId))
            val bitmap = bitmapFetcher.fetchImage(imageUrl)
            val filteredBitmap = imageFilter.transform(bitmap)
            _bitmapLiveData.postValue(SuccessState(filteredBitmap))
        }
    }
}
Let's review what we just did step by step:
- Annotate ImageLoaderViewModel with @ AssistedInject. Theoretically, you should use @ HiltViewModel provided by Hilt to process ViewModel, but unfortunately, this does not apply to auxiliary injection. (see this question for more information.)
- bitmapFetcher and bgDispatcher are defined as the main constructor parameters, which are injected by Dagger.
- Use @ Assisted to annotate imageFilter and loadingDrawableId, which are provided by you when creating ImageLoaderViewModel.
- Provides the implementation of the loadImage() method, including the logic code for obtaining and converting bitmap and updating ImageLoaderState with LiveData
Create @ AssistedFactory for ViewModel
You need to tell Dagger how to create an instance of ImageLoaderViewModel with auxiliary injection.
In the same viewmodels package,
Create a model factory named imageloaderviewmodelfactory KT and write the following code:
class ImageLoaderViewModel @AssistedInject constructor( // 1
    private val bitmapFetcher: BitmapFetcher, // 2
    @Dispatchers.IO private val bgDispatcher: CoroutineDispatcher, // 2
    @Assisted private val imageFilter: ImageFilter, // 3
    @Assisted private val loadingDrawableId: Int // 3
) : ViewModel() {

    private val _bitmapLiveData = MutableLiveData<ImageLoaderState>()
    val bitmapLiveData: LiveData<ImageLoaderState>
        get() = _bitmapLiveData

    fun loadImage(imageUrl: String) { // 4
        viewModelScope.launch(bgDispatcher) {
            _bitmapLiveData.postValue(LoadingState(loadingDrawableId))
            val bitmap = bitmapFetcher.fetchImage(imageUrl)
            val filteredBitmap = imageFilter.transform(bitmap)
            _bitmapLiveData.postValue(SuccessState(filteredBitmap))
        }
    }
}
This code should be very simple now. Here, you:
- Create ImageLoaderViewModelFactory and annotate with @ AssistedFactory
- Define the create() method, and the parameters of the method are also the parameters marked with @ Assisted in the ViewModel constructor
Dagger will generate code to manage auxiliary injection, but for ViewModel, you need to provide viewmodelprovider Factory.
In the same imageloaderviewmodelfactory KT file, add the following top-level functions to the file:
fun provideFactory(
  assistedFactory: ImageLoaderViewModelFactory, // 1
  imageFilter: ImageFilter = NoOpImageFilter,
  loadingDrawableId: Int = R.drawable.loading_animation_drawable
): ViewModelProvider.Factory =
  object : ViewModelProvider.Factory {
    @Suppress("UNCHECKED_CAST")
    override fun <T : ViewModel?> create(modelClass: Class<T>): T {
      return assistedFactory.create(imageFilter, loadingDrawableId) as T // 2
    }
  }
In this part of the code, you create the provideFactory() method,
It will return viewmodelprovider Implementation of factory,
Used to create an instance of ImageLoaderViewModel.
Please note that you want to:
- Pass ImageLoaderViewModelFactory as a parameter.
- Use assistedFactory to create an instance of ImageLoaderViewModel.
When you inject ImageLoaderViewModel into MainActivity, you need to use provideFactory() method.
Auxiliary injection ViewModel
It's time to use ImageLoaderViewModel in MainActivity. Open MainActivity Change it like this:
@AndroidEntryPoint
class MainActivity : AppCompatActivity() {

  @Inject
  lateinit var imageLoaderViewModelFactory: ImageLoaderViewModelFactory // 1

  private val imageLoaderViewModel: ImageLoaderViewModel by viewModels { // 2
    provideFactory( // 3
        imageLoaderViewModelFactory, // 4
        GrayScaleImageFilter()
    )
  }

  @Inject
  lateinit var imageUrlStrategy: ImageUrlStrategy

  lateinit var mainImage: ImageView

  override fun onCreate(savedInstanceState: Bundle?) {
    super.onCreate(savedInstanceState)
    setContentView(R.layout.activity_main)
    mainImage = findViewById<ImageView>(R.id.main_image).apply {
      setOnLongClickListener {
        loadImage()
        true
      }
    }
    imageLoaderViewModel.bitmapLiveData.observe(this) { event ->
      with(mainImage) {
        when (event) {
          is LoadingState -> {
            scaleType = ImageView.ScaleType.CENTER_INSIDE
            setImageDrawable(ContextCompat.getDrawable(
                this@MainActivity,
                event.drawableId)
            )
          }
          is SuccessState -> {
            scaleType = ImageView.ScaleType.FIT_XY
            setImageBitmap(event.bitmap)
          }
        }
      }
    }
  }

  override fun onStart() {
    super.onStart()
    loadImage()
  }

  fun loadImage() {
    imageLoaderViewModel.loadImage(imageUrlStrategy())
  }
}
In this part of the code, you:
- Inject ImageLoaderViewModelFactory with @ inject.
- Use viewModels() to get an instance of ImageLoaderViewModel.
- Call provideFactory() to get viewmodelprovider Factory, and then create an instance of ImageLoaderViewModel. This is where you can use the default values.
- Pass ImageLoaderViewModelFactory as a parameter to provideFactory(). The factory has been injected with dependencies by Dagger, which can pass parameters to the ViewModel it creates.
Build and run the application for the last time to test that everything works as expected.

last
If you want to view the final version of the AssistedGallery application, click the download materials button at the top or bottom of this tutorial to download the project. (translator's note, please download from the original link)
Great, now you've finished the tutorial! You've learned what assisted injection is and how to implement it using AutoFactory and dagger / hilt version 2.31. You also learned how to use auxiliary injection for ViewModel architecture components.
To learn more about dependency injection using Hilt, check out the dependency injection (Basics) video course using Hilt and the Dagger tutorial.
We hope you enjoy this tutorial. If you have any questions or comments, please join the forum below!