In the process of running programs, we often encounter time-consuming and resource-consuming operations. To avoid them blocking the main program, we often use multithreaded or asynchronous tasks.For example, in Web development, when a new user is registered, we usually send him an activation email, which is an IO blocking task. If you put it directly into the application, you need to wait for the email to be sent before you can proceed with the next operation. At this time, the user can only wait and wait.A better way is to trigger an asynchronous task to send mail in business logic, and the main program can continue running down.
Celery Is a powerful distributed task queue that allows task execution to be completely detached from the main program or even assigned to run on other hosts.It is often used to implement async task s and crontab s.Its architecture is as follows:
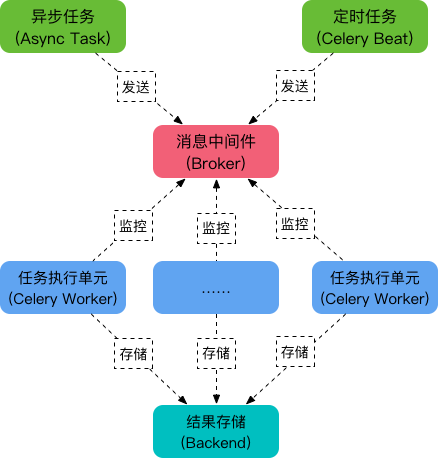
As you can see, Celery mainly contains the following modules:
-
Task Task
Contains asynchronous and timed tasks.Asynchronous tasks are usually triggered in business logic and sent to task queues, while periodic tasks are periodically sent to task queues by the Celery Beat process.
-
Message Middleware Broker
Broker, which is the task scheduling queue, receives messages from the task producer (that is, the task) and puts the task in the queue.Celery does not provide queue services by itself, and RabbitMQ and Redis are officially recommended.
-
Task Execution Unit Worker
Worker is the processing unit that executes tasks. It monitors the message queue in real time, gets the tasks scheduled in the queue, and executes them.
-
Task Result Storage Backend
Backend stores the results of the task execution for query.Like messaging middleware, storage can also use RabbitMQ, Redis, and MonoDB.
Asynchronous Tasks
Using Celery for asynchronous tasks consists of three main steps:
- Create a Celery instance
- Start Celery Worker
- Application Calls Asynchronous Tasks
quick get start
For simplicity, redis are used here for both Broker and Backend.Before running the following example, make sure redis is installed correctly and the redis service is turned on, although celery is also installed.You can install celery and related dependencies using the following commands:
$ pip install 'celery[redis]'
Create a Celery instance
Save the following code as a file, tasks.py:
# -*- coding: utf-8 -*-

import time
from celery import Celery

broker = 'redis://127.0.0.1:6379'
backend = 'redis://127.0.0.1:6379/0'

app = Celery('my_task', broker=broker, backend=backend)

@app.task
def add(x, y):
    time.sleep(5)     # Simulate time-consuming operations
    return x + y
The code above does a few things:
- A Celery instance app named my_task was created.
- Specifies that the message middleware uses redis with a URL of redis://127.0.0.1:6379;
- Specify the redis for storage with the URL redis://127.0.0.1:6379/0;
- Creates a Celery task add, which becomes a task that can be scheduled by Celery when the function is decorated with @app.task;
Start Celery Worker
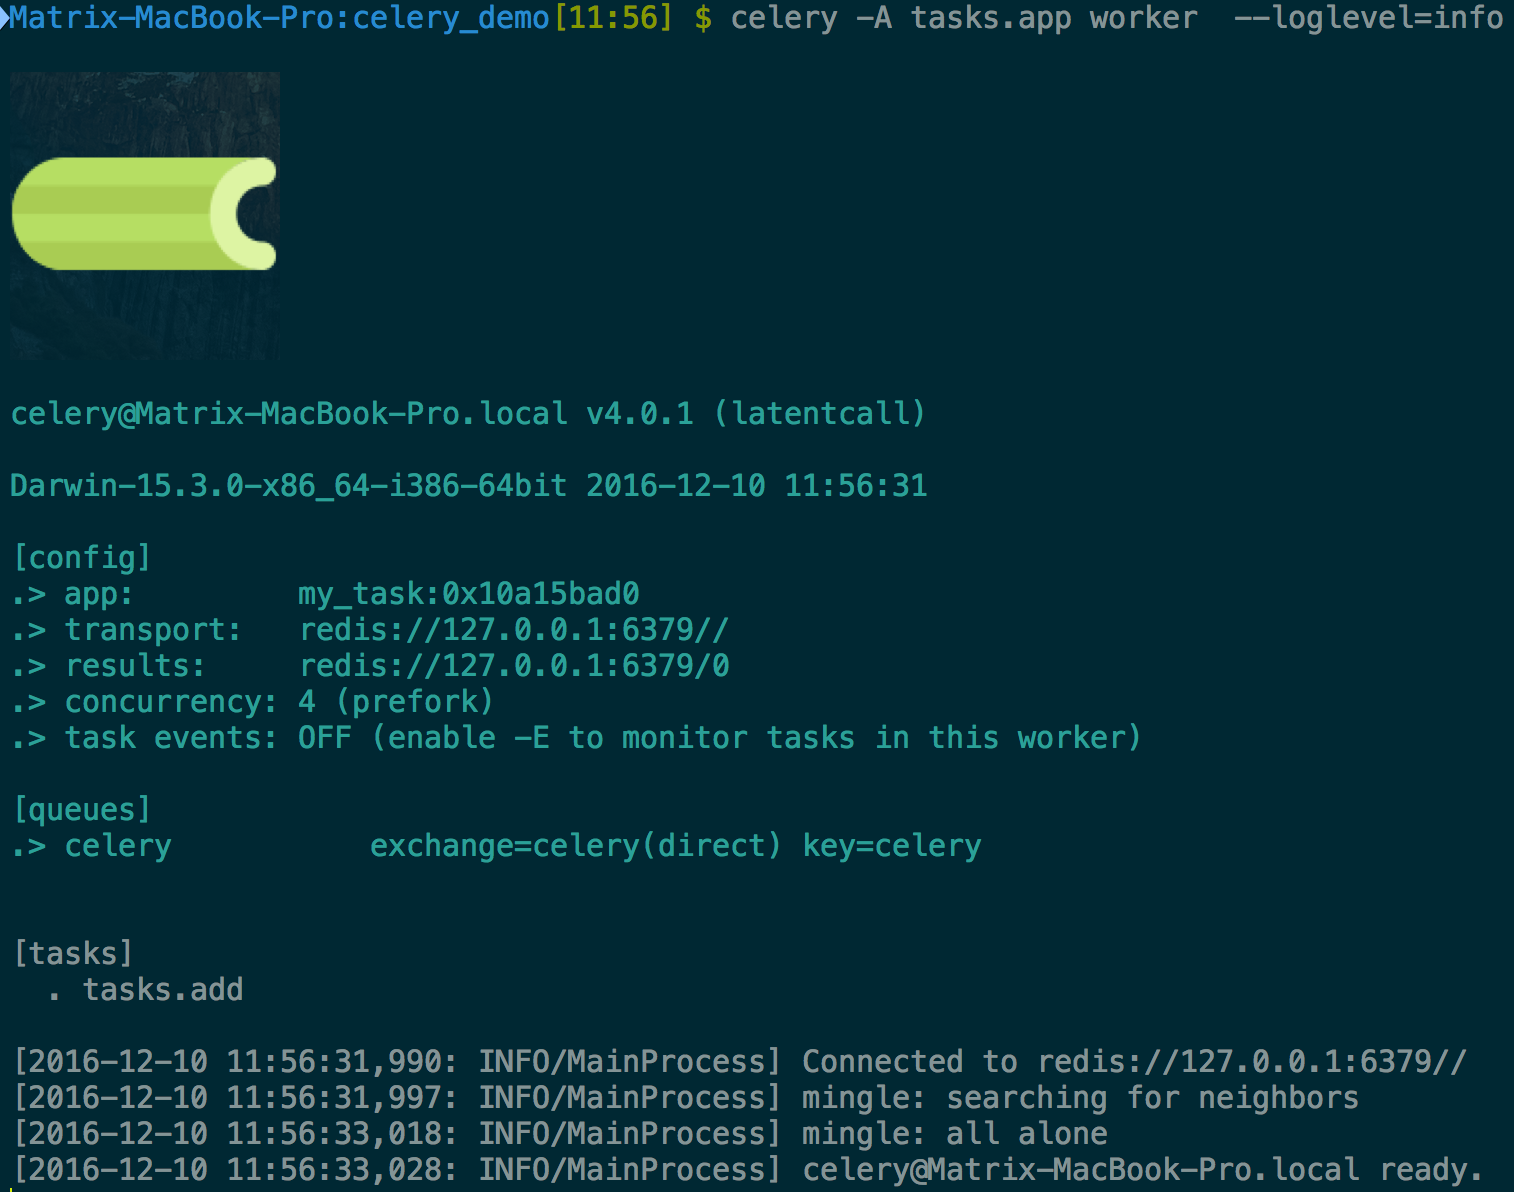
In the current directory, start Celery Worker as follows:
$ celery worker -A tasks --loglevel=info
Where:
- Parameter -A specifies the location of the Celery instance. In this case, in tasks.py, Celery will automatically look for the Celery object instance in this file. Of course, we can specify it ourselves. In this case, use -A tasks.app;
- The parameter --loglevel specifies the log level, which is warning by default or -l info by default;
In production environments, we usually use Supervisor Control the Celery Worker process.
After successful startup, the console displays the following output:
Invoke Task
Now we can use the delay() or apply_async() methods to invoke tasks in our applications.
Open the Python console in the current directory and enter the following code:
>>> from tasks import add
>>> add.delay(2, 8)
<AsyncResult: 2272ddce-8be5-493f-b5ff-35a0d9fe600f>
Above, we imported the add task object from the tasks.py file and then sent the task to the message middleware (Broker) using the delay() method, which is executed after the Celery Worker process monitors the task.We switched the window to Worker's startup window and saw two more logs:
[2016-12-10 12:00:50,376: INFO/MainProcess] Received task: tasks.add[2272ddce-8be5-493f-b5ff-35a0d9fe600f]
[2016-12-10 12:00:55,385: INFO/PoolWorker-4] Task tasks.add[2272ddce-8be5-493f-b5ff-35a0d9fe600f] succeeded in 5.00642602402s: 10
This indicates that the task has been scheduled and executed successfully.
In addition, if you want to get the results after execution, you can do this:
>>> result = add.delay(2, 6)
>>> result.ready()   # Use ready() to determine if a task has been completed
False
>>> result.ready()
False
>>> result.ready()
True
>>> result.get()     # Use get() to get task results
8
Above, we invoke tasks in a Python environment.In fact, we often invoke tasks in our applications.For example, save the following code as client.py:
# -*- coding: utf-8 -*-

from tasks import add

# Asynchronous Tasks
add.delay(2, 8)

print 'hello world'
Run the command $python client.py, and you can see that although the task function add needs to wait five seconds to return the execution results, because it is an asynchronous task, it will not block the current main program, so the main program will execute print statements downward and print out the results.
Use Configuration
In the example above, we wrote the configuration of Broker and Backend directly into the program. A better way is to write the configuration items into a single configuration file, which is usually named celeryconfig.py.Celery has more configurations and can be used in Official Documents Query the meaning of each configuration item.
Let's take another example.The project structure is as follows:
celery_demo                    # Project Root Directory
    ├── celery_app             # Store celery related files
    │   ├── __init__.py
    │   ├── celeryconfig.py    # configuration file
    │   ├── task1.py           # Task File 1
    │   └── task2.py           # Task File 2
    └── client.py              # application program
The u init_u.py code is as follows:
# -*- coding: utf-8 -*-

from celery import Celery

app = Celery('demo')                                # Create a Celery instance
app.config_from_object('celery_app.celeryconfig')   # Loading a configuration module through a Celery instance
The celeryconfig.py code is as follows:
BROKER_URL = 'redis://127.0.0.1:6379'#Specify Broker
CELERY_RESULT_BACKEND = 'redis://127.0.0.1:6379/0'#Specify Backend

CELERY_TIMEZONE='Asia/Shanghai'                     # Specify time zone, default is UTC
# CELERY_TIMEZONE='UTC'

CELERY_IMPORTS = (                                  # Specify Imported Task Modules
    'celery_app.task1',
    'celery_app.task2'
)
The task1.py code is as follows:
import time
from celery_app import app

@app.task
def add(x, y):
    time.sleep(2)
    return x + y
The task2.py code is as follows:
import time
from celery_app import app

@app.task
def multiply(x, y):
    time.sleep(2)
    return x * y
The client.py code is as follows:
# -*- coding: utf-8 -*-

from celery_app import task1
from celery_app import task2

task1.add.apply_async(args=[2, 8])        # task1.add.delay(2, 8) is also available
task2.multiply.apply_async(args=[3, 7])   # task2.multiply.delay(3, 7) is also available

print 'hello world'
Now let's start the Celery Worker process and execute the following command at the root of the project:
celery_demo $ celery -A celery_app worker --loglevel=info
Next, run $python client.py, which sends two asynchronous tasks to Broker, and in the Worker window we can see the following output:
[2016-12-10 13:51:58,939: INFO/MainProcess] Received task: celery_app.task1.add[9ccffad0-aca4-4875-84ce-0ccfce5a83aa]
[2016-12-10 13:51:58,941: INFO/MainProcess] Received task: celery_app.task2.multiply[64b1f889-c892-4333-bd1d-ac667e677a8a]
[2016-12-10 13:52:00,948: INFO/PoolWorker-3] Task celery_app.task1.add[9ccffad0-aca4-4875-84ce-0ccfce5a83aa] succeeded in 2.00600231002s: 10
[2016-12-10 13:52:00,949: INFO/PoolWorker-4] Task celery_app.task2.multiply[64b1f889-c892-4333-bd1d-ac667e677a8a] succeeded in 2.00601326401s: 21
delay and apply_async
In the previous example, we used the delay() or apply_async() method to invoke a task.In fact, the delay method encapsulates apply_async as follows:
def delay(self, *partial_args, **partial_kwargs):
    """Shortcut to :meth:`apply_async` using star arguments."""
    return self.apply_async(partial_args, partial_kwargs)
That is, delay is a shortcut to using apply_async.Apply_async supports more parameters in the following general form:
apply_async(args=(), kwargs={}, route_name=None, **options)
Common parameters for apply_async are as follows:
- countdown: Specify how many seconds to execute the task
task1.apply_async(args=(2, 3), countdown=5) # Execute task in 5 seconds
- eta (estimated time of arrival): Specifies when the task is scheduled, and the parameter type is datetime
from datetime import datetime, timedelta

# Execute task after current UTC time plus 10 seconds
task1.multiply.apply_async(args=[3, 7], eta=datetime.utcnow() + timedelta(seconds=10))
- expires: Task expiration time, parameter type can be int or datetime
task1.multiply.apply_async(args=[3, 7], expires=10) # Expires in 10 seconds
More parameter lists can be found in Official Documents View in.
Timed Tasks
In addition to performing asynchronous tasks, Celery supports performing periodic tasks (Periodic Tasks), or periodic tasks.The Celery Beat process periodically sends timed tasks to the task queue by reading the contents of the configuration file.
Let's take a look at an example where the project structure is as follows:
celery_demo                    # Project Root Directory
    ├── celery_app             # Store celery related files
        ├── __init__.py
        ├── celeryconfig.py    # configuration file
        ├── task1.py           # Task File
        └── task2.py           # Task File
The u init_u.py code is as follows:
# -*- coding: utf-8 -*-

from celery import Celery

app = Celery('demo')
app.config_from_object('celery_app.celeryconfig')
The celeryconfig.py code is as follows:
# -*- coding: utf-8 -*-

from datetime import timedelta
from celery.schedules import crontab

# Broker and Backend
BROKER_URL = 'redis://127.0.0.1:6379'
CELERY_RESULT_BACKEND = 'redis://127.0.0.1:6379/0'

# Timezone
CELERY_TIMEZONE='Asia/Shanghai'    # Specify the time zone, not'UTC'by default
# CELERY_TIMEZONE='UTC'

# import
CELERY_IMPORTS = (
    'celery_app.task1',
    'celery_app.task2'
)

# schedules
CELERYBEAT_SCHEDULE = {
    'add-every-30-seconds': {
         'task': 'celery_app.task1.add',
         'schedule': timedelta(seconds=30),       # Execute every 30 seconds
         'args': (5, 8)                           # Task Function Parameters
    },
    'multiply-at-some-time': {
        'task': 'celery_app.task2.multiply',
        'schedule': crontab(hour=9, minute=50),   # Run once every morning at 9:50 a.m.
        'args': (3, 7)                            # Task Function Parameters
    }
}
The task1.py code is as follows:
import time
from celery_app import app

@app.task
def add(x, y):
    time.sleep(2)
    return x + y
The task2.py code is as follows:
import time
from celery_app import app

@app.task
def multiply(x, y):
    time.sleep(2)
    return x * y
Now let's start the Celery Worker process and execute the following command at the root of the project:
celery_demo $ celery -A celery_app worker --loglevel=info
Next, start the Celery Beat process, send tasks to Broker on a regular basis, and execute the following commands at the project root:
celery_demo $ celery beat -A celery_app
celery beat v4.0.1 (latentcall) is starting.
__    -    ... __   -        _
LocalTime -> 2016-12-11 09:48:16
Configuration ->
    . broker -> redis://127.0.0.1:6379//
    . loader -> celery.loaders.app.AppLoader
    . scheduler -> celery.beat.PersistentScheduler
    . db -> celerybeat-schedule
    . logfile -> [stderr]@%WARNING
    . maxinterval -> 5.00 minutes (300s)
Later, in the Worker window, we can see that task task1 executes every 30 seconds and task 2 executes every day at 9:50 a.m.
Above, we started the Worker and Beat processes with two commands, which we can also place in one command:
$ celery -B -A celery_app worker --loglevel=info
Celery periodic tasks also have multiple configuration items for reference Official Documents.