I. Introduction to kubeadm
1.1 overview
Refer to attachment 003.Kubeadm deployment Kubernetes.
1.2 kubeadm function
Refer to attachment 003.Kubeadm deployment Kubernetes.
II. Deployment planning
2.1 node planning
|
Node hostname
|
IP
|
type
|
Operation service
|
|
k8smaster01
|
172.24.8.71
|
Kubernetes master node
|
docker,etcd,kube-apiserver,kube-scheduler,kube-controller-manager,kubectl,kubelet,heapster,calico
|
|
k8smaster02
|
172.24.8.72
|
Kubernetes master node
|
docker,etcd,kube-apiserver,kube-scheduler,kube-controller-manager,kubectl,
kubelet,heapster,calico
|
|
k8smaster03
|
172.24.8.73
|
Kubernetes master node
|
docker,etcd,kube-apiserver,kube-scheduler,kube-controller-manager,kubectl,
kubelet,heapster,calico
|
|
k8snode01
|
172.24.8.74
|
Kubernetes node 1
|
docker,kubelet,proxy,calico
|
|
k8snode02
|
172.24.8.75
|
Kubernetes node 2
|
docker,kubelet,proxy,calico
|
|
k8snode03
|
172.24.8.76
|
Kubernetes node 3
|
docker,kubelet,proxy,calico
|
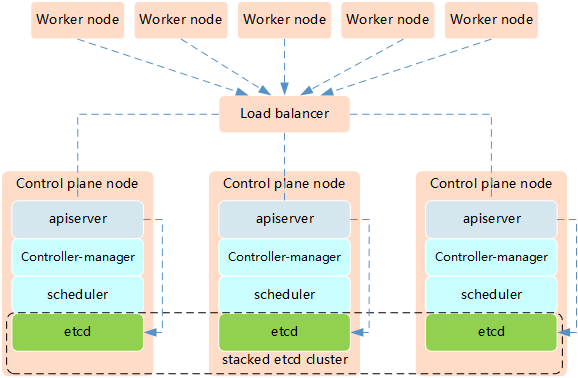
The high availability of Kubernetes mainly refers to the high availability of the control plane, that is, multiple sets of Master node components and Etcd components, and the work nodes are connected to each Master through load balancing. HA has the following two architectures:
High availability architecture 1: etcd is mixed with Master node components.
High availability Architecture 2: independent Etcd cluster is used, not mixed with Master node.

Interpretation:
The similarities between the two methods are that they provide redundancy of control plane and realize high availability of cluster. The differences are as follows:
- Etcd mixing mode
- Less machine resources required
- Simple deployment for management
- Easy to scale out
- The risk is great. When a host is hung up, there is less master and etcd. The cluster redundancy is greatly affected.
- Etcd independent deployment mode:
- More machine resources are needed (according to the odd number principle of Etcd cluster, the cluster control plane of this topology needs at least 6 host computers)
- The deployment is relatively complex, and etcd cluster and master cluster should be managed independently
- The control plane and etcd are decoupled, the cluster risk is small and the robustness is strong, and the effect of a single master or etcd on the cluster is small
Tip: in this experiment, we use high availability architecture one to achieve high availability of Kubernetes.
2.2 initial preparation
  1 [root@k8smaster01 ~]# vi k8sinit.sh
  2 # Modify Author: xhy
  3 # Modify Date: 2019-06-23 22:19
  4 # Version:
  5 #***************************************************************#
  6 # Initialize the machine. This needs to be executed on every machine.
  7
  8 # Add host domain name.
  9 cat >> /etc/hosts << EOF
 10 172.24.8.71 k8smaster01
 11 172.24.8.72 k8smaster02
 12 172.24.8.73 k8smaster03
 13 172.24.8.74 k8snode01
 14 172.24.8.75 k8snode02
 15 172.24.8.76 k8snode03
 16 EOF
 17
 18 # Add docker user
 19 useradd -m docker
 20
 21 # Disable the SELinux.
 22 sed -i 's/^SELINUX=.*/SELINUX=disabled/' /etc/selinux/config
 23
 24 # Turn off and disable the firewalld.
 25 systemctl stop firewalld
 26 systemctl disable firewalld
 27
 28 # Modify related kernel parameters & Disable the swap.
 29 cat > /etc/sysctl.d/k8s.conf << EOF
 30 net.ipv4.ip_forward = 1
 31 net.bridge.bridge-nf-call-ip6tables = 1
 32 net.bridge.bridge-nf-call-iptables = 1
 33 net.ipv4.tcp_tw_recycle = 0
 34 vm.swappiness = 0
 35 vm.overcommit_memory = 1
 36 vm.panic_on_oom = 0
 37 net.ipv6.conf.all.disable_ipv6 = 1
 38 EOF
 39 sysctl -p /etc/sysctl.d/k8s.conf >&/dev/null
 40 swapoff -a
 41 sed -i '/ swap / s/^\(.*\)$/#\1/g' /etc/fstab
 42 modprobe br_netfilter
 43
 44 # Add ipvs modules
 45 cat > /etc/sysconfig/modules/ipvs.modules <<EOF
 46 #!/bin/bash
 47 modprobe -- ip_vs
 48 modprobe -- ip_vs_rr
 49 modprobe -- ip_vs_wrr
 50 modprobe -- ip_vs_sh
 51 modprobe -- nf_conntrack_ipv4
 52 EOF
 53 chmod 755 /etc/sysconfig/modules/ipvs.modules
 54 bash /etc/sysconfig/modules/ipvs.modules
 55
 56 # Install rpm
 57 yum install -y conntrack git ntpdate ntp ipvsadm ipset jq iptables curl sysstat libseccomp wget gcc gcc-c++ make openssl-devel
 58
 59 # Install Docker Compose
 60 sudo curl -L "https://github.com/docker/compose/releases/download/1.25.0/docker-compose-$(uname -s)-$(uname -m)" -o /usr/local/bin/docker-compose
 61 sudo chmod +x /usr/local/bin/docker-compose
 62
 63 # Update kernel
 64 rpm --import https://www.elrepo.org/RPM-GPG-KEY-elrepo.org
 65 rpm -Uvh https://www.elrepo.org/elrepo-release-7.0-4.el7.elrepo.noarch.rpm
 66 yum --disablerepo="*" --enablerepo="elrepo-kernel" install -y kernel-ml-5.4.1-1.el7.elrepo
 67 sed -i 's/^GRUB_DEFAULT=.*/GRUB_DEFAULT=0/' /etc/default/grub
 68 grub2-mkconfig -o /boot/grub2/grub.cfg
 69 yum update -y
 70
 71 # Reboot the machine.
 72 reboot
Tip: for some features, you may need to upgrade the kernel, so the script above will upgrade the kernel to 5.4.
2.3 mutual trust configuration
In order to facilitate remote distribution of files and command execution, this experiment configures the ssh trust relationship between the master node and other nodes.
  1 [root@k8smaster01 ~]# ssh-keygen -f ~/.ssh/id_rsa -N ''
  2 [root@k8smaster01 ~]# ssh-copy-id -i ~/.ssh/id_rsa.pub root@k8smaster01
  3 [root@k8smaster01 ~]# ssh-copy-id -i ~/.ssh/id_rsa.pub root@k8smaster02
  4 [root@k8smaster01 ~]# ssh-copy-id -i ~/.ssh/id_rsa.pub root@k8smaster03
  5 [root@k8smaster01 ~]# ssh-copy-id -i ~/.ssh/id_rsa.pub root@k8snode01
  6 [root@k8smaster01 ~]# ssh-copy-id -i ~/.ssh/id_rsa.pub root@k8snode02
  7 [root@k8smaster01 ~]# ssh-copy-id -i ~/.ssh/id_rsa.pub root@k8snode03
Tip: this operation only needs to be performed on the master node.
III. cluster deployment
3.1 Docker installation
  1 [root@k8smaster01 ~]# yum -y update
  2 [root@k8smaster01 ~]# yum -y install yum-utils device-mapper-persistent-data lvm2
  3 [root@k8smaster01 ~]# yum-config-manager \
  4 --add-repo \
  5 http://mirrors.aliyun.com/docker-ce/linux/centos/docker-ce.repo
  6 [root@k8smaster01 ~]# yum list docker-ce --showduplicates | sort -r		#View available versions
  7 [root@k8smaster01 ~]# yum -y install docker-ce-18.09.9-3.el7.x86_64		#kubeadm currently does not support versions above 18.09
  8 [root@k8smaster01 ~]# mkdir /etc/docker
  9 [root@k8smaster01 ~]# cat > /etc/docker/daemon.json <<EOF
 10 {
 11   "registry-mirrors": ["https://dbzucv6w.mirror.aliyuncs.com"],
 12   "exec-opts": ["native.cgroupdriver=systemd"],
 13   "log-driver": "json-file",
 14   "log-opts": {
 15     "max-size": "100m"
 16   },
 17   "storage-driver": "overlay2",
 18   "storage-opts": [
 19     "overlay2.override_kernel_check=true"
 20   ]
 21 }
 22 EOF								#Configure system to manage cgroup
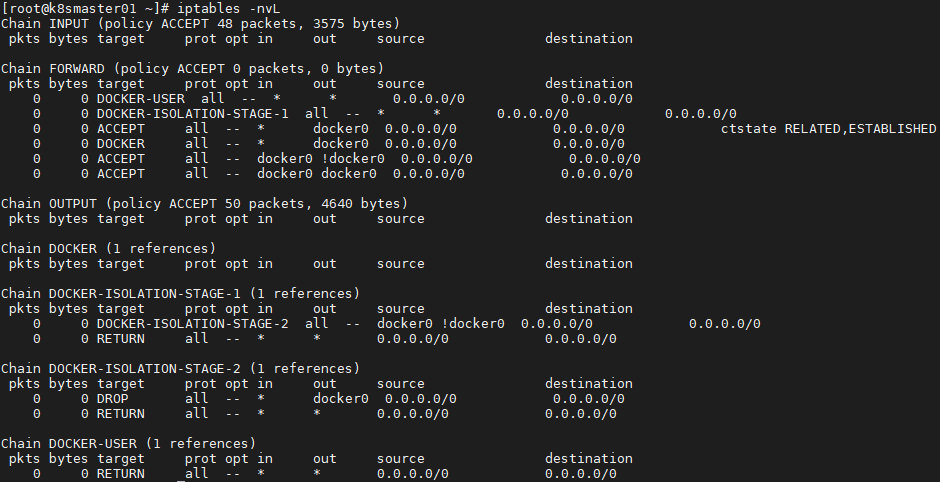
  1 [root@k8smaster01 ~]# systemctl restart docker
  2 [root@k8smaster01 ~]# systemctl enable docker
  3 [root@k8smaster01 ~]# iptables -nvL		#Confirm that the default policy (ply) of the forward chain in the iptables filter table is ACCEPT
3.2 relevant component package
The following packages need to be installed on each machine:
kubeadm: the instruction used to initialize the cluster;
kubelet: used to start pod, container, etc. on each node in the cluster;
kubectl: command line tool for communicating with clusters.
Kubedm cannot install or manage kubelet or kubectl, so you need to ensure that they meet the version requirements of the Kubernetes control layer installed through kubedm. If the version does not meet the requirements, it may cause some unexpected errors or problems.
Refer to appendix 001 introduction and use of kubectl for specific installation of relevant components.
Tip: all Master+Worker nodes need the above operations.
Kubernetes version 1.15: https://github.com/kubernetes/kubernetes/blob/master/CHANGELOG-1.15.md.
3.3 formal installation
  1 [root@k8smaster01 ~]# cat <<EOF > /etc/yum.repos.d/kubernetes.repo
  2 [kubernetes]
  3 name=Kubernetes
  4 baseurl=https://mirrors.aliyun.com/kubernetes/yum/repos/kubernetes-el7-x86_64/
  5 enabled=1
  6 gpgcheck=1
  7 repo_gpgcheck=1
  8 gpgkey=https://mirrors.aliyun.com/kubernetes/yum/doc/yum-key.gpg https://mirrors.aliyun.com/kubernetes/yum/doc/rpm-package-key.gpg
  9 EOF
 10 #Configure yum source
  1 [root@k8smaster01 ~]# yum search kubelet --showduplicates		#View the corresponding version
  2 [root@k8smaster01 ~]# yum install -y kubeadm-1.15.6-0.x86_64 kubelet-1.15.6-0.x86_64 kubectl-1.15.6-0.x86_64 --disableexcludes=kubernetes

Note: at the same time, CRI tools, kubernetes CNI and socat are installed
socat: the dependence of kubelet;
CRI tools: the command line tool of CRI(Container Runtime Interface) container runtime interface.
1 [root@k8smaster01 ~]# systemctl enable kubeletTip: all Master+Worker nodes need the above operations. At this time, you do not need to start kubelet. It will start automatically during initialization. If it starts at this time, an error will be reported. Just ignore it.
III. deploy high availability component I
3.1 preserved installation
  1 [root@k8smaster01 ~]# wget https://www.keepalived.org/software/keepalived-2.0.19.tar.gz
  2 [root@k8smaster01 ~]# tar -zxvf keepalived-2.0.19.tar.gz
  3 [root@k8smaster01 ~]# cd keepalived-2.0.19/
  4 [root@k8smaster01 ~]# ./configure --sysconf=/etc --prefix=/usr/local/keepalived
  5 [root@k8smaster01 keepalived-2.0.19]# make && make install
  6 [root@k8smaster01 ~]# systemctl enable keepalived && systemctl start keepalived
Tip: all Master nodes need the above operations.
3.2 create profile
  1 [root@k8smaster01 ~]# git clone https://github.com/cookeem/kubeadm-ha ා pull github's highly available auto configuration script
  2 [root@k8smaster01 ~]# vi /root/kubeadm-ha/kubeadm-config.yaml
  3 apiVersion: kubeadm.k8s.io/v1beta1
  4 kind: ClusterConfiguration
  5 kubernetesVersion: v1.15.6						#Configure the installed version
  6 ......
  7 podSubnet: "10.10.0.0/16"						#Specify pod segment and mask
  8 ......

Tip: if you need to modify it to domestic Kubernetes to initialize the image source, you can add the following parameters to kubeadm-config.yaml. If you refer to step 4.1 to download in advance:
imageRepository: registry.cn-hangzhou.aliyuncs.com/google_container
  1 [root@k8smaster01 ~]# cd kubeadm-ha/
  2 [root@k8smaster01 kubeadm-ha]# vi create-config.sh
  3 # master keepalived virtual ip address
  4 export K8SHA_VIP=172.24.8.100
  5 # master01 ip address
  6 export K8SHA_IP1=172.24.8.71
  7 # master02 ip address
  8 export K8SHA_IP2=172.24.8.72
  9 # master03 ip address
 10 export K8SHA_IP3=172.24.8.73
 11 # master keepalived virtual ip hostname
 12 export K8SHA_VHOST=k8smaster01
 13 # master01 hostname
 14 export K8SHA_HOST1=k8smaster01
 15 # master02 hostname
 16 export K8SHA_HOST2=k8smaster02
 17 # master03 hostname
 18 export K8SHA_HOST3=k8smaster03
 19 # master01 network interface name
 20 export K8SHA_NETINF1=eth0
 21 # master02 network interface name
 22 export K8SHA_NETINF2=eth0
 23 # master03 network interface name
 24 export K8SHA_NETINF3=eth0
 25 # keepalived auth_pass config
 26 export K8SHA_KEEPALIVED_AUTH=412f7dc3bfed32194d1600c483e10ad1d
 27 # calico reachable ip address
 28 export K8SHA_CALICO_REACHABLE_IP=172.24.8.2
 29 # kubernetes CIDR pod subnet
 30 export K8SHA_CIDR=10.10.0.0
 31
 32 [root@k8smaster01 kubeadm-ha]# ./create-config.sh
Explanation: all Master nodes need the above operations. After executing the script, the following list of configuration files will be produced:
After executing the create-config.sh script, the following configuration files are generated automatically:
- kubeadm-config.yaml: kubeadm initializes the configuration file, located in the. / root directory of the kubeadm ha code
- Keepalived: keepalived configuration file, located in the / etc/keepalived directory of each master node
- Nginx LB: nginx LB load balancing configuration file, located in the / root / nginx LB directory of each master node
- calico.yaml: calico network component deployment file, located in. / calico directory of kubeadm ha code
3.3 start Keepalived
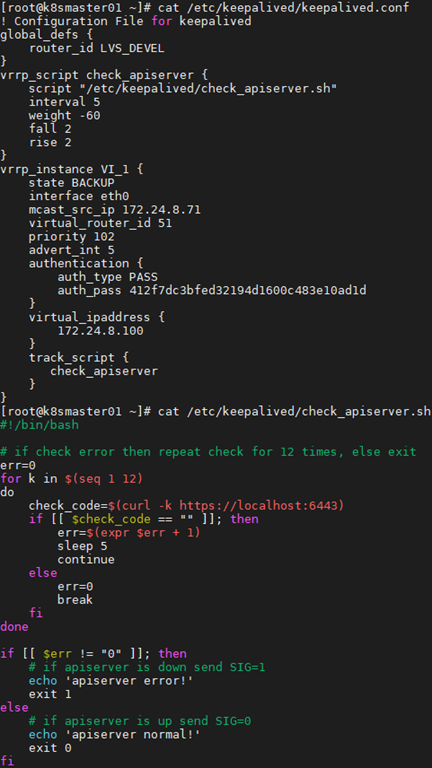
  1 [root@k8smaster01 ~]# cat /etc/keepalived/keepalived.conf
  2 [root@k8smaster01 ~]# cat /etc/keepalived/check_apiserver.sh
  1 [root@k8smaster01 ~]# systemctl restart keepalived.service
  2 [root@k8smaster01 ~]# systemctl status keepalived.service
  3 [root@k8smaster01 ~]# ping 172.24.8.100
  4
Tip: all Master nodes need the above operations.
3.4 start Nginx
After executing the create-config.sh script, the configuration file of nginx LB will be automatically copied to the / root / nginx LB directory of each master's node
1 [root@k8smaster01 ~]# cd /root/nginx-lb/
  1 [root@k8smaster01 nginx-lb]# docker-compose up -d	        #Using docker compose mode to start nginx LB
  2 [root@k8smaster01 ~]# docker-compose ps			#Check the startup status of nginx LB
Tip: all Master nodes need the above operations.
4. Initialize Cluster - mate
4.1 initialization on Master
  1 [root@k8smaster01 ~]# kubeadm --kubernetes-version=v1.15.6 config images list	#List required images
  2 k8s.gcr.io/kube-apiserver:v1.15.6
  3 k8s.gcr.io/kube-controller-manager:v1.15.6
  4 k8s.gcr.io/kube-scheduler:v1.15.6
  5 k8s.gcr.io/kube-proxy:v1.15.6
  6 k8s.gcr.io/pause:3.1
  7 k8s.gcr.io/etcd:3.3.10
  8 k8s.gcr.io/coredns:1.3.1
1 [root@k8smaster01 ~]# kubeadm --kubernetes-version=v1.15.6 config images pull #Pull the image required by kubernetesBe careful:
As the Kubernetes image in China may not be able to pull, it is recommended to pull the image in advance through VPN and other methods, and then upload it to all master nodes.
  1 [root@VPN ~]# docker pull k8s.gcr.io/kube-apiserver:v1.15.6
  2 [root@VPN ~]# docker pull k8s.gcr.io/kube-controller-manager:v1.15.6
  3 [root@VPN ~]# docker pull k8s.gcr.io/kube-scheduler:v1.15.6
  4 [root@VPN ~]# docker pull k8s.gcr.io/kube-proxy:v1.15.6
  5 [root@VPN ~]# docker pull k8s.gcr.io/pause:3.1
  6 [root@VPN ~]# docker pull k8s.gcr.io/etcd:3.3.10
  7 [root@VPN ~]# docker pull k8s.gcr.io/coredns:1.3.1
  8 [root@k8smaster01 ~]# docker load -i kube-apiserver.tar
  9 [root@k8smaster01 ~]# docker load -i kube-controller-manager.tar
 10 [root@k8smaster01 ~]# docker load -i kube-scheduler.tar
 11 [root@k8smaster01 ~]# docker load -i kube-proxy.tar
 12 [root@k8smaster01 ~]# docker load -i pause.tar
 13 [root@k8smaster01 ~]# docker load -i etcd.tar
 14 [root@k8smaster01 ~]# docker load -i coredns.tar
1 [root@k8smaster01 ~]# kubeadm init --config=/root/kubeadm-ha/kubeadm-config.yaml --upload-certs
Keep the following commands for subsequent node additions:
  1 You can now join any number of the control-plane node running the following command on each as root:
  2
  3   kubeadm join 172.24.8.100:16443 --token qcxeyv.q37rluk3qql8p9bf \
  4     --discovery-token-ca-cert-hash sha256:d8cf7c0384fff8779227f1a913d981d02b9f8f79a70365ba76a909e7160899a9 \
  5     --control-plane --certificate-key d8393e3d6c936c2e489e4aff53458c6c5b06ef2a8715f49529494cbd469c1471
  6
  7 Please note that the certificate-key gives access to cluster sensitive data, keep it secret!
  8 As a safeguard, uploaded-certs will be deleted in two hours; If necessary, you can use
  9 "kubeadm init phase upload-certs --upload-certs" to reload certs afterward.
 10
 11 Then you can join any number of worker nodes by running the following on each as root:
 12
 13 kubeadm join 172.24.8.100:16443 --token qcxeyv.q37rluk3qql8p9bf \
 14     --discovery-token-ca-cert-hash sha256:d8cf7c0384fff8779227f1a913d981d02b9f8f79a70365ba76a909e7160899a9
Note: the above token has a default 24-hour validity period. The token and hash values can be obtained as follows:
kubeadm token list
If the Token expires, you can enter the following command to generate a new Token
  1 kubeadm token create
  2 openssl x509 -pubkey -in /etc/kubernetes/pki/ca.crt | openssl rsa -pubin -outform der 2>/dev/null | openssl dgst -sha256 -hex | sed 's/^.* //'
  3
  1 [root@k8smaster01 ~]# mkdir -p $HOME/.kube
  2 [root@k8smaster01 ~]# sudo cp -i /etc/kubernetes/admin.conf $HOME/.kube/admin.conf
  3 [root@k8smaster01 ~]# sudo chown $(id -u):$(id -g) $HOME/.kube/admin.conf
Tip: k8s.gcr.io is used to pull the image by default. Domestic users can use alisource through the following commands:
  1 [root@k8smaster01 ~]# cat << EOF >> ~/.bashrc
  2 export KUBECONFIG=$HOME/.kube/admin.conf
  3 EOF							#Setting the KUBECONFIG environment variable
  4 [root@k8smaster01 ~]# source ~/.bashrc
Additional: the steps of initialization are as follows:
- [kubelet start] generate the configuration file of kubelet "/ var/lib/kubelet/config.yaml"
- [certificates] generate various related certificates
- [kubeconfig] generate the relevant kubeconfig file
- [bootstrap token] generates a token record, which is used later when using kubeadm join to add nodes to the cluster
Tip: initialization only needs to be performed on master01. If the initialization is abnormal, you can reset it through [root @ master ~] (kubeadm reset & & RM - RF $home /. Kube.
4.2 add other master nodes
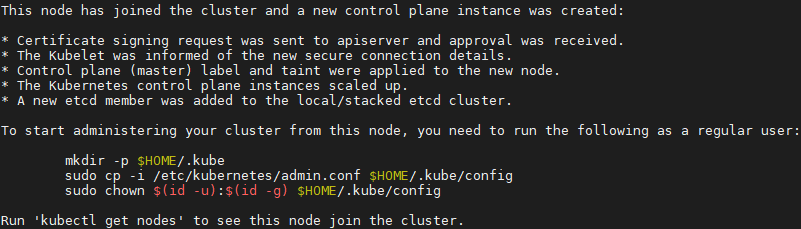
  1 [root@k8smaster02 ~]# kubeadm join 172.24.8.100:16443 --token qcxeyv.q37rluk3qql8p9bf \
  2     --discovery-token-ca-cert-hash sha256:d8cf7c0384fff8779227f1a913d981d02b9f8f79a70365ba76a909e7160899a9 \
  3     --control-plane --certificate-key d8393e3d6c936c2e489e4aff53458c6c5b06ef2a8715f49529494cbd469c1471
  1 [root@k8smaster02 ~]# mkdir -p $HOME/.kube
  2 [root@k8smaster02 ~]# sudo cp -i /etc/kubernetes/admin.conf $HOME/.kube/admin.conf
  3 [root@k8smaster02 ~]# sudo chown $(id -u):$(id -g) $HOME/.kube/admin.conf
  4 [root@k8smaster02 ~]# cat << EOF >> ~/.bashrc
  5 export KUBECONFIG=$HOME/.kube/admin.conf
  6 EOF
  7 [root@k8smaster02 ~]# source ~/.bashrc
Tip: master03 also executes the control plane added to the cluster as above.
5. Install NIC plug-in
5.1 introduction to NIC plug-in
Calico is a secure L3 network and network policy provider.
Canal combines Flannel and Calico to provide network and network policies.
Cilium is a L3 network and network policy plug-in that can transparently implement HTTP/API/L7 policies. Both routing and overlay/encapsulation modes are supported.
Contiv provides configurable networks (native L3 using BGP, overlay using vxlan, classic L2 and Cisco SDN / ACI) and rich policy frameworks for a variety of use cases. The contiv project is fully open source. The installation tool provides both kubeadm based and non kubeadm based installation options.
Flannel is an overlay network provider that can be used for Kubernetes.
Romana is a layer 3 solution for pod network and supports the NetworkPolicy API. Kubeadm add on installation details can be found here.
Weave Net provides a network and network policy to work at both ends of a network packet, and does not require additional databases.
CNI Genie seamlessly connects Kubernetes to a CNI plug-in, such as Flannel, Calico, Canal, Romana, or Weave.
Tip: this experiment uses Calico plug-in.
5.2 deployment of calico
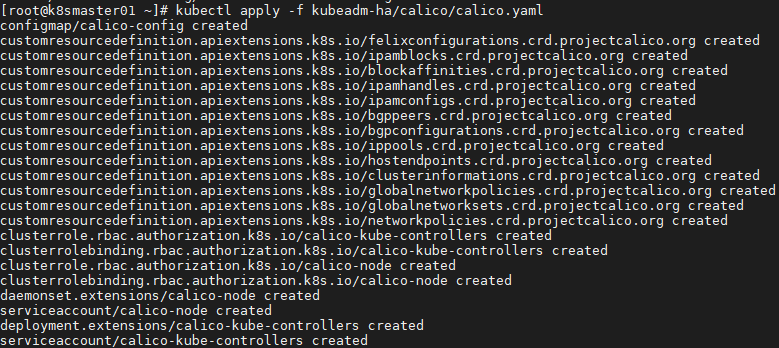
  1 [root@k8smaster01 ~]# docker pull calico/cni:v3.6.0
  2 [root@k8smaster01 ~]# docker pull calico/node:v3.6.0
  3 [root@k8smaster01 ~]# docker pull calico/kube-controllers:v3.6.0	#It is recommended to pull the image in advance
  4 [root@k8smaster01 ~]# kubectl apply -f kubeadm-ha/calico/calico.yaml
1 [root@k8smaster01 ~]# kubectl get pods --all-namespaces -o wide #View deployment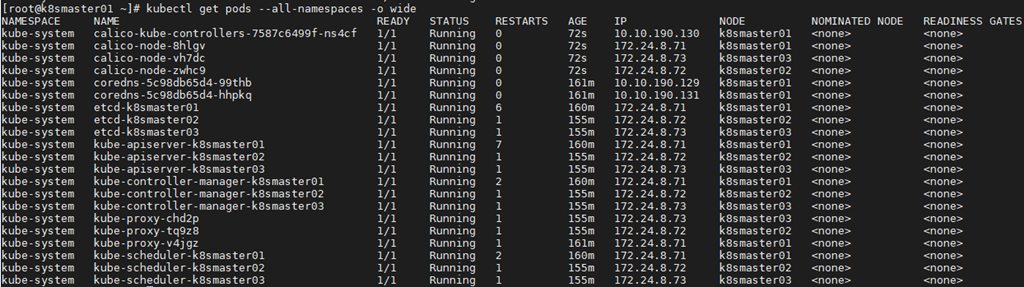
  1 [root@k8smaster01 ~]# kubectl get nodes
  2 NAME          STATUS   ROLES    AGE    VERSION
  3 k8smaster01   Ready    master   174m   v1.15.6
  4 k8smaster02   Ready    master   168m   v1.15.6
  5 k8smaster03   Ready    master   168m   v1.15.6
Vi. deployment of high availability components II
6.1 high availability description
Step 3 of highly available kubernetes cluster configuration has been completed, but using docker compose mode to start nginx LB can not provide the health check and automatic restart function of kubernetes cluster. As the core component of highly available kubernetes cluster, nginx Lb is also recommended to be managed as a pod in kubernetes cluster.
Under the directory / etc / kubernetes / manifest /, it is the core deployment file directly managed by kubelet. Now we stop the nginx LB that was originally started with docker compose, and kubelet directly manages the nginx LB service.
  1 [root@k8smaster01 ~]# systemctl stop kubelet
  2 [root@k8smaster01 ~]# docker stop nginx-lb && docker rm nginx-lb
Tip: all Master nodes need the above operations.
  1 [root@k8smaster01 ~]# export K8SHA_HOST1=k8smaster01
  2 [root@k8smaster01 ~]# export K8SHA_HOST2=k8smaster02
  3 [root@k8smaster01 ~]# export K8SHA_HOST3=k8smaster03
  4 [root@k8smaster01 ~]# scp /root/nginx-lb/nginx-lb.conf root@${K8SHA_HOST1}:/etc/kubernetes/
  5 [root@k8smaster01 ~]# scp /root/nginx-lb/nginx-lb.conf root@${K8SHA_HOST2}:/etc/kubernetes/
  6 [root@k8smaster01 ~]# scp /root/nginx-lb/nginx-lb.conf root@${K8SHA_HOST3}:/etc/kubernetes/
  7 [root@k8smaster01 ~]# scp /root/nginx-lb/nginx-lb.yaml root@${K8SHA_HOST1}:/etc/kubernetes/manifests/
  8 [root@k8smaster01 ~]# scp /root/nginx-lb/nginx-lb.yaml root@${K8SHA_HOST2}:/etc/kubernetes/manifests/
  9 [root@k8smaster01 ~]# scp /root/nginx-lb/nginx-lb.yaml root@${K8SHA_HOST3}:/etc/kubernetes/manifests/
Tip: the above operations only need to be performed on Master01.
1 [root@k8smaster01 ~]# systemctl restart kubelet docker #Restart related services of all master nodesTip: all Master nodes need the above operations.
1 [root@k8smaster01 ~]# kubectl get pods --all-namespaces -o wide #Re verification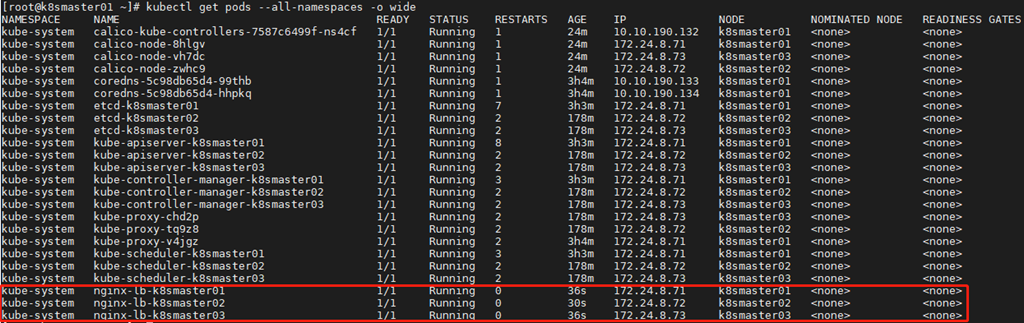
Seven add Worker node
7.1 download image
In order to avoid node nodes being unable to pull related images, it is recommended to reflect pull.
1 [root@k8snode01 ~]# docker load -i pause.tarTip: all node nodes need to operate as above.
7.2 add Node node
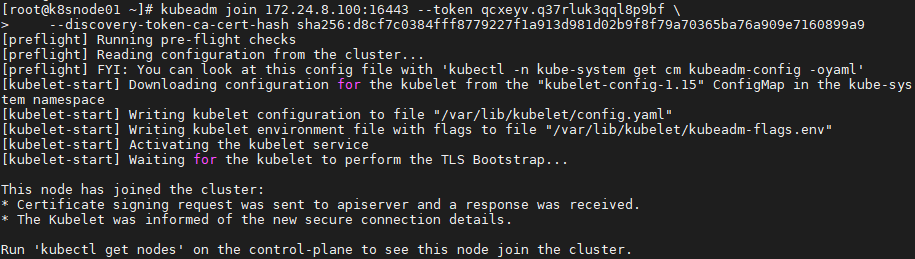
  1 [root@k8snode01 ~]# systemctl enable kubelet.service
  2 [root@k8snode01 ~]# skubeadm join 172.24.8.100:16443 --token qcxeyv.q37rluk3qql8p9bf \
  3     --discovery-token-ca-cert-hash sha256:d8cf7c0384fff8779227f1a913d981d02b9f8f79a70365ba76a909e7160899a9
Tip: if you add an exception, you can reset it as follows:
  1 [root@node01 ~]# kubeadm reset
  2 [root@node01 ~]# ifconfig cni0 down
  3 [root@node01 ~]# ip link delete cni0
  4 [root@node01 ~]# ifconfig flannel.1 down
  5 [root@node01 ~]# ip link delete flannel.1
  6 [root@node01 ~]# rm -rf /var/lib/cni/
7.3 validation
  1 [root@k8smaster01 ~]# kubectl get nodes						#Node state
  2 [root@k8smaster01 ~]# kubectl get cs						#Component state
  3 [root@k8smaster01 ~]# kubectl get serviceaccount					#Service account
  4 [root@k8smaster01 ~]# kubectl cluster-info						#Cluster information
  5 [root@k8smaster01 ~]# kubectl get pod -n kube-system -o wide			#All service status
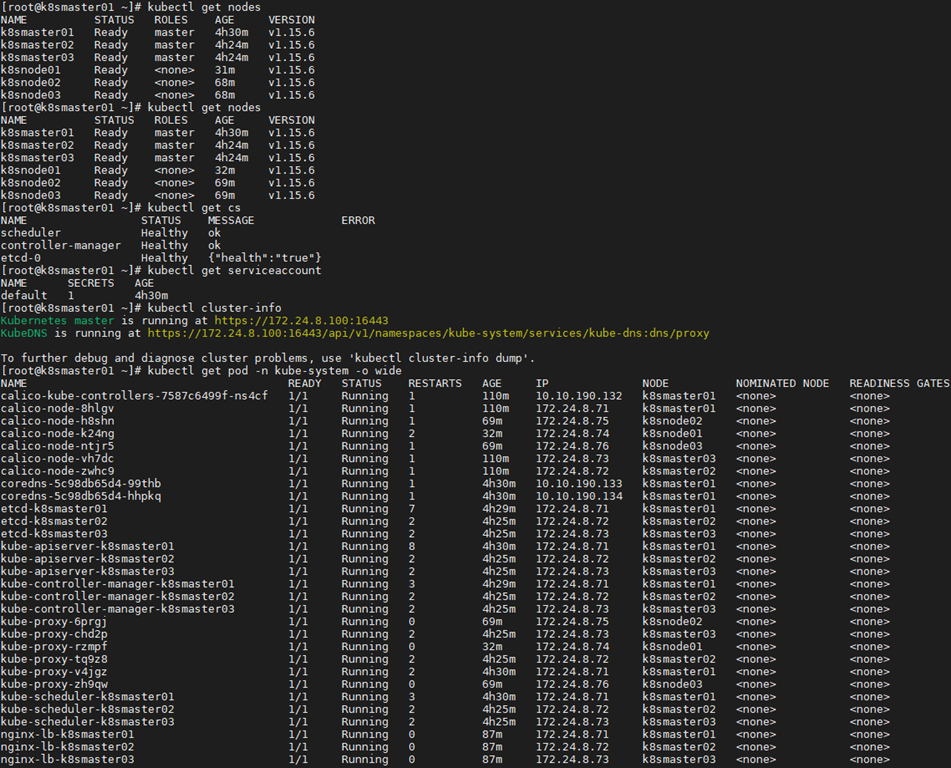
Tip: for more use of Kubetcl, please refer to https://kubernetes.io/docs/reference/kubectl/kubectl/
https://kubernetes.io/docs/reference/kubectl/overview/
For more use of kubeadm, please refer to https://kubernetes.io/docs/reference/setup-tools/kubeadm/kubeadm/
8. Turn on IPVS
8.1 modify ConfigMap
  1 [root@k8smaster01 ~]# kubectl edit cm kube-proxy -n kube-system		#Mode changed to ipvs
  2 ......
  3 mode: "ipvs"
  4 ......
  5 [root@k8smaster01 ~]# kubectl get pod -n kube-system | grep kube-proxy | awk '{system("kubectl delete pod "$1" -n kube-system")}'
  6 [root@k8smaster01 ~]# kubectl get pod -n kube-system | grep kube-proxy	#View the proxy's pod
  7 [root@k8smaster01 ~]# kubectl logs kube-proxy-2c8tj -n kube-system		#View the log of any proxy pod

IX. test cluster
9.1 create test service
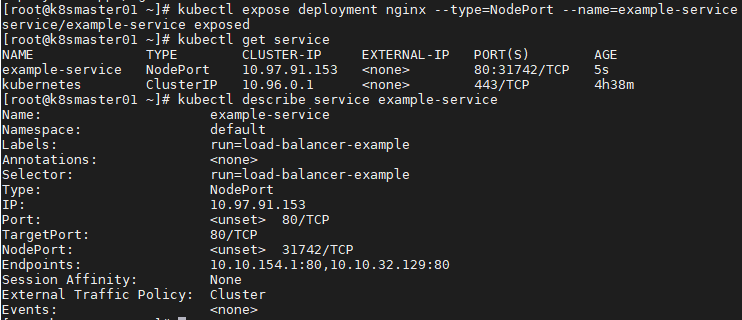
  1 [root@k8smaster01 ~]# kubectl run nginx --replicas=2 --labels="run=load-balancer-example" --image=nginx --port=80
  2 [root@k8smaster01 ~]# kubectl expose deployment nginx --type=NodePort --name=example-service  #Exposed port
  3 [root@k8smaster01 ~]# kubectl get service							  #View service status
  4 [root@k8smaster01 ~]# kubectl describe service example-service				  #see information
9.2 test access
1 [root@k8smaster01 ~]# curl 10.97.91.153:80
1 [root@k8smaster01 ~]# kubectl get pod -o wide #View endpoint
  1 [root@k8smaster01 ~]# curl 10.10.32.129:80		#Access endpoint, the same as access service ip result
  2 [root@k8smaster01 ~]# curl 10.10.154.1:80
Deployment of dashboard
10.1 setting labels
  1 [root@k8smaster01 ~]# kubectl label nodes k8smaster01 app=kube-system
  2 [root@k8smaster01 ~]# kubectl label nodes k8smaster02 app=kube-system
  3 [root@k8smaster01 ~]# kubectl label nodes k8smaster03 app=kube-system
10.2 create certificate
Since the automatically generated certificate may expire, it is recommended to manually generate the certificate and cancel the part of yaml that automatically creates the secret.
  1 [root@k8smaster01 ~]# cd /etc/kubernetes/pki/
  2 [root@k8smaster01 pki]# openssl genrsa -out dashboard.key 2048
  3 [root@k8smaster01 pki]# openssl req -new -out dashboard.csr -key dashboard.key -subj "/CN=dashboard"
  4 [root@k8smaster01 pki]# openssl x509 -req -sha256 -in dashboard.csr -out dashboard.crt -signkey dashboard.key -days 365
  5 [root@k8smaster01 pki]# openssl x509  -noout -text -in ./dashboard.crt		#View certificates
  6
10.3 distribution of certificates
  1 [root@k8smaster01 pki]# scp dashboard.* root@k8smaster02:/etc/kubernetes/pki/
  2 [root@k8smaster01 pki]# scp dashboard.* root@k8smaster03:/etc/kubernetes/pki/
  3
10.4 create secret manually
  1 [root@k8smaster01 ~]# ll /etc/kubernetes/pki/dashboard.*
  2 -rw-r--r-- 1 root root 1.2K Dec  3 03:10 /etc/kubernetes/pki/dashboard.crt
  3 -rw-r--r-- 1 root root  976 Dec  3 03:10 /etc/kubernetes/pki/dashboard.csr
  4 -rw-r--r-- 1 root root 1.7K Dec  3 03:09 /etc/kubernetes/pki/dashboard.key
  5 [root@k8smaster01 ~]# kubectl create secret generic kubernetes-dashboard-certs --from-file="/etc/kubernetes/pki/dashboard.crt,/etc/kubernetes/pki/dashboard.key" -n kube-system	#Mount new certificate to dashboard
  6 [root@master dashboard]# kubectl get secret kubernetes-dashboard-certs -n kube-system -o yaml	#View new certificate
10.5 deploy dashboard
  1 [root@master01 ~]# vim /root/kubeadm-ha/addons/kubernetes-dashboard/kubernetes-dashboard.yaml 		#Delete the following parts
  2 # ------------------- Dashboard Secret ------------------- #
  3
  4 apiVersion: v1
  5 kind: Secret
  6 metadata:
  7   labels:
  8     k8s-app: kubernetes-dashboard
  9   name: kubernetes-dashboard-certs
 10   namespace: kube-system
 11 type: Opaque
  1 [root@k8smaster01 ~]# kubectl apply -f /root/kubeadm-ha/addons/kubernetes-dashboard/kubernetes-dashboard.yaml
  2 [root@k8smaster01 ~]# kubectl get deployment kubernetes-dashboard -n kube-system
  3 NAME                   READY   UP-TO-DATE   AVAILABLE   AGE
  4 kubernetes-dashboard   1/1     1            1           10s
  5 [root@k8smaster01 ~]# kubectl get pods -o wide --namespace kube-system
  6 [root@k8smaster01 ~]# kubectl get services kubernetes-dashboard -n kube-system
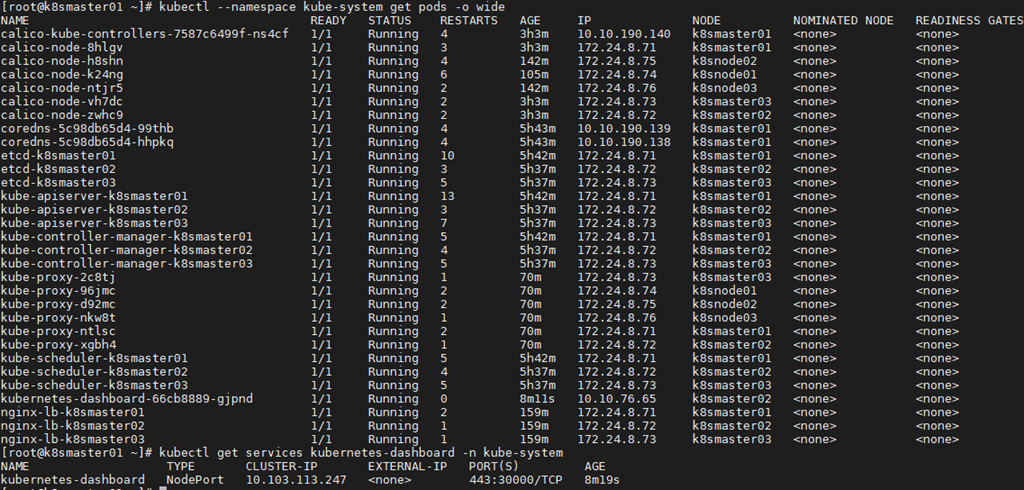
Tip: k8smaster01 NodePort 30000/TCP is mapped to the dashboard pod 443 port.
10.6 view dashboard parameters
1 [root@k8smaster01 ~]# kubectl exec --namespace kube-system -it kubernetes-dashboard-66cb8889-gjpnd -- /dashboard --helpNote: the -- authentication mode of dashboard supports token and basic, and the default is token. If you use basic, the Kube API server must be configured with the -- authorization mode = ABAC and -- Basic auth file parameters.
11. Visit dashboard
11.1 import certificate
Import dashboard.crt into IE browser, set it as trust, and the import operation is omitted.
11.2 create kubeconfig file
Using token is relatively complex. You can add token to the KubeConfig file and use the KubeConfig file to access the dashboard.
  1 [root@k8smaster01 ~]# ADMIN_SECRET=$(kubectl get secrets -n kube-system | grep admin-user-token- | awk '{print $1}')
  2 [root@k8smaster01 ~]# DASHBOARD_LOGIN_TOKEN=$(kubectl describe secret -n kube-system ${ADMIN_SECRET} | grep -E '^token' | awk '{print $2}')
  3 [root@k8smaster01 ~]# kubectl config set-cluster kubernetes \
  4   --certificate-authority=/etc/kubernetes/pki/ca.crt \
  5   --embed-certs=true \
  6   --server=172.24.8.100:16443 \
  7   --kubeconfig=dashboard.kubeconfig		        # Set cluster parameters
  8 [root@k8smaster01 ~]# kubectl config set-credentials dashboard_user \
  9   --token=${DASHBOARD_LOGIN_TOKEN} \
 10   --kubeconfig=dashboard_admin.kubeconfig		# Set the client authentication parameters and use the Token created above
 11 [root@k8smaster01 ~]# kubectl config set-context default \
 12   --cluster=kubernetes \
 13   --user=dashboard_user \
 14   --kubeconfig=dashboard_admin.kubeconfig		# Set context parameters
 15 [root@k8smaster01 ~]# kubectl config use-context default --kubeconfig=dashboard_admin.kubeconfig  # Set default context
#Import the dashboard.kubeconfig file for your browser to log in using it.
11.3 test access dashboard
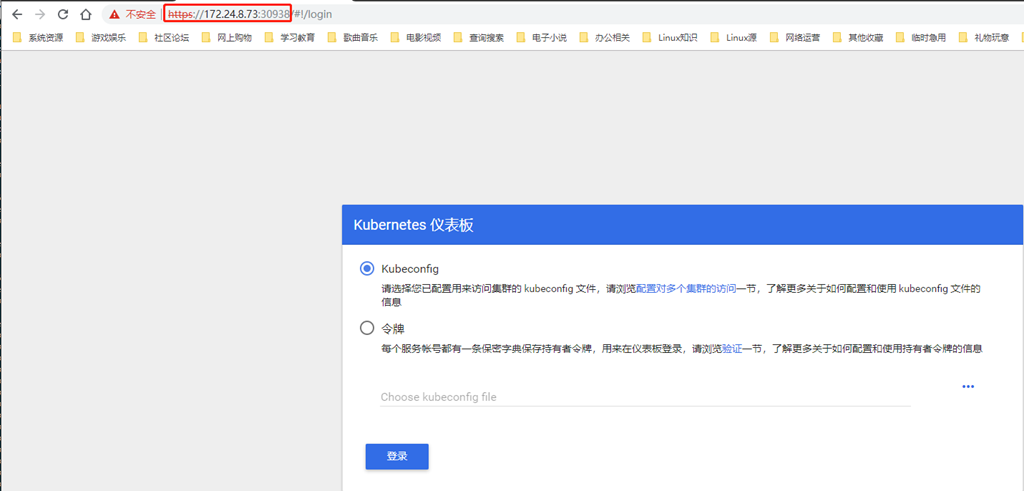
This experiment uses nodeip:nodepord access.
Browser access: https://172.24.8.71:30000
Use the dashboard? Admin.kubeconfig file to access:
Tips:
For more access methods and certification of the dashboard, please refer to appendix 004. Introduction and use of kubernetes dashboard.
For the whole process of dashboard login, please refer to https://www.cnadn.net/post/2613.htm
Tip: due to the lack of the Heapster plug-in, the current dashboard cannot display the CPU, memory and other statistics and charts of Pod and Nodes.
12. Deploy heapster
12.1 pull image
It is recommended to pull the required image of the heapster in advance.
  1 [root@VPN ~]# docker pull k8s.gcr.io/heapster-influxdb-amd64:v1.5.2
  2 [root@VPN ~]# docker run -ti --rm --entrypoint "/bin/sh" k8s.gcr.io/heapster-influxdb-amd64:v1.5.2
  3 / # sed -i "s/localhost/127.0.0.1/g" /etc/config.toml	#Modify config in container
  4 [root@VPN ~]# docker ps				        #Open another terminal
  5 CONTAINER ID        IMAGE                                       COMMAND             CREATED             STATUS              PORTS               NAMES
  6 30b29cf20782        k8s.gcr.io/heapster-influxdb-amd64:v1.5.2   "/bin/sh"           5 minutes ago       Up 5 minutes                            elastic_brahmagupta
  7 [root@VPN ~]# docker commit elastic_brahmagupta k8s.gcr.io/heapster-influxdb-amd64:v1.5.2-fixed  #Commit the modified container as a mirror
  8 [root@VPN ~]# docker save -o heapster-influxdb-fixed.tar k8s.gcr.io/heapster-influxdb-amd64:v1.5.2-fixed
  1 [root@VPN ~]# docker pull k8s.gcr.io/heapster-amd64:v1.5.4
  2 [root@VPN ~]# docker save -o heapster.tar k8s.gcr.io/heapster-amd64:v1.5.4
  1 [root@k8smaster01 ~]# docker load -i heapster.tar
  2 [root@k8smaster01 ~]# docker load -i heapster-influxdb-fixed.tar
Tip: all Master nodes need to load the above image.
12.2 deploy heapster
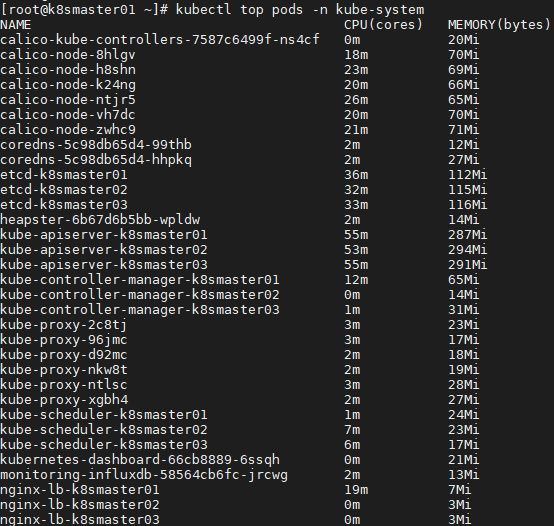
1 [root@k8smaster01 ~]# kubectl apply -f /root/kubeadm-ha/addons/heapster/12.3 validation
1 [root@k8smaster01 ~]# kubectl top pods -n kube-system
Visit the browser again: https://172.24.8.71:30000/

Reference link:
https://www.kubernetes.org.cn/4956.html
https://www.kubernetes.org.cn/4956.html