Attachment 024.Kubernetes_v1.18.3 high availability deployment architecture II
Introduction to kubeadm
kubeadm overview
Refer to attachment 003.Kubeadm deployment Kubernetes.
kubeadm function
Refer to attachment 003.Kubeadm deployment Kubernetes.
Description of the scheme
- Kubernetes version 1.18.3 is deployed by kubeadm;
- etcd adopts mixed mode;
- KeepAlived: realize VIP high availability;
- HAProxy: runs in the form of system system D, providing reverse proxy to three master 6443 ports;
- Other major deployment components include:
- Metrics: measurement;
- Dashboard: Kubernetes graphical UI interface;
- Helm: Kubernetes Helm package management tool;
- Ingress: Kubernetes service exposure;
- Longhorn: Kubernetes dynamic storage component.
Deployment planning
Node planning
| Node hostname | IP | type | Running services |
|---|---|---|---|
| master01 | 172.24.8.71 | Kubernetes master node | docker,etcd,kube-apiserver,kube-scheduler,kube-controller-manager, kubectl,kubelet,metrics,calico,HAProxy,KeepAlived |
| master02 | 172.24.8.72 | Kubernetes master node | docker,etcd,kube-apiserver,kube-scheduler,kube-controller-manager, kubectl,kubelet,metrics,calico,HAProxy,KeepAlived |
| master03 | 172.24.8.73 | Kubernetes master node | docker,etcd,kube-apiserver,kube-scheduler,kube-controller-manager, kubectl,kubelet,metrics,calico,HAProxy,KeepAlived |
| worker01 | 172.24.8.74 | Kubernetes node 1 | docker,kubelet,proxy,calico |
| worker02 | 172.24.8.75 | Kubernetes node 2 | docker,kubelet,proxy,calico |
| worker03 | 172.24.8.76 | Kubernetes node 3 | docker,kubelet,proxy,calico |
| VIP | 172.24.8.100 |
The high availability of Kubernetes mainly refers to the high availability of the control plane, that is, multiple sets of Master node components and Etcd components, and the work nodes are connected to each Master through load balancing.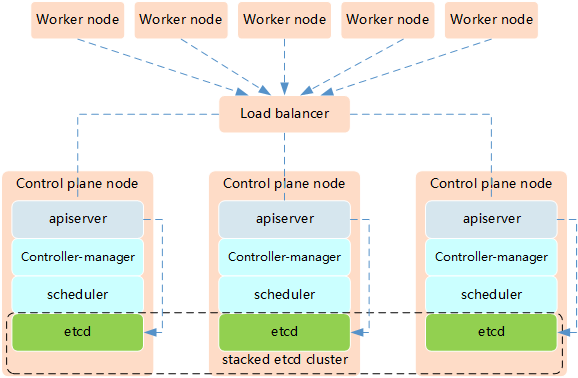
Features of the mixed mode of etcd and Master node components in Kubernetes high availability architecture:
- Less machine resources required
- Simple deployment for management
- Easy to scale out
- The risk is great. When a host is hung up, there is less master and etcd. The cluster redundancy is greatly affected.
Tip: this experiment uses the Keepalived+HAProxy architecture to achieve high availability of Kubernetes.
Initial preparation
[root@master01 ~]# hostnamectl set-hostname master01			#Other nodes are modified in turn
[root@master01 ~]# cat >> /etc/hosts << EOF
172.24.8.71 master01
172.24.8.72 master02
172.24.8.73 master03
172.24.8.74 worker01
172.24.8.75 worker02
172.24.8.76 worker03
EOF
[root@master01 ~]# vi k8sinit.sh
# Initialize the machine. This needs to be executed on every machine.

# Install docker
useradd -m docker
yum -y install yum-utils device-mapper-persistent-data lvm2
yum-config-manager --add-repo http://mirrors.aliyun.com/docker-ce/linux/centos/docker-ce.repo
yum -y install docker-ce
mkdir /etc/docker
cat > /etc/docker/daemon.json <<EOF
{
  "registry-mirrors": ["https://dbzucv6w.mirror.aliyuncs.com"],
  "exec-opts": ["native.cgroupdriver=systemd"],
  "log-driver": "json-file",
  "log-opts": {
    "max-size": "100m"
  },
  "storage-driver": "overlay2",
  "storage-opts": [
    "overlay2.override_kernel_check=true"
  ]
}
EOF
systemctl restart docker
systemctl enable docker
systemctl status docker

# Disable the SELinux.
sed -i 's/^SELINUX=.*/SELINUX=disabled/' /etc/selinux/config

# Turn off and disable the firewalld.
systemctl stop firewalld
systemctl disable firewalld

# Modify related kernel parameters & Disable the swap.
cat > /etc/sysctl.d/k8s.conf << EOF
net.ipv4.ip_forward = 1
net.bridge.bridge-nf-call-ip6tables = 1
net.bridge.bridge-nf-call-iptables = 1
net.ipv4.tcp_tw_recycle = 0
vm.swappiness = 0
vm.overcommit_memory = 1
vm.panic_on_oom = 0
net.ipv6.conf.all.disable_ipv6 = 1
EOF
sysctl -p /etc/sysctl.d/k8s.conf >&/dev/null
swapoff -a
sed -i '/ swap / s/^\(.*\)$/#\1/g' /etc/fstab
modprobe br_netfilter

# Add ipvs modules
cat > /etc/sysconfig/modules/ipvs.modules <<EOF
#!/bin/bash
modprobe -- ip_vs
modprobe -- ip_vs_rr
modprobe -- ip_vs_wrr
modprobe -- ip_vs_sh
modprobe -- nf_conntrack_ipv4
modprobe -- nf_conntrack
EOF

chmod 755 /etc/sysconfig/modules/ipvs.modules
bash /etc/sysconfig/modules/ipvs.modules

# Install rpm
yum install -y conntrack ntpdate ntp ipvsadm ipset jq iptables curl sysstat libseccomp wget

# Update kernel
rpm --import http://down.linuxsb.com:8888/RPM-GPG-KEY-elrepo.org
rpm -Uvh http://down.linuxsb.com:8888/elrepo-release-7.0-4.el7.elrepo.noarch.rpm
yum --disablerepo="*" --enablerepo="elrepo-kernel" install -y kernel-ml
sed -i 's/^GRUB_DEFAULT=.*/GRUB_DEFAULT=0/' /etc/default/grub
grub2-mkconfig -o /boot/grub2/grub.cfg
yum update -y

# Reboot the machine.
# reboot
Tip: for some features, you may need to upgrade the kernel. For kernel upgrade operations, see 018.Linux upgrading the kernel.
4.19 and above kernel nf_conntrack_ipv4 has been changed to nf_conntrack.
Mutual trust configuration
In order to facilitate remote file distribution and command execution, this experiment configures the ssh trust relationship between the master01 node and other nodes.
[root@master01 ~]# ssh-keygen -f ~/.ssh/id_rsa -N ''
[root@master01 ~]# ssh-copy-id -i ~/.ssh/id_rsa.pub root@master01
[root@master01 ~]# ssh-copy-id -i ~/.ssh/id_rsa.pub root@master02
[root@master01 ~]# ssh-copy-id -i ~/.ssh/id_rsa.pub root@master03
[root@master01 ~]# ssh-copy-id -i ~/.ssh/id_rsa.pub root@worker01
[root@master01 ~]# ssh-copy-id -i ~/.ssh/id_rsa.pub root@worker02
[root@master01 ~]# ssh-copy-id -i ~/.ssh/id_rsa.pub root@worker03
Tip: this operation only needs to be performed on the master node.
Other preparations
[root@master01 ~]# vi environment.sh
#!/bin/sh
#****************************************************************#
# ScriptName: environment.sh
# Author: xhy
# Create Date: 2020-05-30 16:30
# Modify Author: xhy
# Modify Date: 2020-06-15 17:55
# Version:
#***************************************************************#
# Cluster MASTER machine IP array
export MASTER_IPS=(172.24.8.71 172.24.8.72 172.24.8.73)

# Host name array corresponding to cluster MASTER IP
export MASTER_NAMES=(master01 master02 master03)

# Cluster NODE machine IP array
export NODE_IPS=(172.24.8.74 172.24.8.75 172.24.8.76)

# Host name array corresponding to cluster NODE IP
export NODE_NAMES=(worker01 worker02 worker03)

# Cluster all machine IP array
export ALL_IPS=(172.24.8.71 172.24.8.72 172.24.8.73 172.24.8.74 172.24.8.75 172.24.8.76)

# Array of host names corresponding to all IP addresses in the cluster
export ALL_NAMES=(master01 master02 master03 worker01 worker02 worker03)
[root@master01 ~]# source environment.sh
[root@master01 ~]# chmod +x *.sh
[root@master01 ~]# for all_ip in ${ALL_IPS[@]}
  do
    echo ">>> ${all_ip}"
    scp -rp /etc/hosts root@${all_ip}:/etc/hosts
    scp -rp k8sinit.sh root@${all_ip}:/root/
    ssh root@${all_ip} "bash /root/k8sinit.sh"
  done
Cluster deployment
Related component package
The following packages need to be installed on each machine:
- kubeadm: the instruction used to initialize the cluster;
- kubelet: used to start pod, container, etc. on each node in the cluster;
- kubectl: command line tool for communicating with clusters.
Kubedm cannot install or manage kubelet or kubectl, so you need to ensure that they meet the version requirements of the Kubernetes control layer installed through kubedm. If the version does not meet the requirements, it may cause some unexpected errors or problems.
For the specific installation of relevant components, see Introduction and use of kubectl.
Note: kubernetes version 1.18 all compatible versions of corresponding components refer to: https://github.com/kubernetes/kubernetes/blob/master/CHANGELOG/CHANGELOG-1.18.md.
Formal installation
[root@master01 ~]# for all_ip in ${ALL_IPS[@]}
  do
    echo ">>> ${all_ip}"
    ssh root@${all_ip} "cat <<EOF > /etc/yum.repos.d/kubernetes.repo
[kubernetes]
name=Kubernetes
baseurl=https://mirrors.aliyun.com/kubernetes/yum/repos/kubernetes-el7-x86_64/
enabled=1
gpgcheck=1
repo_gpgcheck=1
gpgkey=https://mirrors.aliyun.com/kubernetes/yum/doc/yum-key.gpg https://mirrors.aliyun.com/kubernetes/yum/doc/rpm-package-key.gpg
EOF"
    ssh root@${all_ip} "yum install -y kubeadm-1.18.3-0.x86_64 kubelet-1.18.3-0.x86_64 kubectl-1.18.3-0.x86_64 --disableexcludes=kubernetes"
    ssh root@${all_ip} "systemctl enable kubelet"
done
[root@master01 ~]# yum search -y kubelet --showduplicates				#View the corresponding version
Tip: as above, only Master01 node operation is required to realize automatic installation of all nodes. At the same time, kubelet does not need to be started at this time. It will be started automatically during initialization. If it is started at this time, an error will be reported. Just ignore it.
Note: at the same time, CRI tools, kubernetes CNI and socat are installed
socat: the dependence of kubelet;
CRI tools: the command line tool of CRI(Container Runtime Interface) container runtime interface.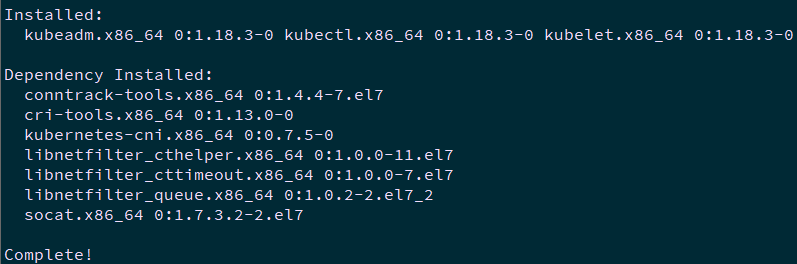
Deploy highly available components
HAProxy installation
[root@master01 ~]# for master_ip in ${MASTER_IPS[@]}
  do
    echo ">>> ${master_ip}"
    ssh root@${master_ip} "yum -y install gcc gcc-c++ make libnl libnl-devel libnfnetlink-devel openssl-devel wget openssh-clients systemd-devel zlib-devel pcre-devel libnl3-devel"
    ssh root@${master_ip} "wget http://down.linuxsb.com:8888/software/haproxy-2.1.6.tar.gz"
    ssh root@${master_ip} "tar -zxvf haproxy-2.1.6.tar.gz"
    ssh root@${master_ip} "cd haproxy-2.1.6/ && make ARCH=x86_64 TARGET=linux-glibc USE_PCRE=1 USE_OPENSSL=1 USE_ZLIB=1 USE_SYSTEMD=1 PREFIX=/usr/local/haprpxy && make install PREFIX=/usr/local/haproxy"
    ssh root@${master_ip} "cp /usr/local/haproxy/sbin/haproxy /usr/sbin/"
    ssh root@${master_ip} "useradd -r haproxy && usermod -G haproxy haproxy"
    ssh root@${master_ip} "mkdir -p /etc/haproxy && cp -r /root/haproxy-2.1.6/examples/errorfiles/ /usr/local/haproxy/"
  done
Keepalived installation
[root@master01 ~]# for master_ip in ${MASTER_IPS[@]}
  do
    echo ">>> ${master_ip}"
    ssh root@${master_ip} "yum -y install gcc gcc-c++ make libnl libnl-devel libnfnetlink-devel openssl-devel"
    ssh root@${master_ip} "wget http://down.linuxsb.com:8888/software/keepalived-2.0.20.tar.gz"
    ssh root@${master_ip} "tar -zxvf keepalived-2.0.20.tar.gz"
    ssh root@${master_ip} "cd keepalived-2.0.20/ && ./configure --sysconf=/etc --prefix=/usr/local/keepalived && make && make install"
  done
Tip: only Master01 node operation is required above, so as to realize automatic installation of all nodes.
create profile
[root@master01 ~]# wget http://down.linuxsb.com:8888/hakek8s.sh ා pull auto deployment script
[root@master01 ~]# chmod u+x hakek8s.sh
[root@master01 ~]# vi hakek8s.sh
#!/bin/sh
#****************************************************************#
# ScriptName: hakek8s.sh
# Author: xhy
# Create Date: 2020-06-08 20:00
# Modify Author: xhy
# Modify Date: 2020-06-15 18:15
# Version: v2
#***************************************************************#

#######################################
# set variables below to create the config files, all files will create at ./config directory
#######################################

# master keepalived virtual ip address
export K8SHA_VIP=172.24.8.100

# master01 ip address
export K8SHA_IP1=172.24.8.71

# master02 ip address
export K8SHA_IP2=172.24.8.72

# master03 ip address
export K8SHA_IP3=172.24.8.73

# master01 hostname
export K8SHA_HOST1=master01

# master02 hostname
export K8SHA_HOST2=master02

# master03 hostname
export K8SHA_HOST3=master03

# master01 network interface name
export K8SHA_NETINF1=eth0

# master02 network interface name
export K8SHA_NETINF2=eth0

# master03 network interface name
export K8SHA_NETINF3=eth0

# keepalived auth_pass config
export K8SHA_KEEPALIVED_AUTH=412f7dc3bfed32194d1600c483e10ad1d

# kubernetes CIDR pod subnet
export K8SHA_PODCIDR=10.10.0.0

# kubernetes CIDR svc subnet
export K8SHA_SVCCIDR=10.20.0.0
[root@master01 ~]# ./hakek8s.sh
Explanation: only Master01 node operation is required above. After executing the hakek8s.sh script, the following list of configuration files will be produced:
- kubeadm-config.yaml : kubeadm initialization profile in the current directory
- Keepalived: keepalived configuration file, located in the / etc/keepalived directory of each master node
- Haproxy: the configuration file of haproxy, located in the / etc/haproxy / directory of each master node
-
calico.yaml : calico network component deployment file, located in the config/calico / directory
[ root@master01 ~]# cat kubeadm-config.yaml #Check cluster initialization configuration
apiVersion: kubeadm.k8s.io/v1beta2
kind: ClusterConfiguration
networking:
  serviceSubnet: "10.20.0.0/16"				#Set svc segment
  podSubnet: "10.10.0.0/16"				#Set up Pod segments
  dnsDomain: "cluster.local"
kubernetesVersion: "v1.18.3"				#Set installation version
controlPlaneEndpoint: "172.24.11.254:16443"		#Set related API VIP address
apiServer:
  certSANs:
  - master01
  - master02
  - master03
  - 127.0.0.1
  - 192.168.2.11
  - 192.168.2.12
  - 192.168.2.13
  - 192.168.2.200
  timeoutForControlPlane: 4m0s
certificatesDir: "/etc/kubernetes/pki"
imageRepository: "k8s.gcr.io"

---
apiVersion: kubeproxy.config.k8s.io/v1alpha1
kind: KubeProxyConfiguration
featureGates:
  SupportIPVSProxyMode: true
mode: ipvs
Tip: only Master01 node operation is required as above. For more config files, please refer to: https://godoc.org/k8s.io/kubernetes/cmd/kubeadm/app/apis/kubeadm/v1beta2.
For more information about this kubeadm deployment initialization configuration: https://pkg.go.dev/k8s.io/kubernetes/cmd/kubeadm/app/apis/kubeadm/v1beta2?tab=doc.
Start service
[root@master01 ~]# cat /etc/keepalived/keepalived.conf
[root@master01 ~]# cat /etc/keepalived/check_apiserver.sh	 Confirm the preserved configuration
[root@master01 ~]# for master_ip in ${MASTER_IPS[@]}
  do
    echo ">>> ${master_ip}"
    ssh root@${master_ip} "systemctl start haproxy.service && systemctl enable haproxy.service"
    ssh root@${master_ip} "systemctl start keepalived.service && systemctl enable keepalived.service"
    ssh root@${master_ip} "systemctl status keepalived.service | grep Active"
    ssh root@${master_ip} "systemctl status haproxy.service | grep Active"
  done
[root@master01 ~]# for all_ip in ${ALL_IPS[@]}
  do
    echo ">>> ${all_ip}"
    ssh root@${all_ip} "ping -c1 172.24.8.100"
  done								#Wait 30s for inspection
Tip: as mentioned above, only the Master01 node is required to operate, so that all nodes can start the service automatically.
Initialize cluster
Pull image
[root@master01 ~]# kubeadm --kubernetes-version=v1.18.3 config images list			#List required images
[root@master01 ~]# cat config/downimage.sh			#Confirm version
#!/bin/sh
#****************************************************************#
# ScriptName: downimage.sh
# Author: xhy
# Create Date: 2020-05-29 19:55
# Modify Author: xhy
# Modify Date: 2020-06-10 19:15
# Version: v2
#***************************************************************#

KUBE_VERSION=v1.18.3
CALICO_VERSION=v3.14.1
CALICO_URL=calico
KUBE_PAUSE_VERSION=3.2
ETCD_VERSION=3.4.3-0
CORE_DNS_VERSION=1.6.7
GCR_URL=k8s.gcr.io
METRICS_SERVER_VERSION=v0.3.6
INGRESS_VERSION=0.32.0
CSI_PROVISIONER_VERSION=v1.4.0
CSI_NODE_DRIVER_VERSION=v1.2.0
CSI_ATTACHER_VERSION=v2.0.0
CSI_RESIZER_VERSION=v0.3.0
ALIYUN_URL=registry.cn-hangzhou.aliyuncs.com/google_containers
UCLOUD_URL=uhub.service.ucloud.cn/uxhy
QUAY_URL=quay.io

kubeimages=(kube-proxy:${KUBE_VERSION}
kube-scheduler:${KUBE_VERSION}
kube-controller-manager:${KUBE_VERSION}
kube-apiserver:${KUBE_VERSION}
pause:${KUBE_PAUSE_VERSION}
etcd:${ETCD_VERSION}
coredns:${CORE_DNS_VERSION}
metrics-server-amd64:${METRICS_SERVER_VERSION}
)

for kubeimageName in ${kubeimages[@]} ; do
docker pull $UCLOUD_URL/$kubeimageName
docker tag $UCLOUD_URL/$kubeimageName $GCR_URL/$kubeimageName
docker rmi $UCLOUD_URL/$kubeimageName
done

calimages=(cni:${CALICO_VERSION}
pod2daemon-flexvol:${CALICO_VERSION}
node:${CALICO_VERSION}
kube-controllers:${CALICO_VERSION})

for calimageName in ${calimages[@]} ; do
docker pull $UCLOUD_URL/$calimageName
docker tag $UCLOUD_URL/$calimageName $CALICO_URL/$calimageName
docker rmi $UCLOUD_URL/$calimageName
done

ingressimages=(nginx-ingress-controller:${INGRESS_VERSION})

for ingressimageName in ${ingressimages[@]} ; do
docker pull $UCLOUD_URL/$ingressimageName
docker tag $UCLOUD_URL/$ingressimageName $QUAY_URL/kubernetes-ingress-controller/$ingressimageName
docker rmi $UCLOUD_URL/$ingressimageName
done

csiimages=(csi-provisioner:${CSI_PROVISIONER_VERSION}
csi-node-driver-registrar:${CSI_NODE_DRIVER_VERSION}
csi-attacher:${CSI_ATTACHER_VERSION}
csi-resizer:${CSI_RESIZER_VERSION}
)

for csiimageName in ${csiimages[@]} ; do
docker pull $UCLOUD_URL/$csiimageName
docker tag $UCLOUD_URL/$csiimageName $QUAY_URL/k8scsi/$csiimageName
docker rmi $UCLOUD_URL/$csiimageName
done
[root@master01 ~]# for all_ip in ${ALL_IPS[@]}
  do
    echo ">>> ${all_ip}"
    scp -rp config/downimage.sh root@${all_ip}:/root/
    ssh root@${all_ip} "bash downimage.sh &"
  done
Tip: only Master01 node operation is required above, so that all nodes can pull the image automatically.
[ root@master01 ~]#Docker images confirm validation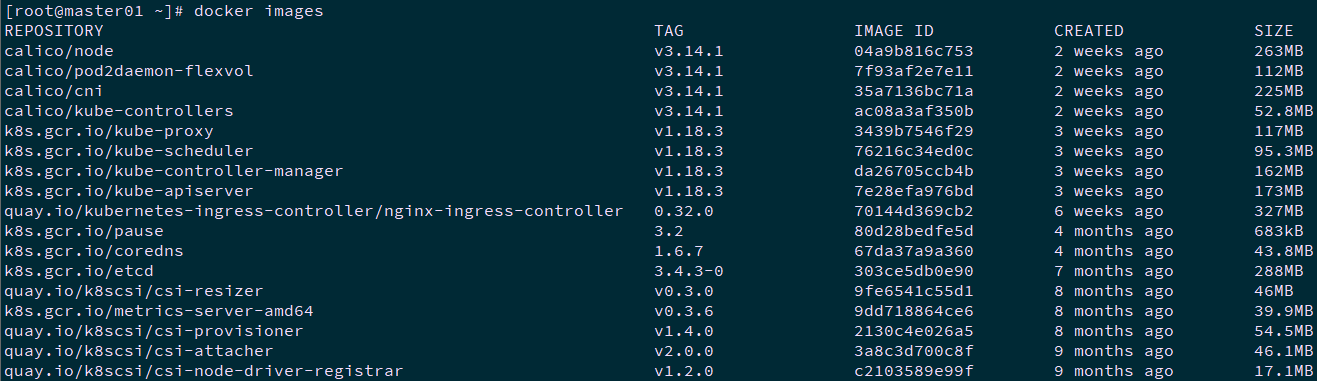
Initialization on Master
[root@master01 ~]# kubeadm init --config=kubeadm-config.yaml --upload-certs 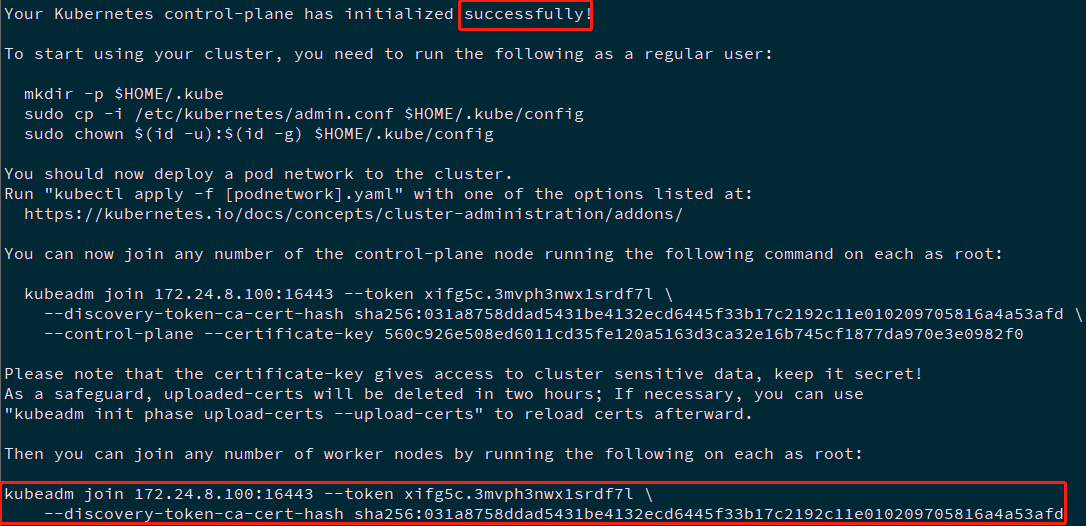
You can now join any number of the control-plane node running the following command on each as root:

  kubeadm join 172.24.8.100:16443 --token xifg5c.3mvph3nwx1srdf7l \
    --discovery-token-ca-cert-hash sha256:031a8758ddad5431be4132ecd6445f33b17c2192c11e010209705816a4a53afd \
    --control-plane --certificate-key 560c926e508ed6011cd35fe120a5163d3ca32e16b745cf1877da970e3e0982f0

Please note that the certificate-key gives access to cluster sensitive data, keep it secret!
As a safeguard, uploaded-certs will be deleted in two hours; If necessary, you can use
"kubeadm init phase upload-certs --upload-certs" to reload certs afterward.

Then you can join any number of worker nodes by running the following on each as root:

kubeadm join 172.24.8.100:16443 --token xifg5c.3mvph3nwx1srdf7l \
    --discovery-token-ca-cert-hash sha256:031a8758ddad5431be4132ecd6445f33b17c2192c11e010209705816a4a53afd
Note: the above token has a default 24-hour validity period. The token and hash values can be obtained as follows:
kubeadm token list
If the Token expires, you can enter the following command to generate a new Token:
kubeadm token create
openssl x509 -pubkey -in /etc/kubernetes/pki/ca.crt | openssl rsa -pubin -outform der 2>/dev/null | openssl dgst -sha256 -hex | sed 's/^.* //'
[root@master01 ~]# mkdir -p $HOME/.kube
[root@master01 ~]# sudo cp -i /etc/kubernetes/admin.conf $HOME/.kube/config
[root@master01 ~]# sudo chown $(id -u):$(id -g) $HOME/.kube/config
[root@master01 ~]# cat << EOF >> ~/.bashrc
export KUBECONFIG=$HOME/.kube/config
EOF							#Setting the KUBECONFIG environment variable
[root@master01 ~]# echo "source <(kubectl completion bash)" >> ~/.bashrc
[root@master01 ~]# source ~/.bashrc
Additional: the steps of initialization are as follows:
- [kubelet start] generate the configuration file of kubelet "/ var/lib/kubelet/config.yaml "
- [certificates] generate various related certificates
- [kubeconfig] generate the relevant kubeconfig file
- [bootstrap token] generates a token record, which is used later when using kubeadm join to add nodes to the cluster
Tip: initialization only needs to be performed on master01. If the initialization is abnormal, you can reset it through kubeadm reset & & RM - RF $home /. Kube.
Add other master nodes
[root@master02 ~]# kubeadm join 172.24.8.100:16443 --token xifg5c.3mvph3nwx1srdf7l \
    --discovery-token-ca-cert-hash sha256:031a8758ddad5431be4132ecd6445f33b17c2192c11e010209705816a4a53afd \
    --control-plane --certificate-key 560c926e508ed6011cd35fe120a5163d3ca32e16b745cf1877da970e3e0982f0

[root@master02 ~]# mkdir -p $HOME/.kube
[root@master02 ~]# sudo cp -i /etc/kubernetes/admin.conf $HOME/.kube/config
[root@master02 ~]# sudo chown $(id -u):$(id -g) $HOME/.kube/config
[root@master02 ~]# cat << EOF >> ~/.bashrc
export KUBECONFIG=$HOME/.kube/config
EOF							#Setting the KUBECONFIG environment variable
[root@master02 ~]# echo "source <(kubectl completion bash)" >> ~/.bashrc
[root@master02 ~]# source ~/.bashrc
Tip: master03 also executes the control plane added to the cluster as above.
Tip: if an exception is added, it can be reset through kubeadm reset & & RM - RF $home /. Kube.
Installing the NIC plug-in
Introduction to NIC plug-in
- Calico is a secure L3 network and network policy provider.
- Canal combines Flannel and Calico to provide network and network policies.
- Cilium is a L3 network and network policy plug-in that can transparently implement HTTP/API/L7 policies. Both routing and overlay/encapsulation modes are supported.
- Contiv provides configurable networks (native L3 using BGP, overlay using vxlan, classic L2 and Cisco SDN / ACI) and rich policy frameworks for a variety of use cases. The contiv project is fully open source. The installation tool provides both kubeadm based and non kubeadm based installation options.
- Flannel is an overlay network provider that can be used for Kubernetes.
- Romana is a layer 3 solution for pod network and supports the NetworkPolicy API. Kubeadm add on installation details can be found here.
- Weave Net provides a network and network policy to work at both ends of a network packet, and does not require additional databases.
- CNI Genie seamlessly connects Kubernetes to a CNI plug-in, such as Flannel, Calico, Canal, Romana, or Weave.
Tip: this scheme uses Calico plug-in.
Set label
[ root@master01 ~]# kubectl taint nodes --all node-role.kubernetes.io/master -Allow master to deploy applications
Tip: after deploying the internal application, you can use kubectl taint node master01 node-role.kubernetes.io/master="":NoSchedule reset Master to Master Only state.
Deploy calico
[root@master01 ~]# cat config/calico/calico.yaml #Check configuration
......
- name: CALICO_IPV4POOL_CIDR
value: "10.10.0.0/16" #Check Pod segment
......
- name: IP_AUTODETECTION_METHOD
value: "interface=eth.*" #Check the network card between nodes
# Auto-detect the BGP IP address.
- name: IP
value: "autodetect"
......
[root@master01 ~]# kubectl apply -f config/calico/calico.yaml
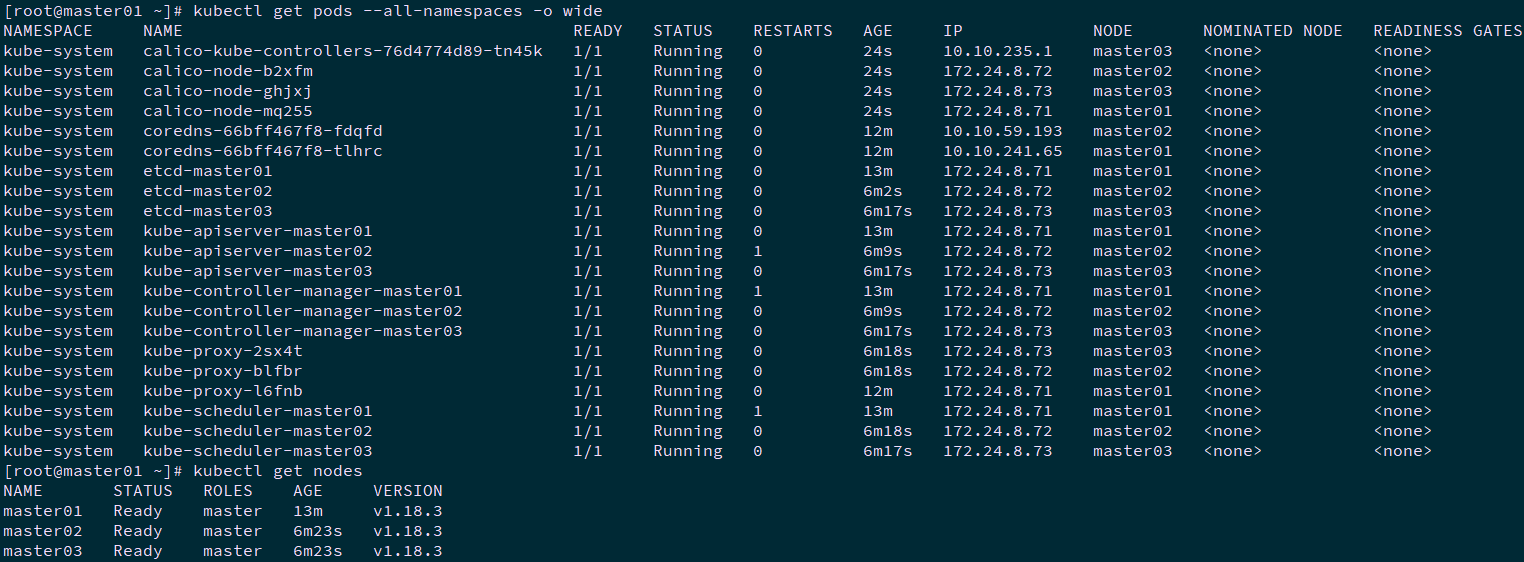
[root@master01 ~]# kubectl get pods --all-namespaces -o wide #View deployment
[root@master01 ~]# kubectl get nodes
Modify node port range
[root@master01 ~]# vi /etc/kubernetes/manifests/kube-apiserver.yaml
......
    - --service-node-port-range=1-65535
......
Tip: only operate on all Master nodes as above.
Add Worker node
Add Worker node
[root@master01 ~]# for node_ip in ${NODE_IPS[@]}
  do
    echo ">>> ${node_ip}"
    ssh root@${node_ip} "kubeadm join 172.24.8.100:16443 --token xifg5c.3mvph3nwx1srdf7l \
    --discovery-token-ca-cert-hash sha256:031a8758ddad5431be4132ecd6445f33b17c2192c11e010209705816a4a53afd"
    ssh root@${node_ip} "systemctl enable kubelet.service"
  done
Tip: only Master01 node operation is required as above, so that all Worker nodes can be added to the cluster. If any exception is added, it can be reset as follows:
[root@node01 ~]# kubeadm reset
[root@node01 ~]# ifconfig cni0 down
[root@node01 ~]# ip link delete cni0
[root@node01 ~]# ifconfig flannel.1 down
[root@node01 ~]# ip link delete flannel.1
[root@node01 ~]# rm -rf /var/lib/cni/
Validation
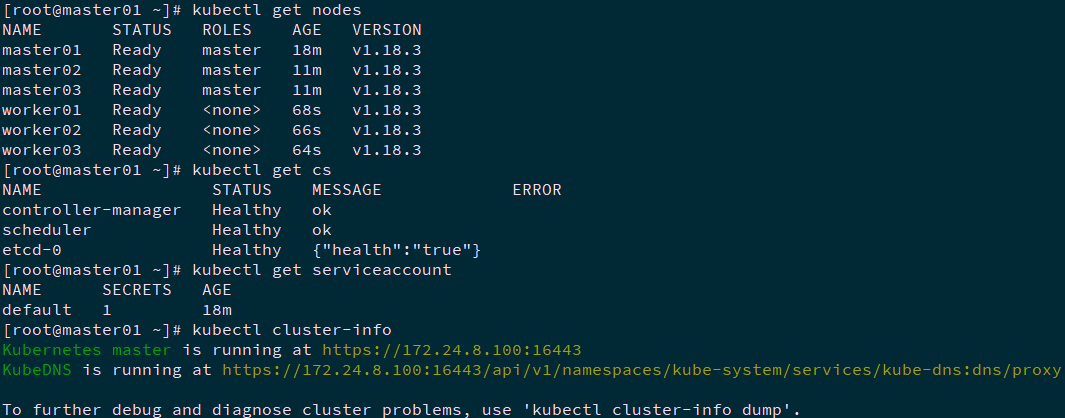
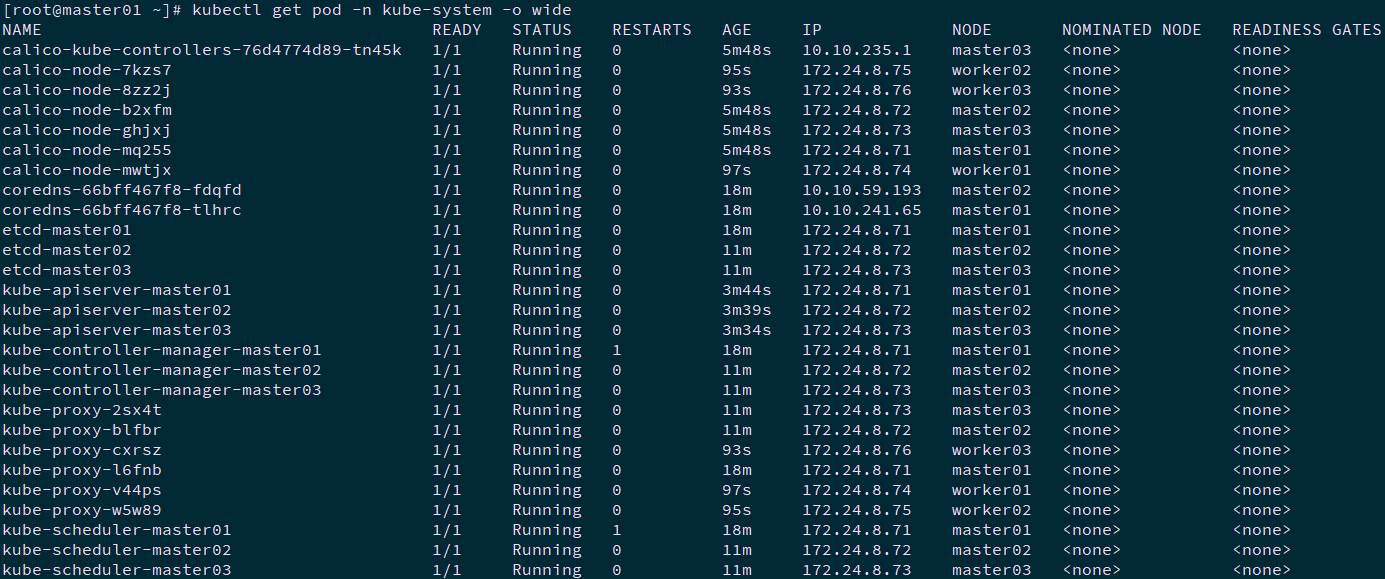
[root@master01 ~]# kubectl get nodes													#Node status
[root@master01 ~]# kubectl get cs															#Component status
[root@master01 ~]# kubectl get serviceaccount									#Service account
[root@master01 ~]# kubectl cluster-info												#Cluster information
[root@master01 ~]# kubectl get pod -n kube-system -o wide			#All service status
Tip: more Kubetcl References: https://kubernetes.io/docs/reference/kubectl/kubectl/
https://kubernetes.io/docs/reference/kubectl/overview/
For more use of kubeadm, please refer to: https://kubernetes.io/docs/reference/setup-tools/kubeadm/kubeadm/
Metrics deployment
Introduction to Metrics
Earlier versions of Kubernetes relied on Heapster to realize complete performance data collection and monitoring functions. From version 1.8, Kubernetes started to provide standardized interfaces in the way of Metrics API, and from version 1.10, it replaced Heapster with Metrics Server. In Kubernetes' new monitoring system, Metrics Server is used to provide Core Metrics, including the CPU and memory usage indicators of Node and Pod.
Other Custom Metrics are monitored by Prometheus and other components.
Open aggregation layer
For aggregation layer knowledge reference: https://blog.csdn.net/liukuan73/article/details/81352637
kubeadm mode deployment is on by default.
Get deployment file
[root@master01 ~]# mkdir metrics
[root@master01 ~]# cd metrics/
[root@master01 metrics]# wget https://github.com/kubernetes-sigs/metrics-server/releases/download/v0.3.6/components.yaml
[root@master01 metrics]# vi components.yaml
......
apiVersion: apps/v1
kind: Deployment
......
spec:
  replicas: 3																	#Adjust the number of replicas according to the cluster size
......
    spec:
      hostNetwork: true
......
      - name: metrics-server
        image: k8s.gcr.io/metrics-server-amd64:v0.3.6
        imagePullPolicy: IfNotPresent
        args:
          - --cert-dir=/tmp
          - --secure-port=4443
          - --kubelet-insecure-tls
          - --kubelet-preferred-address-types=InternalIP,Hostname,InternalDNS,ExternalDNS,ExternalIP	#Append this args
......
Formal deployment
[root@master01 metrics]# kubectl apply -f components.yaml
[root@master01 metrics]# kubectl -n kube-system get pods -l k8s-app=metrics-server
NAME                              READY   STATUS    RESTARTS   AGE
metrics-server-7b97647899-8txt4   1/1     Running   0          53s
metrics-server-7b97647899-btdwp   1/1     Running   0          53s
metrics-server-7b97647899-kbr8b   1/1     Running   0          53s
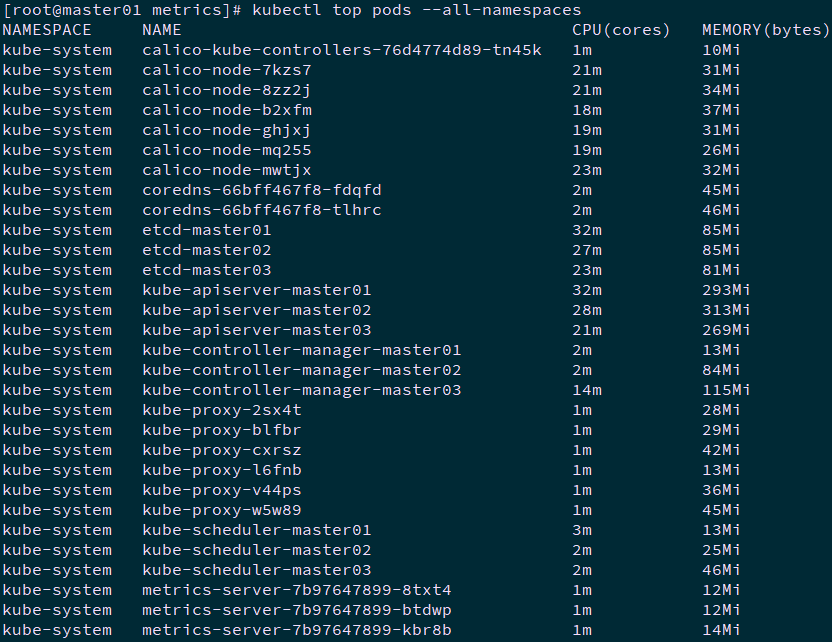
View resource monitoring
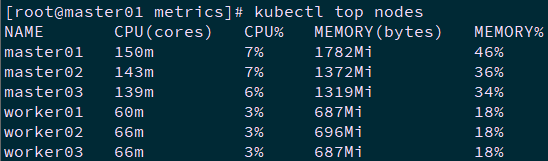
[root@k8smaster01 ~]# kubectl top nodes
[root@master01 metrics]# kubectl top pods --all-namespaces
Note: the data provided by Metrics Server can also be used by HPA controller to realize the automatic expansion and reduction of Pod based on CPU utilization or memory usage.
Deployment reference: https://linux48.com/container/2019-11-13-metrics-server.html
For more deployment reference of metrics:
https://kubernetes.io/docs/tasks/debug-application-cluster/resource-metrics-pipeline/
Open API Aggregation reference:
https://kubernetes.io/docs/concepts/extend-kubernetes/api-extension/apiserver-aggregation/
API Aggregation introduction reference:
https://kubernetes.io/docs/tasks/access-kubernetes-api/configure-aggregation-layer/
Nginx ingress deployment
reference resources Attachment 020.Nginx-ingress deployment and use
Dashboard deployment
Set label
[root@master01 ~]# kubectl label nodes master01 dashboard=yes
[root@master01 ~]# kubectl label nodes master02 dashboard=yes
[root@master01 ~]# kubectl label nodes master03 dashboard=yes
Create certificate
This experiment has obtained a free certificate for one year. For obtaining the free certificate, please refer to: https://freessl.cn.
[root@master01 ~]# mkdir -p /root/dashboard/certs
[root@master01 ~]# cd /root/dashboard/certs
[root@master01 certs]# mv k8s.odocker.com tls.crt
[root@master01 certs]# mv k8s.odocker.com tls.crt
[root@master01 certs]# ll
total 8.0K
-rw-r--r-- 1 root root 1.9K Jun  8 11:46 tls.crt
-rw-r--r-- 1 root root 1.7K Jun  8 11:46 tls.ke
Tip: you can also create a self signed certificate manually as follows:
[root@master01 ~]# openssl req -x509 -nodes -days 365 -newkey rsa:2048 -keyout tls.key -out tls.crt -subj "/C=CN/ST=ZheJiang/L=HangZhou/O=Xianghy/OU=Xianghy/CN=k8s.odocker.com"
Create secret manually
[root@master01 ~]# kubectl create ns kubernetes-dashboard																						#v2 version dashboard independent ns
[root@master01 ~]# kubectl create secret generic kubernetes-dashboard-certs --from-file=$HOME/dashboard/certs/ -n kubernetes-dashboard
[root@master01 ~]# kubectl get secret kubernetes-dashboard-certs -n kubernetes-dashboard -o yaml		#View new certificate
NAME                         TYPE     DATA   AGE
kubernetes-dashboard-certs   Opaque   2      4s
Download yaml
[root@master01 ~]# cd /root/dashboard
[root@master01 dashboard]# wget https://raw.githubusercontent.com/kubernetes/dashboard/v2.0.1/aio/deploy/recommended.yaml
Change to yaml
[root@master01 dashboard]# vi recommended.yaml
......
kind: Service
apiVersion: v1
metadata:
  labels:
    k8s-app: kubernetes-dashboard
  name: kubernetes-dashboard
  namespace: kubernetes-dashboard
spec:
  type: NodePort				#newly added
  ports:
    - port: 443
      targetPort: 8443
      nodePort: 30001				#newly added
  selector:
    k8s-app: kubernetes-dashboard
---
......						#All notes below
#apiVersion: v1
#kind: Secret
#metadata:
#  labels:
#    k8s-app: kubernetes-dashboard
#  name: kubernetes-dashboard-certs
#  namespace: kubernetes-dashboard
#type: Opaque
......
kind: Deployment
......
  replicas: 3					#Adjust to 3 copies as appropriate
......
          imagePullPolicy: IfNotPresent		#Modify image download policy
          ports:
            - containerPort: 8443
              protocol: TCP
          args:
            - --auto-generate-certificates  #Turn off Automatic Certificate creation
            - --namespace=kubernetes-dashboard
            - --tls-key-file=tls.key
            - --tls-cert-file=tls.crt
            - --token-ttl=3600    #Append args above
......
      nodeSelector:
        "beta.kubernetes.io/os": linux
        "dashboard": "yes"			#Deploy on the master node
......
kind: Service
apiVersion: v1
metadata:
  labels:
    k8s-app: dashboard-metrics-scraper
  name: dashboard-metrics-scraper
  namespace: kubernetes-dashboard
spec:
  type: NodePort				#newly added
  ports:
    - port: 8000
      nodePort: 30000				#newly added
      targetPort: 8000
  selector:
    k8s-app: dashboard-metrics-scraper
......
   replicas: 3					#Adjust to 3 copies as appropriate
......
      nodeSelector:
        "beta.kubernetes.io/os": linux
        "dashboard": "yes"			#Deploy on the master node
......
Formal deployment
[root@master01 dashboard]# kubectl apply -f recommended.yaml
[root@master01 dashboard]# kubectl get deployment kubernetes-dashboard -n kubernetes-dashboard
[root@master01 dashboard]# kubectl get services -n kubernetes-dashboard
[root@master01 dashboard]# kubectl get pods -o wide -n kubernetes-dashboard
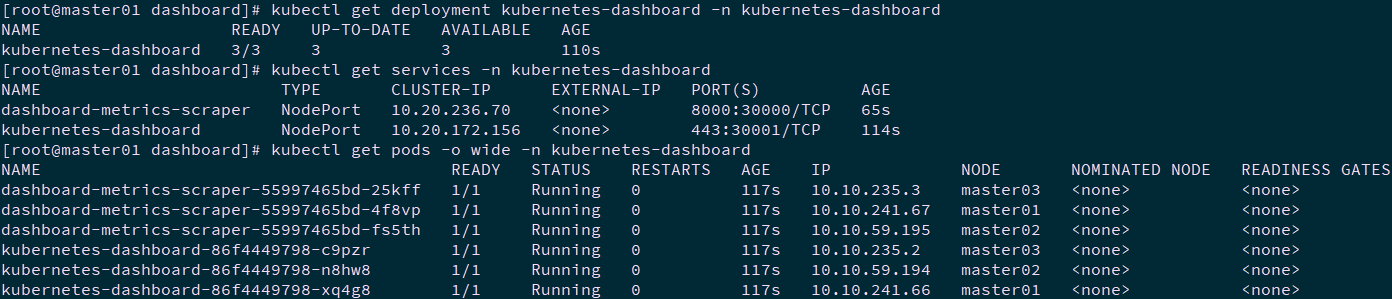
Tip: master01 NodePort 30001/TCP is mapped to dashboard pod 443 port.
Create administrator account
Tip: the dashboard v2 version does not create an account with administrator permission by default. You can create it as follows.
[root@master01 dashboard]# vi dashboard-admin.yaml
---
apiVersion: v1
kind: ServiceAccount
metadata:
  name: admin-user
  namespace: kubernetes-dashboard

---
apiVersion: rbac.authorization.k8s.io/v1
kind: ClusterRoleBinding
metadata:
  name: admin-user
roleRef:
  apiGroup: rbac.authorization.k8s.io
  kind: ClusterRole
  name: cluster-admin
subjects:
- kind: ServiceAccount
  name: admin-user
  namespace: kubernetes-dashboard
[root@master01 dashboard]# kubectl apply -f dashboard-admin.yaml
Ingress exposes Dashboard
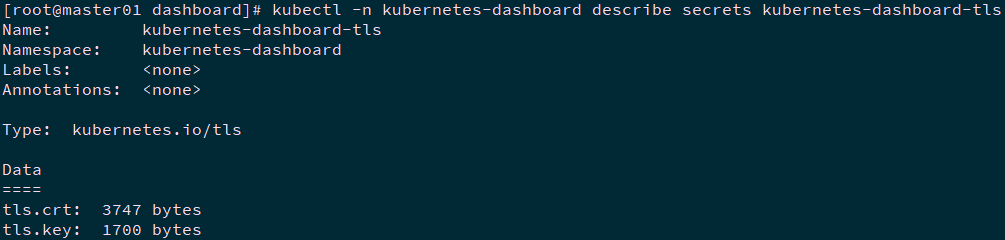
Create Ingress tls
[root@master01 ~]# cd /root/dashboard/certs
[root@master01 certs]# kubectl -n kubernetes-dashboard create secret tls kubernetes-dashboard-tls --cert=tls.crt --key=tls.key
[root@master01 certs]# kubectl -n kubernetes-dashboard describe secrets kubernetes-dashboard-tls
Creating an ingress policy
[root@master01 ~]# cd /root/dashboard/
[root@master01 dashboard]# vi dashboard-ingress.yaml
apiVersion: networking.k8s.io/v1beta1
kind: Ingress
metadata:
  name: kubernetes-dashboard-ingress
  namespace: kubernetes-dashboard
  annotations:
    kubernetes.io/ingress.class: "nginx"
    nginx.ingress.kubernetes.io/use-regex: "true"
    nginx.ingress.kubernetes.io/ssl-passthrough: "true"
    nginx.ingress.kubernetes.io/rewrite-target: /
    nginx.ingress.kubernetes.io/ssl-redirect: "true"
    #nginx.ingress.kubernetes.io/secure-backends: "true"
    nginx.ingress.kubernetes.io/backend-protocol: "HTTPS"
    nginx.ingress.kubernetes.io/proxy-connect-timeout: "600"
    nginx.ingress.kubernetes.io/proxy-read-timeout: "600"
    nginx.ingress.kubernetes.io/proxy-send-timeout: "600"
    nginx.ingress.kubernetes.io/configuration-snippet: |
      proxy_ssl_session_reuse off;
spec:
  rules:
  - host: k8s.odocker.com
    http:
      paths:
      - path: /
        backend:
          serviceName: kubernetes-dashboard
          servicePort: 443
  tls:
  - hosts:
    - k8s.odocker.com
    secretName: kubernetes-dashboard-tls
[root@master01 dashboard]# kubectl apply -f dashboard-ingress.yaml
[root@master01 dashboard]# kubectl -n kubernetes-dashboard get ingress

Visit Dashboard
Import certificate
K8s odocker.com Import browser, set to trust, import operation is omitted.
Create kubeconfig file
Using token is relatively complex. You can add token to the kubeconfig file and use the kubeconfig file to access the dashboard.
[root@master01 dashboard]# ADMIN_SECRET=$(kubectl -n kubernetes-dashboard get secret | grep admin-user | awk '{print $1}')
[root@master01 dashboard]# DASHBOARD_LOGIN_TOKEN=$(kubectl describe secret -n kubernetes-dashboard ${ADMIN_SECRET} | grep -E '^token' | awk '{print $2}')
[root@master01 dashboard]# kubectl config set-cluster kubernetes \
  --certificate-authority=/etc/kubernetes/pki/ca.crt \
  --embed-certs=true \
  --server=172.24.8.100:16443 \
  --kubeconfig=local-hakek8s-dashboard-admin.kubeconfig								# Set cluster parameters
[root@master01 dashboard]# kubectl config set-credentials dashboard_user \
  --token=${DASHBOARD_LOGIN_TOKEN} \
  --kubeconfig=local-hakek8s-dashboard-admin.kubeconfig								# Set the client authentication parameters and use the Token created above
[root@master01 dashboard]# kubectl config set-context default \
  --cluster=kubernetes \
  --user=dashboard_user \
  --kubeconfig=local-hakek8s-dashboard-admin.kubeconfig								# Set context parameters
[root@master01 dashboard]# kubectl config use-context default --kubeconfig=local-hakek8s-dashboard-admin.kubeconfig			# Set default context
Test access Dashboard
In this experiment, the domain name exposed by ingress was used: https://k8s.odocker.com Mode access.
Using local-hakek8s-dashboard-admin.kubeconfig File access: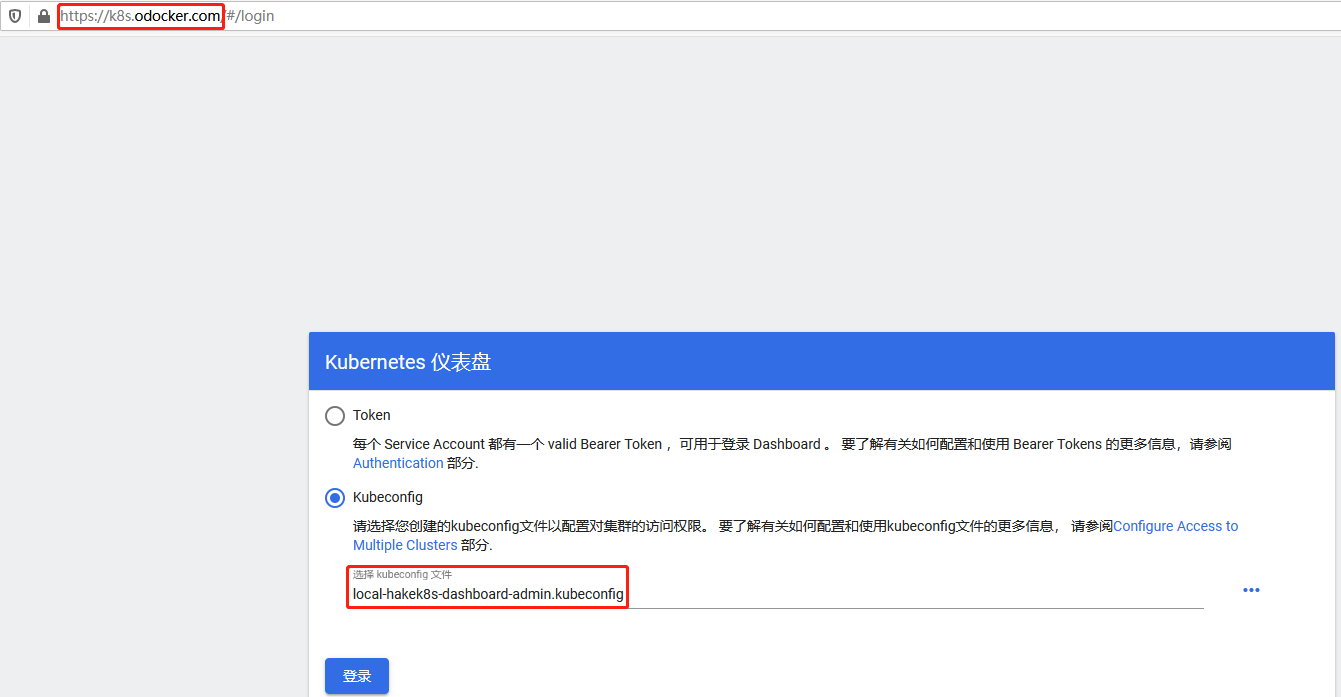
Note: for more access methods and authentication of dashboard, please refer to< Attachment 004. Introduction and use of kubernetes dashboard>.
For the whole process of dashboard login, please refer to: https://www.cnadn.net/post/2613.html
Longhorn storage deployment
Longhorn overview
Longhorn is an open source distributed block storage system for Kubernetes.
Tip: for more information, please refer to: https://github.com/longhorn/longhorn.
Longhorn deployment
[root@master01 ~]# source environment.sh
[root@master01 ~]# for all_ip in ${ALL_IPS[@]}
  do
    echo ">>> ${all_ip}"
    ssh root@${all_ip} "yum -y install iscsi-initiator-utils &"
  done
Tip: all nodes need to be installed.
[root@master01 ~]# mkdir longhorn
[root@master01 ~]# cd longhorn/
[root@master01 longhorn]# wget \
https://raw.githubusercontent.com/longhorn/longhorn/master/deploy/longhorn.yaml
[root@master01 longhorn]# vi longhorn.yaml
#......
---
kind: Service
apiVersion: v1
metadata:
  labels:
    app: longhorn-ui
  name: longhorn-frontend
  namespace: longhorn-system
spec:
  type: NodePort			#Change to nodeport
  selector:
    app: longhorn-ui
  ports:
  - port: 80
    targetPort: 8000
    nodePort: 30002
---
......
kind: DaemonSet
......
        imagePullPolicy: IfNotPresent
......
#......
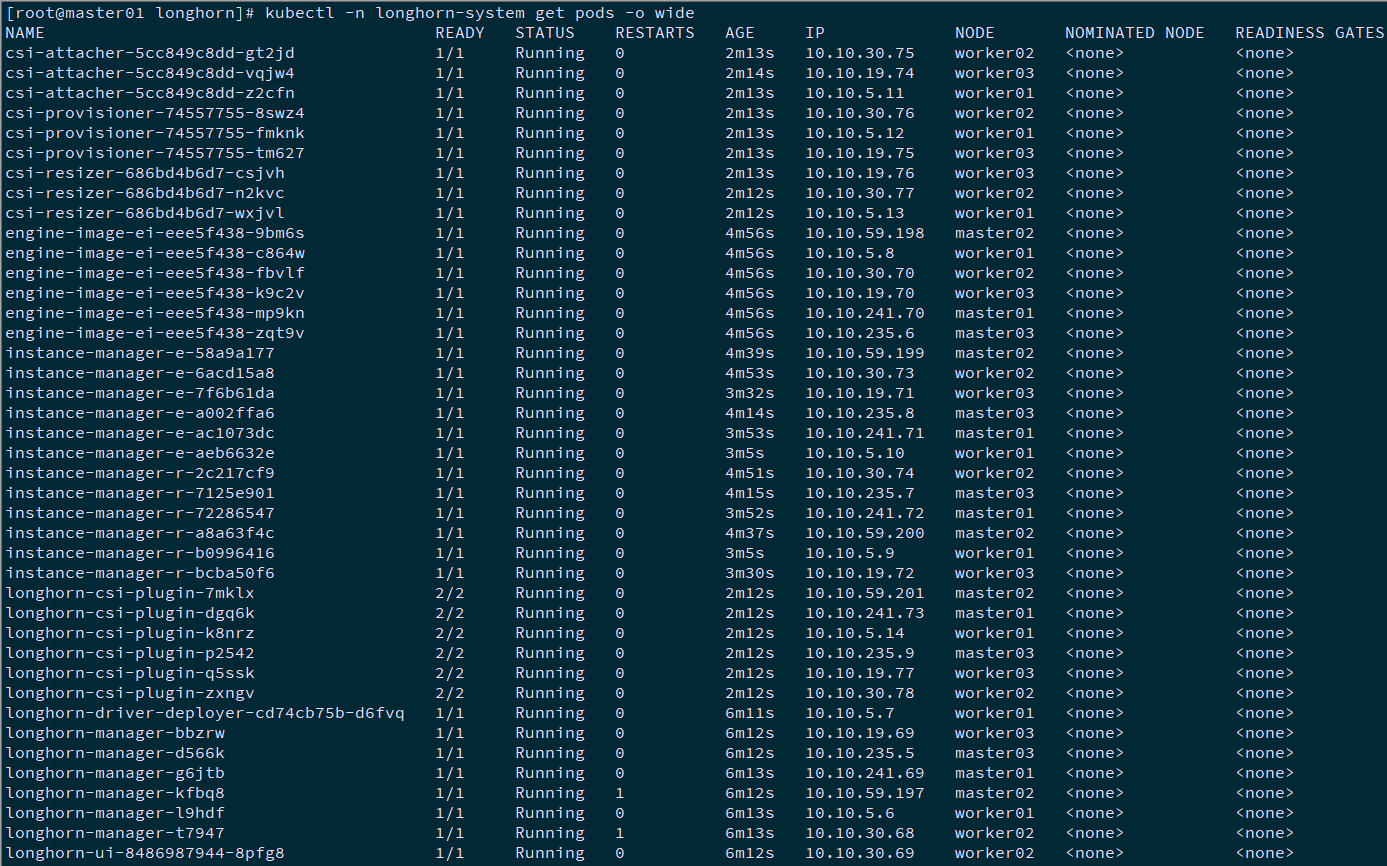
[root@master01 longhorn]# kubectl apply -f longhorn.yaml
[root@master01 longhorn]# kubectl -n longhorn-system get pods -o wide
Tip: if the deployment is abnormal, it can be deleted and rebuilt. If the namespace cannot be deleted, it can be deleted through the following operations:
wget https://github.com/longhorn/longhorn/blob/master/uninstall/uninstall.yaml
rm -rf /var/lib/longhorn/
kubectl apply -f uninstall.yaml
kubectl delete -f longhorn.yaml
Dynamic sc creation
Tip: a sc has been created after the default longhorn deployment, or you can manually write yaml to create it as follows.
[root@master01 longhorn]# kubectl get sc
NAME                   PROVISIONER             RECLAIMPOLICY   VOLUMEBINDINGMODE      ALLOWVOLUMEEXPANSION   AGE
......
longhorn               driver.longhorn.io      Delete          Immediate              true                   15m
[root@master01 longhorn]# vi longhornsc.yaml
kind: StorageClass
apiVersion: storage.k8s.io/v1
metadata:
  name: longhornsc
provisioner: rancher.io/longhorn
parameters:
  numberOfReplicas: "3"
  staleReplicaTimeout: "30"
  fromBackup: ""
[root@master01 longhorn]# kubectl create -f longhornsc.yaml
Test PV and PVC
[root@master01 longhorn]# vi longhornpod.yaml
apiVersion: v1
kind: PersistentVolumeClaim
metadata:
  name: longhorn-pvc
spec:
  accessModes:
    - ReadWriteOnce
  storageClassName: longhorn
  resources:
    requests:
      storage: 2Gi
---
apiVersion: v1
kind: Pod
metadata:
  name: longhorn-pod
  namespace: default
spec:
  containers:
  - name: volume-test
    image: nginx:stable-alpine
    imagePullPolicy: IfNotPresent
    volumeMounts:
    - name: volv
      mountPath: /data
    ports:
    - containerPort: 80
  volumes:
  - name: volv
    persistentVolumeClaim:
      claimName: longhorn-pvc
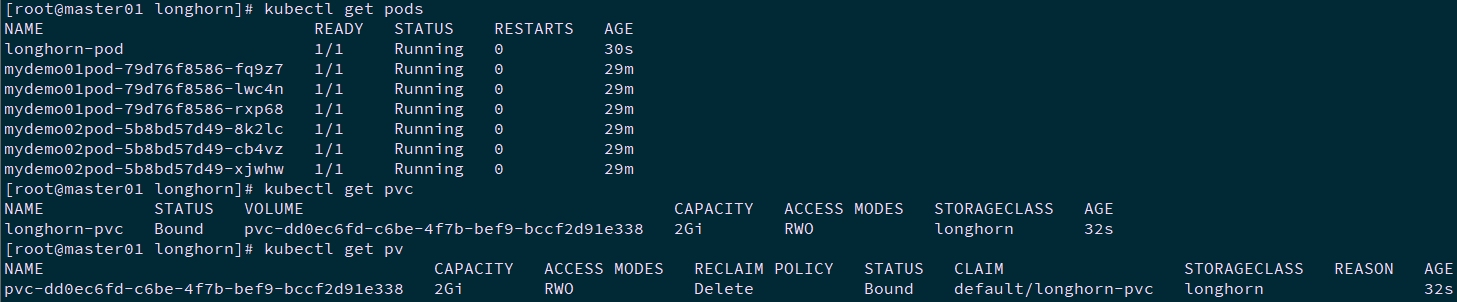
[root@master01 longhorn]# kubectl apply -f longhornpod.yaml
[root@master01 longhorn]# kubectl get pods
[root@master01 longhorn]# kubectl get pvc
[root@master01 longhorn]# kubectl get pv
Ingress exposes Longhorn
[root@master01 longhorn]# yum -y install httpd-tools
[root@master01 longhorn]# htpasswd -c auth xhy								#Create user name and password
Tip: you can also create it with the following command:
USER=xhy; PASSWORD=x120952576; echo "${USER}:$(openssl passwd -stdin -apr1 <<< ${PASSWORD})" >> auth
[root@master01 longhorn]# kubectl -n longhorn-system create secret generic longhorn-basic-auth --from-file=auth
[ root@master01 longhorn]# vi longhorn- ingress.yaml #Creating an ingress rule
apiVersion: networking.k8s.io/v1beta1
kind: Ingress
metadata:
  name: longhorn-ingress
  namespace: longhorn-system
  annotations:
    nginx.ingress.kubernetes.io/auth-type: basic
    nginx.ingress.kubernetes.io/auth-secret: longhorn-basic-auth
    nginx.ingress.kubernetes.io/auth-realm: 'Authentication Required '
spec:
  rules:
  - host: longhorn.odocker.com
    http:
      paths:
      - path: /
        backend:
          serviceName: longhorn-frontend
          servicePort: 80
[root@master01 longhorn]# kubectl apply -f longhorn-ingress.yaml
Validation
Browser access: longhorn.odocker.com , and enter the account number and password.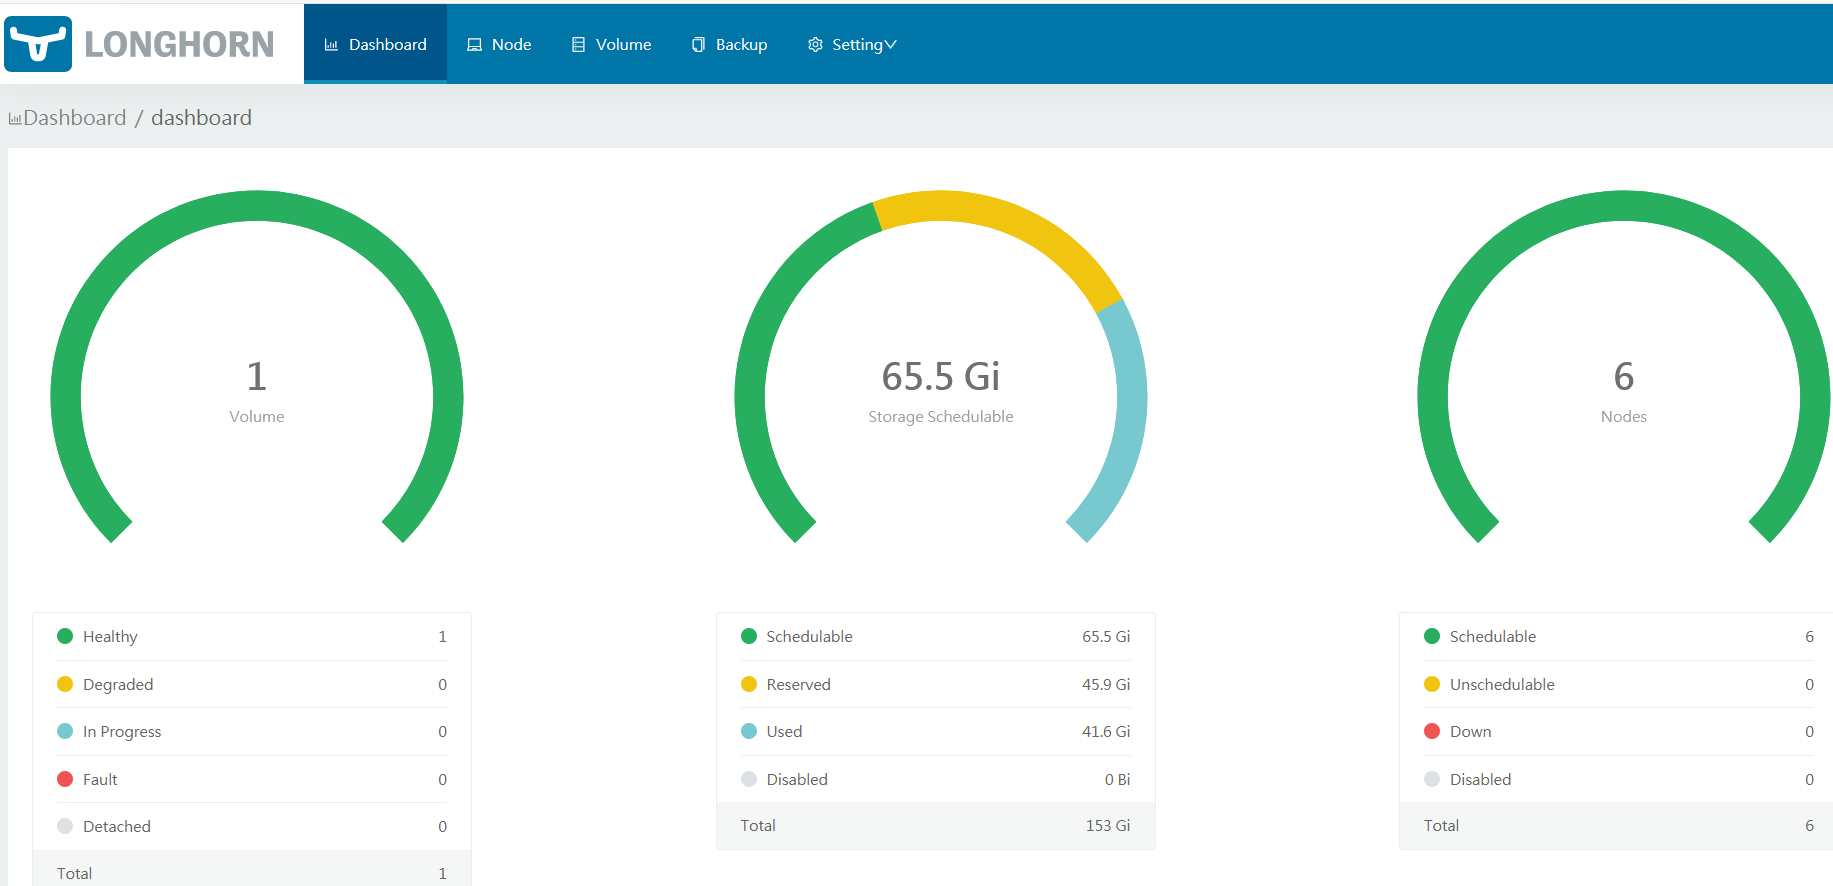
Helm installation
reference resources 053. Cluster management - Helm tool.