Recommended for the same series:
- Jenkins management tool details
- Detailed explanation of Pipeline pipeline Pipeline syntax
- Introduction to Docker container
- Pipeline integration Docker container
- Secondary shallow encapsulation of microservice components
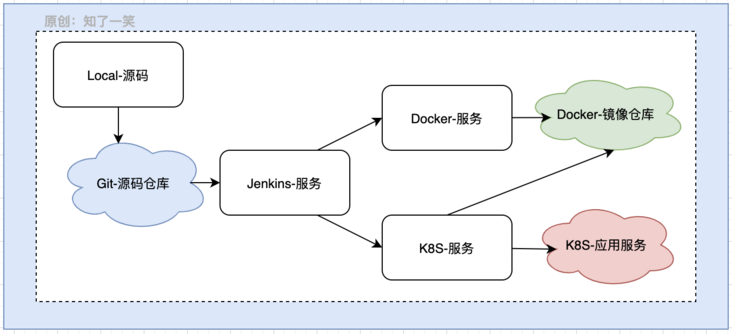
This series of articles focuses on continuous integration: Jenkins+Docker+K8S related components to realize automatic management of source code compilation, packaging, image construction, deployment and other operations; This article mainly describes the usage of Kubernetes engine.
1, Basic introduction
Kubernetes, referred to as K8S, is an open-source distributed container orchestration engine, which is used to automatically deploy and manage container applications.
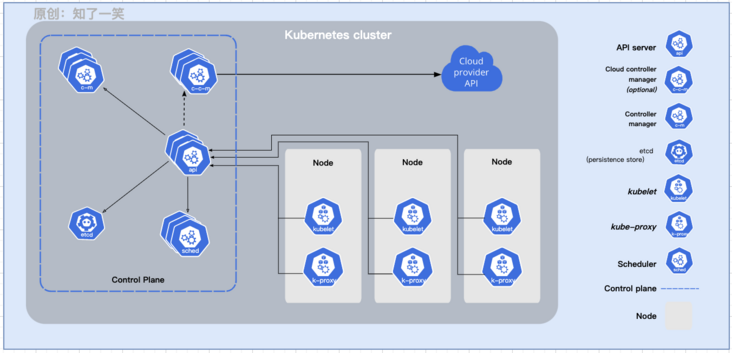
Control plane components: control plane components, which make global decisions on the cluster, such as scheduling, detection and event response, and can run on any node in the cluster;
- API: as a component of K8S control surface, open the API of K8S, which is equivalent to the front end of the control surface;
- etcd: a key value database with consistency and high availability, which is used as the background library for storing K8S data;
- scheduler: listens to newly created Pods that do not specify an operation node, and selects an operation node for the Pod;
- Controller Manager: runs the controller process, which is logically a separate process;
Node: node component: run on each node, maintain the running Pod and provide Kubernetes running environment;
- kubelet: the agent running on each node to ensure that the container runs in the Pod;
- Kube proxy: the network proxy running on each node to maintain the network rules on the node;
Container Runtime: when the container is running, the software responsible for running the container supports multiple container running environments such as Docker, containerd and CRI-O, as well as any interface that implements kubernetes CRI container running environment.
2, Environment configuration
1. Service Building
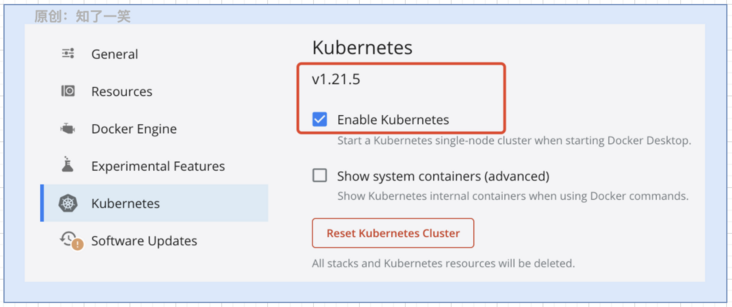
Use Git to pull k8s docker desktop for Mac warehouse and execute load_images.sh script will pull the k8s version corresponding to the local docker. Note that you have to wait until the script process is completed. It may take a long time because of Git connection. The following is the image pulled by the script:
docker images
REPOSITORY                           TAG
docker/desktop-kubernetes            kubernetes-v1.21.5-cni-v0.8.5-critools-v1.17.0-debian
k8s.gcr.io/kube-apiserver            v1.21.5
k8s.gcr.io/kube-proxy                v1.21.5
k8s.gcr.io/kube-controller-manager   v1.21.5
k8s.gcr.io/kube-scheduler            v1.21.5
docker/desktop-vpnkit-controller     v2.0
docker/desktop-storage-provisioner   v2.0
k8s.gcr.io/pause                     3.4.1
k8s.gcr.io/coredns/coredns           v1.8.0
k8s.gcr.io/etcd                      3.4.13-0
After downloading the above image, you can start k8s through docker desktop software. The startup time here is relatively long. After successful startup, k8s in the lower left corner of the interface displays green status:
2. Environment view
# View version: kubectl version
Client Version GitVersion:v1.21.5
Server Version GitVersion:v1.21.5

# View cluster: kubectl cluster info
Kubernetes control plane is running at local-host:6443

# View node: kubectl get nodes
NAME             STATUS   ROLES                  AGE   VERSION
docker-desktop   Ready    control-plane,master   23h   v1.21.5
3, Deploy Docker image
1. Core components
Before implementing Docker image deployment, first understand several core concepts in the process:
- Pod: the smallest deployable computing unit that can be created and managed in Kubernetes; In terms of the Docker concept, pod is similar to a group of Docker containers that share namespaces and file system volumes;
- ReplicaSet: the purpose is to maintain a stable set of Pod replicas that are running at any time; It is usually used to ensure the availability of a certain number of identical pods;
- Deployment: provides declarative update capability for Pods and ReplicaSets. You can define deployment to create a new ReplicaSet or delete an existing deployment;
- Service: the application running on a group of Pods is exposed as a network service in an abstract way. In K8S, Pods collection and access policy are logically. This mode is called micro service;
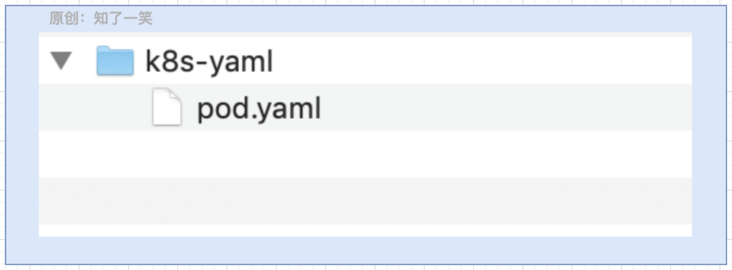
2. Script file
Deployment and Service are put together here yaml file; Image loading setting imagePullPolicy:Never, i.e. local read; The Service discovery adopts NodePort type, and no specific port is set. The control plane will assign a port number in the default range;
---
apiVersion: apps/v1
kind: Deployment
metadata:
  name: cloud-app-deployment
  labels:
    app: cloud-app
spec:
  selector:
    matchLabels:
      app: cloud-app
  template:
    metadata:
      labels:
        app: cloud-app
    spec:
      containers:
      - name: cloud-app
        image: Cloud_Url/cicada-image/cloud-app
        imagePullPolicy: Never
        ports:
        - containerPort: 8079
---
apiVersion: v1
kind: Service
metadata:
  name: cloud-app-service
  labels:
    app: cloud-app
spec:
  type: NodePort
  ports:
    - port: 8080
      targetPort: 8079
  selector:
    app: cloud-app
3. Resource Management
Create resource
kubectl create -f pod.yaml
View resources
# 1. View Pod information
kubectl get pods -o wide

# 2. View Service information
kubectl get svc -o wide

# 3. View Node information
kubectl get nodes -o wide
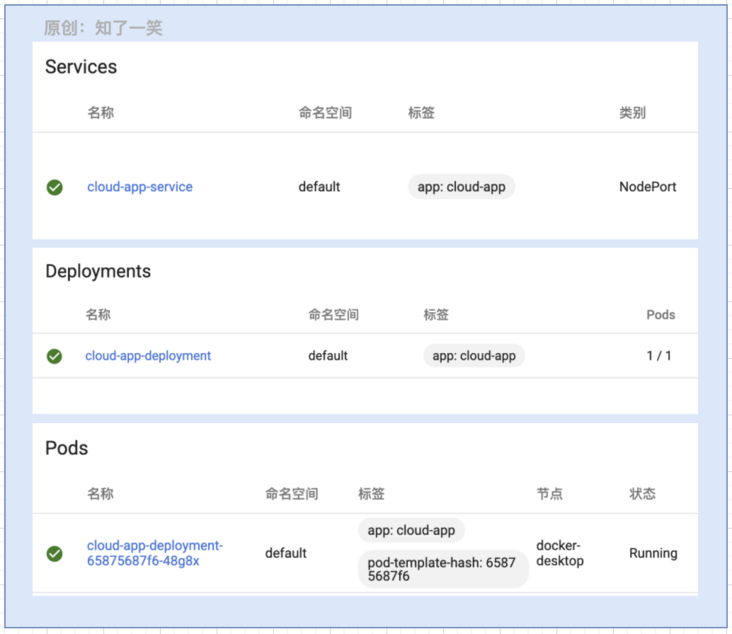
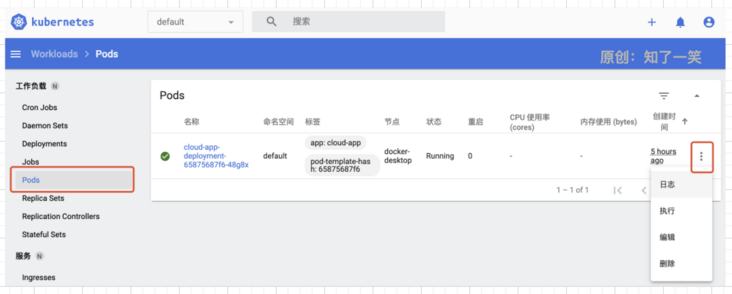
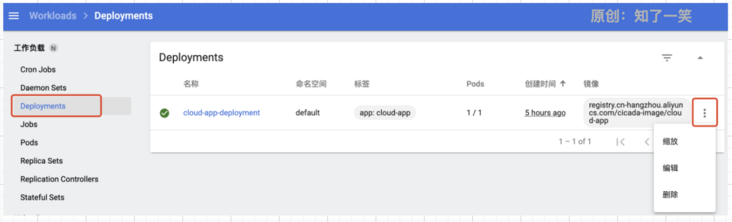
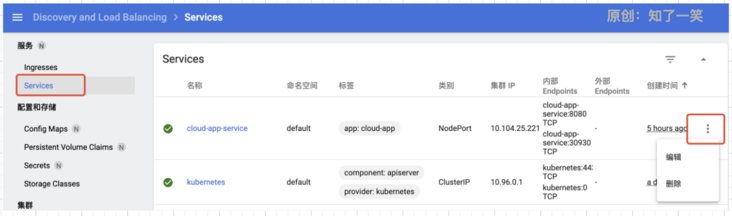
You can also view the visual interface of resources on the K8S Web console. The following screenshots show the resource information explicitly declared in several scripts:
Delete resource
# 1. Delete by file
kubectl delete -f pod.yaml

# 2. Delete by specific resource name
kubectl delete pod cloud-app
4. Access resources
# View a detailed description of the service
kubectl describe svc cloud-app-service
Name:                     cloud-app-service
NodePort:                 <unset>  30930/TCP
Endpoints:                Pod_IP:Pod_port
Here, the NodePort port is assigned 30930 by default. When the external access traffic reaches the Service, it will be routed to the specified Endpoints. From the above resource view, we can see that the Endpoints here are the IP and port of the Pod;
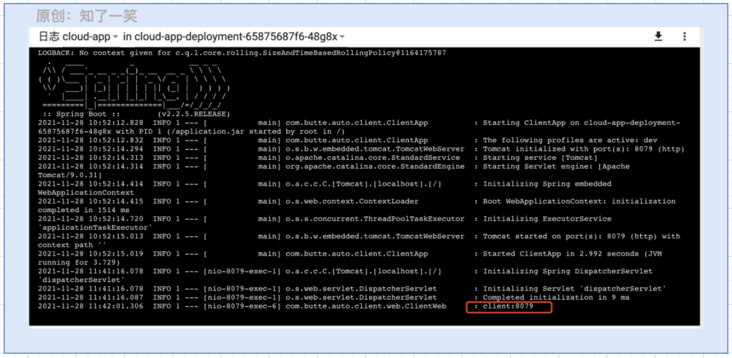
Access the application in the docker container through: native IP: assign port / API, that is, localhost:30930/client. You can also view the specific log output in the Pod module of the Web interface:
4, Console components
Dashboard is a Web-based Kubernetes user interface. You can use dashboard to deploy container applications to Kubernetes clusters, troubleshoot container applications, manage cluster resources, view logs, etc.
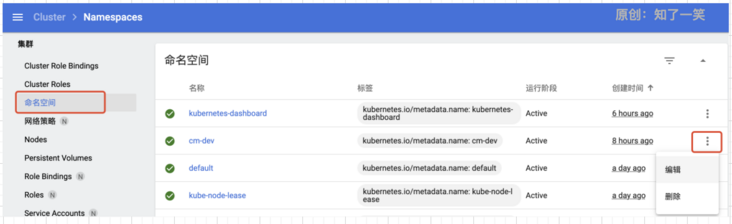
1. Create namespace
kubectl create namespace cm-dev
View namespace
2. View Pod
3. View Deployment
4. View Service
5, Source code address
GitEE·address
https://gitee.com/cicadasmile/butte-auto-parent
Wiki·address
https://gitee.com/cicadasmile/butte-java-note