1. Overview
azkaban: https://azkaban.github.io/
1.1. Why Workflow Scheduling System is Needed
A complete data analysis system usually consists of a large number of task units:
shell script program, java program, mapreduce program, hive script, etc.
Time-dependent and time-dependent relationships exist among task units
In order to organize such complex execution plans well, a workflow scheduling system is needed to schedule execution.
For example, we might have a requirement that a business system produce 20G raw data every day, which we process every day, as follows:
1) Synchronize raw data to HDFS through Hadoop first;
2. Transform the original data with the MapReduce computing framework, and store the generated data in partitioned tables in Hive tables.
3. Multiple tables in Hive need to be JOIN processed to get a large Hive table with detailed data.
4. Various statistical analyses will be performed on the detailed data to get the result report information.
5. Result data from statistical analysis need to be synchronized to the business system for use by business calls.
1.2. Workflow Scheduling Implementation
Simple task scheduling: directly using linux's crontab to define;
Complex task scheduling: develop a scheduling platform or use existing open source scheduling systems such as ooize, azkaban, airflow, etc.
1.3. Common workflow scheduling systems
There are many workflow schedulers on the market
In the hadoop domain, common workflow schedulers are Oozie, Azkaban,Cascading,Hamake, etc.
1.4. Characteristic comparison of various dispatching tools
The following table compares the key features of the four hadoop workflow schedulers listed above. Although these workflow schedulers are able to address essentially the same requirement scenarios, there are significant differences in design concepts, target users, application scenarios, and so on. They can be used as reference when making technical choices.
|
Characteristic |
Hamake |
Oozie |
Azkaban |
Cascading |
|
Workflow Description Language |
XML |
XML (xPDL based) |
text file with key/value pairs |
Java API |
|
Dependency Mechanism |
data-driven |
explicit |
explicit |
explicit |
|
Do you want a web container |
No |
Yes |
Yes |
No |
|
Progress tracking |
console/log messages |
web page |
web page |
Java API |
|
Hadoop job Scheduling Support |
no |
yes |
yes |
yes |
|
Running mode |
command line utility |
daemon |
daemon |
API |
|
Pig support |
yes |
yes |
yes |
yes |
|
Event Notification |
no |
no |
no |
yes |
|
Installation required |
no |
yes |
yes |
no |
|
Supported hadoop versions |
0.18+ |
0.20+ |
currently unknown |
0.18+ |
|
Retry Support |
no |
workflownode evel |
yes |
yes |
|
Run any command |
yes |
yes |
yes |
yes |
|
Amazon EMR support |
yes |
no |
currently unknown |
yes |
1.5, Azkaban vs. Oozie
For the two most popular schedulers on the market, the following detailed comparison is given for reference of technical selection.Overall, ooize is a heavyweight task scheduling system, full-featured, but more complex to configure and use than azkaban.A lightweight dispatcher, azkaban, is a good candidate if you can ignore the loss of some functionality.
function
Both can schedule mapreduce,pig,java, script workflow tasks
Both can perform workflow tasks on a regular basis
Workflow Definition
* Azkaban uses a Properties file to define workflows
Oozie uses XML files to define workflows
Workflow Passage
* Azkaban supports direct parameters such as ${input}
Oozie supports parameters and EL expressions, such as ${fs:dirSize(myInputDir)}
Timed Execution
* Azkaban's scheduled tasks are time based
Oozie's scheduled execution tasks are based on time and input data
resource management
* Azkaban has strict permission controls, such as user read/write/execute operations on Workflows
Oozie does not have strict permission control at this time
Workflow Execution
Azkaban has two modes of operation, solo server mode(executor server and web server deployed on the same node) and multi server mode(executor server and web server can be deployed on different nodes)
Oozie runs as a workflow server, supporting multiple users and workflows
Workflow Management
* Azkaban supports browser and ajax-style workflow
Oozie supports command line, HTTP REST, Java API, browser operation workflow
2. Introduction to Azkaban
Azkaban is a batch workflow task scheduler from Linkedin open source.Used to run a set of work and processes in a specific order within a workflow.
Azkaban defines a KV file (properties) format to establish dependencies between tasks and provides an easy-to-use web user interface to maintain and track your workflow.
It has the following features:
Web User Interface
Convenient upload workflow
Easy to set up relationships between tasks
Schedule workflow
Authentication/Authorization (work with privileges)
Ability to kill and restart workflow
Modular and pluggable plug-in mechanisms
Project Workspace
Logging and auditing of workflows and tasks
3. Azkaban installation and deployment
3.1. Compilation of azkaban
Here we use the azkaban3.51.0 version to recompile and install it with the installation package we need
Note: We need JDK1.8 for compilation here. If the JDK version used by the compilation server is 1.7, remember to switch to jdk1.8, we use jdk8u141 for compilation here
cd /export/softwares/
wget https://github.com/azkaban/azkaban/archive/3.51.0.tar.gz
tar -zxvf 3.51.0.tar.gz -C ../servers/
cd /export/servers/azkaban-3.51.0/
yum -y install git
yum -y install gcc-c++
./gradlew build installDist -x test
The list of installation files required after compilation is as follows
azkaban-exec-server
The installation package we need is available after compilation in the following directory
azkaban-exec-server storage directory
/export/servers/azkaban-3.51.0/azkaban-exec-server/build/distributions

azkaban-web-server
azkaban-web-server storage directory
/export/servers/azkaban-3.51.0/azkaban-web-server/build/distributions

azkaban-solo-server
azkaban-solo-server storage directory
/export/servers/azkaban-3.51.0/azkaban-solo-server/build/distributions

execute-as-user.c
The C program needed in azkaban two server mode is under this path
/export/servers/azkaban-3.51.0/az-exec-util/src/main/c

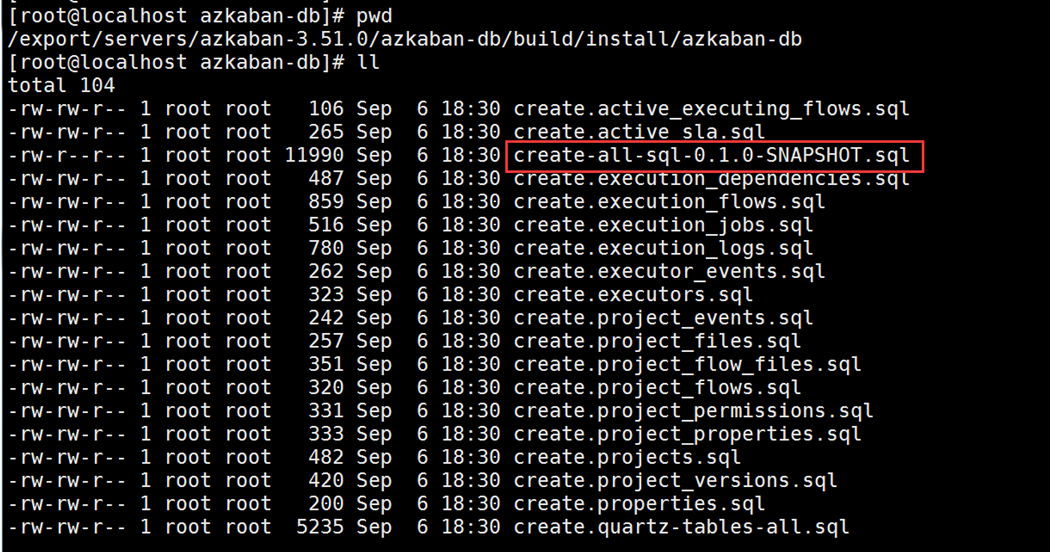
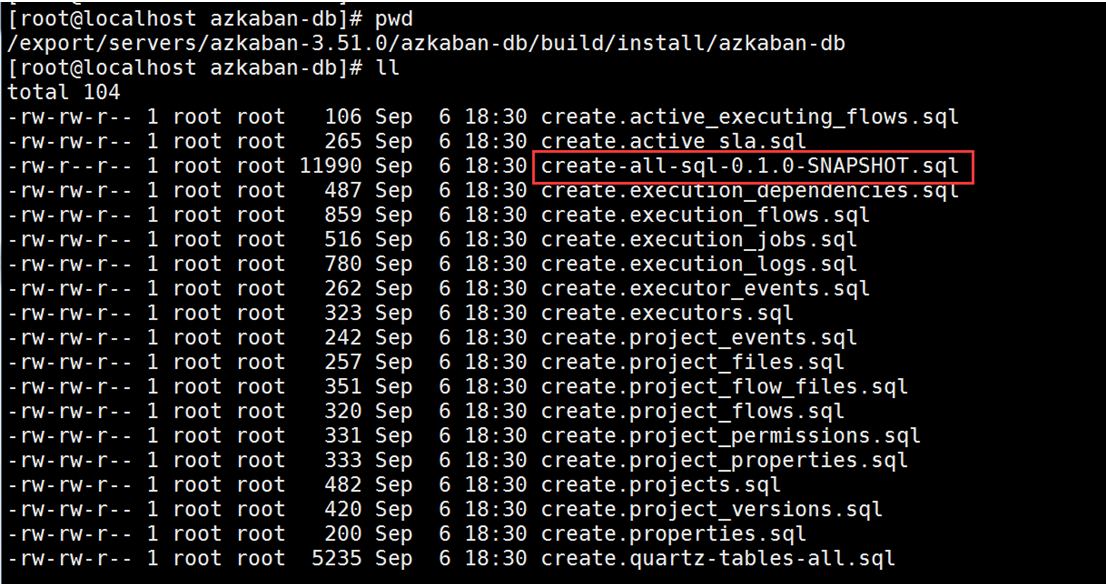
Database script file
Database script files under this path
/export/servers/azkaban-3.51.0/azkaban-db/build/install/azkaban-db
3.2. Installation and use of azkaban single service mode
Required Software
azkaban-solo-server
Single Service Mode Installation
Step 1: Unzip
Azkaban's solo server uses a single-node mode to start the service. It only needs an azkaban-solo-server-0.1.0-SNAPSHOT.tar.gz installation package to start. All the data information is saved in H2, the default data of azkaban, upload our compressed package, and then modify the configuration file to startMove it
cd /export/softwares
tar -zxvf azkaban-solo-server-0.1.0-SNAPSHOT.tar.gz -C ../servers/
Step 2: Modify both profiles
Modify time zone profile
cd /export/servers/azkaban-solo-server-0.1.0-SNAPSHOT/conf
vim azkaban.properties


default.timezone.id=Asia/Shanghai
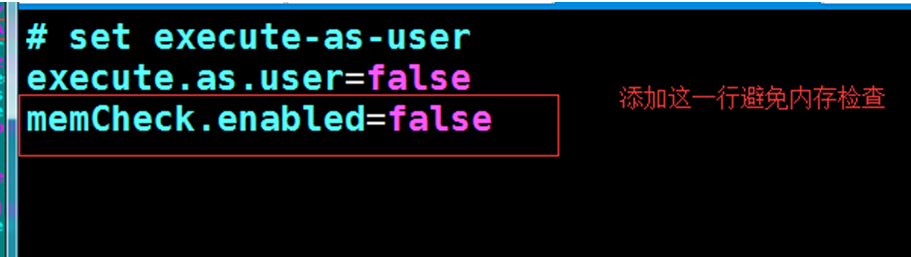
modify commonprivate.properties configuration file
cd /export/servers/azkaban-solo-server-0.1.0-SNAPSHOT/plugins/jobtypes
vim commonprivate.properties


execute.as.user=false
memCheck.enabled=false
Step 3: Start solo-server
start-up azkaban-solo-server
cd  /export/servers/azkaban-solo-server-0.1.0-SNAPSHOT
bin/start-solo.sh
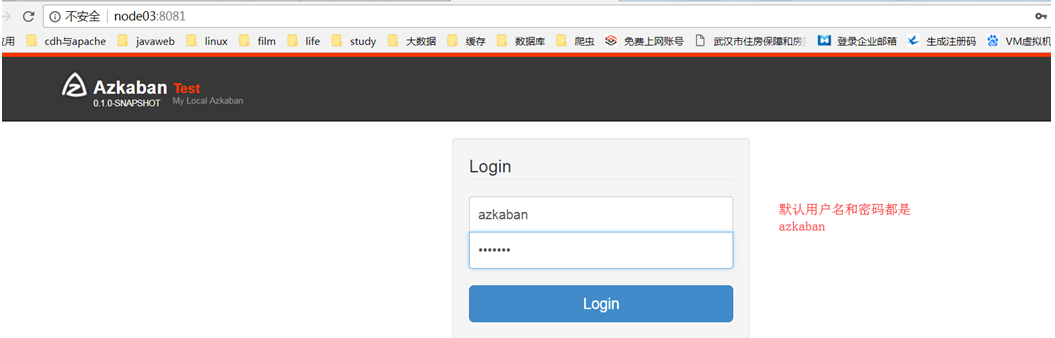
Step 4: Browser Page Access
Browser Page Access http://node03:8081/
Single Service Mode Usage
Requirements: Use azkaban to schedule our shell scripts and execute shell commands for linux
Create a plain text file foo.job with the following contents


type=command
command=echo "hello world"
Then pack the file as a compressed file, as follows:
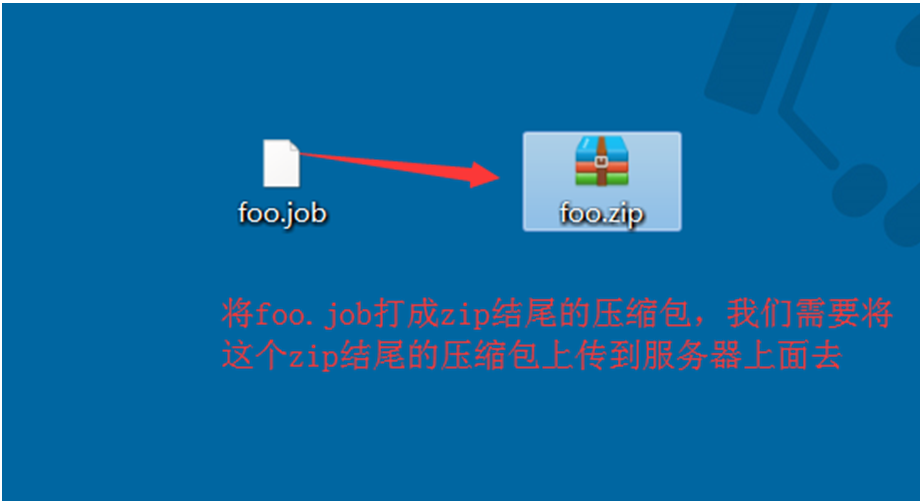
azkaban uploads our compressed package

3.3, azkaban two service mode installation
1. Confirm the required software:
Azkaban Web Service Installation Package
azkaban-web-server-0.1.0-SNAPSHOT.tar.gz
 Azkaban Execution Service Installation Package
azkaban-exec-server-0.1.0-SNAPSHOT.tar.gz

Compiled sql script
create-all-sql-0.1.0-SNAPSHOT.sql
C Program File Script
execute-as-user.c program
2. Database preparation
Get into mysql Clients execute the following commands

mysql  -uroot -p

//Execute the following commands:
CREATE DATABASE azkaban;
CREATE USER 'azkaban'@'%' IDENTIFIED BY 'azkaban';
GRANT all privileges ON azkaban.* to 'azkaban'@'%' identified by 'azkaban' WITH GRANT OPTION;
flush privileges;
use azkaban;
source /export/softwares/create-all-sql-0.1.0-SNAPSHOT.sql;

3. Unzip the installation package
decompression azkaban-web-server
cd /export/softwares
tar -zxvf azkaban-web-server-0.1.0-SNAPSHOT.tar.gz -C ../servers/
cd /export/servers
mv azkaban-web-server-0.1.0-SNAPSHOT/ azkaban-web-server-3.51.0

//Unzip azkaban-exec-server
cd /export/softwares
tar -zxvf azkaban-exec-server-0.1.0-SNAPSHOT.tar.gz -C ../servers/
cd /export/servers
mv azkaban-exec-server-0.1.0-SNAPSHOT/ azkaban-exec-server-3.51.0
4. Install SSL Security Authentication
Install ssl security certification to allow access to our azkaban web services using https
 Passwords must be entered letter by letter, or pasted


cd /export/servers/azkaban-web-server-3.51.0
keytool -keystore keystore -alias jetty -genkey -keyalg RSA
5. azkaban web server installation
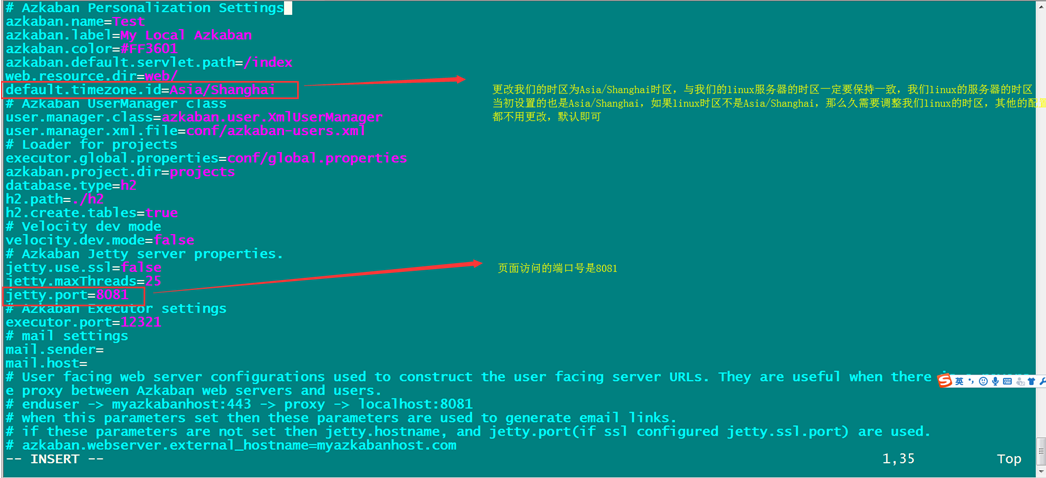
modify azkaban-web-server Profile
cd /export/servers/azkaban-web-server-3.51.0/conf
vim azkaban.properties


# Azkaban Personalization Settings
azkaban.name=Azkaban
azkaban.label=My Azkaban
azkaban.color=#FF3601
azkaban.default.servlet.path=/index
web.resource.dir=web/
default.timezone.id=Asia/Shanghai
# Azkaban UserManager class
user.manager.class=azkaban.user.XmlUserManager
user.manager.xml.file=conf/azkaban-users.xml
# Loader for projects
executor.global.properties=conf/global.properties
azkaban.project.dir=projects
# Velocity dev mode
velocity.dev.mode=false
# Azkaban Jetty server properties.
jetty.use.ssl=true
jetty.maxThreads=25
jetty.port=8081


jetty.ssl.port=8443
jetty.keystore=/export/servers/azkaban-web-server-3.51.0/keystore
jetty.password=azkaban
jetty.keypassword=azkaban
jetty.truststore=/export/servers/azkaban-web-server-3.51.0/keystore
jetty.trustpassword=azkaban


# Azkaban Executor settings
# mail settings
mail.sender=
mail.host=
# User facing web server configurations used to construct the user facing server URLs. They are useful when there is a reverse proxy between Azkaban web servers and users.
# enduser -> myazkabanhost:443 -> proxy -> localhost:8081
# when this parameters set then these parameters are used to generate email links.
# if these parameters are not set then jetty.hostname, and jetty.port(if ssl configured jetty.ssl.port) are used.
# azkaban.webserver.external_hostname=myazkabanhost.com
# azkaban.webserver.external_ssl_port=443
# azkaban.webserver.external_port=8081
job.failure.email=
job.success.email=
lockdown.create.projects=false
cache.directory=cache
# JMX stats
jetty.connector.stats=true
executor.connector.stats=true
# Azkaban mysql settings by default. Users should configure their own username and password.
database.type=mysql
mysql.port=3306
mysql.host=node03
mysql.database=azkaban
mysql.user=azkaban
mysql.password=azkaban
mysql.numconnections=100
#Multiple Executor
azkaban.use.multiple.executors=true
#azkaban.executorselector.filters=StaticRemainingFlowSize,MinimumFreeMemory,CpuStatus
azkaban.executorselector.comparator.NumberOfAssignedFlowComparator=1
azkaban.executorselector.comparator.Memory=1
azkaban.executorselector.comparator.LastDispatched=1
azkaban.executorselector.comparator.CpuUsage=1


azkaban.activeexecutor.refresh.milisecinterval=10000
azkaban.queueprocessing.enabled=true
azkaban.activeexecutor.refresh.flowinterval=10
azkaban.executorinfo.refresh.maxThreads=10
6. azkaban executor server installation
Step 1: Modify the azkaban-exex-server configuration file
modify azkaban-exec-server Profile
cd /export/servers/azkaban-exec-server-3.51.0/conf
vim azkaban.properties

# Azkaban Personalization Settings
azkaban.name=Azkaban
azkaban.label=My Azkaban
azkaban.color=#FF3601
azkaban.default.servlet.path=/index
web.resource.dir=web/
default.timezone.id=Asia/Shanghai
# Azkaban UserManager class
user.manager.class=azkaban.user.XmlUserManager
user.manager.xml.file=conf/azkaban-users.xml
# Loader for projects
executor.global.properties=conf/global.properties
azkaban.project.dir=projects
# Velocity dev mode
velocity.dev.mode=false
# Azkaban Jetty server properties.
jetty.use.ssl=true
jetty.maxThreads=25
jetty.port=8081


jetty.keystore=/export/servers/azkaban-web-server-3.51.0/keystore
jetty.password=azkaban
jetty.keypassword=azkaban
jetty.truststore=/export/servers/azkaban-web-server-3.51.0/keystore
jetty.trustpassword=azkaban


# Where the Azkaban web server is located
azkaban.webserver.url=https://node03:8443
# mail settings
mail.sender=
mail.host=
# User facing web server configurations used to construct the user facing server URLs. They are useful when there is a reverse proxy between Azkaban web servers and users.
# enduser -> myazkabanhost:443 -> proxy -> localhost:8081
# when this parameters set then these parameters are used to generate email links.
# if these parameters are not set then jetty.hostname, and jetty.port(if ssl configured jetty.ssl.port) are used.
# azkaban.webserver.external_hostname=myazkabanhost.com
# azkaban.webserver.external_ssl_port=443
# azkaban.webserver.external_port=8081
job.failure.email=
job.success.email=
lockdown.create.projects=false
cache.directory=cache
# JMX stats
jetty.connector.stats=true
executor.connector.stats=true
# Azkaban plugin settings
azkaban.jobtype.plugin.dir=plugins/jobtypes
# Azkaban mysql settings by default. Users should configure their own username and password.
database.type=mysql
mysql.port=3306
mysql.host=node03
mysql.database=azkaban
mysql.user=azkaban
mysql.password=azkaban
mysql.numconnections=100
# Azkaban Executor settings
executor.maxThreads=50
executor.flow.threads=30
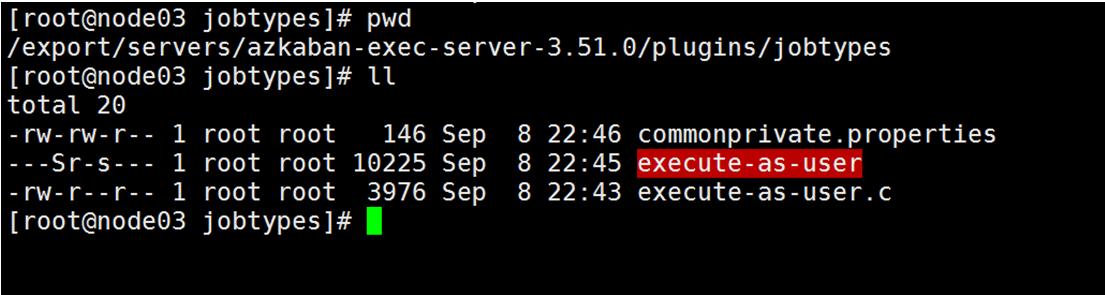
Step 2: Add Plugins
execute-as-user.c
Upload to this directory / export/servers/azkaban-exec-server-3.51.0/plugins/jobtypes
Or just copy us / export/softwares
cp /export/softwares/execute-as-user.c /export/servers/azkaban-exec-server-3.51.0/plugins/jobtypes/


//Then execute-as-user is generated by executing the following command
yum -y install gcc-c++
cd /export/servers/azkaban-exec-server-3.51.0/plugins/jobtypes
gcc execute-as-user.c -o execute-as-user
chown root execute-as-user
chmod 6050 execute-as-user
Step 3: Modify the configuration file
Modify Profile
cd  /export/servers/azkaban-exec-server-3.47.0/plugins/jobtypes
vim commonprivate.properties
execute.as.user=false
memCheck.enabled=false
azkaban.native.lib=/export/servers/azkaban-exec-server-3.51.0/plugins/jobtypes
The final generation is as follows
7. Start Services
Step 1: Start azkaban exec server
cd /export/servers/azkaban-exec-server-3.51.0
bin/start-exec.sh
Step 2: Activate our exec-server
node03 Execute the following commands in any directory of the machine
curl -G "node03:$(<./executor.port)/executor?action=activate" && echo
Step 3: Start azkaban-web-server
cd /export/servers/azkaban-web-server-3.51.0/
bin/start-web.sh
Access address: https://node03:8443
Modifying time zone issues for linux
Because the clock synchronization was done before, you don't have to worry about the time zone, you don't need to modify it.
Note: Configure the time zone on the server node first
-
Generate the time zone profile Asia/Shanghai using the interactive command tzselect
-
Copy the time zone file, overwriting the system's local time zone configuration
cp /usr/share/zoneinfo/Asia/Shanghai /etc/localtime
4. Azkaban Actual Warfare
Azkaba's built-in task types support command, java
Command Type Single job Example
Create job Description File
Create a text file and change the name to mycommand.job
Note that the suffix.txt must not be taken with it and saved as UFT-8 without bom
The contents are as follows
type=command
command=echo 'hello world'
Packaging a job resource file into a zip file
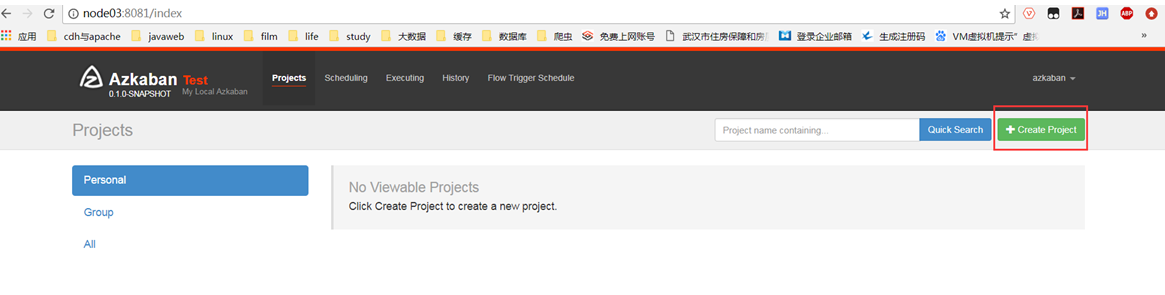
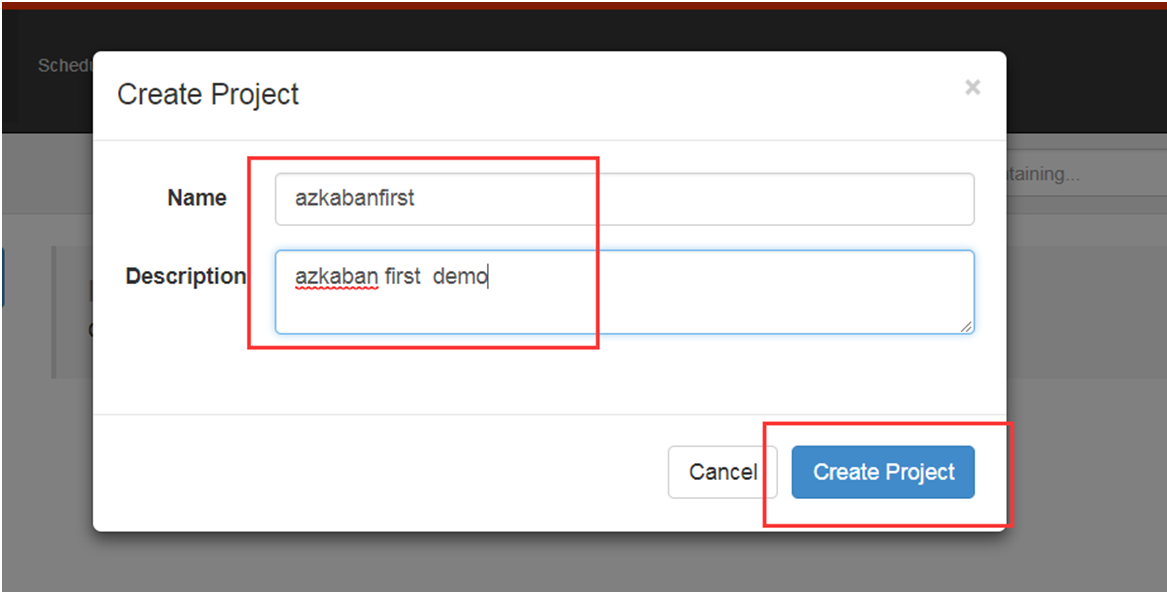
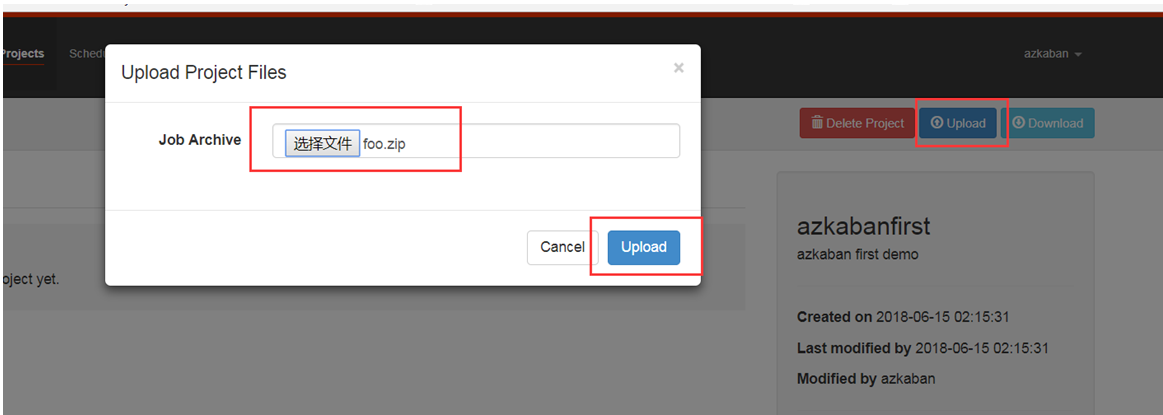
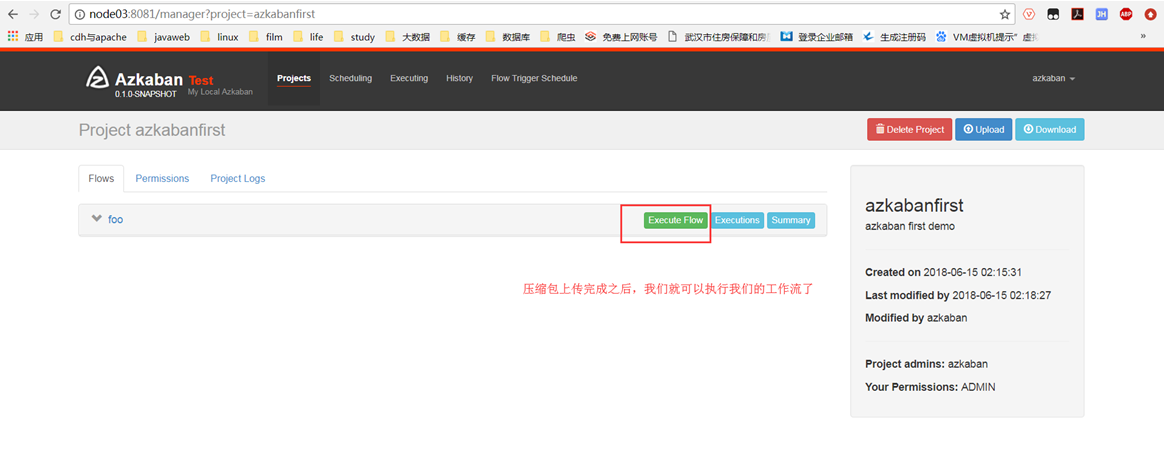
Create a project and upload a compressed package
Create a project and upload a job package through azkaban's web management platform
Create project first
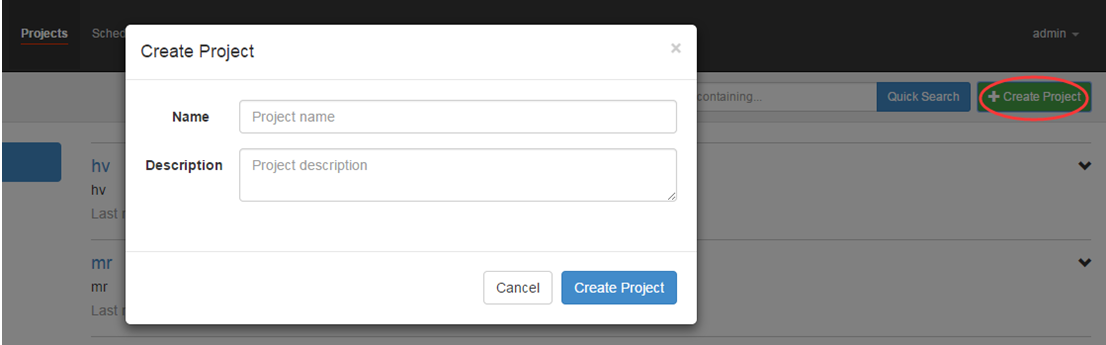
Upload zip package

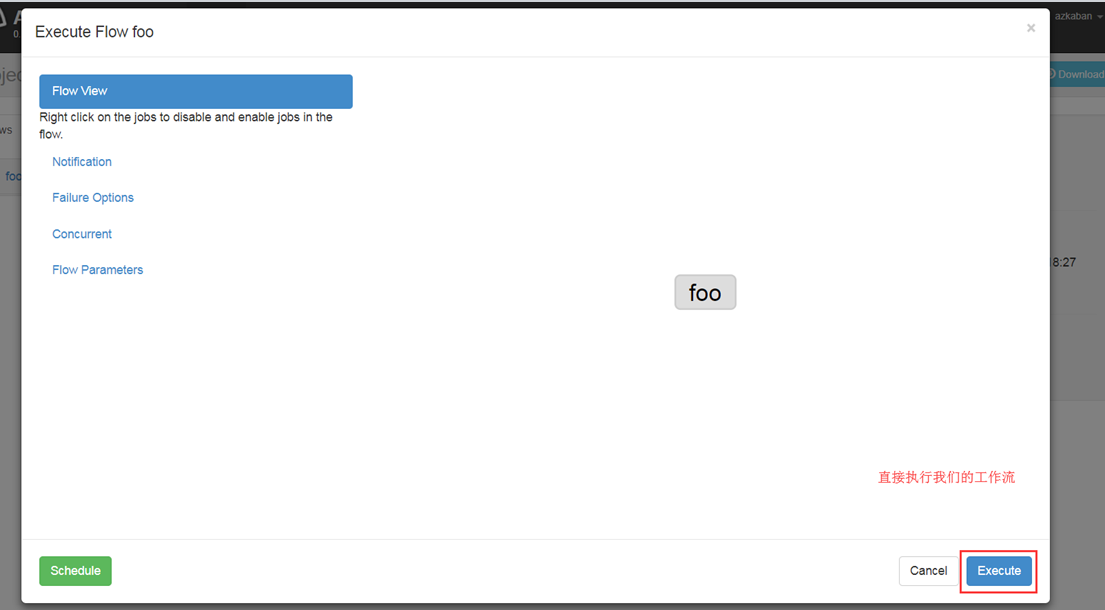
Start execution job

Command Type Multiple job Workflow
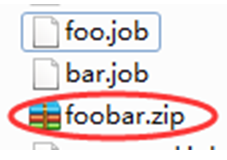
1. Create multiple job descriptions with dependencies
First job: foo.job
type=command
command=echo 'foo'
Second job: bar.job depends on foo.job
type=command
dependencies=foo
command=echo 'bar'
2. Put all job resource files into a zip package
3. Create a project in azkaban's web management interface and upload zip packages
4. Start workflow
HDFS Operational Tasks
-
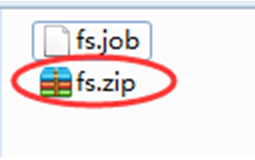
Create a job description file fs.job
type=command
command=/export/servers/hadoop-2.6.0-cdh5.14.0/bin/hadoop fs -mkdir /azkaban
2. Package job resource files into zip files
3. Create project and upload job package through azkaban's web management platform
4. Start executing the job
MAPREDUCE Task
Mr s tasks can still be performed using the job type of command
-
Create a job description file and an mr program jar package (example jar included with hadoop is used directly in the example)
type=command
command=/export/servers/hadoop-2.6.0-cdh5.14.0/bin/hadoop jar hadoop-mapreduce-examples-2.6.0-cdh5.14.0.jar pi 3 5
2. Put all job resource files into a zip package

3. Create a project in azkaban's web management interface and upload zip packages
4. Start job
HIVE script task
Create job description file and hive script
Hive script: hive.sql
create database if not exists azhive;
use azhive;
create table if not exists aztest(id string,name string) row format delimited fields terminated by '\t';
Job Description File: hive.job
type=command
command=/export/servers/hive-1.1.0-cdh5.14.0/bin/hive -f 'hive.sql'
Put all job resource files into a zip package
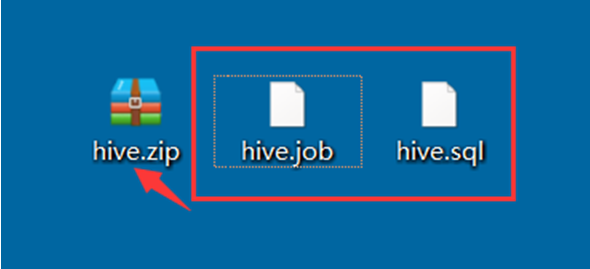
Create a project in azkaban's web management interface and upload a zip package
Start job
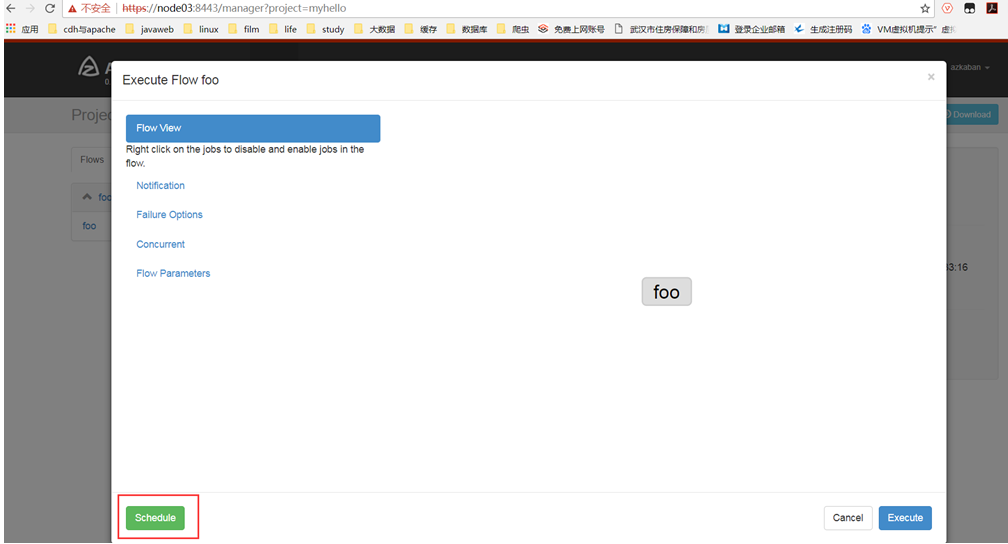
Timed Tasks for azkaban
Using azkaban's scheduler function to schedule our job tasks on a regular basis
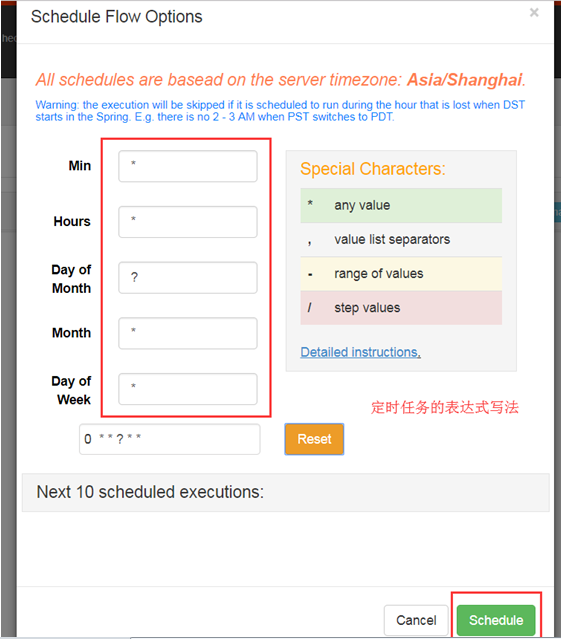
*/1 *?* * Run a scheduled task every minute
 0 1? * * Perform this task at 1 a.m. every night
 0 */2? * * Perform this task regularly every two hours
 30 21? * * Perform this task regularly at 9:30 p.m. every night