In the last two issues, we explained the source code of Axios:
Today, we will implement a simple Axios to implement network requests on the Node side, and support some basic configurations, such as baseURL, url, request method, interceptor, cancel request
This time, all the source codes are placed in here , you can have a look if you are interested.
Axios instance
This time, we will use typescript + node to implement the relevant code, so that we can understand the code more clearly.
Here, let's implement an Axios class first.
type AxiosConfig = {
  url: string;
  method: string;
  baseURL: string;
  headers: {[key: string]: string};
  params: {};
  data: {};
  adapter: Function;
  cancelToken?: number;
}

class Axios {
  public defaults: AxiosConfig;
  public createInstance!: Function;

  constructor(config: AxiosConfig) {
    this.defaults = config;
    this.createInstance = (cfg: AxiosConfig) => {
      return new Axios({ ...config, ...cfg });
    };
  }
}

const defaultAxios = new Axios(defaultConfig);

export default defaultAxios;
In the above, we mainly implemented the Axios class, used defaults to store the default configuration, and declared the createInstance method. This method creates a new Axios instance and inherits the configuration of the previous Axios instance.
Request method
Next, we will https://mbd.baidu.com/newspage/api/getpcvoicelist Initiate a network request and output the data returned by the response to the console.
The syntax of our request is as follows:
import axios from './Axios';

const service = axios.createInstance({
  baseURL: 'https://mbd.baidu.com'
});

(async () => {
  const reply = await service.get('/newspage/api/getpcvoicelist');
  console.log(reply);
})();
request method
Let's add a request and get method to our Axios class first.
import { dispatchRequest } from './request';

class Axios {
  //...

  public request(configOrUrl: AxiosConfig | string, config?: AxiosConfig) {
    if (typeof configOrUrl === 'string') {
      config!.url = configOrUrl;
    } else {
      config = configOrUrl;
    }

    const cfg = { ...this.defaults, ...config };
    return dispatchRequest(cfg);
  }

  public get(configOrUrl: AxiosConfig | string, config?: AxiosConfig) {
    return this.request(configOrUrl, {...(config || {} as any), method: 'get'});
  }
}
There is little difference between the implementation of request method and that of axios.
Now let's edit the dispatchRequest method that initiates the real request.
export const dispatchRequest = (config: AxiosConfig) => {
  const { adapter } = config;
  return adapter(config);
};
Like axios, we call the adapter in the configuration to initiate network requests, and we configure the default adapter in defaultConfig. (below)
const defaultConfig: AxiosConfig = {
  url: '',
  method: 'get',
  baseURL: '',
  headers: {},
  params: {},
  data: {},
  adapter: getAdapter()
};
adapter method
Next, let's focus on our adapter implementation.
// Steal a lazy here and use a fetch library directly
import fetch from 'isomorphic-fetch';
import { AxiosConfig } from './defaults';

// Detect whether it is a hyperlink
const getEffectiveUrl = (config: AxiosConfig) => /^https?/.test(config.url) ? config.url : config.baseURL + config.url;

// Get query string
const getQueryStr = (config: AxiosConfig) => {
  const { params } = config;
  if (!Object.keys(params).length) return '';

  let queryStr = '';
  for (const key in params) {
    queryStr += `&${key}=${(params as any)[key]}`;
  }

  return config.url.indexOf('?') > -1
    ? queryStr
    : '?' + queryStr.slice(1);
};

const getAdapter = () => async (config: AxiosConfig) => {
  const { method, headers, data } = config;
  let url = getEffectiveUrl(config);
  url += getQueryStr(config);

  const response = await fetch(url, {
    method,
    // Only non GET methods send body
    body: method !== 'get' ? JSON.stringify(data) : null,
    headers
  });

  // Assembly response data
  const reply = {
    data: await response.json(),
    status: response.status,
    statusText: response.statusText,
    headers: response.headers,
    config: config,
  };
  return reply;
};

export default getAdapter;
Here, our implementation is relatively simple. Simply put, it's a few steps
- Assembly url
- Initiate request
- Assembly response data
Look at the effect
Now let's run our code on the console, which is the following. Let's take a look at the console output.
import axios from './Axios';

const service = axios.createInstance({
  baseURL: 'https://mbd.baidu.com'
});

(async () => {
  const reply = await service.get('/newspage/api/getpcvoicelist');
  console.log(reply);
})();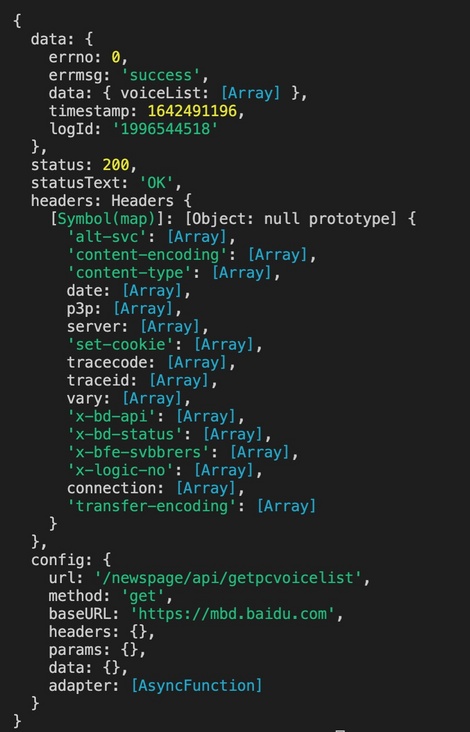
As can be seen from the above figure, the most basic functions of our axios have been realized (although we stole a lazy and used fetch).
Next, let's improve its ability.
Interceptor
Now, I want to give my axios the ability to add interceptors.
- I'll add an interceptor at the request and add some custom headers before each request.
- I will add an interceptor at the response to directly take out the data body (data) and configuration information (config) of the response and remove the redundant information.
The code implementation is as follows:
// Add request interceptor
service.interceptors.request.use((config: AxiosConfig) => {
  config.headers.test = 'A';
  config.headers.check = 'B';
  return config;
});

// Add response interceptor
service.interceptors.response.use((response: any) => ({ data: response.data, config: response.config }));
Transform the Axios class and add interceptors
Let's first create an InterceptorManager class to manage our interceptors. (below)
class InterceptorManager {
  private handlers: any[] = [];

  // Register interceptor
  public use(handler: Function): number {
    this.handlers.push(handler);
    return this.handlers.length - 1;
  }

  // Remove interceptor
  public eject(id: number) {
    this.handlers[id] = null;
  }

  // Get all interceptors
  public getAll() {
    return this.handlers.filter(h => h);
  }
}

export default InterceptorManager;
After defining interceptors, we need to add interceptors in Axios class, as follows:
class Axios {
  public interceptors: {
    request: InterceptorManager;
    response: InterceptorManager;
  }

  constructor(config: AxiosConfig) {
    // ...
    this.interceptors = {
      request: new InterceptorManager(),
      response: new InterceptorManager()
    }
  }
}
Next, let's handle the calls of these interceptors in the request method. (below)
public async request(configOrUrl: AxiosConfig | string, config?: AxiosConfig) {
  if (typeof configOrUrl === 'string') {
    config!.url = configOrUrl;
  } else {
    config = configOrUrl;
  }

  const cfg = { ...this.defaults, ...config };
  // Combine interceptors with real requests in an array
  const requestInterceptors = this.interceptors.request.getAll();
  const responseInterceptors = this.interceptors.response.getAll();
  const handlers = [...requestInterceptors, dispatchRequest, ...responseInterceptors];

  // Concatenate arrays with Promise
  let promise = Promise.resolve(cfg);
  while (handlers.length) {
    promise = promise.then(handlers.shift() as any);
  }

  return promise;
}
Here, the interceptor and the real request are combined into an array, and then concatenated with Promise.
Here I found a Promise knowledge point I don't know yet. In Promise In resolve, there is no need to explicitly return a Promise object. The returned value will be wrapped into a Promise object inside Promise, which supports then syntax call.
Now, run our code again and see how it works with interceptors. (as shown below)
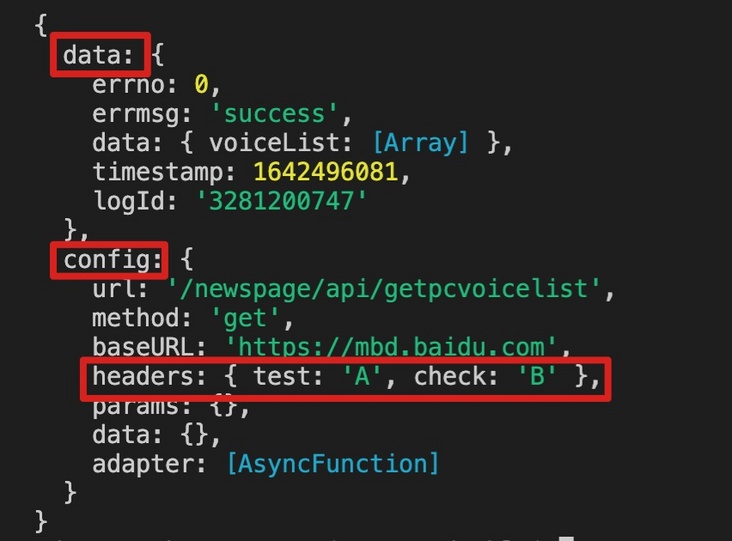
As can be seen from the above figure, only the data and config fields (response interceptor) are left in the returned content. In the config field, you can also see that the custom headers we added in the request interceptor also work!
Cancel request
Finally, let's implement the CancelToken class to cancel the axios request.
In practical applications, I often use CancelToken to automatically detect duplicate requests (from frequent clicks), then cancel earlier requests and only use the last request as a valid request.
Therefore, CancelToken is actually a favorite function for me. Its implementation is not complicated. Let's start to implement it.
Let's look at the calling method first. Next, I will cancel the request 10 ms after the request is initiated (using setTimeout). In other words, only requests completed within 10ms can succeed.
import axios, { CancelToken } from './Axios';

// ...
(async () => {
  const source = CancelToken.source();
  // After 10ms, cancel the request
  setTimeout(() => {
    source.cancel('Operation canceled by the user.');
  }, 10);

  const reply = await service.get('/newspage/api/getpcvoicelist', { cancelToken: source.token });
  console.log(reply);
})();
Let's get some ideas first.
First, we use cancelToken Source () obtains a cancelToken and passes it to the corresponding request function.
Next, we should use this token to query whether the request is cancelled. If it is cancelled, an error will be thrown to end the request.
CancelToken
ok, the idea is clear. Let's start to implement it. Let's start with CancelToken first.
class CancelError extends Error {
  constructor(...options: any) {
    super(...options);
    this.name = 'CancelError';
  }
}

class CancelToken {
  private static list: any[] = [];

  // One CancelToken instance is returned at a time to cancel the request
  public static source(): CancelToken {
    const cancelToken = new CancelToken();
    CancelToken.list.push(cancelToken);
    return cancelToken;
  }

  // Determine whether the request is cancelled by detecting whether there is a message field
  public static checkIsCancel(token: number | null) {
    if (typeof token !== 'number') return false;

    const cancelToken: CancelToken = CancelToken.list[token];
    if (!cancelToken.message) return false;

    // Throw the CancelError type and handle this type of error in subsequent requests
    throw new CancelError(cancelToken.message);
  }

  public token = 0;
  private message: string = '';
  constructor() {
    // Use the list length as the token id
    this.token = CancelToken.list.length;
  }

  // Cancel request, write message
  public cancel(message: string) {
    this.message = message;
  }
}

export default CancelToken;
CancelToken is basically completed. Its main function is to use an instance of CancelToken to correspond to a request to be processed, and then throw an error of CancelError type in the cancelled request.
Processing CancelError
Next, we need to add cancellation request detection at the corresponding request (dispatchRequest), and finally add a corresponding response interceptor to handle the corresponding error.
export const dispatchRequest = (config: AxiosConfig) => {
  // Detect whether to cancel the request before initiating the request
  CancelToken.checkIsCancel(config.cancelToken ?? null);
  const { adapter } = config;
  return adapter(config).then((response: any) => {
    // After the request responds successfully, detect whether to cancel the request
    CancelToken.checkIsCancel(config.cancelToken ?? null);
    return response;
  });
};
Since the implementation of our interceptor is too rough to add a failure response interceptor (which should have been handled here), I directly wrap the whole request in try Processing in catch.
try {
  const reply = await service.get('/newspage/api/getpcvoicelist', { cancelToken: source.token });
  console.log(reply);
} catch(e) {
  if (e.name === 'CancelError') {
    // If the request is cancelled, no error will be thrown, and only a prompt will be output on the console
    console.log(`The request was cancelled, Cancellation reason: ${e.message}`);
    return;
  }
  throw e;
}
Next, let's run our program and look at the console output! (as shown below)

be accomplished!
Summary
Here, our simple version of axios has been completed.
It can be used to implement network requests on the Node side and support some basic configurations, such as baseURL, url, request method, interceptor, cancel request
However, there are still many imperfections. Interested partners can find the following source code address and continue to write.
Source address, Recommended Practice
One last thing
If you've seen here, I hope you'd better give me a compliment before you leave~
Your praise is the greatest encouragement to the author, and can also let more people see this article!
If you think this article is helpful to you, please help in github Light up star and encourage it!