1. Installation and deployment
1.1. Download source code
https://github.com/azkaban/azkaban/tags
1.2. Decompression source code:
tar -zxf azkaban-3.85.1.tar.gz -C /opt/soft
1.3. Compile source code
You need to install GIT and Java environment
# Build Azkaban
./gradlew build

# Clean the build
./gradlew clean

# Build and install distributions
./gradlew installDist

# Run tests
./gradlew test

# Build without running tests
./gradlew build -x test
1.4. Package waiting
The process is slow, wait patiently
If you do not want to test, or execute the test command and report an error, run the last sentence directly/ gradlew build -x test package command.
1.5. Copy installation package
The compiled directory is as follows. Copy the corresponding package and unzip it to the appropriate directory. Rename a short name.
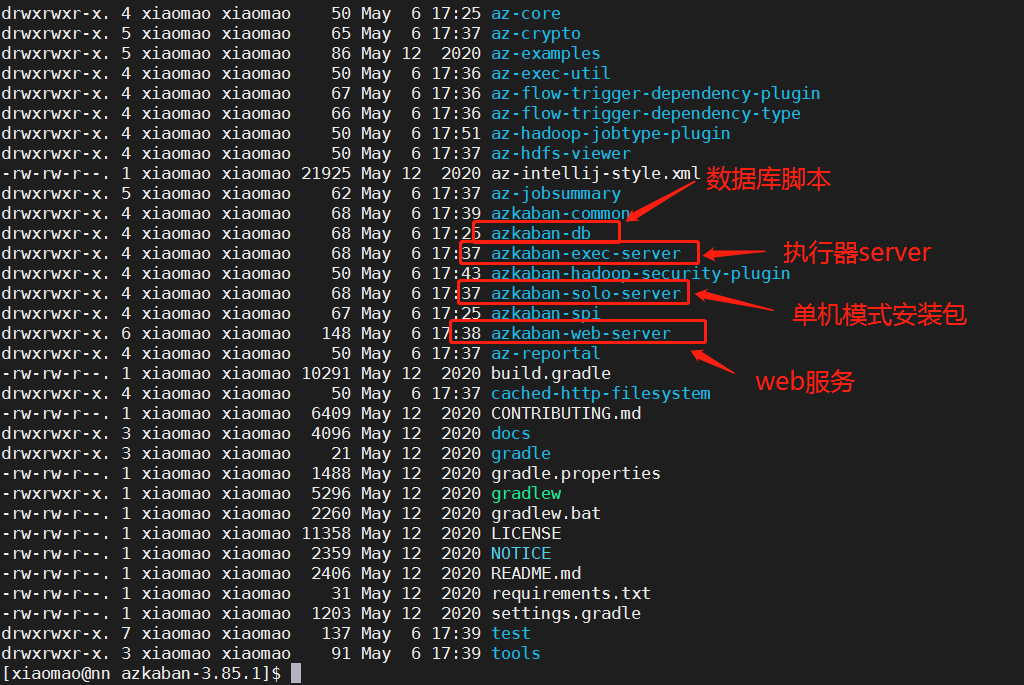
The installation package is in the corresponding directory:
For example, / opt/soft/azkban/azkaban-3.85.1/azkaban-exec-server/build/distributions the following is the azkaban-exec-server-0.1.0-snapshot of the actuator tar. gz.
After the copy is unzipped and renamed, it is as follows: because it is not in stand-alone mode, there is no solo server for the time being.

1.6. Initialize database
After creating the database, initialize it with the script in Azkaban dB above
-- Create a database
mysql> create database azkaban;
-- Create a user
mysql> create user 'azkaban'@'%' identified by 'Azkaban@123';
mysql> GRANT SELECT,INSERT,UPDATE,DELETE ON azkaban.* to 'azkaban'@'%' WITH GRANT OPTION;
-- Switch databases and execute scripts
mysql> use azkaban;
mysql> source /opt/soft/create-all-sql-0.1.0-SNAPSHOT.sql;
1.7. Configuring azkaban
-
Configure exec server
Exec server configuration file: Azkaban properties
The notes of Chinese characters need to be modified.
# Azkaban Personalization Settings
azkaban.name=Test
azkaban.label=My Local Azkaban
azkaban.color=#FF3601
azkaban.default.servlet.path=/index
#Change to absolute path
web.resource.dir=/opt/module/azkaban/azkaban-exec-server/web/
#Modify time zone
default.timezone.id=Asia/Shanghai
# Azkaban UserManager class
user.manager.class=azkaban.user.XmlUserManager
#Change to absolute path
user.manager.xml.file=/opt/module/azkaban/azkaban-exec-server/conf/azkaban-users.xml
# Loader for projects
executor.global.properties=/opt/module/azkaban/azkaban-exec-server/conf/global.properties
azkaban.project.dir=projects
# Velocity dev mode
velocity.dev.mode=false
# Azkaban Jetty server properties.
jetty.use.ssl=false
jetty.maxThreads=25
jetty.port=8081
# Where the Azkaban web server is located
azkaban.webserver.url=http://localhost:8081
# mail settings
mail.sender=
mail.host=
# User facing web server configurations used to construct the user facing server URLs. They are useful when there is a reverse proxy between Azkaban web servers and users.
# enduser -> myazkabanhost:443 -> proxy -> localhost:8081
# when this parameters set then these parameters are used to generate email links.
# if these parameters are not set then jetty.hostname, and jetty.port(if ssl configured jetty.ssl.port) are used.
# azkaban.webserver.external_hostname=myazkabanhost.com
# azkaban.webserver.external_ssl_port=443
# azkaban.webserver.external_port=8081
job.failure.email=
job.success.email=
lockdown.create.projects=false
cache.directory=cache
# JMX stats
jetty.connector.stats=true
executor.connector.stats=true
# Change Azkaban plugin settings to absolute path
azkaban.jobtype.plugin.dir=/opt/module/azkaban/azkaban-exec-server/plugins/jobtypes
# Azkaban mysql settings modify database configuration
database.type=mysql
mysql.port=3306
mysql.host=192.168.111.204
mysql.database=azkaban
mysql.user=azkaban
mysql.password=Azkaban@123
mysql.numconnections=100
# Azkaban Executor settings
executor.maxThreads=50
executor.flow.threads=30
-
Configure web server
azkaban.properties
# Azkaban Personalization Settings
azkaban.name=Test
azkaban.label=My Local Azkaban
azkaban.color=#FF3601
azkaban.default.servlet.path=/index
web.resource.dir=/opt/module/azkaban/azkaban-web-server/web/
default.timezone.id=Asia/Shanghai
# Azkaban UserManager class
user.manager.class=azkaban.user.XmlUserManager
#Change to absolute path
user.manager.xml.file=/opt/module/azkaban/azkaban-web-server/conf/azkaban-users.xml
# Loader for projects: the path of exec configured here
executor.global.properties=/opt/module/azkaban/azkaban-exec-server/conf/global.properties
azkaban.project.dir=projects
# Velocity dev mode
velocity.dev.mode=false
# Azkaban Jetty server properties.
jetty.use.ssl=false
jetty.maxThreads=25
jetty.port=8081
# Azkaban Executor settings
# mail settings
mail.sender=
mail.host=
# User facing web server configurations used to construct the user facing server URLs. They are useful when there is a reverse proxy between Azkaban web servers and users.
# enduser -> myazkabanhost:443 -> proxy -> localhost:8081
# when this parameters set then these parameters are used to generate email links.
# if these parameters are not set then jetty.hostname, and jetty.port(if ssl configured jetty.ssl.port) are used.
# azkaban.webserver.external_hostname=myazkabanhost.com
# azkaban.webserver.external_ssl_port=443
# azkaban.webserver.external_port=8081
job.failure.email=
job.success.email=
lockdown.create.projects=false
cache.directory=cache
# JMX stats
jetty.connector.stats=true
executor.connector.stats=true
# Azkaban mysql settings by default. Users should configure their own username and password.
database.type=mysql
mysql.port=3306
mysql.host=192.168.111.204
mysql.database=azkaban
mysql.user=azkaban
mysql.password=Azkaban@123
mysql.numconnections=100
#Multiple Executor
#Note that if your remaining memory is insufficient 6g, you must delete the following MinimumFreeMemory. Otherwise, something will go wrong
azkaban.use.multiple.executors=true
azkaban.executorselector.filters=StaticRemainingFlowSize,MinimumFreeMemory,CpuStatus
azkaban.executorselector.comparator.NumberOfAssignedFlowComparator=1
azkaban.executorselector.comparator.Memory=1
azkaban.executorselector.comparator.LastDispatched=1
azkaban.executorselector.comparator.CpuUsage=1
azkaban-users.xml to add a web page login account:
<user password="admin" roles="admin" username="admin"/>
<azkaban-users>
  <user groups="azkaban" password="azkaban" roles="admin" username="azkaban"/>
  <user password="metrics" roles="metrics" username="metrics"/>
  <user password="admin" roles="admin" username="admin"/>
  <role name="admin" permissions="ADMIN"/>
  <role name="metrics" permissions="METRICS"/>
</azkaban-users>
1.8. Start service
Execute the executor first, and then execute the Web Server to prevent the Web Server from failing to start because the executor cannot be found.
Start exec server
./bin/start-exec.sh
Start web server
./bin/start-web.sh
Check whether to start through jps command:

If there is no response when starting the web server, you can view the log. If there is an error: No active executors found
Manual activation required:
curl http://${executorHost}:${executorPort}/executor?action=activate the executor in the exec server directory of the port Port file view:
curl http://localhost:33923/executor?action=activate
Remember not to manually change the active field of the executors table of mysql to 1 here. Although the change can install webserver, the incomplete change will leave hidden dangers for subsequent job execution, so it must be activated in the above way
If you are migrating an existing installation directory, you may need to reinitialize the database and delete the currentpid and executor Port and other files are reactivated.
1.9. Configure ssl (optional)
If you want to set a certificate, it is recommended to use Alibaba cloud's certificate. Otherwise, you can generate it yourself according to the following. When you execute a job, you may report an error
[Azkaban] EXCEPTION
javax.net.ssl.SSLHandshakeException: Received fatal alert: certificate_unknown
Therefore, the following steps are only a reference for configuration and are not recommended.
For web server access, ssl certificate can be configured and https access is adopted. Just two steps:
-
Step 1: generate certificate
cd /
keytool -keystore keystore -alias jetty -genkey -keyalg RSA
Keytool: a java data certificate management tool that enables users to manage their own public / private key pairs and related certificates.
-Keystore: specify the name and location of the keystore (the generated information will not be in the. Keystore file)
-genkey: create a default file ". keystore" in the user's home directory
-Alias: Yes, we generated The keystore identifies the alias; If not, the default is mykey
-keyalg: Specifies the algorithm of the key. RSA/DSA is DSA by default
The password is finally set to the same, easy to remember, and other options can be entered directly.
-
Step 2: in azkaban.com of web server Properties add the following configuration
#Originally false, modified to true
jetty.use.ssl=true
jetty.ssl.port=8443
#SSL file name (absolute path)
jetty.keystore=/opt/module/azkaban/azkaban-web-server/keystore
#SSL file password
jetty.password=000000
#Jetty's master password is the same as the keystore file
jetty.keypassword=000000
#SSL file name (absolute path)
jetty.truststore=/opt/module/azkaban/azkaban-web-server/keystore
#SSL file password
jetty.trustpassword=000000
-
Step 3: restart webserver
#Shut down webserver
./bin/shutdown-web.sh
#start-up
./bin/start-web.sh
-
Step 4: Pass https://ip:8443 visit
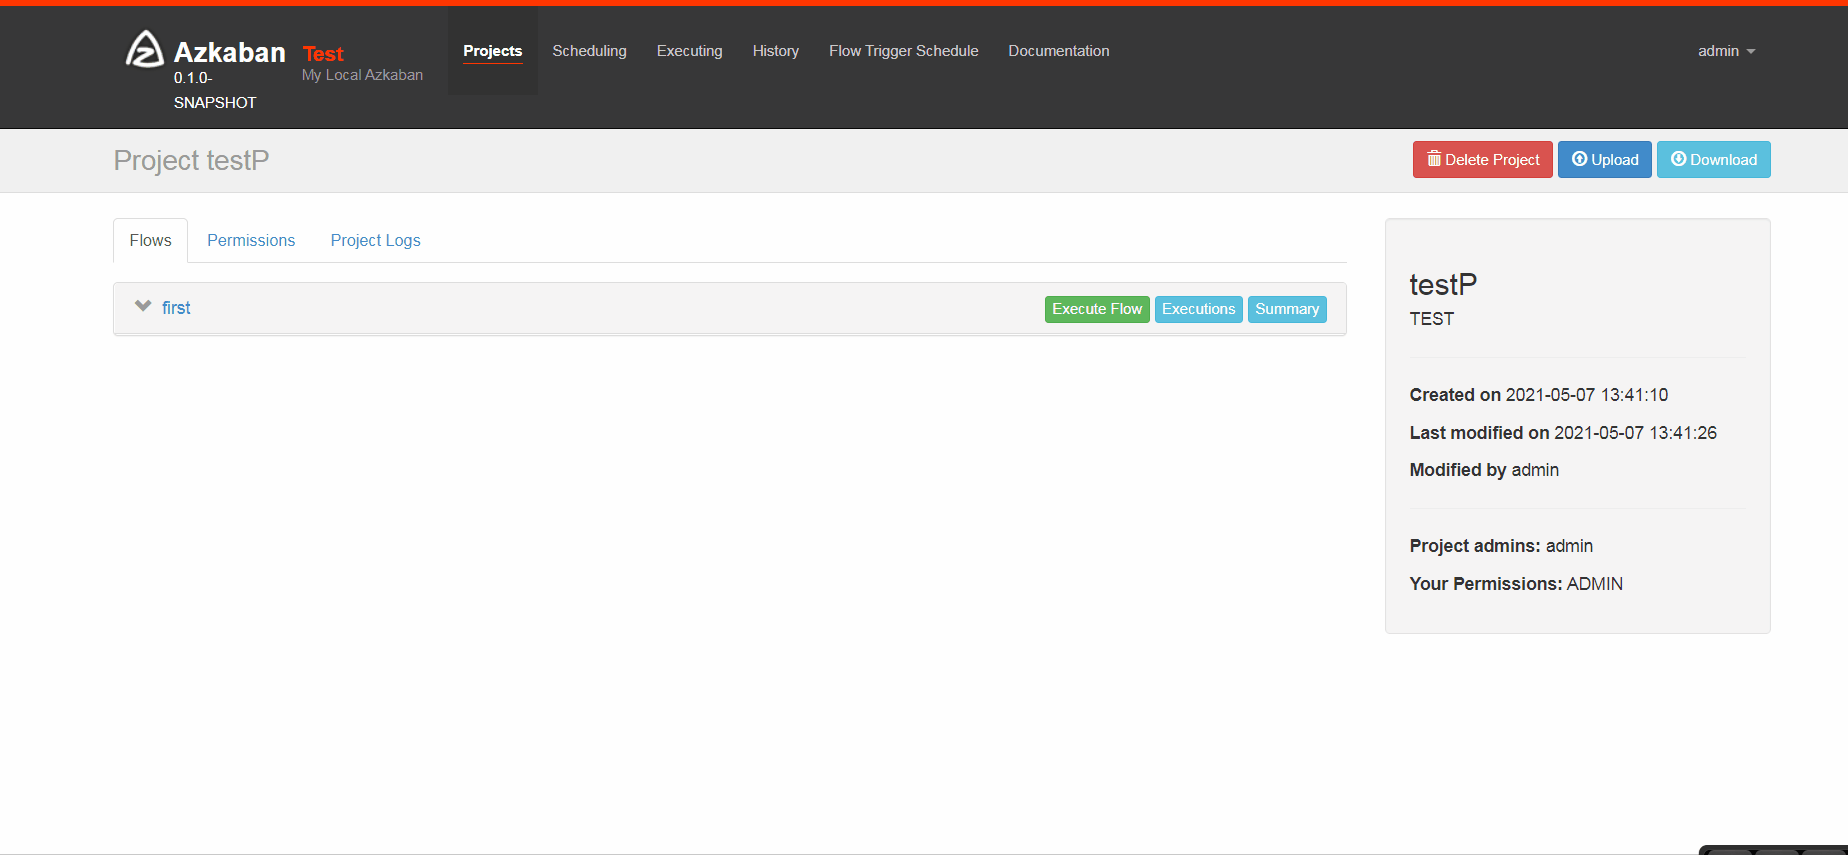
2. Use Azkaban
Azkaban usage steps:
Write job file = > package into ZIP = > new project = > upload zip package = > execute
2.1. Simple introduction
1) Create job description file
#first.job
type=command
command=echo 'this is my first job'
- Package into zip
Currently, the workflow files uploaded by Azkaban only support XXX Zip file. The zip should contain XXX Job files and any files required to run the job (the file name suffix must end with. Job, otherwise it cannot be recognized). The job name must be unique in the project.
Check the following screen recording in simple steps:
2.2. Common errors
- Error 1:
It's always in the prepare state. It's likely that you don't have enough 6G of memory. Look back at Azkaban. On the web server in step 1.7 Have you deleted the MinimumFreeMemory field? If you don't delete this and don't have 6G memory ~ ~ this self-test will never pass, and your job can only be ready all the time.
-
Error 2:
Another pitfall is ssl. If you use your own generated certificate, it will also lead to execution failure. Log directory: installation directory / Azkaban web server / logs / Azkaban webserver log
javax.net.ssl.SSLHandshakeException: Received fatal alert: certificate_unknown
-
Error 3:
Incorrect activation will result in
azkaban.executor.ExecutorManagerException: executor became inactive before setting up the flow 10
3. Summary
This article describes the installation and basic introduction of Azkaban. It will update Azkaban how to schedule the use of task in big data development. Please pay more attention to it.