3D resume
Three.js,
Vue+Element UI,
ES6
preface
Recently made a 3D resume. Let's record the production process.
- Sketch construction
- Download model
- Making maps
- Write code
- Write it at the back
Construction sketch
My idea is to build a three-dimensional study, which includes two walls and a desk, similar to the following figure: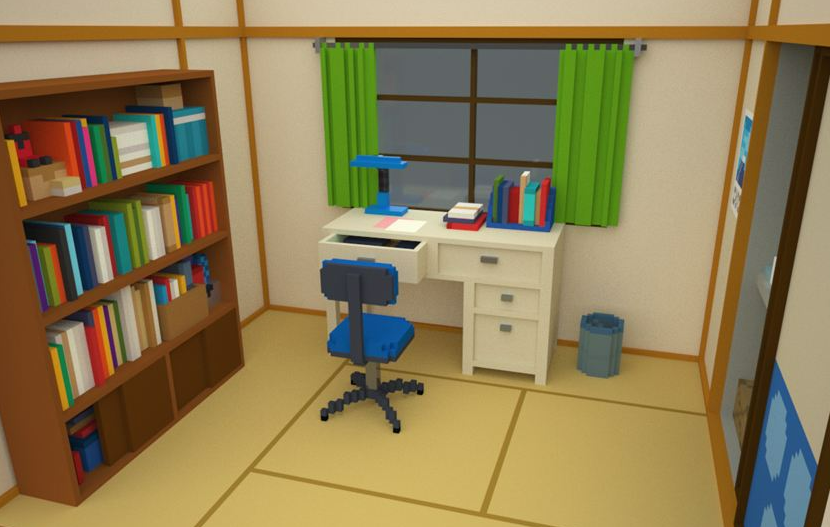
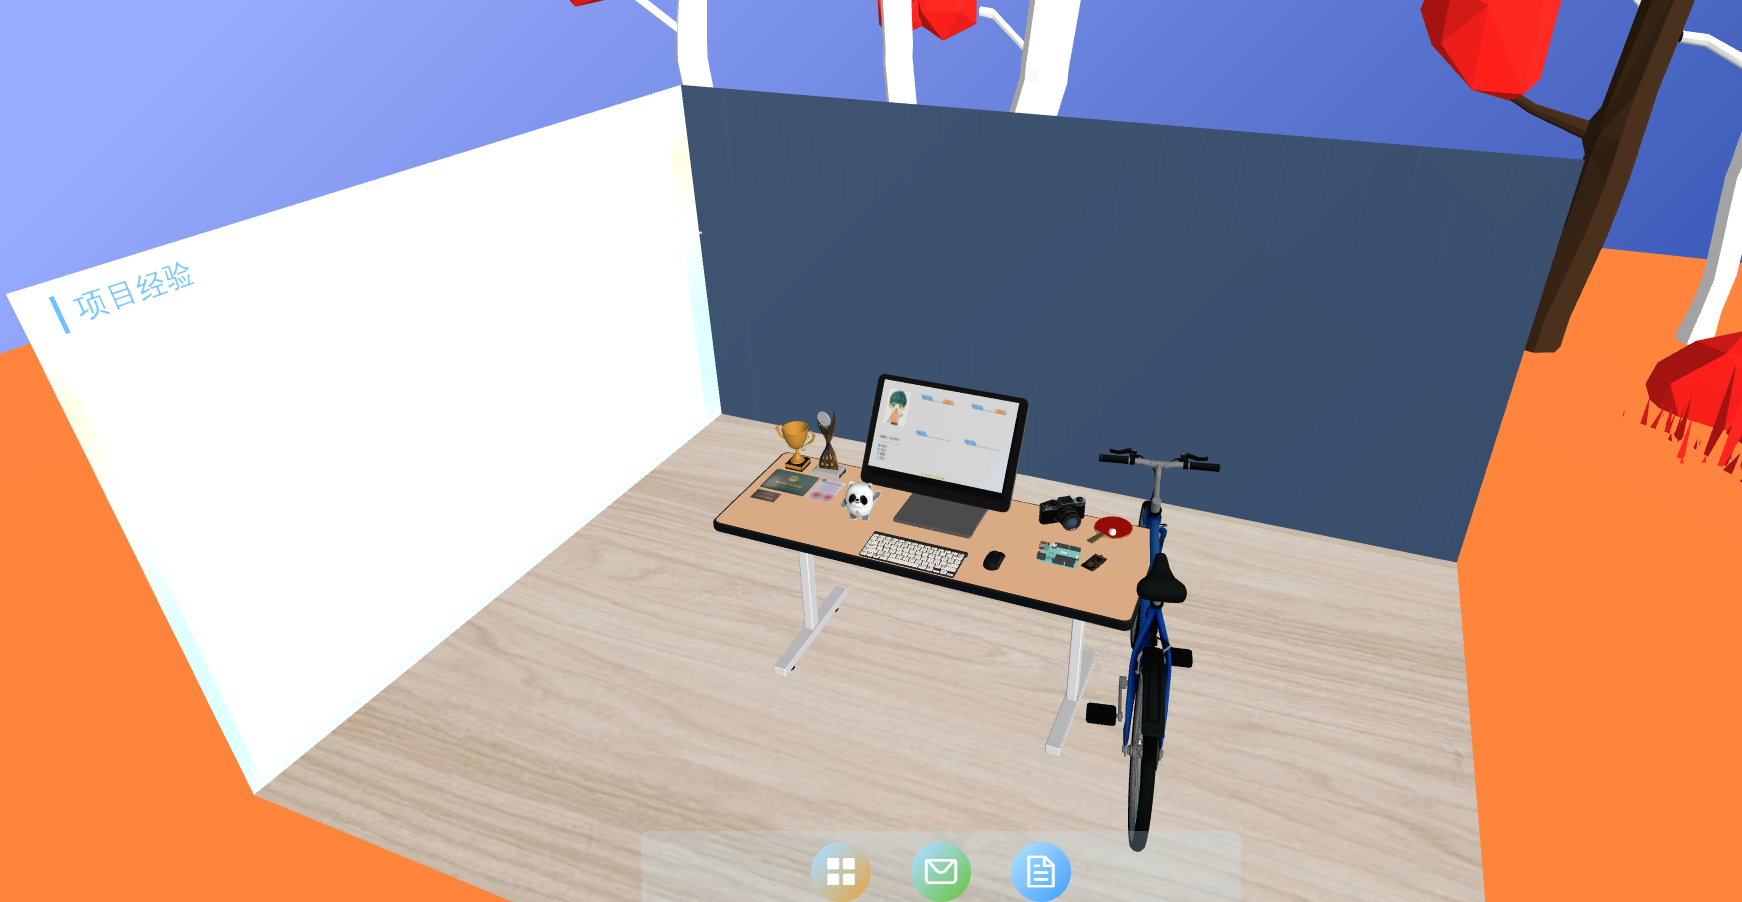
After visitors open the web page, the first thing they see is the computer monitor in the center of the desk, showing a rough version of the resume. There are two buttons on the resume to learn more. After clicking, you can adjust the perspective to the wall behind the desk. These two walls are used to show work experience and project experience. Some objects such as trophies and certificates are placed on the left side of the desk, and table tennis rackets, SLRs and other objects are placed on the right side, which represents personal hobbies.
There are three navigation buttons at the bottom of the page,
The first one is used to return to the perspective of the computer monitor, one is used to show my contact information, and the other is used to download the pdf version of the resume.
Download model
The models mentioned above are mainly downloaded from 3D builder, followed by stechfab in the formats of gltf and glb. Besides, Bing dwen dwen Winter Olympics, I put an ice pier on the table.
Making maps
Through the Fontloader, you can download the processed font and use it in three JS, but too many words will cause the page to be slow. Here, the rough resume on the display, the work experience on the wall and the project experience are made in the PPT and pasted to the corresponding position.
Write code
According to three JS tutorial step by step, mainly to instantiate a scene, and then add content to it. Here, it takes some time to learn more about the switching effect after clicking the button. For example, when switching to the left wall, drag and drop with the mouse to adjust a suitable perspective, and then print the camera information in the console

Store the above position and rotation information in a json. After the user clicks the learn more button, first obtain the current position and rotation data of the camera, then divide the difference between the two data into 20 points, make a timer, and move the current camera to the wall with 20 accumulations.
**Code block**
function goto_fullview(direct = "display", interval = 25) {
let that = this,
camera = that.camera,
frame_rate = 20,
camera_now = {
  position: [
    that.camera.position.x,
    that.camera.position.y,
    that.camera.position.z
  ],
  rotation: [
    that.camera.rotation._x,
    that.camera.rotation._y,
    that.camera.rotation._z
  ],
  quaternion: [
    that.camera.quaternion._w,
    that.camera.quaternion._x,
    that.camera.quaternion._y,
    that.camera.quaternion._z
  ]
},
camera_target = [];
let coordinate = {
display1: {
  position: [0.816055162473323, 34.5160207912348, 14.483266247564536],
  quaternion: [
    0.9681611829150955, -0.25032763310598183, 2.604862468272414e-18,
    6.735129106146197e-19
  ]
},
display: {
  position: [-0.12, 6.44, 11.15],
  rotation: [0.523, -0.009, -0.005]
},
certificate: {
  position: [-20.707893519108357, 35.1846189549925, 9.89421790616445],
  rotation: [-1.094958770022998, 0.016495438517374415, 0.03199698925162763]
},
interest: {
  position: [25.608840514053306, 40.580391036016835, 3.505514815235655],
  rotation: [
    -1.3562426762788162, 0.0034840503965316853, 0.015987263090829085
  ]
},
job: {
  position: [-0.286, 15.403, 26.677],
  rotation: [0.523, -0.009, -0.005]
},
project: {
  position: [41.561, 28.08, 21.74],
  rotation: [-0.894, 0.874, 0.703]
}
};
camera_target = coordinate[direct];
let interval_pos = Array(3)
.fill(0)
.map((n, index) => {
  return (
    (camera_target.position[index] - camera_now.position[index]) /
    frame_rate
  );
});
let interval_rot = Array(3)
.fill(0)
.map((n, index) => {
  return (
    (camera_target.rotation[index] - camera_now.rotation[index]) /
    frame_rate
  );
});
let scale = 0.8 / frame_rate;
for (let i = 0; i < frame_rate + 1; i++) {
setTimeout(
  function (c) {
    camera.position.set(
      ...camera_now.position.map((n, index) => {
        return n + interval_pos[index] * i;
      })
    );
    camera.rotation.set(
      ...camera_now.rotation.map((n, index) => {
        return n + interval_rot[index] * i;
      })
    );
    camera.lookAt(new THREE.Vector3(0, 0, 0));
    c.renderer.render(c.scene, camera);
  },
  (i + 2) * interval,
  that
);
}}
Write it at the back
The above code has been published in Github Folder, download it and use it with a little change. This is just to throw a brick to attract jade. I hope it can inspire you and everyone can find a job suitable for themselves.
If it helps you, give it a star:)