Basic introduction to Docker (basic command)
1, Docker overview
1. Why does docker appear?
One product: development – online two sets of environments! Application environment, application configuration!
Development - operation and maintenance. Question: I can allow it on my computer! Service unavailable due to version update! Is it a big test for operation and maintenance?
The environment configuration is very troublesome. Every machine needs to deploy the environment (cluster Redis, ES, Hadoop...)! It takes a lot of trouble.
Release a project (jar + (Redis MySQL JDK ES)). Can the project be installed and packaged with the environment!
Previously, configuring an application environment Redis MySQL JDK ES Hadoop on the server was too cumbersome to cross platform.
Development environment Windows, finally released to Linux!
Tradition: development jar, operation and maintenance to do!
Now: development, packaging, deployment and launch, and a set of processes are completed!
Android process: java - apk - publish (app store) one three, use apk and install it!
Docker process: Java jar (environment) - packaged project with environment (image) - (docker warehouse: store)-----
Docker has proposed solutions to the above problems!
Docker's idea comes from the container!
JRE – multiple applications (Port conflict) – originally, they are all cross!
Isolation: the core idea of Docker! Packing! Each box is isolated from each other.
Docker can make full use of the server through the isolation mechanism!
Essence: all technologies are learned because there are some problems that we need to solve!
**Why is 2docker so hot** Very light!
Before container technology came out, we all used virtual machine technology!
Virtual machine: install a VMware in the window. Through this software, we can virtual one or more computers! Bulky!
Virtual machine also belongs to virtualization technology. Docker container technology is also a kind of virtualization technology!
-
VM: Linux CentOS native image (one computer!) Isolate and open multiple virtual machines! A few G a few minutes
-
Docker: isolation. The image (the core environment 4m + jdk + mysql) is very compact. Just run the image! Small! A few M seconds to start! Docker is developed based on Go language! Open source project!
Docker is developed based on Go language! Open source project!
Docker official website: https://www.docker.com/
file: https://docs.docker.com/
Docker's documents are super detailed!
Warehouse: https://hub.docker.com/
3. What can docker do?
Compare Docker and virtual machine technologies:
- The traditional virtual machine virtualizes a piece of hardware, runs a complete operating system, and then installs and runs software on this system
- The applications in the container run directly on the content of the host. The container does not have its own kernel or virtual hardware, so it is light
- Each container is isolated from each other, and each container has its own file system, which does not affect each other
4.DevOps (development, operation and maintenance)
Faster delivery and deployment of applications
Traditional: a pair of help documents, installer.
Docker: the packaged image release test runs with one click.
More convenient upgrade and capacity expansion
After using Docker, we deploy the application like building blocks. The project is packaged into an image to expand server A! Server B
Simpler system operation and maintenance
After containerization, our development and testing environments are highly consistent
More efficient computing resources
Docker is kernel level virtualization, which can run many container instances on a physical machine! Server performance can be squeezed to the extreme.
2, Docker installation
1. Basic composition of docker
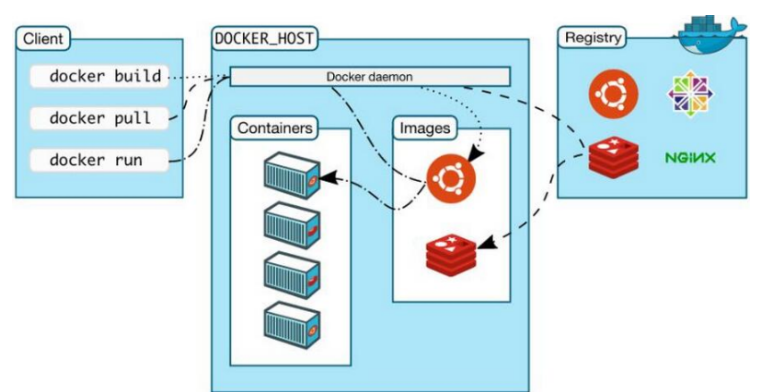
Image:
The docker image is like a target, through which container services can be created. The tomcat image = = > Run = = > container (providing server). Through this image, multiple containers can be created (the final service running or project running is in the container).
Container:
Docker uses container technology to run one or a group of applications independently and create them through image
Start, stop, delete, basic commands
At present, this container can be understood as a simple Linux system.
Repository:
The warehouse is where the image is stored!
Warehouses are divided into public warehouses and private warehouses. (very similar to git)
Docker Hub is foreign.
Alicloud... All have container servers (configure image acceleration!)
2. Install docker (method 1: Xshell installation)
Environmental preparation
1.Linux requires kernel above 3.0
2.CentOS 7
[root@iz2zeak7sgj6i7hrb2g862z ~]# uname -r
3.10.0-514.26.2.el7.x86_64	# Requirements above 3.0
[root@iz2zeak7sgj6i7hrb2g862z ~]# cat /etc/os-release
NAME="CentOS Linux"
VERSION="7 (Core)"
ID="centos"
ID_LIKE="rhel fedora"
VERSION_ID="7"
PRETTY_NAME="CentOS Linux 7 (Core)"
ANSI_COLOR="0;31"
CPE_NAME="cpe:/o:centos:centos:7"
HOME_URL="https://www.centos.org/"
BUG_REPORT_URL="https://bugs.centos.org/"

CENTOS_MANTISBT_PROJECT="CentOS-7"
CENTOS_MANTISBT_PROJECT_VERSION="7"
REDHAT_SUPPORT_PRODUCT="centos"
REDHAT_SUPPORT_PRODUCT_VERSION="7"
install
Help documentation: https://docs.docker.com/engine/install/
Uninstall and install
#1. Uninstall the old version
yum remove docker \
                  docker-client \
                  docker-client-latest \
                  docker-common \
                  docker-latest \
                  docker-latest-logrotate \
                  docker-logrotate \
                  docker-engine
#2. Required installation package
yum install -y yum-utils

#3. Set the warehouse of the image
yum-config-manager \
    --add-repo \
    https://download.docker.com/linux/centos/docker-ce.repo
#The above methods are from abroad by default and are not recommended

#Domestic is recommended
yum-config-manager \
    --add-repo \
    https://mirrors.aliyun.com/docker-ce/linux/centos/docker-ce.repo

#Update yum package index
yum makecache fast

#4. Install docker CE community version related to docker, while ee is enterprise version
yum install docker-ce docker-ce-cli containerd.io # Here we can use the community version

#5. Start docker
systemctl start docker

#6. Use docker version to check whether it is successful
docker version

#7. Test
docker run hello-world
=========================================================
➜ ~ docker run hello-world
Hello from Docker!
This message shows that your installation appears to be working correctly.
To generate this message, Docker took the following steps:
1. The Docker client contacted the Docker daemon.
2. The Docker daemon pulled the "hello-world" image from the Docker Hub.
(amd64)
3. The Docker daemon created a new container from that image which runs the
executable that produces the output you are currently reading.
4. The Docker daemon streamed that output to the Docker client, which sent it
to your terminal.
To try something more ambitious, you can run an Ubuntu container with:
$ docker run -it ubuntu bash
Share images, automate workflows, and more with a free Docker ID:
https://hub.docker.com/
For more examples and ideas, visit:
https://docs.docker.com/get-started/

==========================================================

#8. View the downloaded image (from here you can view the ID of the existing image)
[root@iz2zeak7sgj6i7hrb2g862z ~]# docker images
REPOSITORY            TAG                 IMAGE ID            CREATED             SIZE
hello-world           latest              bf756fb1ae65        4 months ago      13.3kB
3. Install Docker (method 2: brainless installation using pagoda panel)
App Store: Download and install by yourself
Uninstall docker
#1. Uninstall dependency
yum remove docker-ce docker-ce-cli containerd.io
#2. Delete resources
rm -rf /var/lib/docker
# /var/lib/docker is the default working path of docker!
3. Alibaba cloud image acceleration
1. Log in to alicloud and find the container service
2. Mirror accelerator found
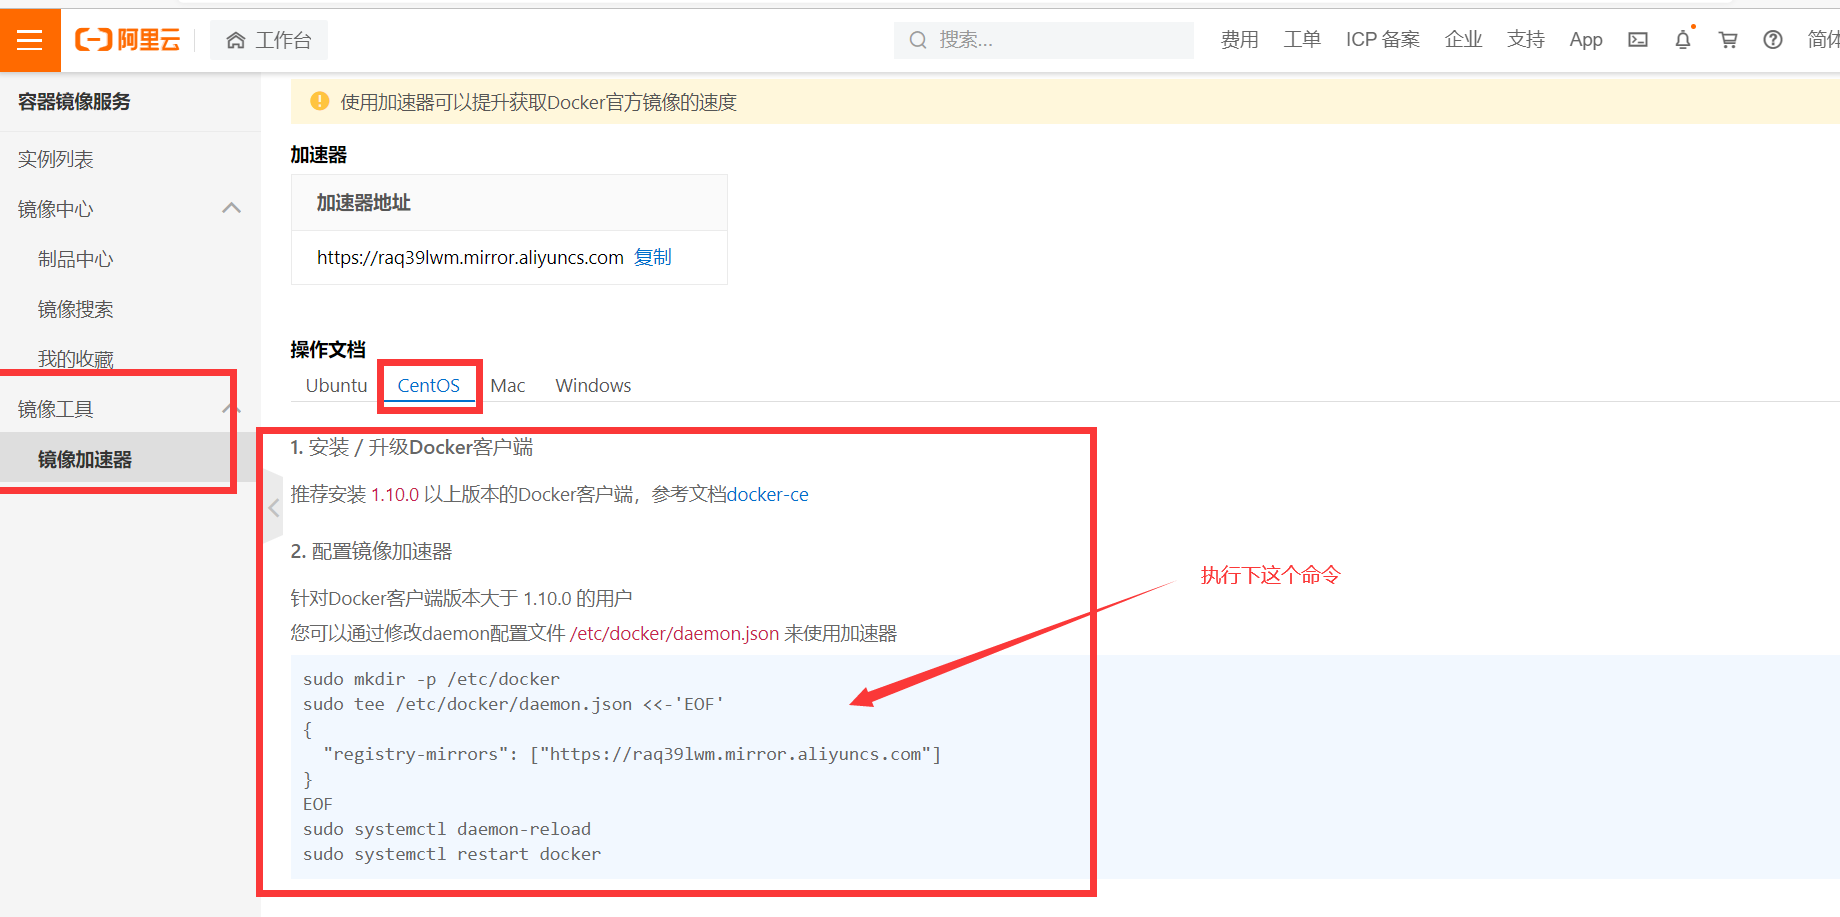
3. Configuration use
#1. Create a directory
sudo mkdir -p /etc/docker
#2. Prepare configuration file
sudo tee /etc/docker/daemon.json <<-'EOF'
{
  "registry-mirrors": ["https://raq39lwm.mirror.aliyuncs.com"]
}
EOF
#3. Restart the service
sudo systemctl daemon-reload
sudo systemctl restart docker
Underlying principle
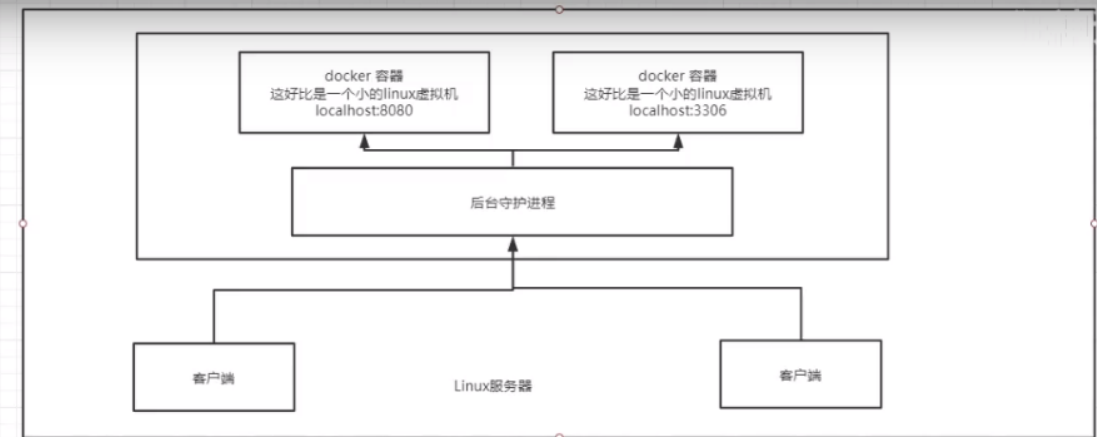
How does Docker work?
Docker is a client server system. The daemon of docker runs on the host. Access from the client through Socket!
When docker server receives the docker client instruction, it will execute this command!
Why is Docker faster than Vm
1. Docker has fewer abstraction layers than virtual machines. Because docker does not need Hypervisor to realize hardware resource virtualization, the programs running on the docker container directly use the hardware resources of the actual physical machine. Therefore, docker will have obvious advantages in efficiency in terms of CPU and memory utilization.
2. docker uses the kernel of the host computer instead of the Guest OS.
GuestOS:  VM(System in virtual machine)( OS)

HostOS: System in physical machine( OS)
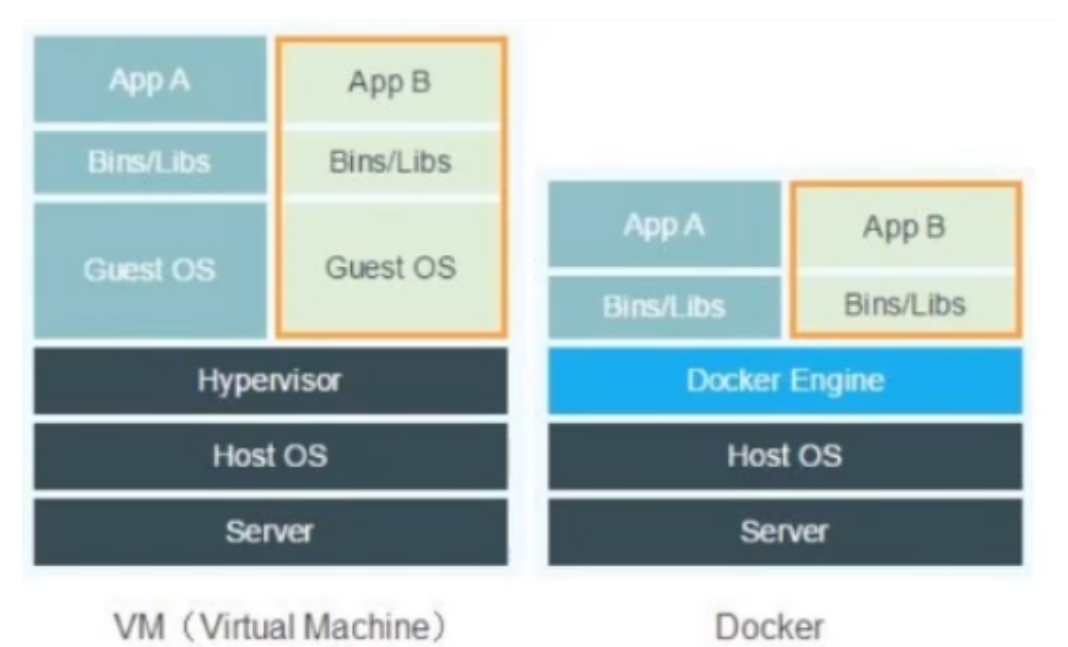
Therefore, when creating a new container, docker does not need to reload an operating system kernel like the virtual machine. Still avoid the time-consuming and resource consuming process of booting and loading the operating system kernel. When creating a new virtual machine, the virtual machine software needs to load GuestOS, and the new process is at the minute level. Because docker directly uses the operating system of the host, this complex process is omitted. Therefore, it only takes a few seconds to create a docker container.
3, Common commands of Docker
1. Help command
docker version #Displays the version information of docker.
docker info #Displays the system information of docker, including the number of images and containers
docker command --help #Help command
#Address of help document: https://docs.docker.com/engine/reference/commandline/build/
2. Mirror command
docker images #To view images on all local hosts, you can use docker image ls instead
docker search Search image
docker pull Download Image docker image pull
docker rmi delete mirror docker image rm
docker images view images on all local hosts
➜ ~ docker images
REPOSITORY TAG IMAGE ID CREATED
SIZE
mysql 5.7 e73346bdf465 24 hours ago
448MB
# explain
#REPOSITORY # Mirrored warehouse source
#TAG # Mirrored label
#IMAGE ID # id of the mirror
#CREATED # Creation time of image
#SIZE # Mirror size
# Optional
Options:
-a, --all Show all images (default hides intermediate images) #list
 All mirrors
-q, --quiet Only show numeric IDs # Only the id of the image is displayed
➜ ~ docker images -aq #Show all mirrored id
e73346bdf465
d03312117bb0
d03312117bb0
602e111c06b6
2869fc110bf7
470671670cac
bf756fb1ae65
5acf0e8da90b
docker search search image
[root@iz2zeak7sgj6i7hrb2g862z ~]# docker search mysql

# --filter=STARS=3000 #Filter and search for images with more than 3000 STARS
Options:
  -f, --filter filter   Filter output based on conditions provided
      --format string   Pretty-print search using a Go template
      --limit int       Max number of search results (default 25)
      --no-trunc        Don't truncate output

[root@iz2zeak7sgj6i7hrb2g862z ~]# docker search mysql --filter=STARS=3000
NAME        DESCRIPTION         STARS            OFFICIAL        AUTOMATED
mysql       MySQL IS ...        9520             [OK]
mariadb     MariaDB IS ...      3456             [OK]
docker pull Download Image
# Download Image docker pull image name [: tag]
➜ ~ docker pull tomcat:8
8: Pulling from library/tomcat #If you do not write tag, the default is latest
90fe46dd8199: Already exists #Layered Download: the core federated file system of docker image
35a4f1977689: Already exists
bbc37f14aded: Already exists
74e27dc593d4: Already exists
93a01fbfad7f: Already exists
1478df405869: Pull complete
64f0dd11682b: Pull complete
68ff4e050d11: Pull complete
f576086003cf: Pull complete
3b72593ce10e: Pull complete
Digest: sha256:0c6234e7ec9d10ab32c06423ab829b32e3183ba5bf2620ee66de866df640a027
# Signature anti-counterfeiting
Status: Downloaded newer image for tomcat:8
docker.io/library/tomcat:8 #Real address
#Equivalent to
docker pull tomcat:8
docker pull docker.io/library/tomcat:8
docker rmi delete image
docker rmi -f image id #Deletes the specified image
docker rmi -f image id image id image id image id#Deletes the specified image
docker rmi -f $(docker images -aq) #Delete all mirrors
3. Container command
Note: only when we have an image can we create a container. For Linux, download the centos image to learn
Image download
#Download centos from docker
docker pull centos
docker run image id #Create a new container and start

docker ps List all running containers docker container list

docker rm container id #Delete specified container

docker start container id	#Start container
docker restart container id	#Restart container
docker stop container id	#Stop the currently running container
docker kill container id	#Force stop of current container
[root@iz2zeak7sgj6i7hrb2g862z ~]# docker container list #h is the same as docker ps
Create a new container and start
docker run [Optional parameters] image | docker container run [Optional parameters] image
#Reference notes
--name="Name"		#The container name tomcat01 tomcat02 is used to distinguish containers
-d					#Run in background mode
-it 				#Run in interactive mode and enter the container to view the content
-p					#Specify container port -p 8080 (host): 8080 (container)
		-p ip:Host port:Container port
		-p Host port:Container port(Commonly used)
		-p Container port
		Container port
-P(Capitalize) 				Randomly assigned port

# Test, start and enter the container
[root@iz2zeak7sgj6i7hrb2g
[root@iz2zeak7sgj6i7hrb2g862z ~]# docker run -it centos /bin/bash
[root@241b5abce65e /]# ls
bin  dev  etc  home  lib  lib64  lost+found  media  mnt  opt  proc  root  run  sbin  srv  sys  tmp  usr  var
[root@241b5abce65e /]# exit #Return host from container
exit
List all running containers
docker ps command  		#Lists the currently running containers
  -a, --all     	 #List currently running containers + bring out historically running containers
  -n=?, --last int   #List recently created? A container? If it is 1, only the most recently created container will be listed, and if it is 2, 2 containers will be listed
  -q, --quiet        #Only the number of the container is listed
Exit container
exit 		#Container exit directly
ctrl +P +Q  #The container does not stop exiting 	--- Note: This is a very useful operation
Delete container
docker rm container id   				#Delete the specified container. You cannot delete the running container. If you want to forcibly delete rm -rf
docker rm -f $(docker ps -aq)  	 #Delete all containers
docker ps -a -q|xargs docker rm  #Delete all containers
Start and stop container operation
docker start container id	#Start container
docker restart container id	#Restart container
docker stop container id	#Stop the currently running container
docker kill container id	#Force stop of current container
4. Other common commands
Background start command
# Command docker run -d image name
[root@iz2zeak7sgj6i7hrb2g862z ~]# docker run -d centos
a8f922c255859622ac45ce3a535b7a0e8253329be4756ed6e32265d2dd2fac6c

[root@iz2zeak7sgj6i7hrb2g862z ~]# docker ps
CONTAINER ID      IMAGE       COMMAND    CREATED     STATUS   PORTS    NAMES
# Problem docker ps. found centos stopped
# In the common pit, when the docker container runs in the background, there must be a foreground process. When docker finds that there is no application, it will automatically stop
# nginx, when the container starts and finds that it does not provide services, it will stop immediately, that is, there is no program
view log
docker logs --help
Options:
      --details        Show extra details provided to logs
*  -f, --follow         Follow log output
      --since string   Show logs since timestamp (e.g. 2013-01-02T13:23:37) or relative (e.g. 42m for 42 minutes)
*      --tail string    Number of lines to show from the end of the logs (default "all")
*  -t, --timestamps     Show timestamps
      --until string   Show logs before a timestamp (e.g. 2013-01-02T13:23:37) or relative (e.g. 42m for 42 minutes)
➜  ~ docker run -d centos /bin/sh -c "while true;do echo 6666;sleep 1;done" #Simulation log
#Show log
-tf		#Display log information (always updated)
--tail number #Number of logs to be displayed
docker logs -t --tail n container id #View n-line log
docker logs -ft container id #Follow the log
View process information in container ps
# Command docker top container id
[root@wanghailin ~]# docker top 545a93c78052
UID            PID         PPID      C        STIME           TTY          TIME                CMD
root           16204        16183     0        14:02            pts/0      00:00:00            /bin/bash
View the metadata of the image
# command
docker inspect container id

#test
[root@wanghailin ~]# docker ps
CONTAINER ID   IMAGE     COMMAND       CREATED          STATUS         PORTS     NAMES
545a93c78052   centos    "/bin/bash"   24 minutes ago   Up 6 minutes             heuristic_grothendieck
[root@wanghailin ~]# docker inspect 545a93c78052
[
    {
        "Id": "545a93c780528542653e882b215f243963eeee411929548bf0acf1bd3717f44d",
        "Created": "2022-01-24T05:43:12.885485182Z",
        "Path": "/bin/bash",
        "Args": [],
        "State": {
            "Status": "running",
            "Running": true,
            "Paused": false,
            "Restarting": false,
            "OOMKilled": false,
            "Dead": false,
            "Pid": 16204,
            "ExitCode": 0,
            "Error": "",
            "StartedAt": "2022-01-24T06:02:06.262437398Z",
            "FinishedAt": "2022-01-24T06:00:36.605464277Z"
        },
        "Image": "sha256:5d0da3dc976460b72c77d94c8a1ad043720b0416bfc16c52c45d4847e53fadb6",
        "ResolvConfPath": "/www/server/docker/containers/545a93c780528542653e882b215f243963eeee411929548bf0acf1bd3717f44d/resolv.conf",
        "HostnamePath": "/www/server/docker/containers/545a93c780528542653e882b215f243963eeee411929548bf0acf1bd3717f44d/hostname",
        "HostsPath": "/www/server/docker/containers/545a93c780528542653e882b215f243963eeee411929548bf0acf1bd3717f44d/hosts",
        "LogPath": "/www/server/docker/containers/545a93c780528542653e882b215f243963eeee411929548bf0acf1bd3717f44d/545a93c780528542653e882b215f243963eeee411929548bf0acf1bd3717f44d-json.log",
        "Name": "/heuristic_grothendieck",
        "RestartCount": 0,
        "Driver": "overlay2",
        "Platform": "linux",
        "MountLabel": "",
        "ProcessLabel": "",
        "AppArmorProfile": "",
        "ExecIDs": null,
        "HostConfig": {
            "Binds": null,
            "ContainerIDFile": "",
            "LogConfig": {
                "Type": "json-file",
                "Config": {}
            },
            "NetworkMode": "default",
            "PortBindings": {},
            "RestartPolicy": {
                "Name": "no",
                "MaximumRetryCount": 0
            },
            "AutoRemove": false,
            "VolumeDriver": "",
            "VolumesFrom": null,
            "CapAdd": null,
            "CapDrop": null,
            "CgroupnsMode": "host",
            "Dns": [],
            "DnsOptions": [],
            "DnsSearch": [],
            "ExtraHosts": null,
            "GroupAdd": null,
            "IpcMode": "private",
            "Cgroup": "",
            "Links": null,
            "OomScoreAdj": 0,
            "PidMode": "",
            "Privileged": false,
            "PublishAllPorts": false,
            "ReadonlyRootfs": false,
            "SecurityOpt": null,
            "UTSMode": "",
            "UsernsMode": "",
            "ShmSize": 67108864,
            "Runtime": "runc",
            "ConsoleSize": [
                0,
                0
            ],
            "Isolation": "",
            "CpuShares": 0,
            "Memory": 0,
            "NanoCpus": 0,
            "CgroupParent": "",
            "BlkioWeight": 0,
            "BlkioWeightDevice": [],
            "BlkioDeviceReadBps": null,
            "BlkioDeviceWriteBps": null,
            "BlkioDeviceReadIOps": null,
            "BlkioDeviceWriteIOps": null,
            "CpuPeriod": 0,
            "CpuQuota": 0,
            "CpuRealtimePeriod": 0,
            "CpuRealtimeRuntime": 0,
            "CpusetCpus": "",
            "CpusetMems": "",
            "Devices": [],
            "DeviceCgroupRules": null,
            "DeviceRequests": null,
            "KernelMemory": 0,
            "KernelMemoryTCP": 0,
            "MemoryReservation": 0,
            "MemorySwap": 0,
            "MemorySwappiness": null,
            "OomKillDisable": false,
            "PidsLimit": null,
            "Ulimits": null,
            "CpuCount": 0,
            "CpuPercent": 0,
            "IOMaximumIOps": 0,
            "IOMaximumBandwidth": 0,
            "MaskedPaths": [
                "/proc/asound",
                "/proc/acpi",
                "/proc/kcore",
                "/proc/keys",
                "/proc/latency_stats",
                "/proc/timer_list",
                "/proc/timer_stats",
                "/proc/sched_debug",
                "/proc/scsi",
                "/sys/firmware"
            ],
            "ReadonlyPaths": [
                "/proc/bus",
                "/proc/fs",
                "/proc/irq",
                "/proc/sys",
                "/proc/sysrq-trigger"
            ]
        },
        "GraphDriver": {
            "Data": {
                "LowerDir": "/www/server/docker/overlay2/c2bf926fd87cd2110ec0dd64080cff1a31a794bff4f95c4f5d5500d343a7ec5b-init/diff:/www/server/docker/overlay2/03cada8d11cf7cca5cc3b09daf83cdbe8167a0bbe5ce8b09cbf3f784dfb78dd6/diff",
                "MergedDir": "/www/server/docker/overlay2/c2bf926fd87cd2110ec0dd64080cff1a31a794bff4f95c4f5d5500d343a7ec5b/merged",
                "UpperDir": "/www/server/docker/overlay2/c2bf926fd87cd2110ec0dd64080cff1a31a794bff4f95c4f5d5500d343a7ec5b/diff",
                "WorkDir": "/www/server/docker/overlay2/c2bf926fd87cd2110ec0dd64080cff1a31a794bff4f95c4f5d5500d343a7ec5b/work"
            },
            "Name": "overlay2"
        },
        "Mounts": [],
        "Config": {
            "Hostname": "545a93c78052",
            "Domainname": "",
            "User": "",
            "AttachStdin": true,
            "AttachStdout": true,
            "AttachStderr": true,
            "Tty": true,
            "OpenStdin": true,
            "StdinOnce": true,
            "Env": [
                "PATH=/usr/local/sbin:/usr/local/bin:/usr/sbin:/usr/bin:/sbin:/bin"
            ],
            "Cmd": [
                "/bin/bash"
            ],
            "Image": "centos",
            "Volumes": null,
            "WorkingDir": "",
            "Entrypoint": null,
            "OnBuild": null,
            "Labels": {
                "org.label-schema.build-date": "20210915",
                "org.label-schema.license": "GPLv2",
                "org.label-schema.name": "CentOS Base Image",
                "org.label-schema.schema-version": "1.0",
                "org.label-schema.vendor": "CentOS"
            }
        },
        "NetworkSettings": {
            "Bridge": "",
            "SandboxID": "2eb582dca4fe1f067c7ddb32fb0fbba7ec6715c3898c7accd2397776fa797dde",
            "HairpinMode": false,
            "LinkLocalIPv6Address": "",
            "LinkLocalIPv6PrefixLen": 0,
            "Ports": {},
            "SandboxKey": "/var/run/docker/netns/2eb582dca4fe",
            "SecondaryIPAddresses": null,
            "SecondaryIPv6Addresses": null,
            "EndpointID": "93732762225a5270e0a99c80faa2e8d983cc5d3e8ae2c1008d3732eeab2fffbb",
            "Gateway": "172.17.0.1",
            "GlobalIPv6Address": "",
            "GlobalIPv6PrefixLen": 0,
            "IPAddress": "172.17.0.2",
            "IPPrefixLen": 16,
            "IPv6Gateway": "",
            "MacAddress": "02:42:ac:11:00:02",
            "Networks": {
                "bridge": {
                    "IPAMConfig": null,
                    "Links": null,
                    "Aliases": null,
                    "NetworkID": "dca1bc7b3838e3cf1895a027ec2d96b36773b754ce2e56ecf056515747ba270c",
                    "EndpointID": "93732762225a5270e0a99c80faa2e8d983cc5d3e8ae2c1008d3732eeab2fffbb",
                    "Gateway": "172.17.0.1",
                    "IPAddress": "172.17.0.2",
                    "IPPrefixLen": 16,
                    "IPv6Gateway": "",
                    "GlobalIPv6Address": "",
                    "GlobalIPv6PrefixLen": 0,
                    "MacAddress": "02:42:ac:11:00:02",
                    "DriverOpts": null
                }
            }
        }
    }
]
[root@wanghailin ~]#
Enter the currently running container
#We usually use the background mode to run the container. We need to enter the container and modify some configurations

#Mode 1:
docker exec -it container id bash

#test
[root@wanghailin ~]# docker ps
CONTAINER ID   IMAGE     COMMAND       CREATED          STATUS          PORTS     NAMES
545a93c78052   centos    "/bin/bash"   32 minutes ago   Up 13 minutes             heuristic_grothendieck
[root@wanghailin ~]# docker exec -it 545a93c78052 bash
[root@545a93c78052 /]# ls
bin  dev  etc  home  lib  lib64  lost+found  media  mnt  opt  proc  root  run  sbin  srv  sys  tmp  usr  var


#Mode 2:
docker attach container id
#test
docker attach 55321bcae33d
Executing current code...
difference
#docker exec #After entering the current container, open a new terminal, which can be operated inside. (common)
#docker attach # Enter the terminal where the container is executing
Copy from container to host
docker cp container id:In container path host destination path

[root@wanghailin ~]# docker ps
CONTAINER ID   IMAGE     COMMAND       CREATED          STATUS          PORTS     NAMES
545a93c78052   centos    "/bin/bash"   45 minutes ago   Up 41 seconds             heuristic_grothendieck


#1. Enter the docker container
[root@wanghailin ~]# docker attach 545a93c78052
[root@545a93c78052 /]# ls
bin  dev  etc  home  lib  lib64  lost+found  media  mnt  opt  proc  root  run  sbin  srv  sys  tmp  usr  var

#Create a new file
[root@545a93c78052 /]# ls
bin  dev  etc  home  lib  lib64  lost+found  media  mnt  opt  proc  root  run  sbin  srv  sys  tmp  usr  var
[root@545a93c78052 /]# cd /home
[root@545a93c78052 home]# touch test.java
[root@545a93c78052 home]# ls
test.java
[root@545a93c78052 home]# exit
exit


#hello. Copy java to the home file and add
[root@wanghailin ~]# docker ps -a
CONTAINER ID   IMAGE       COMMAND       CREATED          STATUS       PORTS     NAMES vigorous_raman
545a93c78052   centos      "/bin/bash"   50 minutes ago   Exited (0)     31       seconds ago
[root@wanghailin ~]# docker cp 545a93c78052:/home/test.java /home
[root@wanghailin ~]# ls
install.sh
[root@wanghailin ~]# cd /home
[root@wanghailin home]# ls
redis  springboot  test.java  www
[root@wanghailin home]#
Summary:
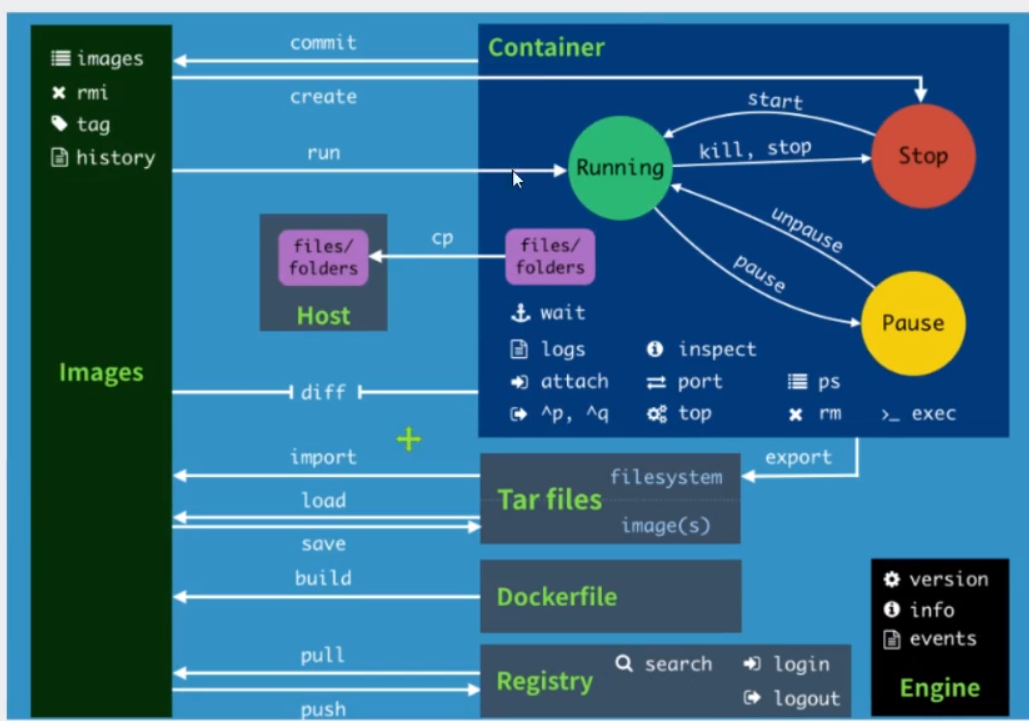
Complete command
  attach      Attach local standard input, output, and error streams to a running container
  #The image of the specified operation of the attach connection under the current shell
  build       Build an image from a Dockerfile # Customized image through Dockerfile
  commit      Create a new image from a container's changes #Commit the current container as a new image
  cp          Copy files/folders between a container and the local filesystem #Copy file
  create      Create a new container #Create a new container
  diff        Inspect changes to files or directories on a container's filesystem #View the changes of docker container
  events      Get real time events from the server # Get container real time from service
  exec        Run a command in a running container # Running commands on a running container
  export      Export a container's filesystem as a tar archive #Export the container file system as a tar archive [corresponding to import]
  history     Show the history of an image # Show a mirror formation history
  images      List images #Lists the current mirrors of the system
  import      Import the contents from a tarball to create a filesystem image #Import content from the tar package to create a file system image
  info        Display system-wide information # Display system wide information
  inspect     Return low-level information on Docker objects #View container details
  kill        Kill one or more running containers # kill specifies the docker container
  load        Load an image from a tar archive or STDIN #Load an image from a tar package or standard input [corresponding to save]
  login       Log in to a Docker registry #
  logout      Log out from a Docker registry
  logs        Fetch the logs of a container
  pause       Pause all processes within one or more containers
  port        List port mappings or a specific mapping for the container
  ps          List containers
  pull        Pull an image or a repository from a registry
  push        Push an image or a repository to a registry
  rename      Rename a container
  restart     Restart one or more containers
  rm          Remove one or more containers
  rmi         Remove one or more images
  run         Run a command in a new container
  save        Save one or more images to a tar archive (streamed to STDOUT by default)
  search      Search the Docker Hub for images
  start       Start one or more stopped containers
  stats       Display a live stream of container(s) resource usage statistics
  stop        Stop one or more running containers
  tag         Create a tag TARGET_IMAGE that refers to SOURCE_IMAGE
  top         Display the running processes of a container
  unpause     Unpause all processes within one or more containers
  update      Update configuration of one or more containers
  version     Show the Docker version information
  wait        Block until one or more containers stop, then print their exit codes
practice
Exercise 1: Docker installation Nginx
#1. Search image search recommends that you search in docker and you can see the help documents
[root@wanghailin /]# docker search nginx

#2. Pull the download image pull
[root@wanghailin /]# docker pull nginx

#3. Check whether the image is downloaded successfully
[root@wanghailin /]# docker images

#3. Operation test
# -d background operation
# --Name name the container
# -p host port: container internal port
[root@wanghailin /]# docker run -d --name nginx01 -p 9091:80 nginx
3ef3f91dfd274ca7c4a531d3413070029a9f9e345af6ee1f9b187e0e8a1c74d4

#4. View the image being started
[root@wanghailin /]# docker ps
CONTAINER ID   IMAGE     COMMAND                  CREATED          STATUS         PORTS                  NAMES
3ef3f91dfd27   nginx     "/docker-entrypoint...."   11 seconds ago   Up 9 seconds   0.0.0.0:9091->80/tcp   nginx01


#5. Enter the container
[root@wanghailin /]# docker exec -it nginx01 /bin/bash   #Enter container
root@3ef3f91dfd27:/# whereis nginx                       #Find the location of nginx in the container
nginx: /usr/sbin/nginx /usr/lib/nginx /etc/nginx /usr/share/nginx
root@3ef3f91dfd27:/# cd /etc/nginx
root@3ef3f91dfd27:/etc/nginx# ls
conf.d	fastcgi_params	mime.types  modules  nginx.conf  scgi_params  uwsgi_params

#6. Exit the container
root@3ef3f91dfd27:/etc/nginx# exit
exit
#7. Stop the container
[root@wanghailin /]# docker ps
CONTAINER ID   IMAGE     COMMAND                  CREATED         STATUS         PORTS                  NAMES
3ef3f91dfd27   nginx     "/docker-entrypoint...."   5 minutes ago   Up 5 minutes   0.0.0.0:9091->80/tcp   nginx01
[root@wanghailin /]# docker stop 3ef3f91dfd27
3ef3f91dfd27
Host port and container internal port and port exposure:
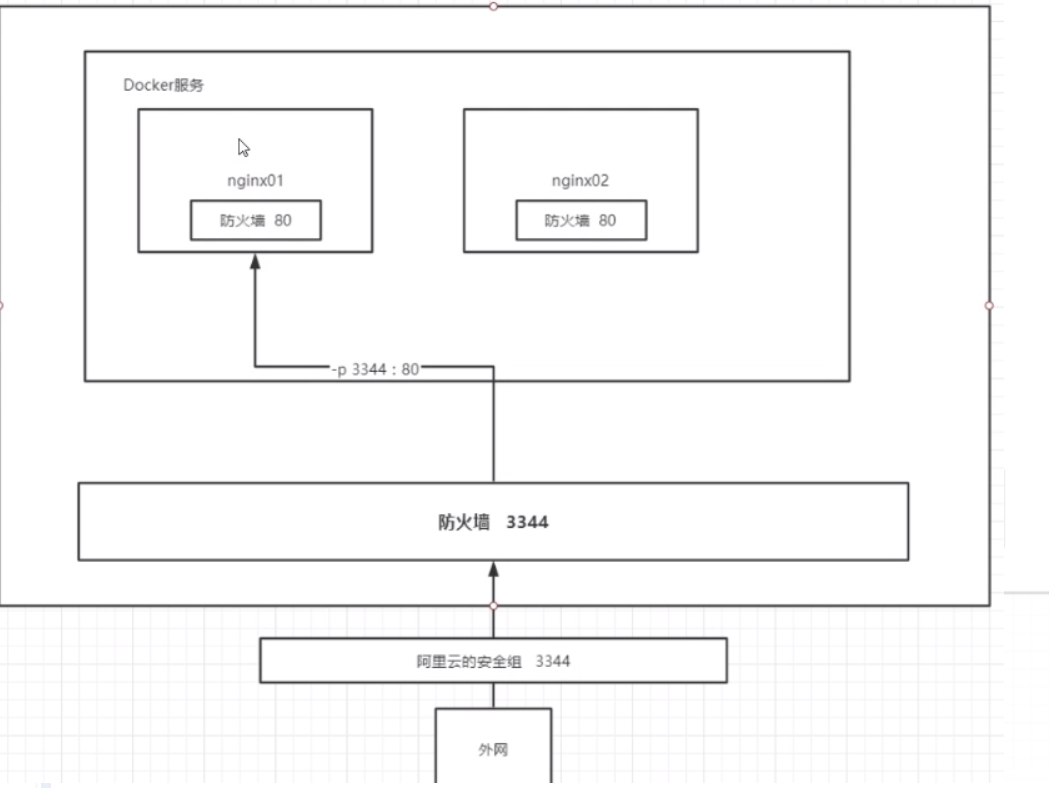
**Question: * * do we need to enter the container every time we change the nginx configuration file? It's very troublesome. If I can provide a mapping path outside the container to modify the file name outside the container, it can be modified automatically inside the container- v data volume technology!
Exercise 2: using docker to install a tomcat
# Download tomcat9 0
# The previous startup was in the background. After stopping the container, the container can still be found. The docker run -it --rm image name is generally used for testing and deleted after use
[root@iz2zeak7sgj6i7hrb2g862z ~]# docker run -it --rm tomcat:9.0

--rm       Automatically remove the container when it exits Delete after use


#Download the latest version
[root@wanghailin /]# docker search tomcat
[root@wanghailin /]# docker pull tomcat
#View downloaded images
[root@wanghailin /]# docker images

#Background mode, exposed port mode, start operation
[root@wanghailin /]# docker run -d -p 9091:8080 --name tomcat01 tomcat

#Is there a problem with the test access
[root@wanghailin /]# curl localhost:9091

#Enter the tomcat container according to the container id
[root@wanghailin /]# docker exec -it 5592e59958e3 /bin/bash
root@5592e59958e3:/usr/local/tomcat#
#To view the contents of the tomcat container:
root@5592e59958e3:/usr/local/tomcat# ls -l
total 152
-rw-r--r-- 1 root root 18982 May  5 20:40 BUILDING.txt
-rw-r--r-- 1 root root  5409 May  5 20:40 CONTRIBUTING.md
-rw-r--r-- 1 root root 57092 May  5 20:40 LICENSE
-rw-r--r-- 1 root root  2333 May  5 20:40 NOTICE
-rw-r--r-- 1 root root  3255 May  5 20:40 README.md
-rw-r--r-- 1 root root  6898 May  5 20:40 RELEASE-NOTES
-rw-r--r-- 1 root root 16262 May  5 20:40 RUNNING.txt
drwxr-xr-x 2 root root  4096 May 16 12:05 bin
drwxr-xr-x 1 root root  4096 May 21 11:04 conf
drwxr-xr-x 2 root root  4096 May 16 12:05 lib
drwxrwxrwx 1 root root  4096 May 21 11:04 logs
drwxr-xr-x 2 root root  4096 May 16 12:05 native-jni-lib
drwxrwxrwx 2 root root  4096 May 16 12:05 temp
drwxr-xr-x 2 root root  4096 May 16 12:05 webapps
drwxr-xr-x 7 root root  4096 May  5 20:37 webapps.dist
drwxrwxrwx 2 root root  4096 May  5 20:36 work
root@645596565d3f:/usr/local/tomcat#
#Enter webapps directory
root@5592e59958e3:/usr/local/tomcat# cd webapps
root@5592e59958e3:/usr/local/tomcat/webapps# ls
root@5592e59958e3:/usr/local/tomcat/webapps#
# Problems found: 1. There are few linux commands. 2.webapps directory is empty
# Reason: Alibaba cloud image is the smallest image by default, so unnecessary images are eliminated
# Ensure a minimum operational environment!
# Solution:
# Webapps All files under dist can be copied to webapps
root@5592e59958e3:/usr/local/tomcat# ls find webapps dist
BUILDING.txt	 LICENSE  README.md	 RUNNING.txt  conf  logs  temp     webapps.dist
CONTRIBUTING.md  NOTICE   RELEASE-NOTES  bin   lib   native-jni-lib  webapps  work

root@5592e59958e3:/usr/local/tomcat# cd webapps.dist/ # Enter webapps dist
root@5592e59958e3:/usr/local/tomcat/webapps.dist# ls # View content
ROOT  docs  examples  host-manager  manager

root@5592e59958e3:/usr/local/tomcat/webapps.dist# cd ..
root@5592e59958e3:/usr/local/tomcat# cp -r webapps.dist/* webapps # Copy webapps Dist content to webapps
root@5592e59958e3:/usr/local/tomcat# cd webapps #Enter webapps
root@5592e59958e3:/usr/local/tomcat/webapps# ls #View copy results
ROOT  docs  examples  host-manager  manager
Exercise 3: deploy elasticsearch+kibana
# es exposed many ports!
# es consumes a lot of memory
# es data generally needs to be placed in the security directory! mount
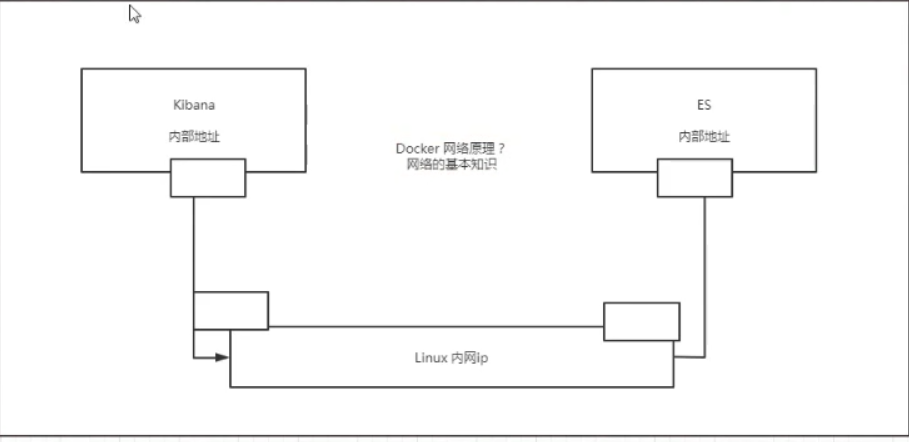
# --net somenetwork ? network configuration
# Start elasticsearch
[root@iz2zeak7sgj6i7hrb2g862z ~]# docker run -d --name elasticsearch -p 9200:9200 -p 9300:9300 -e "discovery.type=single-node" elasticsearch:7.6.2
# Test whether es is started successfully
➜ ~ curl localhost:9200
{
"name" : "d73ad2f22dd3",
"cluster_name" : "docker-cluster",
"cluster_uuid" : "atFKgANxS8CzgIyCB8PGxA",
"version" : {
"number" : "7.6.2",
"build_flavor" : "default",
"build_type" : "docker",
"build_hash" : "ef48eb35cf30adf4db14086e8aabd07ef6fb113f",
"build_date" : "2020-03-26T06:34:37.794943Z",
"build_snapshot" : false,
"lucene_version" : "8.4.0",
"minimum_wire_compatibility_version" : "6.8.0",
"minimum_index_compatibility_version" : "6.0.0-beta1"
},
"tagline" : "You Know, for Search"
}
#If the test is successful, turn off elasticSearch to prevent memory consumption
[root@iz2zeak7sgj6i7hrb2g862z ~]# docker stop d834ce2bd306
d834ce2bd306
[root@iz2zeak7sgj6i7hrb2g862z ~]# docker stats # Check the memory usage of docker container

#If the test is successful, close elasticSearch. You can add memory restrictions and modify the configuration file -e environment configuration
➜  ~ docker rm -f d73ad2f22dd3            # The stop command is also OK
➜  ~ docker run -d --name elasticsearch -p 9200:9200 -p 9300:9300 -e "discovery.type=single-node" -e ES_JAVA_OPTS="-Xms64m -Xmx512m" elasticsearch:7.6.2

[root@wanghailin /]# curl localhost:9200
# Access test
{
  "name" : "2e53ab3de428",
  "cluster_name" : "docker-cluster",
  "cluster_uuid" : "9-W_hA8DRIa3ai72hILxog",
  "version" : {
    "number" : "7.6.2",
    "build_flavor" : "default",
    "build_type" : "docker",
    "build_hash" : "ef48eb35cf30adf4db14086e8aabd07ef6fb113f",
    "build_date" : "2020-03-26T06:34:37.794943Z",
    "build_snapshot" : false,
    "lucene_version" : "8.4.0",
    "minimum_wire_compatibility_version" : "6.8.0",
    "minimum_index_compatibility_version" : "6.0.0-beta1"
  },
  "tagline" : "You Know, for Search"
}
Exercise 3: using kibana to connect es (elastic search)? Think about how the network can connect
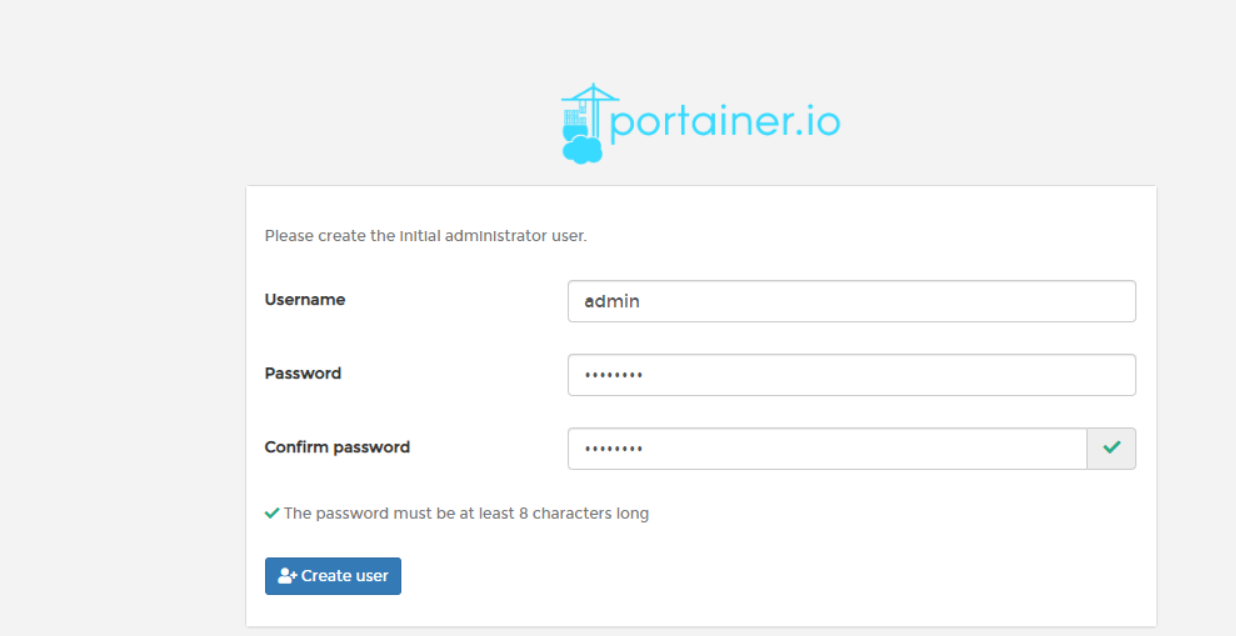
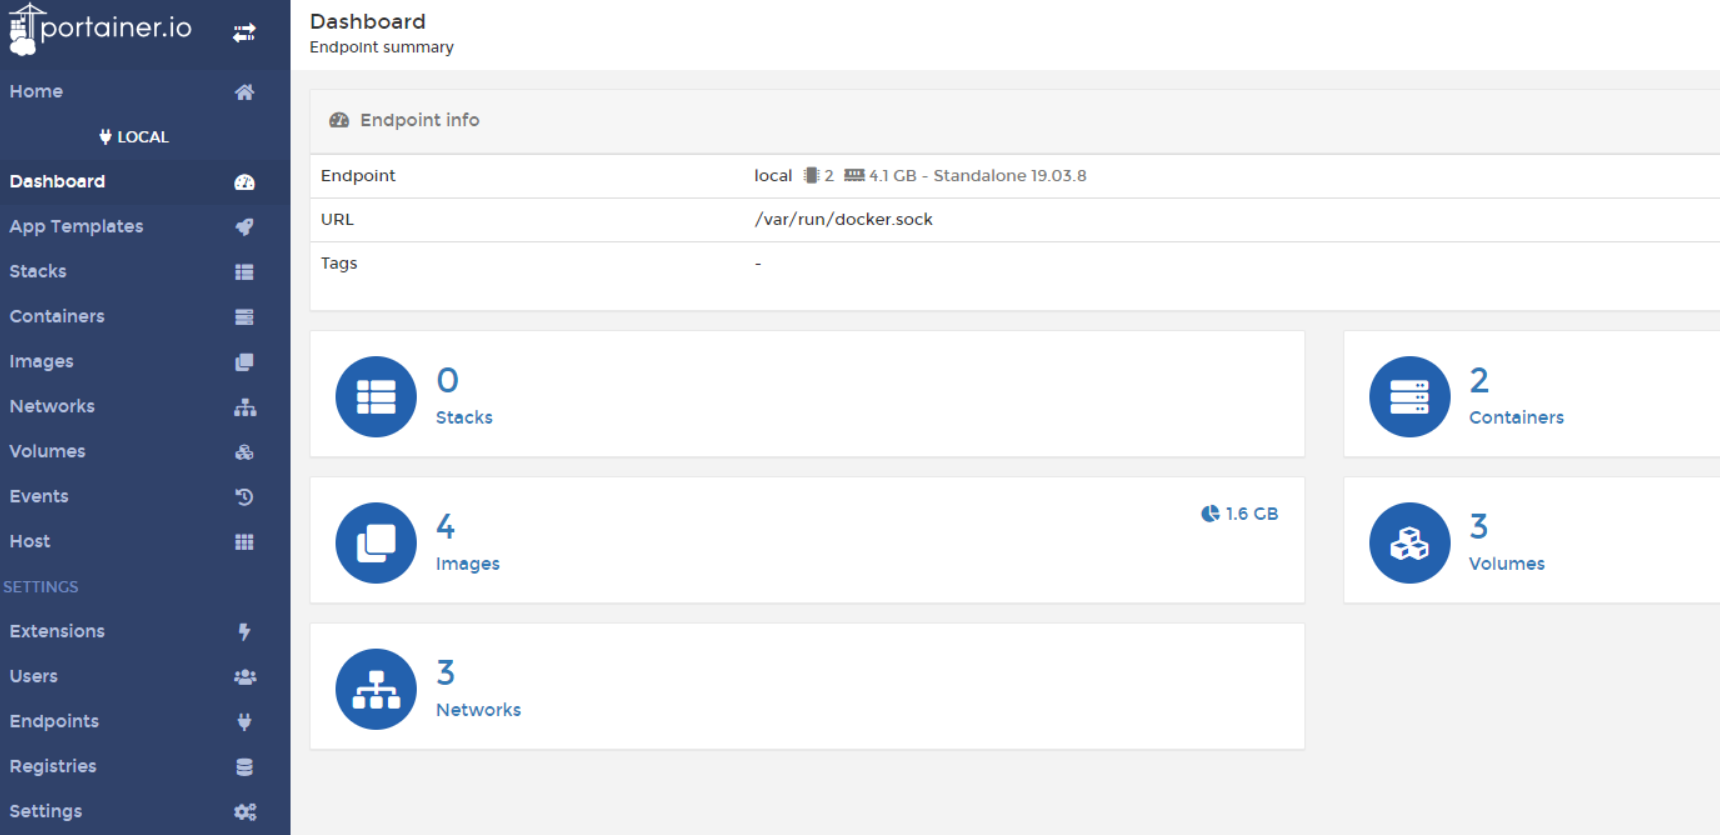
Portal visualization panel installation
- Portal (use this first)
docker run -d -p 8080:9000 \
--restart=always -v /var/run/docker.sock:/var/run/docker.sock --privileged=true portainer/portainer
- Rancher(CI/CD reuse)
What is a portal?
Docker graphical interface management tool! Provide a background panel for us to operate!
# Installation command
[root@iz2zeak7sgj6i7hrb2g862z ~]# docker run -d -p 8080:9000 \
> --restart=always -v /var/run/docker.sock:/var/run/docker.sock --privileged=true portainer/portainer

Unable to find image 'portainer/portainer:latest' locally
latest: Pulling from portainer/portainer
d1e017099d17: Pull complete
a7dca5b5a9e8: Pull complete
Digest: sha256:4ae7f14330b56ffc8728e63d355bc4bc7381417fa45ba0597e5dd32682901080
Status: Downloaded newer image for portainer/portainer:latest
81753869c4fd438cec0e31659cbed0d112ad22bbcfcb9605483b126ee8ff306d
Test access: Internet: 8080 http://ip:8080/
Panel after entering
Federated file system based on image principle
What is mirroring
Image is a lightweight and executable independent software protection, which is used to package the software running environment and the software developed based on the running environment. It contains all the contents required to run a software, including code, runtime library, environment variables and configuration files.
All applications can run directly by directly packaging the docker image!
How to get the image
- Download from remote warehouse
- Someone else copies it to you
- Make an image DockerFile by yourself
Docker image loading principle
UnionFs (Federated file system)
Union fs (Federated file system): Union file system (Union FS) is a layered, lightweight and high-performance file system. It supports the superposition of file system modifications from one submission to another. At the same time, different directories can be mounted into a single virtual file system. The union file system is the foundation of Docker image. Images can be inherited through layering. Based on the basic image (without parent image), various specific application images can be made
Features: multiple file systems can be loaded at the same time, but from the outside, only one file system can be seen. Joint loading will overlay all layers of file systems, so that the final file system will contain all underlying files and directories.
Docker image loading principle
The image of docker is actually composed of a layer by layer file system, which is called UnionFS.
boots(boot file system) mainly includes bootloader and kernel. Bootloader is mainly boot plus kernel. Bootfs file system will be added when Linux is just started. boots is at the bottom of Docker image. This layer is the same as our typical Linux/Unix system, including boot loader and kernel. After the boot is loaded, the whole kernel is in memory. At this time, the right to use the memory has been transferred from bootfs to the kernel. At this time, the system will also unload bootfs.
rootfs (root file system), above bootfs. It contains standard directories and files such as / dev,/proc,/bin,/etc in a typical Linux system. rootfs is a variety of operating system distributions, such as Ubuntu, Centos and so on.
Usually, the CentOS we install into the virtual machine are several G's. why is Docker only 200M here?

For a thin OS,rootfs can be very small. You only need to package the most basic commands, tools and program libraries. Because the underlying layer directly uses the Host kernel, you only need to provide rootfs. It can be seen that for different Linux distributions, boots are basically the same, and rootfs will be different, so different distributions can share bootfs
The virtual machine is at the minute level and the container is at the second level!
Hierarchical understanding
Tiered mirroring
We can download an image and pay attention to the log output of the download. We can see that it is downloading layer by layer
Thinking: why does Docker image adopt this hierarchical structure?
The biggest benefit, I think, is resource sharing! For example, if multiple images are built from the same base image, the host only needs to keep one base image on the disk, and only one base image needs to be loaded in the memory. In this way, it can serve all containers, and each layer of the image can be shared.
You can view the image hierarchy through the docker image inspect command
➜  / docker image inspect redis
[
    {
        "Id": "sha256:f9b9909726890b00d2098081642edf32e5211b7ab53563929a47f250bcdc1d7c",
        "RepoTags": [
            "redis:latest"
        ],
        "RepoDigests": [
            "redis@sha256:399a9b17b8522e24fbe2fd3b42474d4bb668d3994153c4b5d38c3dafd5903e32"
        ],
        "Parent": "",
        "Comment": "",
        "Created": "2020-05-02T01:40:19.112130797Z",
        "Container": "d30c0bcea88561bc5139821227d2199bb027eeba9083f90c701891b4affce3bc",
        "ContainerConfig": {
            "Hostname": "d30c0bcea885",
            "Domainname": "",
            "User": "",
            "AttachStdin": false,
            "AttachStdout": false,
            "AttachStderr": false,
            "ExposedPorts": {
                "6379/tcp": {}
            },
            "Tty": false,
            "OpenStdin": false,
            "StdinOnce": false,
            "Env": [
                "PATH=/usr/local/sbin:/usr/local/bin:/usr/sbin:/usr/bin:/sbin:/bin",
                "GOSU_VERSION=1.12",
                "REDIS_VERSION=6.0.1",
                "REDIS_DOWNLOAD_URL=http://download.redis.io/releases/redis-6.0.1.tar.gz",
                "REDIS_DOWNLOAD_SHA=b8756e430479edc162ba9c44dc89ac394316cd482f2dc6b91bcd5fe12593f273"
            ],
            "Cmd": [
                "/bin/sh",
                "-c",
                "#(nop) ",
                "CMD [\"redis-server\"]"
            ],
            "ArgsEscaped": true,
            "Image": "sha256:704c602fa36f41a6d2d08e49bd2319ccd6915418f545c838416318b3c29811e0",
            "Volumes": {
                "/data": {}
            },
            "WorkingDir": "/data",
            "Entrypoint": [
                "docker-entrypoint.sh"
            ],
            "OnBuild": null,
            "Labels": {}
        },
        "DockerVersion": "18.09.7",
        "Author": "",
        "Config": {
            "Hostname": "",
            "Domainname": "",
            "User": "",
            "AttachStdin": false,
            "AttachStdout": false,
            "AttachStderr": false,
            "ExposedPorts": {
                "6379/tcp": {}
            },
            "Tty": false,
            "OpenStdin": false,
            "StdinOnce": false,
            "Env": [
                "PATH=/usr/local/sbin:/usr/local/bin:/usr/sbin:/usr/bin:/sbin:/bin",
                "GOSU_VERSION=1.12",
                "REDIS_VERSION=6.0.1",
                "REDIS_DOWNLOAD_URL=http://download.redis.io/releases/redis-6.0.1.tar.gz",
                "REDIS_DOWNLOAD_SHA=b8756e430479edc162ba9c44dc89ac394316cd482f2dc6b91bcd5fe12593f273"
            ],
            "Cmd": [
                "redis-server"
            ],
            "ArgsEscaped": true,
            "Image": "sha256:704c602fa36f41a6d2d08e49bd2319ccd6915418f545c838416318b3c29811e0",
            "Volumes": {
                "/data": {}
            },
            "WorkingDir": "/data",
            "Entrypoint": [
                "docker-entrypoint.sh"
            ],
            "OnBuild": null,
            "Labels": null
        },
        "Architecture": "amd64",
        "Os": "linux",
        "Size": 104101893,
        "VirtualSize": 104101893,
        "GraphDriver": {
            "Data": {
                "LowerDir": "/var/lib/docker/overlay2/adea96bbe6518657dc2d4c6331a807eea70567144abda686588ef6c3bb0d778a/diff:/var/lib/docker/overlay2/66abd822d34dc6446e6bebe73721dfd1dc497c2c8063c43ffb8cf8140e2caeb6/diff:/var/lib/docker/overlay2/d19d24fb6a24801c5fa639c1d979d19f3f17196b3c6dde96d3b69cd2ad07ba8a/diff:/var/lib/docker/overlay2/a1e95aae5e09ca6df4f71b542c86c677b884f5280c1d3e3a1111b13644b221f9/diff:/var/lib/docker/overlay2/cd90f7a9cd0227c1db29ea992e889e4e6af057d9ab2835dd18a67a019c18bab4/diff",
                "MergedDir": "/var/lib/docker/overlay2/afa1de233453b60686a3847854624ef191d7bc317fb01e015b4f06671139fb11/merged",
                "UpperDir": "/var/lib/docker/overlay2/afa1de233453b60686a3847854624ef191d7bc317fb01e015b4f06671139fb11/diff",
                "WorkDir": "/var/lib/docker/overlay2/afa1de233453b60686a3847854624ef191d7bc317fb01e015b4f06671139fb11/work"
            },
            "Name": "overlay2"
        },
        "RootFS": {
            "Type": "layers",
            "Layers": [
                "sha256:c2adabaecedbda0af72b153c6499a0555f3a769d52370469d8f6bd6328af9b13",
                "sha256:744315296a49be711c312dfa1b3a80516116f78c437367ff0bc678da1123e990",
                "sha256:379ef5d5cb402a5538413d7285b21aa58a560882d15f1f553f7868dc4b66afa8",
                "sha256:d00fd460effb7b066760f97447c071492d471c5176d05b8af1751806a1f905f8",
                "sha256:4d0c196331523cfed7bf5bafd616ecb3855256838d850b6f3d5fba911f6c4123",
                "sha256:98b4a6242af2536383425ba2d6de033a510e049d9ca07ff501b95052da76e894"
            ]
        },
        "Metadata": {
            "LastTagTime": "0001-01-01T00:00:00Z"
        }
    }
]
understand:
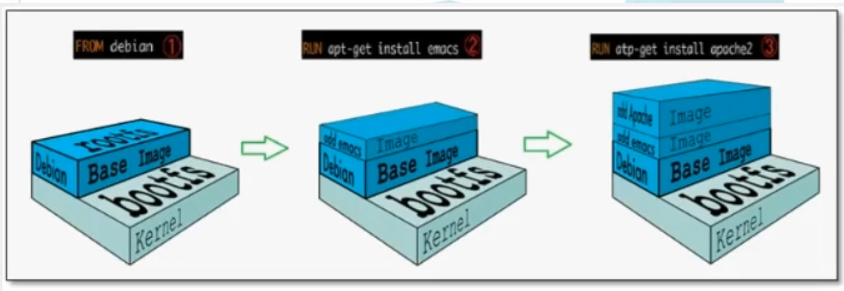
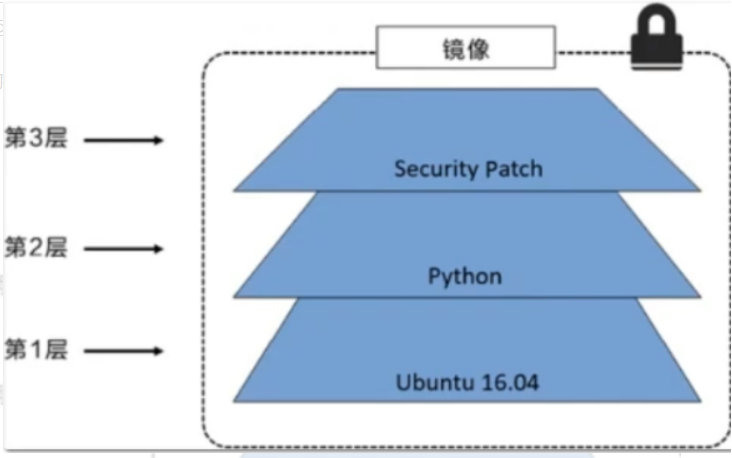
All Docker images start from a basic image layer. When modifying or adding new content, a new image layer will be created on top of the current image layer.
For a simple example, if it is based on Ubuntu Linux 16 04 create a new image, which is the first layer of the new image; If you add a Python package to this image,
A second mirror layer will be created above the basic mirror layer; If you continue to add a security patch, the third mirror layer will be created. The image currently contains three mirror layers, as shown in the following figure (this is only a simple example for demonstration).
We understand that while adding additional mirror layers, the mirror always remains the combination of all current mirrors
It is important to understand that while adding additional mirror layers, the mirror remains the combination of all current mirrors. The following figure shows a simple example. Each mirror layer contains three files, while the mirror contains six files from two mirror layers.
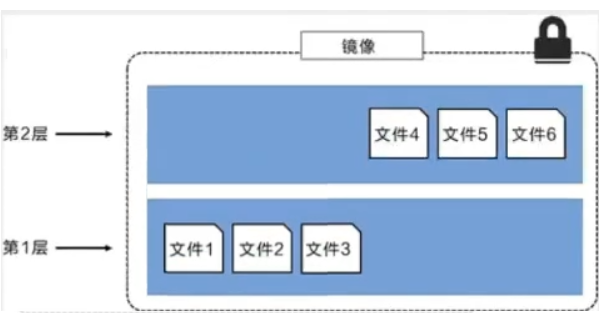
The image layer in the above figure is slightly different from that in the previous figure. The main purpose is to facilitate the display of files
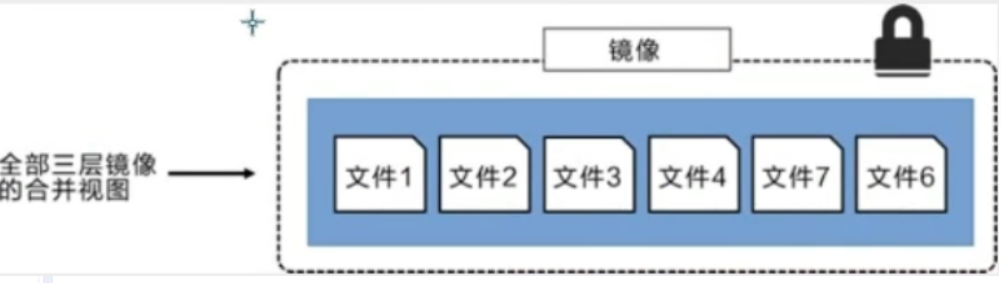
The following figure shows a slightly complex three-tier image. Externally, there are only 6 files in the entire image, because file 7 in the top layer is a newer version of file 5.
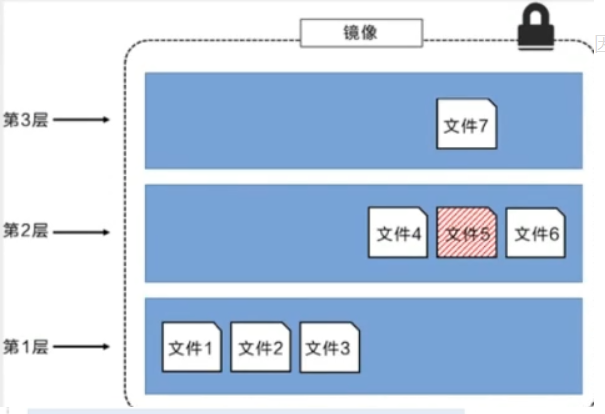
In the case of languages, the files in the upper image layer overwrite the files in the lower image layer. This allows the updated version of the file to be added to the image as a new image layer
Docker realizes the image layer stack through the storage engine (the new version adopts the snapshot mechanism), and ensures that multiple image layers are displayed as a unified file system
AUFS, Overlay2, Device Mapper, Btrfs, and ZFS are available on Linux. As the name suggests, each storage engine is based on the corresponding in Linux
Piece system or block device technology, and each storage engine has its unique performance characteristics.
Docker only supports a Windows filter storage engine on windows, which implements layering and cow based on NTFS file system [1].
The following figure shows the same three-tier image as the system display. All mirror layers are stacked and combined to provide a unified view.
characteristic
Docker images are read-only. When the container starts, a new writable layer is loaded on the top of the image!
This layer is what we usually call the container layer. What is under the container is called the mirror layer!

commit image
docker commit Submit the container as a new copy

# The principle of the command is similar to that of git
docker commit -m="Description information" -a="author" container id Target image name:[edition TAG]
Actual test
# 1. Start a default tomcat
[root@iz2zeak7sgj6i7hrb2g862z ~]# docker run -d -p 8080:8080 tomcat
de57d0ace5716d27d0e3a7341503d07ed4695ffc266aef78e0a855b270c4064e

# 2. It is found that the default tomcat has no webapps application, and there are no files under the official image default webapps!
#docker exec -it container id /bin/bash
[root@iz2zeak7sgj6i7hrb2g862z ~]# docker exec -it de57d0ace571 /bin/bash
root@de57d0ace571:/usr/local/tomcat#

# 3. From webapps Dist copy files into webapp
root@de57d0ace571:/usr/local/tomcat# cp -r webapps.dist/* webapps
root@de57d0ace571:/usr/local/tomcat# cd webapps
root@de57d0ace571:/usr/local/tomcat/webapps# ls
ROOT  docs  examples  host-manager  manager

# 4. Adjust the operated container into an image through commit! We can use our modified image in the future without copying webapps every time The file under dist has been transferred to webapps. This is a modified image of ourselves.
docker commit -m="Description information" -a="author" container id Target image name:[TAG]
docker commit -a="kuangshen" -m="add webapps app" container id tomcat02:1.0

[root@iz2zeak7sgj6i7hrb2g862z ~]# Docker commit - a = "submitted by CSP" - M = "add webapps app" de57d0ace571 tomcat02 one
sha256:d5f28a0bb0d0b6522fdcb56f100d11298377b2b7c51b9a9e621379b01cf1487e

[root@iz2zeak7sgj6i7hrb2g862z ~]# docker images
REPOSITORY            TAG                 IMAGE ID            CREATED             SIZE
tomcat02.1.0          latest              d5f28a0bb0d0        14 seconds ago      652MB
tomcat                latest              1b6b1fe7261e        5 days ago          647MB
nginx                 latest              9beeba249f3e        5 days ago          127MB
mysql                 5.7                 b84d68d0a7db        5 days ago          448MB
elasticsearch         7.6.2               f29a1ee41030        8 weeks ago         791MB
portainer/portainer   latest              2869fc110bf7        2 months ago        78.6MB
centos                latest              470671670cac        4 months ago        237MB
hello-world           latest              bf756fb1ae65        4 months ago        13.3kB
If you want to save the state of the current container, you can submit it through commit to obtain an image, just as we use the snapshot of the virtual machine.
ls
ROOT docs examples host-manager manager
4. Adjust the operated container to an image through commit! We can use our modified image in the future without copying webapps every time The file under dist has been transferred to webapps. This is a modified image of ourselves.
docker commit -m = "description" - a = "author" container id target image name: [TAG]
docker commit -a = "kuangshen" - m = "add webapps app" container id tomcat02:1.0
[ root@iz2zeak7sgj6i7hrb2g862z ~]#Docker commit - a = "submitted by csp" - m = "add webapps app" de57d0ace571 tomcat02 one
sha256:d5f28a0bb0d0b6522fdcb56f100d11298377b2b7c51b9a9e621379b01cf1487e
[root@iz2zeak7sgj6i7hrb2g862z ~]# docker images
REPOSITORY TAG IMAGE ID CREATED SIZE
tomcat02.1.0 latest d5f28a0bb0d0 14 seconds ago 652MB
tomcat latest 1b6b1fe7261e 5 days ago 647MB
nginx latest 9beeba249f3e 5 days ago 127MB
mysql 5.7 b84d68d0a7db 5 days ago 448MB
elasticsearch 7.6.2 f29a1ee41030 8 weeks ago 791MB
portainer/portainer latest 2869fc110bf7 2 months ago 78.6MB
centos latest 470671670cac 4 months ago 237MB
hello-world latest bf756fb1ae65 4 months ago 13.3kB
If you want to save the state of the current container, you can commit To commit and get an image, just as we use a snapshot of a virtual machine.