Virtualization Technology
Overview: the virtualization knowledge here refers to virtualizing a computer into multiple logical computers through virtualization technology, so as to improve the working efficiency of the computer. At the same time, each logical computer can run different operating systems, and the application programs can run in an independent space without affecting each other, so as to ensure the security
Virtualization technology types
- Full Virtualization: abstract all physical hardware resources through software, call them finally, use VMM software, and then establish an abstraction layer between the underlying hardware and the server, such as workstation
- Semi Virtualization: the operating system needs to be modified. It simulates the physical hardware functions in the form of software, and the physical hardware resources strengthen the support
Virtualization technology features
- Centralized management
- Improve hardware utilization
- The system application and service hardware are separated to improve flexibility
- Additional functions and schemes can be deployed to improve transparent load balancing, fault migration and other application environments (high availability)
- The failure of the local physical machine will make the virtual machine unavailable, and the files in the virtual machine may be damaged
- Implement configuration assistance, and the management personnel have difficulties in operation and maintenance and troubleshooting
- Simulate multiple operating systems in one operating system
- Simulating physical hardware devices in the form of software
KVM
Introduction to KVM
KVM (kernel based virtual machine) – a kernel based virtual machine, which belongs to a full virtualization scheme and requires the cpu to support Intel-VT-x or AMD-V
KVM three modes
- Client mode: the mode in which the client runs in the operating system. The client is divided into kernel mode and user mode
- Kernel mode: simulate cpu and memory, realize customer mode switching, process the introduction from customer mode, and KVM runs in this mode
- User mode: it provides users with user space tools for virtual machine management and I/O on behalf of users. QEMU works in this mode (mainly used for docking between abstract layer and kernel layer)
KVM virtualization platform deployment
Equipment: CentOS7, 8G memory, single network card, 192.168 one hundred and eighteen point four four
Virtual machine settings support virtualization

[root@localhost ~]# hostnamectl set-hostname kvm			#Modify host name
[root@localhost ~]# su
[root@kvm ~]# mkdir /mount
[root@kvm ~]# vim /etc/fstab								#Permanently mount a mirrored disc
/dev/cdrom /mount iso9660 defaults 0 0
[root@kvm ~]# mount -a
[root@kvm ~]# vim /etc/ssh/sshd_config 						#Set the anti DNS in the sshd configuration file to NO
UseDNS no
[root@kvm ~]# systemctl restart sshd


##Make local warehouse
[root@kvm yum.repos.d]# mv CentOS-* bak
[root@kvm yum.repos.d]# ls
bak
[root@kvm yum.repos.d]# vim local.repo
[local]
name=kvm
baseurl=file:///mount
gpgcheck=0
enabled=1
[root@kvm yum.repos.d]# yum clean all
[root@kvm yum.repos.d]# yum makecache

##Install qemu and other necessary tools
[root@kvm yum.repos.d]# yum install -y qemu-kvm qemu-kvm-tools virt-install qemu-img bridge-utils libvirt virt-manager
 notes: qemu-kvm by KVM modular, qemu-kvm-tools yes KVM Commissioning tools, virt-install Is a command line tool for virtual machines, qemu-img yes qemu Components,
bridge-utils Bridging network support tools, libvirt For virtual machine management tools, virt-manager GUI management virtual machine
- Check whether the cpu supports virtualization
[root@kvm yum.repos.d]# cat /proc/cpuinfo | grep vmx		#See vmx again, indicating that it can be supported
flags		: fpu vme de pse tsc msr pae mce cx8 apic sep mtrr pge mca cmov pat pse36 clflush mmx fxsr sse sse2 ss ht syscall nx pdpe1gb rdtscp lm constant_tsc arch_perfmon nopl xtopology tsc_reliable nonstop_tsc eagerfpu pni pclmulqdq vmx ssse3 fma cx16 pcid sse4_1 sse4_2 x2apic movbe popcnt tsc_deadline_timer aes xsave avx f16c rdrand hypervisor lahf_lm abm 3dnowprefetch ssbd ibrs ibpb stibp ibrs_enhanced tpr_shadow vnmi ept vpid fsgsbase tsc_adjust bmi1 avx2 smep bmi2 invpcid rdseed adx smap clflushopt xsaveopt xsavec xgetbv1 arat pku ospke spec_ctrl intel_stibp flush_l1d arch_capabilities
flags		: fpu vme de pse tsc msr pae mce cx8 apic sep mtrr pge mca cmov pat pse36 clflush mmx fxsr sse sse2 ss ht syscall nx pdpe1gb rdtscp lm constant_tsc arch_perfmon nopl xtopology tsc_reliable nonstop_tsc eagerfpu pni pclmulqdq vmx ssse3 fma cx16 pcid sse4_1 sse4_2 x2apic movbe popcnt tsc_deadline_timer aes xsave avx f16c rdrand hypervisor lahf_lm abm 3dnowprefetch ssbd ibrs ibpb stibp ibrs_enhanced tpr_shadow vnmi ept vpid fsgsbase tsc_adjust bmi1 avx2 smep bmi2 invpcid rdseed adx smap clflushopt xsaveopt xsavec xgetbv1 arat pku ospke spec_ctrl intel_stibp flush_l1d arch_capabilities
............................................................
[root@kvm yum.repos.d]# lsmod | grep kvm			#View the loaded kvm modules
kvm_intel             183621  0
kvm                   586948  1 kvm_intel
irqbypass              13503  1 kvm
[root@kvm yum.repos.d]# ls -sf /lib/systemd/system/graphical.target 	/etc/systemd/system/default.target
##Set the display mode of the startup interface
- Set Bridge bridging mode
[root@kvm ~]# vim /etc/sysconfig/network-scripts/ifcfg-ens33
 TYPE=Ethernet
PROXY_METHOD=none
BROWSER_ONLY=no
BOOTPROTO=none						#Change to none
DEFROUTE=yes
IPV4_FAILURE_FATAL=no
IPV6INIT=yes
IPV6_AUTOCONF=yes
IPV6_DEFROUTE=yes
IPV6_FAILURE_FATAL=no
IPV6_ADDR_GEN_MODE=stable-privacy
NAME=ens33
UUID=9c1fe1a3-6fd0-45fc-93d3-4c112430fc53
DEVICE=ens33
ONBOOT=yes
#IPADDR=192.168.118.44							#Comment out the original IP address and other information
#NETMASK=255.255.255.0
#GATEWAY=192.168.118.2
#DNS1=114.114.114.114
BRIDGE=br0										#Set the bridge mode and manage br0 network cards
[root@kvm ~]# vim /etc/sysconfig/network-scripts/ifcfg-br0		#Create bridge network card
TYPE=Bridge
PROXY_METHOD=none
BROWSER_ONLY=yes
BOOTPROTO=static
DEFROUTE=yes
IPV4_FAILURE_FATAL=no
IPV6INIT=yes
IPV6_AUTOCONF=yes
IPV6_DEFROUTE=yes
IPV6_FAILURE_FATAL=no
IPV6_ADDR_GEN_MODE=stable-privacy
NAME=br0
DEVICE=br0
ONBOOT=yes
IPADDR=192.168.118.55
NETMASK=255.255.255.0
GATEWAY=192.168.118.2
DNS1=114.114.114.11
- Create KVM storage and image data directory and upload centos7 image
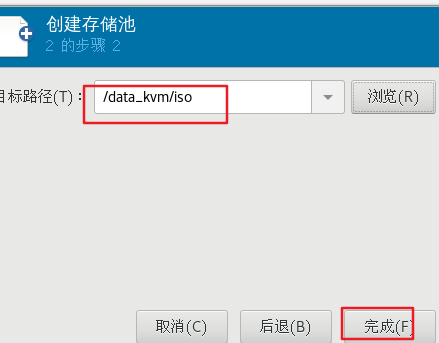
[root@kvm ~]# mkdir -p /data_kvm/iso
[root@kvm ~]# mkdir -p /data_kvm/store
[root@kvm ~]# cd /abc
[root@kvm abc]# ls
CentOS-7-x86_64-DVD-1810-7.6.iso			#Download the image file here first
[root@kvm abc]# cp -p CentOS-7-x86_64-DVD-1810-7.6.iso /data_kvm/iso/		#Copy image file to / data_kvm/iso / directory
[root@kvm abc]# systemctl restart network									#Restart the network card
[root@kvm abc]# ifconfig
br0: flags=4163<UP,BROADCAST,RUNNING,MULTICAST>  mtu 1500
        inet 192.168.118.55  netmask 255.255.255.0  broadcast 192.168.118.255
        inet6 fe80::8b77:e9af:5e0c:d6db  prefixlen 64  scopeid 0x20<link>
        ether 00:0c:29:95:cd:9a  txqueuelen 1000  (Ethernet)
        RX packets 37  bytes 6605 (6.4 KiB)
        RX errors 0  dropped 0  overruns 0  frame 0
        TX packets 46  bytes 6017 (5.8 KiB)
        TX errors 0  dropped 0 overruns 0  carrier 0  collisions 0
- Managing virtual machines using virtual machine manager
[root@kvm abc]# virt-manager
- Create storage pool
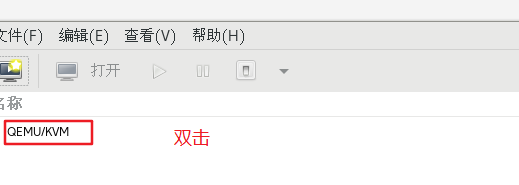
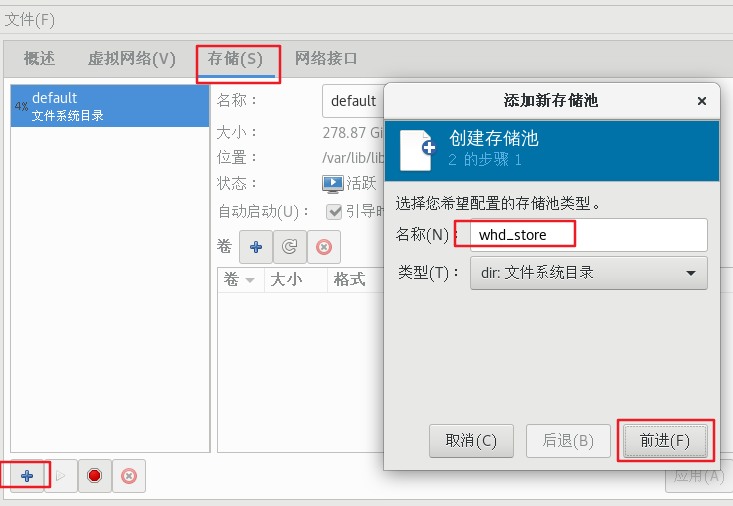
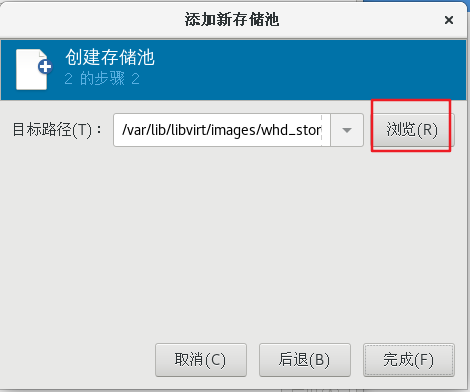

- Create storage volume
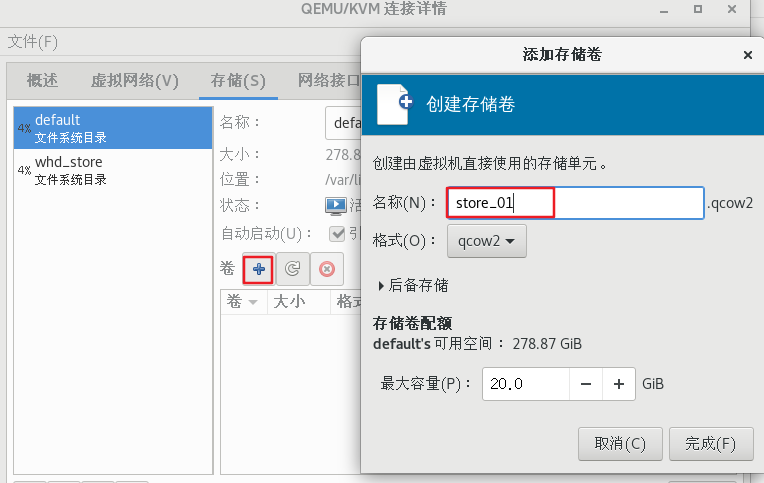
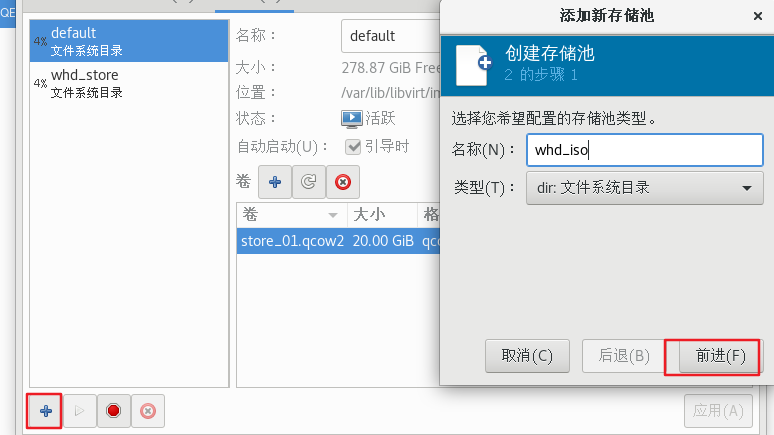
- Create mirror pool
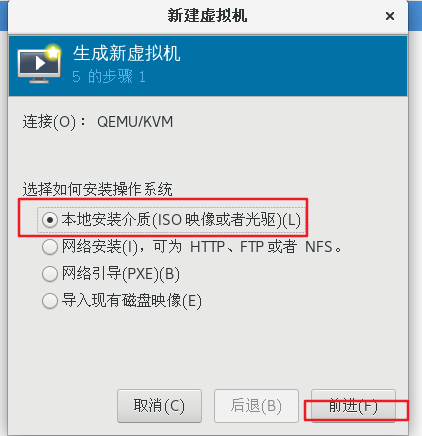
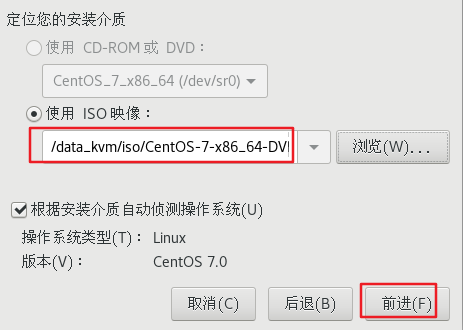
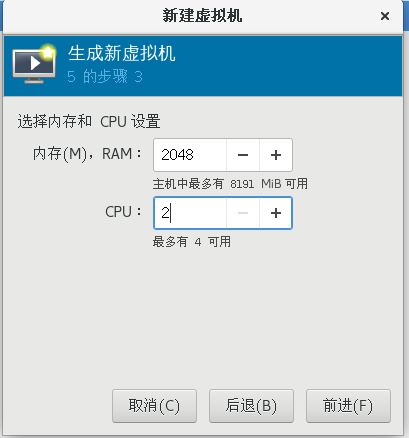
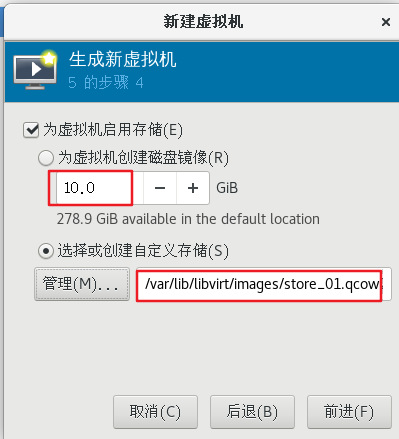
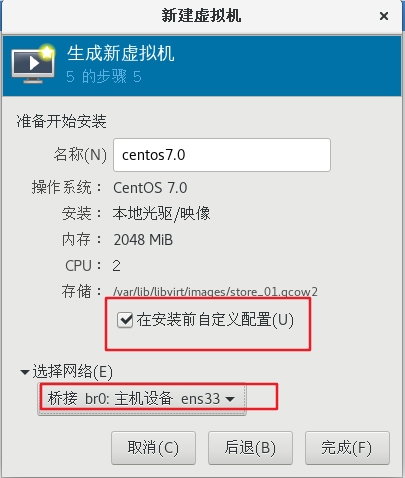
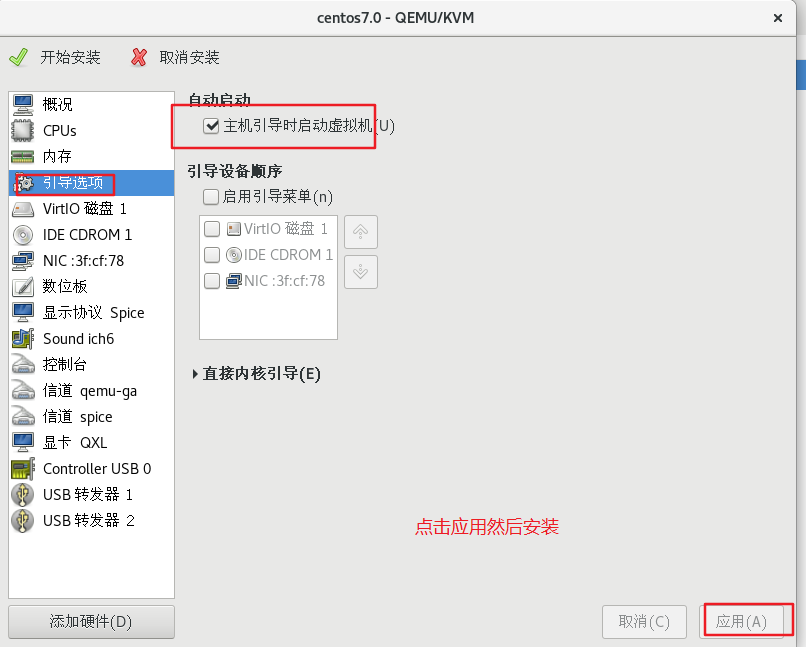
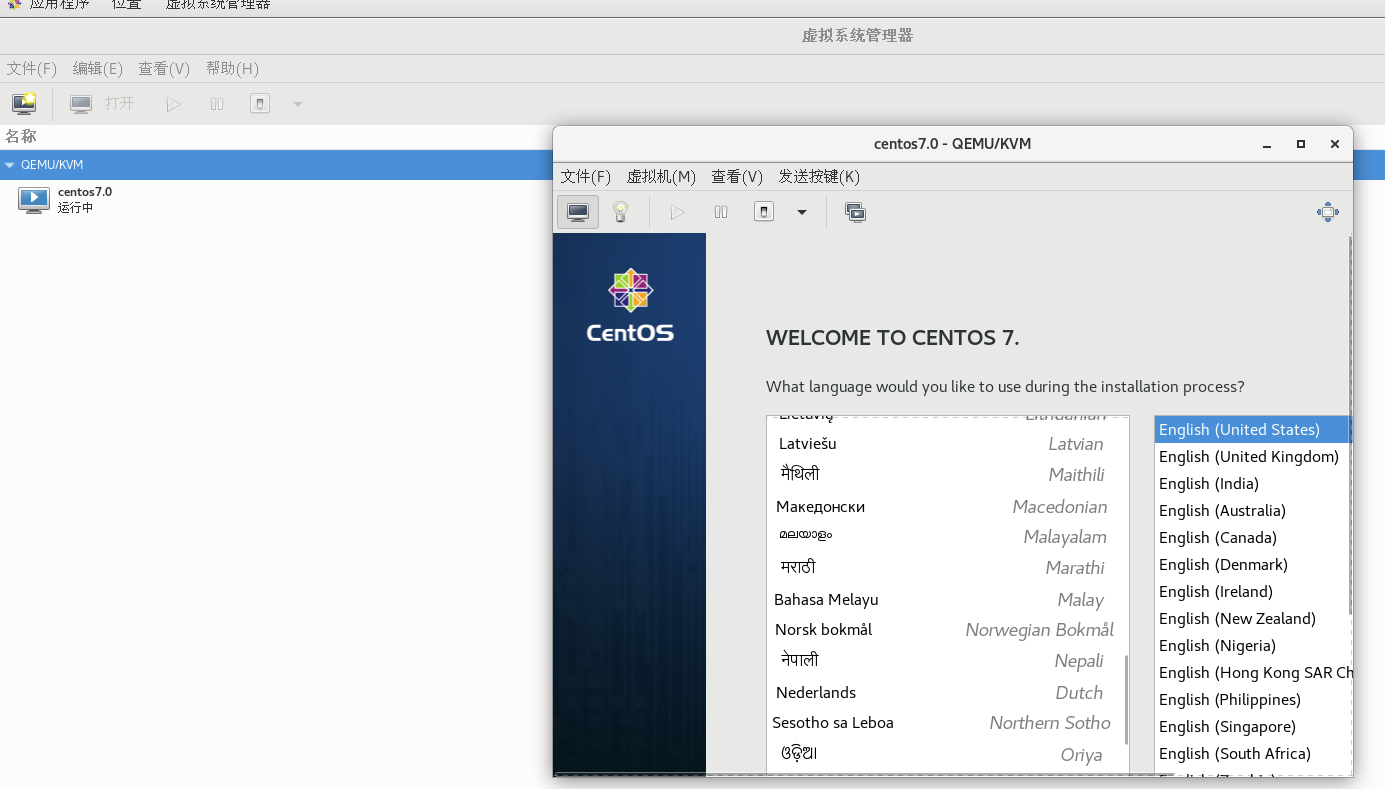
- Enter virtual machine manager to create a new virtual machine
