1, Bitmap principle
1. Introduction to bitmap
The computer can display images in bitmap and vector format.
1.1 bitmap
Image is also called dot matrix or raster. It uses small dots called pixels to describe the image. A computer screen is actually a grid containing a large number of pixels. When we enlarge the bitmap, each pixel looks like a mosaic color block.
1.2. Vector
Use lines and curves to describe graphics. The elements of these graphics are some points, lines, rectangles, polygons, circles and arcs, which are calculated by mathematical formulas.
The simplest difference between bitmap and vector graph is that vector graph can be enlarged infinitely without distortion; Bitmaps cannot.
Software such as Photoshop(PS), which is mainly used to process bitmap, is called image processing software; Software specialized in vector graphics, which we call graphic design software, such as Adobe Illustrator, CorelDRAW, Flash MX, etc.
2.BMP bitmap file
Common image file formats include BMP, JPG(JPE,JPEG), GIF, etc.
Bmp image file format is the image file storage format adopted by windows, which is supported by all image processing software running in Windows environment. BMP files after Windows 3.0 refer to device independent bitmap (DIB). The default file extension for BMP bitmap files is BMP, sometimes it also takes DIB or RLE as extension.
3.BMP file structure
BMP file consists of 4 parts:
Bitmap file header
Bitmap information header
Color table
Color dot matrix data (bits data)
The 24 bit true color bitmap has no color table, so it has only three parts: 1, 2 and 4.
2, Image processing
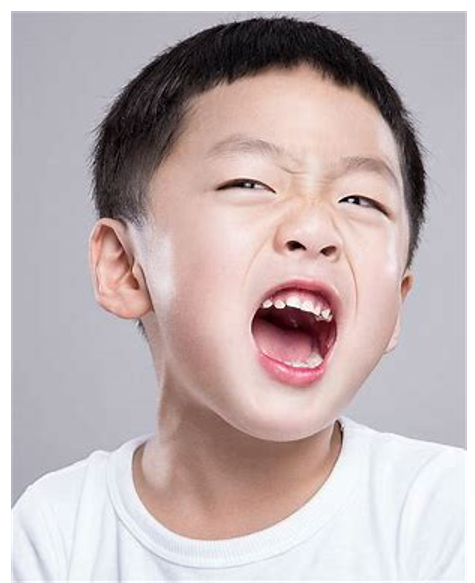
1. Original drawing
2. Compare BMP files with different bit depths
2.1 save the picture as monochrome, 16 color, 256 color bitmap and 24 bit bitmap (BMP) files respectively through computer drawing program and PS software.
Get the following pictures
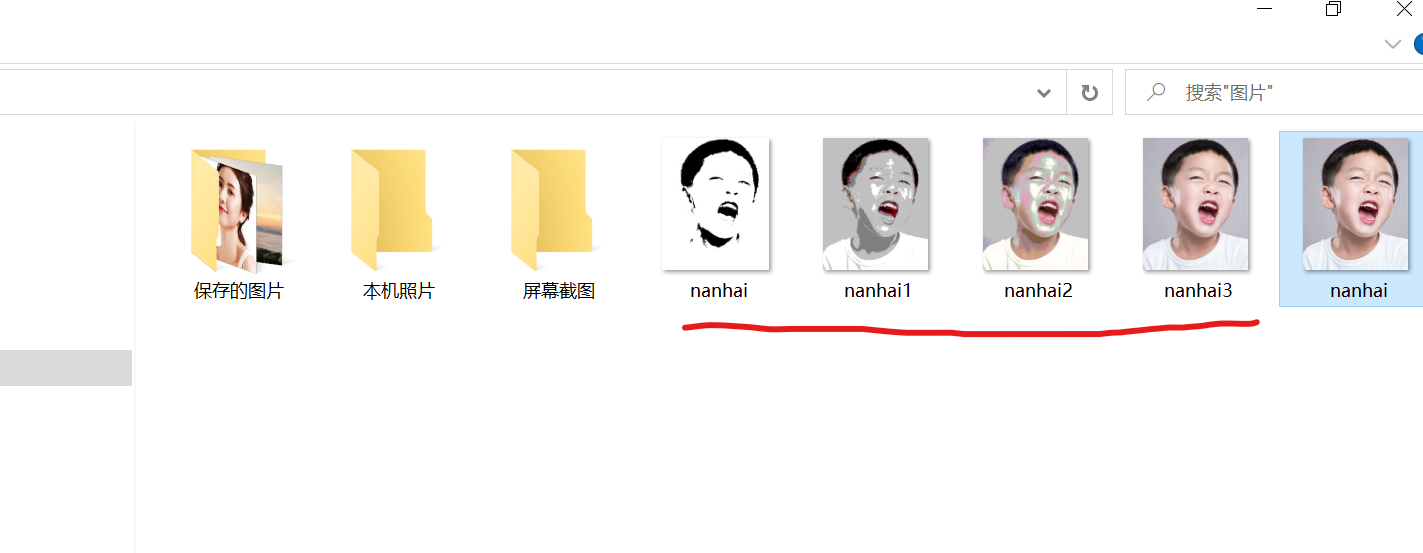
View these picture information
monochrome bitmap
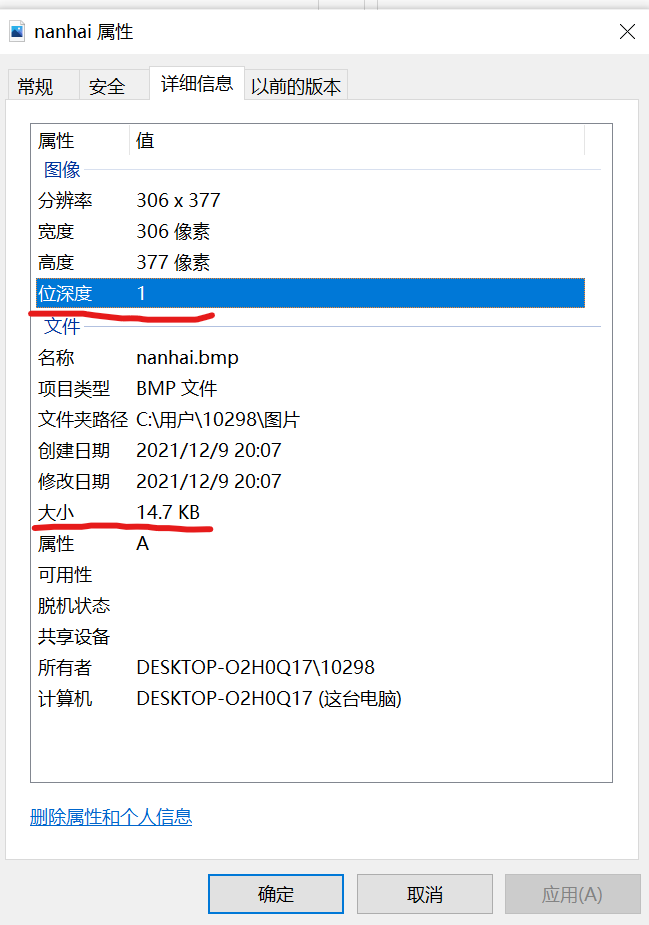
The size of the information display picture is 14.7KB, and the bitmap size calculation: 14.7 * 1024 = 15052.8 bytes, which is the size without file header information.
Use UltraEdit to open the picture and view the file header information:
16 color bitmap

The size of the information display picture is 56.6KB, and the bitmap size calculation: 56.6 * 1024 = 57958.4 bytes, which is the size without file header information.
Use UltraEdit to open the picture and view the file header information:
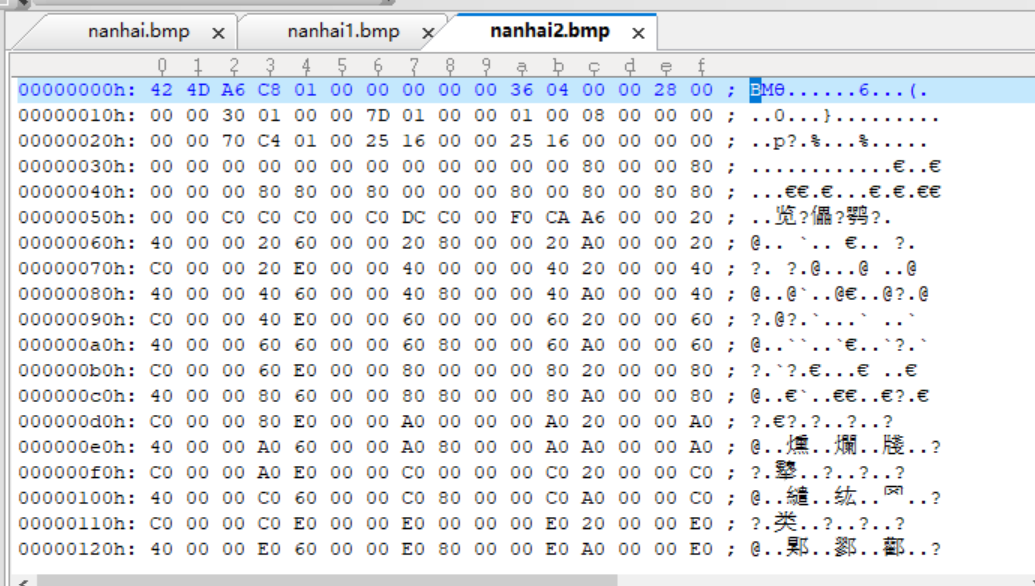
256 color bitmap
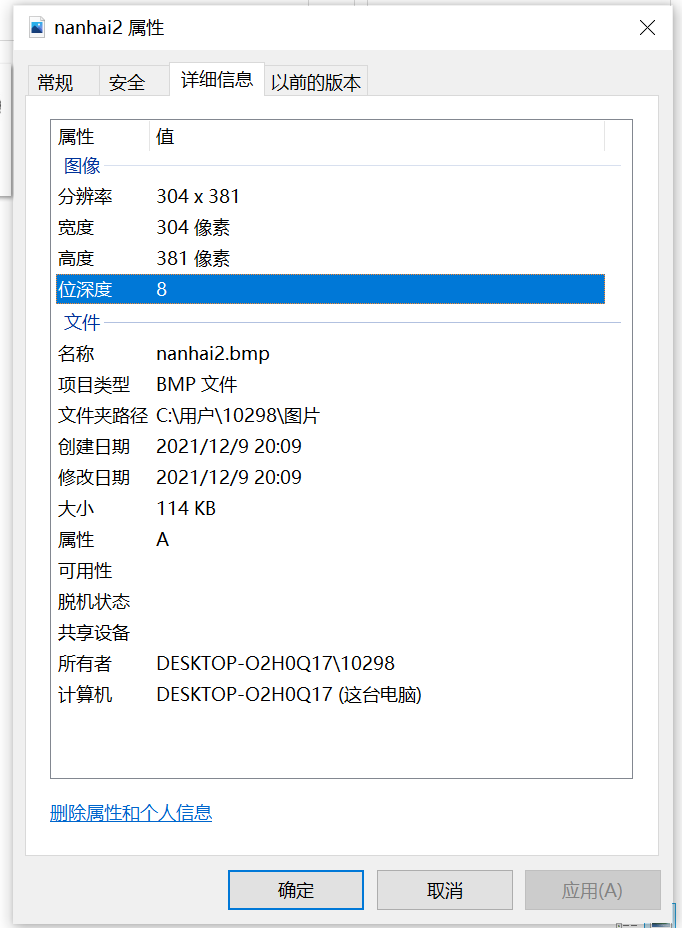
The size of the information display picture is 114KB, and the bitmap size calculation: 114 * 1024 = 116736 bytes, which is the size without file header information.
Use UltraEdit to open the picture and view the file header information:
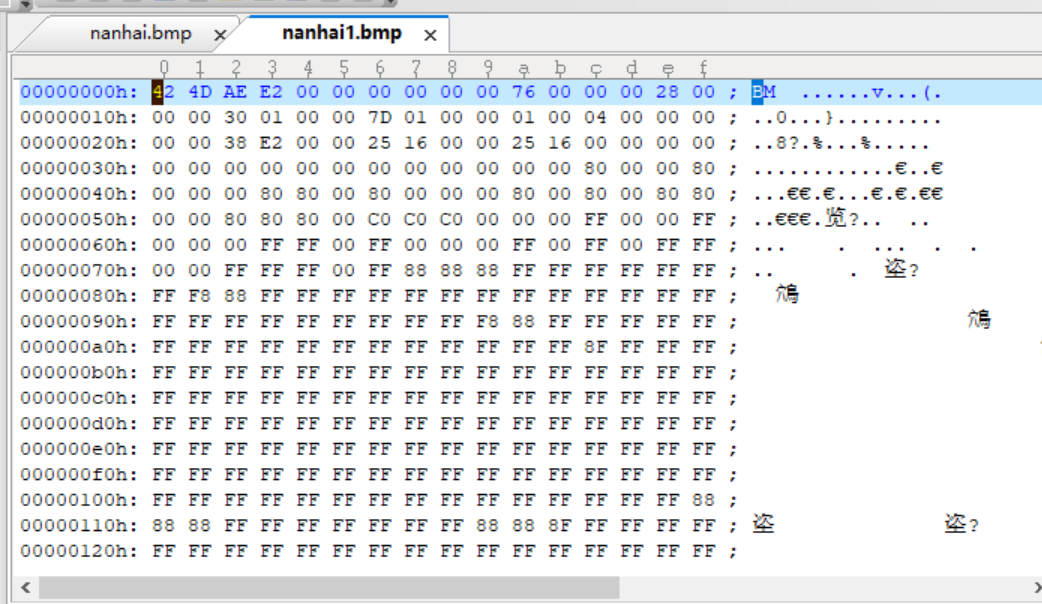
24 bit bitmap
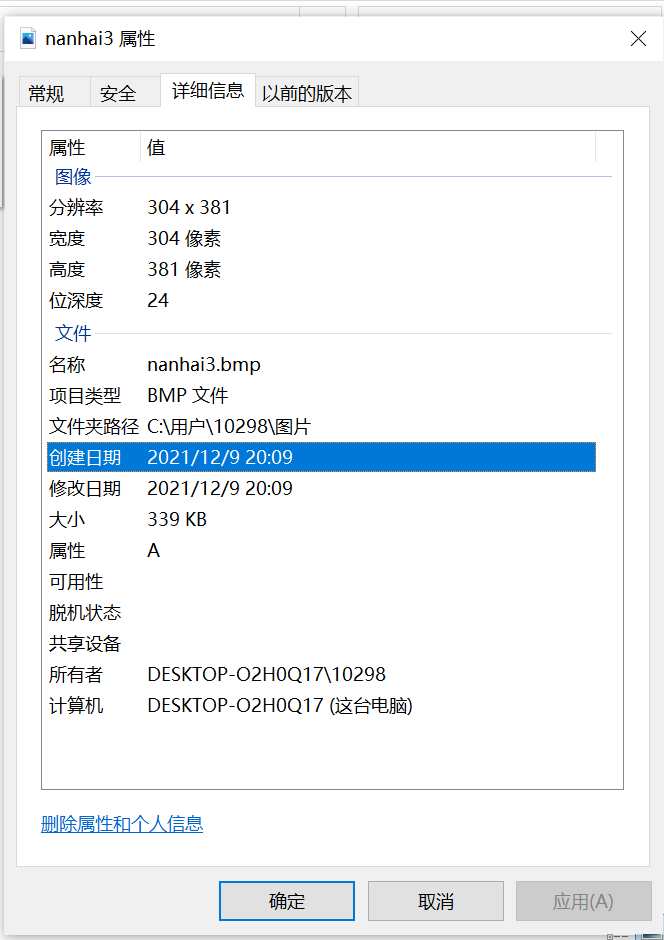
The size of the information display picture is 339KB, and the bitmap size calculation: 339 * 1024 = 134713636 bytes, which is the size without file header information.
Use UltraEdit to open the picture and view the file header information:
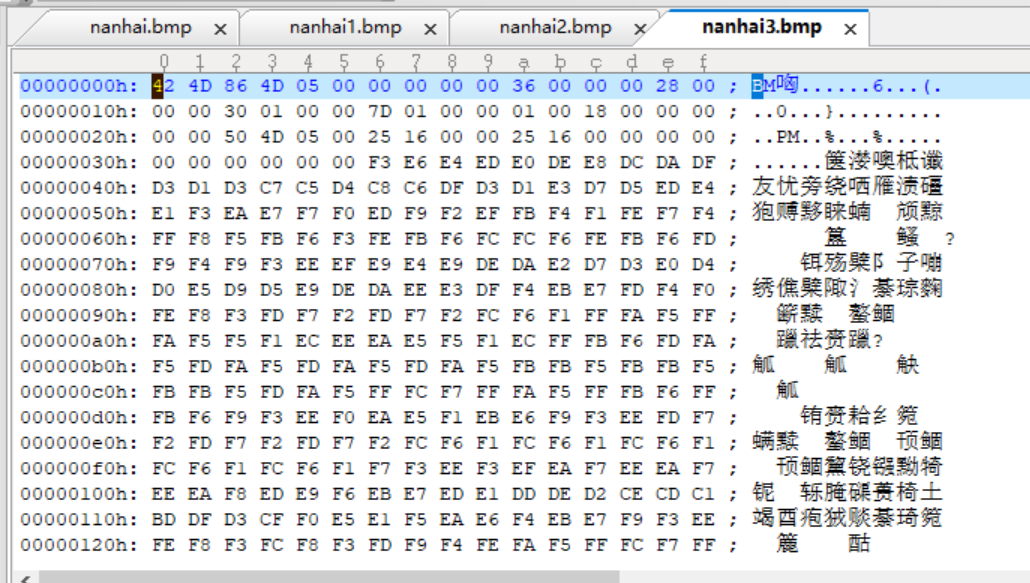
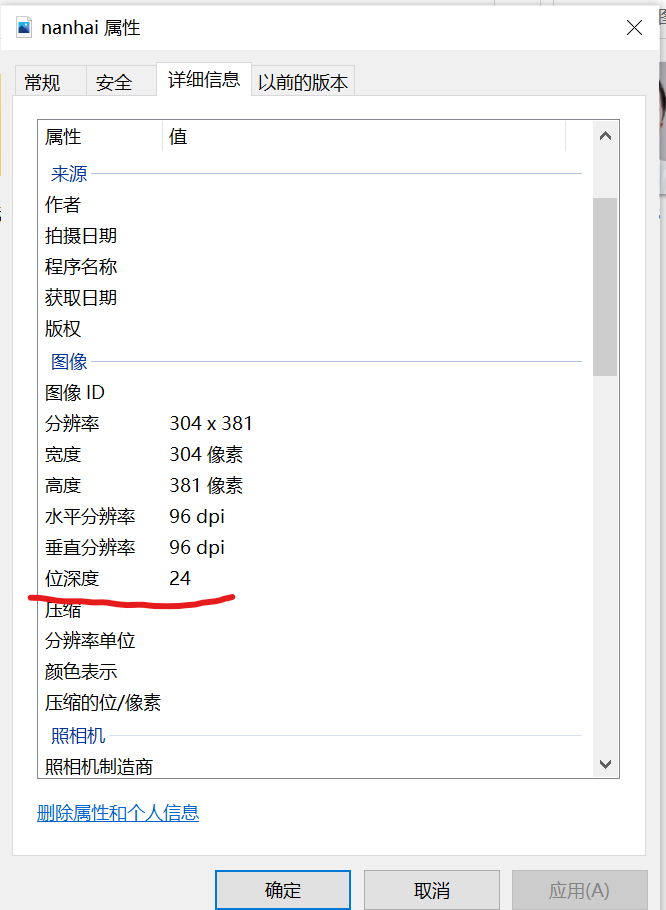
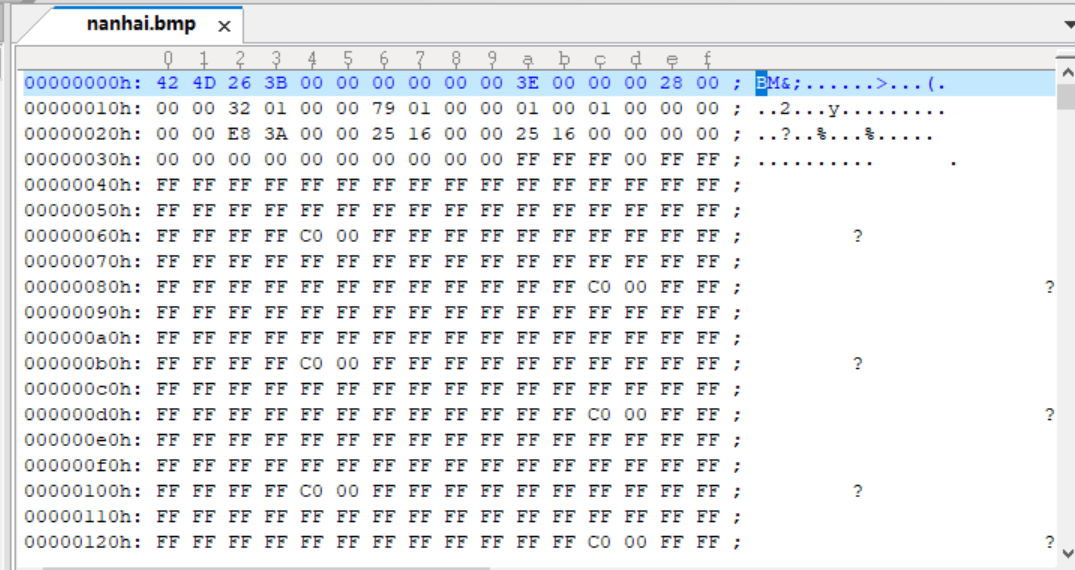
Analysis header Standard Code (take nanhai.bmp as an example)
Bitmap file header (BITMAPFILEHEADER)

The bitmap file header is divided into 4 parts, 14 bytes in total:
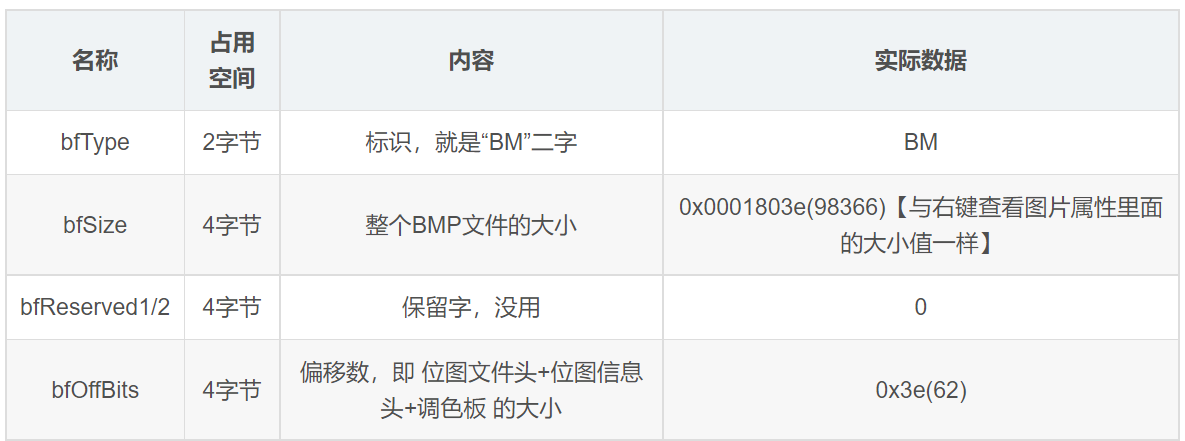
Note that the data of Windows is read backwards, which is the characteristic of PC. if a piece of data is 50 1A 25 3C, the reverse reading is 3C 25 1A50, that is 0x3C251A50. Therefore, if the data of bfSize is 26 3b 00 00, it actually becomes 0x0000b362, that is, 0xb362.
Convert the files of the original image nanhai into BMP, JPEG, GIF and PNG respectively
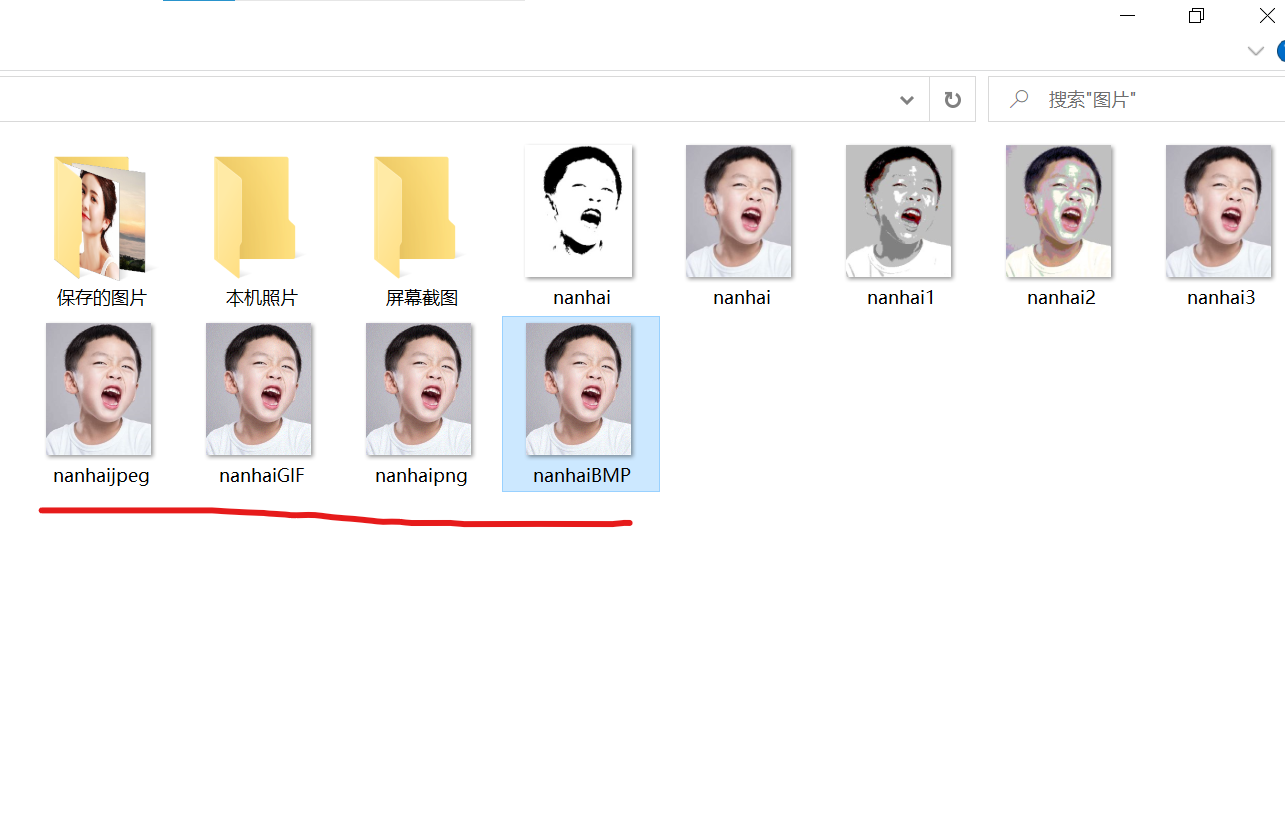
Compare size:
The size of the original image is 347526 bytes
BMP size: 347526 bytes
JPEG size: 27155 bytes
GIF size: 49980 bytes
PNG size: 82317 bytes
3, Singular decomposition is used to reduce the dimension of the image
Run code:
import numpy as np
import os
from PIL import Image
import matplotlib.pyplot as plt
import matplotlib as mpl
from pprint import pprint


def restore1(sigma, u, v, K):  # Singular value, left eigenvector, right eigenvector
    m = len(u)
    n = len(v[0])
    a = np.zeros((m, n))
    for k in range(K):
        uk = u[:, k].reshape(m, 1)
        vk = v[k].reshape(1, n)
        a += sigma[k] * np.dot(uk, vk)
    a[a < 0] = 0
    a[a > 255] = 255
    # a = a.clip(0, 255)
    return np.rint(a).astype('uint8')


def restore2(sigma, u, v, K):  # Singular value, left eigenvector, right eigenvector
    m = len(u)
    n = len(v[0])
    a = np.zeros((m, n))
    for k in range(K+1):
        for i in range(m):
            a[i] += sigma[k] * u[i][k] * v[k]
    a[a < 0] = 0
    a[a > 255] = 255
    return np.rint(a).astype('uint8')


if __name__ == "__main__":
    A = Image.open("nanhai.jfif", 'r')
    print(A)
    output_path = r'D:\Users\nanhai'
    if not os.path.exists(output_path):
        os.mkdir(output_path)
    a = np.array(A)
    print(a.shape)
    K = 50
    u_r, sigma_r, v_r = np.linalg.svd(a[:, :, 0])
    u_g, sigma_g, v_g = np.linalg.svd(a[:, :, 1])
    u_b, sigma_b, v_b = np.linalg.svd(a[:, :, 2])
    plt.figure(figsize=(11, 9), facecolor='w')
    mpl.rcParams['font.sans-serif'] = ['simHei']
    mpl.rcParams['axes.unicode_minus'] = False
    for k in range(1, K+1):
        print(k)
        R = restore1(sigma_r, u_r, v_r, k)
        G = restore1(sigma_g, u_g, v_g, k)
        B = restore1(sigma_b, u_b, v_b, k)
        I = np.stack((R, G, B), axis=2)
        Image.fromarray(I).save('%s\\svd_%d.png' % (output_path, k))
        if k <= 12:
            plt.subplot(3, 4, k)
            plt.imshow(I)
            plt.axis('off')
            plt.title('Number of singular values:%d' % k)
    plt.suptitle('SVD Image decomposition', fontsize=20)
    plt.tight_layout()
    # plt.subplots_adjust(top=0.9)
    plt.show()

When there are fewer singular values, the more blurred the picture is.
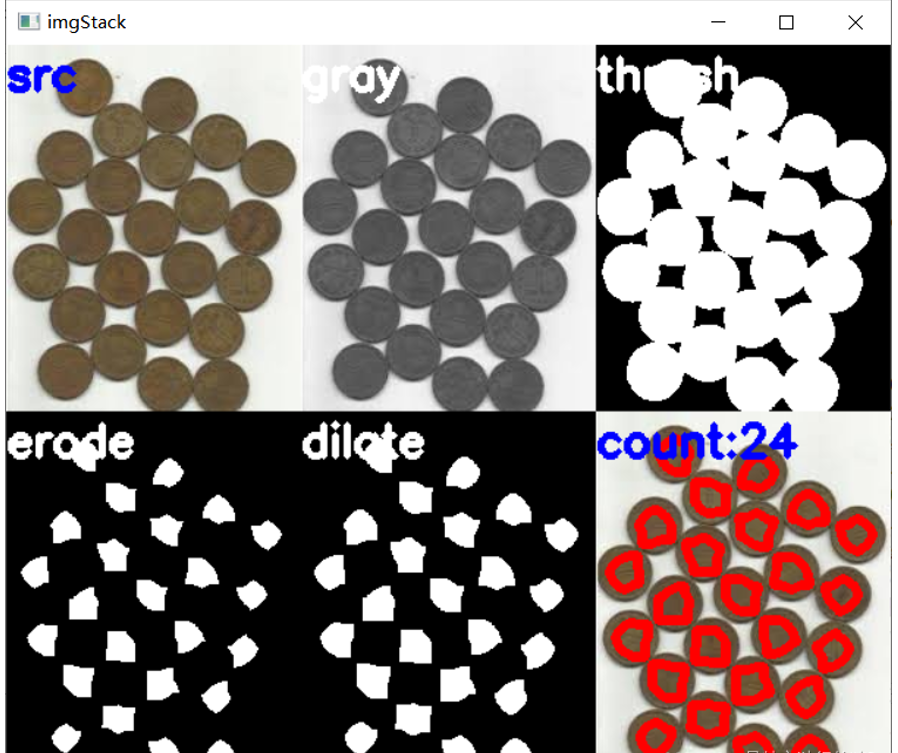
4, The number of coins and cells in two sample images is detected by image opening and closing operation
Processing process: read picture – > Convert to gray picture – > binarization – > corrosion – > expansion – > find the center point – > identification – > display
code:
Coin:
import cv2
import numpy as np

def stackImages(scale, imgArray):
    """
        Press multiple images into the same window for display
        :param scale:float Type, output image display percentage, control zoom scale, 0.5=The image resolution is reduced by half
        :param imgArray:Tuple nested list, image matrix to be arranged
        :return:Output image
    """
    rows = len(imgArray)
    cols = len(imgArray[0])
    rowsAvailable = isinstance(imgArray[0], list)
    width = imgArray[0][0].shape[1]
    height = imgArray[0][0].shape[0]
    if rowsAvailable:
        for x in range(0, rows):
            for y in range(0, cols):
                if imgArray[x][y].shape[:2] == imgArray[0][0].shape[:2]:
                    imgArray[x][y] = cv2.resize(imgArray[x][y], (0, 0), None, scale, scale)
                else:
                    imgArray[x][y] = cv2.resize(imgArray[x][y], (imgArray[0][0].shape[1], imgArray[0][0].shape[0]),
                                                None, scale, scale)
                if len(imgArray[x][y].shape) == 2: imgArray[x][y] = cv2.cvtColor(imgArray[x][y], cv2.COLOR_GRAY2BGR)
        imageBlank = np.zeros((height, width, 3), np.uint8)
        hor = [imageBlank] * rows
        hor_con = [imageBlank] * rows
        for x in range(0, rows):
            hor[x] = np.hstack(imgArray[x])
        ver = np.vstack(hor)
    else:
        for x in range(0, rows):
            if imgArray[x].shape[:2] == imgArray[0].shape[:2]:
                imgArray[x] = cv2.resize(imgArray[x], (0, 0), None, scale, scale)
            else:
                imgArray[x] = cv2.resize(imgArray[x], (imgArray[0].shape[1], imgArray[0].shape[0]), None, scale, scale)
            if len(imgArray[x].shape) == 2: imgArray[x] = cv2.cvtColor(imgArray[x], cv2.COLOR_GRAY2BGR)
        hor = np.hstack(imgArray)
        ver = hor
    return ver


#Read picture
src = cv2.imread("C:/Users/10298/Pictures/Saved Pictures/coin.png")
img = src.copy()

#Grayscale
img_1 = cv2.cvtColor(img, cv2.COLOR_BGR2GRAY)

#Binarization
ret, img_2 = cv2.threshold(img_1, 127, 255, cv2.THRESH_BINARY_INV + cv2.THRESH_OTSU)

#Corrosion (corrosion is mainly to distinguish each coin. If it is too large, it will cause loss, and if it is too low, it will not be able to distinguish. The parameters can be set by themselves to achieve appropriate.)
kernel = np.ones((17, 17), int)
img_3 = cv2.erode(img_2, kernel, iterations=1)

#Expand (expand to the appropriate value so that each white area is a coin.)
kernel = np.ones((3, 3), int)
img_4 = cv2.dilate(img_3, kernel, iterations=1)

#Find the coin center
contours, hierarchy = cv2.findContours(img_4, cv2.RETR_EXTERNAL, cv2.CHAIN_APPROX_NONE)[-2:]

#Identification coin
cv2.drawContours(img, contours, -1, (0, 0, 255), 5)

#display picture
cv2.putText(img, "count:{}".format(len(contours)), (0, 30), cv2.FONT_HERSHEY_SIMPLEX, 1.0, (255, 0, 0), 3)
cv2.putText(src, "src", (0, 30), cv2.FONT_HERSHEY_SIMPLEX, 1.0, (255, 0, 0), 3)
cv2.putText(img_1, "gray", (0, 30), cv2.FONT_HERSHEY_SIMPLEX, 1.0, (255, 0, 0), 3)
cv2.putText(img_2, "thresh", (0, 30), cv2.FONT_HERSHEY_SIMPLEX, 1.0, (255, 0, 0), 3)
cv2.putText(img_3, "erode", (0, 30), cv2.FONT_HERSHEY_SIMPLEX, 1.0, (255, 0, 0), 3)
cv2.putText(img_4, "dilate", (0, 30), cv2.FONT_HERSHEY_SIMPLEX, 1.0, (255, 0, 0), 3)
imgStack = stackImages(1, ([src, img_1, img_2], [img_3, img_4, img]))
cv2.imshow("imgStack", imgStack)
cv2.waitKey(0)
Cells:
import cv2
import numpy as np

def stackImages(scale, imgArray):
    """
        Press multiple images into the same window for display
        :param scale:float Type, output image display percentage, control zoom scale, 0.5=The image resolution is reduced by half
        :param imgArray:Tuple nested list, image matrix to be arranged
        :return:Output image
    """
    rows = len(imgArray)
    cols = len(imgArray[0])
    rowsAvailable = isinstance(imgArray[0], list)
    width = imgArray[0][0].shape[1]
    height = imgArray[0][0].shape[0]
    if rowsAvailable:
        for x in range(0, rows):
            for y in range(0, cols):
                if imgArray[x][y].shape[:2] == imgArray[0][0].shape[:2]:
                    imgArray[x][y] = cv2.resize(imgArray[x][y], (0, 0), None, scale, scale)
                else:
                    imgArray[x][y] = cv2.resize(imgArray[x][y], (imgArray[0][0].shape[1], imgArray[0][0].shape[0]),
                                                None, scale, scale)
                if len(imgArray[x][y].shape) == 2: imgArray[x][y] = cv2.cvtColor(imgArray[x][y], cv2.COLOR_GRAY2BGR)
        imageBlank = np.zeros((height, width, 3), np.uint8)
        hor = [imageBlank] * rows
        hor_con = [imageBlank] * rows
        for x in range(0, rows):
            hor[x] = np.hstack(imgArray[x])
        ver = np.vstack(hor)
    else:
        for x in range(0, rows):
            if imgArray[x].shape[:2] == imgArray[0].shape[:2]:
                imgArray[x] = cv2.resize(imgArray[x], (0, 0), None, scale, scale)
            else:
                imgArray[x] = cv2.resize(imgArray[x], (imgArray[0].shape[1], imgArray[0].shape[0]), None, scale, scale)
            if len(imgArray[x].shape) == 2: imgArray[x] = cv2.cvtColor(imgArray[x], cv2.COLOR_GRAY2BGR)
        hor = np.hstack(imgArray)
        ver = hor
    return ver


#Read picture
src = cv2.imread("C:/Users/86199/Pictures/computer/cell.png")
img = src.copy()

#Grayscale
img_1 = cv2.cvtColor(img, cv2.COLOR_BGR2GRAY)

#Binarization
ret, img_2 = cv2.threshold(img_1, 127, 255, cv2.THRESH_BINARY_INV + cv2.THRESH_OTSU)

#Corrosion (corrosion is mainly to distinguish each coin. If it is too large, it will cause loss, and if it is too low, it will not be able to distinguish. The parameters can be set by themselves to achieve appropriate.)
kernel = np.ones((17, 17), int)
img_3 = cv2.erode(img_2, kernel, iterations=1)

#Expand (expand to the appropriate value so that each white area is a coin.)
kernel = np.ones((3, 3), int)
img_4 = cv2.dilate(img_3, kernel, iterations=1)

#Find the coin center
contours, hierarchy = cv2.findContours(img_4, cv2.RETR_EXTERNAL, cv2.CHAIN_APPROX_NONE)[-2:]

#Identification coin
cv2.drawContours(img, contours, -1, (0, 255,0), 3)

#display picture
cv2.putText(img, "count:{}".format(len(contours)), (0, 30), cv2.FONT_HERSHEY_SIMPLEX, 1.0, (255, 0, 0), 3)
cv2.putText(src, "src", (0, 30), cv2.FONT_HERSHEY_SIMPLEX, 1.0, (255, 0, 0), 3)
cv2.putText(img_1, "gray", (0, 30), cv2.FONT_HERSHEY_SIMPLEX, 1.0, (255, 0, 0), 3)
cv2.putText(img_2, "thresh", (0, 30), cv2.FONT_HERSHEY_SIMPLEX, 1.0, (255, 0, 0), 3)
cv2.putText(img_3, "erode", (0, 30), cv2.FONT_HERSHEY_SIMPLEX, 1.0, (255, 0, 0), 3)
cv2.putText(img_4, "dilate", (0, 30), cv2.FONT_HERSHEY_SIMPLEX, 1.0, (255, 0, 0), 3)
imgStack = stackImages(1, ([src, img_1, img_2], [img_3, img_4, img]))
cv2.imshow("imgStack", imgStack)
cv2.waitKey(0)

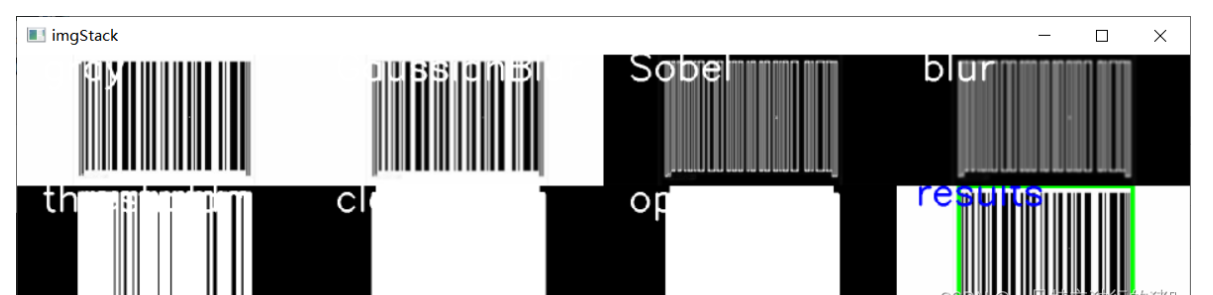
5, Using image gradient, opening and closing, contour operation, etc., locate and extract the barcode in the picture, and then call the barcode library to obtain the barcode characters.
1 code
import cv2
import numpy as np
import imutils
from pyzbar import pyzbar
def stackImages(scale, imgArray):
    """
        Press multiple images into the same window for display
        :param scale:float Type, output image display percentage, control zoom scale, 0.5=The image resolution is reduced by half
        :param imgArray:Tuple nested list, image matrix to be arranged
        :return:Output image
    """
    rows = len(imgArray)
    cols = len(imgArray[0])
    rowsAvailable = isinstance(imgArray[0], list)
    width = imgArray[0][0].shape[1]
    height = imgArray[0][0].shape[0]
    if rowsAvailable:
        for x in range(0, rows):
            for y in range(0, cols):
                if imgArray[x][y].shape[:2] == imgArray[0][0].shape[:2]:
                    imgArray[x][y] = cv2.resize(imgArray[x][y], (0, 0), None, scale, scale)
                else:
                    imgArray[x][y] = cv2.resize(imgArray[x][y], (imgArray[0][0].shape[1], imgArray[0][0].shape[0]),
                                                None, scale, scale)
                if len(imgArray[x][y].shape) == 2: imgArray[x][y] = cv2.cvtColor(imgArray[x][y], cv2.COLOR_GRAY2BGR)
        imageBlank = np.zeros((height, width, 3), np.uint8)
        hor = [imageBlank] * rows
        hor_con = [imageBlank] * rows
        for x in range(0, rows):
            hor[x] = np.hstack(imgArray[x])
        ver = np.vstack(hor)
    else:
        for x in range(0, rows):
            if imgArray[x].shape[:2] == imgArray[0].shape[:2]:
                imgArray[x] = cv2.resize(imgArray[x], (0, 0), None, scale, scale)
            else:
                imgArray[x] = cv2.resize(imgArray[x], (imgArray[0].shape[1], imgArray[0].shape[0]), None, scale, scale)
            if len(imgArray[x].shape) == 2: imgArray[x] = cv2.cvtColor(imgArray[x], cv2.COLOR_GRAY2BGR)
        hor = np.hstack(imgArray)
        ver = hor
    return ver


#Read picture
src = cv2.imread("C:/Users/86199/Pictures/computer/tm.png")
img = src.copy()

#Grayscale
img_1 = cv2.cvtColor(img, cv2.COLOR_BGR2GRAY)

#Gaussian filtering
img_2 = cv2.GaussianBlur(img_1, (5, 5), 1)


#Sobel operator
sobel_x = cv2.Sobel(img_2, cv2.CV_64F, 1, 0, ksize=3)
sobel_y = cv2.Sobel(img_2, cv2.CV_64F, 0, 1, ksize=3)
sobel_x = cv2.convertScaleAbs(sobel_x)
sobel_y = cv2.convertScaleAbs(sobel_y)
img_3 = cv2.addWeighted(sobel_x, 0.5, sobel_y, 0.5, 0)

#Mean square wave
img_4 = cv2.blur(img_3, (5, 5))

#Binarization
ret, img_5 = cv2.threshold(img_4, 127, 255, cv2.THRESH_BINARY + cv2.THRESH_OTSU)

#Closed operation
kernel = np.ones((18, 18), int)
img_6 = cv2.morphologyEx(img_5, cv2.MORPH_CLOSE, kernel)

#Open operation
kernel = np.ones((100,100), int)
img_7 = cv2.morphologyEx(img_6, cv2.MORPH_OPEN, kernel)

#Draw barcode area
contours = cv2.findContours(img_7, cv2.RETR_EXTERNAL, cv2.CHAIN_APPROX_SIMPLE)
contours = imutils.grab_contours(contours)
c = sorted(contours, key = cv2.contourArea, reverse = True)[0]
rect = cv2.minAreaRect(c)
box = cv2.cv.BoxPoints(rect) if imutils.is_cv2() else cv2.boxPoints(rect)
box = np.int0(box)
cv2.drawContours(img, [box], -1, (0,255,0), 6)

#Display picture information
cv2.putText(img, "results", (30, 30), cv2.FONT_HERSHEY_SIMPLEX, 2.0, (255, 0, 0), 3)
cv2.putText(img_1, "gray", (40, 40), cv2.FONT_HERSHEY_SIMPLEX, 2.0, (255, 0, 0), 3)
cv2.putText(img_2, "GaussianBlur",(40, 40), cv2.FONT_HERSHEY_SIMPLEX, 2.0, (255, 0, 0), 3)
cv2.putText(img_3, "Sobel", (40, 40), cv2.FONT_HERSHEY_SIMPLEX, 2.0, (255, 0, 0), 3)
cv2.putText(img_4, "blur", (40, 40), cv2.FONT_HERSHEY_SIMPLEX, 2.0, (255, 0, 0), 3)
cv2.putText(img_5, "threshold", (40, 40), cv2.FONT_HERSHEY_SIMPLEX, 2.0, (255, 0, 0), 3)
cv2.putText(img_6, "close", (40, 40), cv2.FONT_HERSHEY_SIMPLEX, 2.0, (255, 0, 0), 3)
cv2.putText(img_7, "open", (40, 40), cv2.FONT_HERSHEY_SIMPLEX, 2.0, (255, 0, 0), 3)

#Output barcode
barcodes = pyzbar.decode(src)
for barcode in barcodes:
    barcodeData = barcode.data.decode("utf-8")
    cv2.putText(img, barcodeData, (50, 70), cv2.FONT_HERSHEY_SIMPLEX, 1.0, (0, 255, 0), 3)

#Show all pictures
imgStack = stackImages(0.5, ([img_1, img_2,img_3,img_4],[img_5,img_6,img_7,img]))
cv2.imshow("imgStack", imgStack)
cv2.waitKey(0)
6, References
https://blog.csdn.net/qq_45659777/article/details/121698713?spm=1001.2014.3001.5501