Electron process
- Electron inherits the multi process architecture from Chromium, which makes the framework very similar to a modern web browser
Why? It's not a single process
- Web browser is an extremely complex application. In addition to their primary ability to display web content, they have many secondary responsibilities, such as managing many windows (or tabs) and loading third-party extensions. In the early days, browsers typically used a single process to handle all of these functions. Although this mode means that you have less cost to open each tab, it also means that the crash or non response of a website will affect the whole browser.
Multi process model
In order to solve this problem, the Chrome team decided to render each tab in its own process, thus limiting the damage to the entire application caused by errors or malicious code on a web page. A single browser process is then used to control these tab processes and the entire application life cycle. The following diagram from Chrome comics visualizes this model:
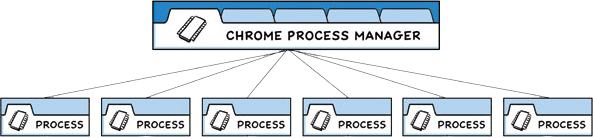
The structure of the Electron application is very similar. As an application developer, you control two types of processes: the main process and the renderer. These are similar to Chrome's own browser and its renderer process outlined above.
Main process
Each Electron application has a single main process (app) as the entry point of the application. The main process is on node JS environment, which means that it has a require module and uses all nodes JS API. The main purpose of the main process is to create and manage application windows using the BrowserWindow module.
Preload script
preload scripts contain code that executes in the renderer process and starts loading before the web page content. Although these scripts run in the environment of the renderer, they have more permissions because they can access the Node.js API.
Preload scripts can be attached to the main process in the webPreferences option in the BrowserWindow constructor.
const { BrowserWindow } = require('electron')
//...
const win = new BrowserWindow({
  webPreferences: {
    preload: 'path/to/preload.js'
  }
})
- Although the preload script shares a window variable globally with its attached renderer, it cannot directly attach any variables to the window,
window.myAPI = {
desktop: true
};
console.log(window.myAPI)// => undefined - Context Isolation means that the preloaded script is isolated from the main running environment of the renderer to avoid disclosing any privileged API to your web page content code. Instead, we will use the contextBridge module to safely realize the interaction:
const { contextBridge } = require('electron')

contextBridge.exposeInMainWorld('myAPI', {
  desktop: true
})
console.log(window.myAPI)
// => { desktop: true }
main.js basic configuration
let electron = require('electron'); // Introduction of electron ic module
const path = require('path')
const process = require('process');
const { app, BrowserWindow } = require('electron');
// app, which controls the event lifecycle of the application.
// BrowserWindow, which creates and manages application windows.
let mainWindow = null; // Declare the main window to open
//In Electron, the browser window can be created only after the ready event of the app module is fired. You can use app whenReady() API to listen for this event. After whenReady (), createWindow() is called.
function createWindew (){
 mainWindow = new BrowserWindow({
        width: 800, // Sets the size of the open window
        height: 800,
        webPreferences: {
        // Open node
          nodeIntegration: true,//Prevent error reporting using require reference
          // Enable remote
          enableRemoteModule: true,
          contextIsolation: false //Prevent error reporting using require reference
           preload: path.join(__dirname, 'preload.js')//Preload the preload script loads before the renderer process loads and has access to both renderer globals (such as window and document) and node JS environment
                //__ The dirname string points to the path of the currently executing script (in this case, it points to the root folder of your project).
                // path. The join API joins multiple paths together to create a cross platform path string.
         }
    });
    mainWindow.loadFile('xxxx.html'); // Which page to load
    mainWindow.on('closed', () => { // Listen for closing events and set the main window to null, otherwise more and more memory will be occupied
        mainWindow = null;
    })
}
  //Exit application when all windows are closed (Windows & Linux)
  //process.platform: obtain operating system platform information
  //An operating system from darwin apple
app.on('window-all-closed', function() {
// With the exception of macOS, exit the program when all windows are closed. Therefore, programs and their
// The icon on the taskbar should remain active until the user exits with Cmd + Q.
    if (process.platform !== 'darwin') app.quit()
})
//Linux and Windows applications exit macOS applications when no window is open, usually continue to run even when no window is open, and a new window will be opened when the application is activated when no window is available.
//To implement this feature, listen for the activate event of the app module. If no browser window is open, the createWindow() method is called Because the window cannot be created before the ready event, you should only listen for the activate event after your application is initialized. Do this by attaching your event listener to your existing whenReady() callback.
// This procedure will be initialized at the end of Electron
// And when creating a browser window
// Some API s can only be used after the ready event is triggered.
app.whenReady().then(() => {
    createWindow()
     app.on('activate', function () {
       // Usually on macOS, when you click the application icon in the dock, if there is no other
    // Open a window, the program will recreate a window.
    if (BrowserWindow.getAllWindows().length === 0) createWindow()
  })
})
Using the remote module
- The remote module is discarded in Electron 12 and will be removed in Electron 14. Replaced by * * @ electronic/remote * * module;
- Function: Generally speaking, the remote module allows only some modules available in the main process, such as app, notification, dialog and rendering process to be called;
use:
// 1. Install npm install --save @electron/remote first
//2. In the main process
 require('@electron/remote/main').initialize();
 require('@electron/remote/main').enable(mainWindow.webContents);//The reason for adding is that @ electron / remote is disabled for this webcontentsclall require ("@ electron / remote / main") enable(webContents) to enable it. It's strange to report an error, but it's not marked in the document
//3. Used during rendering
const { BrowserWindow } = require('@electron/remote')
There are several ways to open a new window in the rendering process;
- 1.window.open(url[, frameName][, features])
- For example: window open(’./render/test3.html’,’_blank’,‘top=500,left=200,frame=false,nodeIntegration=no’);
- 2 import BrowserWindow using remote
- For example:
newWin = new BrowserWindow({ width: 600, height: 600, })
Menu bar content and custom menu bar

Main common functions
- Click File exit to close the program
- View = > reload refresh page view = > toggle developer tools open the console
Customize menu bar
- Custom menu file
//menu.js
const { Menu, BrowserWindow } = require('electron');
let template = [{
        label: 'China rich woman address book',
        submenu: [{
                label: 'List of rich women in Beijing',
                // Add click event
                click: () => {
                    win = new BrowserWindow({
                        width: 400,
                        height: 400,
                        webPreferences: { nodeIntegration: true }
                    })
                    win.loadFile('xxx.html')
                    win.on('closed', () => {
                        win = null
                    })
                }
            },
            { label: 'Hebei address book' },
            {label:"Gini is too beautiful"}
        ]
    },
    {
        label: 'Necessary skills for flirting with girls ',
        submenu: [
            { label: 'Singing and dancing rap' },
            { label: 'Basketball' }
        ]
    }
]

// Setup menu
let m = Menu.buildFromTemplate(template)
Menu.setApplicationMenu(m) //set up
- main.js introduction
//Import your customized menu information into the entry file
function createWindow() {
    require('./main/menu.js') // Custom menu file
    mainWindow = new BrowserWindow({
        width: 800, // Sets the size of the open window
        height: 800,
        webPreferences: {
            nodeIntegration: true,
            // Enable remote
            enableRemoteModule: true,
            contextIsolation: false,
            preload: path.join(__dirname, 'preload.js')
                //__ The dirname string points to the path of the currently executing script (in this case, it points to the root folder of your project).
                // path. The join API joins multiple paths together to create a cross platform path string.
        }
    });
    mainWindow.loadFile('demo1.html'); // Which page to load
    require('@electron/remote/main').initialize();
    require('@electron/remote/main').enable(mainWindow.webContents)
    mainWindow.on('closed', () => { // Listen for closing events and set the main window to null, otherwise more and more memory will be occupied
        mainWindow = null;
    });
    mainWindow.webContents.openDevTools()
}