preface
The previous chapter explained the basic usage of v-bind binding attribute. In this chapter, let's take a look at how to listen to events in Vue. After all, event monitoring is still a big deal for the front-end business! Therefore, we must talk about it.
And in Vue The method used to listen to events in JS is v-on. Let's take a look at the basic introduction.
v-on introduction
The v-on command is equivalent to event binding in js, such as binding click, mouseover, etc. to listen to events.
This chapter takes click event as an example to illustrate the basic usage of v-on.
- Direct use instruction v-on
- Using simplified instructions@
Official website description document
https://cn.vuejs.org/v2/api/#v-on
Basic usage examples
<!-- Method processor -->
<button v-on:click="doThis"></button>

<!-- Dynamic events (2.6.0+) -->
<button v-on:[event]="doThis"></button>

<!-- Inline statement -->
<button v-on:click="doThat('hello', $event)"></button>

<!-- abbreviation -->
<button @click="doThis"></button>

<!-- Dynamic event abbreviation (2.6.0+) -->
<button @[event]="doThis"></button>

<!-- Stop bubbling -->
<button @click.stop="doThis"></button>

<!-- Block default behavior -->
<button @click.prevent="doThis"></button>

<!-- Block default behavior, no expression -->
<form @submit.prevent></form>

<!--  Concatenation modifier -->
<button @click.stop.prevent="doThis"></button>

<!-- Key modifier, key alias -->
<input @keyup.enter="onEnter">

<!-- Key modifier, key code -->
<input @keyup.13="onEnter">

<!-- Clicking callback will only trigger once -->
<button v-on:click.once="doThis"></button>

<!-- Object syntax (2.4.0+) -->
<button v-on="{ mousedown: doThis, mouseup: doThat }"></button>
The above pile is the basic usage of v-on described on the official website. Let's take a look at the examples of quick start.
Example: bind a custom click event

<!DOCTYPE html>
<html lang="en" xmlns:v-on="http://www.w3.org/1999/xhtml">
<head>
<meta charset="UTF-8">
<title>Title</title>
</head>
<body>
<!-- future new of Vue Instance will control all contents in this element -->
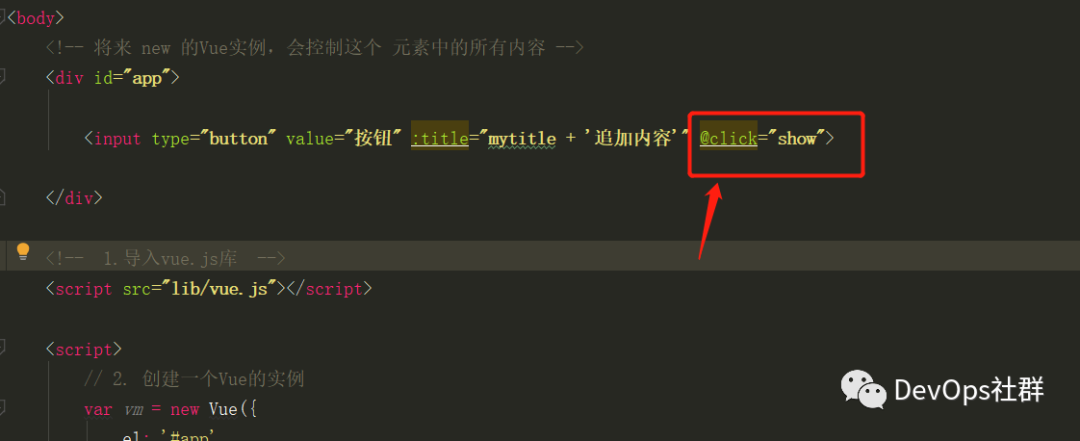
<div id="app">
<input type="button" value="Button" :title="mytitle + 'Additional content'" v-on:click="show">
</div>
<!-- 1.Import vue.js library -->
<script src="lib/vue.js"></script>
<script>
// 2. Create an instance of Vue
var vm = new Vue({
el: '#app',
data: {
mytitle: 'This is mytitle!'
},
methods:{
show(){
alert("hello world");
}
}
})
</script>
</body>
</html>
The browser displays as follows:
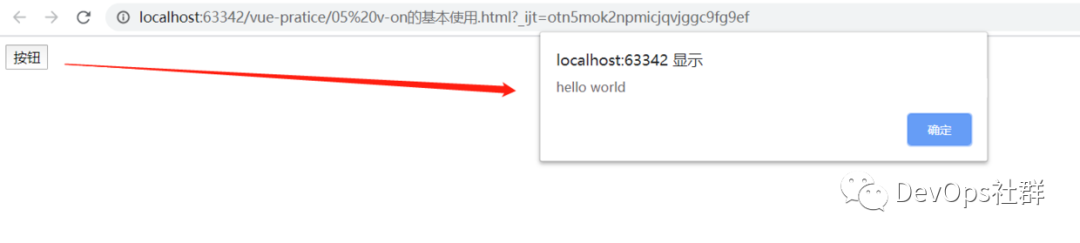
As you can see from the above code, in the Vue example, you need to set methods to write the method show(), and show() is actually a short form of show:function().
            methods:{
                show:function(){
                    alert("hello world");
                }
            }
It can be abbreviated as:
            methods:{
                show(){
                    alert("hello world");
                }
            }
Example: use the abbreviation of v-on@
For faster writing, you can directly use the @ symbol to bind listening events.
Well, after seeing this, you should basically understand the most basic usage of v-on. Let's strengthen an example of the running lantern.
Use v-on to listen to click events to realize the example of running lantern effect
demand
Use v-on to write an example of the effect of the running lantern. Examples of effects are as follows:

Use two buttons to control the following string to scroll to the left in a certain area to form the effect of a running lantern.
Realization idea
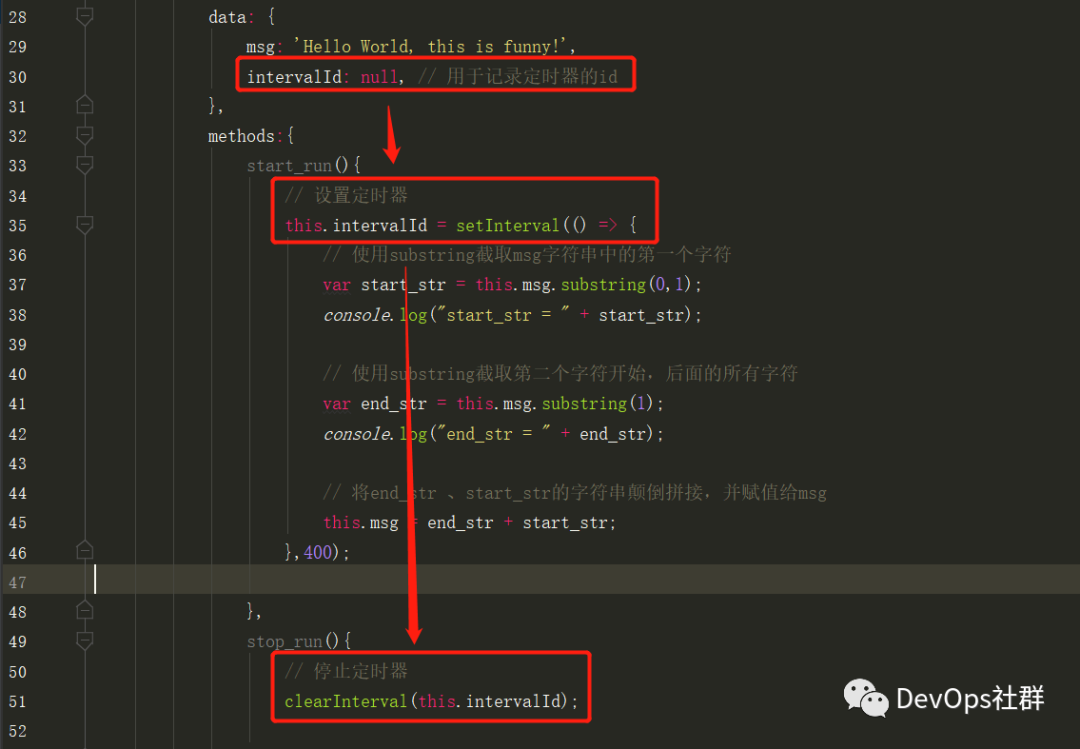
- Write two buttons "start" and "stop", and use v-on to click to listen. Bind start separately_ Run() and stop_run() method.
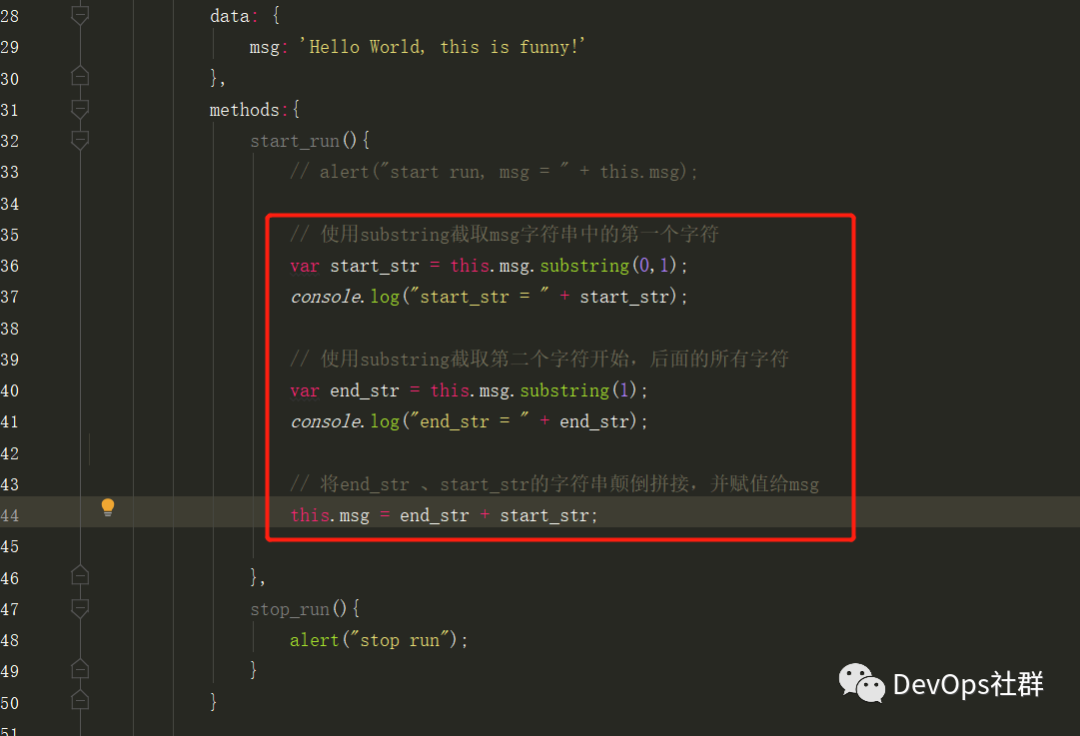
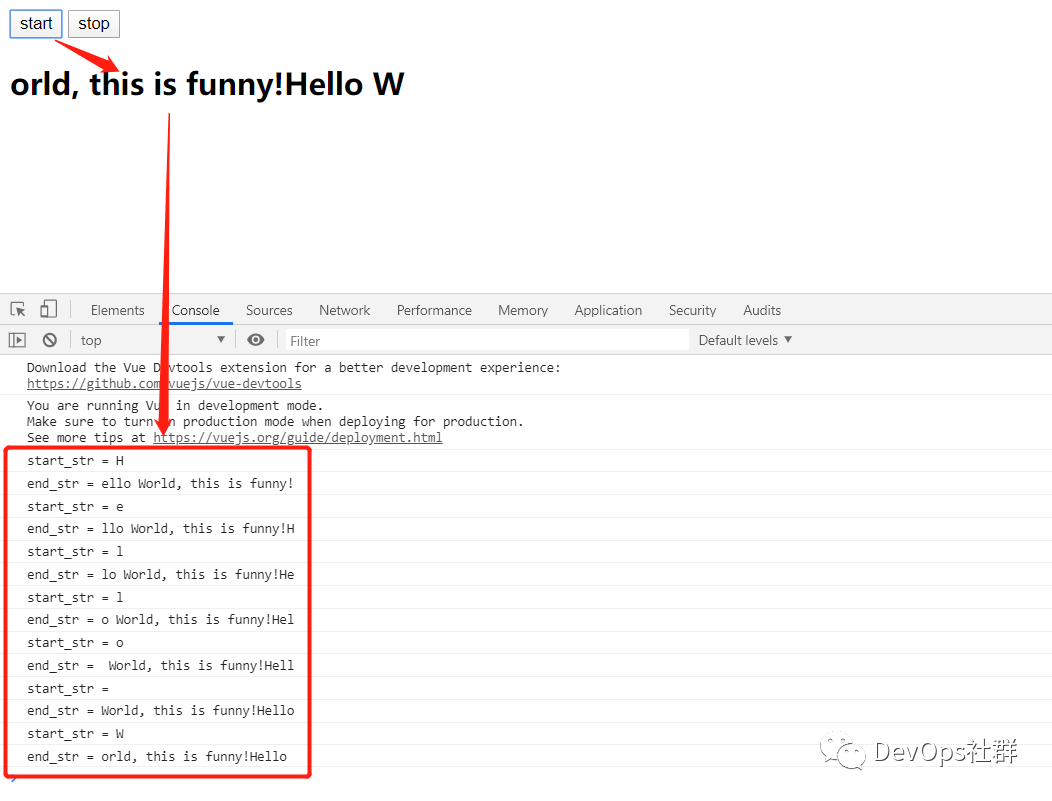
- start_ The run () method first needs to get the currently displayed string Hello world, this is funny, and then use substring (the character position to start intercepting and the character position to stop intercepting) to intercept the string and splice the first character to the last.
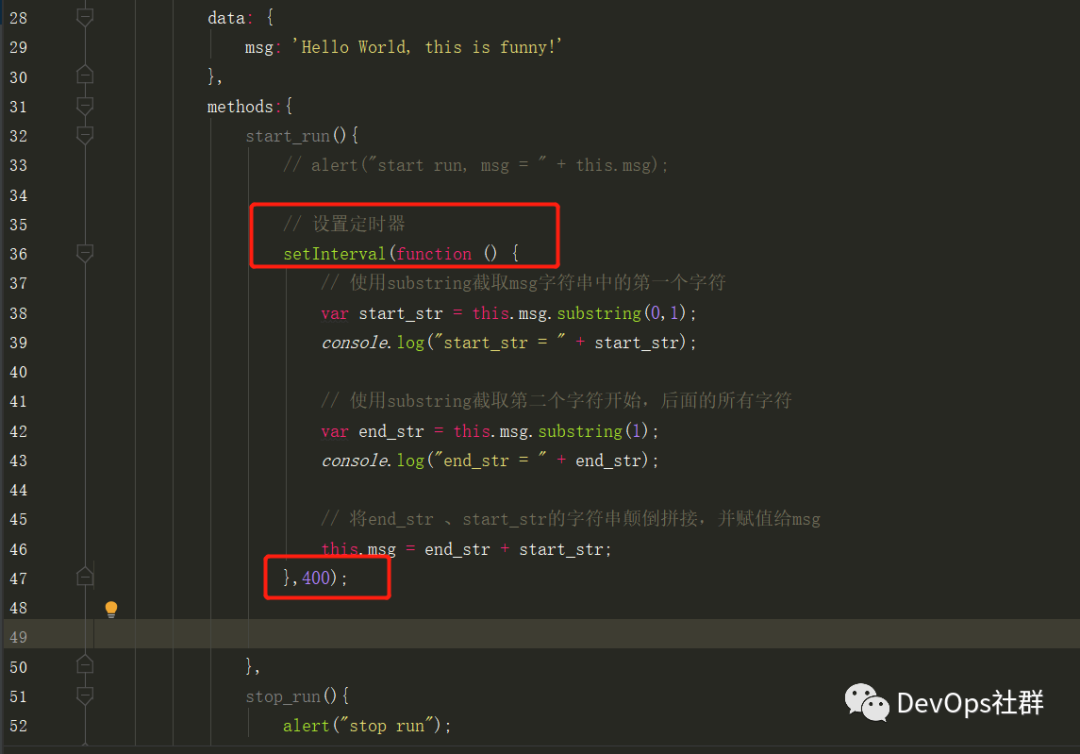
- Set a timer setInterval() to control the continuous interception of characters and splice them one by one to the end to form a rolling effect.
- stop_ The run () method executes the stop timer clearInterval().
Implementation: write two buttons and string rendering
<!DOCTYPE html>
<html lang="en" xmlns:v-on="http://www.w3.org/1999/xhtml">
<head>
<meta charset="UTF-8">
<title>Title</title>
</head>
<body>
<div id="app">
<!-- start Button -->
<input type="button" value="start" @click="start">
<!-- stop Button -->
<input type="button" value="stop" @click="stop">
<!-- String content -->
<h2 v-text="msg"></h2>
</div>
<!-- 1.Import vue.js library -->
<script src="lib/vue.js"></script>
<script>
// 2. Create an instance of Vue
var vm = new Vue({
el: '#app',
data: {
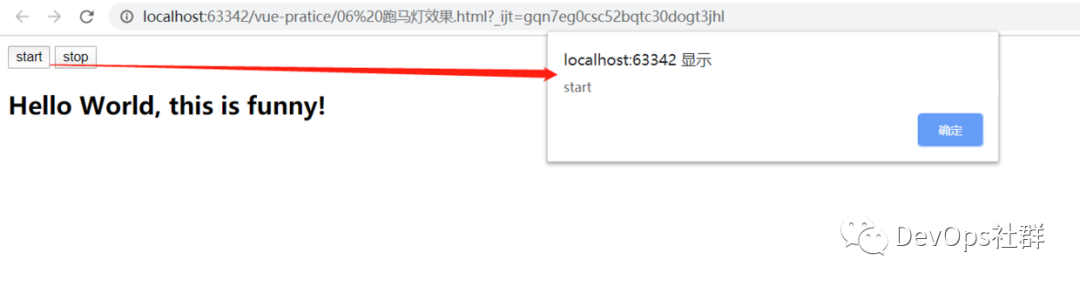
msg: 'Hello World, this is funny!'
},
methods:{
start(){
alert("start");
},
stop(){
alert("stop");
}
}
})
</script>
</body>
</html>
The browser displays as follows:
Write start_run() implements string interception and reverse splicing
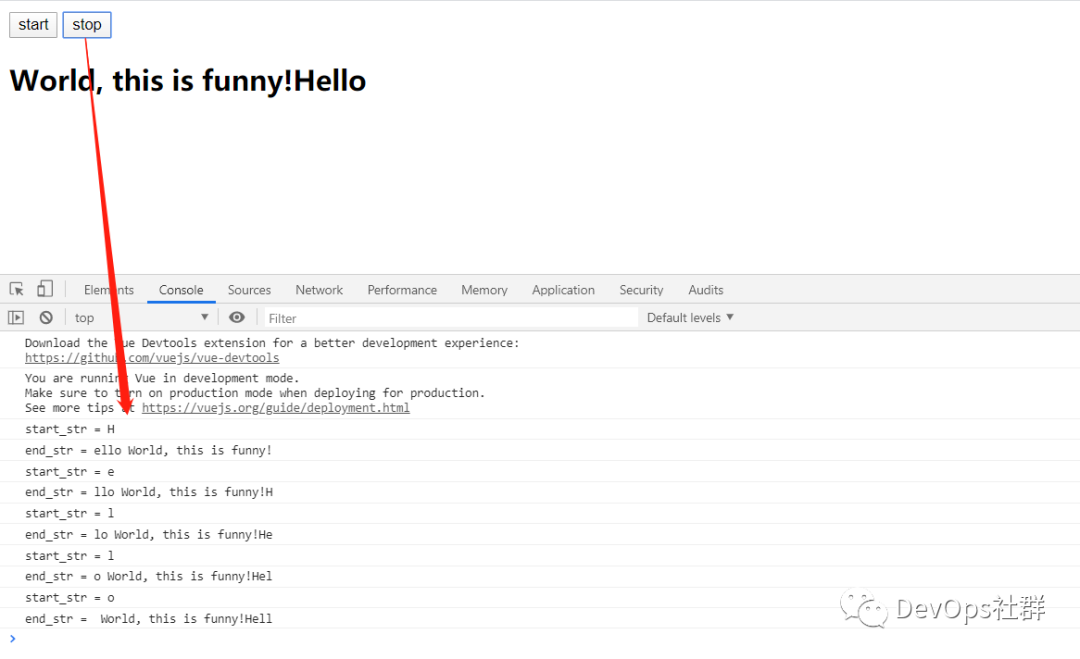
Click the start button several times, and the display is as follows:
Write start_run() adds setInterval() to intercept the string regularly
Execute in the browser and an error is found, as follows:
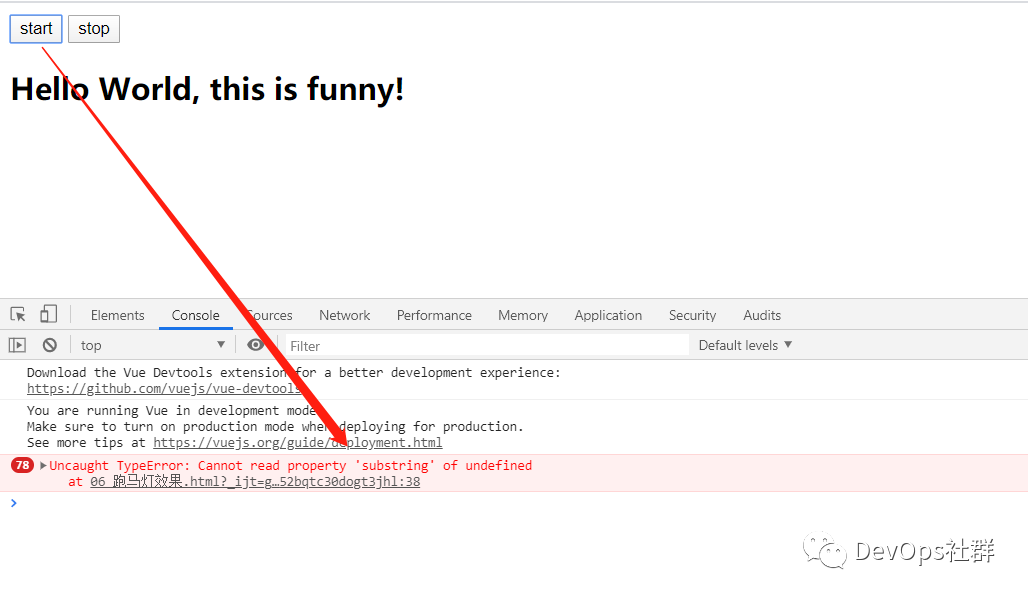
It is suggested here that the substring method is undefined. In fact, this is a problem with the this pointer. Because when the operation method of intercepting the string is put into the function() of the timer, the this pointer points to the function, and the function() does not have a timing msg. Because msg cannot be found, it will prompt that the substring method cannot be found.
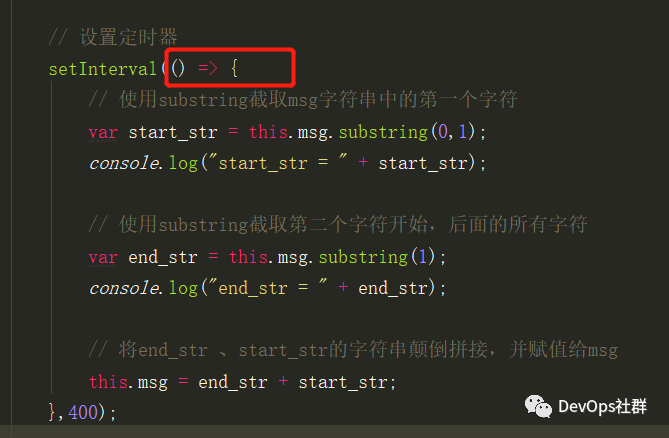
To solve this problem, use the arrow function = >, and assign the external "this" pointer to the function() method.
As follows:
The test browser opens as follows:

Write stop_ The run () method stops the timer
If you want to stop the timer, record the id information of the timer for stopping. Then the "timer id" needs to be a global variable that provides stop_run() and start_ The run () method is accessible.
After the browser clicks the start button, click the stop button to stop the operation, as follows:
However, there is a BUG here. If you click the "start button" many times, multiple timers will be created, and recording the timer id will only record the last timer created, so you can't stop them all.
At this time, you need to make some judgments to limit the start timer. After closing the timer, you need to reset the timer id to null.
Solve the BUG of clicking the start button multiple times
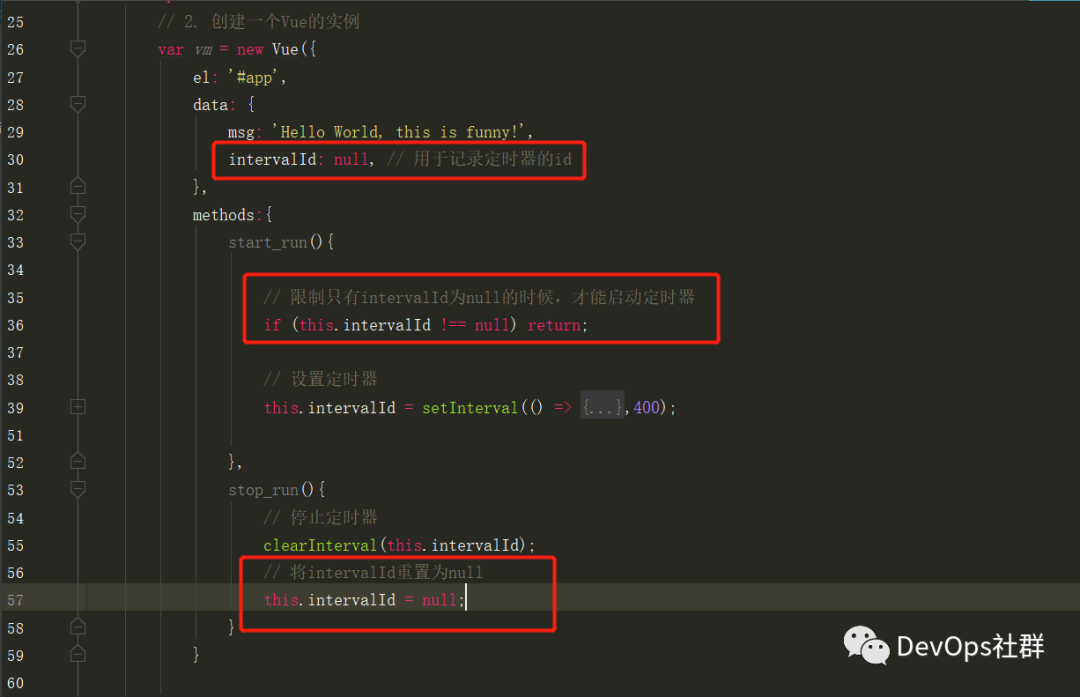
In fact, the ID of the start timer is recorded in the data to control whether to start a new timer.
As long as it is controlled in this way, no matter how many times you click the start button, only one timer will survive. Just click the stop button once to stop the timer.
Well, the chapter here is also relatively long. The next chapter continues to look at "v-on event modifiers".