1, babel
What is babel? The browser does not support ES6 syntax well. Some ES6 syntax cannot be recognized by the browser; The JSX syntax of React cannot be recognized by the browser. It needs to be converted to the syntax recognized by the browser before it can be interpreted and executed by the browser. We need babel to do this and use babel as a translator.
1.1 use of Babel
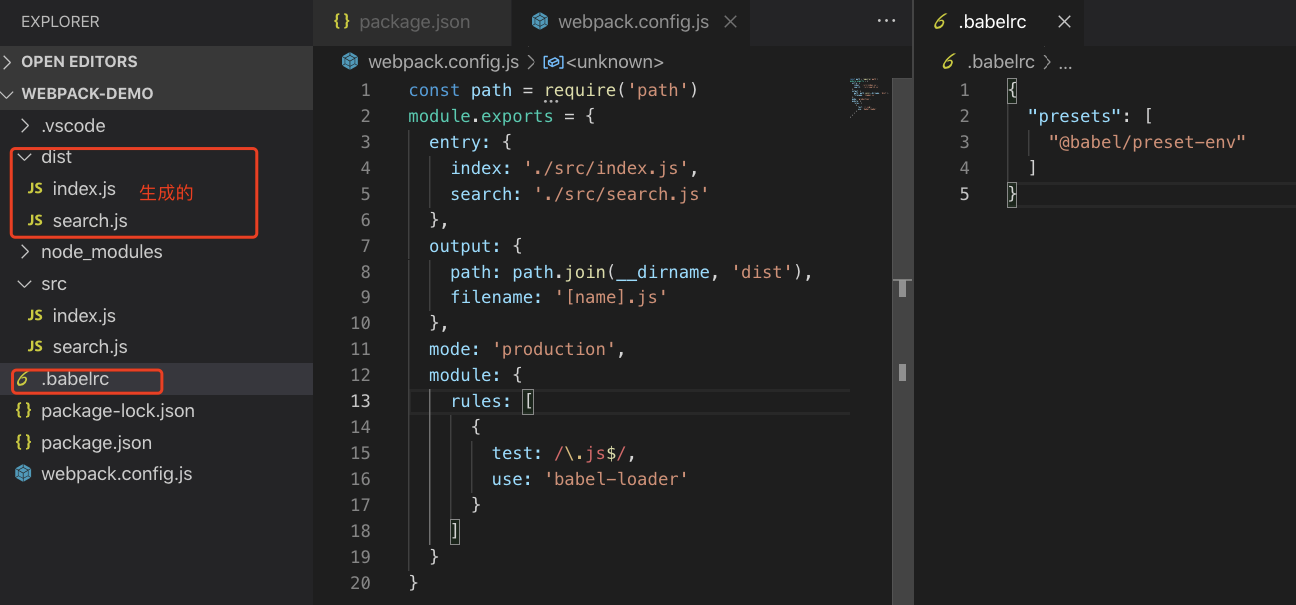
babel's configuration file is bablerc and babel loader are required at the same time.
The use of babel is very simple. test matches the file format, such as js end file / js $/, using bable loader
module: {
  rules: [
    {
      test: /\.js$/,
      use: 'bable-loader'
    }
  ]
}
1.2 composition of Babel
babel is composed of presets and plugins. In bable's plugins, each plugin can solve a problem.
For example, the plug-in transform-es2015-arrow-functions is required to explain the arrow function;
For example, the plugin transform-es2015-template-literals is required to interpret Template Strings;
This is the concept of plug-ins
However, babel also has a family bucket. For example, if you want to explain ES6, babel family bucket will collect the plugins required by ES6 at one time, which is called a preset, so you don't have to install them one by one. If some plug-ins are required in the project, write them in the plugins
1.3 babel analysis ES6
{
  "presets": [
    "@babel/preset-env" // babel preset configuration of ES6
  ],
  "plugins": [
    "@babel/proposal-class-properties"
  ]
}
npm i @babel/core @babel/preset-env babel-loader -D
1.4 babel parsing JSX
npm install react react-dom @babel/plugin-proposal-class-properties @babel/preset-react -D
Yes babelrc add react preset

import React from 'react'
import ReactDOM from 'react-dom'

class Search extends React.Component {
  render = () => {
    return (
      <div>I am React Search assembly</div>
    )
  }
}
ReactDOM.render(
  <Search />,
  document.getElementById('root')
)
After compilation
2, Parsing styles (CSS, Less, Sass)
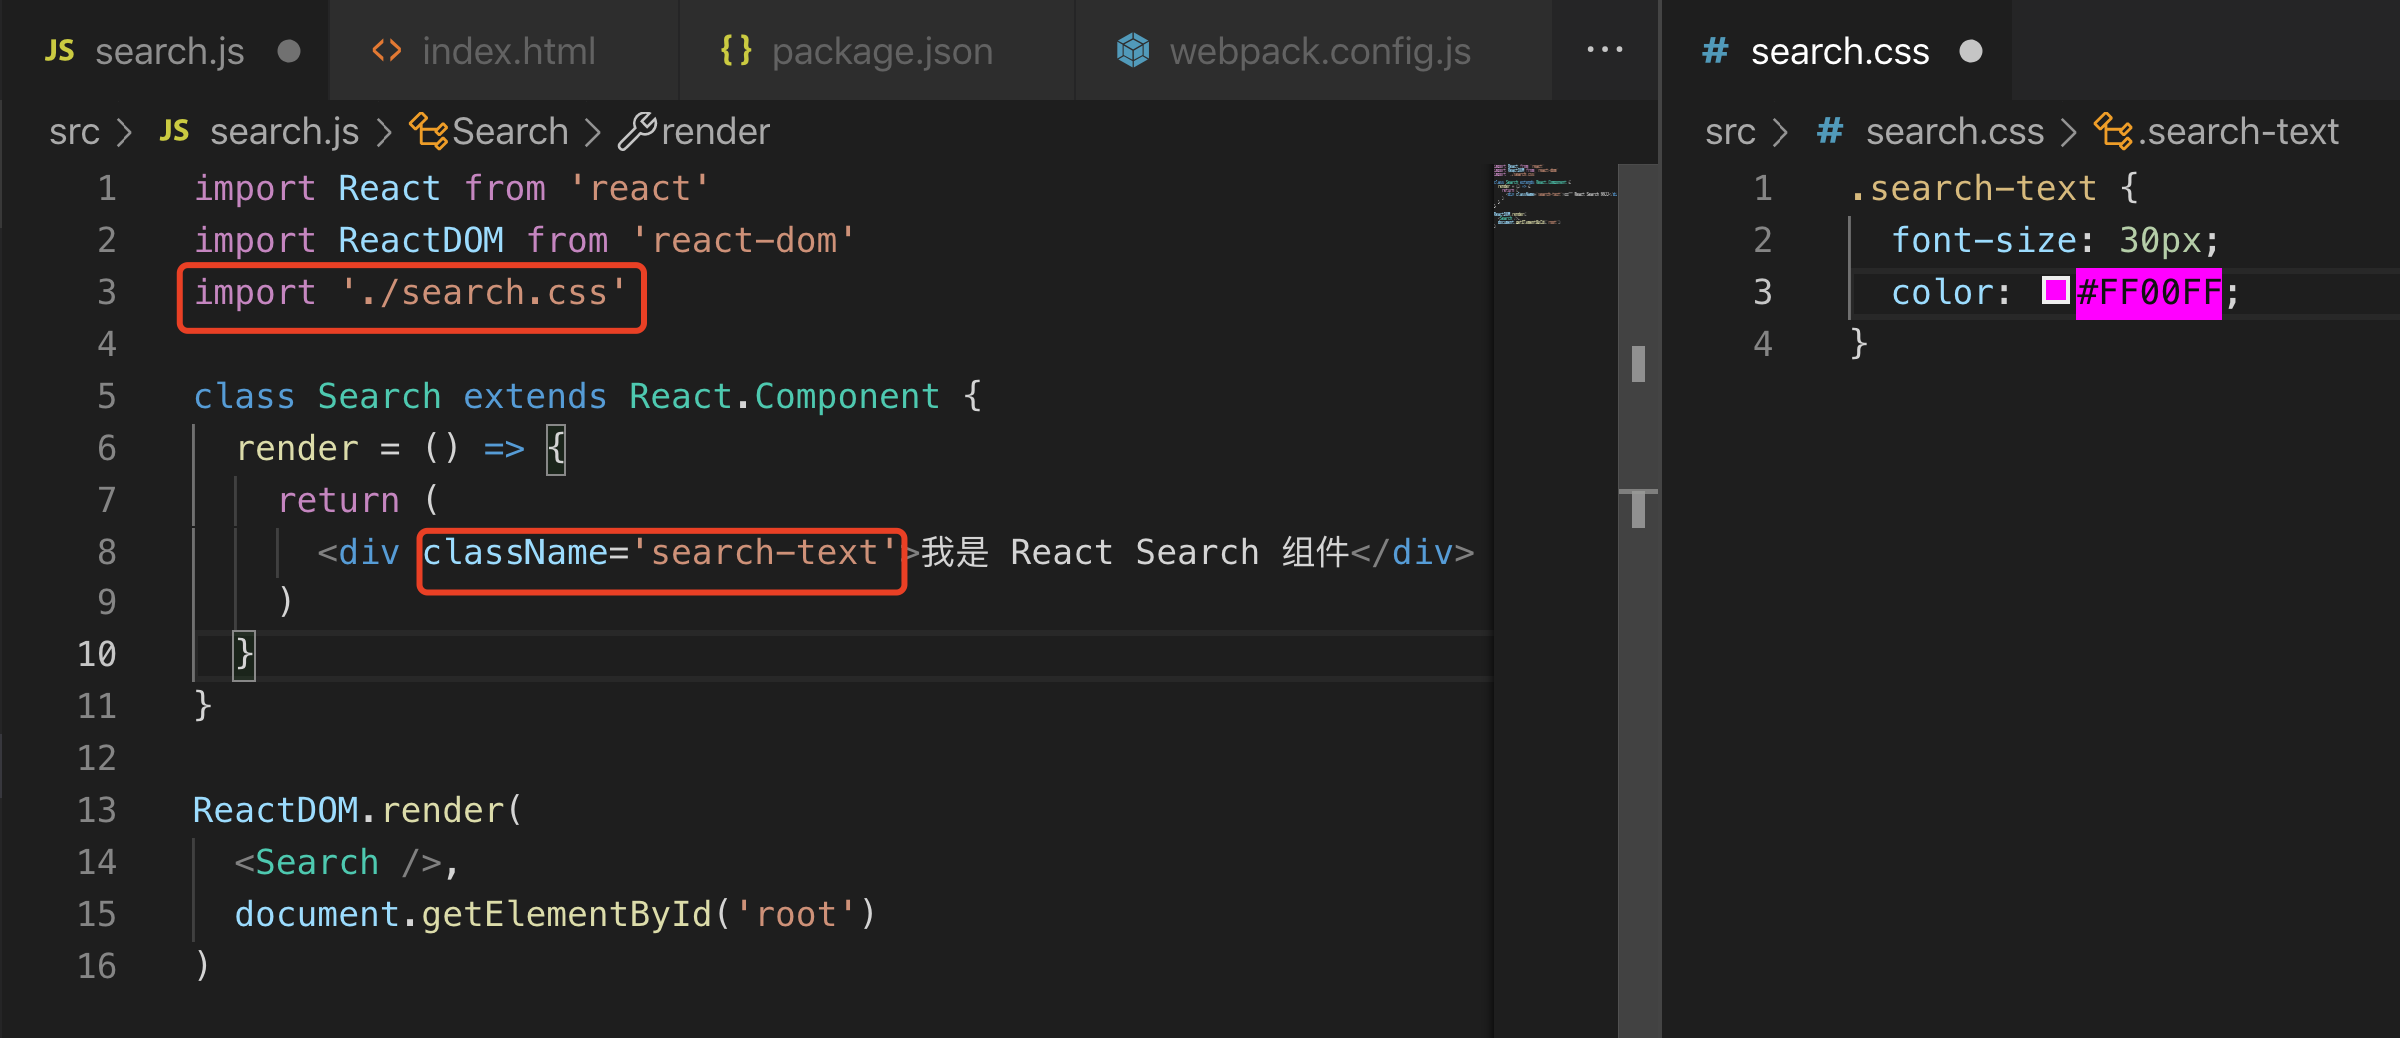
2.1 parsing CSS
css loader is used to load css file and convert it to commonjs object
Style loader passes styles through
npm i style-loader css-loader -D
webpack. config. Add an item to the rules array under module in JS:
{
  test: /\.css$/,
  use: ['style-loader', 'css-loader']
}
be careful:
That is to say, the calling of loader is a chain call from right to left, so we write style loader and css loader from left to right. In actual execution, first use css loader to parse css, and then pass the parsed css to style loader (chain call)
const path = require('path')
module.exports = {
  entry: {
    index: './src/index.js',
    search: './src/search.js'
  },
  output: {
    path: path.join(__dirname, 'dist'),
    filename: '[name].js'
  },
  mode: 'production',
  module: {
    rules: [
      {
        test: /\.js$/,
        use: 'babel-loader'
      },
      {
        test: /\.css$/,
        use: ['style-loader', 'css-loader']
      }
    ]
  }
}
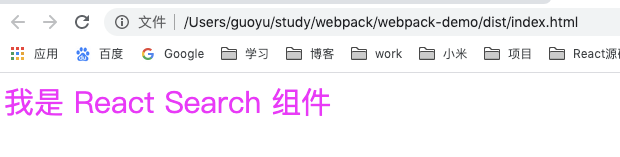
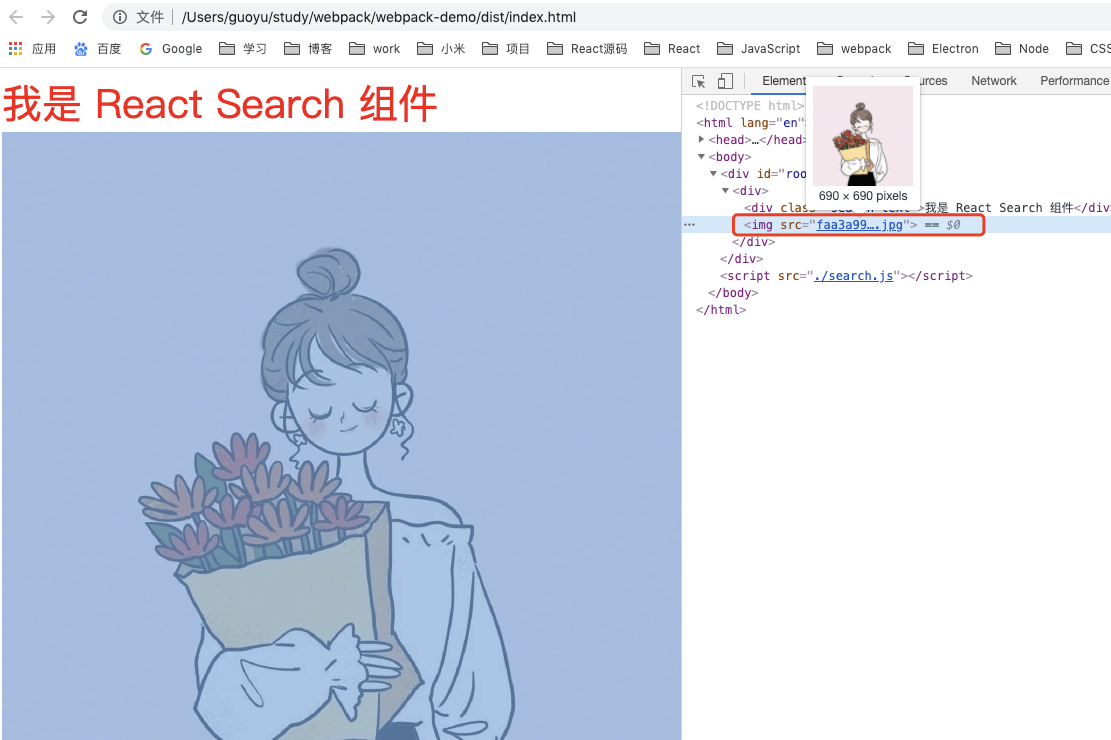
After execution, run npm run build to open the web page:
2.2 parse Less
The less loader converts less to css, and then continues with the previous section
Therefore, we can guess that the rules of less must add less loader at the end of use
npm install less less-loader -D
{
  test: /\.less$/,
  use: ['style-loader', 'css-loader', 'less-loader']
}
const path = require('path')
module.exports = {
  entry: {
    index: './src/index.js',
    search: './src/search.js'
  },
  output: {
    path: path.join(__dirname, 'dist'),
    filename: '[name].js'
  },
  mode: 'production',
  module: {
    rules: [
      {
        test: /\.js$/,
        use: 'babel-loader'
      },
      {
        test: /\.css$/,
        use: ['style-loader', 'css-loader']
      },
      {
        test: /\.less$/,
        use: ['style-loader', 'css-loader', 'less-loader']
      }
    ]
  }
}
The usage of sass is the same as that of less, which can be compared. I won't repeat it here
3, Parse pictures and fonts
Pictures and fonts belong to files. File loader is used to process files, which is simple to use.
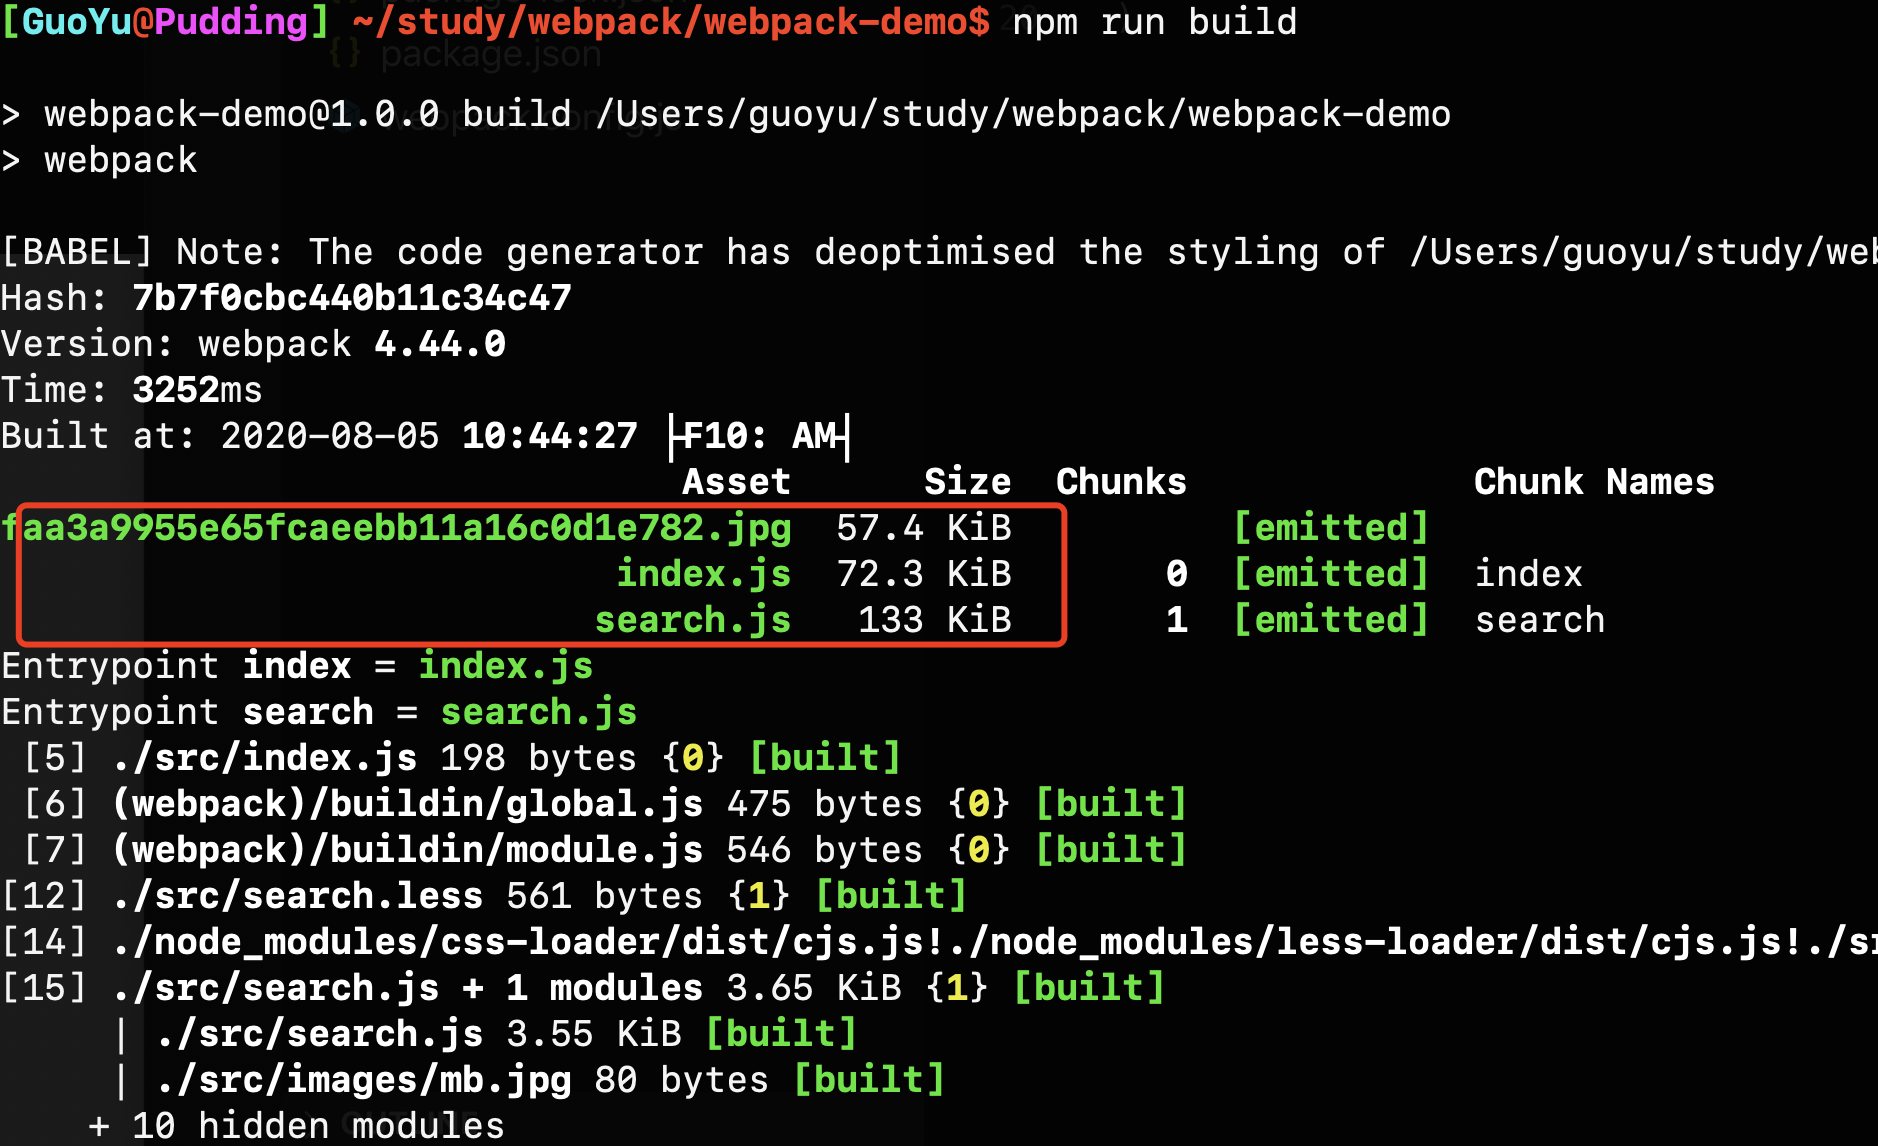
3.1 analyzing pictures
npm install file-loader -D
const path = require('path')
module.exports = {
  entry: {
    index: './src/index.js',
    search: './src/search.js'
  },
  output: {
    path: path.join(__dirname, 'dist'),
    filename: '[name].js'
  },
  mode: 'production',
  module: {
    rules: [
      {
        test: /\.js$/,
        use: 'babel-loader'
      },
      {
        test: /\.css$/,
        use: ['style-loader', 'css-loader']
      },
      {
        test: /\.less$/,
        use: ['style-loader', 'css-loader', 'less-loader']
      },
      {
        test: /\.(png|jpg|gif|jpeg)$/,
        use: ['file-loader']
      }
    ]
  }
}

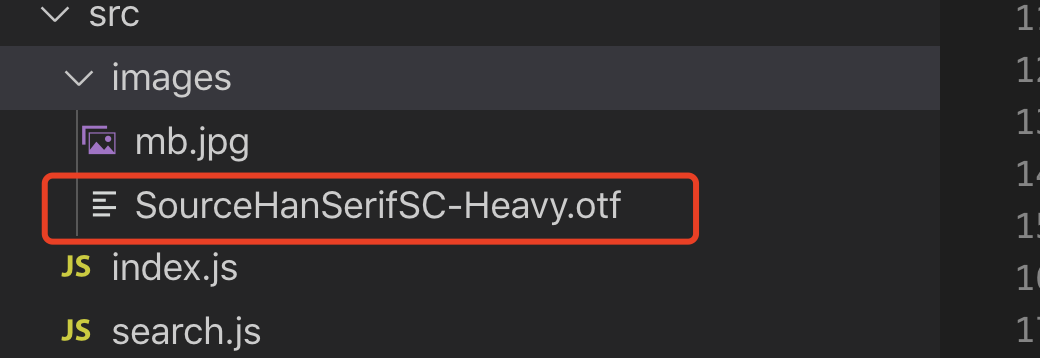
3.2 parsing fonts
Pictures and files are files, similar in use.
We add an otf font file to the project
less file:
@font-face {
  font-family: 'SourceHanSerifSC-Heavy';
  src: url('./images/SourceHanSerifSC-Heavy.otf') format('truetype');
}

.search-text {
  font-size: 40px;
  color: #FF0000;
  font-family: 'SourceHanSerifSC-Heavy'
}
The configuration of webpack is as follows:
const path = require('path')
module.exports = {
  entry: {
    index: './src/index.js',
    search: './src/search.js'
  },
  output: {
    path: path.join(__dirname, 'dist'),
    filename: '[name].js'
  },
  mode: 'production',
  module: {
    rules: [
      {
        test: /\.js$/,
        use: 'babel-loader'
      },
      {
        test: /\.css$/,
        use: ['style-loader', 'css-loader']
      },
      {
        test: /\.less$/,
        use: ['style-loader', 'css-loader', 'less-loader']
      },
      {
        test: /\.(png|jpg|gif|jpeg)$/,
        use: ['file-loader']
      }, {
        test: /\.(woff|woff2|eot|ttf|otf)$/,
        use: ['file-loader']
      }
    ]
  }
}
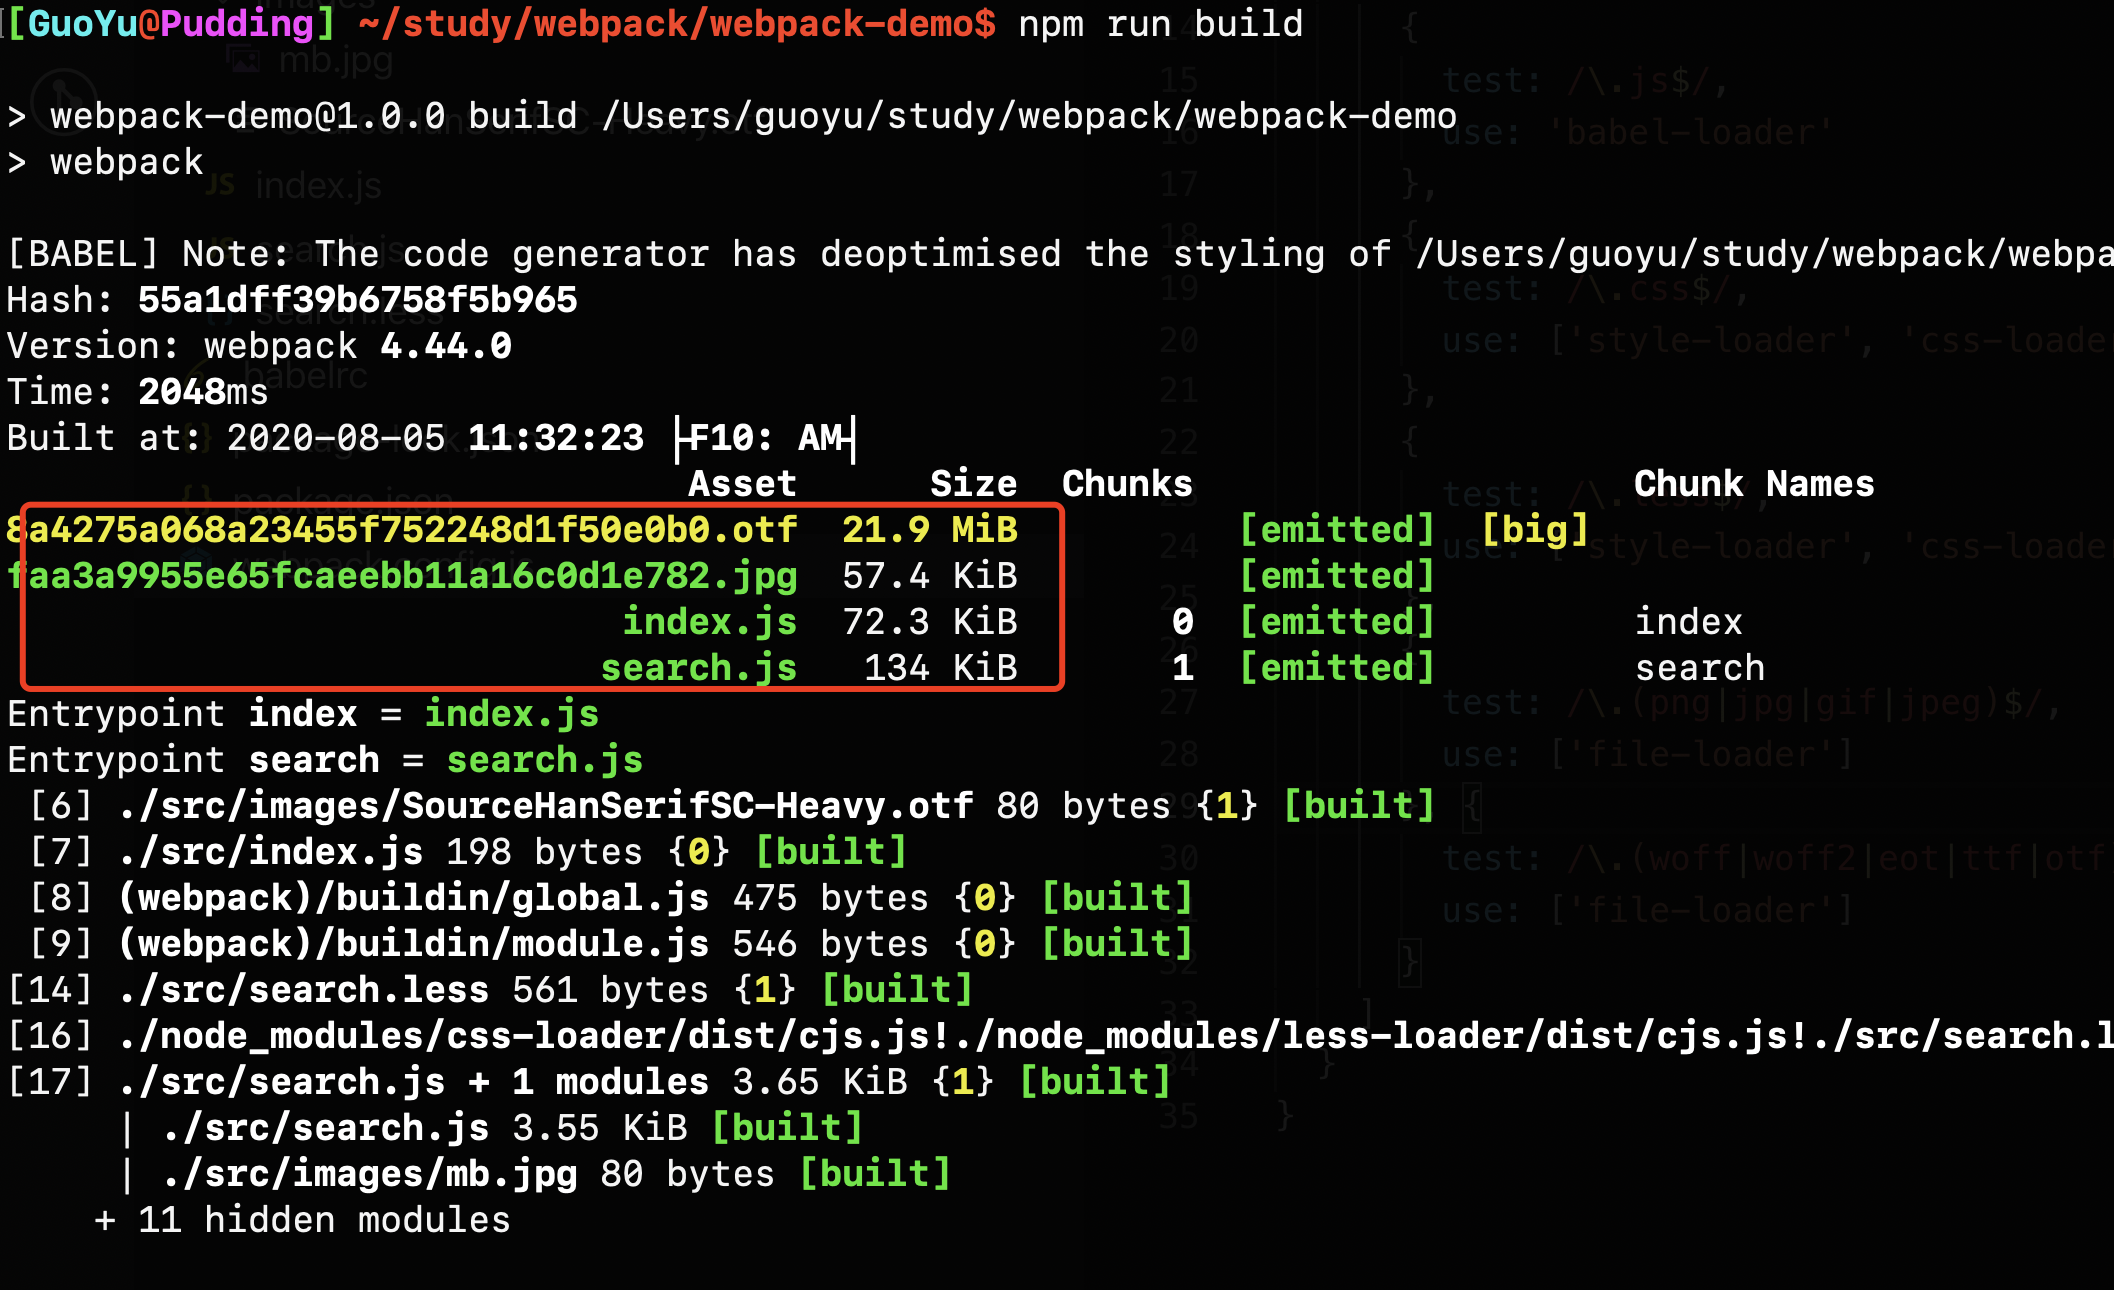
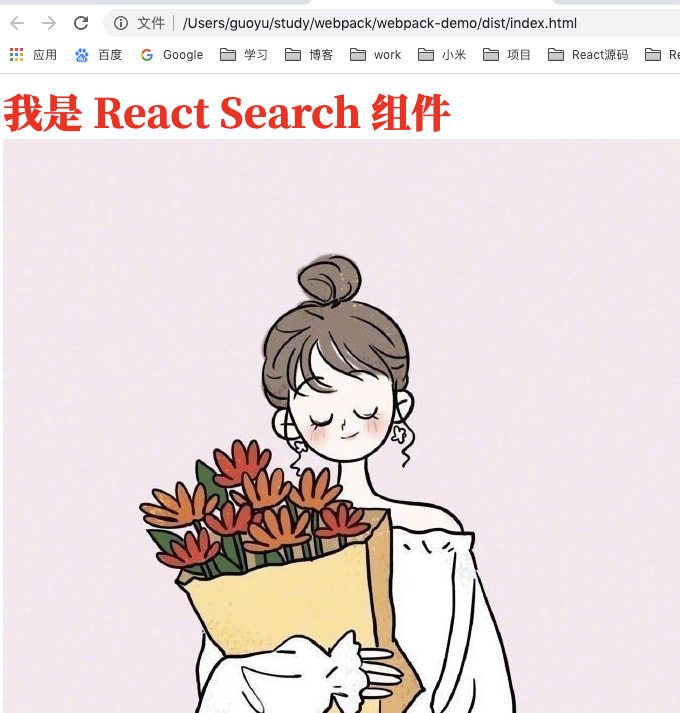
The font has indeed changed
3.3 other ways of parsing files
URL loader can also handle images and fonts, and can set smaller resources automatically
In fact, URL loader, the kernel is file loader, but when the file size (in byte s) is lower than the specified limit, a DataURL can be returned
We changed the previous file loader configuration to URL loader
npm i url-loader -D
const path = require('path')
module.exports = {
  entry: {
    index: './src/index.js',
    search: './src/search.js'
  },
  output: {
    path: path.join(__dirname, 'dist'),
    filename: '[name].js'
  },
  mode: 'production',
  module: {
    rules: [
      {
        test: /\.js$/,
        use: 'babel-loader'
      },
      {
        test: /\.css$/,
        use: ['style-loader', 'css-loader']
      },
      {
        test: /\.less$/,
        use: ['style-loader', 'css-loader', 'less-loader']
      },
      // {
      //   test: /\.(png|jpg|gif|jpeg)$/,
      //   use: ['file-loader']
      // },
      {
        test: /\.(png|jpg|gif|jpeg)$/,
        use: [{loader: 'url-loader', options: {limit: 102400}}]
      },
      {
        test: /\.(woff|woff2|eot|ttf|otf)$/,
        use: ['file-loader']
      }
    ]
  }
}
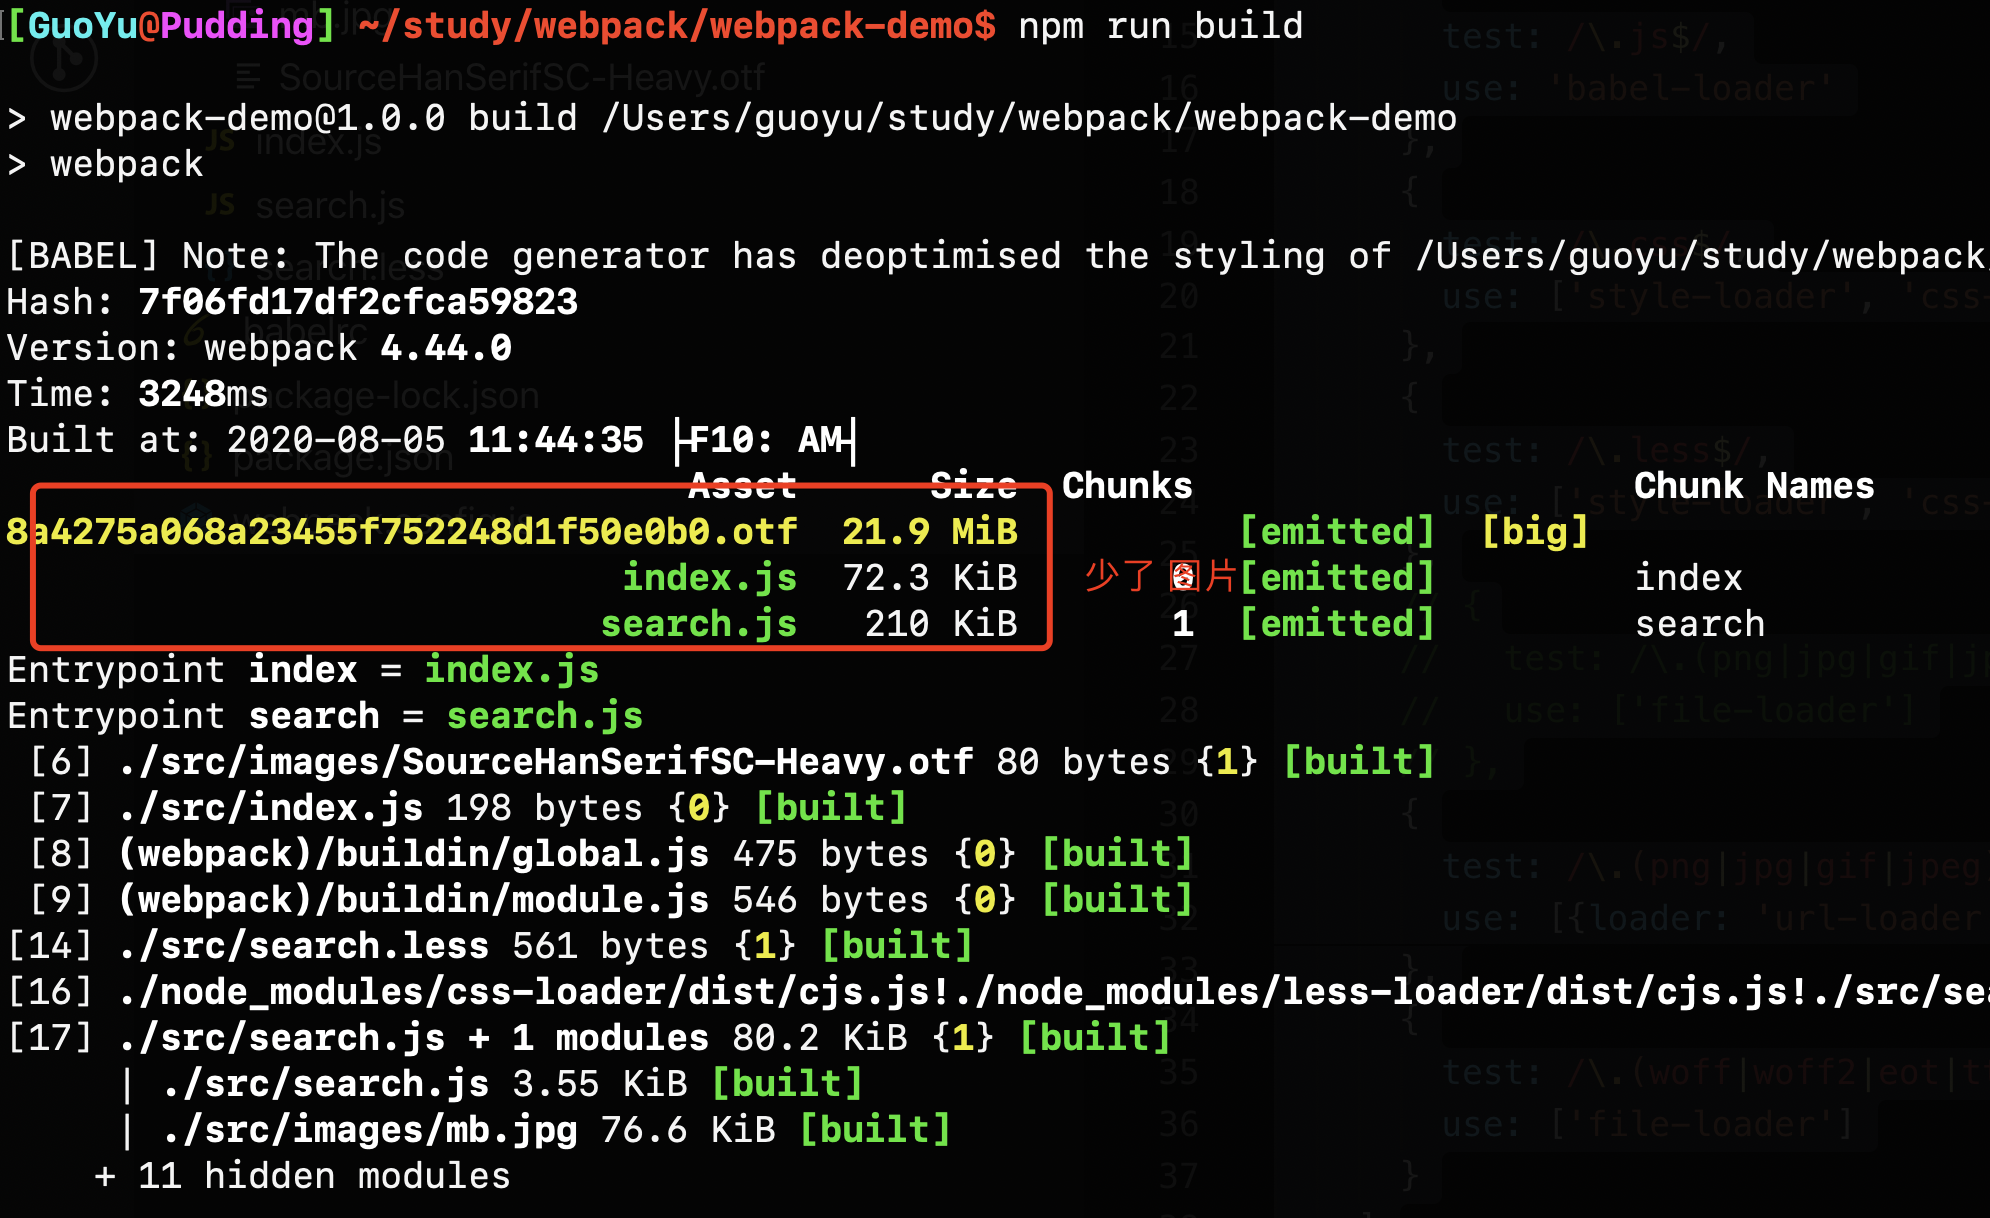
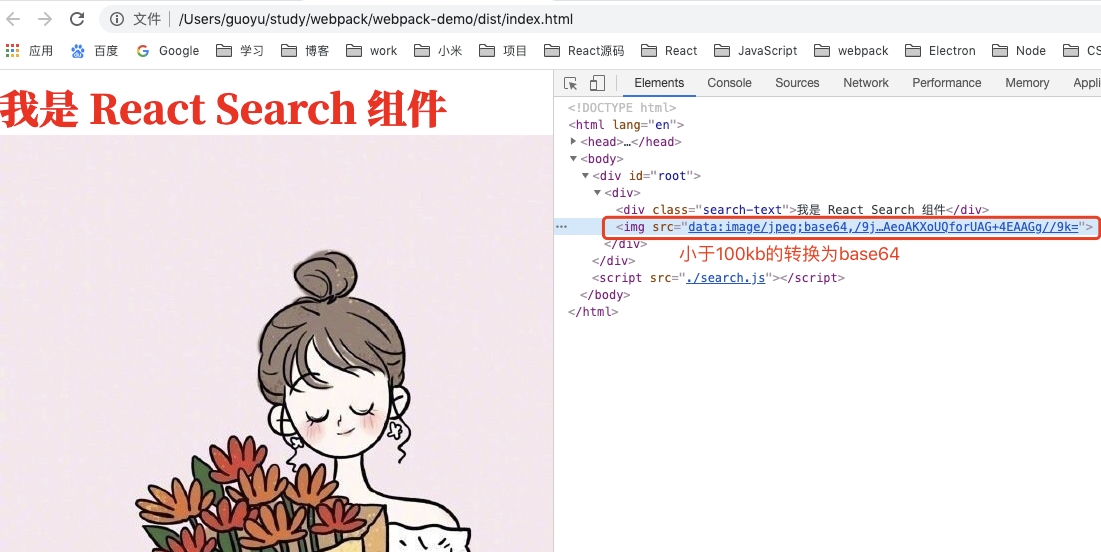
Try comparing search before and after base64 js size, not converted to base64 before search The size of js is 134k. After converting to base64, the picture becomes a part of js, search js size is 210k, the previous picture is 57.4k, the picture is converted to base64, the volume is expanded by 1/3, 57.4k becomes 76k, and the previous 134+76 = 210k, which is very consistent.
Note: the principle of changing to base64 and expanding 1 / 3 is as follows: base64 expands by one third
4, webpack file listening
File listening is to automatically reconstruct a new output file when the source code changes
4.1 usage
There are two ways to enable the listening mode of webpack:
- When starting the webpack command, bring the -- watch parameter;
- Configuring webpack.com config. Set watch: true in JS;
For example, in package JSON, but there is a defect: you have to refresh the browser manually every time
  "scripts": {
    "test": "echo \"Error: no test specified\" && exit 1",
    "build": "webpack",
    "watch": "webpack --watch"
  }
After npm run watch
After modifying and saving the file, you can see that the automatically built print appears on the terminal, and then manually refresh the browser. If you find that the interface changes, the terminal is always in the listening state.
4.2 monitoring principle
The polling mechanism determines whether the last editing time of the file has changed. At the beginning, the file will have a modification time, which will be stored. The next modification will be compared with the last stored time. If it is different, it will not immediately tell the listener, but cache the change first, Wait for a time called aggregateTimeout (300ms by default). If other files change, it will build the changed file list together, and finally generate the results of the construction together into the bundle file.
The configuration is as follows:
module.exports = {
    //The default is false, that is, it is not enabled
    watch: true,
    //watchOptions is meaningful only when listening mode is enabled
    wathcOptions: {
    //It is empty by default. It does not listen to files or folders. Regular matching is supported
    ignored: /node_modules/,
    //After listening to the change, it will wait 300ms for execution. The default is 300ms
    aggregateTimeout: 300,
    //Whether the file has changed is determined by constantly asking the system whether the specified file has changed. By default, it is asked 1000 times per second
    poll: 1000
  }
}
5, Hot update and principle of webpack
As we have seen earlier, the watch can only be built automatically, but it cannot be refreshed. It has to be refreshed manually every time. This section is to solve this problem.
Hot update: webpack dev server, also known as WDS
WDS does not refresh the browser;
WDS does not output files, but puts them in memory;
Use HotModuleReplacementPlugin plug-in;
Note that unlike watch, WDS has local disk I/O operations. WDS is placed in memory, so the construction speed is very advantageous.
5.1 use
"scripts": {
  "build": "webpack",
  "watch": "webpack --watch",
  "dev": "webpack-dev-server --open" // --Open means to open the browser automatically
}
Because this must be used in the development stage, the mode should be set to "development" and a webpack built-in plug-in should be used.

npm run dev

Open browser automatically
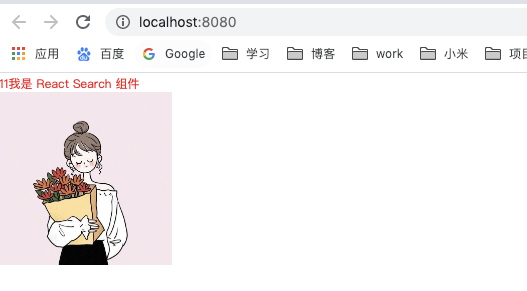
Then, modify the file and you will find that the browser will refresh automatically.
In addition, the hot update can also use the middleware: webapck dev middleware instead of webpack dev sever
Webpack dev middleware transfers the files output from webpack to the server for more flexible customization scenarios. However, it should be used in combination with the express framework.
5.2 principle
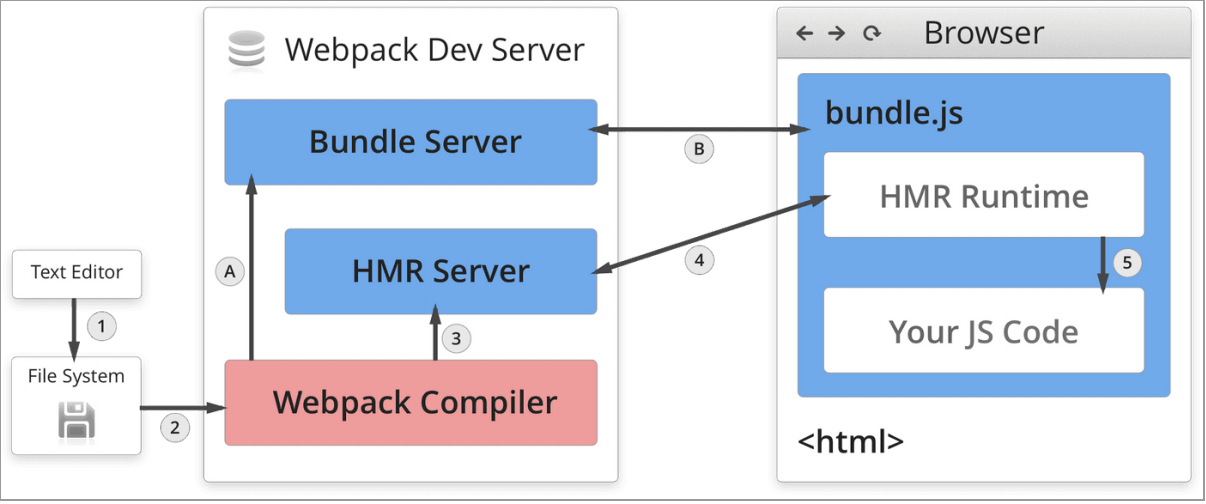
Webpack Compiler: a compiler that compiles source code into bundles JS, that is, the last packaged file;
HMR Server: outputs hot update files to HMR Runtime;
Bundle Server: provide files in the form of a server and then access them in the browser. Otherwise, you can only access them in the form of files[ file:///Users/guoyu/study/webpack/webpack-demo/dist/index.html ]However, bundleserver can be accessed by localhost:8080.
HMR Runtime: when the development process is packaged, it is injected into the browser bundle JS as bundle JS. The HMR runtime can establish a connection with the HMR Server, which is implemented by websocket.
5.3 process
There are two processes:
**1. Startup phase: * * compile your source code into bundle through webpack compiler in the file system JS, put the bundle JS is transferred to the BundleServer (server), and BundleServer enables the browser to access the BundleServer in the form of a server js. As shown below
1 -> 2 -> A -> B
**2. File update: * * if the source code changes, compile it through Webpack Compiler, and then send the compiled code to HMR Server. HMR Server can know which modules have changed, and HMR Server (server) will notify the HMR Runtime of the client (browser) and which files have changed (in json form), The HMR Runtime then updates the code without refreshing the browser.
6, File fingerprint
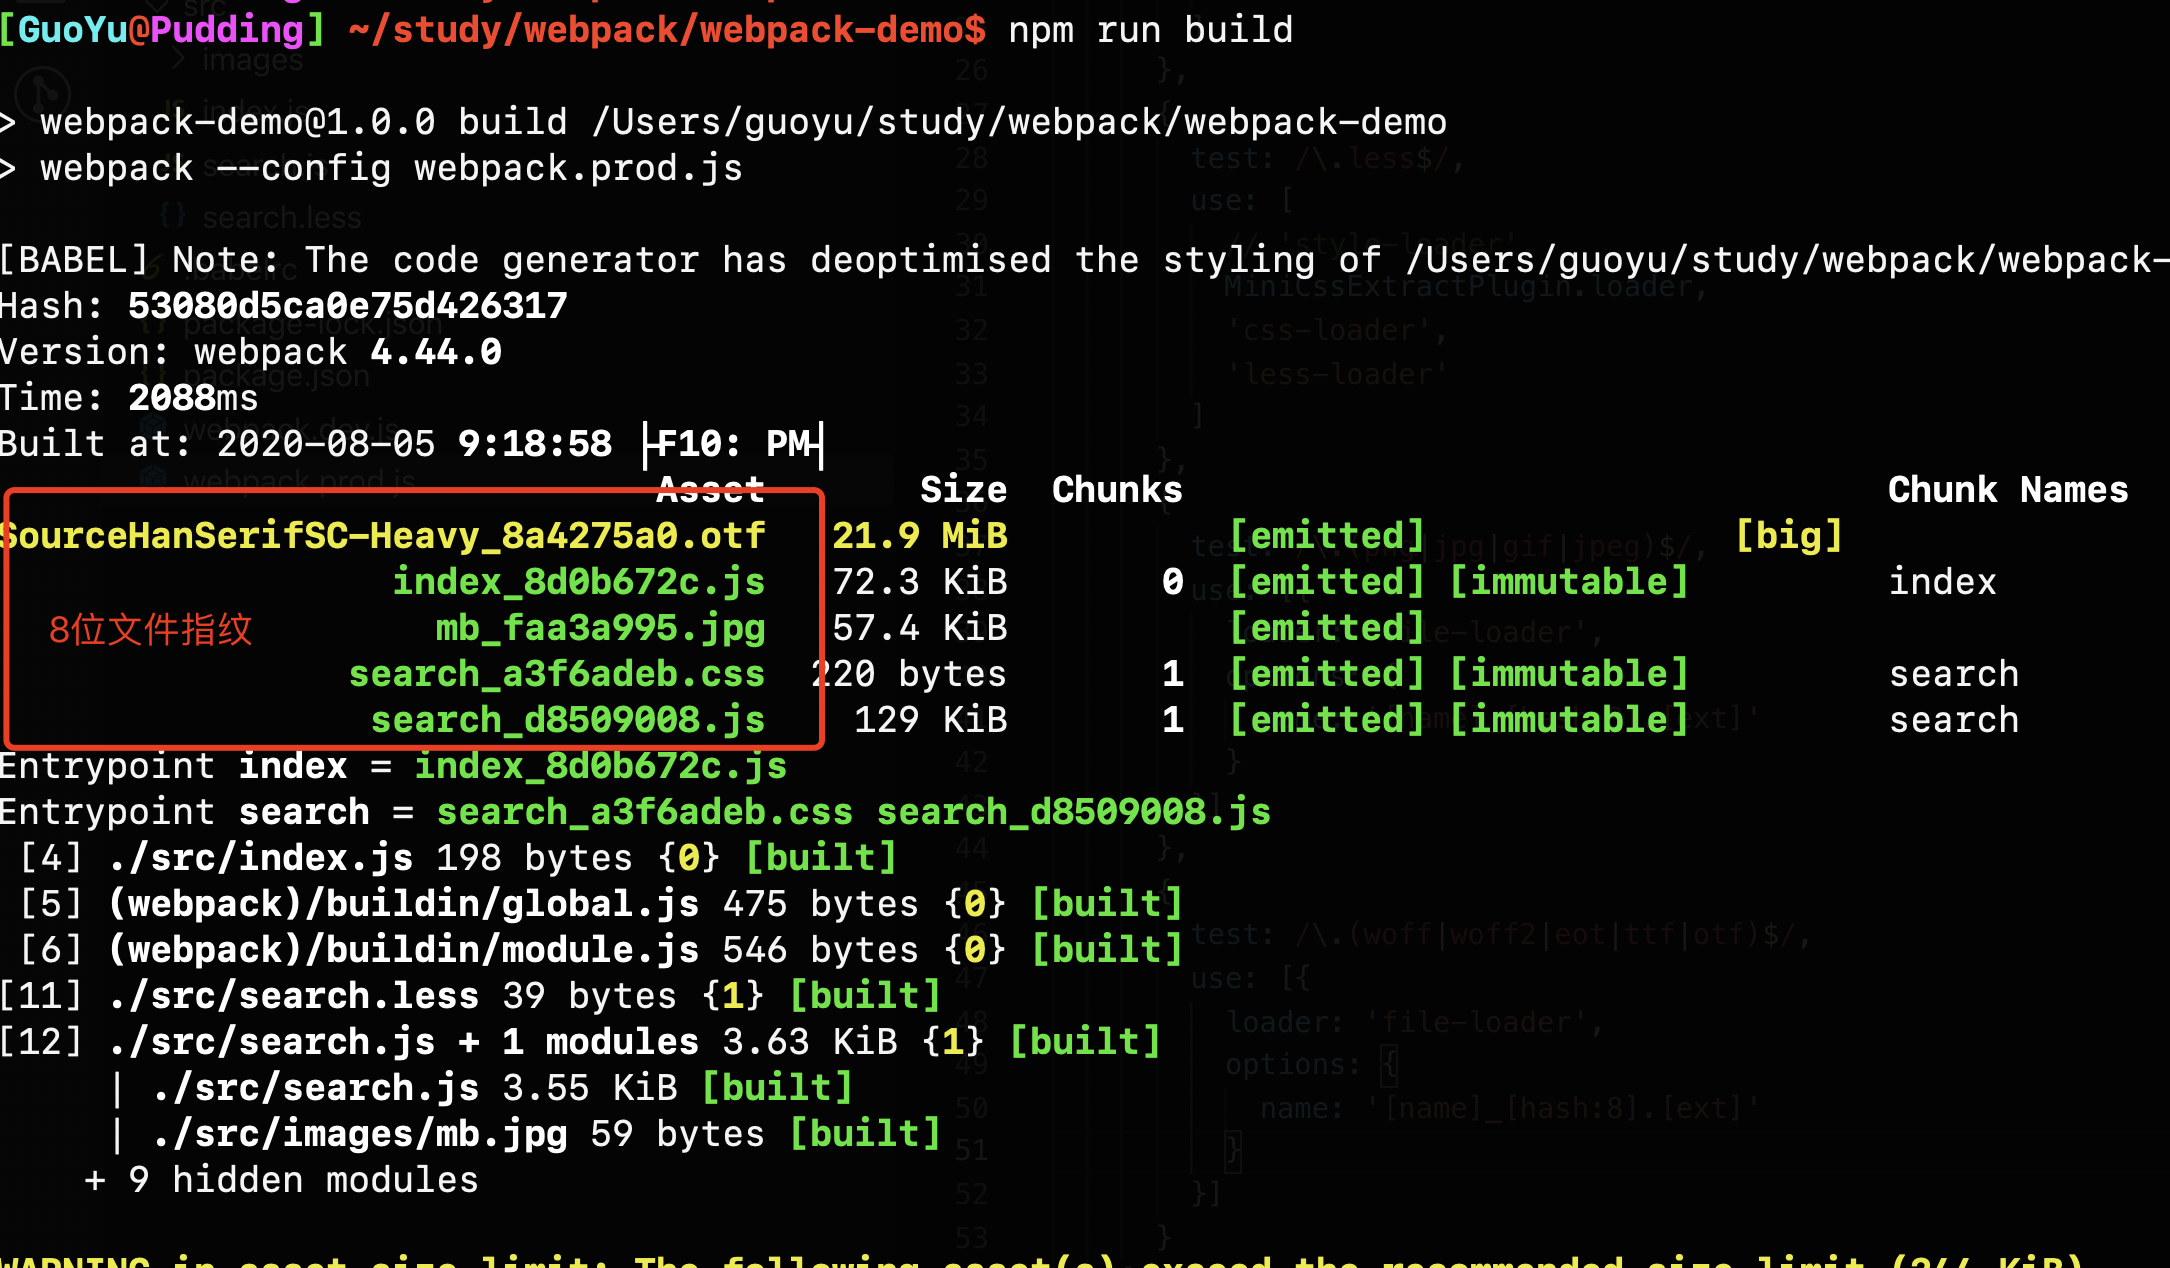
6.1 what is a document fingerprint
Package output file name suffix!
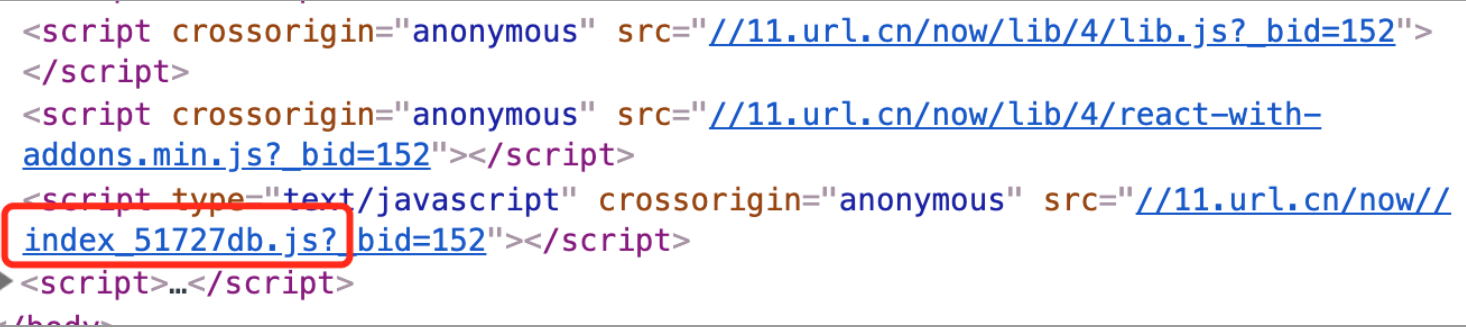
The six characters in the figure above are the file fingerprint.
File fingerprints are used for version management. When publishing files, some files are modified and some files are not modified. Only modified files can be published. For unmodified files, the fingerprints remain unchanged. Files that have not been modified can continue to be cached in the browser.
6.2 what are the fingerprints of documents
**Hash: * * is related to the whole project construction. The hash generated in the same construction process is the same. As long as the project file is changed, the hash value of the whole project construction will change. If the output is hash, once any file in the project is modified, the whole project will be constructed, the hash value will be obtained again, and the cache will become invalid.
**Chunkhash: * * the use of hash is related to the construction of the whole project. The hash generated after each construction is different. Even if the file content does not change, the cache effect cannot be achieved. We need another kind of chunkhash. Related to the chunk packaged by webpack, different entries will generate different chunkcash values; Chunk is actually a module packaged by webpack. The JS of page A and page B and page a have changed. After packaging, the JS of page B will also change, which is actually unnecessary. Here is the concept of chunkash. Chunks are modules. Different entries generate different chunks. Different entries can keep their chunks independent. In this way, one file on each page changes and will not affect other pages. Chunkhash is different from hash. It parses dependent files according to different file entry entries, builds corresponding chunks and generates corresponding hash. In the production environment, we distinguish some public libraries from program entry files and build them separately. Then we use chunkhash to generate hash values, as long as we do not change the code of public libraries, You can ensure that the hash is not affected. For example, using chunkash, the main entry file of the project is main JS and its corresponding dependent file main Because CSS is packaged in the same module, it shares the same chunkash. However, because the public library is a different module, it has a separate chunkash, which ensures that the online construction will not be repeated as long as the file content is not changed.
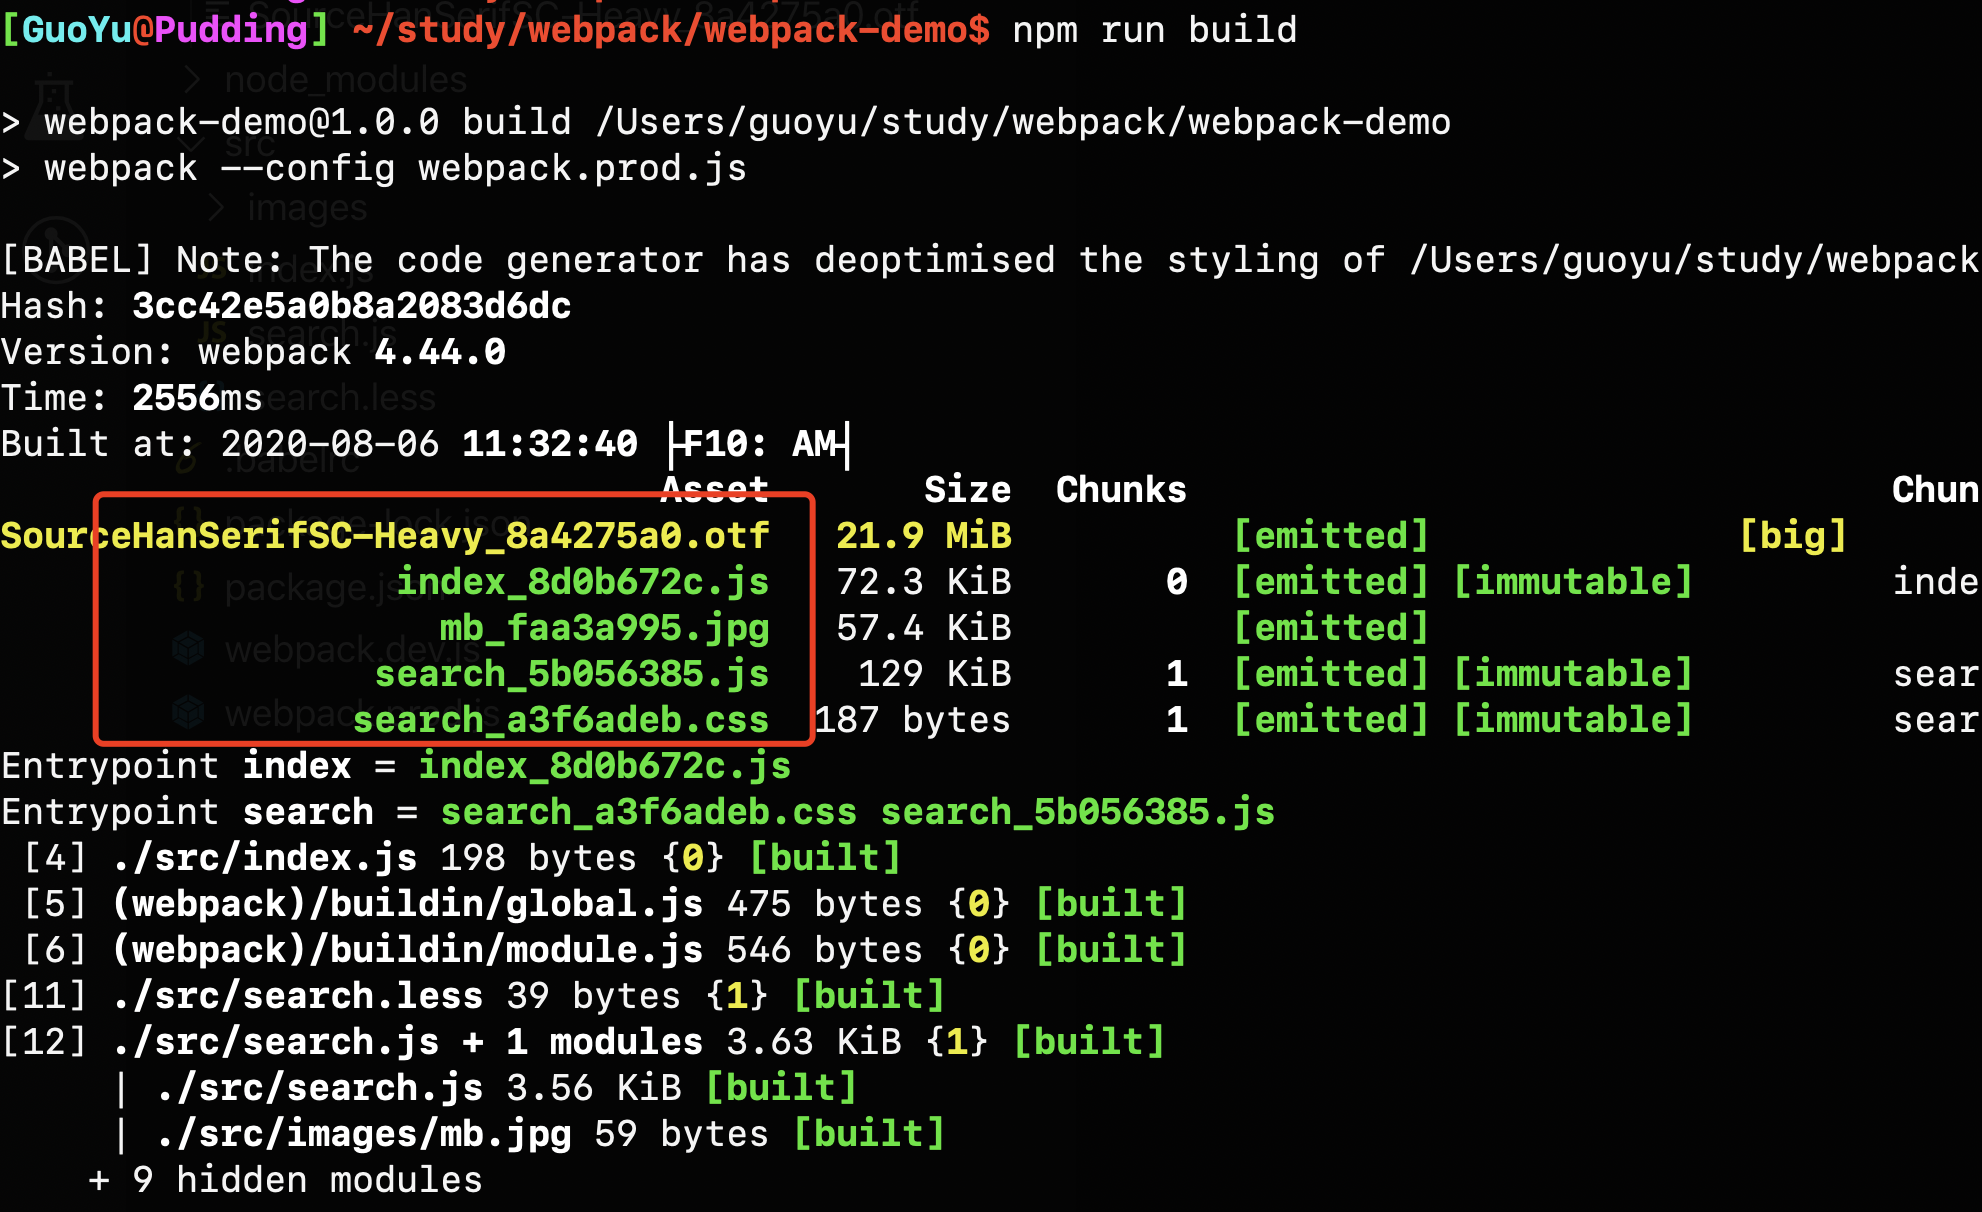
Contenthash: the hash is defined according to the file content. If the file content remains unchanged, the contenthash remains unchanged. If the chunkhash is used for css, it shares the chunkhash with the chunks that depend on it. After the test, it will be found that the chunkhash values of css and js file names are the same. If I modify the js file, the hash value of js will change, The hash value of the css file name is still the same as that of the changed js file. If I modify the css file, it will also lead to reconstruction. The hash value of css is still the same as that of js, even if the js file is not modified. This will invalidate the cache, so it is best to use content hash for css files.
Summary: chunkhash for JS files, contenthash for CSS files, and hash for fonts and pictures (the hash here is not the global hash mentioned above)
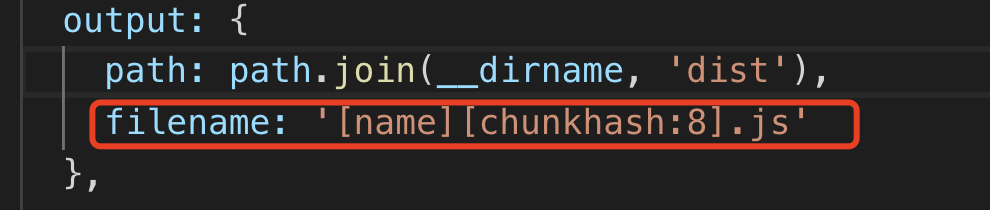
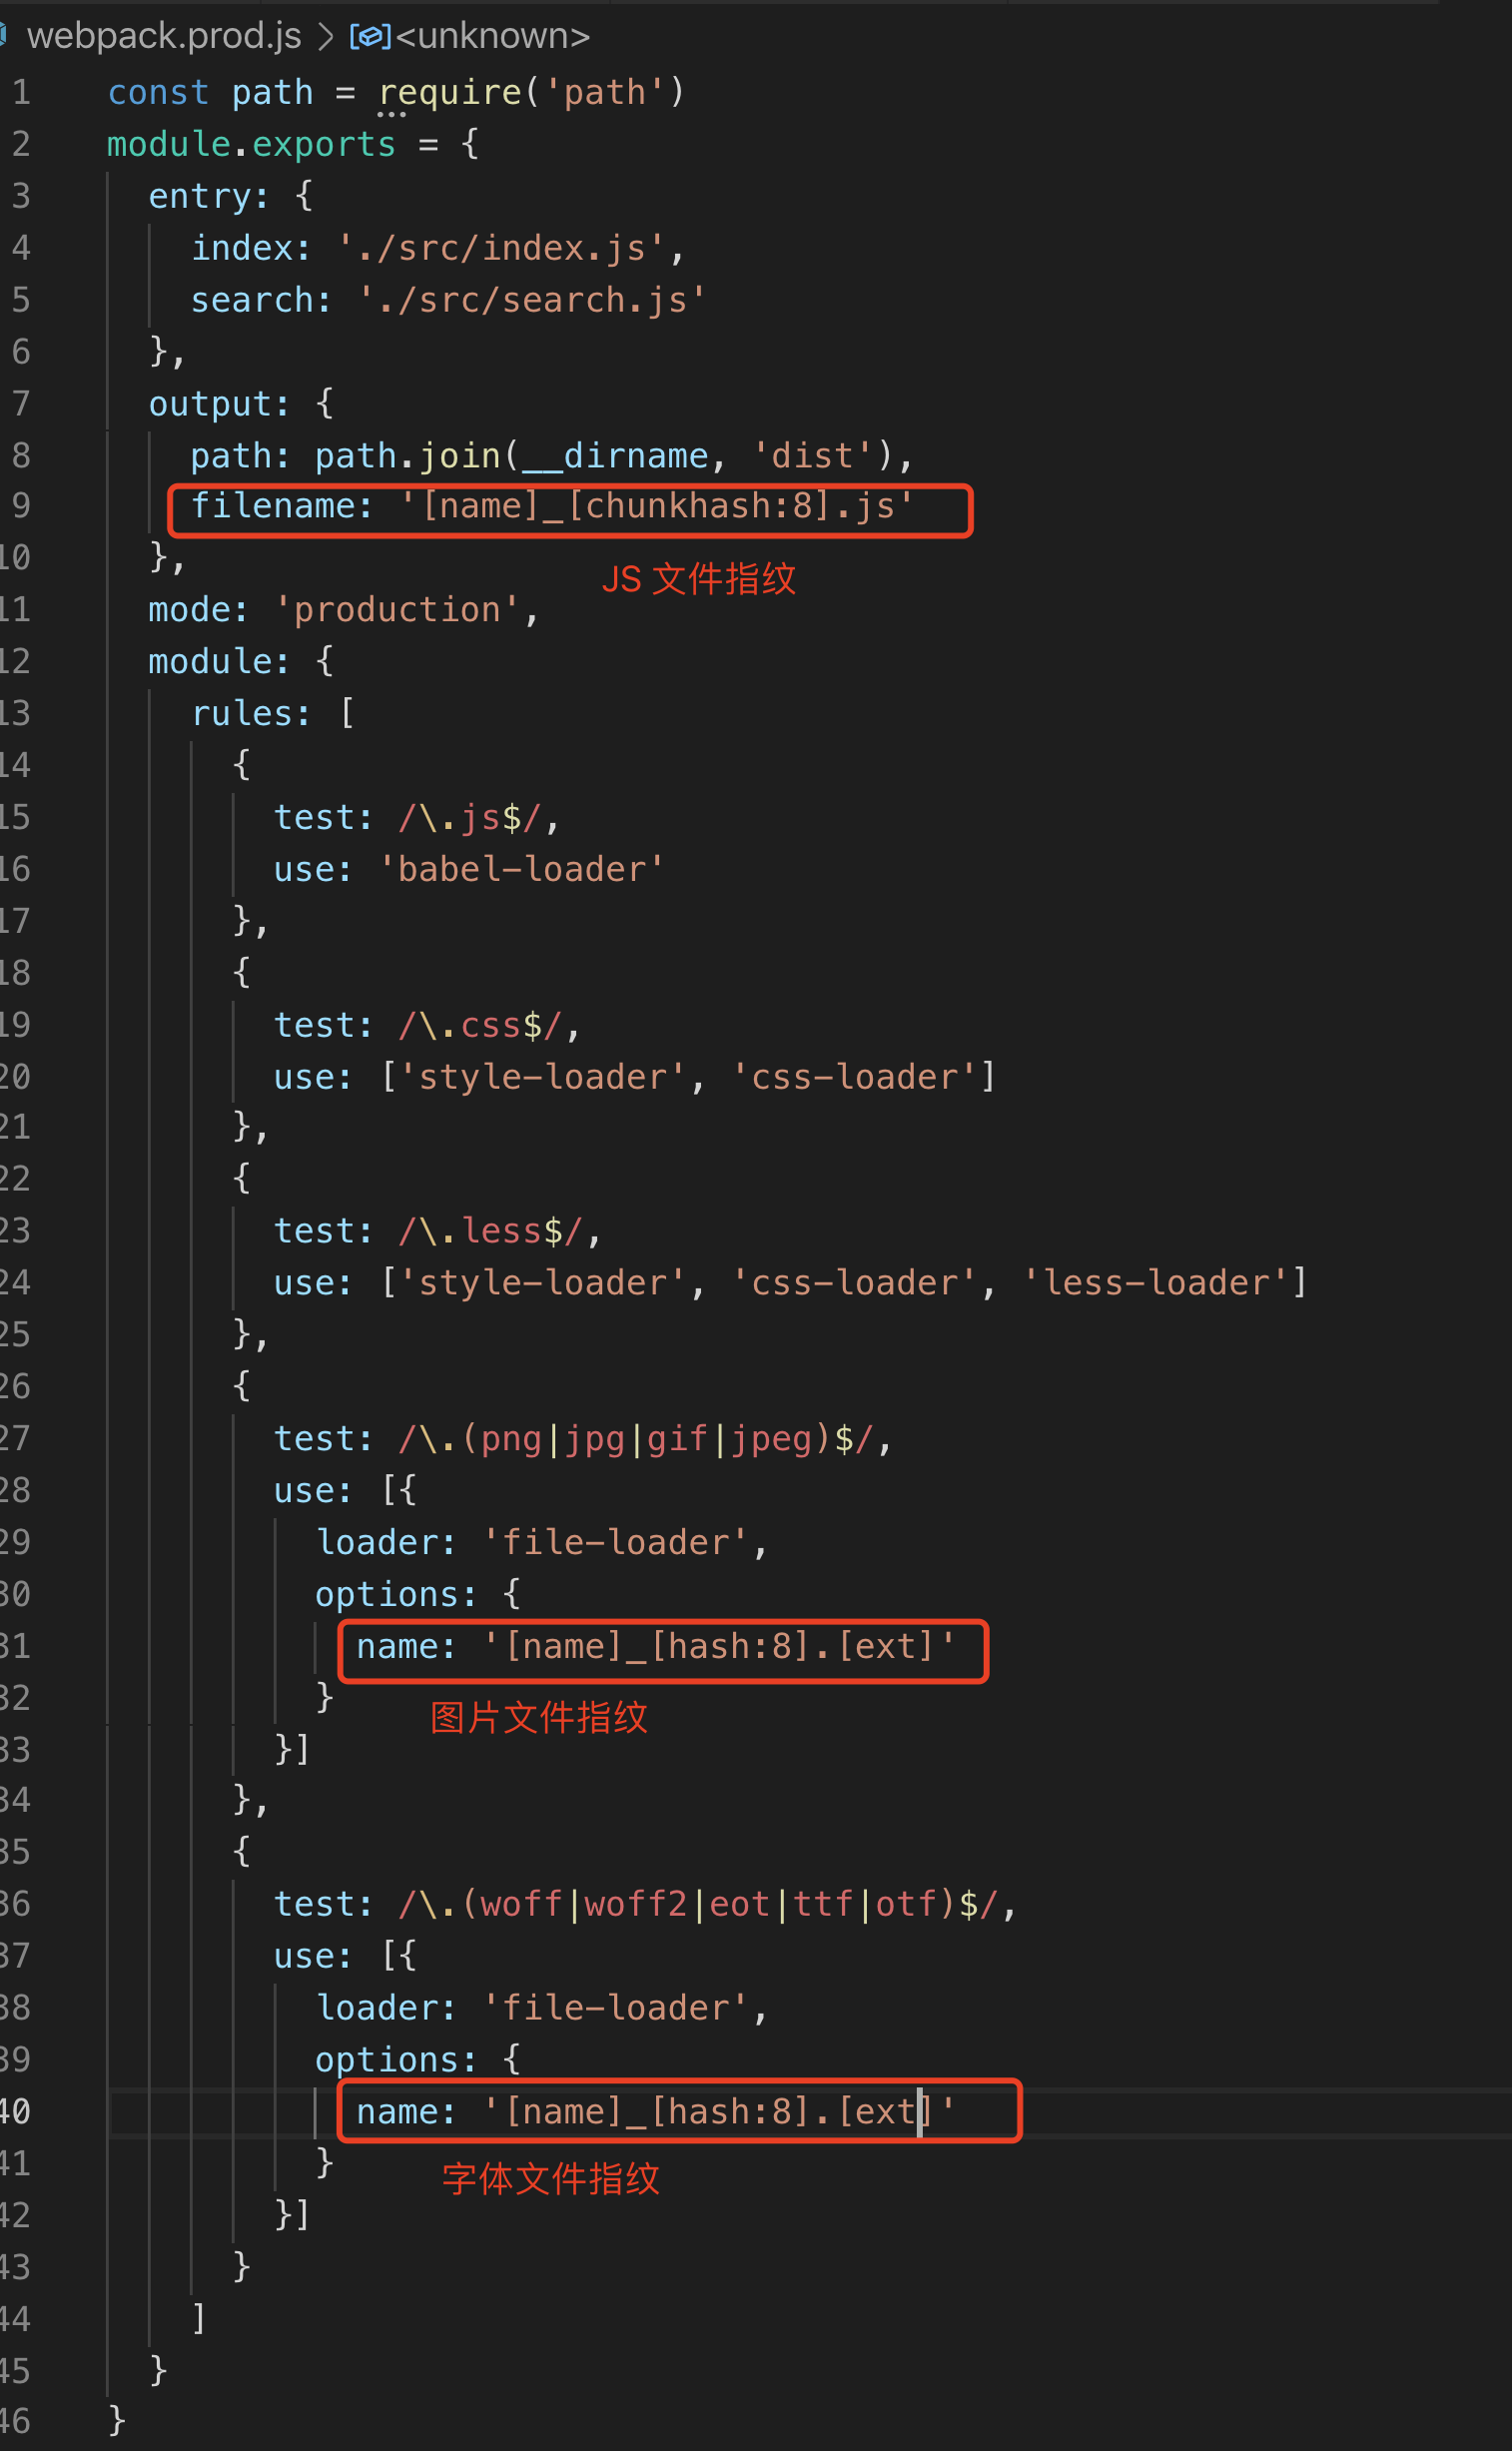
6.3 JS file setting file fingerprint
Set the filename of output and use [chunkash], which is very simple for js
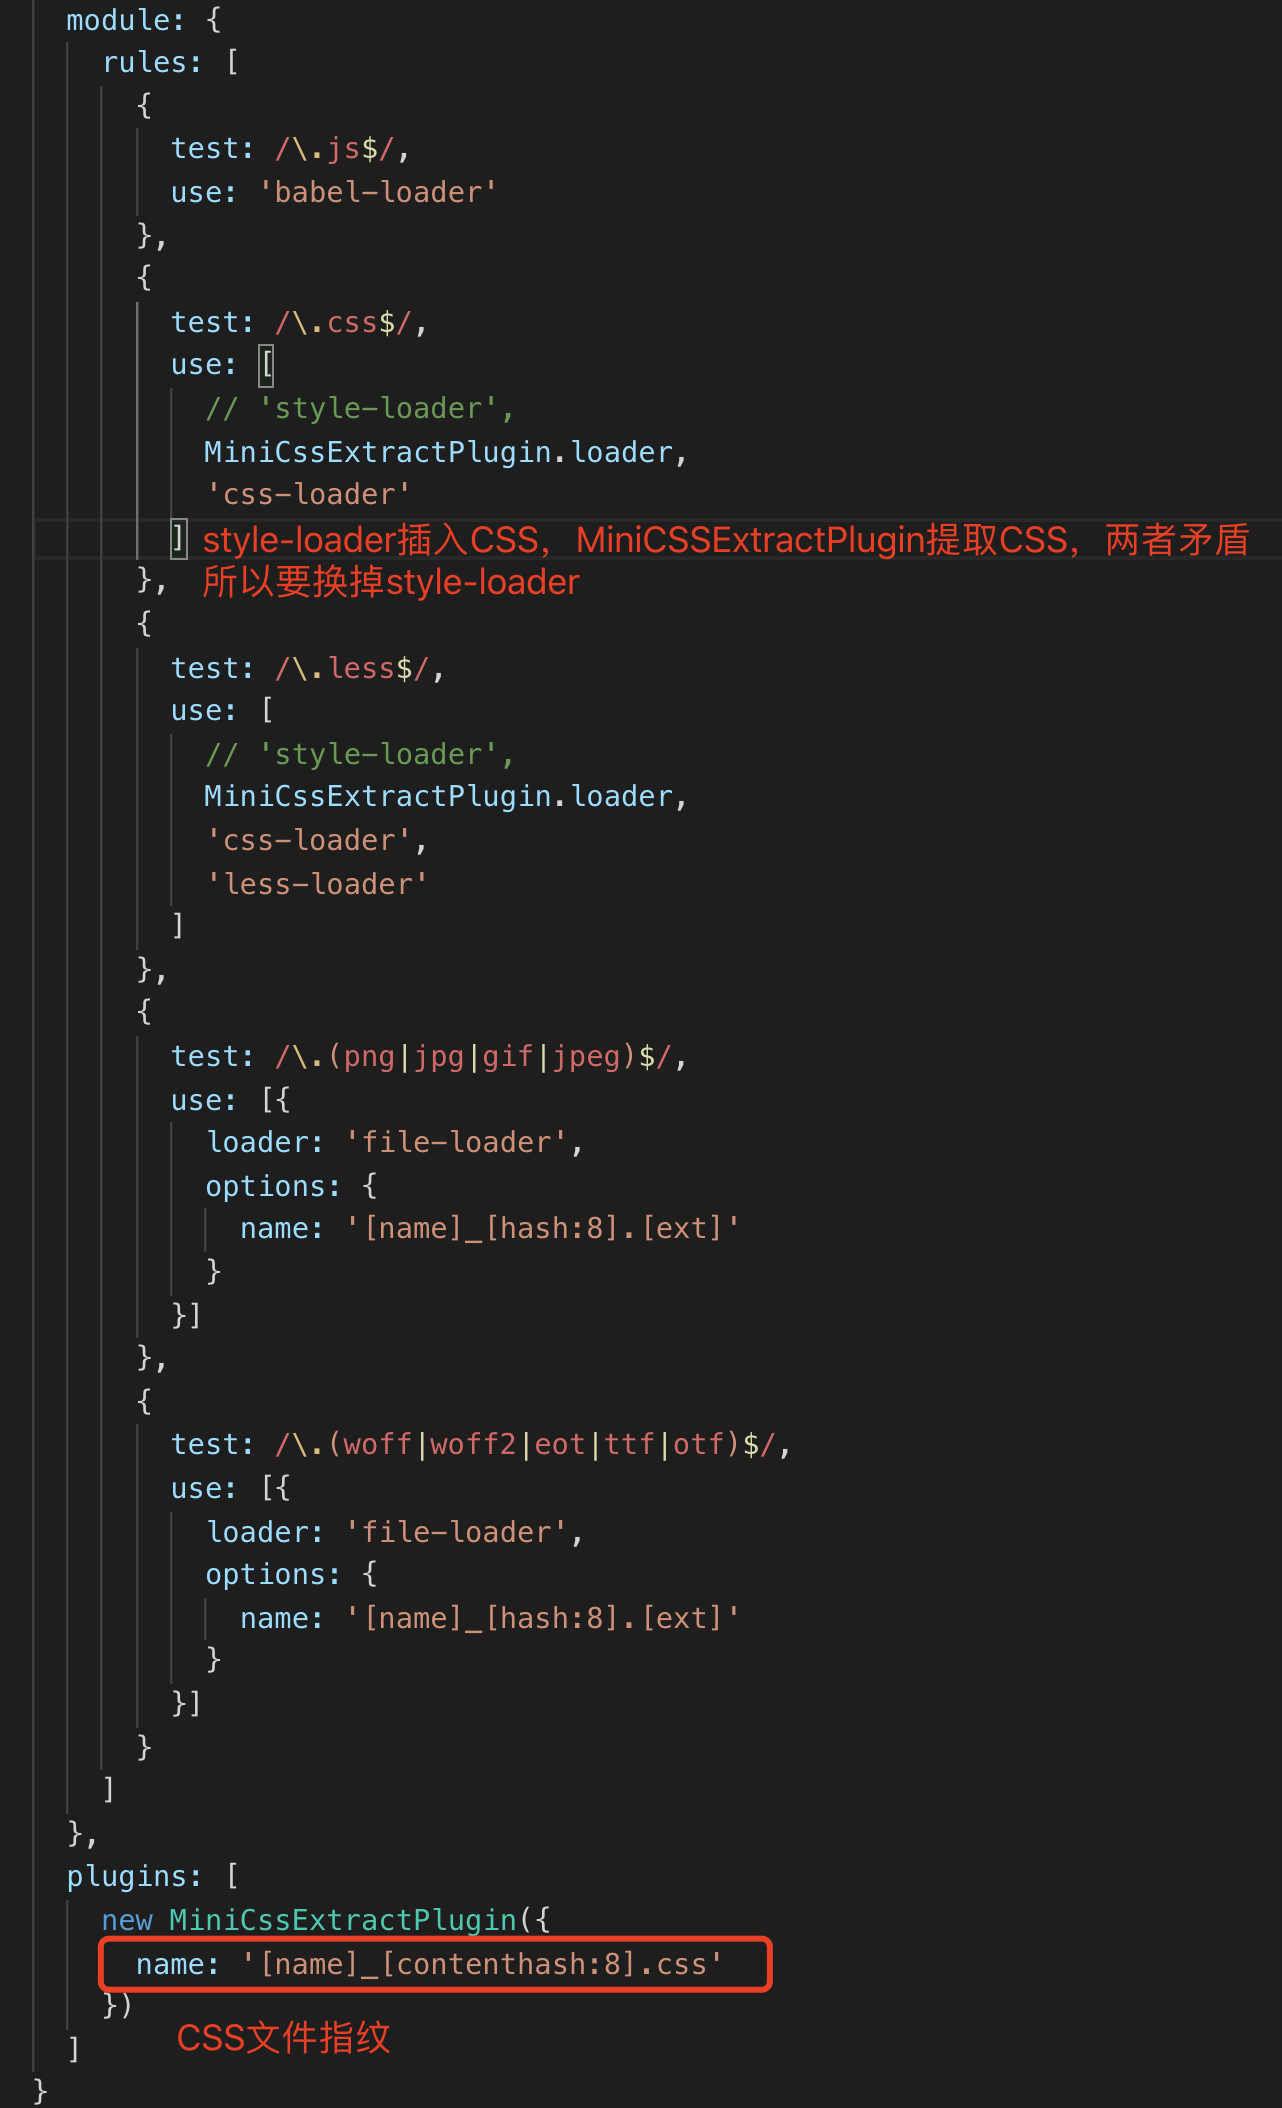
6.4 CSS file setting file fingerprint
To use content hash, under normal circumstances, if we use CSS loader and style loader, CSS will be inserted into style by style loader and placed in the head. At this time, there is no separate CSS file. At this time, we usually use the minicssextractplugin plug to extract CSS into a separate file, so, The file fingerprint is set under the filename field in minicssextractplugin, and the content hash is used.

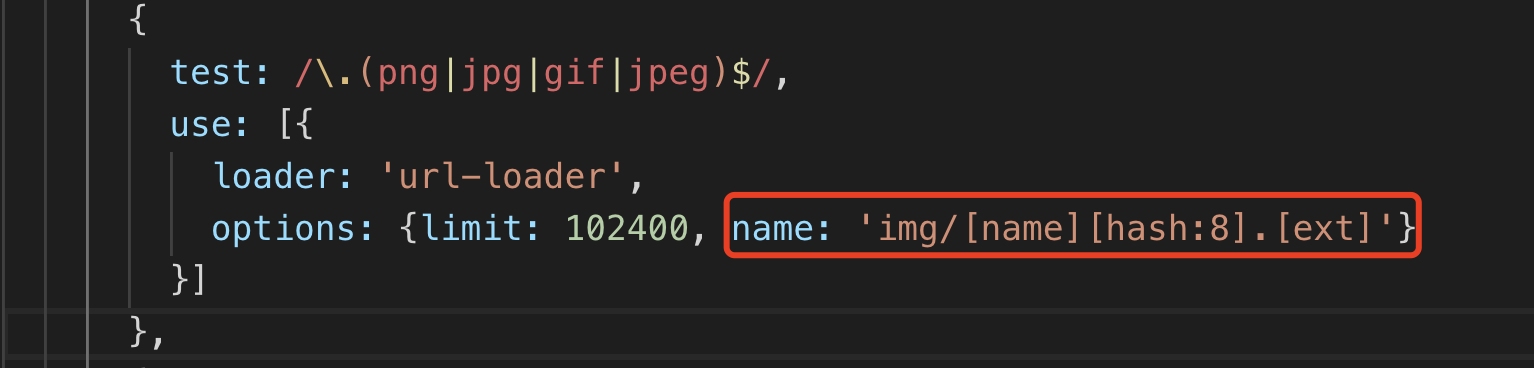
6.5 picture file fingerprint
When setting file loader, use hash. Here, hash is generated by md5, which is not the same concept as the hash mentioned earlier
6.6 examples
For example, if we want to create a hash, we need to use it in the production environment, because the chunkhash of webpack cannot be used with hot update and HotModuleReplacementPlugin, so we create a new configuration webpack Prod.js, the production environment does not need code hot update, and the hot update part needs to be removed.
"scripts": {
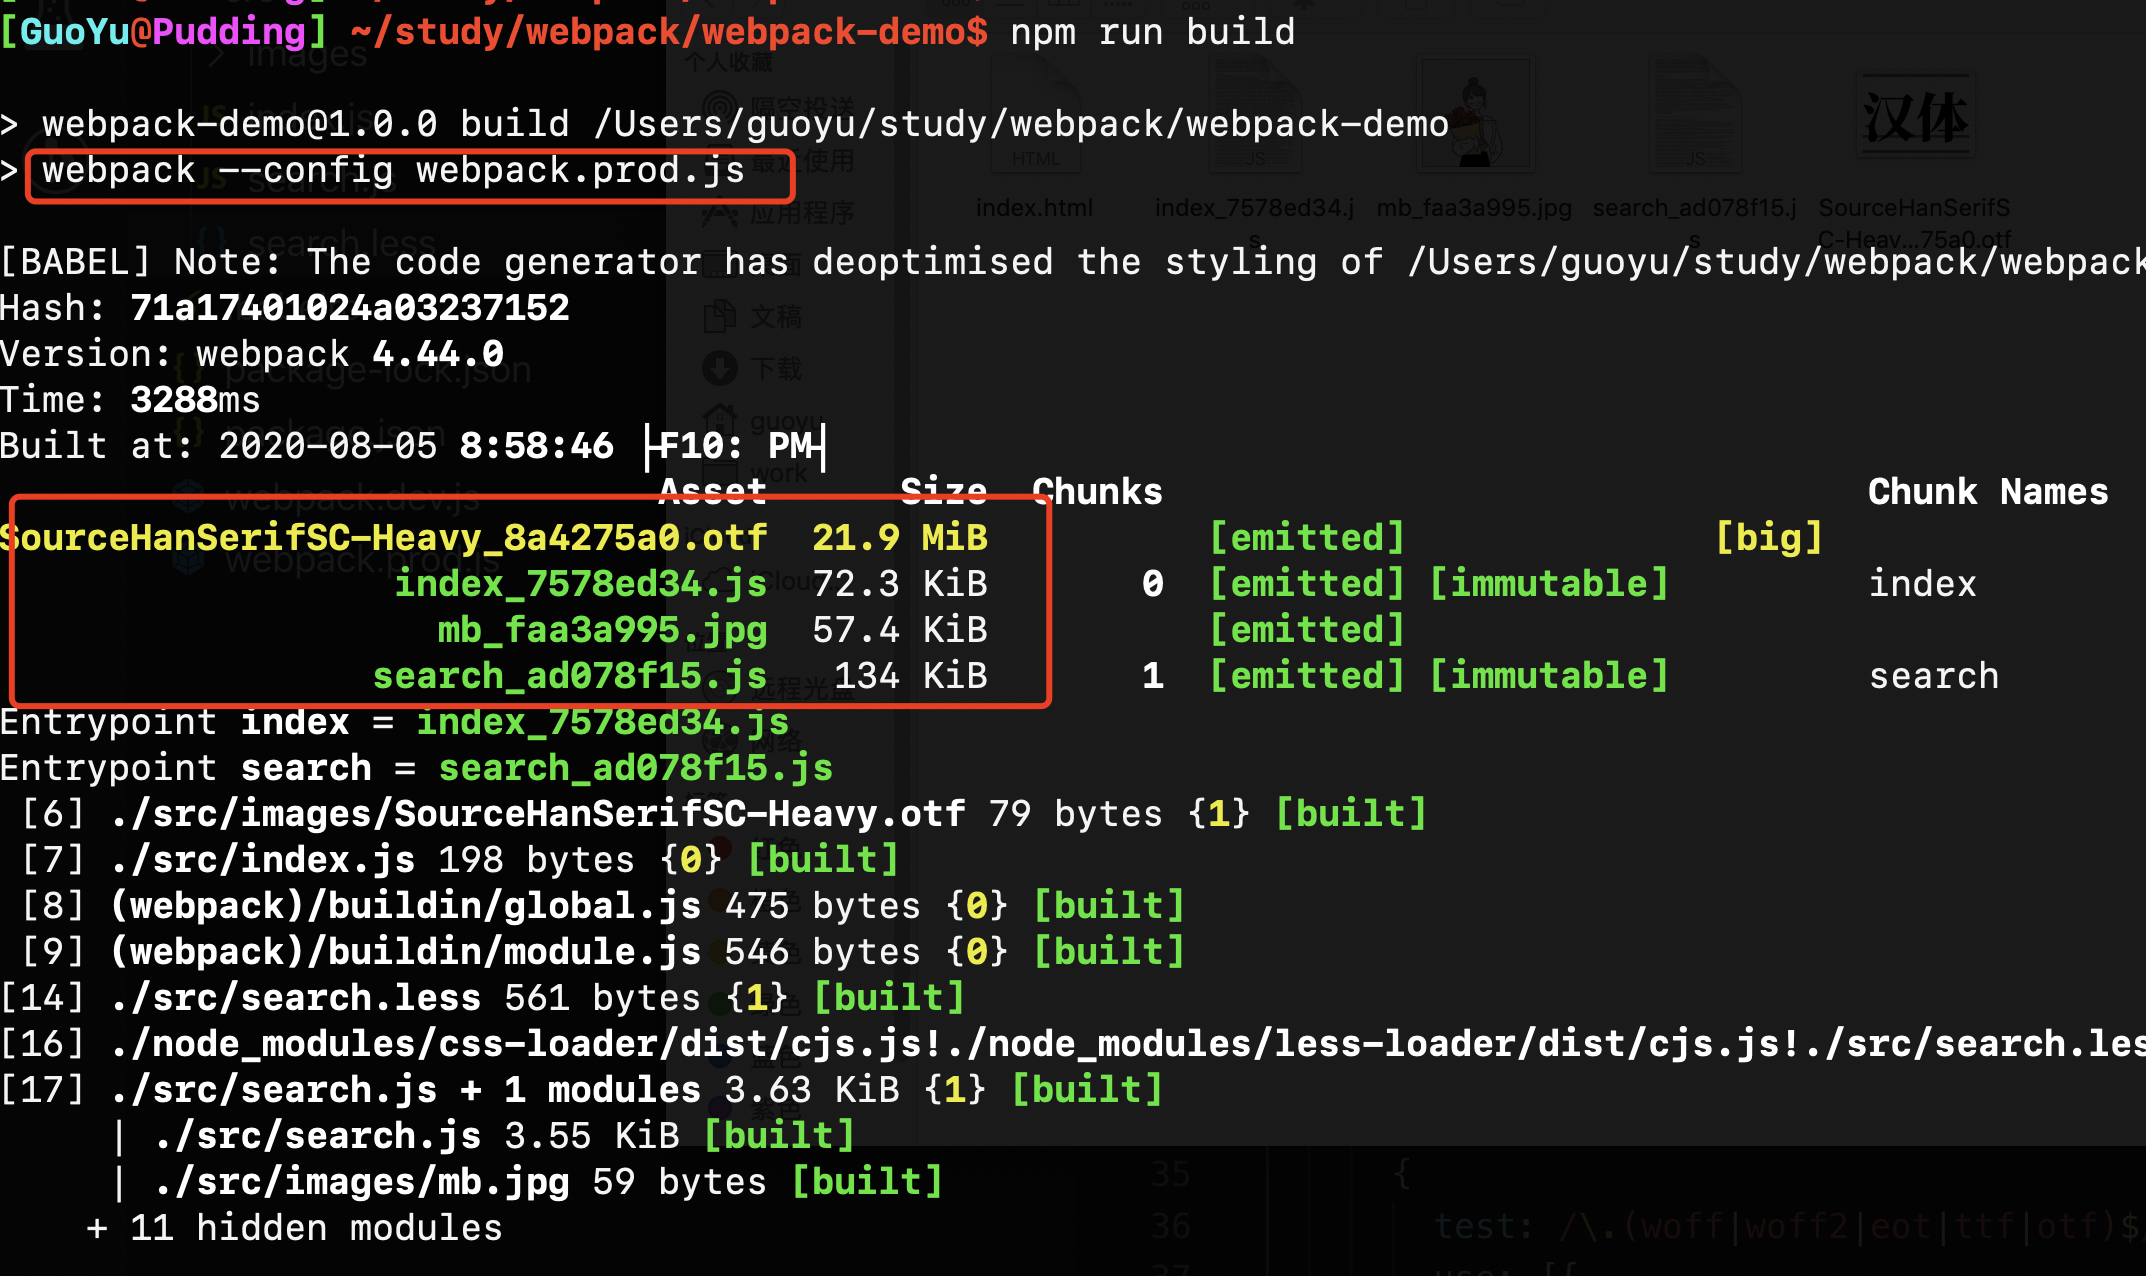
"build": "webpack --config webpack.prod.js",
"watch": "webpack --watch",
"dev": "webpack-dev-server --config webpack.dev.js --open"
}
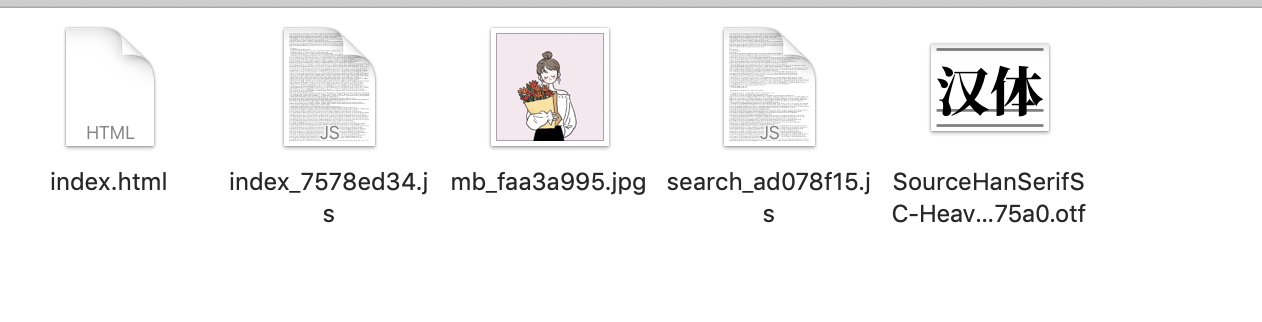
npm run build
There is no css file fingerprint set above. Let's make a css file fingerprint. css file fingerprints must be independent of css, but before, css files were inserted into the head through style loader, which did not form an independent css file. Therefore, css should be extracted through plug-ins.
npm install mini-css-extract-plugin -D
npm run build
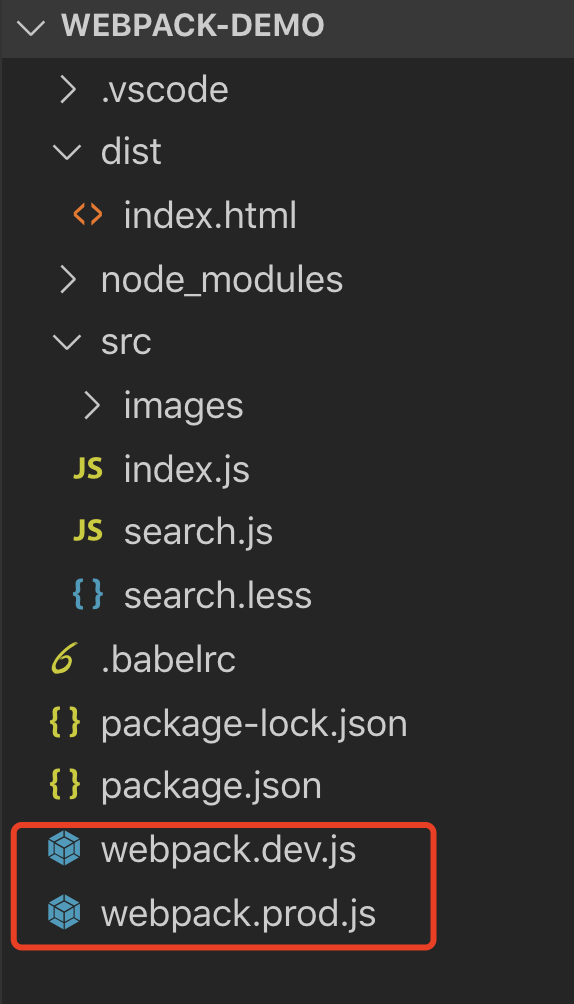
Attached is webpack Prod.js and webpack dev.js
const path = require('path')
const MiniCssExtractPlugin = require('mini-css-extract-plugin')
module.exports = {
  entry: {
    index: './src/index.js',
    search: './src/search.js'
  },
  output: {
    path: path.join(__dirname, 'dist'),
    filename: '[name]_[chunkhash:8].js'
  },
  mode: 'production',
  module: {
    rules: [
      {
        test: /\.js$/,
        use: 'babel-loader'
      },
      {
        test: /\.css$/,
        use: [
          // 'style-loader',
          MiniCssExtractPlugin.loader,
          'css-loader'
        ]
      },
      {
        test: /\.less$/,
        use: [
          // 'style-loader',
          MiniCssExtractPlugin.loader,
          'css-loader',
          'less-loader'
        ]
      },
      {
        test: /\.(png|jpg|gif|jpeg)$/,
        use: [{
          loader: 'file-loader',
          options: {
            name: '[name]_[hash:8].[ext]'
          }
        }]
      },
      {
        test: /\.(woff|woff2|eot|ttf|otf)$/,
        use: [{
          loader: 'file-loader',
          options: {
            name: '[name]_[hash:8].[ext]'
          }
        }]
      }
    ]
  },
  plugins: [
    new MiniCssExtractPlugin({
      filename: '[name]_[contenthash:8].css'
    })
  ]
}
const path = require('path')
const webpack = require('webpack')
module.exports = {
  entry: {
    index: './src/index.js',
    search: './src/search.js'
  },
  output: {
    path: path.join(__dirname, 'dist'),
    filename: '[name].js'
  },
  mode: 'development',
  module: {
    rules: [
      {
        test: /\.js$/,
        use: 'babel-loader'
      },
      {
        test: /\.css$/,
        use: ['style-loader', 'css-loader']
      },
      {
        test: /\.less$/,
        use: ['style-loader', 'css-loader', 'less-loader']
      },
      {
        test: /\.(png|jpg|gif|jpeg)$/,
        use: [{
          loader: 'url-loader',
          options: {limit: 102400}
        }]
      },
      {
        test: /\.(woff|woff2|eot|ttf|otf)$/,
        use: ['file-loader']
      }
    ]
  },
  plugins: [
    new webpack.HotModuleReplacementPlugin(),
  ],
  devServer: {
    contentBase: './dist',
    hot: true
  }
}
7, Code compression
7.1 JS compression
webpack4.x has built-in uglifyjs webpack plugin, so we don't care. Of course, you can also use other compression plugins and configure them yourself. As long as your mode is set to production, the uglifyjs webpack plugin is enabled by default, and js is compressed by default.
7.2 CSS compression
In webpack3 In X, CSS can be compressed in CSS loader, but when it comes to webpack 4 In X, CSS loader no longer supports the compression function of CSS. We fill this function through plug-ins.
Use optimize css assets webpack plugin with cssnano (a preprocessor of css)
plugins: [
  new OptimizeCSSAssetsPlugin({
    assetNameRegExp: /\.css$/g,
    cssProcessor: require('cssnano')
  })
]
npm install optimize-css-assets-webpack-plugin cssnano -D
const path = require('path')
const MiniCssExtractPlugin = require('mini-css-extract-plugin')
// Here's the point
const OptimizeCSSAssetsPlugin = require('optimize-css-assets-webpack-plugin')

module.exports = {
  entry: {
    index: './src/index.js',
    search: './src/search.js'
  },
  output: {
    path: path.join(__dirname, 'dist'),
    filename: '[name]_[chunkhash:8].js'
  },
  mode: 'production',
  module: {
    rules: [
      {
        test: /\.js$/,
        use: 'babel-loader'
      },
      {
        test: /\.css$/,
        use: [
          // 'style-loader',
          MiniCssExtractPlugin.loader,
          'css-loader'
        ]
      },
      {
        test: /\.less$/,
        use: [
          // 'style-loader',
          MiniCssExtractPlugin.loader,
          'css-loader',
          'less-loader'
        ]
      },
      {
        test: /\.(png|jpg|gif|jpeg)$/,
        use: [{
          loader: 'file-loader',
          options: {
            name: '[name]_[hash:8].[ext]'
          }
        }]
      },
      {
        test: /\.(woff|woff2|eot|ttf|otf)$/,
        use: [{
          loader: 'file-loader',
          options: {
            name: '[name]_[hash:8].[ext]'
          }
        }]
      }
    ]
  },
  plugins: [
    new MiniCssExtractPlugin({
      filename: '[name]_[contenthash:8].css'
    }),
    // Here's the point
    new OptimizeCSSAssetsPlugin({
      assetNameRegExp: /\.css$/g,
      cssProcessor: require('cssnano')
    })
  ]
}

7.3 HTML compression
I have to mention a plug-in: HTML webpack plugin, which sets compression parameters. This plug-in exists like a king in the world of webpack.
plugins: [
  new HtmlWebpackPlugin({
    // The file path where the html template is located
        // Generate a specific html file according to your specified template file.
    // The template type here can be any template you like, including html, jade, ejs, hbs, etc,
    // However, it should be noted that when using a customized template file, you need to install the corresponding loader in advance
    // Otherwise, the webpack cannot be parsed correctly
    template: path.join(__dirname, 'src/search.html'),
    // Packaged file name
    filename: 'search.html',
    // Specify which chunk s to use for the generated html
    chunks: ['search'],
    //
    inject: true,
    minify: {
      html5: true,
      collapseWhitespace: true,
      preserveLineBreaks: false,
      minifyCSS: true,
      minifyJS: true,
      removeComments: false
    }
  })
]
npm install html-webpack-plugin -D
Full text configuration:
const path = require('path')
const MiniCssExtractPlugin = require('mini-css-extract-plugin')
const OptimizeCSSAssetsPlugin = require('optimize-css-assets-webpack-plugin')
const HtmlWebpackPlugin = require('html-webpack-plugin')

module.exports = {
  entry: {
    index: './src/index.js',
    search: './src/search.js'
  },
  output: {
    path: path.join(__dirname, 'dist'),
    filename: '[name]_[chunkhash:8].js'
  },
  mode: 'production',
  module: {
    rules: [
      {
        test: /\.js$/,
        use: 'babel-loader'
      },
      {
        test: /\.css$/,
        use: [
          // 'style-loader',
          MiniCssExtractPlugin.loader,
          'css-loader'
        ]
      },
      {
        test: /\.less$/,
        use: [
          // 'style-loader',
          MiniCssExtractPlugin.loader,
          'css-loader',
          'less-loader'
        ]
      },
      {
        test: /\.(png|jpg|gif|jpeg)$/,
        use: [{
          loader: 'file-loader',
          options: {
            name: '[name]_[hash:8].[ext]'
          }
        }]
      },
      {
        test: /\.(woff|woff2|eot|ttf|otf)$/,
        use: [{
          loader: 'file-loader',
          options: {
            name: '[name]_[hash:8].[ext]'
          }
        }]
      }
    ]
  },
  plugins: [
    new MiniCssExtractPlugin({
      filename: '[name]_[contenthash:8].css'
    }),
    new OptimizeCSSAssetsPlugin({
      assetNameRegExp: /\.css$/g,
      cssProcessor: require('cssnano')
    }),
    // There are many pages here. You need to write two
    new HtmlWebpackPlugin({
      template: path.join(__dirname, 'src/index.html'),
      filename: 'index.html',
      chunks: ['index'],
      inject: true,
      minify: {
        html5: true,
        collapseWhitespace: true,
        preserveLineBreaks: false,
        minifyCSS: true,
        minifyJS: true,
        removeComments: false
      }
    }),
    new HtmlWebpackPlugin({
      template: path.join(__dirname, 'src/search.html'),
      filename: 'search.html',
      chunks: ['search'],
      inject: true,
      minify: {
        html5: true,
        collapseWhitespace: true,
        preserveLineBreaks: false,
        minifyCSS: true,
        minifyJS: true,
        removeComments: false
      }
    })
  ]
}
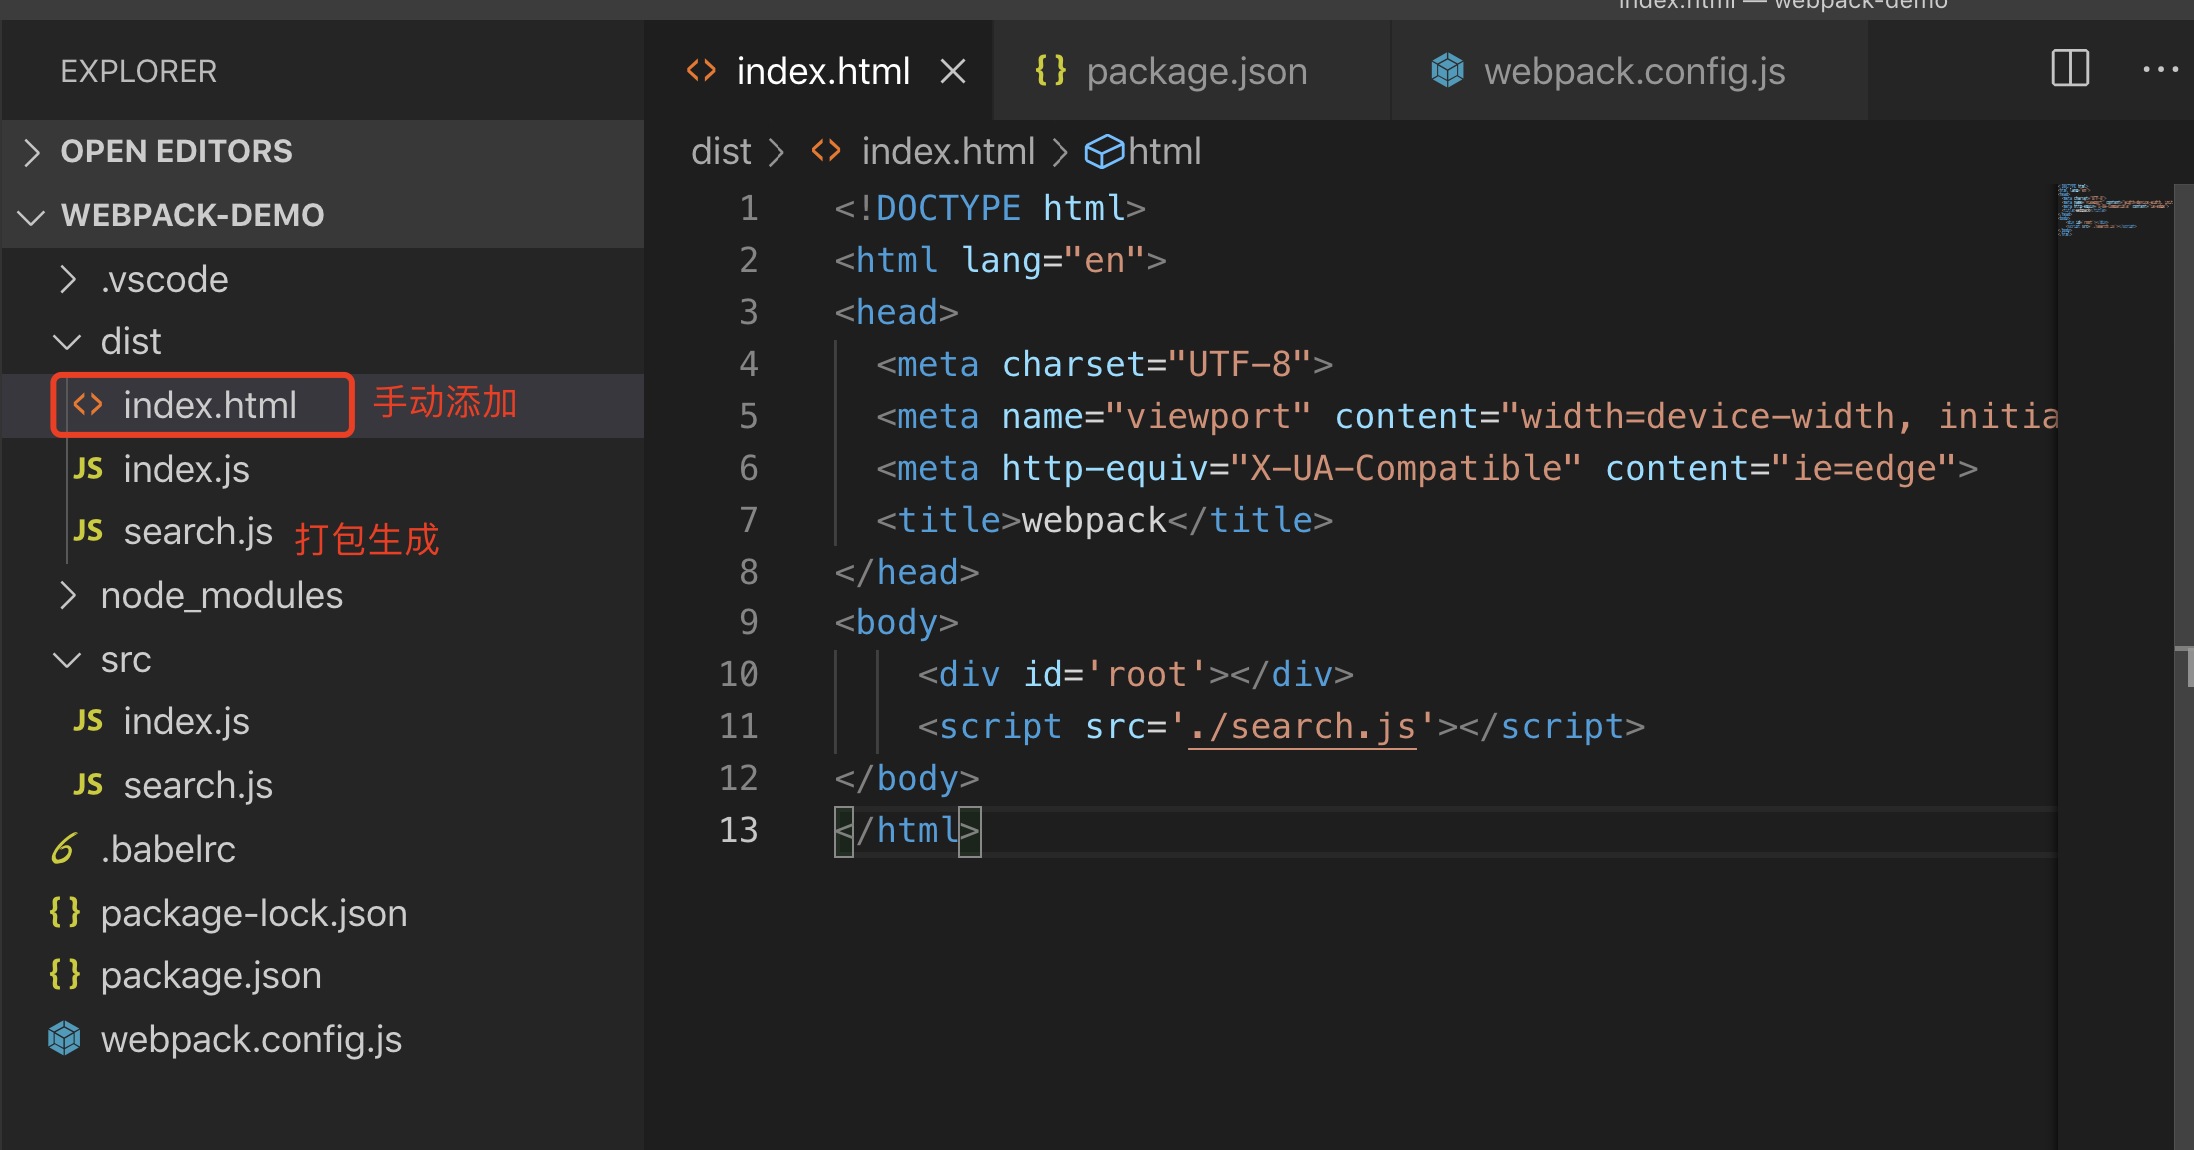
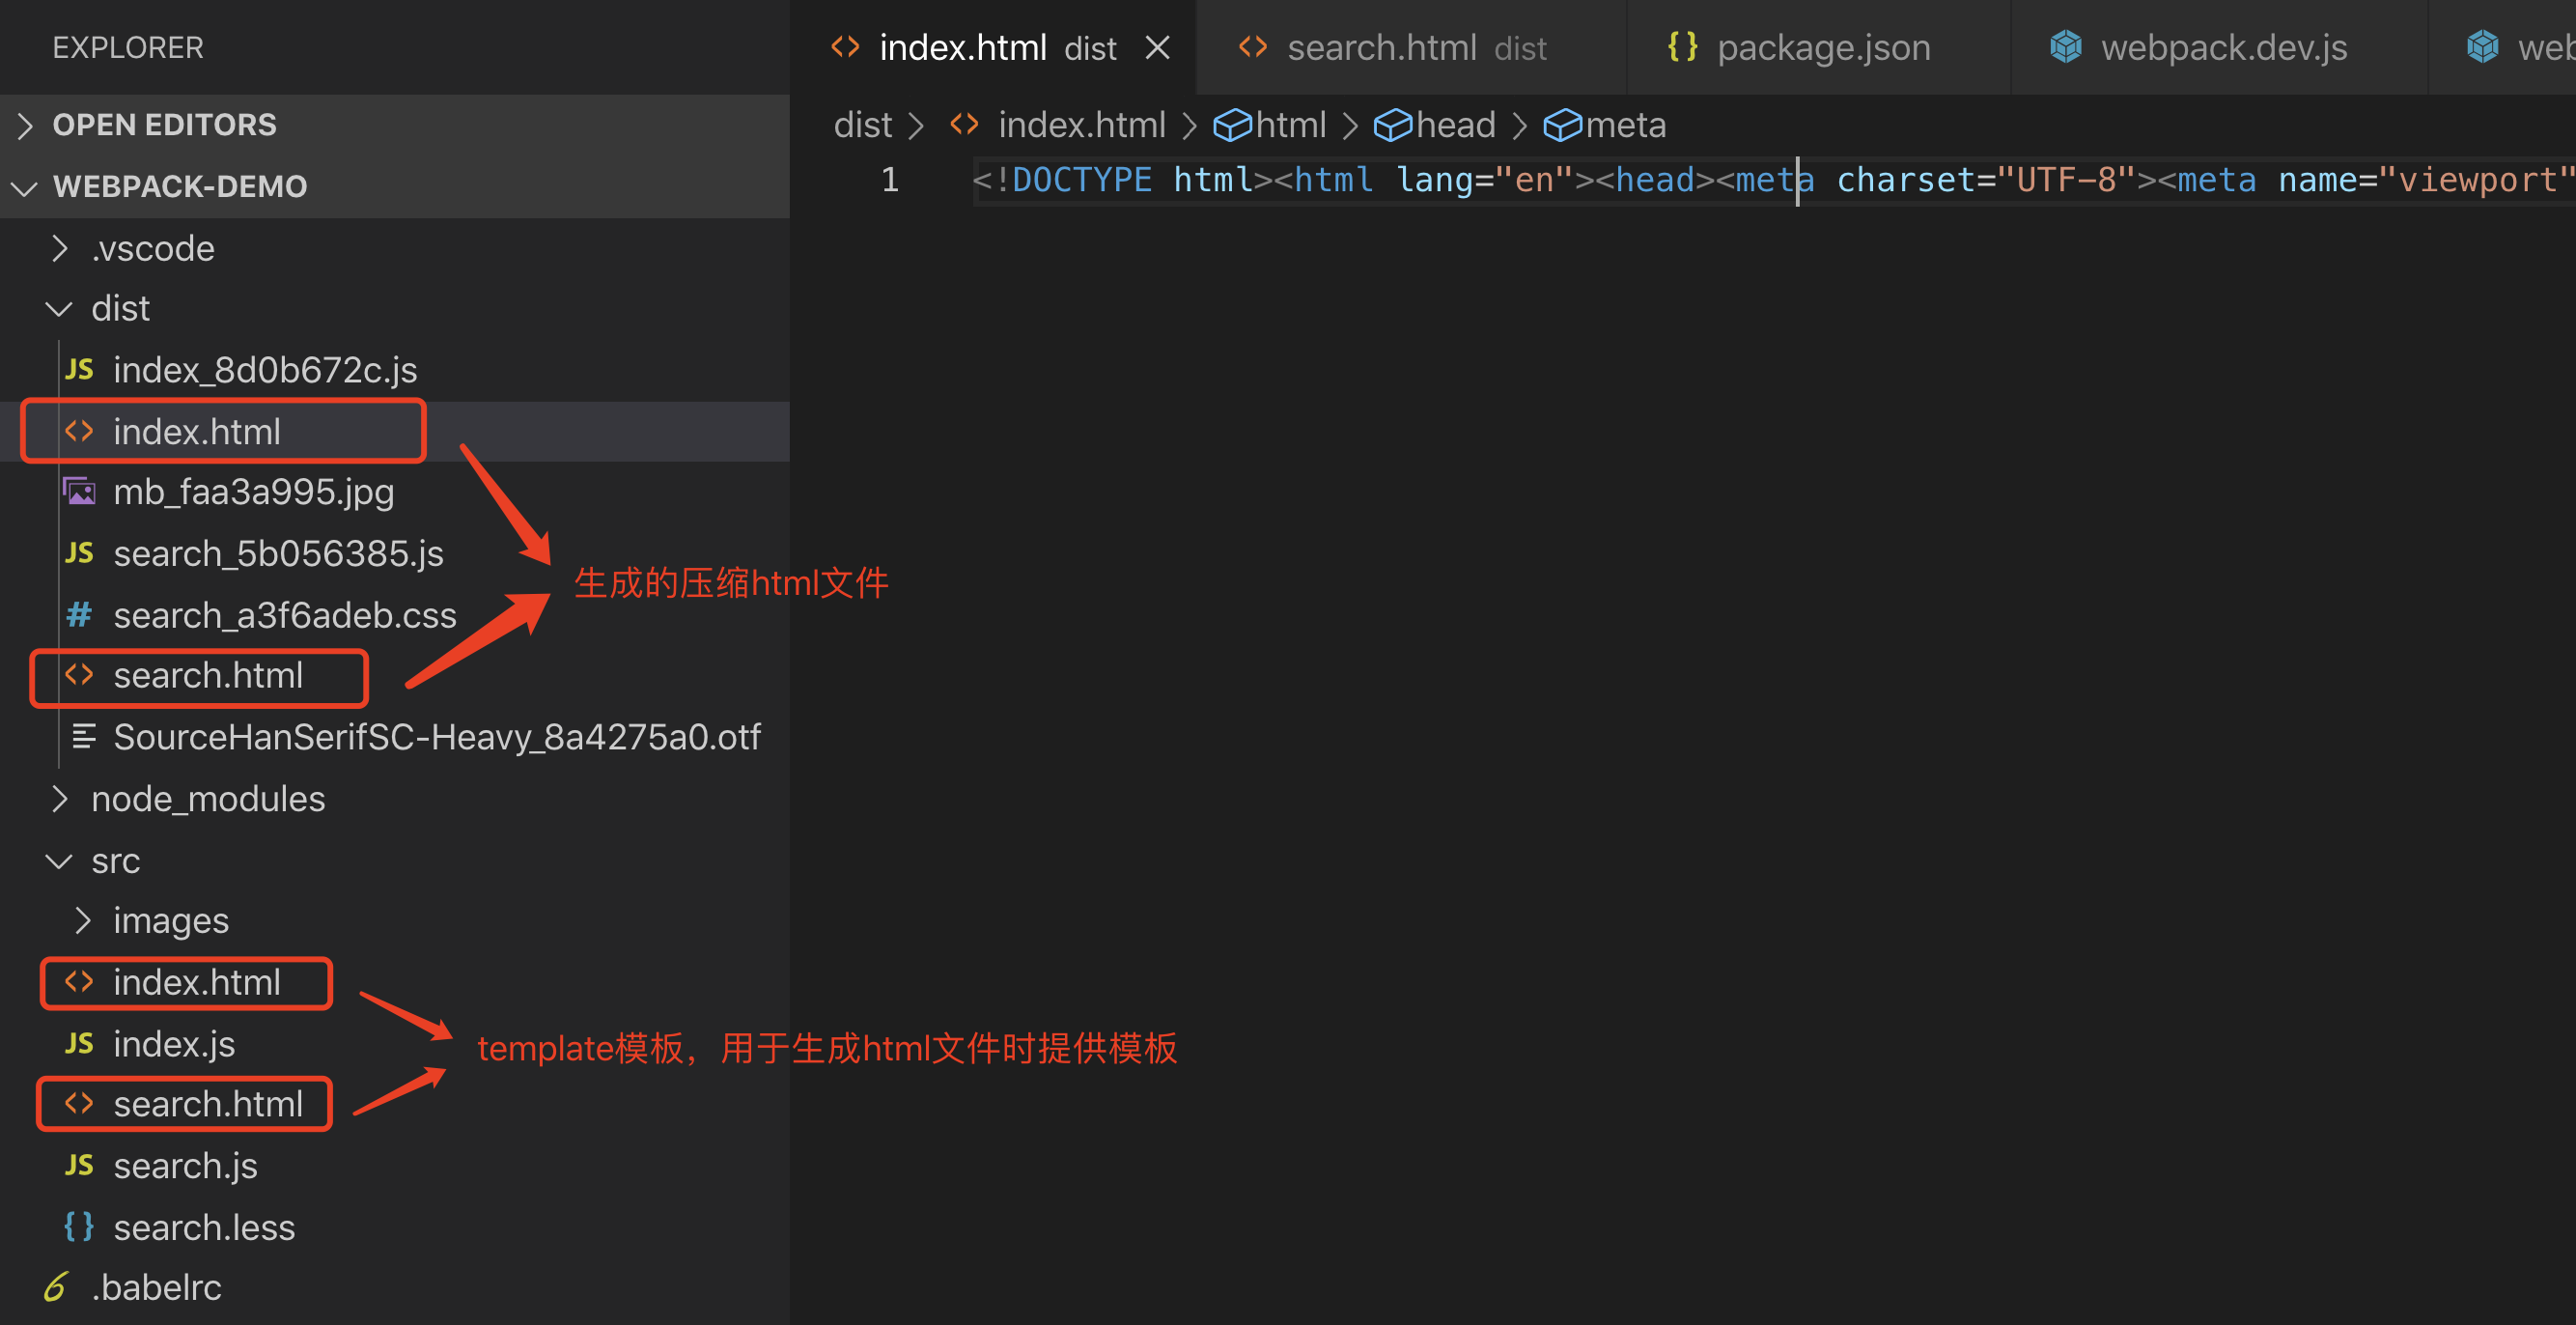
The so-called template is that you write a template HTML, and the generated HTML file is generated according to your template, but the plug-in will insert the generated CSS file and js file into the template.
The sample is as follows:
<!DOCTYPE html>
<html lang="en">
<head>
  <meta charset="UTF-8">
  <meta name="viewport" content="width=device-width, initial-scale=1.0">
  <meta http-equiv="X-UA-Compatible" content="ie=edge">
  <title>Document</title>
</head>
<body>
  <div id="root"></div>
</body>
</html>
Package generated html The documents are as follows:
<!DOCTYPE html>
<html lang="en">
    <head>
        <meta charset="UTF-8">
        <meta name="viewport" content="width=device-width,initial-scale=1">
        <meta http-equiv="X-UA-Compatible" content="ie=edge">
        <title>Document</title>
        <link href="search_a3f6adeb.css" rel="stylesheet">
    </head>
    <body>
        <div id="root"></div>
        <script src="search_5b056385.js">
        </script>
    </body>
</html>
8, Automatically clean up build catalog artifacts
During each build, the last dist directory will not be cleaned up, resulting in more and more output files in the built output directory.
Have you ever thought about it
rm -rf ./dist && webpack
rimraf ./dist && webpack
But this is not elegant. We can use a plug-in: clean webpack plugin, which deletes the output directory specified by output by default
plugins: [new CleanWebpackPlugin()]
npm install clean-webpack-plugin -D
const { CleanWebpackPlugin } = require('clean-webpack-plugin')
plugins: [new CleanWebpackPlugin()]
If you do not use this plug-in, there will be more and more output files in the dist directory. The previously packaged build files will not be deleted. After use, they will be deleted first and then generated.