
preface:
In the previous jetson nano article, we introduced some ideas and materials for learning. Today, we will continue to share an article on using opencv in jetson nano.
The full name of OpenCV is Open Source Computer Vision Library, which is a cross platform computer vision library. Opencv is initiated and developed by Intel Corporation and distributed under BSD license. It can be used free of charge in commercial and research fields. Opencv can be used to develop real-time image processing, computer vision and pattern recognition programs.
In visual processing, the use of opencv is the basic part, so the use of opecv is the first pass in the process of using the board. Next, let me introduce the process of using the python version and c + + version of opencv in jetson nano. In the c + + use part, I will introduce cmake and makefile compilation methods respectively.
Author: conscience still exists
REAUTHORIZING authorization and onlookers: welcome to WeChat official account: Yu Linjun
Or add the author's personal wechat: become_me
oepcv introduction:
The goal of OpenCV is to provide tools for the problems that computer vision needs to solve. In some cases, the advanced functions in the function library can effectively solve the problems in computer vision. Even if you encounter problems that cannot be solved at one time, the basic components in the function library are complete enough to enhance the performance of the solution to deal with any computer vision problems.
Basic functions:
opencv has a wide range of applications, including image mosaic, image noise reduction, product quality inspection, human-computer interaction, face recognition, action recognition, action tracking and unmanned driving. In addition, it also provides machine learning modules. You can use machine learning algorithms such as normal Bayesian, K-nearest neighbor, support vector machine, decision tree, random forest and artificial neural network.
Note: the sample code refers to other blogger articles.
Opencv Python uses:
Opencv Python is easy to use. import imports cv2, so that we can use the functions of OpenCV Python module to perform the actions we need. The following describes a relatively simple demo of image conversion.
Opencv Python installation
pip3 install opencv-python

"""
Color image to gray image
"""

#import imports the module. Each time you use the function in the module, you must determine which module it is.
#from... Import * import the module. Each time you use the function in the module, you can directly use the function; Note: it is already known that the function is in that module
from skimage.color import rgb2gray #skimage graphics processing library color is a color space conversion sub module PIP install scikit image
import numpy as np
import matplotlib.pyplot as plt  #python library pip install matplotlib of matlab
from PIL import Image # Python Imaging Library PIP install pilot
import cv2

#Image graying

#cv2 mode
img = cv2.imread("/home/lyn/Pictures/318c944a7daa47eaa37eaaf8354fe52f.jpeg")
h,w = img.shape[:2] #Get the high and wide of the picture
img_gray=np.zeros([h,w],img.dtype) #Create a single channel picture of the same size as the current picture
for i in range(h):
    for j in range(w):
        m = img[i,j]
        img_gray[i,j] =int(m[0]*0.11+m[1]*0.59+m[2]*0.3) #Convert BGR coordinates to gray coordinates
print(img_gray)
print("image show grap:%s"%img_gray)
cv2.imshow("imageshow gray", img_gray)

#plt mode
plt.subplot(221) #Indicates that the whole image window is divided into 2 rows and 2 columns, and the current position is 1
img = plt.imread("/home/lyn/Pictures/318c944a7daa47eaa37eaaf8354fe52f.jpeg")
plt.imshow(img)
print("----image lenna -----")
print(img)

#Grayscale
img_gray = rgb2gray(img)
plt.subplot(222)
plt.imshow(img_gray,cmap="gray")
print("-----image gray-------")
print(img_gray)

#Binarization
img_binary = np.where(img_gray >= 0.5, 1, 0)
print("-----imge_binary------")
print(img_binary)
print(img_binary.shape)

#plt mode
plt.subplot(223)
plt.imshow(img_binary, cmap='gray')
plt.show()
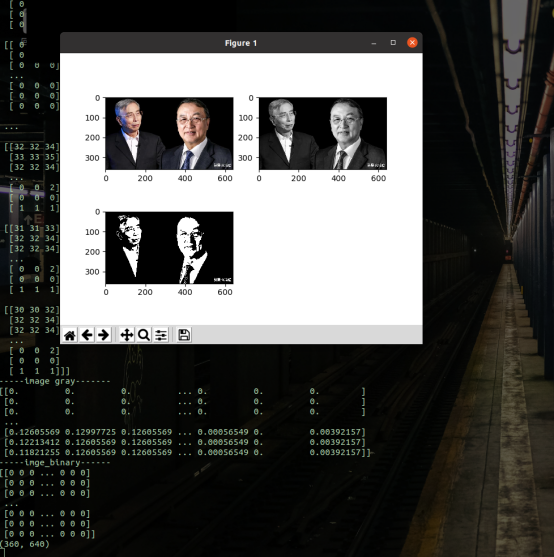
opencv c + + uses:
opencv-c + + installation
For general systems using opencv, we need to go to the official website: https://opencv.org , download the corresponding package, and then camp - > make - > make install until the compiled opencv file is installed in the specified directory.
However, opencv4 is pre installed in the image package of Jetson Nano. The version is from version 4.1.
After I used the command to query, the image opencv version I installed is 4.1.1
jetson@jetson-desktop:/usr/include/opencv4/opencv2$ opencv_version
4.1.1
Developing opencv in C + + requires some additional configuration. First, take a look at the location of OpenCV header file.
In jetson, the header file of OpenCV is in this directory / usr/include/opencv4 /, which will be written into the compilation link file later.

Linked file location:
ls libopencv*

The specific path is / usr / lib / aarch64 Linux GNU. Later, write this directory into the compilation link file.
In c + + development, we usually use make tool or cmake tool to help us package and compile. Here, I also share makefly and cmake libraries for c + + calling opencv.
makefile
Makefile file sharing. Note that the specific files of LIBS link and opencv link here need to be written in one by one. I've written a few commonly used packages here. You can add them according to your needs.
OBJS = *.o
CFLAGS = -Wall -g -std=c++11
CC = gcc
CPP = g++
INCLUDES +=-I  /usr/include/opencv4/ -I /usr/local/include #Compile header file directory
LIBS += -L/usr/lib/aarch64-linux-gnu -lopencv_core -lopencv_imgcodecs -lopencv_imgproc -lopencv_highgui -lopencv_objdetect #Link specific Libraries

target:${OBJS}
#	g++  -o target boost_thread.o  -llua -ldl
	@echo "-- start " ${CC} ${CFLAGS} ${OBJS}  -o $@  ${INCLUDES}  ${LIBS}
	$(CPP) ${CFLAGS} ${OBJS}  -o $@  ${INCLUDES}  ${LIBS}

clean:
	-rm -f *.o core *.core target

%.o:%.cpp #All files in the src directory will be cpp file compiled into o documentation
	${CPP} ${CFLAGS} ${INCLUDES} -c  $<
Code show_img.cpp:
#include <opencv2/opencv.hpp>
#include <iostream>
using namespace std;
using namespace cv;

int main(int argc,char** argv)
{
	std::cout<<"hello opencv"<<std::endl;

	//Grayscale display
	Mat src = imread("/home/jetson/lyn_work/c++/sp_noise.png",IMREAD_GRAYSCALE);//Read in the data to the matrix situation, the second parameter represents the display of a gray image.
	if (src.empty())
	{
		std::cout<<"could not load image"<<endl;//If the picture does not exist, it cannot be read and printed to the terminal.
	}
	//This function is called when the image beyond the screen cannot be displayed.
	namedWindow("Input window", WINDOW_GUI_EXPANDED);//A new window is created, parameter 1 represents the name, and the second parameter represents a free scale
	imshow("Input window", src);//Indicates that it is displayed on the newly created input window. The first parameter indicates the window name, and src indicates the data object Mat
	waitKey(0);//When this sentence is executed, the program is blocked. The parameter represents the delay time. Unit ms
	destroyAllWindows();//Destroy the previously created display window
	return 0;
}
Compile and execute:
make

./target
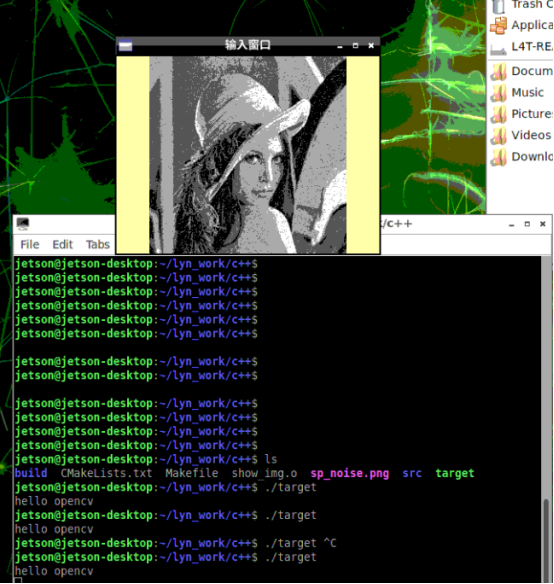
cmake
Corresponding to cmakelists Txt file content:
In cmake compilation, the links we use correspond to opencv dynamic library files, so we don't have to add them one by one like Makefile files. Cmake is equivalent to adding all opencv link files, which is very convenient. So I wrote one more example in the subclass of cmake.
cmake_minimum_required( VERSION 2.8 )

# Declare a cmake project
project(opencv_learn)

# Set compilation mode
#set( CMAKE_BUILD_TYPE "Debug" )

#Add OPENCV Library
#Specify the OpenCV version as follows
#find_package(OpenCV 4.2 REQUIRED)
#If you do not need to specify the OpenCV version, the code is as follows
find_package(OpenCV REQUIRED)

include_directories(
	./src/)


#Add OpenCV header file
include_directories(${OpenCV_INCLUDE_DIRS})

#Show opencv_ INCLUDE_ Value of dirs
message(${OpenCV_INCLUDE_DIRS})

FILE(GLOB_RECURSE TEST_SRC
	#src/*.cpp
	#src/*.c
	${CMAKE_SOURCE_DIR}/*.cpp
	${CMAKE_SOURCE_DIR}/*.cp
	)

# Add an executable
# Syntax: add_ Executable (program name source code file)
add_executable(target show_img.cpp ${TEST_SRC})

# Link library files to executable programs
target_link_libraries(target  ${OpenCV_LIBS})
Perform cmake compilation:
mkdir build
cmake  ..
make
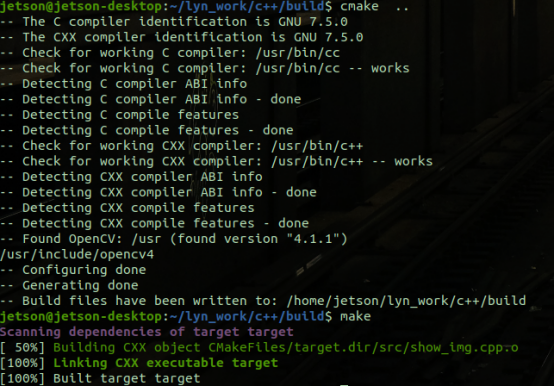
demo1: the same show as the make example is used_ img. CPP code file, refer to the above:
./target
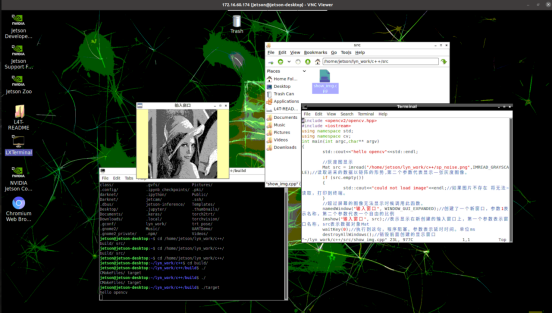
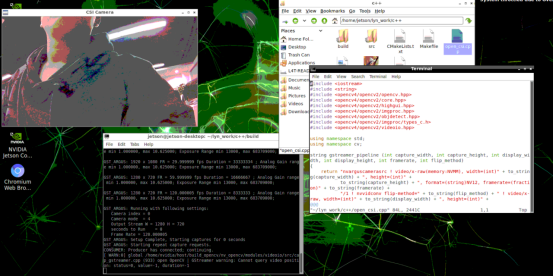
demo2: read the CSI camera with C + + programming. You can see that the video stream image can be displayed normally, but the color is also distorted due to vnc connection
CMakeLists.txt add two lines:
add_executable(open_csi open_csi.cpp ${TEST_SRC})

target_link_libraries(open_csi  ${OpenCV_LIBS})
open_csi.cpp code files are as follows:
#include <iostream>
#include <string>
#include <opencv4/opencv2/opencv.hpp>
#include <opencv4/opencv2/core.hpp>
#include <opencv4/opencv2/highgui.hpp>
#include <opencv4/opencv2/imgproc.hpp>
#include <opencv4/opencv2/objdetect.hpp>
#include <opencv4/opencv2/imgproc/types_c.h>
#include <opencv4/opencv2/videoio.hpp>

using namespace std;
using namespace cv;

string gstreamer_pipeline (int capture_width, int capture_height, int display_width, int display_height, int framerate, int flip_method)
{
    return "nvarguscamerasrc ! video/x-raw(memory:NVMM), width=(int)" + to_string(capture_width) + ", height=(int)" +
           to_string(capture_height) + ", format=(string)NV12, framerate=(fraction)" + to_string(framerate) +
           "/1 ! nvvidconv flip-method=" + to_string(flip_method) + " ! video/x-raw, width=(int)" + to_string(display_width) + ", height=(int)" +
           to_string(display_height) + ", format=(string)BGRx ! videoconvert ! video/x-raw, format=(string)BGR ! appsink";
}

int main( int argc, char** argv )
{
    int capture_width = 1280 ;
    int capture_height = 720 ;
    int display_width = 1280 ;
    int display_height = 720 ;
    int framerate = 60 ;
    int flip_method = 0 ;

    //Create pipe
    string pipeline = gstreamer_pipeline(capture_width,
    capture_height,
    display_width,
    display_height,
    framerate,
    flip_method);
    std::cout << "use gstreamer The Conduit: \n\t" << pipeline << "\n";

    //Binding of pipeline and video stream
    VideoCapture cap(pipeline, CAP_GSTREAMER);
    if(!cap.isOpened())
    {
        std::cout<<"Failed to open camera."<<std::endl;
        return (-1);
    }

    //Create display window
    namedWindow("CSI Camera", WINDOW_AUTOSIZE);
    Mat img;

    //Frame by frame display
    while(true)
    {
        if (!cap.read(img))
        {
            std::cout<<"Capture failed"<<std::endl;
            break;
        }
        int new_width,new_height,width,height,channel;
            width=img.cols;
            height=img.rows;
            channel=img.channels();


        //Resize image
        new_width=640;
        if(width>800)
          {
             new_height=int(new_width*1.0/width*height);
           }
         resize(img, img, cv::Size(new_width, new_height));

        imshow("CSI Camera",img);

        int keycode = cv::waitKey(30) & 0xff ; //ESC key exit
            if (keycode == 27) break ;
    }

    cap.release();
    destroyAllWindows() ;
}
The display effect is shown in the screenshot:
epilogue
This is my basic sharing of using opencv for jetson nano. Later, we can do some more interesting projects based on opencv, such as face recognition, object recognition, pose recognition and so on. If you have better ideas and needs, you are also welcome to add my friends to communicate and share.
Author: conscience still exists, hard work during the day, original public number owner at night. In addition to technology, there are some life insights in official account. A serious driver who drives the contents of the workplace is also a rich person living outside technology. And basketball is a photo and music. Follow me and walk with me.
‧‧‧‧‧‧‧‧‧‧‧‧‧‧‧‧ END ‧‧‧‧‧‧‧‧‧‧‧‧‧‧‧‧
Recommended reading
[1]On the court, I bowed my head to the RMB player
[2]Linux development coredump file analysis and actual combat sharing
[3]How does the program in the CPU run Required reading
[4]cartographer environment establishment and mapping test
[5]Comparison of simple factory mode, factory mode and abstract factory mode of design mode
All the original dry cargo of the official account has been organized into a catalogue, and the reply is made available.