In Netty, there is another common object ByteBuffer, which is actually equivalent to the ByteBuffer in Java Nio, but ByteBuffer has greatly enhanced the function of ByteBuffer in Nio. Let's have a brief look at ByteBuffer.
The following code demonstrates the creation of ByteBuffer and the printing of content. One of the biggest differences between ByteBuffer and ordinary ByteBuffer is that ByteBuffer can be expanded automatically. The default length is 256. If the content length exceeds the threshold, the expansion will be triggered automatically
public class ByteBufExample {

    public static void main(String[] args) {
        ByteBuf buf= ByteBufAllocator.DEFAULT.buffer();//Automatic capacity expansion
        log(buf);
        StringBuilder sb=new StringBuilder();
        for (int i = 0; i < 32; i++) {  //When demonstrating, you can expand the value of the loop to see the expansion effect
            sb.append(" - "+i);
        }
        buf.writeBytes(sb.toString().getBytes());
        log(buf);
    }

    private static void log(ByteBuf buf){
        StringBuilder builder=new StringBuilder()
            .append(" read index:").append(buf.readerIndex()) //Get read index
            .append(" write index:").append(buf.writerIndex()) //Get write index
            .append(" capacity:").append(buf.capacity()) //Get capacity
            .append(StringUtil.NEWLINE);
        //dump the contents of ByteBuf into StringBuilder
        ByteBufUtil.appendPrettyHexDump(builder,buf);
        System.out.println(builder.toString());
    }
}
ByteBuf can be created in two ways
First, create a heap memory based ByteBuf
ByteBuf buffer=ByteBufAllocator.DEFAULT.heapBuffer(10);
Second, create a ByteBuf based on direct memory (off heap memory) (this is used by default)
The memory in Java is divided into two parts. One part is the direct memory that does not need to be managed by the JVM, which is also called out of heap memory. Out of heap memory is to allocate memory objects to the unexpected memory area of the JVM heap. This part of memory is not managed by the virtual machine, but by the operating system, which can reduce the impact of garbage collection on applications
ByteBufAllocator.DEFAULT.directBuffer(10);
The advantage of direct memory is that the read-write performance will be higher. If the data is stored in the heap, you need to send the data in the Java heap space to the remote server. First, you need to copy the data inside the heap to direct memory (off heap memory), and then send it. If the data is stored directly in the off heap memory, there is one less copy step when sending.
However, it also has disadvantages. Due to the lack of memory management of the JVM, we need to maintain out of heap memory to prevent memory overflow.
In addition, it should be noted that ByteBuf is created by using pooling technology by default. The pooling technology has been repeated in the previous courses. Its core idea is to realize the reuse of objects, so as to reduce the performance overhead caused by frequent creation and destruction of objects.
Whether the pooling function is enabled or not can be controlled by the following environment variables, where unpooled means not enabled.
-Dio.netty.allocator.type={unpooled|pooled}public class NettyByteBufExample {
public static void main(String[] args) {
ByteBuf buf= ByteBufAllocator.DEFAULT.buffer();
System.out.println(buf);
}
}Storage structure of ByteBuf
The storage structure of ByteBuf is shown in Figure 3-1. From this figure, we can see that ByteBuf is actually a byte container, which contains three parts
- The bytes that have been discarded are invalid
- Readable bytes, this part of data is the main data of ByteBuf, and the data read from ByteBuf comes from this part; Writable bytes. All data written to ByteBuf will be stored in this section
- Expandable bytes, indicating the maximum capacity that ByteBuf can expand.
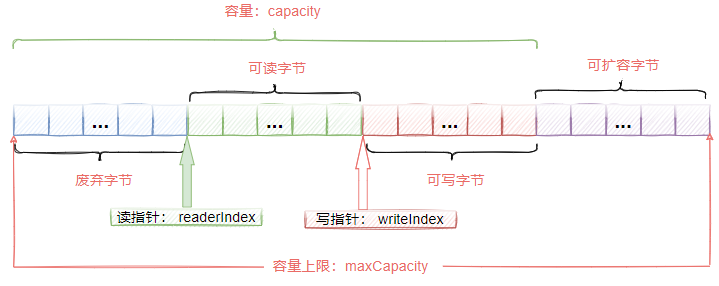
< center > Figure 3-1 < / center >
In ByteBuf, there are two pointers
- readerIndex: read pointer. The readerIndex increases by 1 for each byte read. A total of withindex readerIndex bytes are readable in ByteBuf. When readerIndex and writeIndex are equal, ByteBuf is not readable
- writeIndex: write pointer. For each byte written, writeIndex increases by 1 until it reaches capacity. It can trigger capacity expansion and continue writing.
- There is also a maxCapacity maximum capacity in ByteBuf. The default value is Integer.MAX_VALUE: when ByteBuf writes data, if the capacity is insufficient, the capacity expansion will be triggered until the capacity is expanded to maxCapacity.
Methods commonly used in ByteBuf
For ByteBuf, the common methods are write and read
Write related methods
For the write method, ByteBuf provides writes for various data types, such as
- writeChar, write char type
- writeInt, write int type
- writeFloat, write float type
- writeBytes, write nio's ByteBuffer
- writeCharSequence, write string
public class ByteBufExample {

    public static void main(String[] args) {
        ByteBuf buf= ByteBufAllocator.DEFAULT.heapBuffer();//Automatic capacity expansion
        buf.writeBytes(new byte[]{1,2,3,4}); //Write four bytes
        log(buf);
        buf.writeInt(5);  //Write an int type, which is also 4 bytes
        log(buf);
    }
    private static void log(ByteBuf buf){
        System.out.println(buf);
        StringBuilder builder=new StringBuilder()
                .append(" read index:").append(buf.readerIndex())
                .append(" write index:").append(buf.writerIndex())
                .append(" capacity:").append(buf.capacity())
                .append(StringUtil.NEWLINE);
        //dump the contents of ByteBuf into StringBuilder
        ByteBufUtil.appendPrettyHexDump(builder,buf);
        System.out.println(builder.toString());
    }
}
Capacity expansion
When writing data to ByteBuf, if insufficient capacity is found, capacity expansion will be triggered, and the specific capacity expansion rules are
Assume that the initial capacity of ByteBuf is 10.
- If the data size after writing does not exceed 512 bytes, select the next integer multiple of 16 for storage capacity. For example, if the size after writing data is 12, the capacity after capacity expansion is 16.
- If the data size exceeds 512 bytes after writing, select the next 2^n ^. For example, if the size after writing is 512 bytes, the capacity after expansion is 2 ^ 10 ^ = 1024. (because 2 ^ 9 ^ = 512, the length is not enough)
- The capacity expansion cannot exceed max capacity, otherwise an error will be reported.
Reader related methods
The reader method also provides different operation methods for different data types,
- readByte to read a single byte
- readInt, read an int type
- readFloat, read a float type
public class ByteBufExample {

    public static void main(String[] args) {
        ByteBuf buf= ByteBufAllocator.DEFAULT.heapBuffer();//Automatic capacity expansion
        buf.writeBytes(new byte[]{1,2,3,4});
        log(buf);
        System.out.println(buf.readByte());
        log(buf);
    }
    private static void log(ByteBuf buf){
        StringBuilder builder=new StringBuilder()
            .append(" read index:").append(buf.readerIndex())
            .append(" write index:").append(buf.writerIndex())
            .append(" capacity:").append(buf.capacity())
            .append(StringUtil.NEWLINE);
        //dump the contents of ByteBuf into StringBuilder
        ByteBufUtil.appendPrettyHexDump(builder,buf);
        System.out.println(builder.toString());
    }
}
As can be seen from the following results, after reading a byte, the byte becomes an abandoned part. When reading again, only unread data can be read.
read index:0 write index:7 capacity:256
         +-------------------------------------------------+
         |  0  1  2  3  4  5  6  7  8  9  a  b  c  d  e  f |
+--------+-------------------------------------------------+----------------+
|00000000| 01 02 03 04 05 06 07                            |.......         |
+--------+-------------------------------------------------+----------------+
1
 read index:1 write index:7 capacity:256
         +-------------------------------------------------+
         |  0  1  2  3  4  5  6  7  8  9  a  b  c  d  e  f |
+--------+-------------------------------------------------+----------------+
|00000000| 02 03 04 05 06 07                               |......          |
+--------+-------------------------------------------------+----------------+

Process finished with exit code 0
In addition, if you want to repeatedly read which data has been read, there are two methods to mark and reset
public static void main(String[] args) {
    ByteBuf buf= ByteBufAllocator.DEFAULT.heapBuffer();//Automatic capacity expansion
    buf.writeBytes(new byte[]{1,2,3,4,5,6,7});
    log(buf);
    buf.markReaderIndex(); //Index position of mark read
    System.out.println(buf.readInt());
    log(buf);
    buf.resetReaderIndex();//Reset to flag bit
    System.out.println(buf.readInt());
    log(buf);
}
In addition, if you want to obtain data without changing the position of the read pointer, a method starting with get is provided in ByteBuf. This method reads based on the index position and allows repeated reading.
ByteBuf's zero copy mechanism
It should be noted that the zero copy mechanism of ByteBuf is different from the zero copy at the operating system level mentioned earlier. The zero copy at the operating system level is that when we want to send a file to the remote server, we need to copy it from the kernel space to the user space, and then copy it from the user space to the network card buffer in the kernel space, resulting in an increase in the number of copies.
The idea of zero copy in ByteBuf is the same, which is to reduce data replication and improve performance. As shown in Figure 3-2, suppose there is an original ByteBuf, and we want to operate on the data of two parts of the ByteBuf. According to the normal idea, we will create two new bytebufs, and then copy part of the data in the original ByteBuf to two new bytebufs. However, this will involve data copying, which will affect the performance in the case of large concurrency.

< center > figure 3-2 < / center >
A slice method is provided in ByteBuf. This method can split the original ByteBuf without copying data. The usage method is as follows
public static void main(String[] args) {
    ByteBuf buf= ByteBufAllocator.DEFAULT.buffer();//Automatic capacity expansion
    buf.writeBytes(new byte[]{1,2,3,4,5,6,7,8,9,10});
    log(buf);
    ByteBuf bb1=buf.slice(0,5);
    ByteBuf bb2=buf.slice(5,5);
    log(bb1);
    log(bb2);
    System.out.println("Modify original data");
    buf.setByte(2, 5); //Modify original buf data
    log(bb1);//Then print the results of bb1 and find that the data has changed
}
In the above code, the original buf is sliced through slice, and each slice is 5 bytes.
In order to prove that slice has no data copy, we can find that the result of bb1 has changed by modifying the value of index 2 of the original buf, and then printing the first fragment bb1. It indicates that the data pointed to by the two slices and the original buf are the same.
Unpooled
In the previous case, we often use the Unpooled tool class, which is the same as the creation, combination, replication and other operations of non pooled ByteBuf.
Suppose there is a protocol data, which is composed of a header and a message body. These two parts are placed in two bytebufs respectively
ByteBuf header=...
ByteBuf body= ...
We want to merge header and body into a ByteBuf. The usual approach is
ByteBuf allBuf=Unpooled.buffer(header.readableBytes()+body.readableBytes());
allBuf.writeBytes(header);
allBuf.writeBytes(body);
In this process, we copy the header and body to the new allBuf, which virtually adds two data copy operations. Is there a more efficient way to reduce the number of copies to achieve the same goal?
In Netty, a CompositeByteBuf component is provided, which provides this function.
public class ByteBufExample {

    public static void main(String[] args) {
        ByteBuf header= ByteBufAllocator.DEFAULT.buffer();//Automatic capacity expansion
        header.writeCharSequence("header", CharsetUtil.UTF_8);
        ByteBuf body=ByteBufAllocator.DEFAULT.buffer();
        body.writeCharSequence("body", CharsetUtil.UTF_8);
        CompositeByteBuf compositeByteBuf=Unpooled.compositeBuffer();
        //The first parameter is true, which means that when a new ByteBuf is added, the writeIndex. Of CompositeByteBuf is automatically incremented
        //The default is false, that is, writeIndex=0, so we can't read data from compositeByteBuf.
        compositeByteBuf.addComponents(true,header,body);
        log(compositeByteBuf);
    }
    private static void log(ByteBuf buf){
        StringBuilder builder=new StringBuilder()
            .append(" read index:").append(buf.readerIndex())
            .append(" write index:").append(buf.writerIndex())
            .append(" capacity:").append(buf.capacity())
            .append(StringUtil.NEWLINE);
        //dump the contents of ByteBuf into StringBuilder
        ByteBufUtil.appendPrettyHexDump(builder,buf);
        System.out.println(builder.toString());
    }
}
The reason why CompositeByteBuf can achieve zero copy is that when combining header and body, the two data are not copied, but a logical whole is built through CompositeByteBuf, which is still two real objects, that is, a pointer points to the same object, so it is similar to the implementation of shallow copy.

wrappedBuffer
In the Unpooled tool class, a wrappedBuffer method is provided to realize the zero copy function of CompositeByteBuf. The use method is as follows.
public static void main(String[] args) {
    ByteBuf header= ByteBufAllocator.DEFAULT.buffer();//Automatic capacity expansion
    header.writeCharSequence("header", CharsetUtil.UTF_8);
    ByteBuf body=ByteBufAllocator.DEFAULT.buffer();
    body.writeCharSequence("body", CharsetUtil.UTF_8);
    ByteBuf allBb=Unpooled.wrappedBuffer(header,body);
    log(allBb);
    //For the zero copy mechanism, modifying the value in the original ByteBuf will affect allBb
    header.setCharSequence(0,"Newer0",CharsetUtil.UTF_8);
    log(allBb);
}
copiedBuffer
The biggest difference between copiedBuffer and wrappedbuffer is that this method will realize data replication. The following code demonstrates the difference between copiedBuffer and wrappedbuffer. You can see that the original ByteBuf fer value is modified in the position marked by the case without affecting allBb.
public static void main(String[] args) {
    ByteBuf header= ByteBufAllocator.DEFAULT.buffer();//Automatic capacity expansion
    header.writeCharSequence("header", CharsetUtil.UTF_8);
    ByteBuf body=ByteBufAllocator.DEFAULT.buffer();
    body.writeCharSequence("body", CharsetUtil.UTF_8);
    ByteBuf allBb=Unpooled.copiedBuffer(header,body);
    log(allBb);
    header.setCharSequence(0,"Newer0",CharsetUtil.UTF_8); //case
    log(allBb);
}
Memory release
Memory release methods are different for different ByteBuf creation.
- UnpooledHeapByteBuf uses JVM memory and only needs to wait for GC to recycle
- UnpooledDirectByteBuf uses external memory and requires special methods to reclaim memory
- PooledByteBuf and its like use pooling mechanisms and require more complex rules to reclaim memory
If ByteBuf is created by using off heap memory, try to release memory manually. How?
Netty uses the reference counting method to control memory recycling, and each ByteBuf implements the ReferenceCounted interface.
- The initial count for each ByteBuf object is 1
- When the release method is called, the counter is decremented by one. If the counter is 0, ByteBuf is recycled
- When calling the retain method, the counter is incremented by one, which means that other handler s will not cause recycling if they call release immediately before the caller runs out.
- When the counter is 0, the underlying memory will be reclaimed. At this time, even if the ByteBuf object still exists, its methods cannot be used normally
Copyright notice: unless otherwise stated, all articles on this blog adopt CC BY-NC-SA 4.0 license agreement. Reprint please indicate from Mic to take you to learn architecture!
If this article is helpful to you, please pay attention and praise. Your persistence is the driving force of my continuous creation. Welcome to WeChat public official account for more dry cargo.