
SpringMVC
After learning the Spring framework technology, there will be almost two groups of people:
- A group of people still don't understand what this thing is for;
- Others have almost understood the core idea, but do not know how to play its role.
In the Spring MVC stage, you can gradually realize the convenience brought by the Spring framework.
At this stage, we will return to Tomcat's Web application development again to feel the great convenience brought by spring MVC.
Theoretical basis of MVC
Before, we explained the three-tier architecture, including:
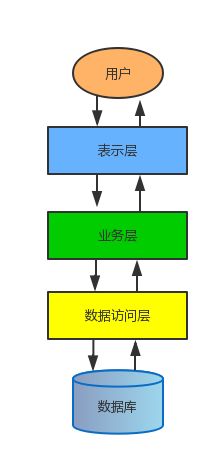
Each layer has its own responsibilities, and the most critical one is the presentation layer, because it is equivalent to a layer directly dealing with the user's browser, and all requests will be parsed through it, and then told to the business layer for processing. The return and data filling of any page also depend on the presentation layer, Therefore, it is actually the most critical layer in the whole three-tier architecture.
We have written a large number of servlets (i.e. presentation layer implementation) to handle various requests from the browser, but we found that we have to write nearly ten servlets for only a few small functions and a few basic pages. If it is a larger website system, such as Taobao and site B, Just one page may contain dozens or even hundreds of functions. Think how terrible it would be to write in that way.
Therefore, spring MVC is born to solve this problem. It is a very excellent presentation layer framework (before that, there was a framework called struts 2, but it seems to be getting cold at this stage). It is designed and implemented with the idea of MVC.
MVC is explained as follows:
- M refers to the business Model: Generally speaking, it is the entity class we used to encapsulate data transmission.
- V refers to the user interface (View): generally refers to the front-end page.
- C is the Controller: the Controller is equivalent to the basic function of Servlet, processing requests and returning responses.
Spring MVC just hopes to decouple the three, realize their own work, and divide the corresponding responsibilities more finely.
Finally, render the View and Model to get the final page and return it to the front end (just like using Thymeleaf before, give both the entity data object and the front end page to Thymeleaf, and then it will integrate and render them to get the final page with data.)
Configure the environment and build the project
Download address: https://tomcat.apache.org/download-90.cgi
Add spring MVC dependencies:
<dependency>
    <groupId>org.springframework</groupId>
    <artifactId>spring-webmvc</artifactId>
    <version>5.3.13</version>
</dependency>
Then we need to configure the web XML, replace the DispatcherServlet with the Servlet provided by Tomcat. Here, the URL pattern needs to be written as /. To complete the replacement:
<?xml version="1.0" encoding="UTF-8"?>
<web-app xmlns="http://xmlns.jcp.org/xml/ns/javaee"
         xmlns:xsi="http://www.w3.org/2001/XMLSchema-instance"
         xsi:schemaLocation="http://xmlns.jcp.org/xml/ns/javaee http://xmlns.jcp.org/xml/ns/javaee/web-app_4_0.xsd"
         version="4.0">
    <servlet>
        <servlet-name>mvc</servlet-name>
        <servlet-class>org.springframework.web.servlet.DispatcherServlet</servlet-class>
    </servlet>
    <servlet-mapping>
        <servlet-name>mvc</servlet-name>
        <url-pattern>/</url-pattern>
    </servlet-mapping>
</web-app>
Next, you need to configure a Spring context environment (i.e. container) for the whole Web application,
Because Spring MVC is developed based on Spring, it directly uses the container provided by Spring to realize various functions. Here, we directly use annotation instead of XML configuration file:
<init-param>
            <param-name>contextConfigLocation</param-name>
            <param-value>com.example.config.MvcConfiguration</param-value>
        </init-param>
        <init-param>
            <param-name>contextClass</param-name>
            <param-value>org.springframework.web.context.support.AnnotationConfigWebApplicationContext</param-value>
        </init-param>
If you want to use XML for configuration file, you can write it directly:
<init-param>
    <param-name>contextConfigLocation</param-name>
    <param-value>Profile name</param-value>
</init-param>
If you want to completely discard the configuration file, you can directly add a class, and Tomcat will find the implementation in the class path.
The class of ServletContainerInitializer interface. If found, use it to configure the Servlet container. Spring provides the implementation class of this interface. SpringServletContainerInitializer is set through @ HandlesTypes(WebApplicationInitializer.class). This class will find the class that implements WebApplicationInitializer and hand over the configuration task to them, Therefore, you can directly implement the interface:
public class MainInitializer extends AbstractAnnotationConfigDispatcherServletInitializer {
    @Override
    protected Class<?>[] getRootConfigClasses() {
        return new Class[]{MainConfiguration.class};   //The basic Spring configuration class is generally used for business layer configuration
    }

    @Override
    protected Class<?>[] getServletConfigClasses() {
        return new Class[0];  //Configure the configuration class of DispatcherServlet, which is mainly used for Controller configuration
    }

    @Override
    protected String[] getServletMappings() {
        return new String[]{"/"};    //Matching path, consistent with the above
    }
}
By the way, write the most basic configuration class:
@Configuration
public class MainConfiguration {

}
Later, we will explain the configuration without XML.
In this way, the most basic configuration is completed. Now any request will be processed centrally through the dispatcher servlet first. We will explain how to use it in detail below.
Controller controller
With spring MVC, we don't need to create a Servlet with a request address as before. It uses dispatcher Servlet to replace the default static resource Servlet provided by Tomcat.
In other words, now all requests (except JSP, because Tomcat also provides a jsp Servlet) will be processed through the dispatcher Servlet.
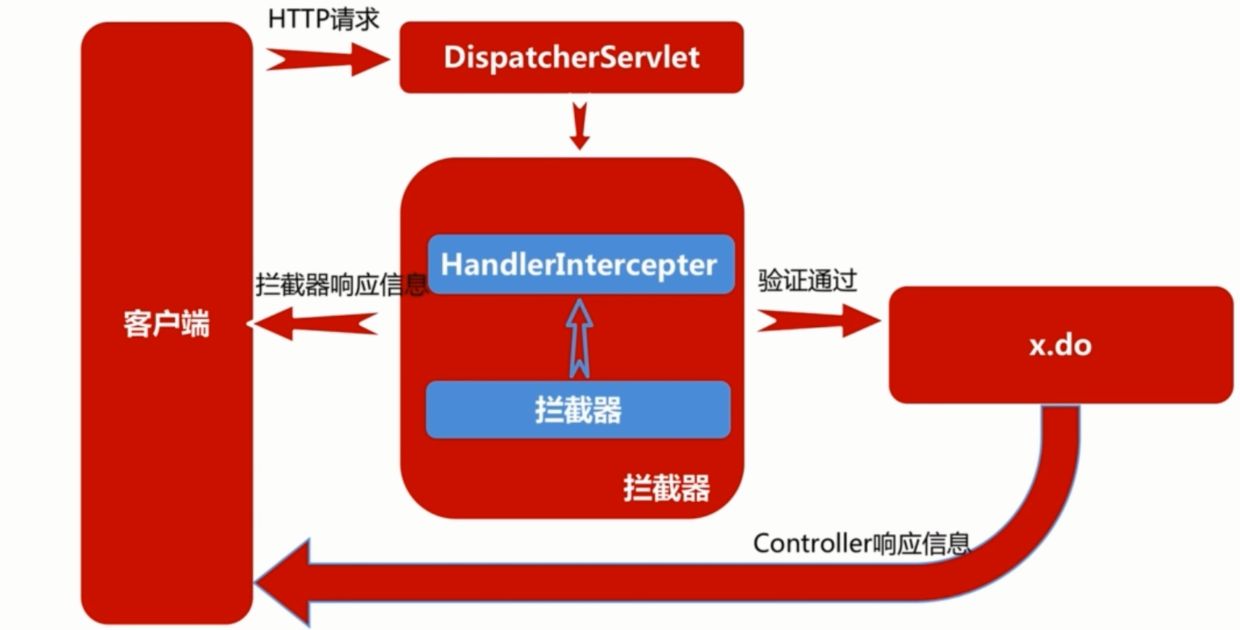
So what does dispatcher servlet do for us?
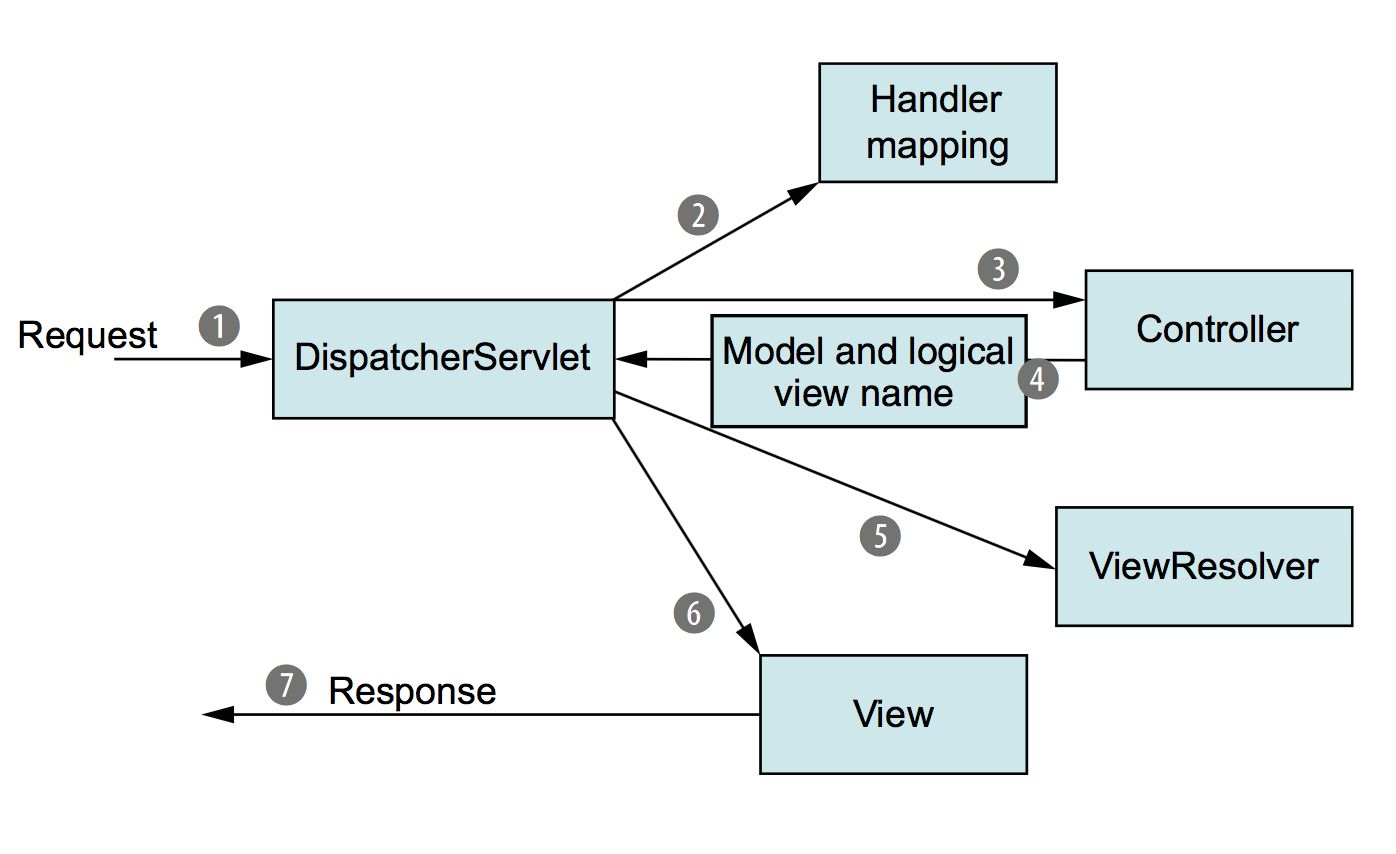
According to the picture, we can see that after our request reaches the Tomcat server, it will be handed over to the current Web application for processing, and spring MVC uses the dispatcher servlet to process all requests, that is, it is used as a unified access point, and all requests are scheduled by it.
When a request passes through the dispatcher servlet, it will go through HandlerMapping first.
It will map the request to HandlerExecutionChain and pass through HandlerInterceptor in turn, which is a bit similar to the filter we learned before.
However, in spring MVC, we use the interceptor, and then give it to the HandlerAdapter to select the appropriate controller for processing according to the requested path. After the controller processing is completed, it will return a ModelAndView object, including the data model and view. Generally speaking, it is the data in the page and the page itself (only including the view name).
After returning ModelAndView, it will be handed over to ViewResolver (View parser) for processing. The View parser will parse the whole View page. Spring MVC comes with some View parsers, but they are only applicable to JSP pages. We can also use Thymeleaf as the View parser as before, so that we can use it according to the given View name, Directly read the page written in HTML and parse it into a real View.
After parsing, you need to render all the data in the page to the View, and finally return to the dispatcher servlet, a formed page containing all the data, and then respond to the browser to complete the whole process.
Therefore, in fact, in the whole process, we only need to write the Controller corresponding to the request path and configure the ViewResolver we need. Then we can continue to add interceptors, and other processes have been completed with the help of spring MVC.
Configure view parser and controller
First, we need to implement the most basic page parsing and return. The first step is to configure the view parser. Here, we use the view parser provided by Thymeleaf to import the required dependencies:
<dependency>
    <groupId>org.thymeleaf</groupId>
    <artifactId>thymeleaf-spring5</artifactId>
    <version>3.0.12.RELEASE</version>
</dependency>
Configuring the view parser is very simple. We only need to register the corresponding ViewResolver as a Bean. Here we write it directly in the configuration class:
@ComponentScan("com.example.controller")
@Configuration
@EnableWebMvc
public class WebConfiguration {

  //We need to use ThymeleafViewResolver as the view parser and parse our HTML pages
    @Bean
    public ThymeleafViewResolver thymeleafViewResolver(@Autowired SpringTemplateEngine springTemplateEngine){
        ThymeleafViewResolver resolver = new ThymeleafViewResolver();
        resolver.setOrder(1);   //There can be multiple view parsers, and the parsing order can be set for them
        resolver.setCharacterEncoding("UTF-8");   //Coding format is the top priority
        resolver.setTemplateEngine(springTemplateEngine);   //As in the previous Java Web phase, you need to use the template engine for parsing, so you also need to set the template engine here
        return resolver;
    }

  	//Configure template parser
  	@Bean
    public SpringResourceTemplateResolver templateResolver(){
        SpringResourceTemplateResolver resolver = new SpringResourceTemplateResolver();
        resolver.setSuffix(".html");   //Suffix name to be resolved
        resolver.setPrefix("/");   //Location of HTML page files to be parsed
        return resolver;
    }

  	//Configure template engine Bean
  	@Bean
    public SpringTemplateEngine springTemplateEngine(@Autowired ITemplateResolver resolver){
        SpringTemplateEngine engine = new SpringTemplateEngine();
        engine.setTemplateResolver(resolver);   //Template parser, which can be used by default
        return engine;
    }
}
Don't forget to add this class as a configuration in the Initializer:
@Override
protected Class<?>[] getServletConfigClasses() {
    return new Class[]{MvcConfiguration.class};
}
Now we have completed the configuration of the view parser. Then we will create a Controller, which is also very simple. Just add an @ Controller annotation on a class, which will be scanned by Spring and automatically registered as a Bean of Controller type. Then we just need to write a method in the class to process the request of the corresponding address:
@Controller   //Just add notes directly
public class MainController {

    @RequestMapping("/index")   //Fill in the access path directly
    public ModelAndView index(){
        return new ModelAndView("index");  //Return the ModelAndView object, where the name of the view is filled in
      	//After returning, it will be processed by the view parser
    }
}
We will find that after opening the browser, we can directly access our HTML page.
The data in the page can be directly provided to the Model:
@RequestMapping(value = "/index")
public ModelAndView index(){
    ModelAndView modelAndView = new ModelAndView("index");
    modelAndView.getModel().put("name", "Ah, this");
    return modelAndView;
}
In this way, Thymeleaf can receive the data from us for analysis:
<!DOCTYPE html>
<html lang="en" xmlns:th="http://www.thymeleaf.org">
<head>
    <meta charset="UTF-8">
    <title>Title</title>
    <script src="static/test.js"></script>
</head>
<body>
    HelloWorld!
    <div th:text="${name}"></div>
</body>
</html>
Of course, if we just pass a page without any additional attributes, we can directly return the View name, and spring MVC will automatically wrap it as a ModelAndView object:
@RequestMapping(value = "/index")
public String index(){
    return "index";
}
You can also add a Model as a formal parameter to set it. Spring MVC will automatically help us pass the instance object:
@RequestMapping(value = "/index")
public String index(Model model){  //It can be not only Model, but also Map and ModelMap
    model.addAttribute("name", "yyds");
    return "index";
}
Note that you must ensure that a horizontal line appears under the view name and press and hold Ctrl to jump. The configuration is correct (the latest version of IDEA)
Our page may also contain some static resources, such as js and css. Therefore, we need to configure the static resources here to be parsed through the default Servlet provided by Tomcat. We need to make the configuration class implement the WebMvcConfigurer interface, so that when the Web application starts, it will be further configured according to the contents of our rewriting method:
@Override
public void configureDefaultServletHandling(DefaultServletHandlerConfigurer configurer) {
    configurer.enable();   //Enable the default Servlet
}

@Override
public void addResourceHandlers(ResourceHandlerRegistry registry) {
    registry.addResourceHandler("/static/**").addResourceLocations("/WEB-INF/static/");
  	//Configure the access path of static resources
}
Let's write the front-end content:
<!DOCTYPE html>
<html lang="en" xmlns:th="http://www.thymeleaf.org">
<head>
    <meta charset="UTF-8">
    <title>Title</title>
      <!-- Reference static resources, which are used here Thymeleaf URL link expression, Thymeleaf Automatically added web The name of the application precedes the link -->
    <script th:src="@{/static/test.js}"></script>
</head>
<body>
    HelloWorld!
</body>
</html>
Create test JS and write the following contents:
window.alert("Welcome to GayHub,The world's largest gay dating website")
Finally, visit the page, and a pop-up window will be displayed when the page is loaded, so we have completed the most basic page configuration. Compared with the previous method, this is much simpler and directly avoids writing a large number of servlets to process requests.
@Detailed explanation of RequestMapping
We have learned how to create a controller to process our requests. Then we just need to add a method to the controller to process the corresponding requests. Before, we need to write a Servlet completely, but now we only need to add a @ RequestMapping. In fact, we can know from its name, This annotation is to establish a mapping relationship between the request and the method of processing the request. When the request is received, the corresponding request processing method can be called according to the mapping relationship. Let's talk about @ RequestMapping first. The annotation is defined as follows:
@Mapping
public @interface RequestMapping {
    String name() default "";

    @AliasFor("path")
    String[] value() default {};

    @AliasFor("value")
    String[] path() default {};

    RequestMethod[] method() default {};

    String[] params() default {};

    String[] headers() default {};

    String[] consumes() default {};

    String[] produces() default {};
}
The key is the path attribute (equivalent to value), which determines the request path processed by the current method. Note that the path must be globally unique. Any path can only be processed by one method. It is an array, that is, this method can not only be used to process a certain request path, but can be used to process multiple request paths:
@RequestMapping({"/index", "/test"})
public ModelAndView index(){
    return new ModelAndView("index");
}
Now when we visit / index or / test, we will go through this method.
We can also directly add @ RequestMapping to the class name, which means adding a path prefix to all request mappings in this class, such as:
@Controller
@RequestMapping("/yyds")
public class MainController {

    @RequestMapping({"/index", "/test"})
    public ModelAndView index(){
        return new ModelAndView("index");
    }
}
Now we need to visit / yyds/index or / yyds/test to get this page. We can directly view all request mappings defined by the current Web application in the endpoint section under the IDEA, and we can directly access a path through the built-in Web client provided by the IDEA.
The path also supports wildcard matching:
- ?: For example, @ X "/ mapping" means any character You can match / index/xa, / index/xb, and so on.
- *: indicates any 0-n characters. For example, @ RequestMapping("/index / *") can match / index/lbwnb, / index/yyds, etc.
- **: indicates the current directory or multi-level directory based on the current directory. For example, @ RequestMapping("/index / * *") can match / index, / index/xxx, etc.
Let's move on to the next method attribute. As the name suggests, it is the method type of the request. We can limit the request method, such as:
@RequestMapping(value = "/index", method = RequestMethod.POST)
public ModelAndView index(){
    return new ModelAndView("index");
}
Now, if we directly use the browser to access this page, it will show that the 405 method is not supported. By default, the browser directly uses the GET method to obtain the page, and we specify the POST method to access this address here, so the access fails. Now we go to the endpoint to access it by POST and GET the page successfully.
We can also directly set the derived annotation to the request mapping of the specified type:
@PostMapping(value = "/index")
public ModelAndView index(){
    return new ModelAndView("index");
}
Here @ PostMapping is directly specified as the request mapping of POST request type. Similarly, @ GetMapping can be directly specified as the GET request method, which will not be listed here.
We can use the params attribute to specify which request parameters the request must carry, such as:
@RequestMapping(value = "/index", params = {"username", "password"})
public ModelAndView index(){
    return new ModelAndView("index");
}
For example, here we require that the request must carry the username and password attributes, otherwise it cannot be accessed. It also supports expressions. For example, we can write:
@RequestMapping(value = "/index", params = {"!username", "password"})
public ModelAndView index(){
    return new ModelAndView("index");
}
Adding an exclamation point before username means that the requested user is not allowed to carry this parameter, otherwise it cannot be accessed. We can even set a fixed value directly:
@RequestMapping(value = "/index", params = {"username!=test", "password=123"})
public ModelAndView index(){
    return new ModelAndView("index");
}
In this way, the request parameter username is not allowed to be test, and the password must be 123, otherwise it cannot be accessed.
The usage of the header attribute is the same as that of params, but it requires what needs to be carried in the request header, such as:
@RequestMapping(value = "/index", headers = "!Connection")
public ModelAndView index(){
    return new ModelAndView("index");
}
Then, if the Connection property is carried in the request header, it will not be accessible. Two other attributes:
- Consumers: specify the submitted content type for processing the request, such as application/json, text/html;
- Only when the return type in the request (request: Accept) contains the specified content type;
@Detailed explanation of RequestParam and @ RequestHeader
Let's next look at how to get the parameters in the request.
We only need to add a formal parameter to the method and add @ RequestParam annotation in front of the formal parameter:
@RequestMapping(value = "/index")
public ModelAndView index(@RequestParam("username") String username){
    System.out.println("Request parameters received:"+username);
    return new ModelAndView("index");
}
We need to fill in the parameter name in @ RequestParam, and the parameter value will be automatically passed to the formal parameter. We can use it directly in the method. Note that if the parameter name is the same as the formal parameter name, the parameter value can be obtained even if @ RequestParam is not added.
Once @ RequestParam is added, the request must carry the specified parameters. We can also set the required property to false to set the property to non required:
@RequestMapping(value = "/index")
public ModelAndView index(@RequestParam(value = "username", required = false) String username){
    System.out.println("Request parameters received:"+username);
    return new ModelAndView("index");
}
We can also directly set a default value. When the request parameters are missing, we can directly use the default value:
@RequestMapping(value = "/index")
public ModelAndView index(@RequestParam(value = "username", required = false, defaultValue = "Paratrooper one") String username){
    System.out.println("Request parameters received:"+username);
    return new ModelAndView("index");
}
If you need to use some of the original classes of Servlet, such as:
@RequestMapping(value = "/index")
public ModelAndView index(HttpServletRequest request){
    System.out.println("Request parameters received:"+request.getParameterMap().keySet());
    return new ModelAndView("index");
}
Simply add HttpServletRequest as a formal parameter, and spring MVC will automatically pass the original HttpServletRequest object of the request. Similarly, we can also add HttpServletResponse as a formal parameter, or even directly pass HttpSession as a parameter:
@RequestMapping(value = "/index")
public ModelAndView index(HttpSession session){
    System.out.println(session.getAttribute("test"));
    session.setAttribute("test", "Chicken, you are so beautiful");
    return new ModelAndView("index");
}
We can also directly pass the request parameters to an entity class:
@Data
public class User {
    String username;
    String password;
}
Note that all parameters must be carried in the set method or construction method. The request parameters will be automatically matched according to the field names in the class:
@RequestMapping(value = "/index")
public ModelAndView index(User user){
    System.out.println("Get cookie The value is:"+user);
    return new ModelAndView("index");
}
@The usage of RequestHeader is the same as @ RequestParam, but it is used to obtain the request header parameters, which will not be demonstrated here.
@Cookie and @ sessionattribute
By using @ Cookie value annotation, we can also quickly obtain the Cookie information carried by the request:
@RequestMapping(value = "/index")
public ModelAndView index(HttpServletResponse response,
                          @CookieValue(value = "test", required = false) String test){
    System.out.println("Get cookie The value is:"+test);
    response.addCookie(new Cookie("test", "lbwnb"));
    return new ModelAndView("index");
}
Similarly, Session can also be obtained quickly using annotations:
@RequestMapping(value = "/index")
public ModelAndView index(@SessionAttribute(value = "test", required = false) String test,
                          HttpSession session){
    session.setAttribute("test", "xxxx");
    System.out.println(test);
    return new ModelAndView("index");
}
It can be found that by using the Spring MVC framework, the development of the whole Web application becomes very simple. Most functions can be done with only one annotation. It is thanks to the Spring framework that Spring MVC can play a great role.
Redirection and request forwarding
Redirection and request forwarding are also very simple. We only need to add a prefix in front of the view name, such as redirection:
@RequestMapping("/index")
public String index(){
    return "redirect:home";
}

@RequestMapping("/home")
public String home(){
    return "home";
}
Redirection can be easily realized by adding the redirect: prefix. In fact, the request forwarding is the same. Using the forward: prefix indicates forwarding to other request mappings:
@RequestMapping("/index")
public String index(){
    return "forward:home";
}

@RequestMapping("/home")
public String home(){
    return "home";
}
Using spring MVC, redirection and request forwarding can be realized with only one prefix, which is very convenient.
Web scope of Bean
When learning Spring, we explained the scope of bean, including singleton and prototype. Bean will be created in single instance mode and multi instance mode respectively. In Spring MVC, its scope will continue to be subdivided:
- Request: for each HTTP request, the Bean defined with the request scope will generate a new instance, and the Bean will disappear after the request is completed.
- Session: for each session, the Bean defined with the session scope will generate a new instance, and the Bean will disappear after the session expires.
- global session: not commonly used and not explained.
Here we create a test class to try:
public class TestBean {

}
Then register it as a Bean. Note that @ RequestScope or @ SessionScope needs to be added here to represent the Web scope of this Bean:
@Bean
@RequestScope
public TestBean testBean(){
    return new TestBean();
}
Then we automatically inject it into the Controller:
@Controller
public class MainController {

    @Resource
    TestBean bean;

    @RequestMapping(value = "/index")
    public ModelAndView index(){
        System.out.println(bean);
        return new ModelAndView("index");
    }
}
We found that the Bean instance obtained from each initiation is different. Then we modified its scope to @ SessionScope, so that the scope will rise to Session. As long as the browser's Cookie is cleared, it will be considered as the same Session. As long as it is the same Session, the Bean instance will remain unchanged.
In fact, it is also implemented through a proxy. The methods we call in the Bean will be forwarded to the real Bean object for execution.
RestFul style
The Chinese definition is "performance layer state transition" (the name is quite tall). It is not a standard, but a design style.
Its main function is to make full and correct use of the characteristics of HTTP protocol and standardize the URI path obtained by resources.
Generally speaking, the RESTful design allows parameters to be spliced to the server through the URL. The purpose is to make the URL look more concise and practical, and we can make full use of a variety of HTTP request methods (POST/GET/PUT/DELETE) to perform different types of operations with the same request address.
Therefore, for this style of connection, we can directly read parameters from the request path, such as:
http://localhost:8080/mvc/index/123456
We can directly process the next level path of index as a request parameter, that is, the current request parameters are included in the request path:
@RequestMapping("/index/{str}")
public String index(@PathVariable String str) {
    System.out.println(str);
    return "index";
}
Note that we can manually add information similar to placeholders to the request path, so that all contents of the placeholder position will be used as request parameters, and the formal parameter list of the method must include a parameter with the same name as the placeholder and annotated with @ PathVariable annotation, or specified as the placeholder name by @ PathVariable annotation:
@RequestMapping("/index/{str}")
public String index(@PathVariable("str") String text){
    System.out.println(text);
    return "index";
}
If it is not configured correctly, a yellow line will appear on the method name.
We can divide it according to different functions:
- POST http://localhost:8080/mvc/index -Add user information and carry form data
- GET http://localhost:8080/mvc/index/{id} -Get the user information and put the id directly in the request path
- PUT http://localhost:8080/mvc/index -Modify user information and carry form data
- DELETE http://localhost:8080/mvc/index/{id} -Delete the user information and put the id directly in the request path
We write four request mappings:
@Controller
public class MainController {

    @RequestMapping(value = "/index/{id}", method = RequestMethod.GET)
    public String get(@PathVariable("id") String text){
        System.out.println("Get user:"+text);
        return "index";
    }

    @RequestMapping(value = "/index", method = RequestMethod.POST)
    public String post(String username){
        System.out.println("Add user:"+username);
        return "index";
    }

    @RequestMapping(value = "/index/{id}", method = RequestMethod.DELETE)
    public String delete(@PathVariable("id") String text){
        System.out.println("Delete user:"+text);
        return "index";
    }

    @RequestMapping(value = "/index", method = RequestMethod.PUT)
    public String put(String username){
        System.out.println("Modify user:"+username);
        return "index";
    }
}
This is just a design style. You can understand it.
Interceptor interceptor
Interceptors are an important part of the whole spring MVC. Similar to filters, interceptors are used to intercept some illegal requests. However, before the filter we explained earlier works on servlets, only through layers of interceptors can we successfully reach servlets.
The interceptor is not before the Servlet. It is between the Servlet and RequestMapping. It is equivalent to the dispatcher Servlet intercepting the request before handing it to the method in the corresponding Controller. It will only intercept the request corresponding to the request mapping defined in all controllers (not static resources). Here, we must distinguish the difference between the two.
Create interceptor
To create an interceptor, we need to implement a HandlerInterceptor interface:
public class MainInterceptor implements HandlerInterceptor {
    @Override
    public boolean preHandle(HttpServletRequest request, HttpServletResponse response, Object handler) throws Exception {
        System.out.println("I was dealing with before!");
        return true;   //Only when you return true will you continue, otherwise you will end directly
    }

    @Override
    public void postHandle(HttpServletRequest request, HttpServletResponse response, Object handler, ModelAndView modelAndView) throws Exception {
        System.out.println("I'm after handling!");
    }

    @Override
    public void afterCompletion(HttpServletRequest request, HttpServletResponse response, Object handler, Exception ex) throws Exception {
        System.out.println("I'm finished!");
    }
}
Then we need to register in the configuration class:
@Override
public void addInterceptors(InterceptorRegistry registry) {
    registry.addInterceptor(new MainInterceptor())
      .addPathPatterns("/**")    //Add the matching path of the interceptor, and intercept as long as it matches
      .excludePathPatterns("/home");   //The path that the interceptor does not intercept
}
Now we visit the index page in the browser, and the interceptor has taken effect.
Get the execution sequence of the sorting Interceptor:
I was dealing with before!
I'm dealing with it!
I'm after handling!
I'm finished!
In other words, before and after the processing, the processing of real request mapping is included. After the end of the whole process, the afterCompletion method is also executed. In fact, the whole process is similar to the Filter we know before. However, before the processing, we only need to return true or false to indicate whether it is intercepted, rather than using FilterChain for downward transmission.
Let's see what happens if false is returned before processing:
I was dealing with before!
The results show that once false is returned, all subsequent processes are cancelled. What if an exception occurs in processing?
@RequestMapping("/index")
public String index(){
    System.out.println("I'm dealing with it!");
    if(true) throw new RuntimeException("");
    return "index";
}
The result is:
I was dealing with before!
I'm dealing with it!
I'm finished!
We found that if an exception is thrown during processing, the postHandle method after processing will not be executed for a long time, but the afterCompletion method will be executed. We can get the thrown exception in this method.
Multistage interceptor
In the case of only one interceptor, let's see how to execute if there are multiple interceptors. We create interceptor 2 in the same way:
public class SubInterceptor implements HandlerInterceptor {
    @Override
    public boolean preHandle(HttpServletRequest request, HttpServletResponse response, Object handler) throws Exception {
        System.out.println("Interceptor 2: I'm before processing!");
        return true;
    }

    @Override
    public void postHandle(HttpServletRequest request, HttpServletResponse response, Object handler, ModelAndView modelAndView) throws Exception {
        System.out.println("Interceptor 2: I'm after processing!");
    }

    @Override
    public void afterCompletion(HttpServletRequest request, HttpServletResponse response, Object handler, Exception ex) throws Exception {
        System.out.println("Interceptor 2: I'm finished!");
    }
}
Register interceptor 2:
@Override
public void addInterceptors(InterceptorRegistry registry) {
  	//Interceptor one
    registry.addInterceptor(new MainInterceptor()).addPathPatterns("/**").excludePathPatterns("/home");
  	//Interceptor 2
    registry.addInterceptor(new SubInterceptor()).addPathPatterns("/**");
}
Note that the interception order is the order of registration, so the interceptor will be executed according to the registration order. We can open the browser and run it once:
Interceptor 1: I'm before processing!
Interceptor 2: I'm before processing!
I'm dealing with it!
Interceptor 2: I'm after processing!
Interceptor 1: I'm after processing!
Interceptor 2: I'm finished!
Interceptor 1: I'm finished!
Like multi-level filters, they are intercepted from front to back in order before processing, but after processing, the post-processing methods are executed in reverse order, and after completion, they are executed in reverse order after all posthandles are executed.
What if interceptor 1 returns false before processing?
@Override
public boolean preHandle(HttpServletRequest request, HttpServletResponse response, Object handler) throws Exception {
    System.out.println("Interceptor 1: I'm before processing!");
    return false;
}
The results are as follows:
Interceptor 1: I'm before processing!
We found that, as in the case of a single interceptor, once the interceptor returns false, it will not continue whether there is an interceptor or not.
exception handling
When an exception occurs in our request mapping method, it will be directly displayed on the front-end page. This is because spring MVC provides us with a default exception handling page. When an exception occurs, our request will be directly transferred to the controller dedicated to exception handling for processing.
We can customize an exception handling controller. Once a specified exception occurs, it will be transferred to this controller for execution:
@ControllerAdvice
public class ErrorController {

    @ExceptionHandler(Exception.class)
    public String error(Exception e, Model model){  //You can directly add formal parameters to get exceptions
        e.printStackTrace();
        model.addAttribute("e", e);
        return "500";
    }
}
Then we write a special page to display exceptions:
<!DOCTYPE html>
<html lang="en">
<head>
    <meta charset="UTF-8">
    <title>Title</title>
</head>
<body>
  500 - An internal error occurred on the server QAQ
  <div th:text="${e}"></div>
</body>
</html>
Then modify:
@RequestMapping("/index")
public String index(){
    System.out.println("I'm dealing with it!");
    if(true) throw new RuntimeException("Cannot access!");
    return "index";
}
After visiting, we found that the console will output exception information, and the page is also a customized page.
JSON data format and AJAX request
JSON (JavaScript object notation) is a lightweight data exchange format.
What we advocate now is the development mode of separating the front end and the back end, rather than all the contents are handed over to the back end for rendering and then sent to the browser. (of course, I personally don't think all projects are suitable for separation.)
In other words, the content of the whole Web page is written at the beginning, and the data in it is dynamically obtained from the server by executing JS code at the front end, and then rendered (filled) at the front end, which can greatly reduce the pressure on the back end, And the back-end only needs to transmit key data (in the upcoming spring boot stage, we will completely adopt the development mode of separating the front and back ends)
JSON data format
Since we want to separate the front and back ends, we must agree on a more efficient data transmission mode to transmit the data provided by the back end to the front-end page. Therefore, JSON was born. It is very easy to understand and has excellent compatibility with the front end. Therefore, the mainstream data transmission mode is carried through JSON format.
A JSON format data is as long as this. Take the student object as an example:
{"name": "Jacko", "age": 18}
Multiple students can be represented in the form of an array:
[{"name": "Jacko", "age": 18}, {"name": "Awei", "age": 18}]
Nested relationships can be expressed as:
{"studentList": [{"name": "Jacko", "age": 18}, {"name": "Awei", "age": 18}], "count": 2}
It directly includes the name and value of the attribute, which is very similar to the object of JavaScript. After it reaches the front end, it can be directly converted into an object for operation and content reading in the form of object, which is equivalent to representing a JS object in the form of string. We can test it directly in the console window:
let obj = JSON.parse('{"studentList": [{"name": "Jacko", "age": 18}, {"name": "Awei", "age": 18}], "count": 2}')
//Convert JSON format string to JS object
obj.studentList[0].name   //Direct access to the first student's name
We can also convert JS objects to JSON strings:
JSON.stringify(obj)
Our back end can return data to the front end in the form of JSON string, so that the front end can quickly obtain the data after getting it, which is very convenient.
So how can the backend quickly create data in JSON format? We first need to import the following dependencies:
<dependency>
    <groupId>com.alibaba</groupId>
    <artifactId>fastjson</artifactId>
    <version>1.2.78</version>
</dependency>
There are many kinds of JSON parsing frameworks. Jackson and FastJSON are commonly used. Here we use Alibaba's FastJSON for parsing.
The first thing to introduce is JSONObject, which uses the same method as Map (implements the Map interface). For example, we store several data in it:
@RequestMapping(value = "/index")
public String index(){
    JSONObject object = new JSONObject();
    object.put("name", "Jacko");
    object.put("age", 18);
    System.out.println(object.toJSONString());   //Output JSONObject string in JSON format
    return "index";
}
Finally, we get the following results:
{"name": "Jacko", "age": 18}
In fact, JSONObject is an object representation of JSON data. Similarly, there is JSONArray, which represents an array. The usage is the same as that of List. Other jsonobjects or JSONArray can be nested in the array:
@RequestMapping(value = "/index")
public String index(){
    JSONObject object = new JSONObject();
    object.put("name", "Jacko");
    object.put("age", 18);
    JSONArray array = new JSONArray();
    array.add(object);
    System.out.println(array.toJSONString());
    return "index";
}
The results obtained are:
[{"name": "Jacko", "age": 18}]
When a circular reference occurs, it will be resolved according to the following syntax: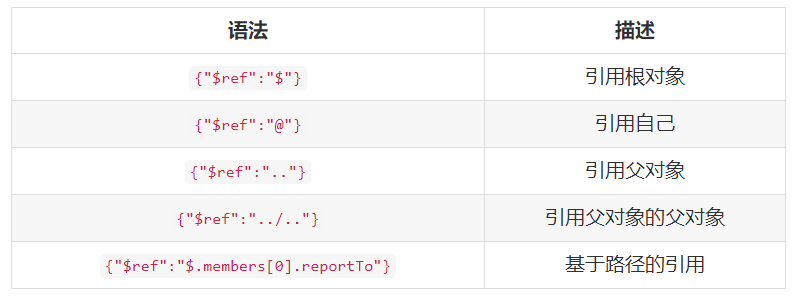
We can also directly create an entity class to convert the entity class into JSON format data:
@RequestMapping(value = "/index", produces = "application/json")
@ResponseBody
public String data(){
    Student student = new Student();
    student.setName("Jacko");
    student.setAge(18);
    return JSON.toJSONString(student);
}
Here, we modify the value of produces and set the returned content type to application/json, It indicates that the server side returns a JSON format data (of course, it can also be displayed without setting, which is for the sake of Standardization). Then we add a @ ResponseBody on the method to indicate that the method returns (you can also add @ RestController on the class to indicate that the Controller returns string data by default) The result is not the view name, but directly needs to return a string as page data. In this way, what is returned to the browser is the string content we directly return.
Then we use JSON tool class to convert it into JSON format string, open the browser and get JSON format data.
Spring MVC is very intelligent. We can directly return an object type, which will be automatically converted to JSON string format:
@RequestMapping(value = "/data", produces = "application/json")
@ResponseBody
public Student data(){
    Student student = new Student();
    student.setName("Jacko");
    student.setAge(18);
    return student;
}
Note that you need to add a FastJSON converter in the configuration class (only JackSon is supported by default):
@Override
public void configureMessageConverters(List<HttpMessageConverter<?>> converters) {
    converters.add(new FastJsonHttpMessageConverter());
}
AJAX Request
We explained how to send data in JSON format to the browser. Now let's see how to request data from the server.
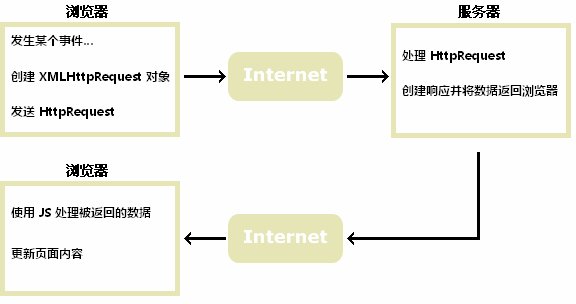
Ajax is Asynchronous Javascript And XML (Asynchronous Javascript And XML). Its goal is to dynamically update the data in the page, rather than directly refresh the whole page. It is a concept.
It is implemented in the JQuery framework, so we directly import JQuery (JQuery greatly simplifies the development of JS and encapsulates a lot of content. You can learn about it if you are interested):
<script src="https://code.jquery.com/jquery-3.1.1.min.js"></script>
Then we can use it directly. First, modify the front-end page:
<!DOCTYPE html>
<html lang="en" xmlns:th="http://www.thymeleaf.org">
<head>
    <meta charset="UTF-8">
    <title>Title</title>
    <script src="https://code.jquery.com/jquery-3.1.1.min.js"></script>
    <script th:src="@{/static/test.js}"></script>
</head>
<body>
    Hello,
    <span id="username"></span>
    Your age is:
    <span id="age"></span>
    <button onclick="updateData()">Click me to update page data</button>
</body>
</html>
Now we hope that the user name and age will not be updated until we click the button. Let's then write JS:
function updateData() {
    //Dollar sign The first parameter is the address of the request (note that you need to bring the Web application name), and the second parameter is the method to successfully obtain the data. Data is the returned data content
  	$.get("/mvc/data", function (data) {   //Get the method of successful execution
        window.alert('Asynchronous request received data:'+JSON.stringify(data))  //Pop up display data
        $("#username").text(data.name) / / the selector provided by JQuery is used here to directly select the element with id username and update the data
        $("#age").text(data.age)
    })
}
Using JQuery is very convenient. We can quickly obtain the elements in the page directly through the selector of JQuery. Note that the elements obtained here are elements encapsulated by JQuery, and we need to use the methods provided by JQuery for operation.
In this way, we can obtain data from the server and update it to the page (in fact, we also demonstrated using XHR request in the Java Web stage, but it was pure data at that time)
Then let's look at how to send a JS object data to the server and parse it:
function submitData() {
    $.post("/mvc/submit", {   //The POST method is used here to send the request
        name: "test",     //The second parameter is the object to be passed, which will be sent as form data
      	age: 18
    }, function (data) {
        window.alert(JSON.stringify(data))   //Send successful execution method
    })
}
The server side only needs to add an object at the request parameter position to receive it (the same as before, because this is also the submitted form data):
@RequestMapping("/submit")
@ResponseBody
public String submit(Student student){
    System.out.println("Front end data received:"+student);
    return "{\"success\": true}";
}
We can also convert js objects into JSON strings for transmission. Here, we need to use ajax method to process:
function submitData() {
    $.ajax({   //The most basic request method needs to set some parameters
        type: 'POST',   //Set request method
        url: "/mvc/submit",   //Request address
        data: JSON.stringify({name: "test", age: 18}),  //Convert to JSON string for sending
        success: function (data) {
            window.alert(JSON.stringify(data))
        },
        contentType: "application/json"  //The content type of the request header must be set to JSON format
    })
}
If we need to read the JSON format data sent to us by the front end, we need to add @ RequestBody annotation at this time:
@RequestMapping("/submit")
@ResponseBody
public String submit(@RequestBody JSONObject object){
    System.out.println("Front end data received:"+object);
    return "{\"success\": true}";
}
In this way, we realize the communication between the front and back ends using JSON strings.
Realize file upload and download
Using spring MVC, we can easily upload and download files. Similarly, we only need to configure a Resolver:
@Bean("multipartResolver")   //Note that the name of the Bean here is fixed and must be multipartResolver
public CommonsMultipartResolver commonsMultipartResolver(){
    CommonsMultipartResolver resolver = new CommonsMultipartResolver();
    resolver.setMaxUploadSize(1024 * 1024 * 10);   //Maximum 10MB size
    resolver.setDefaultEncoding("UTF-8");   //Default encoding format
    return resolver;
}
Then we can write the Controller directly:
@RequestMapping(value = "/upload", method = RequestMethod.POST)
@ResponseBody
public String upload(@RequestParam CommonsMultipartFile file) throws IOException {
    File fileObj = new File("test.html");
    file.transferTo(fileObj);
    System.out.println("The file uploaded by the user has been saved to:"+fileObj.getAbsolutePath());
    return "File upload succeeded!";
}
Use the CommonsMultipartFile object to receive the file uploaded by the user. It is implemented based on Apache's Commons fileUpload framework. We also need to import a dependency:
<dependency>
    <groupId>commons-fileupload</groupId>
    <artifactId>commons-fileupload</artifactId>
    <version>1.4</version>
</dependency>
Finally, add a file upload point at the front end:
<div>
    <form action="upload" method="post" enctype="multipart/form-data">
        <input type="file" name="file">
        <input type="submit">
    </form>
</div>
In this way, after clicking submit, the file will be uploaded to the server.
Downloading is basically the same as our previous writing method. You can directly use HttpServletResponse and transfer data to the output stream.
@RequestMapping(value = "/download", method = RequestMethod.GET)
@ResponseBody
public void download(HttpServletResponse response){
    response.setContentType("multipart/form-data");
    try(OutputStream stream = response.getOutputStream();
        InputStream inputStream = new FileInputStream("test.html")){
        IOUtils.copy(inputStream, stream);
    }catch (IOException e){
        e.printStackTrace();
    }
}
Add a download point in the front page:
<a href="download" download="test.html">Download the latest resources</a>
Interpretation of DispatcherServlet source code
First, we need to find the top HttpServletBean of DispatcherServlet, which directly inherits the HttpServlet here. First, let's take a look at what it does in the initialization method:
public final void init() throws ServletException {
  	//Read the configuration parameters and configure them
    PropertyValues pvs = new HttpServletBean.ServletConfigPropertyValues(this.getServletConfig(), this.requiredProperties);
    if (!pvs.isEmpty()) {
        try {
            BeanWrapper bw = PropertyAccessorFactory.forBeanPropertyAccess(this);
            ResourceLoader resourceLoader = new ServletContextResourceLoader(this.getServletContext());
            bw.registerCustomEditor(Resource.class, new ResourceEditor(resourceLoader, this.getEnvironment()));
            this.initBeanWrapper(bw);
            bw.setPropertyValues(pvs, true);
        } catch (BeansException var4) {
            if (this.logger.isErrorEnabled()) {
                this.logger.error("Failed to set bean properties on servlet '" + this.getServletName() + "'", var4);
            }

            throw var4;
        }
    }
		//This initialization phase is implemented by subclasses,
    this.initServletBean();
}
Next, let's see how the initServletBean() method is implemented. It is defined in the subclass FrameworkServlet:
protected final void initServletBean() throws ServletException {
this.getServletContext().log("Initializing Spring " + this.getClass().getSimpleName() + " '" + this.getServletName() + "'");
if (this.logger.isInfoEnabled()) {
this.logger.info("Initializing Servlet '" + this.getServletName() + "'");
}
long startTime = System.currentTimeMillis();
try {
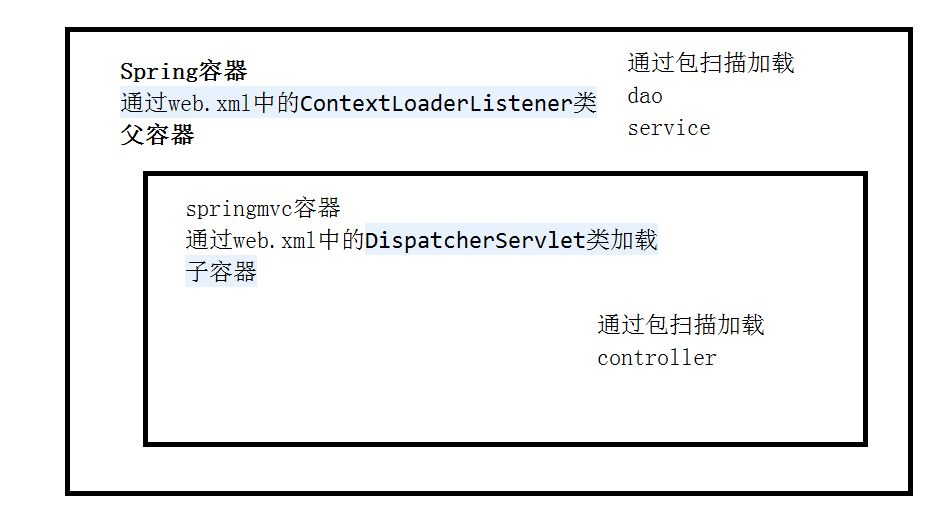
//Note: we said at the beginning that spring MVC has two containers, one is the Web container and the other is the root container
//The Web container is only responsible for presentation layer content such as Controller
//The root container is the Spring container, which is responsible for Service, Dao, etc., and it is the parent container of the Web container.
//Initialize WebApplicationContext. This stage will establish parent-child relationship between root container and Web container
this.webApplicationContext = this.initWebApplicationContext();
this.initFrameworkServlet();
} catch (RuntimeException | ServletException var4) {
//... The following contents are all printed logs
}
Let's see how initWebApplicationContext is initialized:
protected WebApplicationContext initWebApplicationContext() {
  	//The root container obtained here is generally used to configure services, data sources, etc
    WebApplicationContext rootContext = WebApplicationContextUtils.getWebApplicationContext(this.getServletContext());
    WebApplicationContext wac = null;
    if (this.webApplicationContext != null) {
      	//If the webApplicationContext already exists before, it will be directly given to wac
        wac = this.webApplicationContext;
        if (wac instanceof ConfigurableWebApplicationContext) {
            ConfigurableWebApplicationContext cwac = (ConfigurableWebApplicationContext)wac;
            if (!cwac.isActive()) {
                if (cwac.getParent() == null) {
                  	//Set the root container as the parent of the Web container
                    cwac.setParent(rootContext);
                }

                this.configureAndRefreshWebApplicationContext(cwac);
            }
        }
    }

    if (wac == null) {
      	//If webApplicationContext is empty, check whether there is an initialization context from ServletContext
        wac = this.findWebApplicationContext();
    }

    if (wac == null) {
      	//If you still can't find it, create a new one and directly use the root container as the parent container
        wac = this.createWebApplicationContext(rootContext);
    }

    if (!this.refreshEventReceived) {
        synchronized(this.onRefreshMonitor) {
          	//This method is implemented by DispatcherServlet
            this.onRefresh(wac);
        }
    }

    if (this.publishContext) {
        String attrName = this.getServletContextAttributeName();
      	//Throw the Web container into the ServletContext
        this.getServletContext().setAttribute(attrName, wac);
    }

    return wac;
}
Let's move on to the onRefresh() method implemented in the dispatcher servlet:
@Override
protected void onRefresh(ApplicationContext context) {
    initStrategies(context);
}

protected void initStrategies(ApplicationContext context) {
  	//Initialize various parsers
    initMultipartResolver(context);
    initLocaleResolver(context);
    initThemeResolver(context);
  	//Find all HandlerMapping in the container and put it into the collection
  	//HandlerMapping saves all request mapping information (defined in the Controller). It can find the processor Handler according to the request, but it does not simply return to the processor. Instead, it encapsulates the processor and interceptor to form a processor execution chain (similar to the previous Filter)
    initHandlerMappings(context);
  	//Find all handleradapters in the container, which are used to process requests and return ModelAndView objects
  	//By default, there are three implementations: HttpRequestHandlerAdapter, simplecontrolhandleradapter and AnnotationMethodHandlerAdapter
  	//When HandlerMapping finds the Controller that handles the request, it will select an appropriate HandlerAdapter to handle the request
  	//For example, we used the annotation method to configure the Controller before. Now a request carries a parameter. Then the HandlerAdapter will parse the requested data and pass in the method as an argument. Finally, it will be encapsulated as a ModelAndView object according to the return value of the method
    initHandlerAdapters(context);
  	//Other contents
    initHandlerExceptionResolvers(context);
    initRequestToViewNameTranslator(context);
    initViewResolvers(context);
    initFlashMapManager(context);
}
We have learned about the initialization process of DispatcherServlet, so let's next look at how DispatcherServlet is scheduled. First, our request will pass through HttpServlet, and then it will be handed over to the corresponding doGet, doPost and other methods for processing. In the FrameworkServlet, these methods are rewritten and processed with processRequest:
protected final void doGet(HttpServletRequest request, HttpServletResponse response) throws ServletException, IOException {
    this.processRequest(request, response);
}

protected final void doPost(HttpServletRequest request, HttpServletResponse response) throws ServletException, IOException {
    this.processRequest(request, response);
}
Let's see what processRequest does:
protected final void processRequest(HttpServletRequest request, HttpServletResponse response) throws ServletException, IOException {
  	//Preliminary preparation
    long startTime = System.currentTimeMillis();
    Throwable failureCause = null;
    LocaleContext previousLocaleContext = LocaleContextHolder.getLocaleContext();
    LocaleContext localeContext = this.buildLocaleContext(request);
    RequestAttributes previousAttributes = RequestContextHolder.getRequestAttributes();
    ServletRequestAttributes requestAttributes = this.buildRequestAttributes(request, response, previousAttributes);
    WebAsyncManager asyncManager = WebAsyncUtils.getAsyncManager(request);
    asyncManager.registerCallableInterceptor(FrameworkServlet.class.getName(), new FrameworkServlet.RequestBindingInterceptor());
    this.initContextHolders(request, localeContext, requestAttributes);

    try {
      	//The key point is here. The Service is executed here, but it is defined in the dispatcher servlet
        this.doService(request, response);
    } catch (IOException | ServletException var16) {
        //...
}
Please be patient. The bottom layers of these large frameworks are usually layers of dolls, because the layers will be clearer. Let's take a look at how the dispatcher servlet is implemented:
protected void doService(HttpServletRequest request, HttpServletResponse response) throws Exception {
   //...
    try {
      	//Here is the key point. This is the core part of the whole process
        this.doDispatch(request, response);
    } finally {
        //...
}
Finally found the core part:
protected void doDispatch(HttpServletRequest request, HttpServletResponse response) throws Exception {
    HttpServletRequest processedRequest = request;
    HandlerExecutionChain mappedHandler = null;
    boolean multipartRequestParsed = false;
    WebAsyncManager asyncManager = WebAsyncUtils.getAsyncManager(request);

    try {
        try {
            ModelAndView mv = null;
            Object dispatchException = null;

            try {
                processedRequest = this.checkMultipart(request);
                multipartRequestParsed = processedRequest != request;
              	//Find the HandlerMapping that can handle the current request in the HandlerMapping collection
                mappedHandler = this.getHandler(processedRequest);
                if (mappedHandler == null) {
                    this.noHandlerFound(processedRequest, response);
                  	//Cannot process if HandlerMapping is not found
                    return;
                }

              	//According to the information provided by HandlerMapping, find the HandlerAdapter that can be processed
                HandlerAdapter ha = this.getHandlerAdapter(mappedHandler.getHandler());
                String method = request.getMethod();
                boolean isGet = HttpMethod.GET.matches(method);
                if (isGet || HttpMethod.HEAD.matches(method)) {
                    long lastModified = ha.getLastModified(request, mappedHandler.getHandler());
                    if ((new ServletWebRequest(request, response)).checkNotModified(lastModified) && isGet) {
                        return;
                    }
                }

              	//Execute the preHandle() method of all interceptors
                if (!mappedHandler.applyPreHandle(processedRequest, response)) {
                    return;
                }

              	//Handle with HandlerAdapter (the request mapping method we wrote is actually executed at this location)
              	//HandlerAdapter will help us process the requested data, and then call the request mapping method we write
              	//Finally, the HandlerAdapter will encapsulate the result as ModelAndView and return it to mv
                mv = ha.handle(processedRequest, response, mappedHandler.getHandler());
                if (asyncManager.isConcurrentHandlingStarted()) {
                    return;
                }

                this.applyDefaultViewName(processedRequest, mv);
              	//Execute the postHandle() method of all interceptors
                mappedHandler.applyPostHandle(processedRequest, response, mv);
            } catch (Exception var20) {
                dispatchException = var20;
            } catch (Throwable var21) {
                dispatchException = new NestedServletException("Handler dispatch failed", var21);
            }

          	//Finally, process the result and render the view. If an exception is thrown, an error page will appear
            this.processDispatchResult(processedRequest, response, mappedHandler, mv, (Exception)dispatchException);
        } catch (Exception var22) {
            this.triggerAfterCompletion(processedRequest, response, mappedHandler, var22);
        } catch (Throwable var23) {
            this.triggerAfterCompletion(processedRequest, response, mappedHandler, new NestedServletException("Handler processing failed", var23));
        }

    } finally {
        if (asyncManager.isConcurrentHandlingStarted()) {
            if (mappedHandler != null) {
                mappedHandler.applyAfterConcurrentHandlingStarted(processedRequest, response);
            }
        } else if (multipartRequestParsed) {
            this.cleanupMultipart(processedRequest);
        }

    }
}
Therefore, the final flow chart is obtained according to the above source code analysis:
