**
Install Centos6
**
1, Download the CentOS 6.10 installation package, link . Install in VMWare.
2, Set virtual machine fixed ip
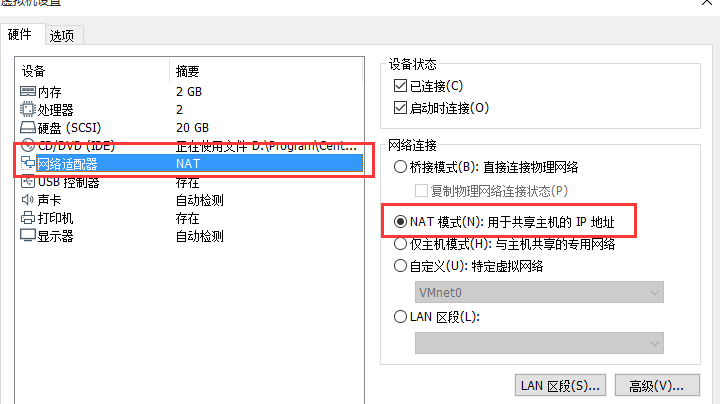
- Edit - > virtual network editor - > device NAT mode - > View gateway.

Right click virtual machine - > set NAT mode
2. Modify the network card configuration. Edit: VI / etc / sysconfig / network scripts / ifcfg-eth0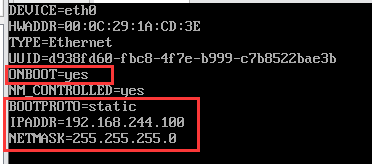
3. Modify the gateway configuration. Edit: vi /etc/sysconfig/network
Change the host name to Hadoop 01 and the gateway to the gateway you just viewed.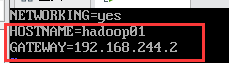
Modify the hostname configuration: vi /etc/hosts, and reboot will take effect immediately.
4. Modify DNS configuration. Edit: vi /etc/resolv.conf
3, Turn off firewall
Temporary shutdown (effective immediately): service iptables stop
Permanently shut down (restart effective): chkconfig iptables off
View firewall status: service iptables status
4, Installation related services
1. Install ssh client: Yum install - y openssh clients
5, Configure the correspondence between host name and IP address
vi /etc/hosts
#Add the following
192.168.244.100 hadoop01
192.168.244.101 hadoop02
192.168.244.102 hadoop03
6, Configure SSH password free login
ssh-keygen -t rsa		//Secret key generator, always enter
cd /root/.ssh
cp id_rsa.pub authorized_keys		//Put the public key of three machines into an authentication file, and then distribute the file to three machines
Install Hadoop cluster
1, Prepare software and folders
java version: jdk-8u211-linux-x64.tar.gz
Hadoop version: hadoop-2.7.6.tar.gz
Create a new software folder under root to place the software installation package, and create a new program folder to install the software
2, Install Java
1. Unzip: tar zxvf jdk-8u211-linux-x64.tar.gz -C. / /program
2. Configure jdk environment variable: vi /etc/profile
#Java Enviroment
JAVA_HOME=/root/program/jdk1.8.0_211
PATH=$JAVA_HOME/bin:$PATH
CLASSPATH=$JAVA_HOME/lib:$CLASSPATH
export JAVA_HOME PATH CLASS
Effective environment variable: source /etc/profile
View java version: Java version
3, Install Hadoop
1. Decompress: tar zxvf hadoop-2.7.6.tar.gz -C. / /program
2. Configure Hadoop environment variable: vi /etc/profile
#Hadoop Enviroment
HADOOP_HOME=/root/program/hadoop-2.7.6
PATH=$HADOOP_HOME/bin:$HADOOP_HOME/sbin:$PATH
CLASSPATH=$HADOOP_HOME/lib:$CLASSPATH
export HADOOP_HOME PATH CLASSPATH
Effective environment variable: source /etc/profile
View hadoop version: hadoop version
3. Find Java home: echo $Java home
4. Modify the file / root/program/hadoop-2.7.6/etc/hadoop/hadoop-env.sh
# The java implementation to use.
export JAVA_HOME=/root/program/jdk1.8.0_211
5. Modified file: yarn env.sh
#echo "run java in $JAVA_HOME"
  JAVA_HOME=/root/program/jdk1.8.0_211
6. Modify the file: core-site.xml
Create a new folder data under /root/program and a new folder tmp under data
<configuration>
  <property>
    <name>fs.defaultFS</name> #Specify the communication address of the namenode
   <value>hdfs://hadoop01:9000</value>
  </property>
  <property>
    <name>hadoop.tmp.dir</name> #Specify the storage directory of data generated in operation
    <value>/root/program/data/tmp/</value>
  </property>
</configuration>
7. Modify hdfs-site.xml
<configuration>
  <property>
    <name>dfs.replication</name>
    <value>1</value>    <!-- Number of pseudo distributed backups is 1 -->
  </property>
  <property>
    <name>dfs.namenode.secondary.http-address</name> 	<!-- HDFS Corresponding HTTP Server address and port -->
    <value>hadoop01:9001</value>
  </property>
  <property>
    <name>dfs.namenode.name.dir</name>	<!-- HDFS The location of the name node in the local file system-->
    <value>file:/root/program/data/tmp/dfs/name</value>
  </property>
    <property>
    <name>dfs.datanode.data.dir</name>	<!-- HDFS Location of the data node in the local file system-->
    <value>file:/root/program/data/tmp/dfs/data</value>
  </property>
</configuration>
8. Copy the mapred-site.xml.template file, name the copy "mapred-site.xml", and then modify the file.
<configuration>
  <property>	<!-- Use YARN Cluster resource allocation-->
    <name>mapreduce.framework.name</name>
    <value>yarn</value>
  </property>
</configuration>
9. Modify the file: yarn.site.xml
<configuration>

<!-- Site specific YARN configuration properties -->

  <property>
    <name>yarn.nodemanager.aux-services</name>
    <value>mapreduce_shuffle</value>
  </property>
  <property>
    <name>yarn.resourcemanager.address</name>
    <value>hadoop01:8032</value>
  </property>
  <property>
    <name>yarn.resourcemanager.scheduler.address</name>
    <value>hadoop01:8030</value>
  </property>
  <property>
    <name>yarn.resourcemanager.resource-tracker.address</name>
    <value>hadoop01:8031</value>
  </property>
</configuration>
10. Modify the slave file to add all the host names of DataNode
hadoop01
hadoop02
hadoop03
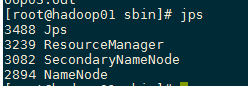
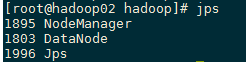
11. Execute the command to start Hadoop cluster
#Format NameNode (only once, no need to format later)
cd /root/program/hadoop-2.7.6/bin/
./hadoop namenode -format

#Start Hadoop cluster
cd /root/program/hadoop-2.7.6/sbin/
./start-all.sh

#Close Hadoop cluster
./stop-all.sh

HDFS: http://192.168.244.100:50070

