Xiaobai's big data journey (73)
Flume advanced
Last review
The previous chapter introduced the internal principle of Flume. This chapter explains the extended knowledge of Flume. The focus of this chapter is to understand and learn to use the user-defined components of Flume
Custom components
The internal principle was introduced in the previous chapter, so we can formulate custom components according to the internal principle. For example, the multiplexing in the Channel selector mentioned in the previous chapter needs to be used with a custom Interceptor
Custom Interceptor
In the actual development, the custom interceptor is our common means. It can cooperate with the channel selector to classify and store our log information. The following is a case to simulate and realize this function
Case requirements:
- Using Flume to collect server local logs
- You need to send different kinds of logs to different analysis systems according to different log types
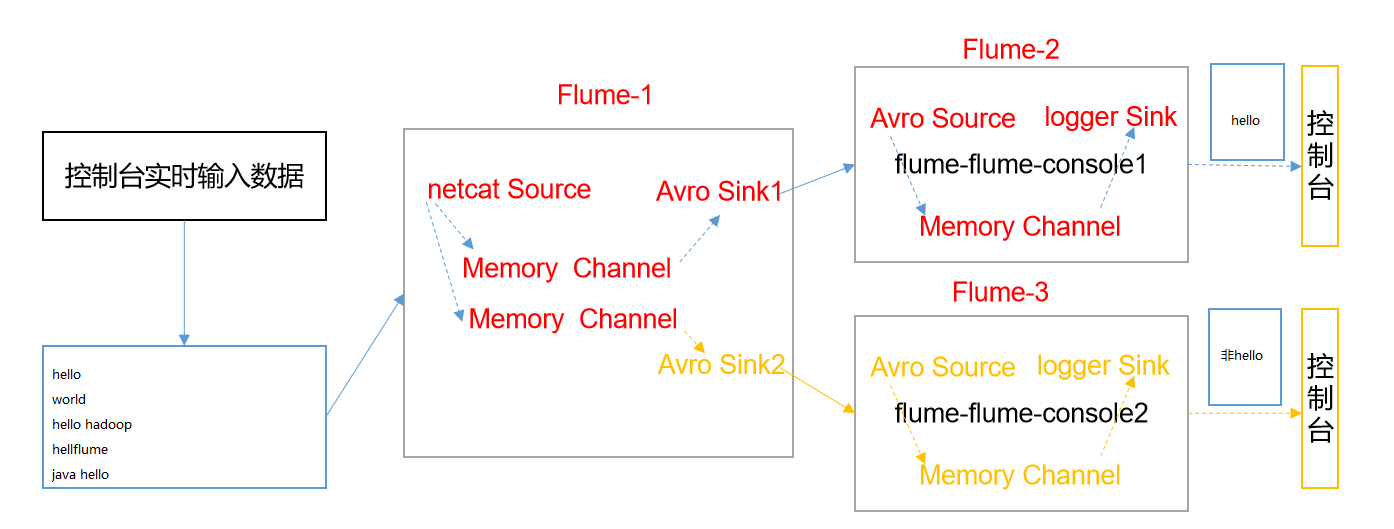
Case study:
- In actual development, there may be many types of logs generated by a server, and different types of logs may need to be sent to different analysis systems
- Multiplexing in the Flume topology is used
- The principle of Multiplexing is to send different events to different channels according to the value of a key in the event Header. Therefore, we need to customize an Interceptor to assign different values to the keys in the headers of different types of events
- In this case, we simulate logs with port data and different types of logs with hello and non Hello information. We need to customize the interceptor to distinguish the log contents and send them to different analysis systems (channels)
Case realization:
- Since it is a custom interceptor, we need to write Java code, create a Maven project, and then import dependencies:
 <dependencies>
        <dependency>
            <groupId>org.apache.flume</groupId>
            <artifactId>flume-ng-core</artifactId>
            <version>1.9.0</version>
        </dependency>
    </dependencies>
- Custom interceptor class
package com.company.myinterceptor;

import org.apache.flume.Context;
import org.apache.flume.Event;
import org.apache.flume.interceptor.Interceptor;

import java.util.ArrayList;
import java.util.List;
import java.util.Map;

public class MyInterceptor implements Interceptor {
    // Declare storage event collection
    private  List<Event> addHeaderEvents;

    // Initialize interceptor
    @Override
    public void initialize() {
        // Initialize collection
        addHeaderEvents = new ArrayList<>();
    }

    // Handling a single event
    @Override
    public Event intercept(Event event) {
        // Get the header information of the event
        Map<String, String> headers = event.getHeaders();

        // Get the body information of the event
        String eventBody = new String(event.getBody());

        if (eventBody.contains("hello")){
            headers.put("type","hello");
        }else {
            headers.put("type","other");
        }
        return event;
    }

    // Batch processing events
    @Override
    public List<Event> intercept(List<Event> events) {
        // Empty collection
        addHeaderEvents.clear();

        // Traverse events and add header information for each event
        for (Event event : events) {
            // Add header information
            addHeaderEvents.add(intercept(event));

        }

        // Return to events
        return addHeaderEvents;
    }

    // close resource
    @Override
    public void close() {

    }

    // Construction method of interceptor class
    public static class MyBuilder implements Interceptor.Builder{

        @Override
        public Interceptor build() {
            return new MyInterceptor();
        }

        @Override
        public void configure(Context context) {

        }
    }
}
Package the written interceptor class, change its name and put it in flume
Change the name to myInterceptor.jar
 put to /opt/module/flume/lib Under folder
Configure flume files: first in Hadoop 102, Hadoop 103, Hadoop 104 Create a folder to store configuration files
mkdir /opt/module/flume/job/group4
Flume1
vim /opt/module/flume/job/group4/flume1-netcat.conf

# Name the components on this agent
a1.sources = r1
a1.sinks = k1 k2
a1.channels = c1 c2

# Describe/configure the source
a1.sources.r1.type = netcat
a1.sources.r1.bind = localhost
a1.sources.r1.port = 44444

a1.sources.r1.interceptors = i1
a1.sources.r1.interceptors.i1.type = com.company.myinterceptor.MyInterceptor$MyBuilder


a1.sources.r1.selector.type = multiplexing
a1.sources.r1.selector.header = type
a1.sources.r1.selector.mapping.hello = c1
a1.sources.r1.selector.mapping.other= c2


# Describe the sink
a1.sinks.k1.type = avro
a1.sinks.k1.hostname = hadoop103
a1.sinks.k1.port = 4141

a1.sinks.k2.type=avro
a1.sinks.k2.hostname = hadoop104
a1.sinks.k2.port = 4142

# Use a channel which buffers events in memory
a1.channels.c1.type = memory
a1.channels.c1.capacity = 1000
a1.channels.c1.transactionCapacity = 100

# Use a channel which buffers events in memory
a1.channels.c2.type = memory
a1.channels.c2.capacity = 1000
a1.channels.c2.transactionCapacity = 100


# Bind the source and sink to the channel
a1.sources.r1.channels = c1 c2
a1.sinks.k1.channel = c1
a1.sinks.k2.channel = c2
Flume2
# Name the components on this agent
a2.sources = r1
a2.sinks = k1
a2.channels = c1

a2.sources.r1.type = avro
a2.sources.r1.bind = hadoop103
a2.sources.r1.port = 4141

a2.sinks.k1.type = logger

a2.channels.c1.type = memory
a2.channels.c1.capacity = 1000
a2.channels.c1.transactionCapacity = 100

a2.sinks.k1.channel = c1
a2.sources.r1.channels = c1
Flume3
# Name the components on this agent
a3.sources = r1
a3.sinks = k1
a3.channels = c1

a3.sources.r1.type = avro
a3.sources.r1.bind = hadoop104
a3.sources.r1.port = 4142

a3.sinks.k1.type = logger

a3.channels.c1.type = memory
a3.channels.c1.capacity = 1000
a3.channels.c1.transactionCapacity = 100

a3.sinks.k1.channel = c1
a3.sources.r1.channels = c1
Run Flume
# flume3
flume-ng agent -n a3 -c /opt/module/flume/conf/ -f /opt/module/flume/job/group4/flume3-console2.conf -Dflume.root.logger=INFO,console

# flume2
flume-ng agent -n a2 -c /opt/module/flume/conf/ -f /opt/module/flume/job/group4/flume2-console1.conf -Dflume.root.logger=INFO,console

# flume1
flume-ng agent -c /opt/module/flume/conf/ -f /opt/module/flume/job/group4/flume1-netcat.conf -n a1 -Dflume.root.logger=INFO,console
test data
# Analog data generation, using natcat to send data to port 44444
nc localhost 44444
hello
hello world
hive
flume
Custom source
There are many officially provided sources, such as exec source, avro source, Taildir source, etc. if the officially provided source cannot meet our needs, we can customize the source according to our needs (so far, I have not encountered any needs that cannot be solved by official cases)
Description document of custom source: https://flume.apache.org/FlumeDeveloperGuide.html#source
Custom source case implementation
Case requirements:
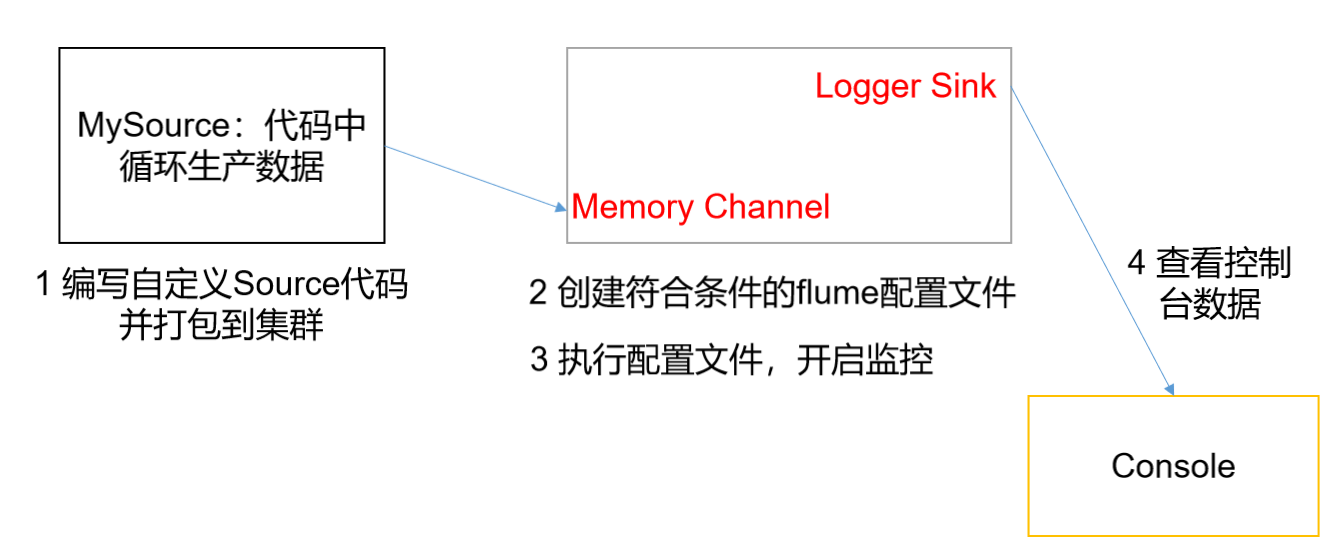
- flume is used to receive data, prefix each data and output it to the console
- The prefix can be configured from the flume configuration file
Demand analysis:
- Because Flume is mainly configured to complete the corresponding data transmission through the configuration file, in order to customize the Source, you need to know what the class implementing the Source is and what the specific implementation method is
- Through Source code analysis, the bottom layer of Source implementation is the interface between abstract classes AbstractSource, Configurable and PollableSource
- Its main methods are:
- Configure (context) / / initialize the context (read the content of the configuration file)
- process() / / encapsulate the obtained data into an event and write it to channel. This method will be called circularly
Case realization
- The first step is to create a maven project and import dependencies
 <dependencies>
        <dependency>
            <groupId>org.apache.flume</groupId>
            <artifactId>flume-ng-core</artifactId>
            <version>1.9.0</version>
        </dependency>
    </dependencies>
Mysource specific code
package com.company;

import org.apache.flume.Context;
import org.apache.flume.EventDeliveryException;
import org.apache.flume.PollableSource;
import org.apache.flume.conf.Configurable;
import org.apache.flume.event.SimpleEvent;
import org.apache.flume.source.AbstractSource;

import java.util.HashMap;

public class MySource extends AbstractSource implements Configurable, PollableSource {

    //Define the fields that the configuration file will read in the future
    private Long delay;
    private String field;

    //Initialize configuration information
    @Override
    public void configure(Context context) {
        delay = context.getLong("delay");
        field = context.getString("field", "Hello!");
    }

    @Override
    public Status process() throws EventDeliveryException {

        try {
            //Create event header information
            HashMap<String, String> hearderMap = new HashMap<>();
            //Create event
            SimpleEvent event = new SimpleEvent();
            //Loop encapsulation event
            for (int i = 0; i < 5; i++) {
                //Set header information for events
                event.setHeaders(hearderMap);
                //Set content for events
                event.setBody((field + i).getBytes());
                //Write events to channel
                getChannelProcessor().processEvent(event);
                Thread.sleep(delay);
            }
        } catch (Exception e) {
            e.printStackTrace();
            return Status.BACKOFF;
        }
        return Status.READY;
    }

    @Override
    public long getBackOffSleepIncrement() {
        return 0;
    }

    @Override
    public long getMaxBackOffSleepInterval() {
        return 0;
    }
}
Package the written Source class, change its name and put it in flume
Change the name to mySource.jar
 put to /opt/module/flume/lib Under folder
Configure flume files: first in Hadoop 102, Hadoop 103, Hadoop 104 Create a folder to store configuration files
mkdir /opt/module/flume/job/group5
This requirement is relatively simple, just a flume
vim /opt/module/flume/job/group5/mysource.conf

# Name the components on this agent
a1.sources = r1
a1.sinks = k1
a1.channels = c1

# Describe/configure the source
a1.sources.r1.type = com.company.source.MySource
a1.sources.r1.delay = 1000
#a1.sources.r1.field = atguigu

# Describe the sink
a1.sinks.k1.type = logger

# Use a channel which buffers events in memory
a1.channels.c1.type = memory
a1.channels.c1.capacity = 1000
a1.channels.c1.transactionCapacity = 100

# Bind the source and sink to the channel
a1.sources.r1.channels = c1
a1.sinks.k1.channel = c1
Run flume
flume-ng agent -c /opt/module/flume/conf/ -f /opt/module/flume/job/group4/mysource.conf -n a1 -Dflume.root.logger=INFO,console
Custom sink
The same is true for custom sink. When business needs are met, we need to customize sink to meet our needs. For example, use sink to write data to mysql (sqoop will be introduced later, which is specifically used to write to the database)
Description document address of custom sink: https://flume.apache.org/FlumeDeveloperGuide.html#sink
Custom Sink case implementation
Case requirements
- Use flume to receive data, add prefix and suffix to each data at the Sink end, and output it to the console
- The prefix and suffix can be configured in the flume task configuration file
Demand analysis:
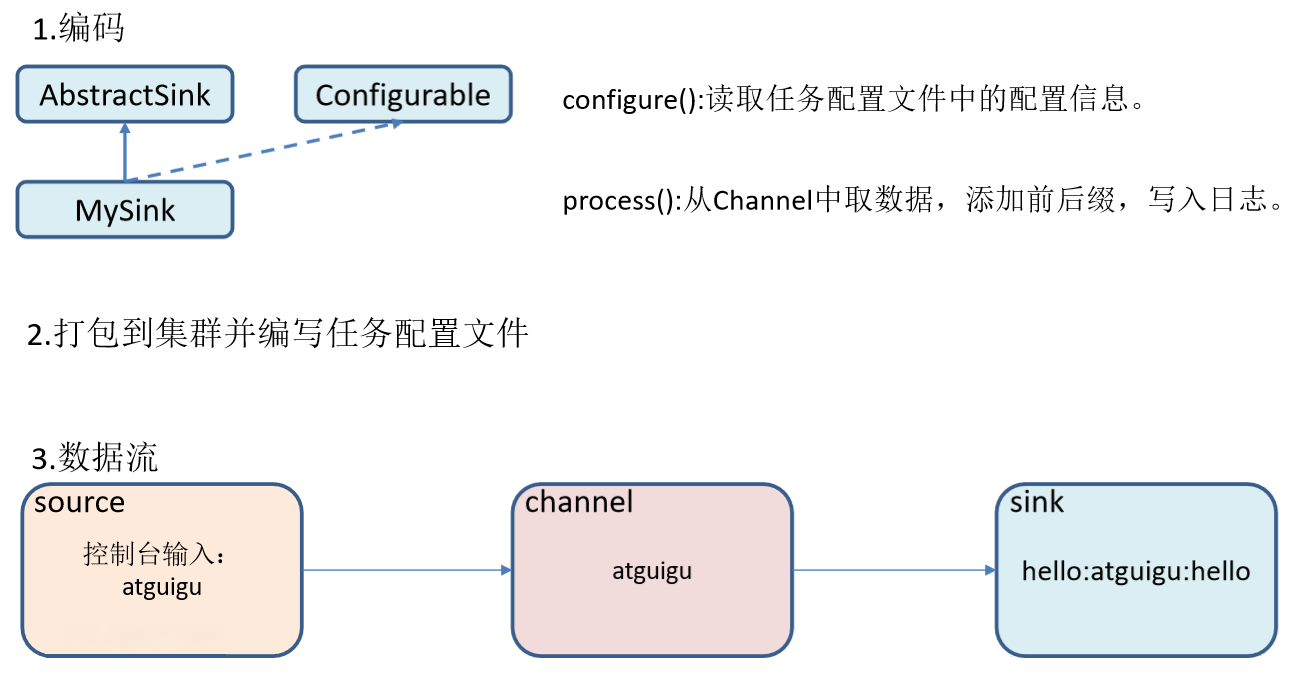
- Similarly, we need to understand the implementation method of Sink. From the source code, we can know that custom Sink needs to inherit the AbstractSink class and implement the Configurable interface
- The main implementation methods are:
- Configure (context) / / initialize the context (read the content of the configuration file)
- process() / / read and obtain data (event) from the Channel. This method will be called circularly
Case realization
- The first step is to create a maven project and import dependencies
 <dependencies>
        <dependency>
            <groupId>org.apache.flume</groupId>
            <artifactId>flume-ng-core</artifactId>
            <version>1.9.0</version>
        </dependency>
    </dependencies>
mysink specific code
package com.company;

import org.apache.flume.*;
import org.apache.flume.conf.Configurable;
import org.apache.flume.sink.AbstractSink;
import org.slf4j.Logger;
import org.slf4j.LoggerFactory;

public class MySink extends AbstractSink implements Configurable {

    //Create Logger object
    private static final Logger LOG = LoggerFactory.getLogger(AbstractSink.class);

    private String prefix;
    private String suffix;

    @Override
    public Status process() throws EventDeliveryException {

        //Declare return value status information
        Status status;

        //Gets the Channel bound by the current Sink
        Channel ch = getChannel();

        //Get transaction
        Transaction txn = ch.getTransaction();

        //Declare event
        Event event;

        //Open transaction
        txn.begin();

        //Read the events in the Channel until the end of the loop is read
        while (true) {
            event = ch.take();
            if (event != null) {
                break;
            }
        }
        try {
            //Handling events (printing)
            LOG.info(prefix + new String(event.getBody()) + suffix);

            //Transaction commit
            txn.commit();
            status = Status.READY;
        } catch (Exception e) {

            //Exception encountered, transaction rolled back
            txn.rollback();
            status = Status.BACKOFF;
        } finally {

            //Close transaction
            txn.close();
        }
        return status;
    }

    @Override
    public void configure(Context context) {

        //Read the contents of the configuration file, with default values
        prefix = context.getString("prefix", "hello:");

        //Read the contents of the configuration file, no default value
        suffix = context.getString("suffix");
    }
}
Package the written Sink class, change its name and put it in flume
Change the name to mySink.jar
 put to /opt/module/flume/lib Under folder
Configure flume files: first in Hadoop 102, Hadoop 103, Hadoop 104 Create a folder to store configuration files
mkdir /opt/module/flume/job/group6
This requirement is relatively simple, just a flume
vim /opt/module/flume/job/group5/mysink.conf
# Name the components on this agent
a1.sources = r1
a1.sinks = k1
a1.channels = c1

# Describe/configure the source
a1.sources.r1.type = netcat
a1.sources.r1.bind = localhost
a1.sources.r1.port = 44444

# Describe the sink
a1.sinks.k1.type = com.atguigu.MySink
#a1.sinks.k1.prefix = atguigu:
a1.sinks.k1.suffix = :atguigu

# Use a channel which buffers events in memory
a1.channels.c1.type = memory
a1.channels.c1.capacity = 1000
a1.channels.c1.transactionCapacity = 100

# Bind the source and sink to the channel
a1.sources.r1.channels = c1
a1.sinks.k1.channel = c1
Run flume
flume-ng agent -c /opt/module/flume/conf/ -f /opt/module/flume/job/group4/mysink.conf -n a1 -Dflume.root.logger=INFO,console
Monitor Flume using Ganglia
Ganglia allows us to easily monitor the running status of our Flume through web pages
Ganglia consists of gmond, gmetad and gweb
- Gmond (Ganglia Monitoring Daemon) is a lightweight service installed on each node host that needs to collect indicator data. Using gmond, you can easily collect a lot of system index data, such as CPU, memory, disk, network and active process data.
- gmetad (Ganglia Meta Daemon) is a service that integrates all information and stores it to disk in RRD format
- gweb (Ganglia Web) Ganglia visualization tool. gweb is a PHP front end that uses a browser to display the data stored in gmetad. In the Web interface, a variety of different indicator data collected under the running state of the cluster are displayed in the form of charts
Ganglia installation and deployment
Step 1: install epel source on three nodes
sudo yum install -y epel-release
Step 2: install web,meta and monitor at 102
sudo yum -y install ganglia-gmetad ganglia-web ganglia-gmond
Step 3: Install monitor at 103 and 104
sudo yum -y install ganglia-gmond
Step 4: modify the ganglia configuration file of Hadoop 102
sudo vim /etc/httpd/conf.d/ganglia.conf

<Location /ganglia>
  Require ip 192.168.5.1
  Require all granted
</Location>
Step 5: modify the gmatad configuration file of Hadoop 102
sudo vim /etc/ganglia/gmetad.conf

data_source "hadoop102" hadoop102
Step 6: modify the gmond configuration file of Hadoop 102
sudo vim /etc/ganglia/gmond.conf

cluster {
  name = "hadoop102"
  owner = "unspecified"
  latlong = "unspecified"
  url = "unspecified"
}
udp_send_channel {
  #bind_hostname = yes # Highly recommended, soon to be default.
                       # This option tells gmond to use a source address
                       # that resolves to the machine's hostname.  Without
                       # this, the metrics may appear to come from any
                       # interface and the DNS names associated with
                       # those IPs will be used to create the RRDs.
  # mcast_join = 239.2.11.71
  host = hadoop102
  port = 8649
  ttl = 1
}
udp_recv_channel {
  # mcast_join = 239.2.11.71
  port = 8649
  bind = 0.0.0.0
  retry_bind = true
}
Step 7: synchronize the modified file
xsync  /etc/httpd
xsync  /etc/ganglia
Step 8: modify hadoop selinux configuration file
sudo vim /etc/selinux/config
# This file controls the state of SELinux on the system.
# SELINUX= can take one of these three values:
#     enforcing - SELinux security policy is enforced.
#     permissive - SELinux prints warnings instead of enforcing.
#     disabled - No SELinux policy is loaded.
SELINUX=disabled
# SELINUXTYPE= can take one of these two values:
#     targeted - Targeted processes are protected,
#     mls - Multi Level Security protection.
SELINUXTYPE=targeted
Step 9: restart each node server
sudo reboot
Step 10: start ganglia
# hadoop102
start httpd
start gmetad
start gmond
# hadoop103/hadoop104
start gmond
start gmond
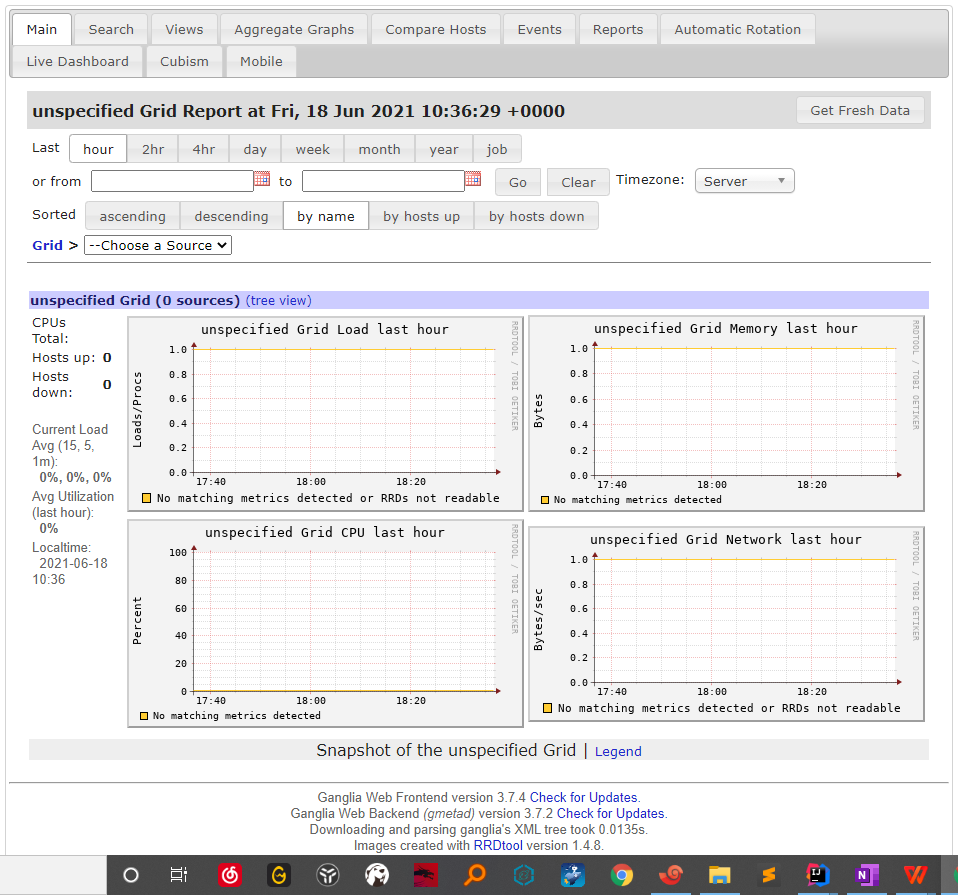
Monitor Flume using ganglia
Open web browsing: http://192.168.1.102/ganglia
Let's start the previous example and take necat flume as an example
vim /opt/module/flume/job/netcat-flume.conf
# Define Name
a1.sources = r1
a1.sinks = k1
a1.channels = c1

# Specify source
a1.sources.r1.type = netcat
a1.sources.r1.bind = localhost
a1.sources.r1.port = 44444

# Specify sink
a1.sinks.k1.type = logger

# Specifies the Channel buffer type
a1.channels.c1.type = memory

# Maximum channel capacity
a1.channels.c1.capacity = 1000

# Size of each transmission event
a1.channels.c1.transactionCapacity = 100

# Bind source,sink
a1.sources.r1.channels = c1
a1.sinks.k1.channel = c1
Start flume
cd /opt/module/flume
flume-ng agent \
--conf conf/ \
--name a1 \
--conf-file jobs/netcat-flume.conf \
-Dflume.root.logger=INFO,console \
-Dflume.monitoring.type=ganglia \
-Dflume.monitoring.hosts=hadoop102:8649
Send data to port 444
nc localhost 44444
hello
world
...Keep sending, and then through web See the effect
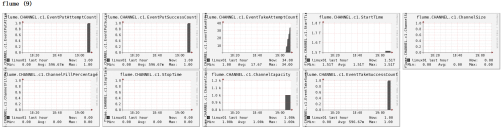
Legend Description:
| Field (Chart name) | Field meaning |
|---|---|
| EventPutAttemptCount | The total number of events source attempted to write to channel |
| EventPutSuccessCount | Total number of events successfully written to channel and submitted |
| EventTakeAttemptCount | The total number of sink attempts to pull events from the channel |
| EventTakeSuccessCount | sink the total number of events successfully read |
| StartTime | Time channel started (MS) |
| StopTime | Time channel stopped (MS) |
| ChannelSize | The total number of events in the current channel |
| ChannelFillPercentage | channel occupancy percentage |
| ChannelCapacity | Capacity of channel |
summary
There are so many knowledge points about flume. In specific use, it is mainly how to configure the conf file, understand the architecture of flume, and cooperate with the official website example when customization is needed. Once again, the official documentation of flume is recommended, which is really easy to use..