1. Introduction to big data
1.1 big data concept
big data refers to a data set that cannot be captured, managed and processed by conventional software tools within a certain time range. It is a massive, high growth rate and diversified information asset that requires a new processing mode to have stronger decision-making power, insight and discovery power and process optimization ability. It mainly solves the problems of massive data storage and massive data analysis and calculation.
The smallest basic unit of data storage is bit, and all units are given in order: bit,Byte,KB,MB,GB,TB,PB,EB,ZB,YB,BB,NB,DB.
1Byte= 8bit 1K = 1024Byte 1MB = 1024K 1G = 1024M
1T = 1024G 1P = 1024T 1E = 1024P 1Z = 1024E
1Y = 1024Z 1B = 1024Y 1N = 1024B 1D = 1024N
In 1986, there was only 0.02EB, or about 21000TB of data in the world, while in 2007, there were 280EB, or about 300000000TB of data in the world, a 14000 fold increase.
Recently, due to the emergence of mobile Internet and Internet of things, the access of various terminal devices and the popularity of various business forms, the global data volume will double every 40 months! If you don't have any impression, you can take another simple example. In 2012, 2.5EB data will be generated every day. According to IDC's report, the global data volume will soar from 4.4ZB to 44ZB from 2013 to 2020! By 2025, there will be 163ZB data in the world!
It can be seen that up to now, the amount of data in the world has been explosive! The traditional relational database can't handle such a large amount of data at all!
1.2 big data features
1) Volume:
Up to now, the data volume of all printing materials produced by mankind is 200PB, while the total data volume of words spoken by mankind in history is about 5EB. At present, the capacity of typical personal computer hard disk is TB, while the data volume of some large enterprises is close to EB.
2) Velocity:
This is the most significant feature that distinguishes big data from traditional data mining. According to IDC's "Digital Universe" report, the global data usage is expected to reach 35.2ZB by 2020. In the face of such a large amount of data, the efficiency of data processing is the life of the enterprise.
3) Variety:
This type of diversity also allows data to be divided into structured data and unstructured data. Compared with the structured data based on database / text, which is easy to store in the past, there are more and more unstructured data, including network log, audio, video, picture, geographic location information, etc. these multiple types of data put forward higher requirements for data processing ability.
4) Value (low value density):
The value density is inversely proportional to the total amount of data.
1.3 big data application scenarios
1) O2O: Baidu big data + platform helps businesses refine operation and improve sales through advanced online and offline communication technology and passenger flow analysis ability.
2) Retail: explore user value and provide personalized service solutions; Run through the network and physical retail, and work together to create the ultimate experience. Classic case, diaper + beer.
3) Commodity advertisement recommendation: recommend the types of commodity advertisements visited to users
4) Real estate: big data comprehensively helps the real estate industry to create accurate investment strategies and marketing, select more suitable places, build more suitable buildings and sell them to more suitable people.
5) Insurance: massive data mining and risk prediction help the insurance industry with precision marketing and improve its fine pricing ability.
6) Finance: multi dimension reflects the characteristics of users, helps financial institutions recommend high-quality customers and prevent fraud risks.
7) Artificial intelligence
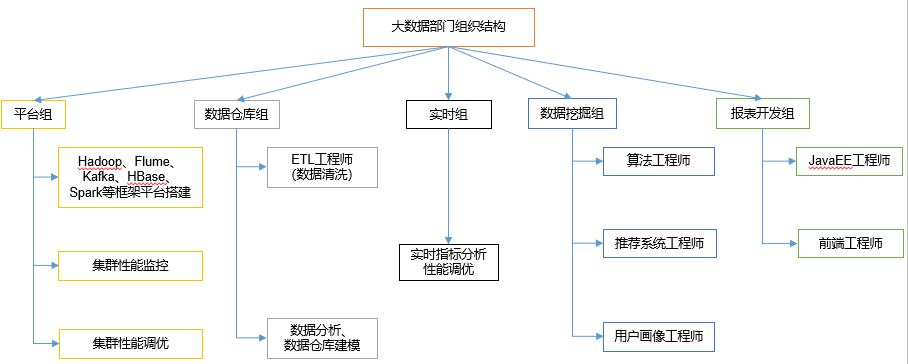
1.4 organizational structure of big data Department
2. Hadoop introduction and big data ecology
2.1 introduction to Hadoop
Hadoop originated from nutch. Nutch's design goal is to build a large-scale whole network search engine, including web page capture, index, query and other functions. However, with the increase of the number of web pages captured, it has encountered a serious scalability problem - how to solve the problem of storage and index of billions of web pages.
Two papers published by Google in 2003 and 2004 provide a feasible solution to this problem.
Distributed file system (GFS) can be used to handle the storage of massive web pages
MAPREDUCE, a distributed computing framework, can be used to deal with the index calculation of massive web pages.
Nutch's developers completed the corresponding open source implementation of HDFS and MAPREDUCE, and split it from nutch into an independent project HADOOP. By January 2008, HADOOP became the top project of Apache
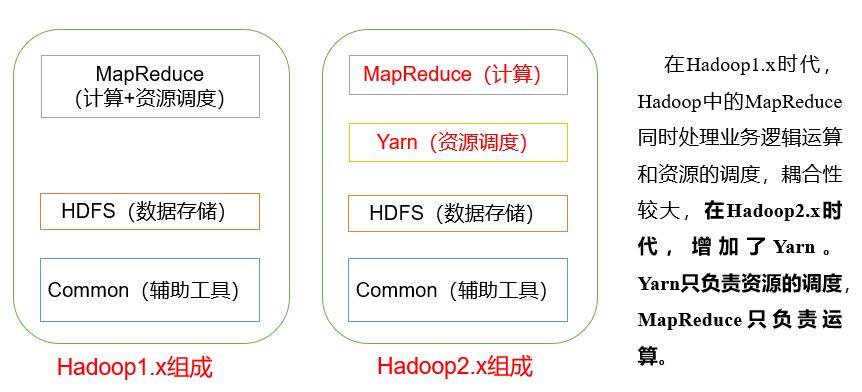
In a narrow sense, hadoop refers to hadoop software alone,
- HDFS: distributed file system
- MapReduce: distributed computing system
- Yarn: distributed cluster resource management
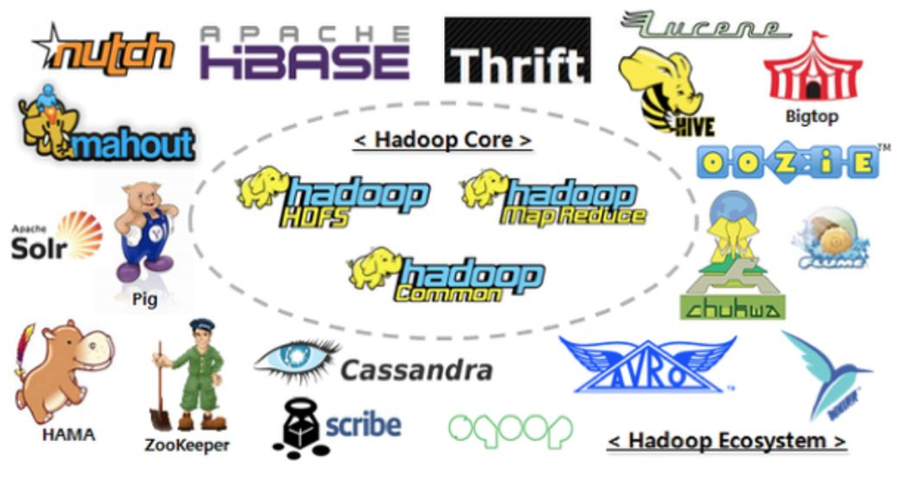
Broadly speaking, hadoop refers to an ecosystem of big data, including many other software
2.2 three major releases of Hadoop
Hadoop has three major distributions: Apache, Cloudera and Hortonworks.
Apache version is the most original (basic) version, which is best for introductory learning.
Cloudera integrates many big data frameworks internally. Corresponding product CDH.
Hortonworks documentation is good. Corresponding product HDP.
1)Apache Hadoop
Official website address: http://hadoop.apache.org/releases.html
Download address: https://archive.apache.org/dist/hadoop/common/
2)Cloudera Hadoop
Official website address: https://www.cloudera.com/downloads/cdh/5-10-0.html
Download address: http://archive-primary.cloudera.com/cdh5/cdh/5/
(1) Cloudera, founded in 2008, is the first company to commercialize Hadoop. It provides partners with Hadoop commercial solutions, mainly including support, consulting services and training.
(2) In 2009, Doug Cutting, the founder of Hadoop, also joined cloudera. Cloudera products mainly include CDH, Cloudera Manager and Cloudera Support
(3) CDH is the Hadoop distribution of cloudera. It is completely open source and has enhanced compatibility, security and stability compared with Apache Hadoop. Cloudera is priced at $10000 per node per year.
(4) Cloudera Manager is the software distribution, management and monitoring platform of the cluster. It can deploy a Hadoop cluster within a few hours and monitor the nodes and services of the cluster in real time.
3)Hortonworks Hadoop
Official website address: https://hortonworks.com/products/data-center/hdp/
Download address: https://hortonworks.com/downloads/#data-platform
(1) Hortonworks, founded in 2011, is a joint venture between Yahoo and Benchmark Capital, a Silicon Valley venture capital company.
(2) At the beginning of its establishment, the company absorbed about 25 to 30 Yahoo engineers specializing in Hadoop. The above engineers began to assist Yahoo in developing Hadoop in 2005, contributing 80% of Hadoop code.
(3) Hortonworks' main product is the Hortonworks Data Platform (HDP), which is also a 100% open source product. In addition to common projects, HDP also includes Ambari, an open source installation and management system.
(4) Hortonworks has been acquired by Cloudera.
2.3 Hadoop composition
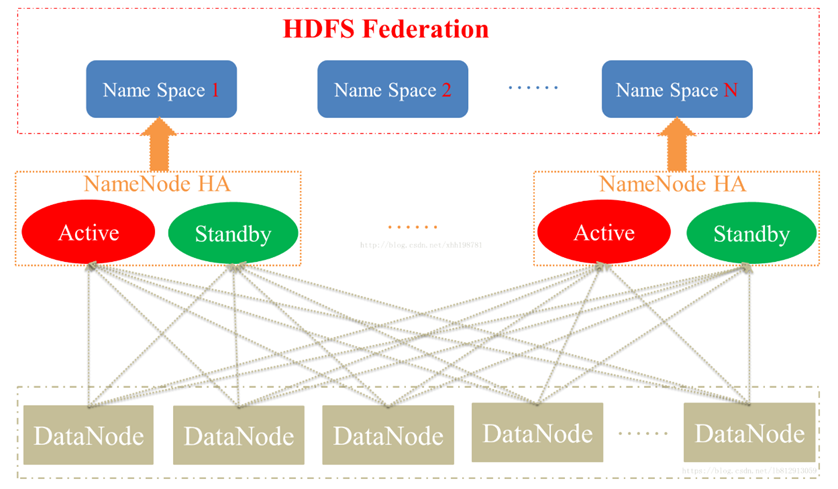
2.3.1 overview of HDFS architecture
1) NameNode (nn): stores the metadata of the file, such as file name, file directory structure, file attributes (generation time, number of copies, file permissions), as well as the block list of each file and the DataNode where the block is located.
2) DataNode(dn): stores file block data and the checksum of block data in the local file system.
3) Secondary NameNode(2nn): Backup metadata of NameNode at regular intervals.
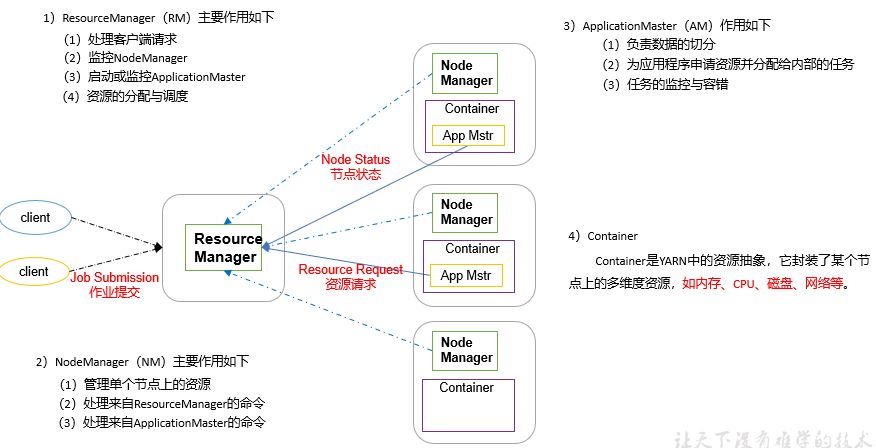
2.3.2 overview of yarn architecture
2.3.3 overview of MapReduce architecture
MapReduce divides the calculation process into two stages: Map and Reduce
1) The Map stage processes the input data in parallel
2) In the Reduce phase, the Map results are summarized
2.4 big data technology ecosystem
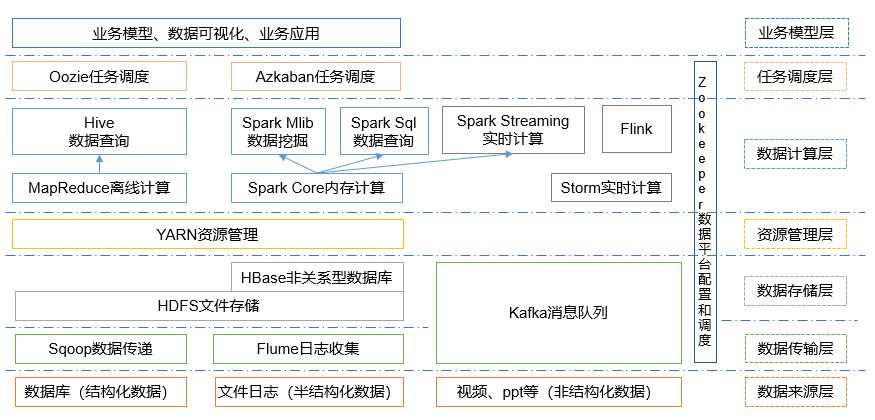
1) Sqoop: sqoop is an open source tool, which is mainly used to transfer data between Hadoop, Hive and traditional database (MySQL). It can import the data in a relational database (such as mysql, Oracle, etc.) into Hadoop HDFS or HDFS into relational database.
2) Flume: flume is a highly available, highly reliable and distributed system for massive log collection, aggregation and transmission. Flume supports customization of various data senders in the log system for data collection;
3) Kafka: Kafka is a high-throughput distributed publish subscribe message system;
4) Spark: spark is currently the most popular open source big data memory computing framework. It can be calculated based on the big data stored on Hadoop.
5) Flink: Flink is currently the most popular open source big data memory computing framework. There are many scenarios for real-time computing.
6) Oozie: oozie is a workflow scheduling management system that manages Hdoop job s.
7) HBase: HBase is a distributed, column oriented open source database. HBase is different from the general relational database. It is a database suitable for unstructured data storage.
8) Hive: hive is a data warehouse tool based on Hadoop. It can map structured data files into a database table and provide simple SQL query function. It can convert SQL statements into MapReduce tasks for operation. Its advantage is low learning cost. It can quickly realize simple MapReduce statistics through SQL like statements without developing special MapReduce applications. It is very suitable for statistical analysis of data warehouse.
9) ZooKeeper: it is a reliable coordination system for large-scale distributed systems. Its functions include configuration maintenance, name service, distributed synchronization, group service, etc.
3. Build Hadoop operating environment
3.1 template virtual machine environment preparation
1) Prepare a template virtual machine. The virtual machine configuration requirements are as follows:
Note: the Linux system environment in this paper is illustrated by CentOS-7.5-x86-1804
Windows version: Windows 10, 64 bit (build 19043.1466) 10.0.19043
VMWare WorkStation version: VMWare ® Workstation 15 Pro
Template virtual machine: CentOS-7.5-x86-1804, 4G memory and 50G hard disk. Install the necessary environment to prepare for the installation of hadoop (the memory size of virtual machine is determined by your own computer, and it is recommended to learn 16G or above of big data computer memory)
yum install -y epel-release
yum install -y psmisc nc net-tools rsync vim lrzsz ntp libzstd openssl-static tree iotop git
Using Yum to install requires that the virtual machine can access the Internet normally. You can test the virtual machine networking before installing yum
ping www.baidu.com
2) Turn off the firewall. Turn off the firewall and start it automatically
systemctl stop firewalld
systemctl disable firewalld
3) Create wangxin user and modify the password of wangxin user (user name and password can be specified by yourself, here is an example)
useradd wangxin
passwd ******
4) Configure wangxin user to have root permission, which is convenient for sudo to execute the command with root permission later
[root@hadoop100 ~]$ vim /etc/sudoers
 modify/etc/sudoers File, find the following line (line 91), in root Add a line below as follows:
## Allow root to run any commands anywhere
root    ALL=(ALL)     ALL
wangxin   ALL=(ALL)     NOPASSWD:ALL
5) Create a folder in the / opt directory and modify the owner and group
(1) Create the module and software folders in the / opt directory
[root@hadoop100 ~]$ mkdir /opt/module
[root@hadoop100 ~]$ mkdir /opt/software
(2) Modify that the owner and group of the module and software folders are wangxin users
[root@hadoop100 ~]$ chown wangxin:wangxin /opt/module
[root@hadoop100 ~]$ chown wangxin:wangxin /opt/software
(3) View the owner and group of the module and software folders
[root@hadoop100 ~]$ cd /opt/
[root@hadoop100 opt]$ ll
6) Uninstall the open JDK of the virtual machine
[root@hadoop100 ~]$ rpm -qa | grep -i java | xargs -n1 rpm -e --nodeps
7) Restart the virtual machine
[root@hadoop100 ~]$ reboot
3.2 cloning virtual machines
1) Using the template machine Hadoop 100, clone three virtual machines: Hadoop 102, Hadoop 103, Hadoop 104
2) Modify the clone machine IP, which is illustrated by Hadoop 102 below
(1) Modify the static IP of the cloned virtual machine
[root@hadoop100 ~]$ vim /etc/sysconfig/network-scripts/ifcfg-ens33
Change to
DEVICE=ens33
TYPE=Ethernet
ONBOOT=yes
BOOTPROTO=static
NAME="ens33"
IPADDR=192.168.1.102
PREFIX=24
GATEWAY=192.168.1.2
DNS1=192.168.1.2
Note: the above configuration is just an example. Other configurations such as IP address can be set by yourself
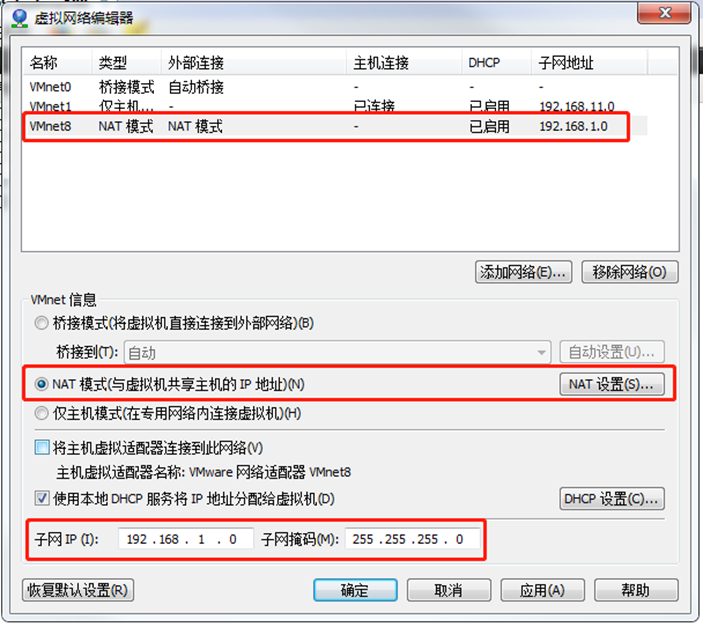
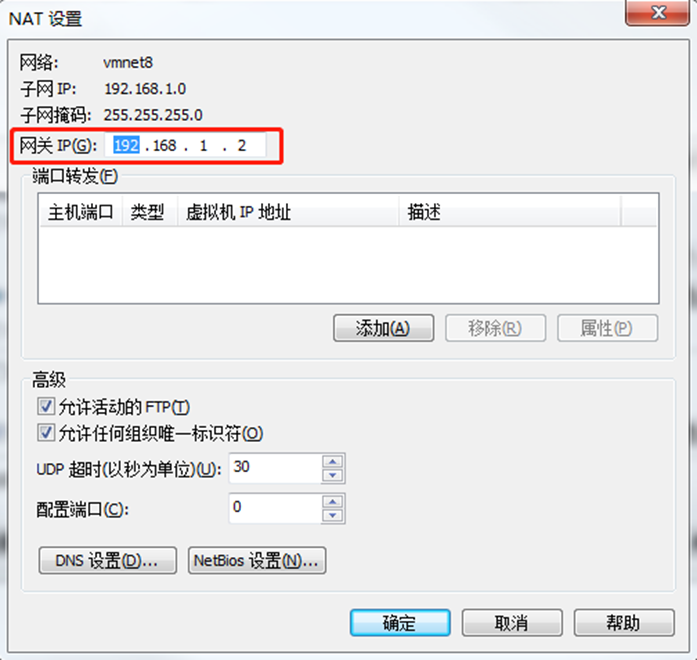
(2) View the virtual network editor of Linux virtual machine, edit - > virtual network editor - > VMnet8
(3) View the IP address of Windows system adapter VMware Network Adapter VMnet8

(4) Ensure that the IP address and virtual network editor address in the ifcfg-ens33 file of Linux system are the same as the VM8 network IP address of Windows system.
3) Modify the host name of the clone machine. The following is an example of Hadoop 102
(1) To modify the host name, choose one of two methods
[root@hadoop100 ~]$ hostnamectl --static set-hostname hadoop102
Or modify the / etc/hostname file
[root@hadoop100 ~]$ vim /etc/hostname
hadoop102
(2) Configure the linux clone host name mapping hosts file and open / etc/hosts
[root@hadoop100 ~]$ vim /etc/hosts
Add the following
192.168.1.100 hadoop100
192.168.1.101 hadoop101
192.168.1.102 hadoop102
192.168.1.103 hadoop103
192.168.1.104 hadoop104
192.168.1.105 hadoop105
192.168.1.106 hadoop106
192.168.1.107 hadoop107
192.168.1.108 hadoop108
4) Restart the clone machine Hadoop 102
[root@hadoop100 ~]$ reboot
5) Modify the host mapping file (hosts file) of windows
(1) If the operating system is Windows 7, you can modify it directly
(a) Enter the path C:\Windows\System32\drivers\etc
(b) Open the hosts file, add the following contents, and then save
192.168.1.100 hadoop100
192.168.1.101 hadoop101
192.168.1.102 hadoop102
192.168.1.103 hadoop103
192.168.1.104 hadoop104
192.168.1.105 hadoop105
192.168.1.106 hadoop106
192.168.1.107 hadoop107
192.168.1.108 hadoop108
(2) If the operating system is windows10, copy it first, modify and save it, and then overwrite it
(a) Enter the path C:\Windows\System32\drivers\etc
(b) Copy hosts file to desktop
(c) Open the desktop hosts file and add the following
192.168.1.100 hadoop100
192.168.1.101 hadoop101
192.168.1.102 hadoop102
192.168.1.103 hadoop103
192.168.1.104 hadoop104
192.168.1.105 hadoop105
192.168.1.106 hadoop106
192.168.1.107 hadoop107
192.168.1.108 hadoop108
(d) Overwrite the desktop hosts file with the C:\Windows\System32\drivers\etc path hosts file
3.3 installing JDK
Operate under virtual machine Hadoop 102
1) Uninstall existing JDK
[wangxin@hadoop102 ~]$ rpm -qa | grep -i java | xargs -n1 sudo rpm -e --nodeps
2) Import the JDK into the software folder under the opt directory with the XShell tool
3) Check whether the software package is imported successfully in opt directory under Linux system
[wangxin@hadoop102 ~]$ ls /opt/software/
See the following results:
hadoop-3.1.3.tar.gz jdk-8u212-linux-x64.tar.gz
4) Unzip the JDK to the / opt/module directory
[wangxin@hadoop102 software]$ tar -zxvf jdk-8u212-linux-x64.tar.gz -C /opt/module/
5) Configure JDK environment variables
(1) Create a new / etc / profile d/my_ env. SH file
[wangxin@hadoop102 ~]$ sudo vim /etc/profile.d/my_env.sh
Add the following
#JAVA_HOME
export JAVA_HOME=/opt/module/jdk1.8.0_212
export PATH=$PATH:$JAVA_HOME/bin
(2) Exit after saving
:wq
(3) source click the / etc/profile file to make the new environment variable PATH effective
[wangxin@hadoop102 ~]$ source /etc/profile
6) Test whether the JDK is installed successfully
[wangxin@hadoop102 ~]$ java -version
If you can see the following results, the Java installation is successful.
java version "1.8.0_212"
Note: restart (if java version can be used, there is no need to restart)
[wangxin@hadoop102 ~]$ sudo reboot
3.4 installing Hadoop
Operate under the virtual machine Hadoop 102
Hadoop download address: https://archive.apache.org/dist/hadoop/common/hadoop-3.1.3/
1) Add hadoop-3.1.3. With XShell tool tar. GZ is imported into the software folder under the opt directory
2) Enter the Hadoop installation package path
[wangxin@hadoop102 ~]$ cd /opt/software/
3) Unzip the installation file under / opt/module
[wangxin@hadoop102 software]$ tar -zxvf hadoop-3.1.3.tar.gz -C /opt/module/
4) Check whether the decompression is successful
[wangxin@hadoop102 software]$ ls /opt/module/
hadoop-3.1.3
5) Add Hadoop to environment variable
(1) Get Hadoop installation path
[wangxin@hadoop102 hadoop-3.1.3]$ pwd
/opt/module/hadoop-3.1.3
(2) Open / etc / profile d/my_ env. SH file
sudo vim /etc/profile.d/my_env.sh
In my_ env. Add the following at the end of the SH file: (shift+g)
#HADOOP_HOME
export HADOOP_HOME=/opt/module/hadoop-3.1.3
export PATH=$PATH:$HADOOP_HOME/bin
export PATH=$PATH:$HADOOP_HOME/sbin
(3) Exit after saving
:wq
(4) Make the modified document effective
[wangxin@hadoop102 hadoop-3.1.3]$ source /etc/profile
6) Test whether the installation is successful
[wangxin@hadoop102 hadoop-3.1.3]$ hadoop version
Hadoop 3.1.3
7) Restart (restart if Hadoop command cannot be used)
[wangxin@hadoop102 hadoop-3.1.3]$ sync
[wangxin@hadoop102 hadoop-3.1.3]$ sudo reboot
3.5 Hadoop directory structure
1) View Hadoop directory structure
[wangxin@hadoop102 hadoop-3.1.3]$ ll
 Total consumption 52
drwxr-xr-x. 2 wangxin wangxin  4096 5 June 22, 2017 bin
drwxr-xr-x. 3 wangxin wangxin  4096 5 June 22, 2017 etc
drwxr-xr-x. 2 wangxin wangxin  4096 5 June 22, 2017 include
drwxr-xr-x. 3 wangxin wangxin  4096 5 June 22, 2017 lib
drwxr-xr-x. 2 wangxin wangxin  4096 5 June 22, 2017 libexec
-rw-r--r--. 1 wangxin wangxin 15429 5 June 22, 2017 LICENSE.txt
-rw-r--r--. 1 wangxin wangxin   101 5 June 22, 2017 NOTICE.txt
-rw-r--r--. 1 wangxin wangxin  1366 5 June 22, 2017 README.txt
drwxr-xr-x. 2 wangxin wangxin  4096 5 June 22, 2017 sbin
drwxr-xr-x. 4 wangxin wangxin  4096 5 June 22, 2017 share
2) Important catalogue
(1) bin directory: stores scripts for operating Hadoop related services (HDFS,YARN)
(2) etc Directory: Hadoop configuration file directory, which stores Hadoop configuration files
(3) lib Directory: the local library where Hadoop is stored (the function of compressing and decompressing data)
(4) sbin Directory: stores scripts for starting or stopping Hadoop related services
(5) share Directory: stores the dependent jar packages, documents, and official cases of Hadoop
4. Hadoop operation mode
Hadoop operation modes include: local mode, pseudo distributed mode and fully distributed mode.
Hadoop official website: http://hadoop.apache.org/
4.1 local operation mode (official wordcount)
1) Create a wcinput folder under the hadoop-3.1.3 file
[wangxin@hadoop102 hadoop-3.1.3]$ mkdir wcinput
2) Create a word under the wcinput file Txt file
[wangxin@hadoop102 hadoop-3.1.3]$ cd wcinput
3) Edit word Txt file
[wangxin@hadoop102 wcinput]$ vim word.txt
Enter the following in the file
hadoop yarn
hadoop mapreduce
wangxin
wangxin
Save exit:: wq
4) Go back to Hadoop directory / opt/module/hadoop-3.1.3
5) Execution procedure
[wangxin@hadoop102 hadoop-3.1.3]$ hadoop jar share/hadoop/mapreduce/hadoop-mapreduce-examples-3.1.3.jar wordcount wcinput wcoutput
6) View results
[wangxin@hadoop102 hadoop-3.1.3]$ cat wcoutput/part-r-00000
See the following results:
wangxin 2
hadoop  2
mapreduce       1
yarn    1
4.2 fully distributed operation mode
4.2.1 virtual machine preparation
See Chapter 3.1 and 3.2 for details.
4.2.2 writing cluster distribution script xsync
1) scp (secure copy)
(1) scp definition:
scp can copy data between servers. (from server1 to server2)
(2) Basic grammar
scp    -r     $pdir/$fname           $user@hadoop$host:$pdir/$fname
 Command recursion    File path to copy/name     Target user@host:Destination path/name
(3) Case practice
Premise: in Hadoop 102, Hadoop 103 and Hadoop 104, the / opt/module has been created
/opt/software two directories, and these two directories have been modified to wangxin:wangxin
sudo chown wangxin:wangxin -R /opt/module
(a) On Hadoop 102, add / opt / module / jdk1 8.0_ 212 directory to Hadoop 103.
[wangxin@hadoop102 ~]$ scp -r /opt/module/jdk1.8.0_212 wangxin@hadoop103:/opt/module
(b) On Hadoop 103, copy the / opt/module/hadoop-3.1.3 directory in Hadoop 102 to Hadoop 103.
[wangxin@hadoop103 ~]$ scp -r wangxin@hadoop102:/opt/module/hadoop-3.1.3 /opt/module/
(c) Operate on Hadoop 103 and copy all directories under / opt/module directory in Hadoop 102 to Hadoop 104.
[wangxin@hadoop103 opt]$ scp -r wangxin@hadoop102:/opt/module/* wangxin@hadoop104:/opt/module
2) rsync remote synchronization tool
rsync is mainly used for backup and mirroring. It has the advantages of high speed, avoiding copying the same content and supporting symbolic links.
Difference between rsync and scp: copying files with rsync is faster than scp. rsync only updates the difference files. scp is to copy all the files.
(1) Basic grammar
rsync    -av       $pdir/$fname      $user@hadoop$host:$pdir/$fname
 The command option parameter is the path of the file to be copied/name    Target user@host:Destination path/name
Option parameter description
Option function
-a archive copy
-v displays the copy process
(2) Case practice
(a) Synchronize the / opt/software directory on Hadoop 102 to the / opt/software directory on Hadoop 103 server
[wangxin@hadoop102 opt]$ rsync -av /opt/software/* wangxin@hadoop103:/opt/software
3) xsync cluster distribution script
(1) Requirement: copy files to the same directory of all nodes in a circular way
(2) Demand analysis:
(a) Original copy of rsync command:
rsync -av /opt/module root@hadoop103:/opt/
(b) Expected script:
xsync name of the file to synchronize
(c) Note: the script stored in the directory / home/wangxin/bin can be directly executed by wangxin users anywhere in the system.
(3) Script implementation
(a) Create an xsync file in the / home/wangxin/bin directory
[wangxin@hadoop102 opt]$ cd /home/wangxin
[wangxin@hadoop102 ~]$ mkdir bin
[wangxin@hadoop102 ~]$ cd bin
[wangxin@hadoop102 bin]$ vim xsync
Write the following code in this file
#!/bin/bash
#1. Number of judgment parameters
if [ $# -lt 1 ]
then
  echo Not Enough Arguement!
  exit;
fi
#2. Traverse all machines in the cluster
for host in hadoop102 hadoop103 hadoop104
do
  echo ====================  $host  ====================
  #3. Traverse all directories and send them one by one
  for file in $@
  do
    #4. Judge whether the document exists
    if [ -e $file ]
    then
      #5. Get parent directory
      pdir=$(cd -P $(dirname $file); pwd)
      #6. Get the name of the current file
      fname=$(basename $file)
      ssh $host "mkdir -p $pdir"
      rsync -av $pdir/$fname $host:$pdir
    else
      echo $file does not exists!
    fi
  done
done
(b) The modified script xsync has execution permission
[wangxin@hadoop102 bin]$ chmod +x xsync
(c) Copy the script to / bin for global invocation
[wangxin@hadoop102 bin]$ sudo cp xsync /bin/
(d) Test script
[wangxin@hadoop102 ~]$ xsync /home/wangxin/bin
[wangxin@hadoop102 bin]$ sudo xsync /bin/xsync
4.2.3 SSH non secret login configuration
1) Configure ssh
(1) Basic grammar
ssh ip address of another computer
(2) Solution to Host key verification failed during ssh connection
[wangxin@hadoop102 ~]$ ssh hadoop103
appear:
The authenticity of host '192.168.1.103 (192.168.1.103)' can't be established.
RSA key fingerprint is cf:1e:de:d7:d0:4c:2d:98:60:b4:fd:ae:b1:2d:ad:06.
Are you sure you want to continue connecting (yes/no)?
(3) The solution is as follows: enter yes directly
2) No key configuration
(1) Secret free login principle
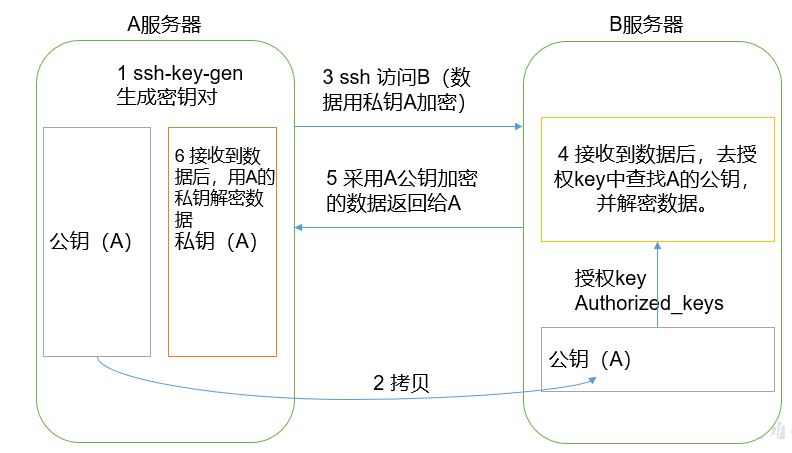
(2) Generate public and private keys:
[wangxin@hadoop102 .ssh]$ ssh-keygen -t rsa
Then click (three carriage returns) and two file IDS will be generated_ RSA (private key), id_rsa.pub (public key)
(3) Copy the public key to the target machine for password free login
[wangxin@hadoop102 .ssh]$ ssh-copy-id hadoop102
[wangxin@hadoop102 .ssh]$ ssh-copy-id hadoop103
[wangxin@hadoop102 .ssh]$ ssh-copy-id hadoop104
be careful:
You also need to configure wangxin account on Hadoop 103 to log in to Hadoop 102, Hadoop 103 and Hadoop 104 servers without secret.
You also need to configure wangxin account on Hadoop 104 to log in to Hadoop 102, Hadoop 103 and Hadoop 104 servers without secret.
You also need to use the root account on Hadoop 102 to configure non secret login to Hadoop 102, Hadoop 103 and Hadoop 104;
3). Explanation of file functions under the ssh folder (~ /. ssh)
known_hosts records the public key of the computer that ssh has accessed
id_rsa generated private key
id_ rsa. Public key generated by pub
authorized_keys stores the authorized secret free login server public key
4.2.4 cluster configuration
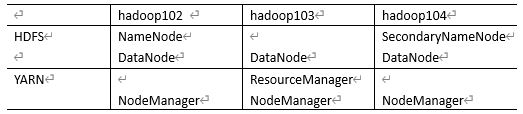
1) Cluster deployment planning
Note: NameNode and SecondaryNameNode should not be installed on the same server
Note: resource manager also consumes a lot of memory and should not be configured on the same machine as NameNode and SecondaryNameNode.
2) Profile description
Hadoop configuration files are divided into two types: default configuration files and user-defined configuration files. Only when users want to modify a default configuration value, they need to modify the user-defined configuration file and change the corresponding attribute value.
(1) Default profile:
The default file to be obtained is stored in the jar package of Hadoop

(2) Custom profile:
core-site.xml,hdfs-site.xml,yarn-site.xml,mapred-site.xml four configuration files are stored in $Hadoop_ On the path of home / etc / Hadoop, users can modify the configuration again according to the project requirements.
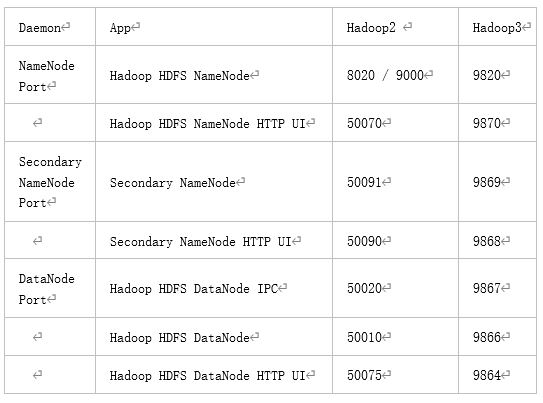
(3) Common port number Description
3) Configure cluster
(1) Core profile
Configure core site xml
[wangxin@hadoop102 ~]$ cd $HADOOP_HOME/etc/hadoop
[wangxin@hadoop102 hadoop]$ vim core-site.xml
The contents of the document are as follows:
<?xml version="1.0" encoding="UTF-8"?>
<?xml-stylesheet type="text/xsl" href="configuration.xsl"?>

<configuration>
	<!-- appoint NameNode Address of -->
    <property>
        <name>fs.defaultFS</name>
        <value>hdfs://hadoop102:9820</value>
	</property>
	<!-- appoint hadoop Storage directory of data -->
    <property>
        <name>hadoop.tmp.dir</name>
        <value>/opt/module/hadoop-3.1.3/data</value>
	</property>

	<!-- to configure HDFS The static user used for web page login is wangxin -->
    <property>
        <name>hadoop.http.staticuser.user</name>
        <value>wangxin</value>
	</property>

	<!-- Configure this wangxin(superUser)Host nodes that are allowed to be accessed through proxy -->
    <property>
        <name>hadoop.proxyuser.wangxin.hosts</name>
        <value>*</value>
	</property>
	<!-- Configure this wangxin(superUser)Allow groups to which users belong through proxy -->
    <property>
        <name>hadoop.proxyuser.wangxin.groups</name>
        <value>*</value>
	</property>
	<!-- Configure this wangxin(superUser)Allow users through proxy-->
    <property>
        <name>hadoop.proxyuser.wangxin.groups</name>
        <value>*</value>
	</property>
</configuration>
(2) HDFS profile
Configure HDFS site xml
[wangxin@hadoop102 hadoop]$ vim hdfs-site.xml
The contents of the document are as follows:
<?xml version="1.0" encoding="UTF-8"?>
<?xml-stylesheet type="text/xsl" href="configuration.xsl"?>

<configuration>
	<!-- nn web End access address-->
	<property>
        <name>dfs.namenode.http-address</name>
        <value>hadoop102:9870</value>
    </property>
	<!-- 2nn web End access address-->
    <property>
        <name>dfs.namenode.secondary.http-address</name>
        <value>hadoop104:9868</value>
    </property>
</configuration>
(3) YARN profile
Configure yarn site xml
[wangxin@hadoop102 hadoop]$ vim yarn-site.xml
The contents of the document are as follows:
<?xml version="1.0" encoding="UTF-8"?>
<?xml-stylesheet type="text/xsl" href="configuration.xsl"?>

<configuration>
	<!-- appoint MR go shuffle -->
    <property>
        <name>yarn.nodemanager.aux-services</name>
        <value>mapreduce_shuffle</value>
	</property>
	<!-- appoint ResourceManager Address of-->
    <property>
        <name>yarn.resourcemanager.hostname</name>
        <value>hadoop103</value>
	</property>
	<!-- Inheritance of environment variables -->
    <property>
        <name>yarn.nodemanager.env-whitelist</name>
        	<value>JAVA_HOME,HADOOP_COMMON_HOME,HADOOP_HDFS_HOME,HADOOP_CONF_DIR,CLASSPATH_PREPEND_DISTCACHE,HADOOP_YARN_HOME,HADOOP_MAPRED_HOME</value>
	</property>
	<!-- yarn Maximum and minimum memory allowed to be allocated by the container -->
    <property>
        <name>yarn.scheduler.minimum-allocation-mb</name>
        <value>512</value>
    </property>
    <property>
        <name>yarn.scheduler.maximum-allocation-mb</name>
        <value>4096</value>
	</property>
	<!-- yarn The amount of physical memory the container allows to manage -->
    <property>
        <name>yarn.nodemanager.resource.memory-mb</name>
        <value>4096</value>
	</property>
	<!-- close yarn Limit check on physical memory and virtual memory -->
    <property>
        <name>yarn.nodemanager.pmem-check-enabled</name>
        <value>false</value>
    </property>
    <property>
        <name>yarn.nodemanager.vmem-check-enabled</name>
        <value>false</value>
    </property>
</configuration>
(4) MapReduce profile
Configure mapred site xml
[wangxin@hadoop102 hadoop]$ vim mapred-site.xml
The contents of the document are as follows:
<?xml version="1.0" encoding="UTF-8"?>
<?xml-stylesheet type="text/xsl" href="configuration.xsl"?>

<configuration>
	<!-- appoint MapReduce The program runs on Yarn upper -->
    <property>
        <name>mapreduce.framework.name</name>
        <value>yarn</value>
    </property>
</configuration>
4) Distribute the configured Hadoop configuration file on the cluster
[wangxin@hadoop102 hadoop]$ xsync /opt/module/hadoop-3.1.3/etc/hadoop/
5) Go to 103 and 104 to check the distribution of documents
[wangxin@hadoop103 ~]$ cat /opt/module/hadoop-3.1.3/etc/hadoop/core-site.xml
[wangxin@hadoop104 ~]$ cat /opt/module/hadoop-3.1.3/etc/hadoop/core-site.xml
4.2.5 cluster
1) Configure workers
[wangxin@hadoop102 hadoop]$ vim /opt/module/hadoop-3.1.3/etc/hadoop/workers
Add the following contents to the document:
hadoop102
hadoop103
hadoop104
Note: no space is allowed at the end of the content added in the file, and no blank line is allowed in the file.
Synchronize all node profiles
[wangxin@hadoop102 hadoop]$ xsync /opt/module/hadoop-3.1.3/etc
2) Start cluster
(1) If the cluster is started for the first time, The namenode needs to be formatted in the Hadoop 102 node (note that formatting namenode will generate a new cluster id, resulting in inconsistent cluster IDS between namenode and datanode, and the cluster cannot find past data. If the cluster reports an error during operation and needs to reformat namenode, be sure to stop the namenode and datanode processes first, and delete the data and logs directories of all machines before formatting.)
[wangxin@hadoop102 ~]$ hdfs namenode -format
(2) Start HDFS
[wangxin@hadoop102 hadoop-3.1.3]$ sbin/start-dfs.sh
(3) Start YARN on the node (Hadoop 103) where the resource manager is configured
[wangxin@hadoop103 hadoop-3.1.3]$ sbin/start-yarn.sh
(4) View the NameNode of HDFS on the Web side
(a) Enter in the browser: http://hadoop102:9870
(b) View data information stored on HDFS
(5) View YARN's ResourceManager on the Web
(a) Enter in the browser: http://hadoop103:8088
(b) View Job information running on YARN
3) Cluster Basic test
(1) Upload files to cluster
Upload small files
[wangxin@hadoop102 ~]$ hadoop fs -mkdir /input
[wangxin@hadoop102 ~]$ hadoop fs -put $HADOOP_HOME/wcinput/word.txt /input
Upload large files
[wangxin@hadoop102 ~]$ hadoop fs -put /opt/software/jdk-8u212-linux-x64.tar.gz /
(2) After uploading the file, check where the file is stored
(a) View HDFS file storage path
[wangxin@hadoop102 subdir0]$ pwd
/opt/module/hadoop-3.1.3/data/dfs/data/current/BP-938951106-192.168.10.107-1495462844069/current/finalized/subdir0/subdir0
(b) View the contents of files stored on disk by HDFS
[wangxin@hadoop102 subdir0]$ cat blk_1073741825
hadoop yarn
hadoop mapreduce
wangxin
wangxin
(3) Splicing
-rw-rw-r--. 1 wangxin wangxin 134217728 5 June 23-16:01 blk_1073741836
-rw-rw-r--. 1 wangxin wangxin   1048583 5 June 23-16:01 blk_1073741836_1012.meta
-rw-rw-r--. 1 wangxin wangxin  63439959 5 June 23-16:01 blk_1073741837
-rw-rw-r--. 1 wangxin wangxin    495635 5 June 23-16:01 blk_1073741837_1013.meta
[wangxin@hadoop102 subdir0]$ cat blk_1073741836>>tmp.tar.gz
[wangxin@hadoop102 subdir0]$ cat blk_1073741837>>tmp.tar.gz
[wangxin@hadoop102 subdir0]$ tar -zxvf tmp.tar.gz
(4) Download
[wangxin@hadoop104 software]$ hadoop fs -get /jdk-8u212-linux-x64.tar.gz ./
(5) Execute the wordcount program
[wangxin@hadoop102 hadoop-3.1.3]$ hadoop jar share/hadoop/mapreduce/hadoop-mapreduce-examples-3.1.3.jar wordcount /input /output
4.2.6 summary of cluster start / stop mode
1) Each service component starts / stops one by one
(1) Start / stop HDFS components respectively
hdfs --daemon start/stop namenode/datanode/secondarynamenode
(2) Start / stop YARN
yarn --daemon start/stop resourcemanager/nodemanager
2) Each module starts / stops separately (ssh configuration is the premise)
(1) Overall start / stop HDFS
start-dfs.sh/stop-dfs.sh
(2) Overall start / stop of YARN
start-yarn.sh/stop-yarn.sh
4.2.7 configuring the history server
In order to view the historical operation of the program, you need to configure the history server. The specific configuration steps are as follows:
1) Configure mapred site xml
[wangxin@hadoop102 hadoop]$ vim mapred-site.xml
Add the following configuration to this file.
<!-- Historical server address -->
<property>
    <name>mapreduce.jobhistory.address</name>
    <value>hadoop102:10020</value>
</property>

<!-- History server web End address -->
<property>
    <name>mapreduce.jobhistory.webapp.address</name>
    <value>hadoop102:19888</value>
</property>
2) Distribution configuration
[wangxin@hadoop102 hadoop]$ xsync $HADOOP_HOME/etc/hadoop/mapred-site.xml
3) Start the history server in Hadoop 102
[wangxin@hadoop102 hadoop]$ mapred --daemon start historyserver
4) Check whether the history server is started
[atguigu@hadoop102 hadoop]$ jps
5) View JobHistory
http://hadoop102:19888/jobhistory
4.2.8 configuring log aggregation
Log aggregation concept: after the application runs, upload the program running log information to the HDFS system.
Benefits of log aggregation function: you can easily view the details of program operation, which is convenient for development and debugging.
Note: to enable the log aggregation function, you need to restart NodeManager, ResourceManager and HistoryServer.
To enable the log aggregation function, the specific steps are as follows:
1) Configure yarn site xml
[wangxin@hadoop102 hadoop]$ vim yarn-site.xml
Add the following configuration to this file.
<!-- Enable log aggregation -->
<property>
    <name>yarn.log-aggregation-enable</name>
    <value>true</value>
</property>
<!-- Set log aggregation server address -->
<property>
    <name>yarn.log.server.url</name>
    <value>http://hadoop102:19888/jobhistory/logs</value>
</property>
<!-- Set the log retention time to 7 days -->
<property>
    <name>yarn.log-aggregation.retain-seconds</name>
    <value>604800</value>
</property>
2) Distribution configuration
[wangxin@hadoop102 hadoop]$ xsync $HADOOP_HOME/etc/hadoop/yarn-site.xml
3) Close NodeManager, ResourceManager, and HistoryServer
[wangxin@hadoop103 ~]$ stop-yarn.sh
[wangxin@hadoop102 ~]$ mapred --daemon stop historyserver
4) Start NodeManager, ResourceManage, and HistoryServer
[wangxin@hadoop103 ~]$ start-yarn.sh
[wangxin@hadoop102 ~]$ mapred --daemon start historyserver
5) Delete existing output files on HDFS
[wangxin@hadoop102 ~]$ hadoop fs -rm -r /output
6) Execute WordCount program
[wangxin@hadoop102 ~]$ hadoop jar  $HADOOP_HOME/share/hadoop/mapreduce/hadoop-mapreduce-examples-3.1.3.jar
wordcount /input /output
7) Check the log,
http://hadoop102:19888/jobhistory
4.2.9 writing common scripts for hadoop clusters
1) View the java process script of three servers: jpsall
[wangxin@hadoop102 ~]$ cd /home/wangxin/bin
[wangxin@hadoop102 ~]$ vim jpsall
Then enter
#!/bin/bash
for host in hadoop102 hadoop103 hadoop104
do
        echo =============== $host ===============
        ssh $host jps $@ | grep -v Jps
done
Exit after saving, and then grant script execution permission
[wangxin@hadoop102 bin]$ chmod +x jpsall
2) hadoop cluster startup and shutdown script (including hdfs, yarn and historyserver): myhadoop sh
[wangxin@hadoop102 ~]$ cd /home/wangxin/bin
[wangxin@hadoop102 ~]$ vim myhadoop.sh
Then enter
#!/bin/bash
if [ $# -lt 1 ]
then
    echo "No Args Input..."
    exit ;
fi
case $1 in
"start")
        echo " =================== start-up hadoop colony ==================="

        echo " --------------- start-up hdfs ---------------"
        ssh hadoop102 "/opt/module/hadoop-3.1.3/sbin/start-dfs.sh"
        echo " --------------- start-up yarn ---------------"
        ssh hadoop103 "/opt/module/hadoop-3.1.3/sbin/start-yarn.sh"
        echo " --------------- start-up historyserver ---------------"
        ssh hadoop102 "/opt/module/hadoop-3.1.3/bin/mapred --daemon start historyserver"
;;
"stop")
        echo " =================== close hadoop colony ==================="

        echo " --------------- close historyserver ---------------"
        ssh hadoop102 "/opt/module/hadoop-3.1.3/bin/mapred --daemon stop historyserver"
        echo " --------------- close yarn ---------------"
        ssh hadoop103 "/opt/module/hadoop-3.1.3/sbin/stop-yarn.sh"
        echo " --------------- close hdfs ---------------"
        ssh hadoop102 "/opt/module/hadoop-3.1.3/sbin/stop-dfs.sh"
;;
*)
    echo "Input Args Error..."
;;
esac
Exit after saving, and then grant script execution permission
[wangxin@hadoop102 bin]$ chmod +x myhadoop.sh
3) Distribute the / home/wangxin/bin directory to ensure that custom scripts can be used on all three machines
[wangxin@hadoop102 ~]$ xsync /home/wangxin/bin/
4.2.10 cluster time synchronization
Time synchronization method: find a machine as a time server, and all machines will synchronize with the cluster time regularly. For example, synchronize the time every ten minutes.
Specific operation of configuring time synchronization:
1) Time server configuration (must be root)
(0) view ntpd service status and startup and self startup status of all nodes
[wangxin@hadoop102 ~]$ sudo systemctl status ntpd
[wangxin@hadoop102 ~]$ sudo systemctl is-enabled ntpd
(1) Turn off ntpd service and self start on all nodes
[wangxin@hadoop102 ~]$ sudo systemctl stop ntpd
[wangxin@hadoop102 ~]$ sudo systemctl disable ntpd
(2) Modify NTP of Hadoop 102 Conf configuration file (Hadoop 102 should be used as the time server)
[wangxin@hadoop102 ~]$ sudo vim /etc/ntp.conf
The amendments are as follows
a) Modify 1 (authorize all machines in the 192.168.1.0-192.168.1.255 network segment to query and synchronize time from this machine)
#restrict 192.168.1.0 mask 255.255.255.0 nomodify notrap
restrict 192.168.1.0 mask 255.255.255.0 nomodify notrap
b) Modification 2 (cluster in LAN, do not use time on other Internet)
server 0.centos.pool.ntp.org iburst
server 1.centos.pool.ntp.org iburst
server 2.centos.pool.ntp.org iburst
server 3.centos.pool.ntp.org iburst
by
#server 0.centos.pool.ntp.org iburst
#server 1.centos.pool.ntp.org iburst
#server 2.centos.pool.ntp.org iburst
#server 3.centos.pool.ntp.org iburst
c) Add 3 (when the node loses network connection, the local time can still be used as the time server to provide time synchronization for other nodes in the cluster)
server 127.127.1.0
fudge 127.127.1.0 stratum 10
(3) Modify the / etc/sysconfig/ntpd file of Hadoop 102
[wangxin@hadoop102 ~]$ sudo vim /etc/sysconfig/ntpd
Add the following contents (synchronize the hardware time with the system time)
SYNC_HWCLOCK=yes
(4) Restart ntpd service
[wangxin@hadoop102 ~]$ sudo systemctl start ntpd
(5) Set ntpd service startup
[wangxin@hadoop102 ~]$ sudo systemctl enable ntpd
2) Other machine configurations (must be root)
(1) Configure other machines to synchronize with the time server once every 10 minutes
[wangxin@hadoop103 ~]$ sudo crontab -e
The scheduled tasks are as follows:
*/10 * * * * /usr/sbin/ntpdate hadoop102
(2) Modify any machine time
[wangxin@hadoop103 ~]$ sudo date -s "2017-9-11 11:11:11"
(3) Check whether the machine is synchronized with the time server in ten minutes
[wangxin@hadoop103 ~]$ sudo date
5. HDFS
5.1 HDFS overview
5.1.1 HDFS output background and definition
HDFS generation background
With the increasing amount of data, if there is not enough data in one operating system, it will be allocated to more disks managed by the operating system, but it is inconvenient to manage and maintain. There is an urgent need for a system to manage the files on multiple machines, which is the distributed file management system. HDFS is just one kind of distributed file management system.
HDFS definition
HDFS (Hadoop Distributed File System), which is a file system used to store files and locate files through the directory tree; Secondly, it is distributed, and many servers unite to realize its functions. The servers in the cluster have their own roles.
HDFS usage scenario: it is suitable for the scenario of one write and multiple read, and does not support file modification. Suitable for data analysis, not suitable for network disk application.
5.1.2 advantages and disadvantages of HDFS
advantage:
1) High fault tolerance
(1) Data is automatically saved in multiple copies. It improves fault tolerance by adding copies
(2) After a copy is lost, it can be recovered automatically
2) Suitable for handling big data
(1) Data scale: it can handle data with data scale of GB, TB or even PB
(2) File size: it can handle a large number of files with a size of more than one million
3) It can be built on cheap machines and improve reliability through multi copy mechanism
Disadvantages:
1) It is not suitable for low latency data access, such as millisecond data storage
2) Unable to efficiently store a large number of small files
(1) If a large number of small files are stored, it will occupy a lot of memory of NameNode to store file directory and block information. This is not desirable because NameNode memory is always limited
(2) The addressing time of small file storage will exceed the reading time, which violates the design goal of HDFS.
3) Concurrent writing and random file modification are not supported
(1) A file can only have one write, and multiple threads are not allowed to write at the same time;
(2) Only data append is supported, and random modification of files is not supported.
5.1.3 HDFS composition architecture
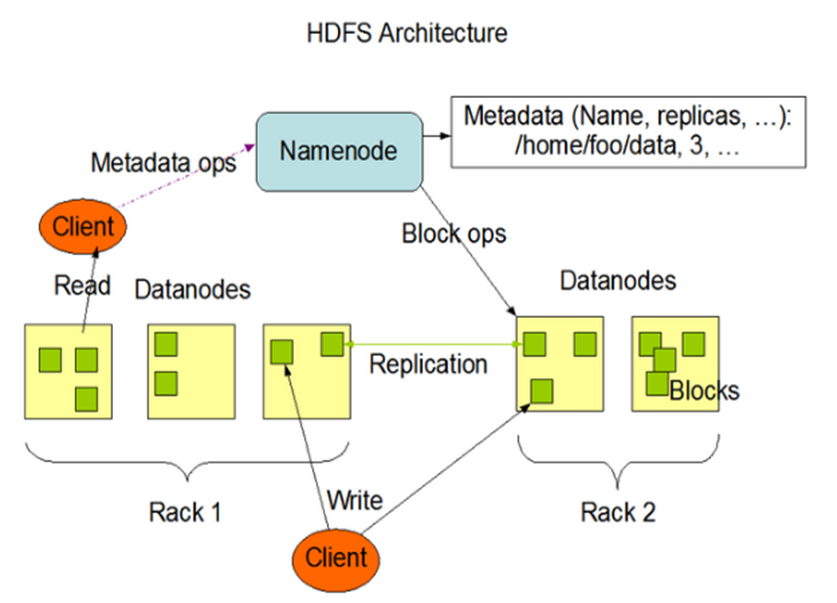
1) NameNode (nn): Master, which is a supervisor and manager.
(1) Manage the namespace of HDFS;
(2) Configure replica policy;
(3) Managing Block mapping information;
(4) Handle client read and write requests.
2) DataNode: Slave. The NameNode issues a command and the DataNode performs the actual operation.
(1) Store actual data blocks
(2) Perform read / write operations on data blocks.
3) Client: the client.
(1) File segmentation. When uploading files to HDFS, the Client divides the files into blocks one by one, and then uploads them;
(2) Interact with NameNode to obtain the location information of the file;
(3) Interact with DataNode to read or write data;
(4) The Client provides some commands to manage HDFS, such as NameNode formatting;
(5) The Client can access HDFS through some commands, such as adding, deleting, checking and modifying HDFS;
4) Secondary NameNode: not a hot standby of NameNode. When the NameNode hangs, it cannot immediately replace the NameNode and provide services.
(1) Assist NameNode to share its workload, such as regularly merging Fsimage and Edits and pushing them to NameNode;
(2) In case of emergency, NameNode can be recovered.
5.1.4 HDFS file block size
The files in HDFS are physically stored in blocks. The size of blocks can be specified through the configuration parameter (DFS. Block size). The default size is Hadoop 2 128M in the X version and 64M in the old version.
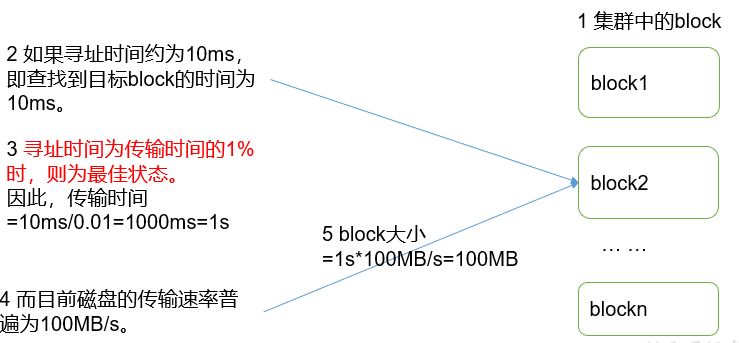
Why can't the size of the block be set too small or too large?
(1) The block setting of HDFS is too small, which will increase the addressing time. The program has been looking for the starting position of the block
(2) If the block is set too large, the time to transfer data from the disk will be significantly greater than the time required to locate the start position of the block. As a result, the program will be very slow in processing this data.
Summary: the size setting of HDFS block mainly depends on the disk transfer rate.
5.2 Shell operation of HDFS
5.2.1 basic grammar
hadoop fs specific command OR hdfs dfs specific command
The two are identical.
5.2.2 complete command
[wangxin@hadoop102 hadoop-3.1.3]$ bin/hadoop fs

[-appendToFile <localsrc> ... <dst>]
        [-cat [-ignoreCrc] <src> ...]
        [-checksum <src> ...]
        [-chgrp [-R] GROUP PATH...]
        [-chmod [-R] <MODE[,MODE]... | OCTALMODE> PATH...]
        [-chown [-R] [OWNER][:[GROUP]] PATH...]
        [-copyFromLocal [-f] [-p] <localsrc> ... <dst>]
        [-copyToLocal [-p] [-ignoreCrc] [-crc] <src> ... <localdst>]
        [-count [-q] <path> ...]
        [-cp [-f] [-p] <src> ... <dst>]
        [-createSnapshot <snapshotDir> [<snapshotName>]]
        [-deleteSnapshot <snapshotDir> <snapshotName>]
        [-df [-h] [<path> ...]]
        [-du [-s] [-h] <path> ...]
        [-expunge]
        [-get [-p] [-ignoreCrc] [-crc] <src> ... <localdst>]
        [-getfacl [-R] <path>]
        [-getmerge [-nl] <src> <localdst>]
        [-help [cmd ...]]
        [-ls [-d] [-h] [-R] [<path> ...]]
        [-mkdir [-p] <path> ...]
        [-moveFromLocal <localsrc> ... <dst>]
        [-moveToLocal <src> <localdst>]
        [-mv <src> ... <dst>]
        [-put [-f] [-p] <localsrc> ... <dst>]
        [-renameSnapshot <snapshotDir> <oldName> <newName>]
        [-rm [-f] [-r|-R] [-skipTrash] <src> ...]
        [-rmdir [--ignore-fail-on-non-empty] <dir> ...]
        [-setfacl [-R] [{-b|-k} {-m|-x <acl_spec>} <path>]|[--set <acl_spec> <path>]]
        [-setrep [-R] [-w] <rep> <path> ...]
        [-stat [format] <path> ...]
        [-tail [-f] <file>]
        [-test -[defsz] <path>]
        [-text [-ignoreCrc] <src> ...]
        [-touchz <path> ...]
        [-usage [cmd ...]]
5.2.3 practical operation of common commands
2.3.1 preparation
1) Start Hadoop cluster (convenient for subsequent testing)
[wangxin@hadoop102 hadoop-3.1.3]$ sbin/start-dfs.sh
[wangxin@hadoop103 hadoop-3.1.3]$ sbin/start-yarn.sh
2) - help: output this command parameter
[wangxin@hadoop102 hadoop-3.1.3]$ hadoop fs -help rm
2.3.2 upload
1) - moveFromLocal: cut and paste from local to HDFS
[wangxin@hadoop102 hadoop-3.1.3]$ touch a.txt
[wangxin@hadoop102 hadoop-3.1.3]$ hadoop fs  -moveFromLocal  ./a.txt  /test
2) - copyFromLocal: copy files from the local file system to the HDFS path
[wangxin@hadoop102 hadoop-3.1.3]$ hadoop fs -copyFromLocal README.txt /
3) - appendToFile: append a file to the end of an existing file
[wangxin@hadoop102 hadoop-3.1.3]$ touch b.txt
[wangxin@hadoop102 hadoop-3.1.3]$ vi b.txt
input
Hello, Hadoop!
[wangxin@hadoop102 hadoop-3.1.3]$ hadoop fs -appendToFile b.txt /test/a.txt
4) - put: equivalent to copyFromLocal
[wangxin@hadoop102 hadoop-3.1.3]$ hadoop fs -put ./b.txt /user/wangxin/test/
2.3.3 Download
1) - copyToLocal: copy from HDFS to local
[wangxin@hadoop102 hadoop-3.1.3]$ hadoop fs -copyToLocal /test/a.txt ./
2) - get: equivalent to copyToLocal, which means downloading files from HDFS to local
[wangxin@hadoop102 hadoop-3.1.3]$ hadoop fs -get /test/a.txt ./
3) - getmerge: merge and download multiple files. For example, there are multiple files in HDFS directory / user/wangxin/test: log 1, log. 2,log. 3,…
[wangxin@hadoop102 hadoop-3.1.3]$ hadoop fs -getmerge /user/wangxin/test/* ./logs.txt
2.3.4 HDFS direct operation
1) - ls: display directory information
[wangxin@hadoop102 hadoop-3.1.3]$ hadoop fs -ls /
2) - mkdir: create directory on HDFS
[wangxin@hadoop102 hadoop-3.1.3]$ hadoop fs -mkdir -p /monash/FIT
3) - cat: displays the contents of the file
[wangxin@hadoop102 hadoop-3.1.3]$ hadoop fs -cat /test/b.txt
4) - chgrp, - chmod, - chown: the same as in Linux file system. Modify the permissions of the file
[wangxin@hadoop102 hadoop-3.1.3]$ hadoop fs  -chmod  666  /test/a.txt
[wangxin@hadoop102 hadoop-3.1.3]$ hadoop fs  -chown  wangxin:wangxin   /test/b.txt
5) - cp: copy from one path of HDFS to another path of HDFS
[wangxin@hadoop102 hadoop-3.1.3]$ hadoop fs -cp /test/b.txt /copys.txt
6) - mv: move files in HDFS directory
[wangxin@hadoop102 hadoop-3.1.3]$ hadoop fs -mv /copys.txt /monash/FIT
7) - tail: displays data at the end 1kb of a file
[wangxin@hadoop102 hadoop-3.1.3]$ hadoop fs -tail /sanguo/shuguo/kongming.txt
8) - rm: delete a file or folder
[wangxin@hadoop102 hadoop-3.1.3]$ hadoop fs -rm /test/a.txt
9) - rmdir: delete empty directory
[wangxin@hadoop102 hadoop-3.1.3]$ hadoop fs -mkdir /test1
[wangxin@hadoop102 hadoop-3.1.3]$ hadoop fs -rmdir /test2
10) - du statistics folder size information
[wangxin@hadoop102 hadoop-3.1.3]$ hadoop fs -du -s -h /user/wangxin/test
2.7 K  /user/wangxin/test

[wangxin@hadoop102 hadoop-3.1.3]$ hadoop fs -du  -h /user/wangxin/test
1.3 K  /user/wangxin/test/README.txt
15     /user/wangxin/test/hello.txt
1.4 K  /user/wangxin/test/world.txt
11) - setrep: sets the number of copies of files in HDFS
[wangxin@hadoop102 hadoop-3.1.3]$ hadoop fs -setrep 10 /test/b.txt
The number of replicas set here is only recorded in the metadata of NameNode. Whether there will be so many replicas depends on the number of datanodes. At present, there are only three devices, and there are only three replicas at most. Only when the number of nodes increases to 10, the number of replicas can reach 10.
5.3 HDFS client operation
5.3.1 prepare Windows Hadoop development environment
1) Find the Windows dependency directory of the downloaded Hadoop and open it:
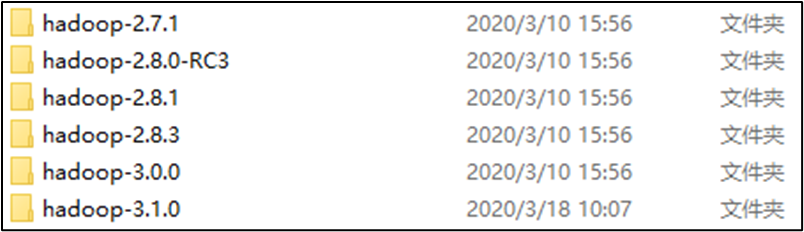
Select Hadoop-3.1.0 and copy it to other places (such as disk D).
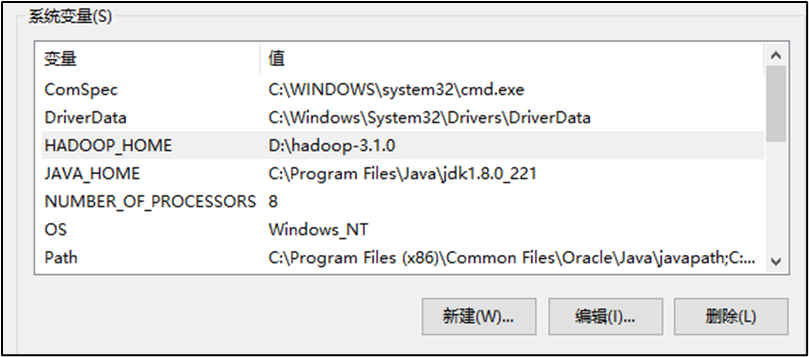
2) Configure HADOOP_HOME environment variable.
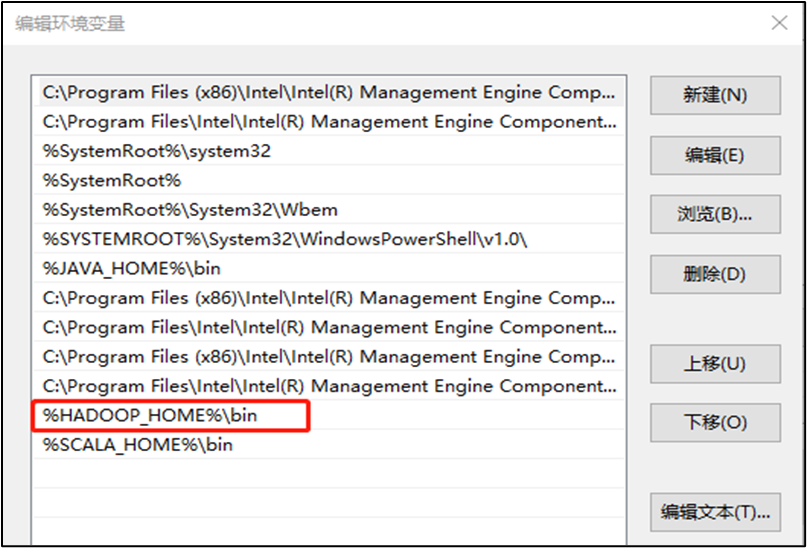
3) Configure the Path environment variable. Then restart the computer
4) Open Intellij, create a Maven project HdfsClientDemo, and import the corresponding dependent coordinates + log addition
<dependencies>
    <dependency>
        <groupId>junit</groupId>
        <artifactId>junit</artifactId>
        <version>4.12</version>
    </dependency>
    <dependency>
        <groupId>org.apache.logging.log4j</groupId>
        <artifactId>log4j-slf4j-impl</artifactId>
        <version>2.12.0</version>
    </dependency>
    <dependency>
        <groupId>org.apache.hadoop</groupId>
        <artifactId>hadoop-client</artifactId>
        <version>3.1.3</version>
    </dependency>
</dependencies>
In the src/main/resources directory of the project, create a new file named "log4j2.xml", and fill in the file
<?xml version="1.0" encoding="UTF-8"?>
<Configuration status="error" strict="true" name="XMLConfig">
    <Appenders>
        <!-- The type name is Console,The name must be an attribute -->
        <Appender type="Console" name="STDOUT">
            <!-- Layout as PatternLayout In a way,
            The output style is[INFO] [2018-01-22 17:34:01][org.test.Console]I'm here -->
            <Layout type="PatternLayout"
                    pattern="[%p] [%d{yyyy-MM-dd HH:mm:ss}][%c{10}]%m%n" />
        </Appender>

    </Appenders>

    <Loggers>
        <!-- Additivity is false -->
        <Logger name="test" level="info" additivity="false">
            <AppenderRef ref="STDOUT" />
        </Logger>

        <!-- root loggerConfig set up -->
        <Root level="info">
            <AppenderRef ref="STDOUT" />
        </Root>
    </Loggers>
</Configuration>
5) Create package name: com wangxin. hdfs
6) Create HdfsClient class
public class HdfsClient{
	@Test
	public void testMkdirs() throws IOException, InterruptedException, URISyntaxException{

		// 1 get file system
		Configuration configuration = new Configuration();
		// Configure to run on a cluster
		// configuration.set("fs.defaultFS", "hdfs://hadoop102:9820");
		// FileSystem fs = FileSystem.get(configuration);

		FileSystem fs = FileSystem.get(new URI("hdfs://hadoop102:9820"), configuration, "wangxin");

		// 2 create directory
		fs.mkdirs(new Path("/test/hadoop-api"));

		// 3 close resources
		fs.close();
	}
}
7) Execution procedure
The user name needs to be configured at runtime
When the client operates HDFS, it has a user identity. By default, the HDFS client API will obtain a parameter from the JVM as its user identity: - dhaoop_ USER_ Name = wangxin, wangxin is the user name.
5.3.2 API operation of HDFS
HDFS file upload (test parameter priority)
1) Write source code
@Test
public void testCopyFromLocalFile() throws IOException, InterruptedException, URISyntaxException {

		// 1 get file system
		Configuration configuration = new Configuration();
		configuration.set("dfs.replication", "2");
		FileSystem fs = FileSystem.get(new URI("hdfs://hadoop102:8020"), configuration, "wangxin");

		// 2 upload files
		fs.copyFromLocalFile(new Path("E:/hello.txt"), new Path("/hello.txt"));

		// 3 close resources
		fs.close();

		System.out.println("over");
}
2) HDFS site Copy the XML to the root directory of the project
<?xml version="1.0" encoding="UTF-8"?>
<?xml-stylesheet type="text/xsl" href="configuration.xsl"?>

<configuration>
	<property>
		<name>dfs.replication</name>
         <value>1</value>
	</property>
</configuration>
3) Parameter priority
Parameter priority: (1) value set in client code > (2) user defined configuration file under ClassPath > (3) then custom configuration of server (xxx site. XML) > (4) default configuration of server (XXX default. XML)
HDFS file download
@Test
public void testCopyToLocalFile() throws IOException, InterruptedException, URISyntaxException{

		// 1 get file system
		Configuration configuration = new Configuration();
		FileSystem fs = FileSystem.get(new URI("hdfs://hadoop102:9820"), configuration, "wangxin");

		// 2. Perform the download operation
		// boolean delSrc refers to whether to delete the original file
		// Path src refers to the path of the file to be downloaded
		// Path dst refers to the path to download the file to
		// boolean useRawLocalFileSystem whether to enable file verification
		fs.copyToLocalFile(false, new Path("/hello.txt"), new Path("e:/helloworld.txt"), true);

		// 3 close resources
		fs.close();
}
HDFS delete files and directories
@Test
public void testDelete() throws IOException, InterruptedException, URISyntaxException{

	// 1 get file system
	Configuration configuration = new Configuration();
	FileSystem fs = FileSystem.get(new URI("hdfs://hadoop102:9820"), configuration, "wangxin");

	// 2 execute deletion
	fs.delete(new Path("/test1/"), true);

	// 3 close resources
	fs.close();
}
Renaming and moving HDFS files
@Test
public void testRename() throws IOException, InterruptedException, URISyntaxException{

	// 1 get file system
	Configuration configuration = new Configuration();
	FileSystem fs = FileSystem.get(new URI("hdfs://hadoop102:9820"), configuration, "wangxin");

	// 2. Modify the file name
	fs.rename(new Path("/hello.txt"), new Path("/test.txt"));

	// 3 close resources
	fs.close();
}
HDFS file details view
View file name, permission, length and block information
@Test
public void testListFiles() throws IOException, InterruptedException, URISyntaxException{

	// 1 get file system
	Configuration configuration = new Configuration();
	FileSystem fs = FileSystem.get(new URI("hdfs://hadoop102:9820"), configuration, "wangxin");

	// 2 obtain document details
	RemoteIterator<LocatedFileStatus> listFiles = fs.listFiles(new Path("/"), true);

	while(listFiles.hasNext()){
		LocatedFileStatus status = listFiles.next();

		// Output details
		// File name
		System.out.println(status.getPath().getName());
		// length
		System.out.println(status.getLen());
		// jurisdiction
		System.out.println(status.getPermission());
		// grouping
		System.out.println(status.getGroup());

		// Get stored block information
		BlockLocation[] blockLocations = status.getBlockLocations();

		for (BlockLocation blockLocation : blockLocations) {

			// Gets the host node of the block storage
			String[] hosts = blockLocation.getHosts();

			for (String host : hosts) {
				System.out.println(host);
			}
		}

		System.out.println("-----------Division line of monitor----------");
	}

// 3 close resources
fs.close();
}
HDFS file and folder judgment
@Test
public void testListStatus() throws IOException, InterruptedException, URISyntaxException{

	// 1 get file configuration information
	Configuration configuration = new Configuration();
	FileSystem fs = FileSystem.get(new URI("hdfs://hadoop102:9820"), configuration, "wangxin");

	// 2. Judge whether it is a file or a folder
	FileStatus[] listStatus = fs.listStatus(new Path("/"));

	for (FileStatus fileStatus : listStatus) {

		// If it's a file
		if (fileStatus.isFile()) {
				System.out.println("f:"+fileStatus.getPath().getName());
			}else {
				System.out.println("d:"+fileStatus.getPath().getName());
			}
		}

	// 3 close resources
	fs.close();
}
5.4 data flow of HDFS
5.4.1 HDFS data writing process
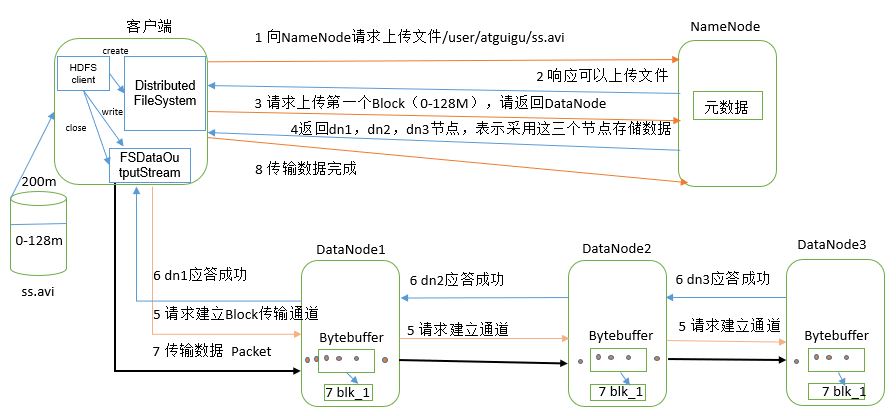
(1) The client requests the NameNode to upload files through the distributed file system module. The NameNode checks whether the target file exists and whether the parent directory exists.
(2) NameNode returns whether it can be uploaded.
(3) The client requests which DataNode servers the first Block is uploaded to.
(4) NameNode returns three DataNode nodes: dn1, dn2 and dn3.
(5) The client requests dn1 to upload data through FSDataOutputStream module. dn1 will continue to call dn2 after receiving the request, and then dn2 will call dn3 to complete the establishment of this communication pipeline.
(6) dn1, dn2 and dn3 answer the client level by level.
(7) The client starts to upload the first Block to dn1 (first read the data from the disk and put it into a local memory cache). With packets as the unit, dn1 will send a packet to dn2 and dn2 to dn3; Every packet transmitted by dn1 will be put into a reply queue to wait for a reply.
(8) After the transmission of a Block is completed, the client again requests the NameNode to upload the server of the second Block. (repeat steps 3-7).
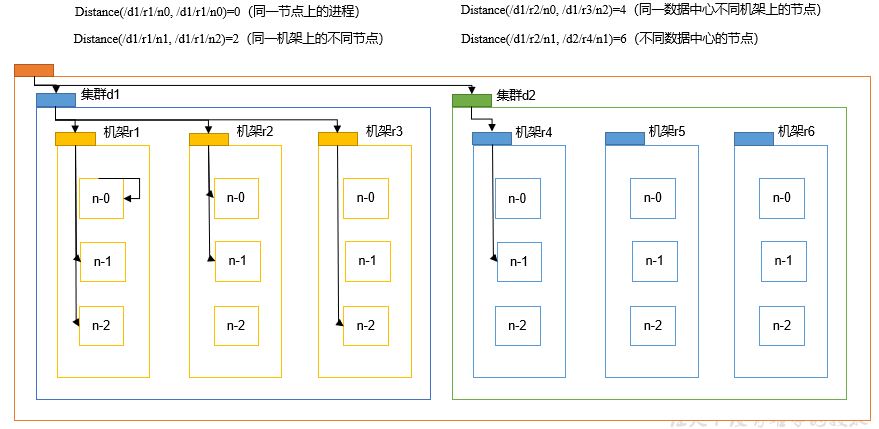
5.4.2 network topology - node distance calculation
In the process of HDFS writing data, NameNode will select the DataNode closest to the data to be uploaded to receive the data. So how to calculate the nearest distance?
Node distance: the sum of the distances from two nodes to the nearest common ancestor.
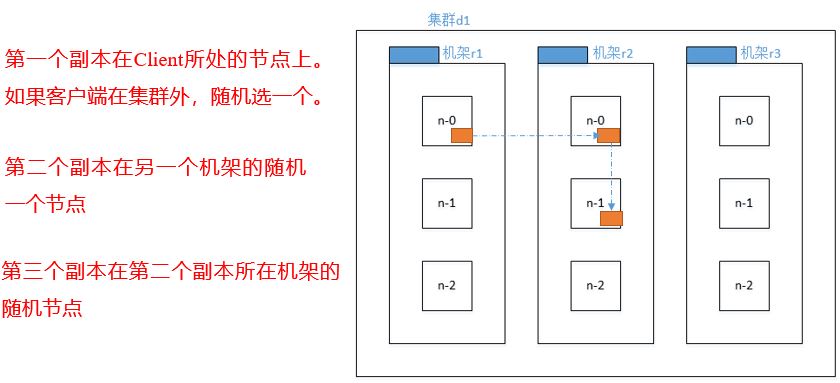
5.4.3 rack awareness (replica storage node selection)
1) Official IP address
Rack sensing description
http://hadoop.apache.org/docs/r3.1.3/hadoop-project-dist/hadoop-hdfs/HdfsDesign.html#Data_Replication
For the common case, when the replication factor is three, HDFS's placement policy is to put one replica on the local machine if the writer is on a datanode, otherwise on a random datanode, another replica on a node in a different (remote) rack, and the last on a different node in the same remote rack. This policy cuts the inter-rack write traffic which generally improves write performance. The chance of rack failure is far less than that of node failure; this policy does not impact data reliability and availability guarantees. However, it does reduce the aggregate network bandwidth used when reading data since a block is placed in only two unique racks rather than three. With this policy, the replicas of a file do not evenly distribute across the racks. One third of replicas are on one node, two thirds of replicas are on one rack, and the other third are evenly distributed across the remaining racks. This policy improves write performance without compromising data reliability or read performance.
Hadoop3.1.3 replica node selection
5.4.4 HDFS data reading process
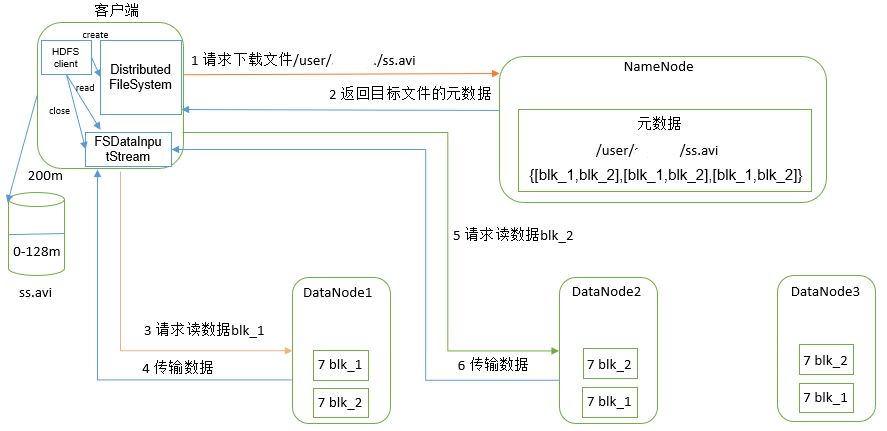
(1) The client requests the NameNode to download the file through the distributedfile system. The NameNode finds the DataNode address where the file block is located by querying the metadata.
(2) Select a DataNode (proximity principle, then random) server and request to read data.
(3) DataNode starts to transmit data to the client (read the data input stream from the disk and verify it in packets).
(4) The client receives in packets, caches them locally, and then writes them to the target file.
5.5 NameNode and SecondaryNameNode
5.5.1 working mechanism of NN and 2NN
Where is the metadata stored in NameNode?
First of all, let's assume that if it is stored in the disk of the NameNode node, it must be inefficient because it often needs random access and responds to customer requests. Therefore, metadata needs to be stored in memory. However, if it only exists in memory, once the power is cut off and the metadata is lost, the whole cluster will not work. Therefore, an FsImage that backs up metadata on disk is generated.
This will bring new problems. When the metadata in memory is updated, if FsImage is updated at the same time, the efficiency will be too low. However, if it is not updated, consistency problems will occur. Once the NameNode node is powered off, data loss will occur. Therefore, the edit file is introduced (only additional operation is performed, which is very efficient). Whenever metadata is updated or added, the metadata in memory is modified and appended to Edits. In this way, once the NameNode node is powered off, metadata can be synthesized through the combination of FsImage and Edits.
However, if data is added to Edits for a long time, the file data will be too large, the efficiency will be reduced, and once the power is off, the time required to recover metadata will be too long. Therefore, it is necessary to merge FsImage and Edits regularly. If this operation is completed by NameNode node, the efficiency will be too low. Therefore, a new node, SecondaryNamenode, is introduced to merge FsImage and Edits.
NameNode working mechanism
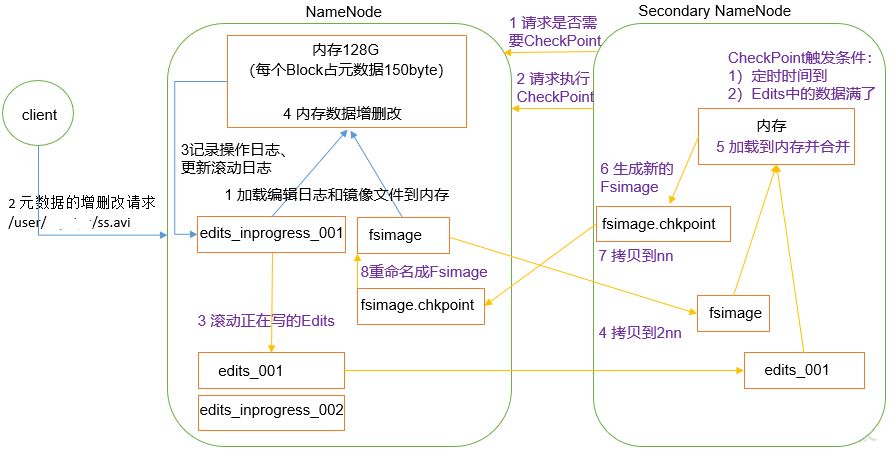
1) Phase 1: NameNode startup
(1) After the NameNode formatting is started for the first time, the Fsimage and Edits files are created. If it is not the first time to start, directly load the editing log and image file into memory.
(2) The request of the client to add, delete or modify metadata.
(3) NameNode records the operation log and updates the rolling log.
(4) NameNode adds, deletes and modifies metadata in memory.
2) The second stage: the second namenode works
(1) The Secondary NameNode asks if the NameNode needs a CheckPoint. Directly bring back the NameNode check result.
(2) Secondary NameNode requests CheckPoint.
(3) NameNode scrolls the Edits log being written.
(4) Copy the editing log and image file before scrolling to the Secondary NameNode.
(5) The Secondary NameNode loads the editing log and image files into memory and merges them.
(6) Generate a new image file fsimage chkpoint.
(7) Copy fsimage Chkpoint to NameNode.
(8) NameNode will fsimage Rename chkpoint to fsimage.
Detailed explanation of working mechanism of NN and 2NN:
Fsimage: file formed after metadata in NameNode memory is serialized.
Edits: records every step of the client's operation to update metadata information (metadata can be calculated through edits).
When the NameNode starts, first scroll through the Edits and generate an empty Edits Inprogress, and then load Edits and Fsimage into memory. At this time, NameNode memory holds the latest metadata information. The Client starts sending metadata addition, deletion and modification requests to the NameNode, and the operations of these requests will be recorded in Edits In progress (the operation of querying metadata will not be recorded in Edits, because the query operation will not change the metadata information). If NameNode hangs up at this time, the metadata information will be read from Edits after restart. Then, NameNode will add, delete and modify metadata in memory.
Since there will be more and more operations recorded in Edits and the edit file will be larger and larger, the NameNode will be very slow when starting to load Edits, so it is necessary to merge Edits and Fsimage (the so-called merging is to load Edits and Fsimage into memory, follow the operations in Edits step by step, and finally form a new Fsimage). The function of secondary NameNode is to help NameNode merge Edits and Fsimage.
The SecondaryNameNode will first ask whether the NameNode needs a CheckPoint (trigger the CheckPoint by satisfying either of the two conditions: the timing time is up and the data in the Edits is full). Directly bring back the NameNode check result. When the SecondaryNameNode performs the CheckPoint operation, it will first make the NameNode scroll the Edits and generate an empty Edits In progress, the purpose of scrolling Edits is to mark Edits, and all new operations in the future will be written to Edits In progress, other unconsolidated Edits and Fsimage will be copied to the local of the SecondaryNameNode, and then the copied Edits and Fsimage will be loaded into memory for merging to generate Fsimage Chkpoint, and then Fsimage Copy chkpoint to NameNode, rename it to Fsimage and replace the original Fsimage. When the NameNode starts, it only needs to load the previously unconsolidated Edits and Fsimage, because the metadata information in the merged Edits has been recorded in Fsimage.
5.5.2 analysis of fsimage and Edits
Fsimage and Edits concepts
After the NameNode is formatted, the following files will be generated in the / opt/module/hadoop-3.1.3/data/tmp/dfs/name/current directory
(1) Fsimage file: a permanent checkpoint of HDFS file system metadata, which contains the serialization information of all directories and file inode s of HDFS file system.
(2) Edits file: the path to store all update operations of the HDFS file system. All write operations performed by the file system client will first be recorded in the edits file.
(3)seen_ The txid file holds a number, which is the last edit_ Number of
(4) Each time the NameNode starts, it will read the Fsimage file into the memory and load the update operation in the Edits to ensure that the metadata information in the memory is up-to-date and synchronous. It can be seen that the Fsimage and Edits files are merged when the NameNode starts.
1) oiv view Fsimage file
(1) View oiv and oev commands
[wangxin@hadoop102 current]$ hdfs
oiv            apply the offline fsimage viewer to an fsimage
oev            apply the offline edits viewer to an edits file
(2) Basic grammar
hdfs oiv -p file type -i Mirror file -o Converted file output path
(3) Case practice
[wangxin@hadoop102 current]$ pwd
/opt/module/hadoop-3.1.3/data/dfs/name/current

[wangxin@hadoop102 current]$ hdfs oiv -p XML -i fsimage_0000000000000000025 -o /opt/module/hadoop-3.1.3/fsimage.xml

[wangxin@hadoop102 current]$ cat /opt/module/hadoop-3.1.3/fsimage.xml
Thinking: it can be seen that there is no DataNode corresponding to the record block in Fsimage. Why?
After the cluster starts, the DataNode is required to report the data block information and report it again after an interval of time.
2) oev view Edits file
(1) Basic grammar
hdfs oev -p file type -i Edit log -o Converted file output path
(2) Case practice
[wangxin@hadoop102 current]$ hdfs oev -p XML -i edits_0000000000000000012-0000000000000000013 -o /opt/module/hadoop-3.1.3/edits.xml

[wangxin@hadoop102 current]$ cat /opt/module/hadoop-3.1.3/edits.xml
5.5.3 CheckPoint time setting
1) Typically, the SecondaryNameNode executes every hour.
[hdfs-default.xml]
<property>
  <name>dfs.namenode.checkpoint.period</name>
  <value>3600s</value>
</property>
2) Check the number of operations once a minute. When the number of operations reaches 1 million, the SecondaryNameNode executes once.
<property>
  <name>dfs.namenode.checkpoint.txns</name>
  <value>1000000</value>
<description>Operation action times</description>
</property>

<property>
  <name>dfs.namenode.checkpoint.check.period</name>
  <value>60s</value>
<description> 1 Number of operations per minute</description>
</property >
5.5.4 NameNode fault handling
After the NameNode fails, the following two methods can be used to recover the data.
1) Copy the data in the SecondaryNameNode to the directory where the NameNode stores the data;
(1) kill -9 NameNode process
(2) Delete the data stored in NameNode (/ opt/module/hadoop-3.1.3/data/tmp/dfs/name)
[wangxin@hadoop102 hadoop-3.1.3]$ rm -rf /opt/module/hadoop-3.1.3/data/dfs/name/*
(3) Copy the data in the SecondaryNameNode to the original NameNode storage data directory
[wangxin@hadoop102 dfs]$ scp -r wangxin@hadoop104:/opt/module/hadoop-3.1.3/data/dfs/namesecondary/* ./name/
(4) Restart NameNode
[wangxin@hadoop102 hadoop-3.1.3]$ hdfs --daemon start namenode
2) Use the - importCheckpoint option to start the NameNode daemon to copy the data in the SecondaryNameNode to the NameNode directory.
(1) Modify HDFS site In XML
<property>
    <name>dfs.namenode.checkpoint.period</name>
    <value>120</value>
</property>

<property>
    <name>dfs.namenode.name.dir</name>
    <value>/opt/module/hadoop-3.1.3/data/dfs/name</value>
</property>
(2) kill -9 NameNode process
(3) Delete the data stored in NameNode (/ opt/module/hadoop-3.1.3/data/dfs/name)
[wangxin@hadoop102 hadoop-3.1.3]$ rm -rf /opt/module/hadoop-3.1.3/data/dfs/name/*
(4) If the SecondaryNameNode is not on the same host node as the NameNode, you need to copy the directory in which the SecondaryNameNode stores data to the same level directory in which the NameNode stores data, and delete in_use.lock file
[wangxin@hadoop102 dfs]$ scp -r wangxin@hadoop104:/opt/module/hadoop-3.1.3/data/dfs/namesecondary ./

[wangxin@hadoop102 namesecondary]$ rm -rf in_use.lock

[wangxin@hadoop102 dfs]$ pwd
/opt/module/hadoop-3.1.3/data/dfs

[wangxin@hadoop102 dfs]$ ls
data  name  namesecondary
(5) Import checkpoint data (wait for a while and ctrl+c ends)
[wangxin@hadoop102 hadoop-3.1.3]$ bin/hdfs namenode -importCheckpoint
(6) Start NameNode
[wangxin@hadoop102 hadoop-3.1.3]$ hdfs --daemon start namenode
5.5.5 cluster security mode
1. NameNode startup
When NameNode starts, first load the image file (Fsimage) into memory and perform various operations in the edit log (Edits). Once the image of the file system metadata is successfully created in memory, an empty edit log is created. At this point, NameNode starts listening to DataNode requests. During this process, NameNode has been running in safe mode, that is, the file system of NameNode is read-only to the client.
2. DataNode startup
The location of data blocks in the system is not maintained by NameNode, but stored in DataNode in the form of block list. During the normal operation of the system, NameNode will keep the mapping information of all block positions in memory. In the safe mode, each DataNode will send the latest block list information to the NameNode. After the NameNode knows enough block location information, it can run the file system efficiently.
3. Safe mode exit judgment
If the minimum replica condition is met, the NameNode exits safe mode after 30 seconds. The so-called minimum replica condition means that 99.9% of the blocks in the entire file system meet the minimum replica level (default: dfs.replication.min=1). When starting a newly formatted HDFS cluster, because there are no blocks in the system, the NameNode will not enter safe mode.
1) Basic grammar
The cluster is in safe mode and cannot perform important operations (write operations). After the cluster is started, it will automatically exit the safe mode.
(1)bin/hdfs dfsadmin -safemode get		(Function Description: View safe mode status)
(2)bin/hdfs dfsadmin -safemode enter  	(Function Description: enter safe mode state)
(3)bin/hdfs dfsadmin -safemode leave	(Function Description: leave safe mode state)
(4)bin/hdfs dfsadmin -safemode wait	(Function Description: wait for safe mode status)
2) Case
Simulate wait safe mode
3) View current mode
[wangxin@hadoop102 hadoop-3.1.3]$ hdfs dfsadmin -safemode get
Safe mode is OFF
4) First in security mode
[wangxin@hadoop102 hadoop-3.1.3]$ bin/hdfs dfsadmin -safemode enter
5.5.6 NameNode multi directory configuration
1) The local directory of NameNode can be configured into multiple directories, and the contents of each directory are the same, which increases the reliability
2) The specific configuration is as follows
(1) At HDFS site Add the following content to the XML file
<property>
<name>dfs.namenode.name.dir</name>
<value>file://${hadoop.tmp.dir}/dfs/name1,file://${hadoop.tmp.dir}/dfs/name2</value>
</property>
(2) Stop the cluster and delete all data in the data and logs of the three nodes.
[wangxin@hadoop102 hadoop-3.1.3]$ rm -rf data/ logs/
[wangxin@hadoop103 hadoop-3.1.3]$ rm -rf data/ logs/
[wangxin@hadoop104 hadoop-3.1.3]$ rm -rf data/ logs/
(3) Format the cluster and start it.
[wangxin@hadoop102 hadoop-3.1.3]$ bin/hdfs namenode –format
[wangxin@hadoop102 hadoop-3.1.3]$ sbin/start-dfs.sh
(4) View results
[wangxin@hadoop102 dfs]$ ll
 Total consumption 12
drwx------. 3 wangxin wangxin 4096 12 November 8:03 data
drwxrwxr-x. 3 wangxin wangxin 4096 12 November 8:03 name1
drwxrwxr-x. 3 wangxin wangxin 4096 12 November 8:03 name2
5.6 DataNode
5.6.1 working mechanism of datanode
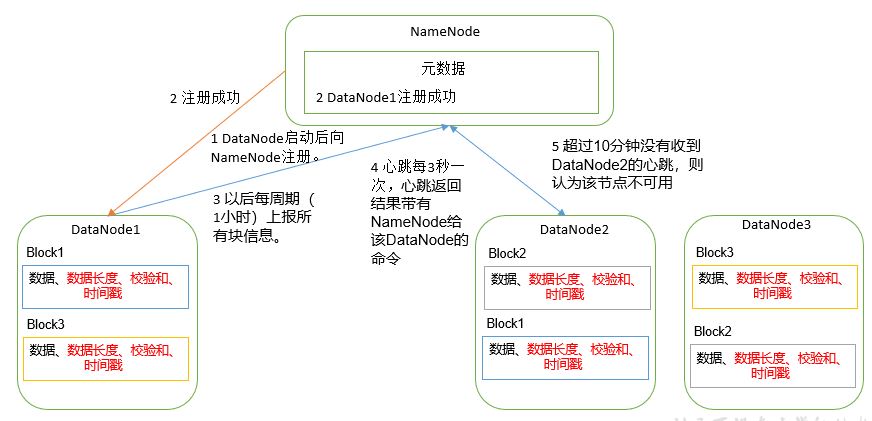
(1) A data block is stored on the disk in the form of a file on the DataNode, including two files, one is the data itself, and the other is metadata, including the length of the data block, the checksum of the block data, and the timestamp.
(2) After the DataNode is started, it registers with the NameNode. After passing the registration, it periodically reports all block information to the NameNode (1 hour).
(3) The heartbeat occurs every 3 seconds. The result of the heartbeat is accompanied by the command given by the NameNode to the DataNode, such as copying block data to another machine or deleting a data block. If the heartbeat of a DataNode is not received for more than 10 minutes, the node is considered unavailable.
(4) Some machines can be safely joined and exited during cluster operation.
5.6.2 data integrity
If the data stored in the computer disk is the red light signal (1) and green light signal (0) controlling the high-speed railway signal, but the disk storing the data is broken and the green light is always displayed, is it very dangerous? Similarly, if the data on the DataNode node is damaged but not found, is it also dangerous? So how to solve it?
The following is the method of DataNode node to ensure data integrity.
(1) When DataNode reads Block, it will calculate CheckSum.
(2) If the calculated CheckSum is different from the value when the Block was created, it indicates that the Block has been damaged.
(3) The Client reads blocks on other datanodes.
(4) Common verification algorithms crc (32), md5 (128), sha1 (160)
(5) DataNode periodically validates CheckSum after its file is created.
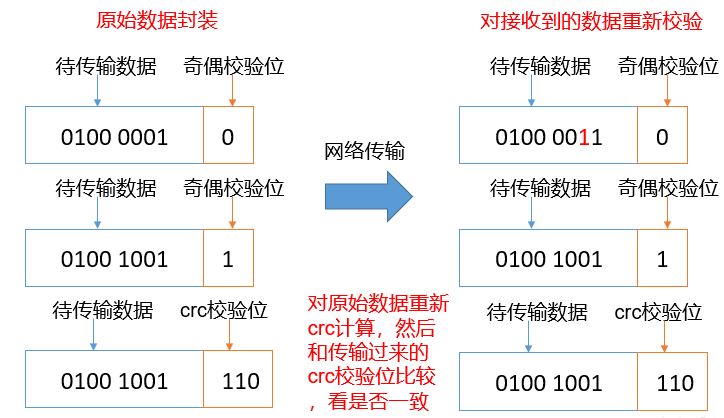
5.6.3 parameter setting of disconnection time limit
Parameter setting of DataNode disconnection time limit
1. DataNode cannot communicate with NameNode due to the death of DataNode process or network failure
2. NameNode will not immediately judge the node as dead. It will take a period of time, which is temporarily called timeout.
3. The default timeout length of HDFS is 10 minutes + 30 seconds.
4. If TimeOut is defined as TimeOut, the calculation formula of TimeOut length is:
TimeOut = 2 * dfs.namenode.heartbeat.recheck-interval + 10 * dfs.heartbeat.interval
The default is DFS namenode. heartbeat. The recheck interval size is 5 minutes, DFS heartbeat. The default interval is 3 seconds
It should be noted that HDFS site Heartbeat. XML configuration file recheck. Interval is in milliseconds, DFS heartbeat. Interval is in seconds.
<property>
    <name>dfs.namenode.heartbeat.recheck-interval</name>
    <value>300000</value>
</property>
<property>
    <name>dfs.heartbeat.interval</name>
    <value>3</value>
</property>
5.6.4 new data node in service
With the growth of business and the increasing amount of data, the capacity of the original data nodes can no longer meet the needs of storing data. It is necessary to dynamically add new data nodes on the basis of the original cluster.
Environmental preparation
(1) Clone another Hadoop 105 host on Hadoop 104 host
(2) Modify IP address and host name
(3) Delete the files saved by the original HDFS file system (/ opt/module/hadoop-3.1.3/data and logs)
(4) source configuration file
[wangxin@hadoop105 hadoop-3.1.3]$ source /etc/profile
3) Specific steps for new nodes
(1) Start DataNode directly to associate with the cluster
[wangxin@hadoop105 hadoop-3.1.3]$ hdfs --daemon start datanode
[wangxin@hadoop105 hadoop-3.1.3]$ yarn --daemon start nodemanager
(2) Upload files on Hadoop 105
[wangxin@hadoop105 hadoop-3.1.3]$ hadoop fs -put /opt/module/hadoop-3.1.3/LICENSE.txt /
(3) If the data is unbalanced, you can use commands to rebalance the cluster
[wangxin@hadoop102 sbin]$ ./start-balancer.sh
starting balancer, logging to /opt/module/hadoop-3.1.3/logs/hadoop-wangxin-balancer-hadoop102.out
Time Stamp               Iteration#  Bytes Already Moved  Bytes Left To Move  Bytes Being Moved
5.6.5 decommissioning old data nodes
Add whitelist and blacklist
Whitelist and blacklist are a mechanism for hadoop to manage cluster hosts.
Host nodes added to the white list are allowed to access namenodes. Host nodes not in the white list will be exited. Host nodes added to the blacklist are not allowed to access namenodes and will exit after data migration.
In practice, the white list is used to determine the DataNode nodes that are allowed to access the NameNode. The content configuration is generally consistent with the contents of the workers file. Blacklist is used to retire DataNode nodes during cluster operation.
The specific steps of configuring white list and blacklist are as follows:
1) Create whitelist and blacklist files in / opt/module/hadoop-3.1.3/etc/hadoop directory of NameNode node
[wangxin@hadoop102 hadoop]$ pwd
/opt/module/hadoop-3.1.3/etc/hadoop
[wangxin@hadoop102 hadoop]$ touch whitelist
[wangxin@hadoop102 hadoop]$ touch blacklist
Add the following host name to the whitelist, assuming that the node of the cluster is 102 103 104 105
hadoop102
hadoop103
hadoop104
hadoop105
The blacklist is temporarily empty.
2) At HDFS site Add dfs.xml to the configuration file Hosts and DFS hosts. Exclude configuration parameters
<!-- White list -->
<property>
<name>dfs.hosts</name>
<value>/opt/module/hadoop-3.1.3/etc/hadoop/whitelist</value>
</property>
<!-- blacklist -->
<property>
<name>dfs.hosts.exclude</name>
<value>/opt/module/hadoop-3.1.3/etc/hadoop/blacklist</value>
</property>
3) Distribute configuration files whitelist, blacklist, HDFS site XML (Note: node 105 should also send a copy)
[wangxin@hadoop102 etc]$ xsync hadoop/
[wangxin@hadoop102 etc]$ rsync -av hadoop/ wangxin@hadoop105:/opt/module/hadoop-3.1.3/etc/hadoop/
4) Restart the cluster (Note: node 105 is not added to workers, so start and stop separately)
[wangxin@hadoop102 hadoop-3.1.3]$ stop-dfs.sh
[wangxin@hadoop102 hadoop-3.1.3]$ start-dfs.sh
[wangxin@hadoop105 hadoop-3.1.3]$ hdfs –daemon start datanode
5) View the DN node currently working normally on the web browser
Blacklist retirement
1) Edit the blacklist file in / opt/module/hadoop-3.1.3/etc/hadoop directory
[wangxin@hadoop102 hadoop] vim blacklist
Add the following host name (node to retire)
hadoop105
2) Distribute blacklist to all nodes
[wangxin@hadoop102 etc]$ xsync hadoop/
[wangxin@hadoop102 etc]$ rsync -av hadoop/ wangxin@hadoop105:/opt/module/hadoop-3.1.3/etc/hadoop/
3) Refresh NameNode, refresh ResourceManager
[wangxin@hadoop102 hadoop-3.1.3]$ hdfs dfsadmin -refreshNodes
Refresh nodes successful

[wangxin@hadoop102 hadoop-3.1.3]$ yarn rmadmin -refreshNodes
17/06/24 14:55:56 INFO client.RMProxy: Connecting to ResourceManager at hadoop103/192.168.1.103:8033
4) Check the Web browser. The status of the retired node is "retirement in progress", indicating that the data node is copying blocks to other nodes
5) Wait until the decommissioned node status is decommissioned (all blocks have been copied), stop the node and node resource manager. Note: if the number of replicas is 3 and the serving node is less than or equal to 3, it cannot be retired successfully. You need to modify the number of replicas before you can retire
[wangxin@hadoop105 hadoop-3.1.3]$ hdfs --daemon stop datanode
stopping datanode
[wangxin@hadoop105 hadoop-3.1.3]$ yarn --daemon stop nodemanager
stopping nodemanager
6) If the data is unbalanced, you can use commands to rebalance the cluster
[wangxin@hadoop102 hadoop-3.1.3]$ sbin/start-balancer.sh
starting balancer, logging to /opt/module/hadoop-3.1.3/logs/hadoop-wangxin-balancer-hadoop102.out
Time Stamp               Iteration#  Bytes Already Moved  Bytes Left To Move  Bytes Being Moved
Note: the same host name is not allowed to appear in the whitelist and blacklist at the same time. Since blacklist is used and Hadoop 105 node is successfully retired, Hadoop 105 in whitelist should be removed
5.6.5 DataNode multi directory configuration
1) DataNode can be configured into multiple directories, and the data stored in each directory is different. That is, the data is not a copy
2) The specific configuration is as follows
(1) At HDFS site Add the following content to the XML file
<property>
        <name>dfs.datanode.data.dir</name>
<value>file://${hadoop.tmp.dir}/dfs/data1,file://${hadoop.tmp.dir}/dfs/data2</value>
</property>
(2) Stop the cluster and delete all data in the data and logs of the three nodes.
[wangxin@hadoop102 hadoop-3.1.3]$ rm -rf data/ logs/
[wangxin@hadoop103 hadoop-3.1.3]$ rm -rf data/ logs/
[wangxin@hadoop104 hadoop-3.1.3]$ rm -rf data/ logs/
(3) Format the cluster and start it.
[wangxin@hadoop102 hadoop-3.1.3]$ bin/hdfs namenode –format
[wangxin@hadoop102 hadoop-3.1.3]$ sbin/start-dfs.sh
(4) View results
[wangxin@hadoop102 dfs]$ ll
 Total consumption 12
drwx------. 3 wangxin wangxin 4096 4 April 14:22 data1
drwx------. 3 wangxin wangxin 4096 4 April 14:22 data2
drwxrwxr-x. 3 wangxin wangxin 4096 12 November 8:03 name1
drwxrwxr-x. 3 wangxin wangxin 4096 12 November 8:03 name2
6. MapReduce
6.1 MapReduce overview
6.1.1 MapReduce definition
MapReduce is a programming framework for distributed computing programs and the core framework for users to develop "Hadoop based data analysis applications".
The core function of MapReduce is to integrate the business logic code written by the user and its own default components into a complete distributed computing program, which runs in parallel on a Hadoop cluster.
6.1.2 advantages and disadvantages of MapReduce
advantage:
1) MapReduce is easy to program
By simply implementing some interfaces, it can complete a distributed program, which can be distributed to a large number of cheap PC machines. As like as two peas, you write a distributed program, which is exactly the same as writing a simple serial program. It is because of this feature that MapReduce programming has become very popular.
2) Good scalability
When your computing resources cannot be met, you can simply add machines to expand its computing power.
3) High fault tolerance
The original intention of MapReduce design is to enable the program to be deployed on cheap PC machines, which requires it to have high fault tolerance. For example, if one of the machines hangs, it can transfer the above computing tasks to another node to run, so that the task will not fail. Moreover, this process does not require manual participation, but is completely completed by Hadoop.
4) It is suitable for offline processing of massive data above PB level
It can realize the concurrent work of thousands of server clusters and provide data processing capacity.
Disadvantages:
1) Not good at real-time computing
MapReduce cannot return results in milliseconds or seconds like MySQL.
2) Not good at flow computing
The input data of streaming computing is dynamic, while the input data set of MapReduce is static and cannot change dynamically. This is because the design characteristics of MapReduce determine that the data source must be static.
3) Not good at DAG (directed acyclic graph) calculation
Multiple applications have dependencies, and the input of the latter application is the output of the previous one. In this case, MapReduce is not impossible, but after use, the output results of each MapReduce job will be written to the disk, which will cause a lot of disk IO, resulting in very low performance.
6.1.3 MapReduce core idea
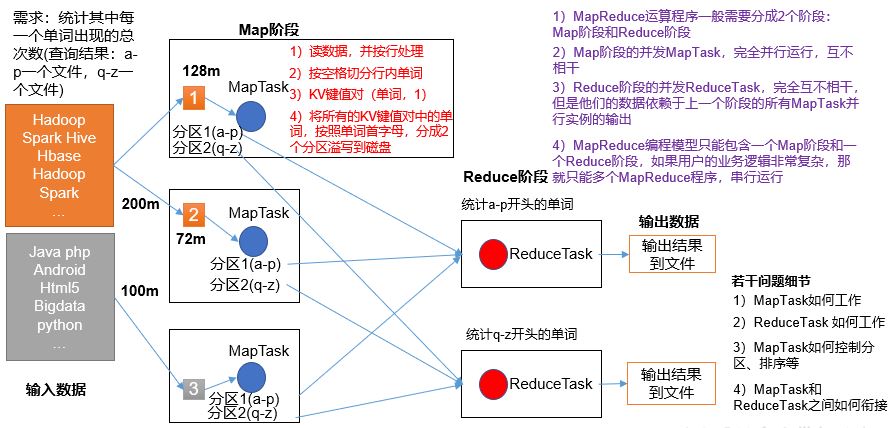
(1) Distributed computing programs often need to be divided into at least two stages.
(2) The MapTask concurrent instances in the first stage run completely in parallel and irrelevant to each other.
(3) The ReduceTask concurrent instances in the second stage are irrelevant, but their data depends on the output of all MapTask concurrent instances in the previous stage.
(4) MapReduce programming model can only contain one Map phase and one Reduce phase. If the user's business logic is very complex, it can only have multiple MapReduce programs running in series.
Summary: analyze the trend of WordCount data flow and deeply understand the core idea of MapReduce.
6.1.4 MapReduce process
A complete MapReduce program has three types of instance processes during distributed operation:
(1) MrAppMaster: responsible for the process scheduling and state coordination of the whole program.
(2) MapTask: responsible for the entire data processing process in the Map phase.
(3) ReduceTask: responsible for the entire data processing process in the Reduce phase.
6.1.5 official WordCount source code
Decompile the source code with the decompile tool. It is found that the WordCount cases include Map class, Reduce class and driver class. And the data type is the serialization type encapsulated by Hadoop itself.
6.1.6 common data serialization types
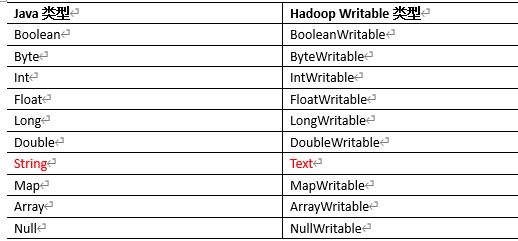
6.1.7 MapReduce programming specification
The program written by users is divided into three parts: Mapper, Reducer and Driver.
1. Mapper stage
(1) User defined Mapper should inherit its own parent class
(2) Mapper's input data is in the form of KV pairs (the type of KV can be customized)
(3) The business logic in Mapper is written in the map() method
(4) Mapper's output data is in the form of KV pairs (the type of KV can be customized)
(5) The map() method (MapTask process) calls every < K, V >
2. Reducer stage
(1) The user-defined Reducer should inherit its own parent class
(2) The input data type of Reducer corresponds to the output data type of Mapper, which is also KV
(3) The business logic of the Reducer is written in the reduce() method
(4) The ReduceTask process calls the reduce() method once for each < k, V > group with the same k
3. Driver stage
The client, which is equivalent to the YARN cluster, is used to submit our entire program to the YARN cluster. The submitted job object encapsulates the relevant running parameters of the MapReduce program
6.1.8 WordCount case
Requirement: count the total number of occurrences of each word in a given text file
1) Environmental preparation
(1) Open Intellij and create maven project
(2) In POM Add the following dependencies to the XML file
<dependencies>
    <dependency>
        <groupId>junit</groupId>
        <artifactId>junit</artifactId>
        <version>4.12</version>
    </dependency>
    <dependency>
        <groupId>org.apache.logging.log4j</groupId>
        <artifactId>log4j-slf4j-impl</artifactId>
        <version>2.12.0</version>
    </dependency>
    <dependency>
        <groupId>org.apache.hadoop</groupId>
        <artifactId>hadoop-client</artifactId>
        <version>3.1.3</version>
    </dependency>
</dependencies>
(2) In the src/main/resources directory of the project, create a new file named "log4j2.xml", and fill in the file.
<?xml version="1.0" encoding="UTF-8"?>
<Configuration status="error" strict="true" name="XMLConfig">
    <Appenders>
        <!-- The type name is Console,The name must be an attribute -->
        <Appender type="Console" name="STDOUT">
            <!-- Layout as PatternLayout In a way,
            The output style is[INFO] [2018-01-22 17:34:01][org.test.Console]I'm here -->
            <Layout type="PatternLayout"
                    pattern="[%p] [%d{yyyy-MM-dd HH:mm:ss}][%c{10}]%m%n" />
        </Appender>

    </Appenders>

    <Loggers>
        <!-- Additivity is false -->
        <Logger name="test" level="info" additivity="false">
            <AppenderRef ref="STDOUT" />
        </Logger>

        <!-- root loggerConfig set up -->
        <Root level="info">
            <AppenderRef ref="STDOUT" />
        </Root>
    </Loggers>

</Configuration>
2) Programming
(1) Write Mapper class
import java.io.IOException;
import org.apache.hadoop.io.IntWritable;
import org.apache.hadoop.io.LongWritable;
import org.apache.hadoop.io.Text;
import org.apache.hadoop.mapreduce.Mapper;

public class WordcountMapper extends Mapper<LongWritable, Text, Text, IntWritable>{

	Text k = new Text();
	IntWritable v = new IntWritable(1);

	@Override
	protected void map(LongWritable key, Text value, Context context)	throws IOException, InterruptedException {

		// 1 get a row
		String line = value.toString();

		// 2 cutting
		String[] words = line.split(" ");

		// 3 output
		for (String word : words) {

			k.set(word);
			context.write(k, v);
		}
	}
}
(2) Write Reducer class
import java.io.IOException;
import org.apache.hadoop.io.IntWritable;
import org.apache.hadoop.io.Text;
import org.apache.hadoop.mapreduce.Reducer;

public class WordcountReducer extends Reducer<Text, IntWritable, Text, IntWritable>{

int sum;
IntWritable v = new IntWritable();

	@Override
	protected void reduce(Text key, Iterable<IntWritable> values,Context context) throws IOException, InterruptedException {

		// 1 cumulative summation
		sum = 0;
		for (IntWritable count : values) {
			sum += count.get();
		}

		// 2 output
         v.set(sum);
		context.write(key,v);
	}
}
(3) Write Driver driver class
import java.io.IOException;
import org.apache.hadoop.conf.Configuration;
import org.apache.hadoop.fs.Path;
import org.apache.hadoop.io.IntWritable;
import org.apache.hadoop.io.Text;
import org.apache.hadoop.mapreduce.Job;
import org.apache.hadoop.mapreduce.lib.input.FileInputFormat;
import org.apache.hadoop.mapreduce.lib.output.FileOutputFormat;

public class WordcountDriver {

	public static void main(String[] args) throws IOException, ClassNotFoundException, InterruptedException {

		// 1 get configuration information and get job object
		Configuration configuration = new Configuration();
		Job job = Job.getInstance(configuration);

		// 2. jar associated with this Driver program
		job.setJarByClass(WordcountDriver.class);

		// 3. jar associated with Mapper and Reducer
		job.setMapperClass(WordcountMapper.class);
		job.setReducerClass(WordcountReducer.class);

		// 4. Set the kv type of Mapper output
		job.setMapOutputKeyClass(Text.class);
		job.setMapOutputValueClass(IntWritable.class);

		// 5 set the final output kv type
		job.setOutputKeyClass(Text.class);
		job.setOutputValueClass(IntWritable.class);

		// 6 set input and output paths
		FileInputFormat.setInputPaths(job, new Path(args[0]));
		FileOutputFormat.setOutputPath(job, new Path(args[1]));

		// 7 submit job
		boolean result = job.waitForCompletion(true);
		System.exit(result ? 0 : 1);
	}
}
3) Local test
(1) Hadoop needs to be configured first_ Home variable and Windows runtime dependency
(2) Running programs on IDEA/Eclipse
4) Test on Cluster
(0) use maven to make jar package, and the package plug-in dependency needs to be added
 <build>
        <plugins>
            <plugin>
                <artifactId>maven-compiler-plugin</artifactId>
                <version>3.6.1</version>
                <configuration>
                    <source>1.8</source>
                    <target>1.8</target>
                </configuration>
            </plugin>
            <plugin>
                <artifactId>maven-assembly-plugin</artifactId>
                <configuration>
                    <descriptorRefs>
                        <descriptorRef>jar-with-dependencies</descriptorRef>
                    </descriptorRefs>
                </configuration>
                <executions>
                    <execution>
                        <id>make-assembly</id>
                        <phase>package</phase>
                        <goals>
                            <goal>single</goal>
                        </goals>
                    </execution>
                </executions>
            </plugin>
        </plugins>
    </build>
Note: if a red cross is displayed on the project. Right click - > Maven - > reimport on the project.
(1) Print the program into a jar package and copy it to the Hadoop cluster
Step details: right click - > run as - > Maven install. When the compilation is completed, the jar package will be generated in the target folder of the project. If you can't see it. Right click - > refresh on the item to see. Modify the name of the jar package without dependency to WC Jar and copy the jar package to the Hadoop cluster.
(2) Start Hadoop cluster
(3) Execute WordCount program
[wangxin@hadoop102 software]$ hadoop jar  wc.jar
 com.wangxin.wordcount.WordcountDriver /user/wangxin/input /user/wangxin/output
5) Submitting tasks to the cluster on Windows
(1) Add necessary configuration information
public class WordcountDriver {

	public static void main(String[] args) throws IOException, ClassNotFoundException, InterruptedException {

		// 1 get configuration information and encapsulate tasks
		Configuration configuration = new Configuration();
		//Set the address of HDFS NameNode
       configuration.set("fs.defaultFS", "hdfs://hadoop102:9820");
		// Specify that MapReduce runs on Yan
       configuration.set("mapreduce.framework.name","yarn");
		// Specifies that mapreduce can run on a remote cluster
       configuration.set("mapreduce.app-submission.cross-platform","true");
		//Specify the location of the Yan ResourceManager
    configuration.set("yarn.resourcemanager.hostname","hadoop103");

		Job job = Job.getInstance(configuration);

		// 2. Set jar loading path
	job.setJar("F:\\idea_project\\MapReduce\\target\\MapReduce-1.0-SNAPSHOT.jar");

		// 3. Set map and reduce classes
		job.setMapperClass(WordcountMapper.class);
		job.setReducerClass(WordcountReducer.class);

		// 4 set map output
		job.setMapOutputKeyClass(Text.class);
		job.setMapOutputValueClass(IntWritable.class);

		// 5 set the final output kv type
		job.setOutputKeyClass(Text.class);
		job.setOutputValueClass(IntWritable.class);

		// 6 set input and output paths
		FileInputFormat.setInputPaths(job, new Path(args[0]));
		FileOutputFormat.setOutputPath(job, new Path(args[1]));

		// 7 submission
		boolean result = job.waitForCompletion(true);

		System.exit(result ? 0 : 1);
	}
}
(2) Edit task configuration
1) Check whether the first parameter Main class is the full class name of the class we want to run. If not, you must modify it!
2) Add: - dhadoop after VM options_ USER_ NAME=wangxin
3) Add two parameters after Program arguments to represent the input and output path respectively, and the two parameters are separated by spaces. For example: hdfs://hadoop102:9820/input hdfs://hadoop102:9820/output
(3) Package and set the Jar package into the Driver
public class WordcountDriver {

	public static void main(String[] args) throws IOException, ClassNotFoundException, InterruptedException {

		// 1 get configuration information and encapsulate tasks
		Configuration configuration = new Configuration();

       configuration.set("fs.defaultFS", "hdfs://hadoop102:9820");
       configuration.set("mapreduce.framework.name","yarn");
       configuration.set("mapreduce.app-submission.cross-platform","true");
       configuration.set("yarn.resourcemanager.hostname","hadoop103");

		Job job = Job.getInstance(configuration);

		// 2. Set jar loading path
//job.setJarByClass(WordCountDriver.class);
		job.setJar("D:\IdeaProjects\mapreduce\target\mapreduce-1.0-SNAPSHOT.jar");

		// 3. Set map and reduce classes
		job.setMapperClass(WordcountMapper.class);
		job.setReducerClass(WordcountReducer.class);

		// 4 set map output
		job.setMapOutputKeyClass(Text.class);
		job.setMapOutputValueClass(IntWritable.class);

		// 5 set the final output kv type
		job.setOutputKeyClass(Text.class);
		job.setOutputValueClass(IntWritable.class);

		// 6 set input and output paths
		FileInputFormat.setInputPaths(job, new Path(args[0]));
		FileOutputFormat.setOutputPath(job, new Path(args[1]));

		// 7 submission
		boolean result = job.waitForCompletion(true);

		System.exit(result ? 0 : 1);
	}
}
(4) Submit and view results
6.2 Hadoop serialization
6.2.1 serialization overview
Serialization is to convert objects in memory into byte sequences (or other data transfer protocols) for storage to disk (persistence) and network transmission.
Deserialization is to convert the received byte sequence (or other data transfer protocol) or disk persistent data into objects in memory.
Generally speaking, "live" objects only exist in memory, and there is no power off. Moreover, "live" objects can only be used by local processes and cannot be sent to another computer on the network. However, serialization can store "live" objects and send "live" objects to remote computers.
Java serialization is a heavyweight Serializable framework. After an object is serialized, it will carry a lot of additional information (various verification information, Header, inheritance system, etc.), which is not convenient for efficient transmission in the network. Therefore, Hadoop has developed its own serialization mechanism (Writable).
Hadoop serialization features: (1) compact: efficient use of storage space. (2) Fast: the extra cost of reading and writing data is small. (3) Extensibility: it can be upgraded with the upgrading of communication protocol (4) interoperability: support multilingual interaction
The basic serialization type commonly used in enterprise development can not meet all requirements. For example, if a bean object is passed within the Hadoop framework, the object needs to implement the serialization interface.
The specific steps to realize bean object serialization are as follows: 7 steps. (the following code is an example code, which needs to be written according to the actual situation)
(1) The Writable interface must be implemented
(2) When deserializing, the null parameter constructor needs to be called by reflection, so there must be an empty parameter constructor
public FlowBean() {
	super();
}
(3) Override serialization method
@Override
public void write(DataOutput out) throws IOException {
	out.writeLong(upFlow);
	out.writeLong(downFlow);
	out.writeLong(sumFlow);
}
(4) Override deserialization method
@Override
public void readFields(DataInput in) throws IOException {
	upFlow = in.readLong();
	downFlow = in.readLong();
	sumFlow = in.readLong();
}
(5) Note that the order of deserialization is exactly the same as that of serialization
(6) To display the results in the file, you need to rewrite toString(), which can be separated by "\ t" for subsequent use.
(7) If you need to transfer the customized bean s in the key, you also need to implement the Comparable interface, because the Shuffle process in the MapReduce box requires that the keys must be able to be sorted.
@Override
public int compareTo(FlowBean o) {
	// In reverse order, from large to small
	return this.sumFlow > o.getSumFlow() ? -1 : 1;
}
6.3 MapReduce framework principle
6.3.1 InputFormat data input
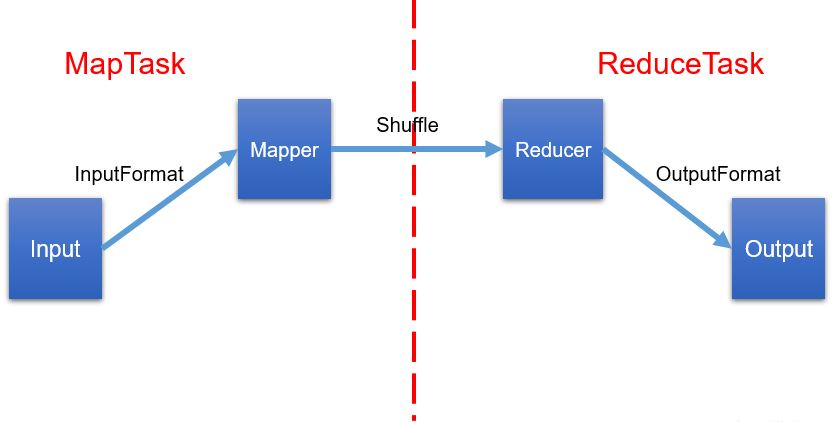
Parallelism determination mechanism of slice and MapTask
1) Problem elicitation
The parallelism of MapTask determines the concurrency of task processing in the Map phase, and then affects the processing speed of the whole Job.
Thinking: starting 8 maptasks with 1G data can improve the concurrent processing ability of the cluster. Then, with 1K data and 8 maptasks, will the cluster performance be improved? Does MapTask have as many parallel tasks as possible? What factors affect MapTask parallelism?
2) MapTask parallelism determination mechanism
Data Block: HDFS physically divides data into blocks. A data Block is a unit of data that HDFS stores.
Data slicing: data slicing is only the logical slicing of the input, and will not be sliced on the disk for storage. Data slice is the unit for MapReduce program to calculate the input data. A slice will start a MapTask accordingly.
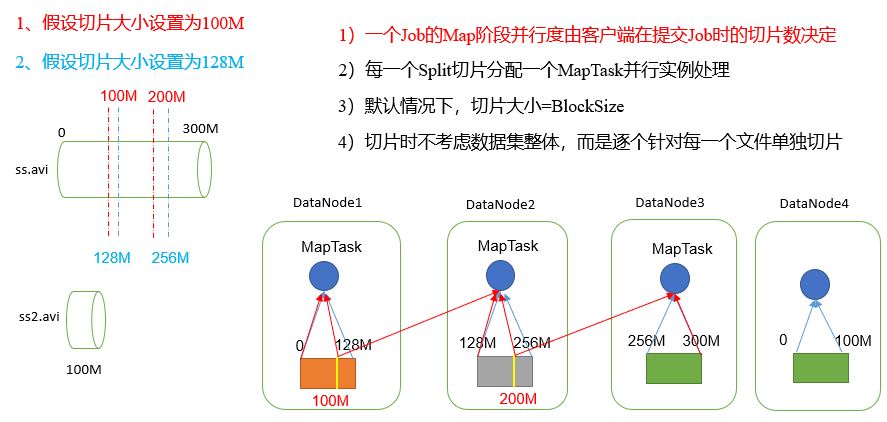
Detailed explanation of Job submission process source code
waitForCompletion()

submit();

// 1 establish connection
	connect();
		// 1) Create a proxy for submitting jobs
		new Cluster(getConfiguration());
			// (1) Judge whether it is a local operating environment or a yarn cluster operating environment
			initialize(jobTrackAddr, conf);

// 2. Submit job
submitter.submitJobInternal(Job.this, cluster)
	// 1) Create a Stag path to submit data to the cluster
	Path jobStagingArea = JobSubmissionFiles.getStagingDir(cluster, conf);

	// 2) Get jobid and create Job path
	JobID jobId = submitClient.getNewJobID();

	// 3) Copy jar package to cluster
copyAndConfigureFiles(job, submitJobDir);
	rUploader.uploadFiles(job, jobSubmitDir);

// 4) Calculate the slice and generate the slice planning file
writeSplits(job, submitJobDir);
		maps = writeNewSplits(job, jobSubmitDir);
		input.getSplits(job);

// 5) Write XML configuration file to Stag path
writeConf(conf, submitJobFile);
	conf.writeXml(out);

// 6) Submit Job and return to submission status
status = submitClient.submitJob(jobId, submitJobDir.toString(), job.getCredentials());
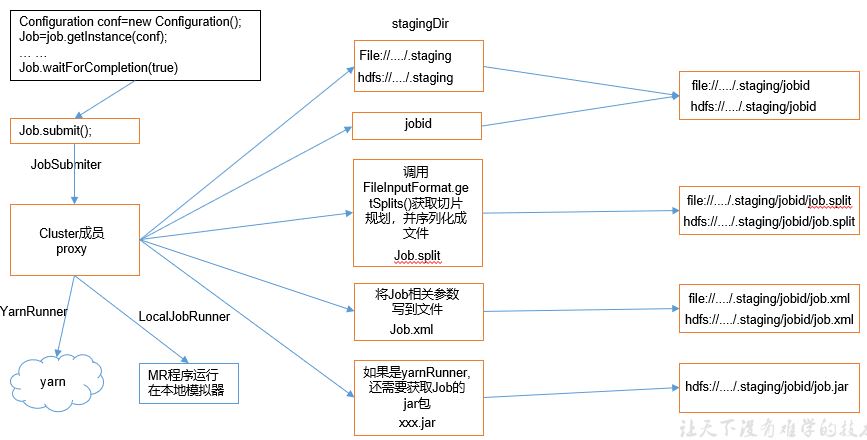
Source code analysis of FileInputFormat slice
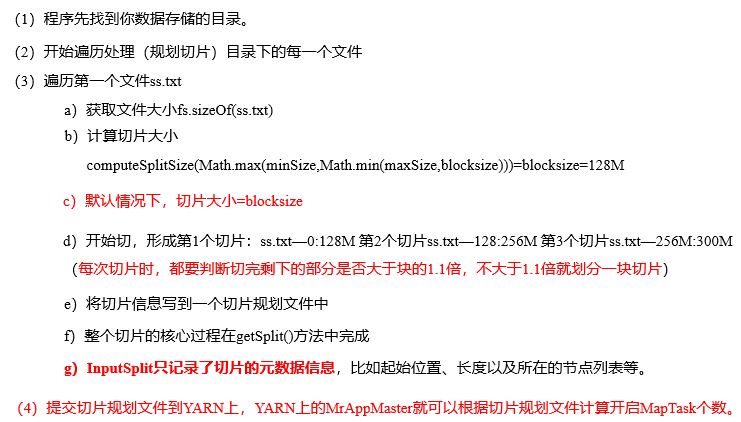
FileInputFormat slicing mechanism
(1) Simply slice according to the content length of the file
(2) Slice size, which is equal to Block size by default
(3) When slicing, the whole dataset is not considered, but each file is sliced separately one by one
TextInputFormat
When running MapReduce program, the input file formats include: Line Based log file, binary format file, database table, etc. Then, how does MapReduce read these data for different data types?
Common interface implementation classes of FileInputFormat include TextInputFormat, KeyValueTextInputFormat, NLineInputFormat, CombineTextInputFormat and custom InputFormat.
TextInputFormat is the default FileInputFormat implementation class. Read each record by line. Key is the offset of the starting byte of the line stored in the whole file, of type LongWritable. The value is the content of this line, excluding any line terminators (line feed and carriage return), Text type.
CombineTextInputFormat slicing mechanism
The default TextInputFormat slicing mechanism of the framework is to plan the slicing of tasks according to files. No matter how small the files are, they will be a separate slice and handed over to a MapTask. In this way, if there are a large number of small files, a large number of maptasks will be generated, which is extremely inefficient.
1) Application scenario:
CombineTextInputFormat is used in scenarios with too many small files. It can logically plan multiple small files into one slice, so that multiple small files can be handed over to a MapTask for processing.
2) Virtual storage slice maximum setting
CombineTextInputFormat.setMaxInputSplitSize(job, 4194304);// 4m
Note: the maximum value of virtual storage slice should be set according to the actual small file size.
3) Slicing mechanism
The slicing process includes two parts: virtual storage process and slicing process.
6.3.2 MapReduce workflow

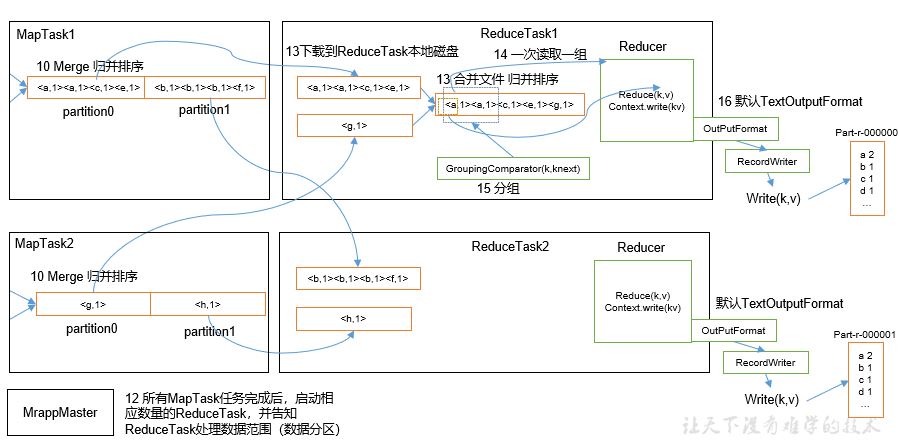
The above process is the most complete workflow of MapReduce, but the Shuffle process only starts from step 7 to the end of step 16. The specific Shuffle process is explained in detail as follows:
(1) MapTask collects the kv pairs output by our map() method and puts them into the memory buffer
(2) Continuous overflow of local disk files from memory buffer may overflow multiple files
(3) Multiple overflow files will be merged into large overflow files
(4) In the process of overflow and merging, the Partitioner should be called to partition and sort the key s
(5) ReduceTask fetches the corresponding result partition data from each MapTask machine according to its partition number
(6) ReduceTask will grab the result files from different maptasks in the same partition, and ReduceTask will merge (merge and sort) these files again
(7) After merging into a large file, the Shuffle process ends, and then enters the logical operation process of ReduceTask (take out the key value pairs Group by Group from the file and call the user-defined reduce() method)
be careful:
(1) The size of the buffer in the Shuffle will affect the execution efficiency of the MapReduce program. In principle, the larger the buffer, the less the number of disk io, and the faster the execution speed.
(2) The size of the buffer can be adjusted through parameters: MapReduce task. io. sort. MB default 100M
6.3.3 Shuffle mechanism
After the Map method, the data processing process before the Reduce method is called Shuffle.
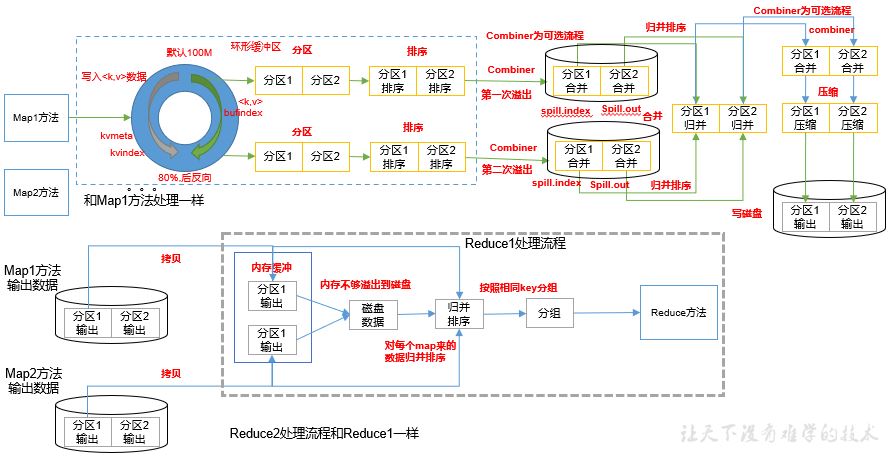
Shuffle is a very important and essential process in MR execution. The shuffle process starts when MapTask writes data through the context object after executing the map() method. First, the data is written into the ring buffer from the Map side. The written data will enter the specified partition according to the partition rules and sort in the memory at the same time. The default size of the ring buffer is 100M. When the write capacity of the data reaches 80% of the buffer size, the data begins to overflow to the disk. If there are a lot of data, N times of overflow may occur. In this way, multiple overflow files will be generated on the disk, and the data in each overflow file will be orderly, Next, the files overflowed for many times will be merged together in the disk to form a file. In the process of merging, the merging and sorting will be carried out according to the same partition to ensure that the merged file area is orderly. The shuffle process is completed at the Map end. Then, the data output from the Map side will be summarized again as the input data of the reduce side. At this time, the ReduceTask task will copy the data of the same partition calculated in each MapTask to the memory of ReduceTask. If the memory cannot fit, start writing to the disk, and then merge and sort the data. After sorting, it will be grouped according to the same key, In the future, values corresponding to the same set of keys will call the reduce method once. If there are multiple partitions, multiple reducetasks will be generated for processing, and the processing logic is the same.
Partition partition
It is required to output the statistical results to different files (partitions) according to conditions. For example: output the statistical results to different files (partitions) according to different provinces where the mobile phone belongs
Default Partitioner partition - HashPartition
public class HashPartitioner<K, V> extends Partitioner<K, V> {
  public int getPartition(K key, V value, int numReduceTasks) {
    return (key.hashCode() & Integer.MAX_VALUE) % numReduceTasks;
  }
}
The default partition is obtained by taking the modulus of the number of ReduceTasks according to the hashCode of the key. The user cannot control which key is stored in which partition
We can also write user-defined partitions. The steps of user-defined Partitioner are as follows:
(1) The custom class inherits the Partitioner and overrides the getPartition() method
public class CustomPartitioner extends Partitioner<Text, FlowBean> {
 	@Override
	public int getPartition(Text key, FlowBean value, int numPartitions) {
          // Control partition code logic
    ... ...
		return partition;
	}
}
(2) In the Job driver, set a custom Partitioner
job.setPartitionerClass(CustomPartitioner.class);
(3) After customizing the Partition, set the corresponding number of ReduceTask according to the logic of the customized Partition
job.setNumReduceTasks(5);
Zoning summary
(1) If the number of ReduceTask > the number of getpartition results, several more empty output files part-r-000xx will be generated;
(2) If 1 < the number of reducetask < the number of getpartition results, some partition data has no place to put, and an Exception will be generated;
(3) If the number of reducetasks = 1, no matter how many partition files are output by MapTask, the final result will be handed over to this ReduceTask, and only one result file part-r-00000 will be generated in the end;
(4) The partition number must start from zero and be accumulated one by one.
For example, if the number of custom partitions is 5, then
(1)job.setNumReduceTasks(1); It will run normally, but an output file will be generated
(2)job.setNumReduceTasks(2); Will report an error
(3)job.setNumReduceTasks(6); If it is greater than 5, the program will run normally and an empty file will be generated
WritableComparable sort
Sorting is one of the most important operations in MapReduce framework. MapTask and ReduceTask will sort the data by key. This operation is the default behavior of Hadoop. The data in any application is sorted regardless of whether it is logically required or not.
The default sort is to sort according to the dictionary order, and the method to realize this sort is quick sort.
For MapTask, it will temporarily put the processing results into the ring buffer. When the utilization rate of the ring buffer reaches a certain threshold, it will quickly sort the data in the buffer and overflow these ordered data to the disk. When the data processing is completed, it will merge and sort all files on the disk.
For ReduceTask, it copies the corresponding data files remotely from each MapTask. If the file size exceeds a certain threshold, it will overflow on the disk, otherwise it will be stored in memory. If the number of files on the disk reaches a certain threshold, merge and sort once to generate a larger file; If the size or number of files in memory exceeds a certain threshold, the data will overflow to the disk after a merge. When all data is copied, ReduceTask will merge and sort all data on memory and disk at one time.
Sorting and classification
(1) Partial sorting
MapReduce sorts the dataset according to the key of the input record. Ensure the internal order of each output file.
(2) Full sort
The final output result has only one file, and the file is orderly. The implementation method is to set only one ReduceTask. However, this method is extremely inefficient when dealing with large files, because one machine processes all files and completely loses the parallel architecture provided by MapReduce.
(3) Auxiliary sorting: (grouping comparator)
Group keys on the reduce side. Apply to: when the received key is a bean object and you want one or more keys with the same field (all fields are different) to enter the same reduce method, you can use grouping sorting.
(4) Secondary sorting
In the process of user-defined sorting, if the judgment conditions in compareTo are two, it is a secondary sorting.
Analysis of WritableComparable principle of custom sorting
As a key transfer, bean objects need to implement the WritableComparable interface and rewrite the compareTo method to realize sorting.
Combiner merge
(1) Combiner is a component other than Mapper and Reducer in MR program.
(2) The parent class of the Combiner component is Reducer.
(3) The difference between Combiner and Reducer lies in the running location
Combiner runs on the node where each MapTask is located;
Reducer receives the output results of all mappers in the world;
(4) The meaning of Combiner is to summarize the output of each MapTask locally to reduce the amount of network transmission.
(5) The premise that Combiner can be applied is that it cannot affect the final business logic, and the output kv of Combiner should correspond to the input kv type of Reducer.
6.3.4 working mechanism of maptask
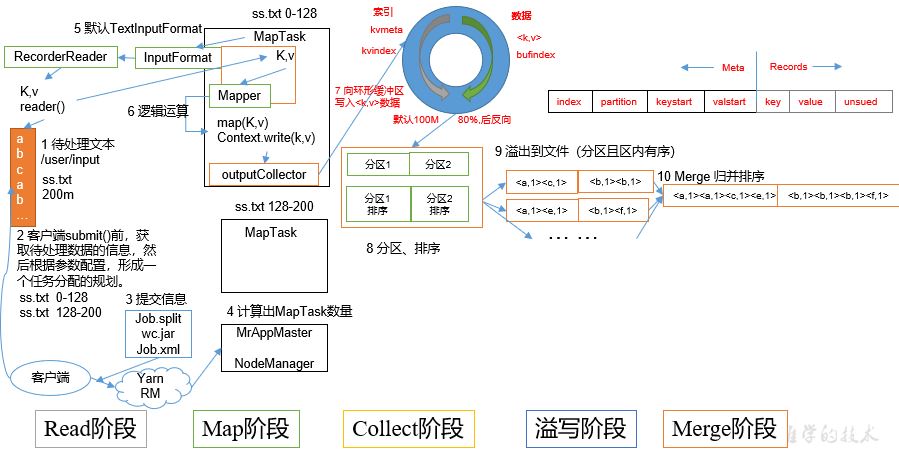
(1) Read stage: MapTask parses key/value from InputSplit through InputFormat obtained RecordReader.
(2) Map stage: this node mainly gives the parsed key/value to the map() function written by the user for processing, and generates a series of new key / values.
(3) Collect collection phase: in the map() function written by the user, outputcollector is generally called after data processing is completed Collect() outputs the result. Inside this function, it will partition the generated key/value (call Partitioner) and write it to a ring memory buffer.
(4) Spill stage: that is, "write overflow". When the ring buffer is full, MapReduce will write the data to the local disk and generate a temporary file. It should be noted that before writing the data to the local disk, the data should be sorted locally, and the data should be merged and compressed when necessary.
Overflow stage details:
Step 1: use the quick sort algorithm to sort the data in the cache. The sorting method is to sort according to the Partition number Partition first, and then according to the key. In this way, after sorting, the data are gathered together in the unit of Partition, and all data in the same Partition are ordered according to the key.
Step 2: write the data in each partition into the temporary file output / spilln under the task working directory according to the partition number from small to large Out (N indicates the current number of overflow writes). If the user sets Combiner, the data in each partition is aggregated once before writing to the file.
Step 3: write the meta information of the partition data to the memory index data structure SpillRecord, where the meta information of each partition includes the offset in the temporary file, the data size before compression and the data size after compression. If the current memory index size exceeds 1MB, write the memory index to the file output / spin out. Index.
(5) Merge stage: when all data processing is completed, MapTask will merge all temporary files at once to ensure that only one data file will be generated in the end.
When all data is processed, MapTask will merge all temporary files into a large file and save it to the file output / file Out, the corresponding index file output / file is generated at the same time out. index.
In the process of file merging, MapTask merges by partition. For a partition, it will adopt multiple rounds of recursive merging. Each round of merge MapReduce task. io. sort. Factor (default 10) files, and add the generated files back to the list to be merged. After sorting the files, repeat the above process until a large file is finally obtained.
Let each MapTask finally generate only one data file, which can avoid the overhead of random reading caused by opening a large number of files and reading a large number of small files at the same time.
6.3.5 ReduceTask working mechanism

(1) Copy phase: ReduceTask copies a piece of data remotely from each MapTask. If the size of a piece of data exceeds a certain threshold, it will be written to disk, otherwise it will be directly put into memory.
(2) Merge stage: while copying data remotely, ReduceTask starts two background threads to merge files on memory and disk to prevent excessive memory use or too many files on disk.
(3) Sort stage: according to MapReduce semantics, the user writes the reduce() function, and the input data is a group of data aggregated by key. In order to gather the same data, Hadoop adopts a sort based strategy. Since each MapTask has implemented local sorting of its processing results, ReduceTask only needs to merge and sort all data once.
(4) Reduce phase: the reduce() function writes the calculation results to HDFS.
6.3.6 OutputFormat data output
OutputFormat is the base class of MapReduce output. All MapReduce outputs implement the OutputFormat interface. Here are several common OutputFormat implementation classes.
1. Text output TextOutputFormat
The default output format is TextOutputFormat, which writes each record as a line of text. Its keys and values can be of any type because TextOutputFormat calls the toString() method to convert them to strings.
2.SequenceFileOutputFormat
Taking the output of SequenceFileOutputFormat as the input of subsequent MapReduce tasks is a good output format, because its format is compact and easy to be compressed.
3. Customize OutputFormat
Customize the output according to user requirements.
Usage scenario: in order to control the output path and output format of the final file, you can customize the OutputFormat.
Custom OutputFormat steps:
(1) Customize a class to inherit FileOutputFormat.
(2) Rewrite the RecordWriter. Specifically, the method of rewriting the output data is write().
6.3.7 multiple applications of join
How Reduce Join works
The main work of the Map side: tag key/value pairs from different tables or files to distinguish records from different sources. Then use the connection field as the key, the rest and the newly added flag as the value, and finally output.
Main work of the Reduce side: the grouping with the connection field as the key on the Reduce side has been completed. We only need to separate the records from different files (marked in the Map stage) in each grouping, and finally merge them.
Map Join
1) Usage scenario
Map Join is suitable for scenarios where a table is very small and a table is very large.
2) Advantages
Thinking: processing too many tables on the Reduce side is very easy to produce data skew. What should I do?
Cache multiple tables on the Map side and process the business logic in advance, so as to increase the Map side business, Reduce the pressure on the Reduce side data and Reduce the data skew as much as possible.
3) Specific method: adopt DistributedCache
(1) In Mapper's setup phase, the file is read into the cache collection.
(2) Load the cache in the Driver driver class.
//Cache ordinary files to the Task run node.
job.addCacheFile(new URI("file:///e:/cache/pd.txt"));
//If you are running in a cluster, you need to set the HDFS path
job.addCacheFile(new URI("hdfs://hadoop102:9820/cache/pd.txt"));
6.3.8 counter application
Hadoop maintains several built-in counters for each job to describe multiple indicators. For example, some counters record the number of bytes processed and the number of records, enabling the user to monitor the amount of input data processed and the amount of output data generated.
1. Counter API
(1) Count by enumeration
enum MyCounter{MALFORORMED,NORMAL}
//Increment the custom counter defined by the enumeration by 1
context.getCounter(MyCounter.MALFORORMED).increment(1);
(2) Count by counter group and counter name
context.getCounter("counterGroup", "counter").increment(1);
The group name and counter name can be used casually, but it is better to be meaningful
(3) The counting results are viewed on the console after the program runs.
7. Yarn resource scheduler
Yarn is a resource scheduling platform, which is responsible for providing server computing resources for computing programs. It is equivalent to a distributed operating system platform, while computing programs such as MapReduce are equivalent to applications running on the operating system.
7.1 Yarn basic architecture
YARN is mainly composed of ResourceManager, NodeManager, ApplicationMaster, Container and other components.

7.2 Yarn working mechanism
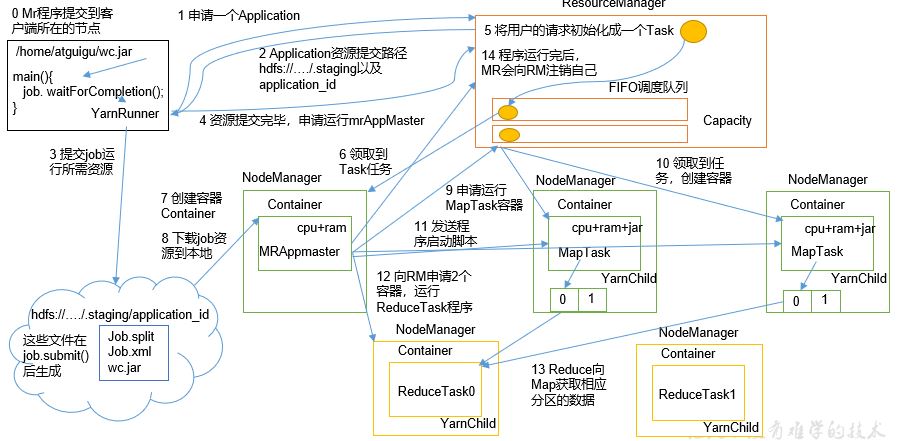
(1) The MR program is submitted to the node where the client is located.
(2) YarnRunner requests an Application from ResourceManager.
(3) RM returns the resource path of the application to YarnRunner.
(4) The program submits the resources required for operation to HDFS.
(5) After submitting the program resources, apply to run mrAppMaster.
(6) RM initializes the user's request into a Task.
(7) One of the nodemanagers receives the Task.
(8) The NodeManager creates Container and generates MRAppmaster.
(9) Container copies resources from HDFS to local.
(10) MRAppmaster requests RM to run MapTask resource.
(11) RM assigns the task of running MapTask to the other two nodemanagers, and the other two nodemanagers receive the task and create a container respectively.
(12) MR sends the program startup script to two nodemanagers who have received the task. The two nodemanagers start MapTask respectively, and MapTask sorts the data partition.
(13) After MrAppMaster waits for all maptasks to run, it applies to RM for containers and runs ReduceTask.
(14) ReduceTask obtains the data of the corresponding partition from MapTask.
(15) After the program is completed, MR will apply to RM for cancellation.
7.3 resource scheduler
At present, there are three types of Hadoop job scheduler: FIFO, Capacity Scheduler and Fair Scheduler. Hadoop3.1.3 the default resource scheduler is Capacity Scheduler.
For specific settings, see: yarn default XML file
<property>
    <description>The class to use as the resource scheduler.</description>
    <name>yarn.resourcemanager.scheduler.class</name>
<value>org.apache.hadoop.yarn.server.resourcemanager.scheduler.capacity.CapacityScheduler</value>
</property>
1) First in first out scheduler (FIFO)
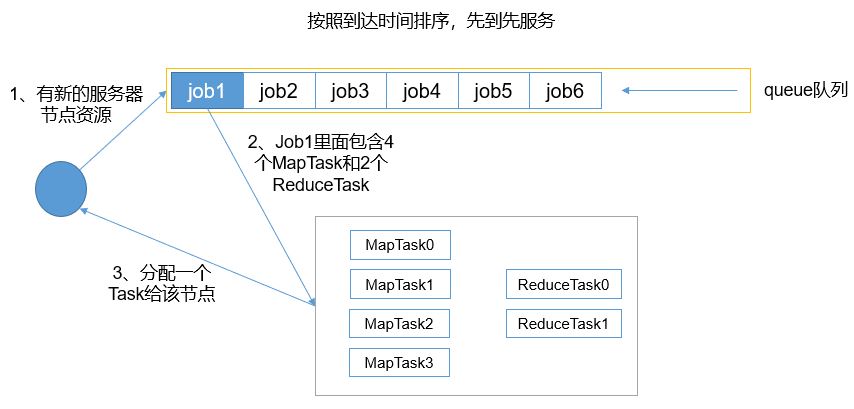
Hadoop was originally designed to support big data batch processing jobs, such as log mining, Web indexing and so on,
Therefore, Hadoop only provides a very simple scheduling mechanism: FIFO, that is, first come first service. Under this scheduling mechanism, all jobs are submitted to a queue, and Hadoop runs these jobs in turn according to the submission order.
However, with the popularity of Hadoop, the number of users in a single Hadoop cluster is increasing. Applications submitted by different users often have different quality of service requirements. Typical applications are as follows:
Batch job: this kind of job often takes a long time, and there are generally no strict requirements on the completion time, such as application programs in data mining, machine learning and so on.
Interactive job: this kind of job is expected to return results in time, such as SQL query (Hive).
Productive operation: this kind of operation requires a certain amount of resources, such as statistical value calculation, garbage data analysis, etc.
In addition, these applications also have different requirements for hardware resources. For example, filtering and statistics jobs are generally CPU intensive jobs, while data mining and machine learning jobs are generally I/O-Intensive jobs. Therefore, a simple FIFO scheduling strategy can not only meet the diversified needs, but also make full use of hardware resources.
2) Capacity Scheduler
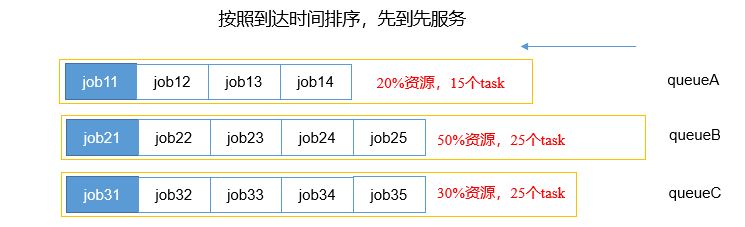
Capacity Scheduler Capacity Scheduler is a multi-user scheduler developed by Yahoo. It divides resources by queue. Each queue can set a certain proportion of the minimum guarantee and upper limit of resources. At the same time, each user can also set a certain upper limit of resources to prevent resource abuse. When a queue has surplus resources, the remaining resources can be temporarily shared with other queues.
In short, Capacity Scheduler has the following characteristics:
① Capacity guarantee. The administrator can set the minimum resource guarantee and resource usage limit for each queue, and all applications submitted to the queue share these resources.
② Flexibility: if there are surplus resources in a queue, they can be temporarily shared with those queues that need resources. Once a new application is submitted to the queue, the resources seconded by other queues will be returned to the queue. This flexible allocation of resources can significantly improve resource utilization.
③ Multiple leases. Support multi-user shared cluster and multi application running at the same time. In order to prevent a single application, user or queue from monopolizing resources in the cluster, the administrator can add multiple constraints (such as the number of tasks run by a single application at the same time).
④ Safety assurance. Each queue has a strict ACL list to specify its access users. Each user can specify which users are allowed to view the running status of their own application or control the application (such as killing the application). In addition, administrators can specify queue administrators and cluster system administrators.
⑤ Dynamically update the configuration file. Administrators can dynamically modify various configuration parameters as needed to realize online cluster management.
3) Fair Scheduler
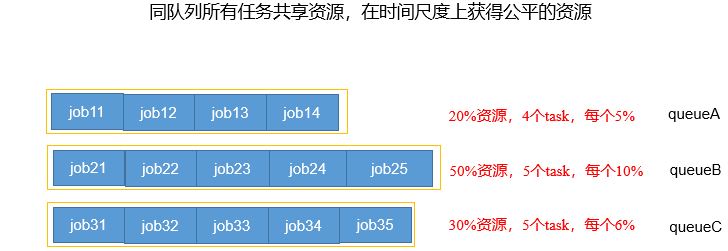
Fair scheduler fair scheduler is a multi-user scheduler developed by Facebook.
The purpose of fair scheduler is to enable all jobs to obtain equal shared resources over time. When a job is submitted, the system will allocate free resources to new jobs, and each task will obtain roughly equal amount of resources. Different from the traditional scheduling strategy, it will allow small tasks to be completed in a reasonable time, and will not starve the tasks that need to run for a long time and consume a lot of resources!
Similar to the Capacity Scheduler, it divides resources by queue. Each queue can set a certain proportion of the minimum guarantee and upper limit of resources. At the same time, each user can also set a certain upper limit of resources to prevent resource abuse; When a queue has surplus resources, the remaining resources can be temporarily shared with other queues.
7.4 capacity scheduler multi queue submission cases
Yarn's default capacity scheduler is a single queue scheduler. In actual use, a single task will block the whole queue. At the same time, with the growth of business, the company needs to limit the utilization rate of clusters by business. This requires us to configure multiple task queues according to business types.
Under the default configuration of Yarn, the capacity scheduler has only one default queue. In capacity scheduler Multiple queues can be configured in XML and the proportion of default queue resources can be reduced:
<!-- Specify multiple queues and add hive queue -->
<property>
    <name>yarn.scheduler.capacity.root.queues</name>
    <value>default,hive</value>
    <description>
      The queues at the this level (root is the root queue).
    </description>
</property>

<!-- reduce default The rated capacity of queue resources is 40%,Default 100% -->
<property>
    <name>yarn.scheduler.capacity.root.default.capacity</name>
    <value>40</value>
</property>

<!-- reduce default The maximum capacity of queue resources is 60%,Default 100% -->
<property>
    <name>yarn.scheduler.capacity.root.default.maximum-capacity</name>
    <value>60</value>
</property>
At the same time, add the necessary attributes for the newly added queue:
<!-- appoint hive Rated resource capacity of the queue -->
<property>
    <name>yarn.scheduler.capacity.root.hive.capacity</name>
    <value>60</value>
</property>

<property>
    <name>yarn.scheduler.capacity.root.hive.user-limit-factor</name>
    <value>1</value>
</property>

<!-- appoint hive Maximum resource capacity of the queue -->
<property>
    <name>yarn.scheduler.capacity.root.hive.maximum-capacity</name>
    <value></value>
</property>

<property>
    <name>yarn.scheduler.capacity.root.hive.state</name>
    <value>RUNNING</value>
</property>

<property>
    <name>yarn.scheduler.capacity.root.hive.acl_submit_applications</name>
    <value>*</value>
</property>

<property>
    <name>yarn.scheduler.capacity.root.hive.acl_administer_queue</name>
    <value>*</value>
</property>

<property>
    <name>yarn.scheduler.capacity.root.hive.acl_application_max_priority</name>
    <value>*</value>
</property>

<property>
    <name>yarn.scheduler.capacity.root.hive.maximum-application-lifetime</name>
    <value>-1</value>
</property>

<property>
    <name>yarn.scheduler.capacity.root.hive.default-application-lifetime</name>
    <value>-1</value>
</property>
After the configuration is completed, restart Yarn or execute yarn rmadmin -refreshQueues to refresh the queue. You can see two queues:
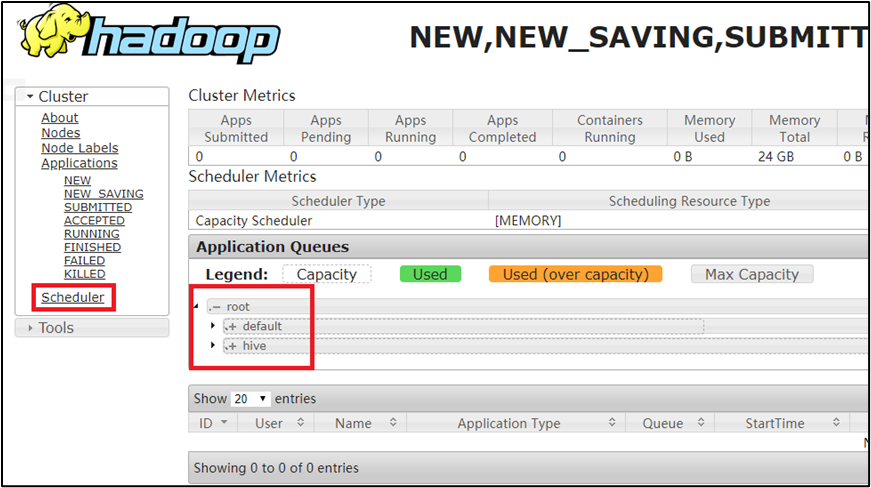
The default task submission is submitted to the default queue. If you want to submit tasks to other queues, you need to declare in the Driver: configuration set(“mapreduce.job.queuename”,“hive”);
In this way, the task will be submitted to the hive queue when the cluster is submitted
8. Hadoop data compression
8.1 general
Compression technology can effectively reduce the number of read and write sections in the underlying storage system (HDFS). Compression improves the efficiency of network bandwidth and disk space. When running MR program, I/O operation, network data transmission, Shuffle and Merge take a lot of time, especially in the case of large data scale and intensive workload. Therefore, the use of data compression is very important.
Since disk I/O and network bandwidth are valuable resources of Hadoop, data compression is very helpful to save resources and minimize disk I/O and network transmission. Compression can be enabled at any MapReduce stage. However, although the CPU overhead of compression and decompression operation is not high, its performance improvement and resource saving are not without cost.
Compression strategies and principles
Compression is an optimization strategy to improve the running efficiency of Hadoop.
Compress the data of Mapper and Reducer to reduce disk IO and improve the running speed of MR program.
Note: the compression technology reduces the disk IO, but increases the CPU computing burden at the same time. Therefore, proper use of compression characteristics can improve performance, but improper use may also reduce performance.
Basic principles of compression:
(1) Operation intensive job s use less compression
(2) IO intensive job, multi-purpose compression
MR supported compression coding
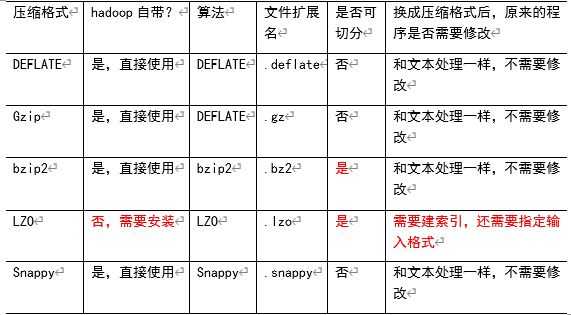
In order to support a variety of compression / decompression algorithms, Hadoop introduces a codec / decoder, as shown in the table below.
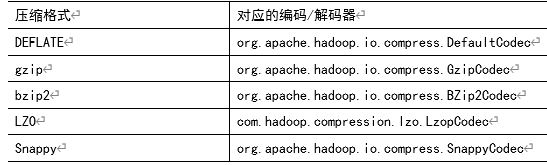
Comparison of compression performance

8.2 selection of compression mode
Gzip compression
Advantages: high compression ratio and fast compression / decompression speed; Hadoop itself supports, and processing Gzip files in applications is the same as directly processing text; Most Linux systems come with Gzip command, which is easy to use.
Disadvantages: Split is not supported.
Application scenario: when each file is compressed within 130M (within 1 block size), Gzip compression format can be considered. For example, a log of one day or one hour is compressed into a Gzip file
Bzip2 compression
Advantages: support Split; It has high compression ratio, which is higher than Gzip compression ratio; Hadoop comes with itself and is easy to use.
Disadvantages: slow compression / decompression speed.
Application scenario: suitable for the time when the speed requirement is not high but the compression rate is high; Or the output data is relatively large, the processed data needs to be compressed and archived to reduce disk space, and the later data is used less; Or if you want to compress a single large text file to reduce storage space, and you need to support Split and be compatible with previous applications.
Lzo compression
Advantages: fast compression / decompression speed and reasonable compression rate; Support Split, which is the most popular compression format in Hadoop; lzop command can be installed under Linux system, which is convenient to use.
Disadvantages: the compression ratio is lower than Gzip; Hadoop itself does not support and needs to be installed; In the application, the Lzo format file needs some special processing (in order to support Split, the index needs to be built, and the InputFormat needs to be specified as Lzo format).
Application scenario: a large text file that is more than 200M after compression can be considered, and the larger the single file, the more obvious the advantages of Lzo.
Snappy compression
Advantages: high compression speed and reasonable compression ratio.
Disadvantages: Split is not supported; The compression ratio is lower than Gzip; Hadoop itself is not supported and needs to be installed.
Application scenario: when the data output from the Map of MapReduce job is relatively large, it is used as the compression format of the intermediate data from Map to Reduce; Or as the output of one MapReduce job and the input of another MapReduce job.
8.3 selection of compression position
Compression can be enabled at any stage of MapReduce.
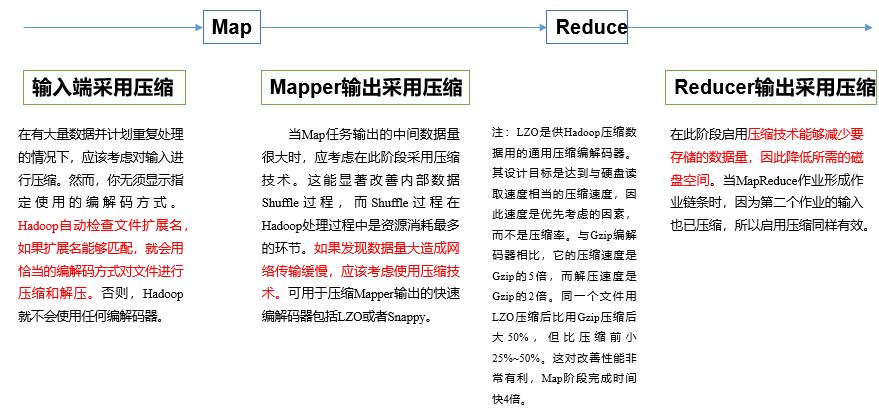
8.4 compression parameter configuration
To enable compression in Hadoop, you can configure the following parameters:
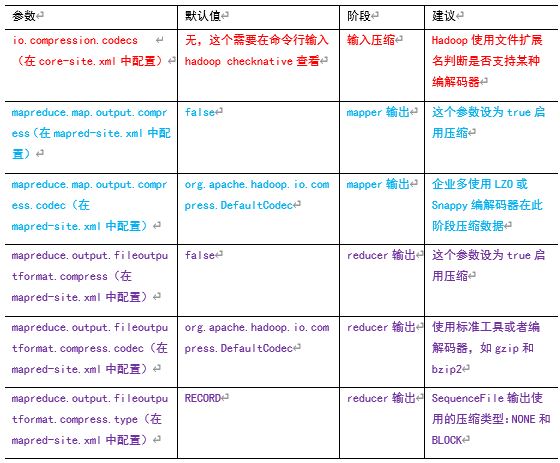
9. Hadoop optimization
9.1 reasons why MapReduce runs slowly
The bottleneck of MapReduce program efficiency lies in two points:
1. Computer performance
CPU, memory, disk health, network
2. I/O operation optimization
(1) Data skew
(2) Unreasonable Map and Reduce number settings
(3) The running time of Map is too long, which causes Reduce to wait too long
(4) Too many small files
(5) Large number of non slicable super large compressed files
(6) Too many spills
(7) Too many Merge times, etc.
9.2 MapReduce optimization method
MapReduce optimization method is mainly considered from six aspects: data input, Map stage, Reduce stage, IO transmission, data skew problem and common tuning parameters.
data input
(1) Merge small files: merge small files before executing MR tasks. A large number of small files will produce a large number of Map tasks, increasing the loading times of Map tasks, which is time-consuming, resulting in slow MR operation.
(2) Combine textinputformat is used as input to solve the scenario of a large number of small files at the input end.
Map phase
(1) Reduce the number of spills: by adjusting MapReduce task. io. sort. MB and MapReduce map. sort. Spill. The percentage parameter value increases the upper memory limit for triggering the Spill and reduces the number of spills, thereby reducing disk IO.
(2) Reduce the number of merges: by adjusting MapReduce task. io. sort. Factor parameter, increase the number of Merge files and reduce the number of Merge, so as to shorten the MR processing time.
(3) After Map, Combine processing is performed first to reduce I/O without affecting business logic.
Reduce phase
(1) Reasonably set the number of Map and Reduce: neither of them can be set too little or too much. Too little will cause the Task to wait and prolong the processing time; Too much will lead to competition for resources between Map and Reduce tasks, resulting in processing timeout and other errors.
(2) Set the coexistence of Map and Reduce:
Adjust MapReduce job. Reduce. slowstart. The completedmaps parameter enables Reduce to run after the Map runs to a certain extent, reducing the wait time of Reduce.
(3) Avoid using Reduce: because Reduce will generate a lot of network consumption when used to connect data sets.
(4) Reasonably set the Buffer on the Reduce side: by default, when the data reaches a threshold, the data in the Buffer will be written to the disk, and then Reduce will get all the data from the disk. In other words, Buffer and Reduce are not directly related. Since there is this disadvantage in the process of writing to disk - > reading disk for many times, it can be configured through parameters so that some data in Buffer can be directly transmitted to Reduce, so as to Reduce IO overhead: MapReduce Reduce. input. Buffer. Percent, the default is 0.0. When the value is greater than 0, the specified proportion of memory will be reserved, and the data in the read Buffer will be directly used by Reduce. In this way, memory is required to set Buffer, read data and Reduce calculation, so it should be adjusted according to the operation of the job.
IO transmission
1) Data compression is adopted to reduce the time of network IO. Install Snappy and LZO compression encoders.
2) Use SequenceFile binaries.
Data skew problem
1. Data skew
Data frequency tilt - the amount of data in one area is much larger than that in other areas.
Data size skew - the size of some records is much larger than the average.
2. Methods to reduce data skew
Method 1: sampling and range zoning
The partition boundary value can be preset through the result set obtained by sampling the original data.
Method 2: Custom partition
Customize the partition based on the background knowledge of the output key. For example, if the word of the Map output key comes from a book. And some professional words are more. Then you can customize the partition and send these professional terms to a fixed part of the Reduce instance. Send the rest to the remaining Reduce instances
Method 3: Combiner
Using Combiner can greatly reduce data skew. Where possible, the purpose of Combine is to aggregate and streamline data.
Method 4: adopt Map Join and try to avoid Reduce Join
9.3 Hadoop small file optimization method
Disadvantages of Hadoop small files
Each file in HDFS needs to create corresponding metadata on the NameNode. The size of this metadata is about 150byte. In this way, when there are many small files, a lot of metadata files will be generated. On the one hand, it will occupy a lot of memory space of the NameNode. On the other hand, there are too many metadata files, which slows down the addressing and indexing speed.
There are too many small files. During MR calculation, too many slices will be generated, and too many maptasks need to be started. The amount of data processed by each MapTask is small, so the processing time of MapTask is smaller than the startup time, which consumes resources in vain.
Hadoop small file solution
-
Direction of small file Optimization:
(1) During data collection, small files or small batches of data are synthesized into large files and then uploaded to HDFS.
(2) Before business processing, use MapReduce program on HDFS to merge small files.
(3) In MapReduce processing, CombineTextInputFormat can be used to improve efficiency.
(4) Open uber mode to realize jvm reuse -
Hadoop Archive
It is an efficient file archiving tool that puts small files into HDFS blocks. It can package multiple small files into one HAR file, so as to reduce the memory use of NameNode -
SequenceFile
SequenceFile is composed of a series of binary k/v. if key is the file name and value is the file content, a large number of small files can be combined into a large file -
CombineTextInputFormat
CombineTextInputFormat is used to generate a single slice or a small number of slices from multiple small files during the slicing process. -
Turn on uber mode to realize Jvm reuse. By default, each Task needs to start a Jvm to run. If the amount of data calculated by the Task task is very small, we can let multiple tasks of the same Job run in one Jvm without opening a Jvm for each Task
Turn on uber mode, in mapred site Add the following configuration to XML
<!--  open uber pattern -->
<property>
  <name>mapreduce.job.ubertask.enable</name>
  <value>true</value>
</property>

<!-- uber Maximum in mode mapTask Quantity, can be modified downward  -->
<property>
  <name>mapreduce.job.ubertask.maxmaps</name>
  <value>9</value>
</property>
<!-- uber Maximum in mode reduce Quantity, can be modified downward -->
<property>
  <name>mapreduce.job.ubertask.maxreduces</name>
  <value>1</value>
</property>
<!-- uber The maximum amount of input data in the mode. It is used by default dfs.blocksize The value of can be modified downward -->
<property>
  <name>mapreduce.job.ubertask.maxbytes</name>
  <value></value>
</property>
10. New features of Hadoop
10.1 Hadoop2.x new features
Inter cluster data copy
1) scp implements file replication between two remote hosts
scp -r hello.txt root@hadoop103:/user/wangxin/hello.txt		// push
scp -r root@hadoop103:/user/wangxin/hello.txt  hello.txt		// pull
scp -r root@hadoop103:/user/wangxin/hello.txt root@hadoop104:/user/wangxin   //yes
Realize file replication of two remote hosts through local host transfer; This method can be used if ssh is not configured between two remote hosts.
2) Using distcp command to realize recursive data replication between two Hadoop clusters
[wangxin@hadoop102 hadoop-3.1.3]$ bin/hadoop distcp hdfs://hadoop102:9820/user/wangxin/hello.txt hdfs://hadoop105:9820/user/wangxin/hello.txt
Small file archiving
Disadvantages of HDFS storing small files: each file is stored in blocks, and the metadata of each block is stored in the memory of NameNode. Therefore, HDFS storing small files will be very inefficient. Because a large number of small files will consume most of the memory in the NameNode. Note, however, that the disk capacity required to store small files is independent of the size of the data block. For example, a 1MB file set to 128MB block storage actually uses 1MB disk space instead of 128MB.
One of the ways to store small files: HDFS archive file or HAR file is a more efficient file archive tool. It stores files into HDFS blocks and allows transparent access to files while reducing the memory use of NameNode. Specifically, the HDFS archive file is an independent file internally, but it is a whole for the NameNode, reducing the memory of the NameNode.
recycle bin
Turn on the recycle bin function to restore the original data of deleted files without timeout, so as to prevent accidental deletion and backup.
1) Parameter setting and working mechanism of recycle bin
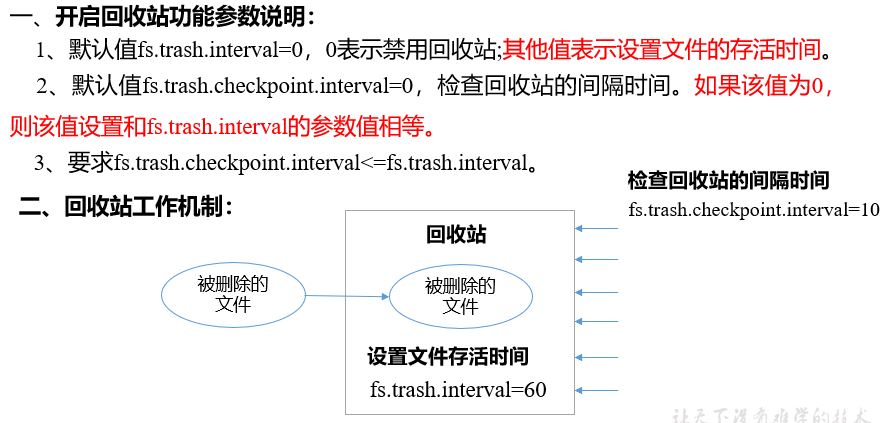
2) Enable recycle bin
Modify core site XML, configure the garbage collection time to 1 minute.
<property>
    <name>fs.trash.interval</name>
<value>1</value>
</property>
<property>
<name>fs.trash.checkpoint.interval</name>
<value>1</value>
</property>
3) View recycle bin
Path of recycle bin directory in hdfs cluster: / user / Wangxin / Trash/….
4) The files deleted through the program will not go through the recycle bin. You need to call moveToTrash() to enter the recycle bin
Trash trash = New Trash(conf);
trash.moveToTrash(path);
5) Files deleted directly through the web page will not go to the recycle bin.
6) Only files deleted with hadoop fs -rm command on the command line will go to the recycle bin.
[wangxin@hadoop102 hadoop-3.1.3]$ hadoop fs -rm -r /user/wangxin/input
7) Recover recycle bin data
[wangxin@hadoop102 hadoop-3.1.3]$ hadoop fs -mv
/user/wangxin/.Trash/Current/user/wangxin/input    /user/wangxin/input
10.2 Hadoop3.x new features
Multi NN HA architecture
The initial implementation of HDFS NameNode high availability is a single active NameNode and a single standby NameNode, and the edits are copied to three journalnodes. The architecture can tolerate the failure of one NN or one JN in the system.
However, some deployments require a higher degree of fault tolerance. Hadoop3.x allows users to run multiple alternate namenodes. For example, by configuring three namenodes and five journalnodes, the cluster can tolerate the failure of two nodes instead of one.
Erasure code
The default 3 replica scheme in HDFS has 200% overhead in storage space and other resources (for example, network bandwidth). However, for warm and cold datasets with relatively low I / O activity, other block copies are rarely accessed during normal operation, but still consume the same amount of resources as the first copy.
Erasure Coding can provide the same fault tolerance as 3 replicas with less than 50% data redundancy. Therefore, it is natural to use erasure code as the improvement of replica mechanism.
View the erasure code policies supported by the cluster: hdfs ec -listPolicies
11. Hadoop HA high availability
11.1 HA overview
(1) The so-called HA (high availability), that is, high availability (7 * 24-hour uninterrupted service).
(2) The key strategy to achieve high availability is to eliminate single point of failure. Strictly speaking, ha should be divided into HA mechanisms of various components: ha of HDFS and ha of YARN.
(3)Hadoop2. Before 0, there was a single point of failure (SPOF) in the NameNode in the HDFS cluster.
(4) NameNode mainly affects HDFS clusters in the following two aspects
If the NameNode machine goes down unexpectedly, the cluster will not be available until the administrator restarts
The NameNode machine needs to be upgraded, including software and hardware upgrades. At this time, the cluster will not be available
The HDFS HA function solves the above problems by configuring Active/Standby NameNodes to realize the hot standby of NameNodes in the cluster. If there is a failure, such as the machine crashes or the machine needs to be upgraded and maintained, the NameNode can be quickly switched to another machine in this way.
11.2 working mechanism of hdfs-ha
Eliminate single point of failure through multiple namenodes
Key points of HDFS-HA
1) Metadata management needs to be changed
Save a copy of metadata in memory;
Edit log: only NameNode nodes in Active status can write;
All namenodes can read Edits;
Shared Edits are managed in a shared storage (qjournal and NFS are two mainstream implementations);
2) A status management function module is required
A zkfailover is implemented, which resides in the node where each namenode is located. Each zkfailover is responsible for monitoring its namenode node and using zk to identify the state. When state switching is required, zkfailover is responsible for switching. During switching, brain split phenomenon needs to be prevented.
3) You must ensure ssh password free login between two namenodes
4) Fence, that is, only one NameNode provides services at the same time
Working mechanism of HDFS-HA automatic failover
Automatic failover adds two new components to HDFS deployment: ZooKeeper and zkfailover controller (ZKFC) process, as shown in Figure 3-20. ZooKeeper is a highly available service that maintains a small amount of coordination data, notifies clients of changes in these data, and monitors client failures. The automatic failover of HA depends on the following functions of ZooKeeper:
1. Fault detection
Each NameNode in the cluster maintains a session in ZooKeeper. If the machine crashes, the session in ZooKeeper will be terminated, and ZooKeeper notifies another NameNode that failover needs to be triggered.
2. Active NameNode selection
ZooKeeper provides a simple mechanism for uniquely selecting a node as active. If the current active NameNode crashes, another node may obtain a special exclusive lock from ZooKeeper to indicate that it should become an active NameNode.
ZKFC is another new component in automatic failover. It is the client of ZooKeeper and also monitors and manages the status of NameNode. Each host running NameNode also runs a ZKFC process. ZKFC is responsible for:
1) Health monitoring
ZKFC uses a health check command to ping the NameNode of the same host regularly. As long as the NameNode replies to the health status in time, ZKFC considers the node to be healthy. If the node crashes, freezes or enters an unhealthy state, the health monitor identifies the node as unhealthy.
2) ZooKeeper session management
When the local NameNode is healthy, ZKFC maintains an open session in ZooKeeper. If the local NameNode is active, ZKFC also maintains a special znode lock, which uses ZooKeeper's support for transient nodes. If the session is terminated, the lock node will be deleted automatically.
3) Selection based on ZooKeeper
If the local NameNode is healthy and ZKFC finds that no other node currently holds a znode lock, it will acquire the lock for itself. If successful, it has won the choice and is responsible for running the failover process so that its local NameNode is Active.
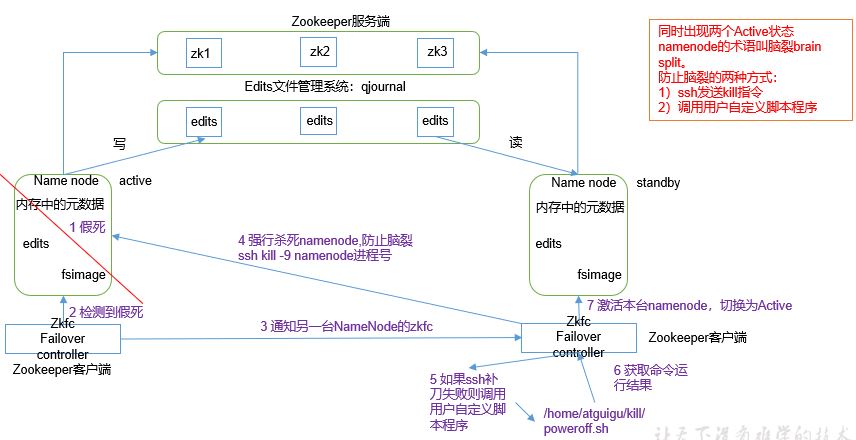
11.3 working mechanism of yarn-ha
1) Official documents:
http://hadoop.apache.org/docs/r3.1.3/hadoop-yarn/hadoop-yarn-site/ResourceManagerHA.html
2) Working mechanism of YARN-HA
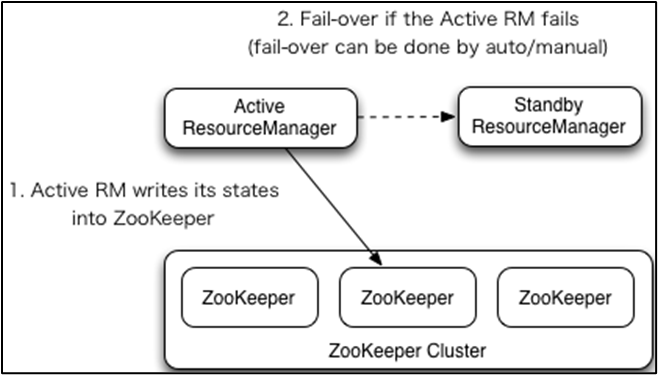
11.4 architecture design of HDFS Federation
Limitations of NameNode architecture
1) Namespace restrictions
Since the NameNode stores all metadata in memory, the number of objects (files + blocks) that a single NameNode can store is limited by the heap size of the JVM where the NameNode resides. 50G heap can store 2 billion (200million) objects, which support 4000 datanodes and 12PB storage (assuming the average file size is 40MB). With the rapid growth of data, the demand for storage also increases. A single DataNode increases from 4T to 36T, and the size of the cluster increases to 8000 datanodes. Storage demand increased from 12PB to more than 100PB.
2) Isolation problem
Since HDFS has only one NameNode, it is impossible to isolate various programs. Therefore, an experimental program on HDFS is likely to affect the programs running on the whole HDFS.
3) Performance bottlenecks
Because it is the HDFS architecture of a single NameNode, the throughput of the entire HDFS file system is limited by the throughput of a single NameNode.
HDFS Federation architecture design
Can there be multiple namenodes
NameNode NameNode NameNode
Metadata
Log machine e-commerce data / bill data

Thoughts on the application of HDFS Federation
Different applications can use different namenodes for data management, image service, crawler service and log audit service. In the Hadoop ecosystem, different frameworks use different namenodes to manage namespaces. (isolation)