http://www.cnblogs.com/xuwujing/p/8059079.html
Introduction
In the last article Big Data Learning Series IV - --- Hadoop+Hive Environment Construction Graphics and Text Details (stand-alone) And before Big Data Learning Series II - HBase Environment Construction (stand-alone) Hive and HBase environments were successfully built and tested. This paper mainly talks about how to integrate Hive and HBase.
Communication Intention between Hive and HBase
The implementation of integration between Hive and HBase is accomplished by communication between the two external API interfaces. The specific work of integration is implemented by hive-hbase-handler-*.jar tool class in Hive's lib directory. The communication principle is shown in the following figure.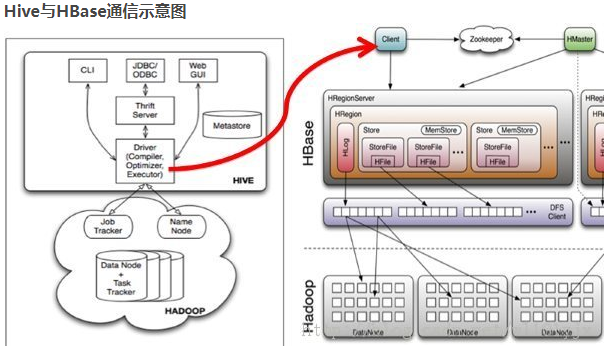
Hive integrates HBase usage scenarios:
(1) The data is loaded into HBase through Hive, and the data source can be either a file or a table in Hive.
(2) Through integration, HBase supports JOIN, GROUP and other SQL query grammars.
(3) Through integration, we can not only complete the real-time query of HBase data, but also use Hive to query the data in HBase to complete complex data analysis.
I. Environmental Choice
1. Server selection
Local Virtual Machine
Operating system: linux CentOS 7
Cpu:2 core
Memory: 2G
Hard disk: 40G
2. Configuration selection
JDK:1.8 (jdk-8u144-linux-x64.tar.gz)
Hadoop:2.8.2 (hadoop-2.8.2.tar.gz)
Hive: 2.1 (apache-hive-2.1.1-bin.tar.gz)
HBase:1.6.2 (hbase-1.2.6-bin.tar.gz)
3. Download address
Official website address
JDK:
http://www.oracle.com/technetwork/java/javase/downloads
Hadopp:
http://www.apache.org/dyn/closer.cgi/hadoop/common
Hive
http://mirror.bit.edu.cn/apache/hive/
HBase:
http://mirror.bit.edu.cn/apache/hbase/
Baidu cloud disk
Links: https://pan.baidu.com/s/1jIemIDC Password: uycu
II. Relevant Configuration of Servers
Before configuring Hadoop+Hive+HBase, you should configure it.
These configurations are convenient to use root privileges.
1. Change the host name
First, the host name is changed to facilitate management.
Input:
hostname View the name of the machine
Then change the host name to master
Input:
hostnamectl set-hostname masterNote: The reboot will not take effect until the host name is changed.
2. Mapping IP and Host Name
Modify hosts file to do relational mapping
input
vim /etc/hostsAdd to
ip and host name of the host
192.168.238.128 master3. Close the firewall
Close the firewall for easy access.
Enter the following version of CentOS 7:
Close the firewall
service iptables stopCentOS version 7 or more input:
systemctl stop firewalld.service4. Time Settings
View the current time
Input:
dateSee if the server time is consistent, if not, change it
Change time command
date -s 'MMDDhhmmYYYY.ss'5. Overall environmental allocation
/ Overall configuration of etc/profile
#Java Config
export JAVA_HOME=/opt/java/jdk1.8
export JRE_HOME=/opt/java/jdk1.8/jre
export CLASSPATH=.:$JAVA_HOME/lib/dt.jar:$JAVA_HOME/lib/tools.jar:$JRE_HOME/lib

# Scala Config
export SCALA_HOME=/opt/scala/scala-2.12.2


# Spark Config
export  SPARK_HOME=/opt/spark/spark1.6-hadoop2.4-hive

# Zookeeper Config
export ZK_HOME=/opt/zookeeper/zookeeper3.4

# HBase Config
export HBASE_HOME=/opt/hbase/hbase1.2

# Hadoop Config
export HADOOP_HOME=/opt/hadoop/hadoop2.8
export HADOOP_COMMON_LIB_NATIVE_DIR=$HADOOP_HOME/lib/native
export HADOOP_OPTS="-Djava.library.path=$HADOOP_HOME/lib"

# Hive Config
export HIVE_HOME=/opt/hive/hive2.1
export HIVE_CONF_DIR=${HIVE_HOME}/conf

export PATH=.:${JAVA_HOME}/bin:${SCALA_HOME}/bin:${SPARK_HOME}/bin:${HADOOP_HOME}/bin:${HADOOP_HOME}/sbin:${ZK_HOME}/bin:${HBASE_HOME}/bin:${HIVE_HOME}/bin:$PATH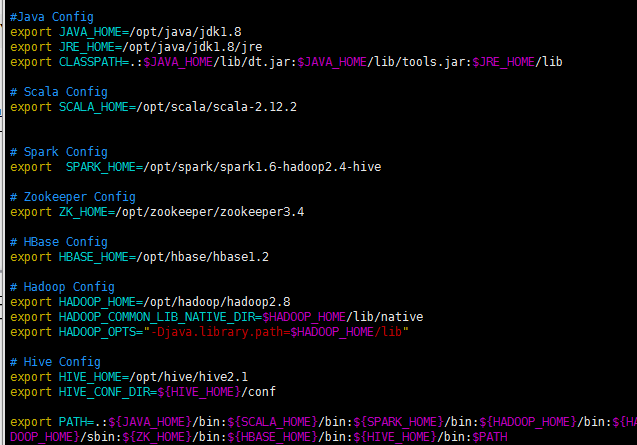
Note: The specific configuration is based on their own, no need to configure.
III. Hadoop's Environmental Configuration
The specific configuration of Hadoop is Hadoop environment building (stand-alone) It is described in great detail. So this article will give a general introduction.
Note: The specific configuration is based on your own.
1. Environment variable settings
Edit/etc/profile file:
vim /etc/profileConfiguration file:
export HADOOP_HOME=/opt/hadoop/hadoop2.8
export HADOOP_COMMON_LIB_NATIVE_DIR=$HADOOP_HOME/lib/native
export HADOOP_OPTS="-Djava.library.path=$HADOOP_HOME/lib"
export PATH=.:${JAVA_HOME}/bin:${HADOOP_HOME}/bin:$PATH
2. Configuration file changes
Switch to / home / Hadoop / Hadoop 2.8 / etc / Hadoop / directory first
3.2.1 Modify core-site.xml
Input:
vim core-site.xmlstay
<configuration>
<property>
        <name>hadoop.tmp.dir</name>
        <value>/root/hadoop/tmp</value>
        <description>Abase for other temporary directories.</description>
   </property>
   <property>
        <name>fs.default.name</name>
        <value>hdfs://master:9000</value>
   </property>
</configuration>
3.2.2 Modify hadoop-env.sh
Input:
vim hadoop-env.shModify ${JAVA_HOME} to your JDK path
export JAVA_HOME=${JAVA_HOME}Revised to:
export JAVA_HOME=/home/java/jdk1.83.2.3 Modify hdfs-site.xml
Input:
vim hdfs-site.xmlstay
<property>
   <name>dfs.name.dir</name>
   <value>/root/hadoop/dfs/name</value>
   <description>Path on the local filesystem where theNameNode stores the namespace and transactions logs persistently.</description>
</property>
<property>
   <name>dfs.data.dir</name>
   <value>/root/hadoop/dfs/data</value>
   <description>Comma separated list of paths on the localfilesystem of a DataNode where it should store its blocks.</description>
</property>
<property>
   <name>dfs.replication</name>
   <value>2</value>
</property>
<property>
      <name>dfs.permissions</name>
      <value>false</value>
      <description>need not permissions</description>
</property>
3.2.4 Modify mapred-site.xml
If there is no mapred-site.xml file, copy the mapred-site.xml.template file and rename it mapred-site.xml.
Input:
vim mapred-site.xmlModify the newly created mapred-site.xml file to
<property>
    <name>mapred.job.tracker</name>
    <value>master:9001</value>
</property>
<property>
      <name>mapred.local.dir</name>
       <value>/root/hadoop/var</value>
</property>
<property>
       <name>mapreduce.framework.name</name>
       <value>yarn</value>
</property>
3. Hadoop Start
Format before starting
Switch to / home / Hadoop / Hadoop 2.8 / bin directory
Input:
./hadoop namenode -formatAfter successful formatting, switch to the / home / Hadoop / Hadoop 2.8 / SBIN directory
Start hdfs and yarn
Input:
start-dfs.sh
start-yarn.sh
After successful startup, enter jsp to see if the startup is successful
Enter ip+8088 and ip+50070 in the browser to see if it can be accessed
Start successfully if access is correct
IV. Hive's Environmental Configuration
Specific configuration of Hive environment in my article Big Data Learning Series IV - --- Hadoop+Hive Environment Construction Graphics and Text Details (stand-alone) And the introduction is very detailed. This is a general introduction.
Modify hive-site.xml
Switch to / opt/hive/hive2.1/conf directory
Copy hive-default.xml.template and rename it hive-site.xml
Then edit the hive-site.xml file
cp hive-default.xml.template hive-site.xml
vim hive-site.xml
Edit the hive-site.xml file in
<!-- Appoint HDFS Medium hive Warehouse address -->
  <property>
    <name>hive.metastore.warehouse.dir</name>
    <value>/root/hive/warehouse</value>
  </property>

<property>
    <name>hive.exec.scratchdir</name>
    <value>/root/hive</value>
  </property>

  <!-- This property is null for embedding mode or local mode, otherwise it is remote mode. -->
  <property>
    <name>hive.metastore.uris</name>
    <value></value>
  </property>

<!-- Appoint mysql Connection -->
 <property>
        <name>javax.jdo.option.ConnectionURL</name>
        <value>jdbc:mysql://master:3306/hive?createDatabaseIfNotExist=true</value>
    </property>
<!-- Specify driver class -->
    <property>
        <name>javax.jdo.option.ConnectionDriverName</name>
        <value>com.mysql.jdbc.Driver</value>
    </property>
   <!-- Specify user name -->
    <property>
        <name>javax.jdo.option.ConnectionUserName</name>
        <value>root</value>
    </property>
    <!-- Specified password -->
    <property>
        <name>javax.jdo.option.ConnectionPassword</name>
        <value>123456</value>
    </property>
    <property>
   <name>hive.metastore.schema.verification</name>
   <value>false</value>
    <description>
    </description>
 </property>
Then all of the
${system:java.io.tmpdir}Change to / opt/hive/tmp (if no file exists),
Give read and write permission to this folder, and
${system:user.name}
Change to root
For example:
Before the change:
After the change:
Configuration diagram: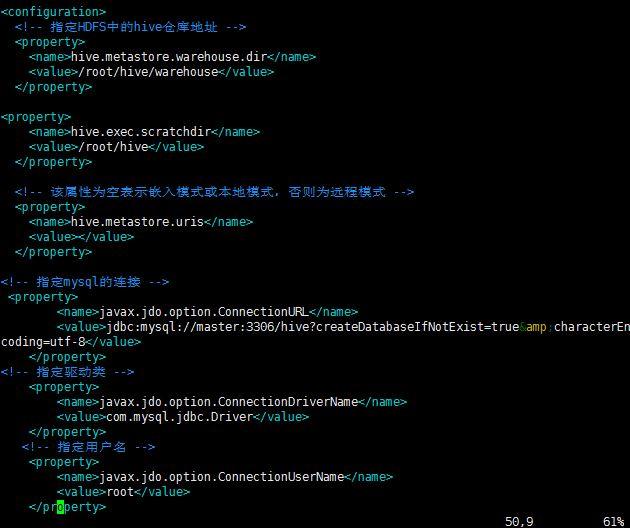
Note: Because of the excessive configuration in hive-site.xml file, it can be downloaded and edited by FTP. You can also configure what you need directly, and the rest can be deleted. The master in MySQL's connection address is an alias for the host and can be changed to ip.
Modify hive-env.sh
Modify the hive-env.sh file, copy hive-env.sh.template without it, and rename it hive-env.sh
Add in this configuration file
export  HADOOP_HOME=/opt/hadoop/hadoop2.8
export  HIVE_CONF_DIR=/opt/hive/hive2.1/conf
export  HIVE_AUX_JARS_PATH=/opt/hive/hive2.1/lib
Adding data-driven packages
Because Hive defaults to using mysql for its own database, this block uses mysql
Upload mysql driver package to / opt/hive/hive2.1/lib
V. Environmental configuration of HBase
Specific configuration of HBase environment in my article Big Data Learning Series II - HBase Environment Construction (stand-alone) And the introduction is very detailed. This is a general introduction.
Modify hbase-env.sh
Edit the hbase-env.sh file and add the following configuration
export JAVA_HOME=/opt/java/jdk1.8
export HADOOP_HOME=/opt/hadoop/hadoop2.8
export HBASE_HOME=/opt/hbase/hbase1.2
export HBASE_CLASSPATH=/opt/hadoop/hadoop2.8/etc/hadoop
export HBASE_PID_DIR=/root/hbase/pids
export HBASE_MANAGES_ZK=false
Description: Configuration of the path to their own prevailing. HBASE_MANAGES_ZK=false is a Zookeeper cluster that does not enable HBase.
Modify hbase-site.xml
Edit the hbase-site.xml file in
<!-- Storage directory -->
<property>
 <name>hbase.rootdir</name>
 <value>hdfs://test1:9000/hbase</value>
 <description>The directory shared byregion servers.</description>
</property>
<!-- hbase Port -->
<property>
 <name>hbase.zookeeper.property.clientPort</name>
 <value>2181</value>
 <description>Property from ZooKeeper'sconfig zoo.cfg. The port at which the clients will connect.
 </description>
</property>
<!--  timeout -->
<property>
 <name>zookeeper.session.timeout</name>
 <value>120000</value>
</property>
<!--  zookeeper Cluster configuration. If it is a cluster, add another host address -->
<property>
 <name>hbase.zookeeper.quorum</name>
 <value>test1</value>
</property>
<property>
 <name>hbase.tmp.dir</name>
 <value>/root/hbase/tmp</value>
</property>
<!-- false It's a stand-alone mode. true It's a distributed model.  -->
<property>
 <name>hbase.cluster.distributed</name>
 <value>false</value>
</property>
Description: hbase.rootdir: This directory is the shared directory of region server for persistence of Hbase. hbase.cluster.distributed: The running mode of Hbase. False is a stand-alone mode and true is a distributed mode. If false,Hbase and Zookeeper run in the same JVM.
VI. Environment Configuration and Testing of Hive Integrated HBase
1. Environmental configuration
Because the integration of Hive and HBase is accomplished by communicating with each other through the API interface of Hive and HBase, the specific work of which is implemented by the hive-hbase-handler-.jar tool class in Hive's lib directory. So you just need to copy hive-hbase-handler-.jar from hive to hbase/lib.
Switch to hive/lib directory
Input:
cp hive-hbase-handler-*.jar /opt/hbase/hbase1.2/lib
Note: If there is a version problem in the integration of hive with hbase, then the version of HBase is the main one, and the jar package in HBase will cover the jar package of hive.
2. hive and hbase tests
When testing, make sure that hadoop, hbase, and hive environments are successfully built and started.
Open two command windows of the xshell
One enters hive, one enters hbase
6.2.1 Create tables mapping hbase in hive
Create a table in hive that maps hbase. For convenience, set the table names on both sides to t_student, and the stored tables are the same.
Enter in hive:
create table t_student(id int,name string) stored by 'org.apache.hadoop.hive.hbase.HBaseStorageHandler' with serdeproperties("hbase.columns.mapping"=":key,st1:name") tblproperties("hbase.table.name"="t_student","hbase.mapred.output.outputtable" = "t_student");Note: The first t_student is the name of the hit table, the second t_student is the table name defined in hbase, and the third t_student is the name of the storage table ("hbase.mapred.output.output table"="t_student") is not required, so the table data is stored in the second table.
(id int,name string) This is the hit table structure. If you want to add fields, add them in this format. If you want to add a comment to a field, add comment'You want to describe'after the field.
For example:
create table t_student(id int comment 'StudentId',name string comment 'StudentName')
Http://www.apache.hadoop.hive.hbase.HBaseStorageHandler This is the designated memory.
hbase.columns.mapping is a family of columns defined in hbase.
For example, ST1 is the column family and name is the column. Create the table t_student in hive, which contains two fields (id of int type and name of string type). Mapping to the table t_student in hbase, key corresponds to rowkey of hbase, value corresponds to st1:name column of hbase.
After the table has been successfully created
View tables and table structures in hive and hbase respectively
Input in hive
show tables;
describe t_student;
hbase input:
list
describe 't_student'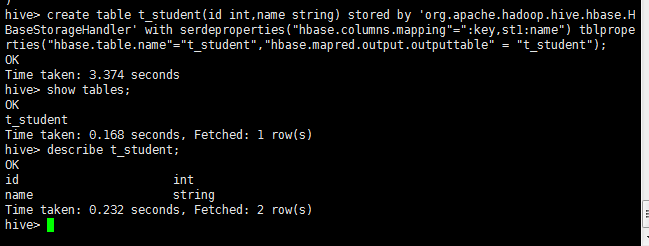
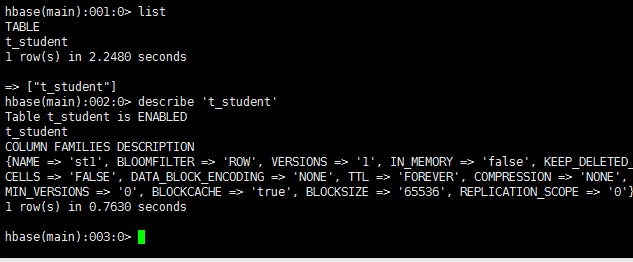
You can see that the table has been successfully created
6.2.2 Data Synchronization Test
After entering hbase
Add two data to t_student and query the table
put 't_student','1001','st1:name','zhangsan'
put 't_student','1002','st1:name','lisi'
scan 't_student'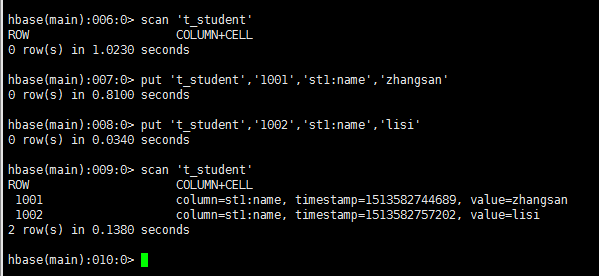
Then switch to hive
Query the table
Input:
select * from t_student;
Then delete the table in hive
Note: Because the test depends on the results, the table was deleted. It is not necessary to delete the table if the students want to do the test, because the table will be used later.
Then check if the tables in hive and hbase have been deleted
Input:
drop table t_student;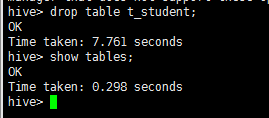
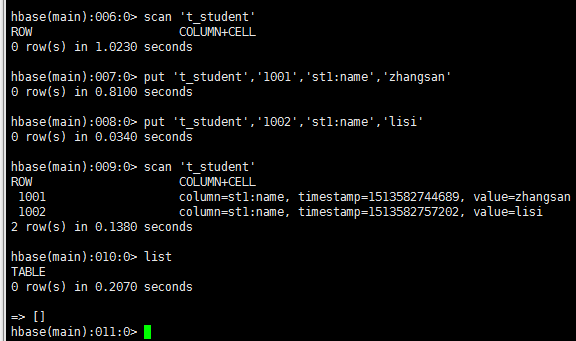
From these we can see that the data between hive and hbase is synchronized successfully!
6.2.3 Association Query Test
hive external table test
First, build a t_student_info table in hbase and add two column families
Then look at the table structure
Input:
create 't_student_info','st1','st2'
describe 't_student_info'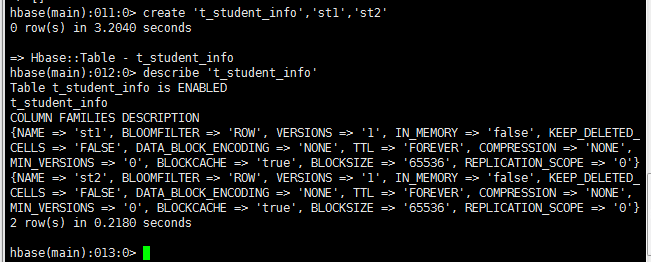
Then create external tables in hive
Description: Use EXTERNAL keywords to create external tables
Input:
create external table t_student_info(id int,age int,sex string) stored by 'org.apache.hadoop.hive.hbase.HBaseStorageHandler' with serdeproperties("hbase.columns.mapping"=":key,st1:age,st2:sex") tblproperties("hbase.table.name"="t_student_info");
Then add data in t_student_info
put 't_student_info','1001','st2:sex','man'
put 't_student_info','1001','st1:age','20'
put 't_student_info','1002','st1:age','18'
put 't_student_info','1002','st2:sex','woman'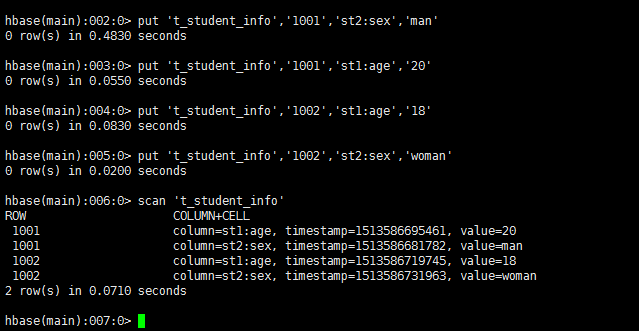
Then query the table in hive
Input:
select * from t_student_info;
After querying the data, the t_student and t_student_info are queried in association.
Input:
select * from t_student t join t_student ti where t.id=ti.id ;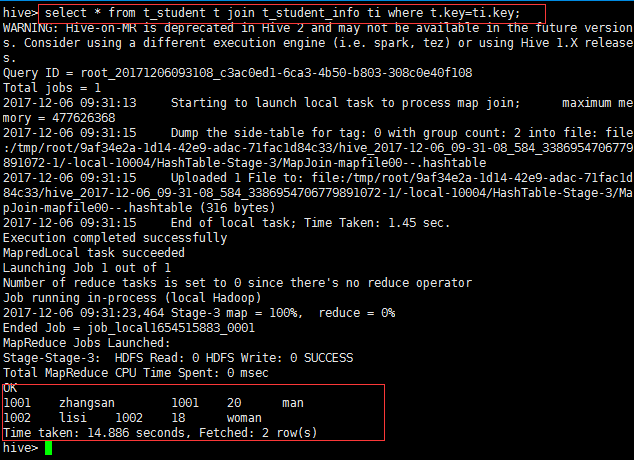
Explanation: By Association query, it can be concluded that tables can be related query. But it's obvious how slow hive is using the default mapreduce as the engine...
Other notes:
Because their virtual machine configuration is too slag, even if the reduce memory is increased to limit the amount of data processed by each reduce, it is still not possible, and finally unable to use the company's test services for testing.
When inquiring a table, hive does not use engine, so it is relatively fast. If it does association query, it will use engine. Because hive's default engine is mr, it will be very slow and has some relationship with configuration. Officials will not recommend using MR after hive 2.x.