K8s binary high availability deployment
Say in front
Relevant codes and note addresses in this chapter: a plane ticket 🚀
🌍Github: 🚀 Java supernatural path:[ 🍔 Study notes of Java full ecological technology, let's be supernatural together 🍔]
🪐CSDN: 🚀 Java supernatural path:[ 🍔 Study notes of Java full ecological technology, let's be supernatural together 🍔]
preface
All the software packages and other files involved in this article are on the following network disk. Of course, you can also download them one by one according to the links given in the article
Link: https://pan.baidu.com/s/1c4OjB9HsSb9hRupFHsgCyw
Extraction code: 6 awp
catalogue
- preface
- catalogue
- I Deployment preparation
- II Etcd cluster deployment
- 2.1 Introduction & node planning
- 2.2 prepare cfssl certificate generation tool
- 2.3 generating certificates for Etcd
- 2.4 downloading Etcd binaries
- 2.5 deployment of Etcd cluster
- 2.5.1 upload, decompress and create Etcd working directory
- 2.5.2 create Etcd configuration file
- 2.5.3 systemd management Etcd
- 2.5.4 copy Etcd certificate to its working directory
- 2.5.5 send the Etcd working directory of Master1 to Node1 and Node2 nodes
- 2.5.6 modify the Etcd configuration files of Node1 and Node2 nodes
- 2.5.7 start Etcd cluster & View Status & query log
- III Deploy Master node
- IV Deploy Work Node
- V Deploy CNI network (Calico)
- Vi Deploy cluster internal DNS (CoreDNS)
- VII Capacity expansion Work Node
- 7.1 copy the deployed Node related files to the capacity expansion Node
- 7.2 delete the kubelet certificate and kubeconfig file on the capacity expansion node
- 7.3 modifying the expansion node configuration file
- 7.4 start the expansion node Kube proxy
- 7.5 approve the kubelet certificate application of the expansion node at the Master node
- 7.6 viewing the status of expansion nodes
- VIII Capacity expansion Master (realizing high availability Architecture)
- 8.1 deploy Master2 expansion node
- 8.2 deploy Nginx + Keepalived high availability load balancer
- 8.2.1 installing software packages
- 8.2.2 Nginx configuration file
- 8.2.3 Keepalived configuration file (LB master node)
- 8.2.4 Keepalived configuration file (LB standby node)
- 8.2.5 startup
- 8.2.6 viewing the keepalived working status
- 8.2.7 Nginx+Keepalived high availability test
- 8.2.8 access K8s cluster test through VIP
- 8.3 modify the connection VIP of all nodes (important)
I Deployment preparation
1.1 two ways to deploy Kubernetes cluster
At present, there are two main ways to deploy Kubernetes cluster in production:
Kubeadm
Kubedm is the official deployment tool of K8S. It provides kubedm init and kubedm join. Users can quickly build Kubernetes clusters and join Node nodes
Binary deployment
Download the binary package of the distribution from github and manually deploy each component to form a Kubernetes cluster.
Kubedm lowered the deployment threshold, but shielded many details, making it difficult to troubleshoot problems.
If you want to be more controllable, it is recommended to use binary packages to deploy Kubernetes clusters. Although manual deployment is troublesome, you can learn a lot of working principles during this period, which is also conducive to later maintenance.
This chapter also introduces the deployment through binary packages.
Other deployment methods
- monikube (we usually use minikube to test the new version of K8S)
- Kubespreay (an automated deployment tool officially provided by google)
- Ranger, kubesphere (automatic deployment tool)
Version 1.2
| Software | edition |
|---|---|
| Docker | 20.10.2 |
| Kubernetes | 1.20.4 |
| Etcd | 3.4.9 |
| Nginx | 1.16.0-1 |
1.3 node planning of high availability cluster
| host name | role | IP | Include components |
|---|---|---|---|
| yf-k8s-160005 | Master1 | 10.0.160.5 | kube-apiserver kube-controller-manager kube-scheduler etcd docker |
| yf-k8s-160008 | Master2 | 10.0.160.8 | kube-apiserver kube-controller-manager kube-scheduler docker |
| yf-k8s-160006 | Work Node1 | 10.0.160.6 | kubelet kube-proxy docker etcd |
| yf-k8s-160007 | Work Node2 | 10.0.160.7 | kubelet kube-proxy docker etcd |
| yf-k8s-160111 | LB(Master) | 10.0.160.111 10.0.160.60(VIP) | Nginx keepalived |
| yf-k8s-160112 | LB(BackUp) | 10.0.160.112 10.0.160.60(VIP) | Nginx keepalived |
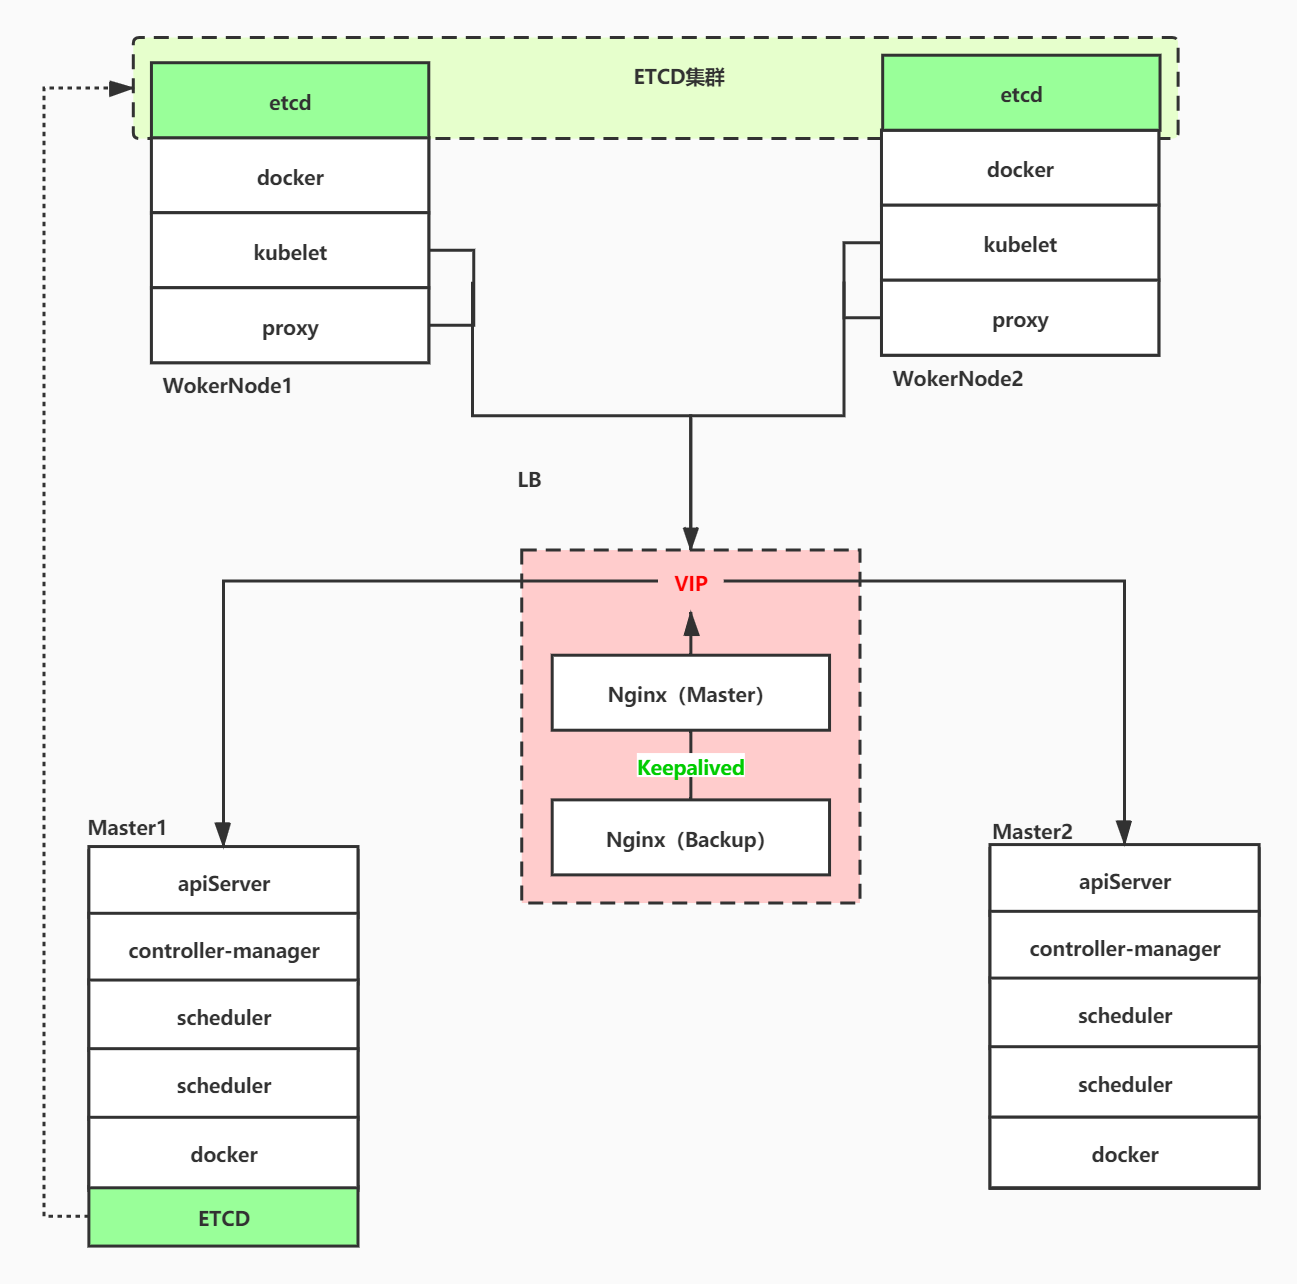
Due to the limited number of machines, we reuse Master1, Node1 and Node2 to deploy ETCD clusters to store K8S related information. Of course, you can also use plug-in mode instead of deploying ETCD clusters in K8S cluster nodes.
Two independent machines are used to deploy Nginx for load balancing for the Master node, and VIP is generated by Keepalived to perform high availability load balancing for the primary and standby nodes of Nginx
1.4 system initialization (including Docker installation)
For brand-new machines, we need to perform a series of initialization and configuration operations on the system
Close dash
#implement
dpkg-reconfigure dash
#Select No
Change user shell
#Use the root permission to change the / bin/sh of the user you created to / bin/bash
vim /etc/passwd

#Before modification
web:x:1001:1001::/home/web:/bin/sh
#After modification
web:x:1001:1001::/home/web:/bin/bash
bashrc configuration (Note: web is the user name created, which needs to be modified to the corresponding one during execution)
cp ~/.bashrc /home/web/
chown web:web /home/web/.bashrc
source /home/web/.bashrc
Change the software source to Alibaba cloud
cp /etc/apt/sources.list /etc/apt/sources.list_bak
#Check / etc / apt / sources The URL in the list is archive Ubuntu or CN archive.ubuntu
vim /etc/apt/sources.list
#archive.ubuntu executes the following commands
sudo sed -i 's/archive.ubuntu.com/mirrors.aliyun.com/g' /etc/apt/sources.list
#cn.archive.ubuntu executes the following commands
sudo sed -i 's/cn.archive.ubuntu.com/mirrors.aliyun.com/g' /etc/apt/sources.list

#to update
apt-get update -y && apt-get upgrade -y
Update time zone
#implement
tzselect
#Select 4 9 1 1(yes)
#Then execute
cp /usr/share/zoneinfo/Asia/Shanghai /etc/localtime
Set hostname
hostnamectl set-hostname yf-k8s-160005
Set HOSTS
vim /etc/hosts
10.0.160.5 yf-k8s-160005
10.0.160.6 yf-k8s-160006
10.0.160.7 yf-k8s-160007
Configure DNS
systemctl stop systemd-resolved
systemctl disable systemd-resolved

cat>/etc/resolv.conf<<EOF
nameserver 10.0.22.14
nameserver 10.0.12.8
nameserver 10.0.34.14
nameserver 114.114.114.114
EOF
Install necessary software (including Docker)
apt install -y lrzsz iotop bzip2 python htop iftop dos2unix supervisor lsof autojump openjdk-8-jdk python-pip libjsoncpp-dev jq unzip python-pip docker.io
Docker configuration
useradd -m web
passwd web
cmbjxccwtn19
cmbjxccwtn19
usermod -aG docker web
mkdir -p /data/docker/data
cat>/etc/docker/daemon.json<<EOF
{
        "registry-mirrors":[
                "https://registry.docker-cn.com/",
                "http://hub-mirror.c.163.com/"
        ],
        "log-driver":"json-file",
        "log-opts": {
                "max-size":"1024m",
                "max-file":"7"
        },
        "data-root": "/data/docker/data"
}
EOF
systemctl daemon-reload
systemctl restart docker
systemctl enable docker
Basic file permission settings
chmod 1777 /data
chmod 1777 /ssd
chmod 1777 /usr/local/lib/python*/dist-packages
mkdir -p /data/apollo/config
chmod 1777 /data/apollo/config
mkdir -p /opt/settings/
echo 'idc=yf' > /opt/settings/server.properties
limits settings
vim /etc/security/limits.conf
#Add the following
* soft nofile 1024000
* hard nofile 1024000
# Sometimes * is useless. You need to specify a user, such as:
root soft nofile 1024000
root hard nofile 1024000
docker others
#hosts of docker warehouse
echo '10.0.193.39 docker-hub.kuwo.cn' >> /etc/hosts

#Set scheduled login
sudo select-editor #Select editor select 2
crontab -e
#Add the following
0 */1 * * * /usr/bin/docker login -u deployment -p deploy@kuwo docker-hub.kuwo.cn >> /tmp/dockerLogin.log 2>&1
#View scheduled tasks
crontab -l

#Log in to docker warehouse
docker login -u deployment -p deploy@kuwo docker-hub.kuwo.cn
Close ghost patch
vim /etc/default/grub

#At grub_ CMDLINE_ Add to Linux variables
noibrs noibpb nopti nospectre_v2 nospectre_v1 l1tf=off nospec_store_bypass_disable no_stf_barrier mds=off tsx=on tsx_async_abort=off mitigations=off

# Update profile boot profile (Ubuntu only)
grub-mkconfig
grub-mkconfig -o /boot/grub/grub.cfg
The following are the necessary configurations for K8s
Close Swap
# If the swap partition is enabled, kubelet will fail to start (you can ignore the swap on by setting the parameter -- fail swap on to false), so you need to close the swap partition on each machine:
sudo swapoff -a
#To prevent the swap partition from being mounted automatically after startup, you can comment the corresponding entry in / etc/fstab:
sudo sed -i '/ swap / s/^\(.*\)$/#\1/g' /etc/fstab

#The test can see that the last line is 0, which means that it is not turned on at present.
root@yf-k8s-160005:/etc/selinux# sudo free -m
              total        used        free      shared  buff/cache   available
Mem:         128555        1298      124561           6        2695      126280
Swap:             0           0           0
The chain that passes the bridged Ipv4 traffic to iptables
cat > /etc/sysctl.d/k8s.conf << EOF
net.bridge.bridge-nf-call-ip6tables = 1
net.bridge.bridge-nf-call-iptables = 1
EOF

#take effect
sysctl --system
II Etcd cluster deployment
2.1 Introduction & node planning
Etcd is a distributed key value storage database. K8s officially uses etcd for data storage by default, so the first step in building k8s cluster is to prepare the etcd database.
In order to prevent the K8s cluster from crashing due to single point failure of Etcd, it has been mentioned in the previous chapter 1.3 node planning of high availability cluster that three nodes are used to form a cluster, and one machine failure can be tolerated.
In order to save machines, the cluster deployment of Etcd reuses the nodes Master1, Node1 and Node2 in the K8s cluster. Of course, it can also be deployed independently of the K8s cluster, as long as apiServer can be connected to it.
| Node name (non machine hostname) | IP | Host name of the machine |
|---|---|---|
| etcd-1 | 10.0.160.5 | yf-k8s-160005 |
| etcd-2 | 10.0.160.6 | yf-k8s-160006 |
| etcd-3 | 10.0.160.7 | yf-k8s-160007 |
2.2 prepare cfssl certificate generation tool
cfssl is an open source certificate management tool. It uses json files to generate certificates, which is more convenient to use than openssl.
Find any server to operate. Here, I use the Master1 node as the node for issuing certificates
#Operation on Master1 only
#If the download tool fails to download, manually download and upload the server
wget https://pkg.cfssl.org/R1.2/cfssl_linux-amd64 --no-check-certificate
wget https://pkg.cfssl.org/R1.2/cfssljson_linux-amd64  --no-check-certificate
wget https://pkg.cfssl.org/R1.2/cfssl-certinfo_linux-amd64  --no-check-certificate

#to grant authorization
chmod +x cfssl_linux-amd64 cfssljson_linux-amd64 cfssl-certinfo_linux-amd64

#move
mv cfssl_linux-amd64 /usr/local/bin/cfssl
mv cfssljson_linux-amd64 /usr/local/bin/cfssljson
mv cfssl-certinfo_linux-amd64 /usr/bin/cfssl-certinfo
2.3 generating certificates for Etcd
2.3.1 generate self signed certificate authority (CA)
Create certificate working directory
# Create certificate working directory in Master1
mkdir -p ~/TLS/{etcd,k8s}
cd ~/TLS/etcd
Create CA file
#Create in the ~ / TLS/etcd directory of Master1
cat > ca-config.json << EOF
{
  "signing": {
    "default": {
      "expiry": "87600h"
    },
    "profiles": {
      "www": {
         "expiry": "87600h",
         "usages": [
            "signing",
            "key encipherment",
            "server auth",
            "client auth"
        ]
      }
    }
  }
}
EOF
#Create in the ~ / TLS/etcd directory of Master1
cat > ca-csr.json << EOF
{
    "CN": "etcd CA",
    "key": {
        "algo": "rsa",
        "size": 2048
    },
    "names": [
        {
            "C": "CN",
            "L": "Beijing",
            "ST": "Beijing"
        }
    ]
}
EOF
ca-config.json file: "expire": "87600h" means that the validity period of the generated certificate is 10 years. 10 years. Don't set it too small. When the certificate expires, the K8s machine will fail to communicate and crash
If kubedm is deployed, the default validity period is 1 year. It can only be upgraded or renewed when it expires. It is very troublesome, or modify its source code and recompile to solve it
Generate CA certificate
After creating the self signed CA file above, we can use the cfssl tool according to Ca config json ca-csr. JSON build a CA authority that issues certificates in the directory / root/TLS/etcd /
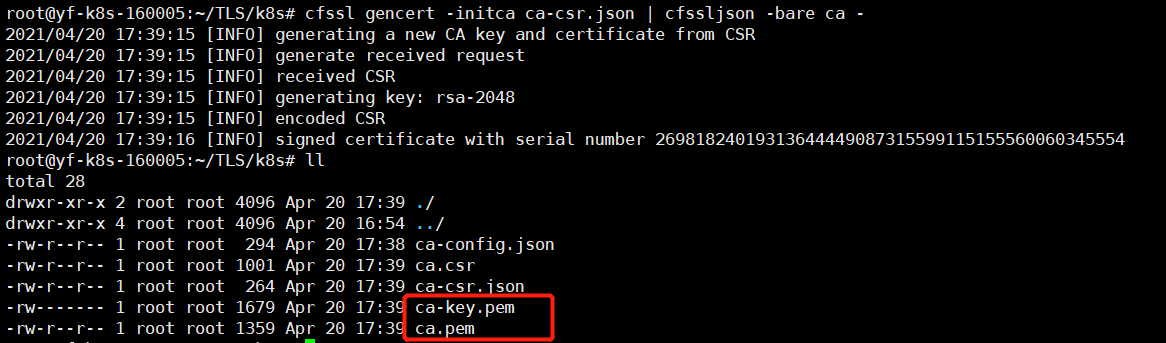
#Execute at Master1
cfssl gencert -initca ca-csr.json | cfssljson -bare ca -
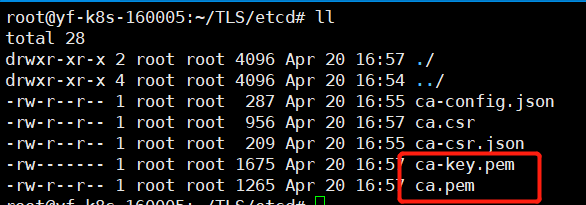
After execution, there will be two more files in the current directory: CA key PEM (CA digital certificate) and ca.pem (CA private key) issue certificates for Etcd through these two CA self signing authority files.
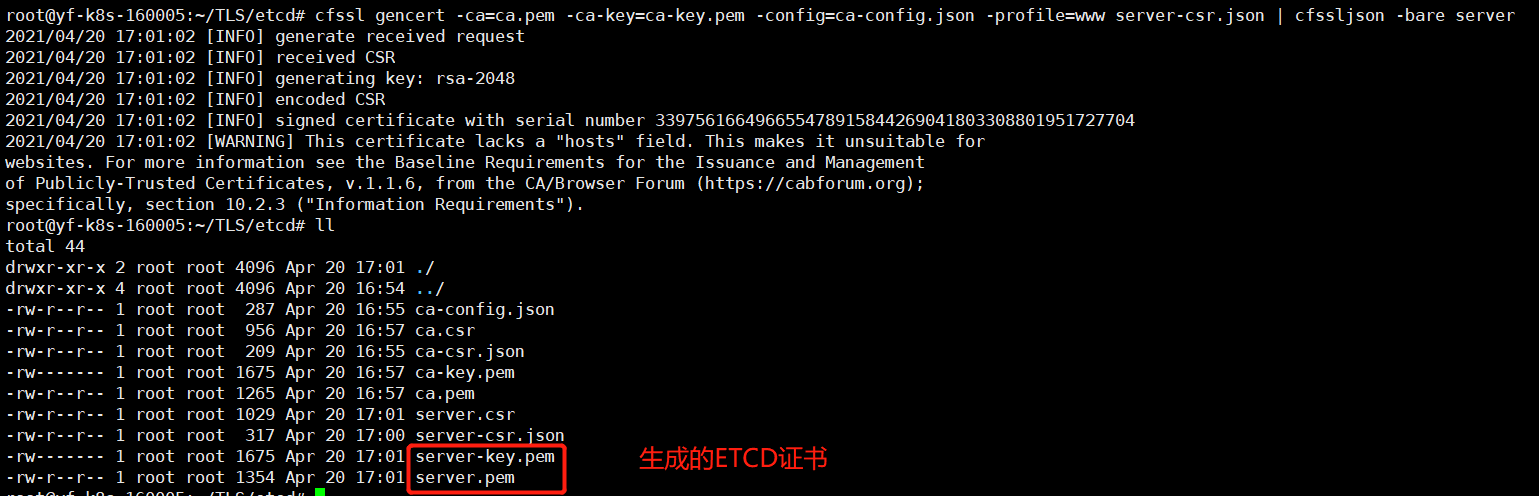
2.3.2 use self signed CA to issue certificate for Etcd
Create Etcd certificate application file
# Operate at Master1 node
cd /root/TLS/etcd
#Create the following Etcd certificate application file
cat > server-csr.json << EOF
{
    "CN": "etcd",
    "hosts": [
    "10.0.160.5",
    "10.0.160.6",
    "10.0.160.7",
    "10.0.160.8",
    "10.0.160.9",
    "10.0.160.60"
    ],
    "key": {
        "algo": "rsa",
        "size": 2048
    },
    "names": [
        {
            "C": "CN",
            "L": "BeiJing",
            "ST": "BeiJing"
        }
    ]
}
EOF
The IP in the hosts field of the above file is the internal communication IP of the cluster of all Etcd nodes, and none of them can be less! In order to facilitate the later expansion, you can write more reserved IP addresses.
Generate certificate for Etcd
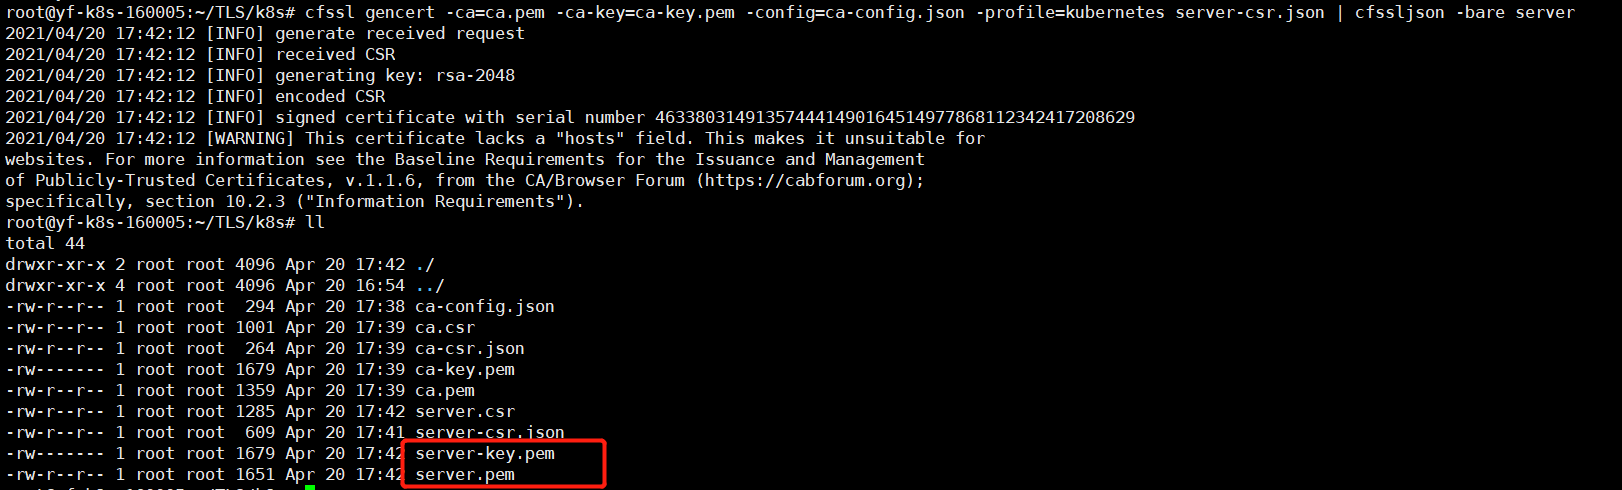
We can use cfssl tool according to server CSR JSON file to request certificate from CA organization
cfssl gencert -ca=ca.pem -ca-key=ca-key.pem -config=ca-config.json -profile=www server-csr.json | cfssljson -bare server
2.4 downloading Etcd binaries
etcd-v3.4.9-linux-amd64.tar.gz download link
2.5 deployment of Etcd cluster
The following operations are performed on Master1. To simplify the operation, all Etcd files generated by Master1 will be copied to Node1 and Node2 later.
2.5.1 upload, decompress and create Etcd working directory
# Operate in Master1
rz -be
tar zxvf etcd-v3.4.9-linux-amd64.tar.gz

#working directory
mkdir /opt/etcd/{bin,cfg,ssl} -p
#Move to working directory
mv etcd-v3.4.9-linux-amd64/{etcd,etcdctl} /opt/etcd/bin/
2.5.2 create Etcd configuration file
# Operate in Master1
# Note: the host address here needs to be configured according to the IP address of the node
cat > /opt/etcd/cfg/etcd.conf << EOF
#[Member]
ETCD_NAME="etcd-1"
ETCD_DATA_DIR="/var/lib/etcd/default.etcd"
ETCD_LISTEN_PEER_URLS="https://10.0.160.5:2380"
ETCD_LISTEN_CLIENT_URLS="https://10.0.160.5:2379"
#[Clustering]
ETCD_INITIAL_ADVERTISE_PEER_URLS="https://10.0.160.5:2380"
ETCD_ADVERTISE_CLIENT_URLS="https://10.0.160.5:2379"
ETCD_INITIAL_CLUSTER="etcd-1=https://10.0.160.5:2380,etcd-2=https://10.0.160.6:2380,etcd-3=https://10.0.160.7:2380"
ETCD_INITIAL_CLUSTER_TOKEN="etcd-cluster"
ETCD_INITIAL_CLUSTER_STATE="new"
EOF
Configuration interpretation
ETCD_NAME: node name, unique in the cluster (need to be changed)
ETCD_DATA_DIR: Data Directory
ETCD_LISTEN_PEER_URLS: cluster IP port monitored by etcd, used for inter cluster communication (it needs to be changed according to the IP of the machine)
ETCD_LISTEN_CLIENT_URLS: client access listening address (it needs to be changed according to the IP of the machine)
ETCD_INITIAL_ADVERTISE_PEER_URLS: cluster notification address (it needs to be changed according to the IP of the machine)
ETCD_ADVERTISE_CLIENT_URLS: notification address of the client (it needs to be changed according to the IP of the machine)
ETCD_INITIAL_CLUSTER: addresses of all nodes in the cluster (need to be changed)
ETCD_INITIAL_CLUSTER_TOKEN: cluster token, the security authentication of nodes in the cluster
ETCD_INITIAL_CLUSTER_STATE: the cluster status can be changed to existing cluster joining nodes
2.5.3 systemd management Etcd
# Operate in Master1
cat >  /lib/systemd/system/etcd.service << EOF
[Unit]
Description=Etcd Server
After=network.target
After=network-online.target
Wants=network-online.target
[Service]
Type=notify
EnvironmentFile=/opt/etcd/cfg/etcd.conf
ExecStart=/opt/etcd/bin/etcd \
--cert-file=/opt/etcd/ssl/server.pem \
--key-file=/opt/etcd/ssl/server-key.pem \
--peer-cert-file=/opt/etcd/ssl/server.pem \
--peer-key-file=/opt/etcd/ssl/server-key.pem \
--trusted-ca-file=/opt/etcd/ssl/ca.pem \
--peer-trusted-ca-file=/opt/etcd/ssl/ca.pem \
--logger=zap
Restart=on-failure
LimitNOFILE=65536
[Install]
WantedBy=multi-user.target
EOF
This configuration only needs to pay attention to whether the certificate address path of Etcd is correct. Of course, we haven't copied Etcd's certificate to his working directory yet. We will copy it in the next step
2.5.4 copy Etcd certificate to its working directory
# Operate in Master1
cp ~/TLS/etcd/ca*pem ~/TLS/etcd/server*pem /opt/etcd/ssl/
2.5.5 send the Etcd working directory of Master1 to Node1 and Node2 nodes
# Operate in Master1
# Copy to Node1
scp -r /opt/etcd root@10.0.160.6:/opt/
scp /usr/lib/systemd/system/etcd.service root@10.0.160.6:/lib/systemd/system/

# Copy to Node2
scp -r /opt/etcd root@10.0.160.7:/opt/
scp /usr/lib/systemd/system/etcd.service root@10.0.160.7:/lib/systemd/system/
2.5.6 modify the Etcd configuration files of Node1 and Node2 nodes
# Modify etcd of Node1 node Conf file
# Modify ETCD_NAME and machine ip involved in other configuration items

#[Member]
ETCD_NAME="etcd-2"
ETCD_DATA_DIR="/var/lib/etcd/default.etcd"
ETCD_LISTEN_PEER_URLS="https://10.0.160.6:2380"
ETCD_LISTEN_CLIENT_URLS="https://10.0.160.6:2379"
#[Clustering]
ETCD_INITIAL_ADVERTISE_PEER_URLS="https://10.0.160.6:2380"
ETCD_ADVERTISE_CLIENT_URLS="https://10.0.160.6:2379"
ETCD_INITIAL_CLUSTER="etcd-1=https://10.0.160.5:2380,etcd-2=https://10.0.160.6:2380,etcd-3=https://10.0.160.7:2380"
ETCD_INITIAL_CLUSTER_TOKEN="etcd-cluster"
ETCD_INITIAL_CLUSTER_STATE="new"
EOF
# Modify the etcd of Node2 node Conf file
# Modify ETCD_NAME and machine ip involved in other configuration items

#[Member]
ETCD_NAME="etcd-3"
ETCD_DATA_DIR="/var/lib/etcd/default.etcd"
ETCD_LISTEN_PEER_URLS="https://10.0.160.7:2380"
ETCD_LISTEN_CLIENT_URLS="https://10.0.160.7:2379"
#[Clustering]
ETCD_INITIAL_ADVERTISE_PEER_URLS="https://10.0.160.7:2380"
ETCD_ADVERTISE_CLIENT_URLS="https://10.0.160.7:2379"
ETCD_INITIAL_CLUSTER="etcd-1=https://10.0.160.5:2380,etcd-2=https://10.0.160.6:2380,etcd-3=https://10.0.160.7:2380"
ETCD_INITIAL_CLUSTER_TOKEN="etcd-cluster"
ETCD_INITIAL_CLUSTER_STATE="new"
EOF
2.5.7 start Etcd cluster & View Status & query log
start-up
#Start Etcd at Master1, Node1 and Node2 nodes respectively
systemctl daemon-reload
systemctl start etcd
systemctl enable etcd

#View startup status
systemctl status etcd.service
View Etcd cluster status
#Nodes in any Etcd cluster can be viewed using the following command
ETCDCTL_API=3 /opt/etcd/bin/etcdctl \
--cacert=/opt/etcd/ssl/ca.pem \
--cert=/opt/etcd/ssl/server.pem \
--key=/opt/etcd/ssl/server-key.pem \
--endpoints="https://10.0.160.5:2379,https://10.0.160.6:2379,https://10.0.160.7:2379" endpoint health

If the above information is output, it indicates that the Etcd cluster deployment is successful. If there is a problem with that node, you can use the following command to view the log:
journalctl -u etcd
View the list of Etcd cluster nodes
# View the list of cluster nodes
ETCDCTL_API=3  /opt/etcd/bin/etcdctl \
--cacert=/opt/etcd/ssl/ca.pem \
--cert=/opt/etcd/ssl/server.pem \
--key=/opt/etcd/ssl/server-key.pem \
--endpoints="https://10.0.160.5:2379,https://10.0.160.6:2379,https://10.0.160.7:2379"   member list \
--write-out=table
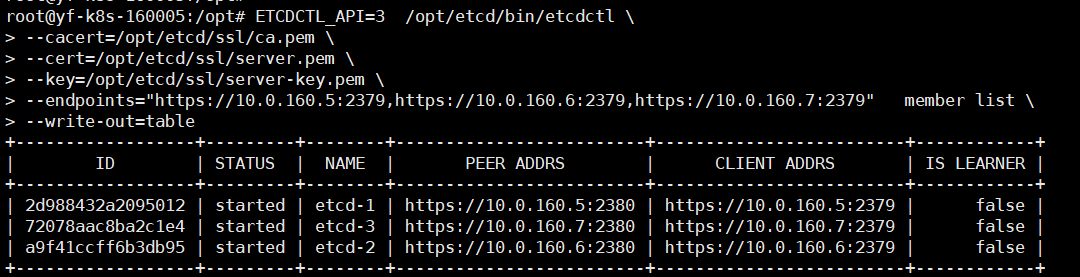
If there is a problem with a node in the cluster node list, you can view the specific error information through the following command:
systemctl status etcd.service # in the node that reports an error, use this command to view the etcd status of the node
journalctl -u etcd or journalctl -xe # at the node reporting an error, you can use this command to view the log
III Deploy Master node
Say:
We have completed the multi basic deployment and configuration before moving on to the real K8s deployment.
Through chapter 1.3, we found that we need to deploy two Master nodes, namely Master1 and Master2, but here I only deploy one Master1 node.
Why? Because I want to build a single Master K8s cluster first, and then build a highly available multi Master K8s cluster by expanding the Master node.
In this way, we can not only learn how to deploy K8s high availability cluster, but also learn how to expand the capacity of K8s cluster nodes.
3.1 generate Kube apisever certificate
3.1.1 generate self signed certificate authority (CA)
Create CA file
#Note: operate at the Master1 node
cd ~/TLS/k8s/
cat > ca-config.json << EOF
{
  "signing": {
    "default": {
      "expiry": "87600h"
    },
    "profiles": {
      "kubernetes": {
         "expiry": "87600h",
         "usages": [
            "signing",
            "key encipherment",
            "server auth",
            "client auth"
        ]
      }
    }
  }
}
EOF
#Note: operate at the Master1 node
cd ~/TLS/k8s/
cat > ca-csr.json << EOF
{
    "CN": "kubernetes",
    "key": {
        "algo": "rsa",
        "size": 2048
    },
    "names": [
        {
            "C": "CN",
            "L": "Beijing",
            "ST": "Beijing",
            "O": "k8s",
            "OU": "System"
        }
    ]
}
EOF
Generate CA certificate
After creating the self signed CA file above, we can use the cfssl tool according to Ca config json ca-csr. JSON build a CA authority that issues certificates in the directory / root/TLS/k8s /
#Execute at Master1
cfssl gencert -initca ca-csr.json | cfssljson -bare ca -
After execution, there will be two more files in the current directory: CA key PEM (CA digital certificate) and ca.pem (CA private key) issue certificates for k8s apiserver, Kube controller manager and Kube scheduler through these two CA self signing authority files.
3.1.2 use self signed CA to issue certificate for Kube apiserver
#Note: operate at the Master1 node
cd ~/TLS/k8s/
# Create certificate request file
cat > server-csr.json << EOF
{
    "CN": "kubernetes",
    "hosts": [
      "10.0.0.1",
      "127.0.0.1",
      "10.0.160.5",
      "10.0.160.6",
      "10.0.160.7",
      "10.0.160.8",
      "10.0.160.9",
      "10.0.160.60",
      "kubernetes",
      "kubernetes.default",
      "kubernetes.default.svc",
      "kubernetes.default.svc.cluster",
      "kubernetes.default.svc.cluster.local"
    ],
    "key": {
        "algo": "rsa",
        "size": 2048
    },
    "names": [
        {
            "C": "CN",
            "L": "BeiJing",
            "ST": "BeiJing",
            "O": "k8s",
            "OU": "System"
        }
    ]
}
EOF
Note: the IP in the hosts field of the above file is the IP of all Master1, Master2, Node1, Node2 and VIP. There can be no less! In order to facilitate the later expansion, you can write more reserved IP addresses.
10.0.160.60 is VIP
Generate certificate
cfssl gencert -ca=ca.pem -ca-key=ca-key.pem -config=ca-config.json -profile=kubernetes server-csr.json | cfssljson -bare server
3.2 deploy Kube apisever
3.2.1 download binaries from Github
kubernetes-server-linux-amd64.tar.gz download link
3.2.2 upload, decompress and create working directory
#Note: operate at the Master1 node
#Upload and unzip the binary package
rz -be
tar -zxvf kubernetes-server-linux-amd64.tar.gz

#Create a working directory for k8s
mkdir -p /opt/kubernetes/{bin,cfg,ssl,logs}

#Enter the extracted directory / root/kubernetes/server/bin and move the apiserver, scheduler and controller manager files
cd /root/kubernetes/server/bin
cp kube-apiserver kube-scheduler kube-controller-manager /opt/kubernetes/bin
cp kubectl /usr/bin/
3.2.3 create Kube apiserver configuration file
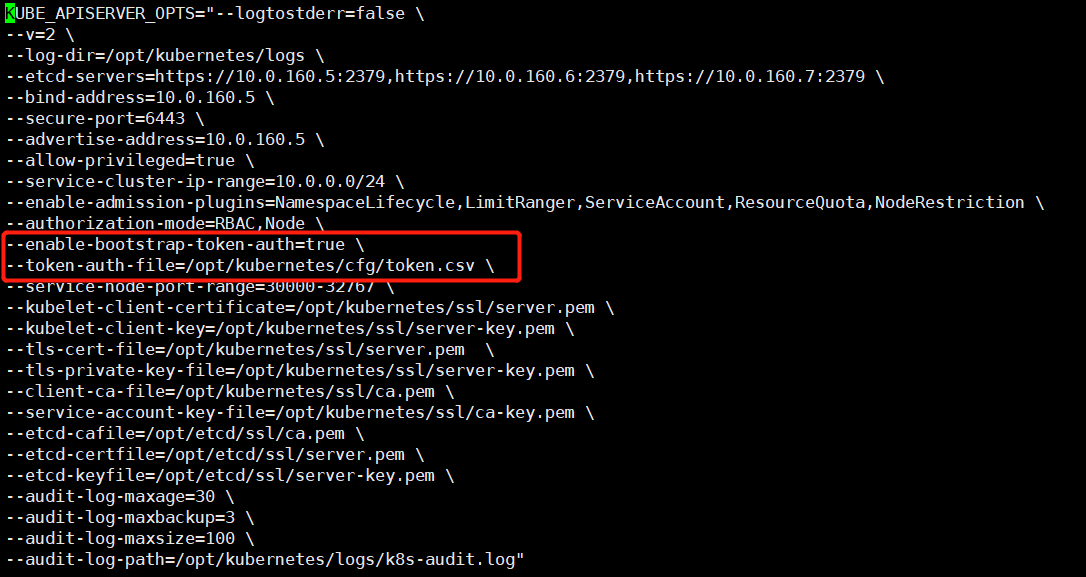
#Note: execute on the Master1 node
cat > /opt/kubernetes/cfg/kube-apiserver.conf << EOF
KUBE_APISERVER_OPTS="--logtostderr=false \\
--v=2 \\
--log-dir=/opt/kubernetes/logs \\
--etcd-servers=https://10.0.160.5:2379,https://10.0.160.6:2379,https://10.0.160.7:2379 \\
--bind-address=10.0.160.5 \\
--secure-port=6443 \\
--advertise-address=10.0.160.5 \\
--allow-privileged=true \\
--service-cluster-ip-range=10.0.0.0/24 \\
--enable-admission-plugins=NamespaceLifecycle,LimitRanger,ServiceAccount,ResourceQuota,NodeRestriction \\
--authorization-mode=RBAC,Node \\
--enable-bootstrap-token-auth=true \\
--token-auth-file=/opt/kubernetes/cfg/token.csv \\
--service-node-port-range=30000-32767 \\
--kubelet-client-certificate=/opt/kubernetes/ssl/server.pem \\
--kubelet-client-key=/opt/kubernetes/ssl/server-key.pem \\
--tls-cert-file=/opt/kubernetes/ssl/server.pem  \\
--tls-private-key-file=/opt/kubernetes/ssl/server-key.pem \\
--client-ca-file=/opt/kubernetes/ssl/ca.pem \\
--service-account-key-file=/opt/kubernetes/ssl/ca-key.pem \\
--service-account-issuer=api \\
--service-account-signing-key-file=/opt/kubernetes/ssl/server-key.pem \\
--etcd-cafile=/opt/etcd/ssl/ca.pem \\
--etcd-certfile=/opt/etcd/ssl/server.pem \\
--etcd-keyfile=/opt/etcd/ssl/server-key.pem \\
--requestheader-client-ca-file=/opt/kubernetes/ssl/ca.pem \\
--proxy-client-cert-file=/opt/kubernetes/ssl/server.pem \\
--proxy-client-key-file=/opt/kubernetes/ssl/server-key.pem \\
--requestheader-allowed-names=kubernetes \\
--requestheader-extra-headers-prefix=X-Remote-Extra- \\
--requestheader-group-headers=X-Remote-Group \\
--requestheader-username-headers=X-Remote-User \\
--enable-aggregator-routing=true \\
--audit-log-maxage=30 \\
--audit-log-maxbackup=3 \\
--audit-log-maxsize=100 \\
--audit-log-path=/opt/kubernetes/logs/k8s-audit.log"
EOF
Parameter description
– logtostderr: enable logging
- v: log level 0-8, from small to large, more and more detailed, generally 2
– log dir: log directory
– etcd servers: etcd cluster address (need to be modified)
– bind address: the ip address monitored by apiserver, which is generally the intranet ip of the current machine (need to be modified)
– secure port: https secure port
– advertise address: the advertised address of the cluster, which is generally consistent with bind address. Other node s connect to your apiserver through this ip (need to be modified)
– allow privileged: enables authorization
– Service cluster IP range: Service virtual IP address segment
– enable admission plugins: admission control module
– authorization mode: authentication and authorization, enabling RBAC authorization and node self-management
– enable bootstrap token auth: enables the TLS bootstrap mechanism
– token auth file: the bootstrap token file will be created in chapter 4.2.5 below
– service node port range: the default assigned port range of Service nodeport type
– kubelet client XXX: apiserver access kubelet client certificate
– TLS XXX file: apiserver https certificate
– Etcd xfile: Certificate for connecting Etcd cluster
– audit log XXX: audit log
3.2.4 copy the generated apiserver certificate to its working directory
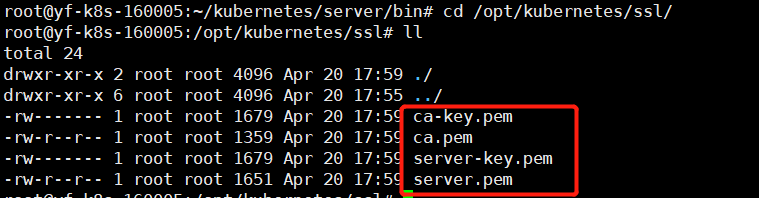
cp ~/TLS/k8s/ca*pem ~/TLS/k8s/server*pem /opt/kubernetes/ssl/
None of the four is indispensable
3.2.5 start TLS Bootstrapping mechanism
We're at apiserver The bootstrapping mechanism is actually enabled in the conf configuration file. We can have a look
The mechanism of TLS Bootstrapping is enabled to issue certificates manually for kubelet when there are more and more machines. Therefore, this mechanism is used to issue certificates automatically
As shown in the figure above, token is introduced CSV file, in which an account will be configured. The format of this account is: token, user, uid and user group
Create token csv
#Note: execute on the master1 node
cat > /opt/kubernetes/cfg/token.csv << EOF
e9eefb2b458c373f779665de3099a7bd,kubelet-bootstrap,10001,"system:node-bootstrapper"
EOF
Format: token, user name, UID, user group
Of course, we can also generate and replace the token ourselves: head -c 16 /dev/urandom | od -An -t x | tr -d '
It is mainly used to let node take the token, and then use the kubelet bootstrap account permission to automatically issue certificates
3.2.6 system D management Kube apiserver
#Note: operate at the Master1 node
cat > /lib/systemd/system/kube-apiserver.service << EOF
[Unit]
Description=Kubernetes API Server
Documentation=https://github.com/kubernetes/kubernetes

[Service]
EnvironmentFile=/opt/kubernetes/cfg/kube-apiserver.conf
ExecStart=/opt/kubernetes/bin/kube-apiserver \$KUBE_APISERVER_OPTS
Restart=on-failure

[Install]
WantedBy=multi-user.target
EOF
3.2.7 startup
#Note: operate at the Master1 node
systemctl daemon-reload
systemctl start kube-apiserver
systemctl enable kube-apiserver
You can use systemctl status Kube apiserver Check whether the service is started successfully
Address configured in apiserver's configuration file: tail / opt / kubernetes / logs / Kube apiserver INFO -f
3.3 deploy Kube Controller Manager
3.3.1 create controller manager configuration file
#Note: operate at the Master1 node
cat > /opt/kubernetes/cfg/kube-controller-manager.conf << EOF
KUBE_CONTROLLER_MANAGER_OPTS="--logtostderr=false \\
--v=2 \\
--log-dir=/opt/kubernetes/logs \\
--leader-elect=true \\
--kubeconfig=/opt/kubernetes/cfg/kube-controller-manager.kubeconfig \\
--bind-address=127.0.0.1 \\
--allocate-node-cidrs=true \\
--cluster-cidr=10.244.0.0/16 \\
--service-cluster-ip-range=10.0.0.0/24 \\
--cluster-signing-cert-file=/opt/kubernetes/ssl/ca.pem \\
--cluster-signing-key-file=/opt/kubernetes/ssl/ca-key.pem  \\
--root-ca-file=/opt/kubernetes/ssl/ca.pem \\
--service-account-private-key-file=/opt/kubernetes/ssl/ca-key.pem \\
--cluster-signing-duration=87600h0m0s"
EOF
Parameter Description:
– master: connect to apiserver through local non secure local port 8080.
– leader select: when the component starts multiple, automatic election (HA)
– cluster signing cert file / – cluster signing key file: CA that automatically issues certificates for kubelet, and apiserver
bring into correspondence with
– cluster CIDR: the ip segment of the cluster pod should be the same as that of the cni plug-in
– service cluster ip range: the virtual ip of the service is allocated from this 10.0.0.0/24 segment, which should be the same as that configured in apiserver
3.3.2 generate Kube controller manager certificate
#Execute at Master1
# Switch working directory
cd ~/TLS/k8s

# Create certificate request file
cat > kube-controller-manager-csr.json << EOF
{
  "CN": "system:kube-controller-manager",
  "hosts": [],
  "key": {
    "algo": "rsa",
    "size": 2048
  },
  "names": [
    {
      "C": "CN",
      "L": "BeiJing",
      "ST": "BeiJing",
      "O": "system:masters",
      "OU": "System"
    }
  ]
}
EOF

# Generate certificate
cfssl gencert -ca=ca.pem -ca-key=ca-key.pem -config=ca-config.json -profile=kubernetes kube-controller-manager-csr.json | cfssljson -bare kube-controller-manager
3.3.3 generate kubeconfig file (the following are shell commands, which are directly executed on the terminal)
#Execute at Master1
KUBE_CONFIG="/opt/kubernetes/cfg/kube-controller-manager.kubeconfig"
KUBE_APISERVER="https://10.0.160.5:6443"

kubectl config set-cluster kubernetes \
  --certificate-authority=/opt/kubernetes/ssl/ca.pem \
  --embed-certs=true \
  --server=${KUBE_APISERVER} \
  --kubeconfig=${KUBE_CONFIG}
kubectl config set-credentials kube-controller-manager \
  --client-certificate=./kube-controller-manager.pem \
  --client-key=./kube-controller-manager-key.pem \
  --embed-certs=true \
  --kubeconfig=${KUBE_CONFIG}
kubectl config set-context default \
  --cluster=kubernetes \
  --user=kube-controller-manager \
  --kubeconfig=${KUBE_CONFIG}
kubectl config use-context default --kubeconfig=${KUBE_CONFIG}
3.3.4 system D Kube Controller Manager
#Note: operate at the Master1 node
cat > /lib/systemd/system/kube-controller-manager.service << EOF
[Unit]
Description=Kubernetes Controller Manager
Documentation=https://github.com/kubernetes/kubernetes

[Service]
EnvironmentFile=/opt/kubernetes/cfg/kube-controller-manager.conf
ExecStart=/opt/kubernetes/bin/kube-controller-manager \$KUBE_CONTROLLER_MANAGER_OPTS
Restart=on-failure

[Install]
WantedBy=multi-user.target
EOF
3.3.5 startup
#Note: operate at the Master1 node
systemctl daemon-reload
systemctl start kube-controller-manager
systemctl enable kube-controller-manager
Check the startup status: systemctl status Kube controller manager service
Log: tail / opt / kubernetes / logs / Kube controller manager INFO -f
3.4 deploy Kube scheduler
3.4.1 create Kube scheduler configuration file
#Note: operate at the Master1 node
cat > /opt/kubernetes/cfg/kube-scheduler.conf << EOF
KUBE_SCHEDULER_OPTS="--logtostderr=false \\
--v=2 \\
--log-dir=/opt/kubernetes/logs \\
--leader-elect \\
--kubeconfig=/opt/kubernetes/cfg/kube-scheduler.kubeconfig \\
--bind-address=127.0.0.1"
EOF
Parameter Description:
– master: connect to apiserver through local non secure local port 8080.
– leader select: when the component starts multiple, automatic election (HA)
3.4.2 generate kubeconfig file
Generate Kube scheduler certificate
#Execute at Master1
# Switch working directory
cd ~/TLS/k8s

# Create certificate request file
cat > kube-scheduler-csr.json << EOF
{
  "CN": "system:kube-scheduler",
  "hosts": [],
  "key": {
    "algo": "rsa",
    "size": 2048
  },
  "names": [
    {
      "C": "CN",
      "L": "BeiJing",
      "ST": "BeiJing",
      "O": "system:masters",
      "OU": "System"
    }
  ]
}
EOF

# Generate certificate
cfssl gencert -ca=ca.pem -ca-key=ca-key.pem -config=ca-config.json -profile=kubernetes kube-scheduler-csr.json | cfssljson -bare kube-scheduler
Generate kubeconfig file (the following are shell commands, which are executed directly on the terminal)
#Execute at Master1
KUBE_CONFIG="/opt/kubernetes/cfg/kube-scheduler.kubeconfig"
KUBE_APISERVER="https://10.0.160.5:6443"

kubectl config set-cluster kubernetes \
  --certificate-authority=/opt/kubernetes/ssl/ca.pem \
  --embed-certs=true \
  --server=${KUBE_APISERVER} \
  --kubeconfig=${KUBE_CONFIG}
kubectl config set-credentials kube-scheduler \
  --client-certificate=./kube-scheduler.pem \
  --client-key=./kube-scheduler-key.pem \
  --embed-certs=true \
  --kubeconfig=${KUBE_CONFIG}
kubectl config set-context default \
  --cluster=kubernetes \
  --user=kube-scheduler \
  --kubeconfig=${KUBE_CONFIG}
kubectl config use-context default --kubeconfig=${KUBE_CONFIG}
3.4.3 system D management Kube scheduler
#Note: operate at the Master1 node
cat > /lib/systemd/system/kube-scheduler.service << EOF
[Unit]
Description=Kubernetes Scheduler
Documentation=https://github.com/kubernetes/kubernetes

[Service]
EnvironmentFile=/opt/kubernetes/cfg/kube-scheduler.conf
ExecStart=/opt/kubernetes/bin/kube-scheduler \$KUBE_SCHEDULER_OPTS
Restart=on-failure

[Install]
WantedBy=multi-user.target
EOF
3.4.3 startup
#Note: operate at the Master1 node
systemctl daemon-reload
systemctl start kube-scheduler
systemctl enable kube-scheduler
View startup status: systemctl status Kube scheduler service
Log: tail / opt / kubernetes / logs / Kube scheduler INFO -f
3.5 view the current K8s cluster component status
3.5.1 generate kubectl connection cluster certificate
#Execute at Master1
cat > admin-csr.json <<EOF
{
  "CN": "admin",
  "hosts": [],
  "key": {
    "algo": "rsa",
    "size": 2048
  },
  "names": [
    {
      "C": "CN",
      "L": "BeiJing",
      "ST": "BeiJing",
      "O": "system:masters",
      "OU": "System"
    }
  ]
}
EOF

cfssl gencert -ca=ca.pem -ca-key=ca-key.pem -config=ca-config.json -profile=kubernetes admin-csr.json | cfssljson -bare admin
3.5.2 generate kubeconfig file
#Execute at Master1
mkdir /root/.kube

KUBE_CONFIG="/root/.kube/config"
KUBE_APISERVER="https://10.0.160.5:6443"

kubectl config set-cluster kubernetes \
  --certificate-authority=/opt/kubernetes/ssl/ca.pem \
  --embed-certs=true \
  --server=${KUBE_APISERVER} \
  --kubeconfig=${KUBE_CONFIG}
kubectl config set-credentials cluster-admin \
  --client-certificate=./admin.pem \
  --client-key=./admin-key.pem \
  --embed-certs=true \
  --kubeconfig=${KUBE_CONFIG}
kubectl config set-context default \
  --cluster=kubernetes \
  --user=cluster-admin \
  --kubeconfig=${KUBE_CONFIG}
kubectl config use-context default --kubeconfig=${KUBE_CONFIG}
View the current status of components through kuctl tool 3.5
Now we can check the status of the current K8s cluster components through kubectl tool:
#Note: operate at the Master1 node
root@yf-k8s-160005:~# kubectl get cs
NAME                 STATUS    MESSAGE             ERROR
scheduler            Healthy   ok
controller-manager   Healthy   ok
etcd-0               Healthy   {"health":"true"}
etcd-2               Healthy   {"health":"true"}
etcd-1               Healthy   {"health":"true"}
If you find any component with abnormal health, please return to the deployment section of the component to check the problem
3.5.4 authorized kubelet bootstrap users are allowed to request certificates
Although we are already in token The CSV has set the token, user group and other information, but the permission authorization is not carried out. We need to authorize kubelet bootstrap
Overview: bind the kubelet bootstrap user to the system: node bootstrapper group
# Authorize at the master1 node
kubectl create clusterrolebinding kubelet-bootstrap \
--clusterrole=system:node-bootstrapper \
--user=kubelet-bootstrap

IV Deploy Work Node
4.1 create working directory and copy binary files
#Create a working directory on Node1 node
mkdir -p /opt/kubernetes/{bin,cfg,ssl,logs}
#Send Kube proxy and kubelet to Node1 node at Master1 node
cd /root/kubernetes/server/bin
scp kubelet kube-proxy 10.0.160.6:/opt/kubernetes/bin
4.2 deploying kubelet
4.2.1 create kubelete configuration file
#Create a configuration file on Node1 node
cat > /opt/kubernetes/cfg/kubelet.conf << EOF
KUBELET_OPTS="--logtostderr=false \\
--v=2 \\
--log-dir=/opt/kubernetes/logs \\
--hostname-override=yf-k8s-160006 \\
--network-plugin=cni \\
--kubeconfig=/opt/kubernetes/cfg/kubelet.kubeconfig \\
--bootstrap-kubeconfig=/opt/kubernetes/cfg/bootstrap.kubeconfig \\
--config=/opt/kubernetes/cfg/kubelet-config.yml \\
--cert-dir=/opt/kubernetes/ssl \\
--pod-infra-container-image=lizhenliang/pause-amd64:3.0"
EOF
Parameter Description:
– hostname override: display name, unique in the cluster (to be modified according to the current node)
– network plugin: enable CNI
– kubeconfig: kubeconfig file when kubelet joins the cluster for the first time
– bootstrap kubeconfig: apply for a certificate from apiserver for the first time. The file has not been created yet. It will be created in the next step 4.23
– config: configure the parameter file, which will be created in the next step 4.22
– cert dir: kubelet certificate generation directory
– Pod infra container image: manages the image of the Pod network container
4.2.2 parameter files for creating configuration files
#Create a configuration parameter file on Node1 node
cat > /opt/kubernetes/cfg/kubelet-config.yml << EOF
kind: KubeletConfiguration
apiVersion: kubelet.config.k8s.io/v1beta1
address: 0.0.0.0
port: 10250
readOnlyPort: 10255
cgroupDriver: cgroupfs
clusterDNS:
- 10.0.0.2
clusterDomain: cluster.local
failSwapOn: false
authentication:
  anonymous:
    enabled: false
  webhook:
    cacheTTL: 2m0s
    enabled: true
  x509:
    clientCAFile: /opt/kubernetes/ssl/ca.pem
authorization:
  mode: Webhook
  webhook:
    cacheAuthorizedTTL: 5m0s
    cacheUnauthorizedTTL: 30s
evictionHard:
  imagefs.available: 15%
  memory.available: 100Mi
  nodefs.available: 10%
  nodefs.inodesFree: 5%
maxOpenFiles: 1000000
maxPods: 110
EOF
#The ca.pem certificate is also required in the above configuration: clientCAFile: /opt/kubernetes/ssl/ca.pem
#So we have to send it from Master1 node to Node1
scp /opt/kubernetes/ssl/ca.pem 10.0.160.6:/opt/kubernetes/ssl
4.2.3 generate kubelet and join the cluster for the first time kubeconfig file
#Set variables in Master1 node
KUBE_CONFIG="/opt/kubernetes/cfg/bootstrap.kubeconfig"
KUBE_APISERVER="https://10.0.160.5:6443" # apiserver IP:PORT
TOKEN="c47ffb939f5ca36231d9e3121a252940" # And / opt / kubernetes / CFG / token Consistent in CSV
#Execute at Master1
# Generate bootstrap Kubeconfig configuration file
cd /opt/kubernetes/cfg

kubectl config set-cluster kubernetes \
  --certificate-authority=/opt/kubernetes/ssl/ca.pem \
  --embed-certs=true \
  --server=${KUBE_APISERVER} \
  --kubeconfig=${KUBE_CONFIG}
kubectl config set-credentials "kubelet-bootstrap" \
  --token=${TOKEN} \
  --kubeconfig=${KUBE_CONFIG}
kubectl config set-context default \
  --cluster=kubernetes \
  --user="kubelet-bootstrap" \
  --kubeconfig=${KUBE_CONFIG}
kubectl config use-context default --kubeconfig=${KUBE_CONFIG}
Through the above command, we will generate bootstrap.exe in / opt/kubernetes/cfg directory Kubeconfig configuration file. Now you need to send the file to Node1, because the configuration file is kubelet in step 4.2.1 Conf this configuration file needs to be loaded.
#Operate at Master1 node
scp /opt/kubernetes/cfg/bootstrap.kubeconfig 10.0.160.6:/opt/kubernetes/cfg
4.2.4 system management kubelet
#In Node1
cat > /lib/systemd/system/kubelet.service << EOF
[Unit]
Description=Kubernetes Kubelet
After=docker.service

[Service]
EnvironmentFile=/opt/kubernetes/cfg/kubelet.conf
ExecStart=/opt/kubernetes/bin/kubelet \$KUBELET_OPTS
Restart=on-failure
LimitNOFILE=65536

[Install]
WantedBy=multi-user.target
EOF
4.2.5 start kubelet
#In Node1
systemctl daemon-reload
systemctl start kubelet
systemctl enable kubelet
Check the startup status: systemctl status kubelet service
View log: tail / opt / kubernetes / logs / kubelet INFO -f
4.2.6 approve the application for kubelet certificate and join the cluster
#Query the kubelet certificate request at the Master1 node
root@yf-k8s-160005:/opt/kubernetes/cfg# kubectl get csr
NAME                                                   AGE   SIGNERNAME                                    REQUESTOR           CONDITION
node-csr-SCqccQZbTjDgFsAnL3fjJEZBd0bMbPHkTJrltpAOZ8g   22s   kubernetes.io/kube-apiserver-client-kubelet   kubelet-bootstrap   Pending
It can be seen that the kubelet certificate application of our Node can be queried, so we will approve it now
#Approve at Master1 node
#Note: do not copy and execute this command directly. Replace the following node CSR - * with the name value obtained from kubectl get csr
kubectl certificate approve node-csr-SCqccQZbTjDgFsAnL3fjJEZBd0bMbPHkTJrltpAOZ8g
Looking at this application record again, you can find that the status has changed from pending to approved and released

Now let's look at the node status of the entire K8s cluster
#View in Master1 node
# View node
kubectl get node
NAME         STATUS     ROLES    AGE   VERSION
yf-k8s-160006   NotReady   <none>   7s    v1.20.4

#Note: because the network plug-in has not been deployed, the node will not be ready NotReady
4.3 deploy Kube proxy
4.3.1 create Kube proxy configuration file
#Create in Node1 node
cat > /opt/kubernetes/cfg/kube-proxy.conf << EOF
KUBE_PROXY_OPTS="--logtostderr=false \\
--v=2 \\
--log-dir=/opt/kubernetes/logs \\
--config=/opt/kubernetes/cfg/kube-proxy-config.yml"
EOF
4.3.2 create configuration parameter file
#In Node1 node, create the following file hostnameOverride: modify it to the corresponding host name
cat > /opt/kubernetes/cfg/kube-proxy-config.yml << EOF
kind: KubeProxyConfiguration
apiVersion: kubeproxy.config.k8s.io/v1alpha1
bindAddress: 0.0.0.0
metricsBindAddress: 0.0.0.0:10249
clientConnection:
  kubeconfig: /opt/kubernetes/cfg/kube-proxy.kubeconfig
hostnameOverride: yf-k8s-160006
clusterCIDR: 10.0.0.0/24
EOF
In the above file, you also need to load Kube proxy Let's create bekuconfig next
4.3.3 generate Kube proxy Kubeconfig file
Create Kube proxy certificate request file
# Operate at Master1 node
cd ~/TLS/k8s
# Create certificate request file
cat > kube-proxy-csr.json << EOF
{
  "CN": "system:kube-proxy",
  "hosts": [],
  "key": {
    "algo": "rsa",
    "size": 2048
  },
  "names": [
    {
      "C": "CN",
      "L": "BeiJing",
      "ST": "BeiJing",
      "O": "k8s",
      "OU": "System"
    }
  ]
}
EOF
Generate Kube proxy certificate
# Operate at Master1 node
# Generate certificate
cfssl gencert -ca=ca.pem -ca-key=ca-key.pem -config=ca-config.json -profile=kubernetes kube-proxy-csr.json | cfssljson -bare kube-proxy

# View Certificate
root@yf-k8s-160005:~/TLS/k8s# ls kube-proxy*pem
kube-proxy-key.pem  kube-proxy.pem
Generate Kube proxy Kubeconfig file
# Operate at Master1 node
#set variable
KUBE_CONFIG="/opt/kubernetes/cfg/kube-proxy.kubeconfig"
KUBE_APISERVER="https://10.0.160.5: 6443 "#master apiserver address


#Generate node in master proxy.1 kubeconfig
cd /root/TLS/k8s

kubectl config set-cluster kubernetes \
  --certificate-authority=/opt/kubernetes/ssl/ca.pem \
  --embed-certs=true \
  --server=${KUBE_APISERVER} \
  --kubeconfig=${KUBE_CONFIG}
kubectl config set-credentials kube-proxy \
  --client-certificate=./kube-proxy.pem \
  --client-key=./kube-proxy-key.pem \
  --embed-certs=true \
  --kubeconfig=${KUBE_CONFIG}
kubectl config set-context default \
  --cluster=kubernetes \
  --user=kube-proxy \
  --kubeconfig=${KUBE_CONFIG}
kubectl config use-context default --kubeconfig=${KUBE_CONFIG}
Through the above command, we will generate Kube proxy in / root/TLS/k8s directory Kubeconfig configuration file. Now you need to send the file to Node1 node, because the configuration file is Kube proxy config in step 4.3.2 YML this configuration file needs to be loaded.
#Operate at Master1 node
scp /root/TLS/k8s/kube-proxy.kubeconfig 10.0.160.6:/opt/kubernetes/cfg
4.3.4 system management Kube proxy
# Operate on Node1 node
cat > /lib/systemd/system/kube-proxy.service << EOF
[Unit]
Description=Kubernetes Proxy
After=network.target

[Service]
EnvironmentFile=/opt/kubernetes/cfg/kube-proxy.conf
ExecStart=/opt/kubernetes/bin/kube-proxy \$KUBE_PROXY_OPTS
Restart=on-failure
LimitNOFILE=65536

[Install]
WantedBy=multi-user.target
EOF
4.3.5 startup
# Operate on Node1 node
systemctl daemon-reload
systemctl start kube-proxy
systemctl enable kube-proxy
Check the startup status: systemctl status kubelet service
View log: tail / opt / kubernetes / logs / Kube proxy INFO -f
V Deploy CNI network (Calico)
5.1 download Calico resource list
Because there are too many files, you don't paste the code directly. You can download it directly from my baidu cloud and upload it to the Master1 node.
Link: https://pan.baidu.com/s/1NVlH5HgQIBIFZBEqjZ-h4A
Extraction code: 52 gt
5.2 apply and view
#Apply calico resource list in Master1 node
kubectl apply -f calico.yaml

#Check startup
[root@k8s-master1 ~]# kubectl get pods -n kube-system
NAME                          READY   STATUS    RESTARTS   AGE
calico-node-b4qf5              1/1     Running   0          98s
When Calico Pod is Running, the node will be ready
kubectl get node
NAME            STATUS   ROLES    AGE   VERSION
yf-k8s-160006   Ready    <none>   37m   v1.20.4
5.3 authorize apiserver to access kubelet
Application scenario: for example, kubectl logs
#At Master1 node
cat > apiserver-to-kubelet-rbac.yaml << EOF
apiVersion: rbac.authorization.k8s.io/v1
kind: ClusterRole
metadata:
  annotations:
    rbac.authorization.kubernetes.io/autoupdate: "true"
  labels:
    kubernetes.io/bootstrapping: rbac-defaults
  name: system:kube-apiserver-to-kubelet
rules:
  - apiGroups:
      - ""
    resources:
      - nodes/proxy
      - nodes/stats
      - nodes/log
      - nodes/spec
      - nodes/metrics
      - pods/log
    verbs:
      - "*"
---
apiVersion: rbac.authorization.k8s.io/v1
kind: ClusterRoleBinding
metadata:
  name: system:kube-apiserver
  namespace: ""
roleRef:
  apiGroup: rbac.authorization.k8s.io
  kind: ClusterRole
  name: system:kube-apiserver-to-kubelet
subjects:
  - apiGroup: rbac.authorization.k8s.io
    kind: User
    name: kubernetes
EOF


#application
kubectl apply -f apiserver-to-kubelet-rbac.yaml
Vi Deploy cluster internal DNS (CoreDNS)
CoreDNS is used for Service name resolution within the cluster.
6.1 create coredns resource list (no change)
#Operate in Master1
vim coredns.yaml

#The contents are as follows
# Warning: This is a file generated from the base underscore template file: coredns.yaml.base

apiVersion: v1
kind: ServiceAccount
metadata:
  name: coredns
  namespace: kube-system
  labels:
      kubernetes.io/cluster-service: "true"
      addonmanager.kubernetes.io/mode: Reconcile
---
apiVersion: rbac.authorization.k8s.io/v1
kind: ClusterRole
metadata:
  labels:
    kubernetes.io/bootstrapping: rbac-defaults
    addonmanager.kubernetes.io/mode: Reconcile
  name: system:coredns
rules:
- apiGroups:
  - ""
  resources:
  - endpoints
  - services
  - pods
  - namespaces
  verbs:
  - list
  - watch
- apiGroups:
  - ""
  resources:
  - nodes
  verbs:
  - get
---
apiVersion: rbac.authorization.k8s.io/v1
kind: ClusterRoleBinding
metadata:
  annotations:
    rbac.authorization.kubernetes.io/autoupdate: "true"
  labels:
    kubernetes.io/bootstrapping: rbac-defaults
    addonmanager.kubernetes.io/mode: EnsureExists
  name: system:coredns
roleRef:
  apiGroup: rbac.authorization.k8s.io
  kind: ClusterRole
  name: system:coredns
subjects:
- kind: ServiceAccount
  name: coredns
  namespace: kube-system
---
apiVersion: v1
kind: ConfigMap
metadata:
  name: coredns
  namespace: kube-system
  labels:
      addonmanager.kubernetes.io/mode: EnsureExists
data:
  Corefile: |
    .:53 {
        log
        errors
        health {
            lameduck 5s
        }
        ready
        kubernetes cluster.local in-addr.arpa ip6.arpa {
            pods insecure
            fallthrough in-addr.arpa ip6.arpa
            ttl 30
        }
        prometheus :9153
        forward . /etc/resolv.conf
        cache 30
        loop
        reload
        loadbalance
    }
---
apiVersion: apps/v1
kind: Deployment
metadata:
  name: coredns
  namespace: kube-system
  labels:
    k8s-app: kube-dns
    kubernetes.io/cluster-service: "true"
    addonmanager.kubernetes.io/mode: Reconcile
    kubernetes.io/name: "CoreDNS"
spec:
  # replicas: not specified here:
  # 1. In order to make Addon Manager do not reconcile this replicas parameter.
  # 2. Default is 1.
  # 3. Will be tuned in real time if DNS horizontal auto-scaling is turned on.
  strategy:
    type: RollingUpdate
    rollingUpdate:
      maxUnavailable: 1
  selector:
    matchLabels:
      k8s-app: kube-dns
  template:
    metadata:
      labels:
        k8s-app: kube-dns
      annotations:
        seccomp.security.alpha.kubernetes.io/pod: 'runtime/default'
    spec:
      priorityClassName: system-cluster-critical
      serviceAccountName: coredns
      tolerations:
        - key: "CriticalAddonsOnly"
          operator: "Exists"
      nodeSelector:
        kubernetes.io/os: linux
      containers:
      - name: coredns
        image: lizhenliang/coredns:1.6.7
        imagePullPolicy: IfNotPresent
        resources:
          limits:
            memory: 512Mi
          requests:
            cpu: 100m
            memory: 70Mi
        args: [ "-conf", "/etc/coredns/Corefile" ]
        volumeMounts:
        - name: config-volume
          mountPath: /etc/coredns
          readOnly: true
        ports:
        - containerPort: 53
          name: dns
          protocol: UDP
        - containerPort: 53
          name: dns-tcp
          protocol: TCP
        - containerPort: 9153
          name: metrics
          protocol: TCP
        livenessProbe:
          httpGet:
            path: /health
            port: 8080
            scheme: HTTP
          initialDelaySeconds: 60
          timeoutSeconds: 5
          successThreshold: 1
          failureThreshold: 5
        readinessProbe:
          httpGet:
            path: /ready
            port: 8181
            scheme: HTTP
        securityContext:
          allowPrivilegeEscalation: false
          capabilities:
            add:
            - NET_BIND_SERVICE
            drop:
            - all
          readOnlyRootFilesystem: true
      dnsPolicy: Default
      volumes:
        - name: config-volume
          configMap:
            name: coredns
            items:
            - key: Corefile
              path: Corefile
---
apiVersion: v1
kind: Service
metadata:
  name: kube-dns
  namespace: kube-system
  annotations:
    prometheus.io/port: "9153"
    prometheus.io/scrape: "true"
  labels:
    k8s-app: kube-dns
    kubernetes.io/cluster-service: "true"
    addonmanager.kubernetes.io/mode: Reconcile
    kubernetes.io/name: "CoreDNS"
spec:
  selector:
    k8s-app: kube-dns
  clusterIP: 10.0.0.2
  ports:
  - name: dns
    port: 53
    protocol: UDP
  - name: dns-tcp
    port: 53
    protocol: TCP
  - name: metrics
    port: 9153
    protocol: TCP
6.2 application and test
kubectl apply -f coredns.yaml

kubectl get pods -n kube-system
NAME                          READY   STATUS    RESTARTS   AGE
coredns-5ffbfd976d-j6shb      1/1     Running   0          32s
DNS resolution test
kubectl run -it --rm dns-test --image=busybox:1.28.4 sh
If you don't see a command prompt, try pressing enter.

/ # nslookup kubernetes
Server:    10.0.0.2
Address 1: 10.0.0.2 kube-dns.kube-system.svc.cluster.local

Name:      kubernetes
Address 1: 10.0.0.1 kubernetes.default.svc.cluster.local
No problem parsing.
VII Capacity expansion Work Node
Before capacity expansion, the new node should complete the operation of system initialization (including Docker installation) in 1.4 of this document.
7.1 copy the deployed Node related files to the capacity expansion Node
Copy the files involved in the Worker Node to the capacity expansion node Node2 at Node1: 10.0.160.7
#Operate on Node1 node
scp -r /opt/kubernetes root@10.0.160.7:/opt/

scp -r /usr/lib/systemd/system/{kubelet,kube-proxy}.service root@10.0.160.7:/usr/lib/systemd/system

scp /opt/kubernetes/ssl/ca.pem root@10.0.160.7:/opt/kubernetes/ssl
7.2 delete the kubelet certificate and kubeconfig file on the capacity expansion node
#Operate on Node2 node
rm -f /opt/kubernetes/cfg/kubelet.kubeconfig
rm -f /opt/kubernetes/ssl/kubelet*
These files are automatically generated after the certificate application is approved. Each Node is different and must be deleted
7.3 modifying the expansion node configuration file
Modify kubelet conf
#Operate on Node2 node
vi /opt/kubernetes/cfg/kubelet.conf

#Modify kubelet The hostname in the conf file is the hostname of the current node
--hostname-override=yf-k8s-160007
Modify Kube proxy config yml
#Operate on Node2 node
vi /opt/kubernetes/cfg/kube-proxy-config.yml

#Modify Kube proxy config The hostname in the YML file is the hostname of the current node
hostnameOverride: yf-k8s-160007
7.4 start the expansion node Kube proxy
systemctl daemon-reload
systemctl start kubelet kube-proxy
systemctl enable kubelet kube-proxy
7.5 approve the kubelet certificate application of the expansion node at the Master node
# View certificate requests
kubectl get csr
NAME           AGE   SIGNERNAME                    REQUESTOR           CONDITION
node-csr-4zTjsaVSrhuyhIGqsefxzVoZDCNKei-aE2jyTP81Uro   89s   kubernetes.io/kube-apiserver-client-kubelet   kubelet-bootstrap   Pending

# Authorization request
kubectl certificate approve node-csr-4zTjsaVSrhuyhIGqsefxzVoZDCNKei-aE2jyTP81Uro
7.6 viewing the status of expansion nodes
kubectl get node
NAME            STATUS   ROLES    AGE     VERSION
yf-k8s-160006   Ready    <none>   47m     v1.20.4
yf-k8s-160007    Ready    <none>   6m49s   v1.20.4
VIII Capacity expansion Master (realizing high availability Architecture)
Before capacity expansion, the new node should complete the operation of system initialization (including Docker installation) in 1.4 of this document.
8.1 deploy Master2 expansion node
Master2 is consistent with all operations of deployed Master1. So we just need to copy all K8s files of Master1, and then modify the server IP and hostname to start.
8.1.1 create Etcd certificate directory
#Create the etcd certificate directory in the Master2 capacity expansion node
mkdir -p /opt/etcd/ssl
8.1.2 copy the deployed Master node related files to the expansion node
#Copy all K8s files and etcd certificates on Master1 to Master2:
scp -r /opt/kubernetes root@10.0.160.8:/opt
scp -r /opt/etcd/ssl root@10.0.160.8:/opt/etcd
scp /usr/lib/systemd/system/kube* root@10.0.160.8:/usr/lib/systemd/system
scp /usr/bin/kubectl  root@10.0.160.8:/usr/bin
scp -r ~/.kube root@10.0.160.8:~
8... 1.3 delete certificate file
Delete kubelet certificate and kubeconfig file
#Operate in Master2
rm -f /opt/kubernetes/cfg/kubelet.kubeconfig
rm -f /opt/kubernetes/ssl/kubelet*
8.1.4 modify configuration file IP and host name
Modify apiserver, kubelet and Kube proxy configuration files to local IP
#Operate at Master2 node
vi /opt/kubernetes/cfg/kube-apiserver.conf
...
--bind-address=10.0.160.8 \
--advertise-address=10.0.160.8 \
...

vi /opt/kubernetes/cfg/kube-controller-manager.kubeconfig
server: https://10.0.160.8:6443

vi /opt/kubernetes/cfg/kube-scheduler.kubeconfig
server: https://10.0.160.8:6443

vi /opt/kubernetes/cfg/kubelet.conf
--hostname-override=yf-k8s-160008

vi /opt/kubernetes/cfg/kube-proxy-config.yml
hostnameOverride: yf-k8s-160008

vi ~/.kube/config
...
server: https://10.0.160.8:6443
8.1.5 startup
systemctl daemon-reload
systemctl start kube-apiserver kube-controller-manager kube-scheduler kubelet kube-proxy
systemctl enable kube-apiserver kube-controller-manager kube-scheduler kubelet kube-proxy
8.1.6 viewing cluster status
#Operate at Master2 node
kubectl get cs
NAME                   STATUS    MESSAGE             ERROR
scheduler              Healthy   ok
controller-manager     Healthy   ok
etcd-1                 Healthy   {"health":"true"}
etcd-2                 Healthy   {"health":"true"}
etcd-0                 Healthy   {"health":"true"}
8.2 deploy Nginx + Keepalived high availability load balancer
8.2.1 installing software packages
#Operate on lb active and standby nodes
yum install epel-release -y
yum install nginx keepalived -y
8.2.2 Nginx configuration file
#The Nginx configuration files of the lb active and standby nodes are the same, which are configured as follows
cat > /etc/nginx/nginx.conf << "EOF"
user nginx;
worker_processes auto;
error_log /var/log/nginx/error.log;
pid /run/nginx.pid;

include /usr/share/nginx/modules/*.conf;

events {
    worker_connections 1024;
}

# Four layer load balancing provides load balancing for two Master apiserver components
stream {

    log_format  main  '$remote_addr $upstream_addr - [$time_local] $status $upstream_bytes_sent';

    access_log  /var/log/nginx/k8s-access.log  main;

    upstream k8s-apiserver {
       server 10.0.160.5:6443;   # Master1 APISERVER IP:PORT
       server 10.0.160.8:6443;   # Master2 APISERVER IP:PORT
    }

    server {
       listen 16443; # If your nginx is multiplexed with the master node, the listening port cannot be 6443, otherwise it will conflict
       proxy_pass k8s-apiserver;
    }
}

http {
    log_format  main  '$remote_addr - $remote_user [$time_local] "$request" '
                      '$status $body_bytes_sent "$http_referer" '
                      '"$http_user_agent" "$http_x_forwarded_for"';

    access_log  /var/log/nginx/access.log  main;

    sendfile            on;
    tcp_nopush          on;
    tcp_nodelay         on;
    keepalive_timeout   65;
    types_hash_max_size 2048;

    include             /etc/nginx/mime.types;
    default_type        application/octet-stream;

    server {
        listen       80 default_server;
        server_name  _;

        location / {
        }
    }
}
EOF
8.2.3 Keepalived configuration file (LB master node)
#Modify the keepalived configuration file on the lb master node
cat > /etc/keepalived/keepalived.conf << EOF
global_defs {
   notification_email {
     acassen@firewall.loc
     failover@firewall.loc
     sysadmin@firewall.loc
   }
   notification_email_from Alexandre.Cassen@firewall.loc
   smtp_server 127.0.0.1
   smtp_connect_timeout 30
   router_id NGINX_MASTER
}

vrrp_script check_nginx {
    script "/etc/keepalived/check_nginx.sh"
}

vrrp_instance VI_1 {
    state MASTER
    interface eno2  # Change to actual network card name
    virtual_router_id 51 # VRRP routing ID instance. Each instance is unique
    priority 100    # Priority, standby server setting 90
    advert_int 1    # Specify the notification interval of VRRP heartbeat packet, which is 1 second by default
    authentication {
        auth_type PASS
        auth_pass 1111
    }
    # Virtual IP
    virtual_ipaddress {
        10.0.160.60/24
    }
    track_script {
        check_nginx
    }
}
EOF
• vrrp_script: Specifies the script to check nginx working status (judge whether to fail over according to nginx status)
• virtual_ipaddress: virtual IP (VIP)
Create a script to check the running status of Nginx in the above configuration file
#At lb master node
cat > /etc/keepalived/check_nginx.sh  << "EOF"
#!/bin/bash
count=$(ss -antp |grep 16443 |egrep -cv "grep|$$")

if [ "$count" -eq 0 ];then
    exit 1
else
    exit 0
fi
EOF

#to grant authorization
chmod +x /etc/keepalived/check_nginx.sh
8.2.4 Keepalived configuration file (LB standby node)
#Operate at lb standby node
cat > /etc/keepalived/keepalived.conf << EOF
global_defs {
   notification_email {
     acassen@firewall.loc
     failover@firewall.loc
     sysadmin@firewall.loc
   }
   notification_email_from Alexandre.Cassen@firewall.loc
   smtp_server 127.0.0.1
   smtp_connect_timeout 30
   router_id NGINX_BACKUP
}

vrrp_script check_nginx {
    script "/etc/keepalived/check_nginx.sh"
}

vrrp_instance VI_1 {
    state BACKUP
    interface eno2
    virtual_router_id 51 # VRRP routing ID instance. Each instance is unique
    priority 90
    advert_int 1
    authentication {
        auth_type PASS
        auth_pass 1111
    }
    virtual_ipaddress {
        10.0.160.60/24
    }
    track_script {
        check_nginx
    }
}
EOF
Create a script to check the allowed state of Nginx in the above configuration file
#At the standby node
cat > /etc/keepalived/check_nginx.sh  << "EOF"
#!/bin/bash
count=$(ss -antp |grep 16443 |egrep -cv "grep|$$")

if [ "$count" -eq 0 ];then
    exit 1
else
    exit 0
fi
EOF


#to grant authorization
chmod +x /etc/keepalived/check_nginx.sh
Note: keepalived determines whether to fail over according to the status code returned by the script (0 is normal, non-0 is abnormal).
8.2.5 startup
systemctl daemon-reload
systemctl start nginx keepalived
systemctl enable nginx keepalived
8.2.6 viewing the keepalived working status
At the LB Master node, use the ip a command to check whether the eno2 network card is bound with a 10.0.160.60 virtual IP.
8.2.7 Nginx+Keepalived high availability test
Close Nginx of LB Master node and test whether VIP will drift to LB Backup node
8.2.8 access K8s cluster test through VIP
curl -k https://10.0.160.60:16443/version
{
  "major": "1",
  "minor": "20",
  "gitVersion": "v1.20.4",
  "gitCommit": "e87da0bd6e03ec3fea7933c4b5263d151aafd07c",
  "gitTreeState": "clean",
  "buildDate": "2021-02-18T16:03:00Z",
  "goVersion": "go1.15.8",
  "compiler": "gc",
  "platform": "linux/amd64"
}
The K8s version information can be obtained correctly, indicating that the load balancer is set up normally. Data flow of the request: curl - > VIP (nginx) - > apiserver
You can also see the forwarding apiserver IP by viewing the Nginx log:
tail /var/log/nginx/k8s-access.log -f
8.3 modify the connection VIP of all nodes (important)
Imagine that although we have added Master2 Node and load balancer, we have expanded the capacity from a single Master architecture, that is, at present, all Worker Node components are still connected to Master1 Node. If we do not connect VIP to load balancer, the Master will still have a single point of failure.
Therefore, the next step is to change the component configuration files of all worker nodes (nodes viewed by kubectl get node command) from 10.0.160.5 to 10.0.160.60 (VIP).
Execute on all worker nodes
#It is recommended that you check them one by one after batch modification
sed -i 's#10.0.160.5:6443#10.0.160.60:16443#' /opt/kubernetes/cfg/*
#restart
systemctl restart kubelet kube-proxy
View node status
kubectl get node
NAME            STATUS   ROLES    AGE   VERSION
yf-k8s-160006    Ready    <none>   31d   v1.20.4
yf-k8s-160007    Ready    <none>   31d   v1.20.4
Say more:
Relevant codes and note addresses in this chapter: a plane ticket 🚀
🌍Github: 🚀 Java supernatural path:[ 🍔 Study notes of Java full ecological technology, let's be supernatural together 🍔]
🪐CSDN: 🚀 Java supernatural path:[ 🍔 Study notes of Java full ecological technology, let's be supernatural together 🍔]