Think in Component
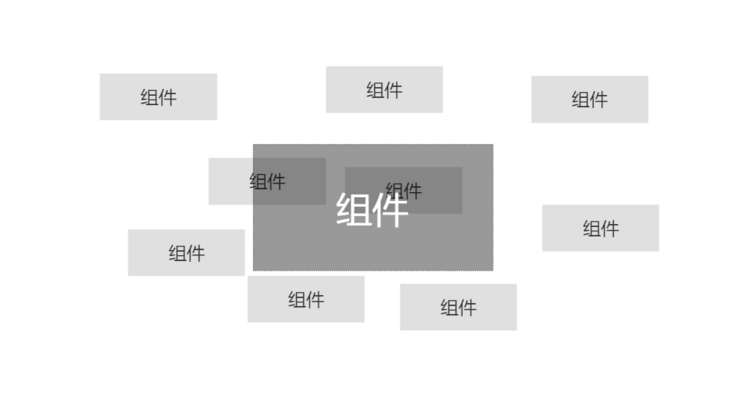
Bit is a component-driven architecture for modern application development based on components. In Bit's world, everything is a component.
Components can be grouped into other components, which ultimately form an application APP, which is also a component.
This gives us a new idea for development: we build components that can be integrated into different applications instead of building applications that contain components.
Bit helps us build modular, robust, testable, reusable code.
Bit Cloud is a component's cloud hosting service. It provides end-to-end solutions for developers and teams to host, organize, retrieve, use, update, and collaborate on processing components.
Bit Advantage
- Help us build modular, robust, testable, reusable code with the idea of component architecture.
- Separate components from existing code structures without changing the structure or maintaining new projects.
- You can change dependent components and create your own version to be managed independently without worrying about polluting other environments.
Initialize Bit Workspace
Install BVM & Bit
BVM Is a Bit version management tool, the same as NVM
// node version 12.22.0 and above
npm i -g @teambit/bvm
Perform bvm-h to verify that the installation was successful and set the environment variable if the BVM command is reminded that it is not available:
# MacOs Bash
echo 'export PATH=$HOME/bin:$PATH' >> ~/.bashrc && source ~/.bashrc

# zsh
echo 'export PATH=$HOME/bin:$PATH' >> ~/.zshrc && source ~/.zshrc

# windows
setx path "%path%;%LocalAppData%\.bvm"
Install the latest version of bit:
bvm install
Perform a bit-h check to see if the installation was successful, and if the reminder bit command is unavailable, set the environment variable as described above.
bit new command initializes workspace
Suitable for new projects
$ bit new  <env> <project>
$ cd <project>
$ bit install
bit init command initializes workspace
Apply to existing projects
- Initialize environment first
$ cd <project>
$ bit init --harmony
- Manually configure the development environment
Take the react environment as an example, modify the workspace.jsonc file:
"teambit.workspace/variants": {
  "*": {
    "teambit.react/react": { }
  }
}
- Install the necessary peer dependencies
$ bit install react --type peer
$ bit install react-dom --type peer
Initialize Git
You need to upload workspace.jsonc and.bitmap to Git.
Create Components
Create with built-in components
Take react for example:
- Create component bit create <build-in-template> <component>with built-in template
$ bit templates # View all built-in templates
$ bit create react-component ui/button     # TypeScript
$ bit create react-component-js ui/button  # JavaScript
Note: where <component>can be a path and the preceding path is a namespace, the above example is equivalent to bit create react-component button --namespace ui.
- Add Test Cases
$ bit install @testing-library/react
- Compile and Start Service
$ bit compile
$ bit start
Custom Components
- Existing component structure and code
- Add components through bit add <relative-path> --namespace <namespace>
View component information
You can view all the information about the component compilation environment, including files, dependencies, and so on.
$ bit show <component-id>
Example output information:
  ┌───────────────┬────────────────────────────────────────────────────────────────────┐
  │ id            │ my-scope/ui/button                                                 │
  ├───────────────┼────────────────────────────────────────────────────────────────────┤
  │ scope         │ my-scope                                                           │
  ├───────────────┼────────────────────────────────────────────────────────────────────┤
  │ name          │ ui/button                                                          │
  ├───────────────┼────────────────────────────────────────────────────────────────────┤
  │ env           │ teambit.react/react                                                │
  ├───────────────┼────────────────────────────────────────────────────────────────────┤
  │ package name  │ @my-scope/ui.button                                                │
  ├───────────────┼────────────────────────────────────────────────────────────────────┤
  │ main file     │ index.ts                                                           │
  ├───────────────┼────────────────────────────────────────────────────────────────────┤
  │ files         │ button.composition.tsx                                             │
  │               │ button.docs.mdx                                                    │
  │               │ button.tsx                                                         │
  │               │ button.spec.tsx                                                    │
  │               │ index.ts                                                           │
  ├───────────────┼────────────────────────────────────────────────────────────────────┤
  │ dev files     │ button.docs.mdx (teambit.docs/docs)                                │
  │               │ button.spec.tsx (teambit.defender/tester)                          │
  │               │ button.composition.tsx (teambit.compositions/compositions)         │
  ├───────────────┼────────────────────────────────────────────────────────────────────┤
  │ extensions    │ teambit.react/react                                                │
  │               │ teambit.component/dev-files                                        │
  │               │ teambit.compositions/compositions                                  │
  │               │ teambit.pkg/pkg                                                    │
  │               │ teambit.docs/docs                                                  │
  │               │ teambit.envs/envs                                                  │
  │               │ teambit.dependencies/dependency-resolver                           │
  ├───────────────┼────────────────────────────────────────────────────────────────────┤
  │ dependencies  │ core-js@3.8.3- (package)                                           │
  ├───────────────┼────────────────────────────────────────────────────────────────────┤
  │ dev           │ @testing-library/react@11.2.6- (package)                           │
  │ dependencies  │ @babel/runtime@7.12.18-------- (package)                           │
  │               │ @types/react-router-dom@5.1.7- (package)                           │
  │               │ @types/jest@26.0.20----------- (package)                           │
  │               │ @types/react@16.9.43---------- (package)                           │
  │               │ @types/node@12.20.4----------- (package)                           │
  ├───────────────┼────────────────────────────────────────────────────────────────────┤
  │ peer          │ react@16.13.1----- (package)                                       │
  │ dependencies  │ react-dom@16.13.1- (package)                                       │
  └───────────────┴────────────────────────────────────────────────────────────────────┘
View component status
$ bit status
View all versions of a component
$ bit log <component-id>
View a list of all local components
$ bit list
Start the test server
Run different workspace tasks through the worker, such as tests, linter s, and any workspace tasks defined by components.
$ bit compile
$ bit start
Using Components
Bit does not allow relative path imports when importing another component as a dependency. Because this couples project-specific directory structures, use package names instead.
To import components as dependencies, you must use module links.
Bit creates a module for each component in the workspace that is linked in node_modules directory with its build output and auto-generated package.json.
To regenerate module links for components, run the bit link command.
Install components as NPM packages
The install command installs components, which are used as NPM packages.
As a Vendor component
Bit Workspace takes a component and manages it as if it were a custom component
Install components with the import command, as shown in the following example:
$ bit import <component-id>
Update import components to the latest version
$ bit import
Turn Vendor components into NPM package dependencies
$ bit eject <component-id>
Scope
Scope is the virtual storage of components.
Bit uses Scope to save versions of Bit components and access them as needed.
Remote Scope
A Bit server that hosts components and their versions.
characteristic
Set up Scope s on remote servers to share components, such as Bit.dev or self-hosted Bit servers.
Storing components on a Remote Scope allows them to be reused in other projects.
- Use the import command to get components from Remote Scope.
- Use the export command to push components to Remote Scope.
Note: Remote Scope caches component dependencies, such as those of other Scopes. This has the advantage of ensuring that the current component is executable even if the dependent component is not available.
Use
After Bit Server creates the Remote Scope, you need to change the workspace.jsonc file:
{
  "teambit.workspace/workspace": {
    "defaultScope": "<bit-username>.<remote-scope-name>"
  }
}
Any changes in the workspace.jsonc file require the local development server to be restarted.
$ bit start
Workspace Scope
Local storage of workspace components.
characteristic
The developer's workspace keeps working copies of the components and their history in the local Scope. This allows us to browse the history, compare versions, and review past revisions of components.
Workspace Scope s may also contain components from different Remote Scope s.
Shared Components
- Update version number for modified components
$ bit tag --all --message "first version"
- Shared Components
$ bit export
Note: When the sharing upload process ends, the.bitmap file will be updated to reflect the new state.
Install Components
Register Scope Source
$ npm config set '@YourUserName:registry' https://node.bit.dev
Installation Dependency
$ npm install @orgName/componentScopeName.componentID
Bit Component vs. NPM Package
Bit focuses on component-based workflows, while npm packages focus on compiled output.
- Generating NPM packages is only part of the Bit Component build process, which Bit calls version artifacts.
Configuration
Each component must be configured with an environment in which Bit "knows" how to build, test, link, and document components.
teambit.workspace/variants provides a unified way to set different configuration items for each component without modifying the package.json under each component file.
{
  "teambit.workspace/variants": {
    "design/theme": {
      "defaultScope": "acme.theme",
    },
    "cart": {
      "defaultScope": "acme.cart",
      "teambit.react/react": {}
    }
  }
}
View Configuration
- bit env - Prints a simple table containing all components in the workspace and their environments
- Bit show <component> - Print all information about the component, including the environment
- bit start - Visualize the component tree through a browser to see the component's environment
Remove Components
Remove Local Build
$ bit remove <component-id>
Impact:
An untracked component relies on deleting components - no effect
- Because Bit has not isolated untracked components, its dependencies will not be detected
- A tracked component relies on deleting the component - warning, use --force to force deletion
Imported remote components rely on deleting components - no impact
- Because remote components are isolated and immutable
- Locally introduced remote components and changes create another version
Remove remote components
$ bit remove <username.your-scope/ui/button> --remote
Describe the impact with one example:
- button component in remote uiScope
- The card component relies on the button component, which is also in the uiScope
- The login component relies on the button component in adminScope
Impact of deleting button components:
Because the card component is in the same Scope as the button component, there is a warning to delete the button component.
- Appendable - force deletion
- After deletion, the card component lacks dependencies and needs to be refactored to keep it working properly
login component has no effect
- Bit maintains dependencies in Scope
Installation errors when other projects depend on login components
- Source button component, missing
Compile Components
Most modern frameworks require a compilation or translation project to convert source code into executable code that can run in multiple browsers or Nodejs.
Bit's compiler is an environment service.
The choice of a compiler (Babel, TypeScript, and so on) and its configuration are determined by the various environments in which it serves.
Compilers never run directly, but only through the Compiler service.
A single workspace may run different compilers for different components, each depending on its environment.
$ bit compile <component-id> # Compile specific components
$ bit compile # Compile Workspace All Components
Component Dependency Diagram
A key feature of Bit is the ability to automatically create dependency diagrams from the source code of components.
Javascript can use require or import declarations to depend on two types of dependencies:
- As node_ Packages installed by modules
- Files and directories inside the project, or referenced in an ornament (for example, in Angular)
node_modules Dependency
The process for Bit parsing packages (that is, node_modules):
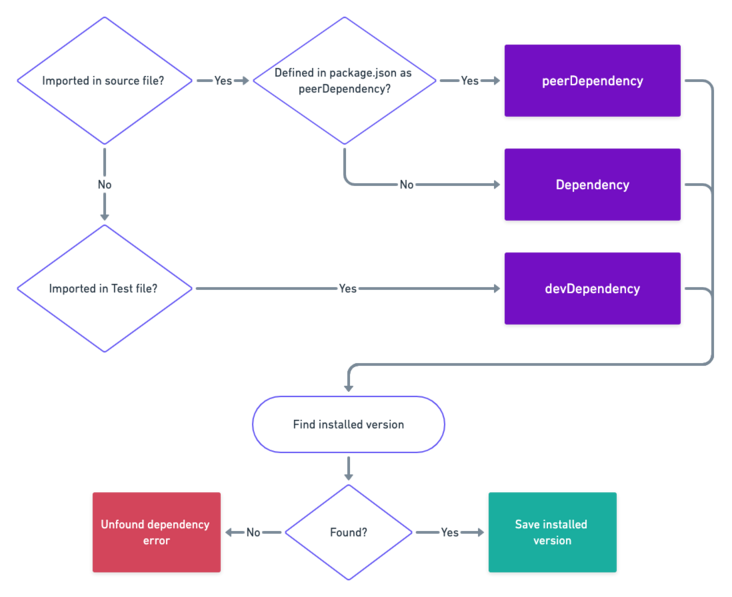
- You can check the dependencies Bit resolves for each package by bit show <component-id>
$ bit show hello/world
┌───────────────────┬─────────────────────────────────────────────────────────────────────┐
│        ID         │                            hello/world                              │
├───────────────────┼─────────────────────────────────────────────────────────────────────┤
│     Language      │                             javascript                              │
├───────────────────┼─────────────────────────────────────────────────────────────────────┤
│     Main File     │                      src/hello-world/index.js                       │
├───────────────────┼─────────────────────────────────────────────────────────────────────┤
│     Packages      │                           left-pad@^2.1.0                           │
├───────────────────┼─────────────────────────────────────────────────────────────────────┤
│       Files       │       src/hello-world/hello-world.js, src/hello-world/index.js      │
└───────────────────┴─────────────────────────────────────────────────────────────────────┘
If Bit cannot resolve all package dependencies, it prompts missing package dependencies. We need to verify that all packages do exist in package.json.
File Dependency
Components can depend on other files, such as import. /utils.js.
In order to isolate these components that depend on other files, we also need to track the other files that the component depends on. This is because if we want to use this component in another project, it must have its dependent files.
Note: Bit uses static code analysis and therefore only supports static import, not require.
Bit Resolve File Dependent Processes
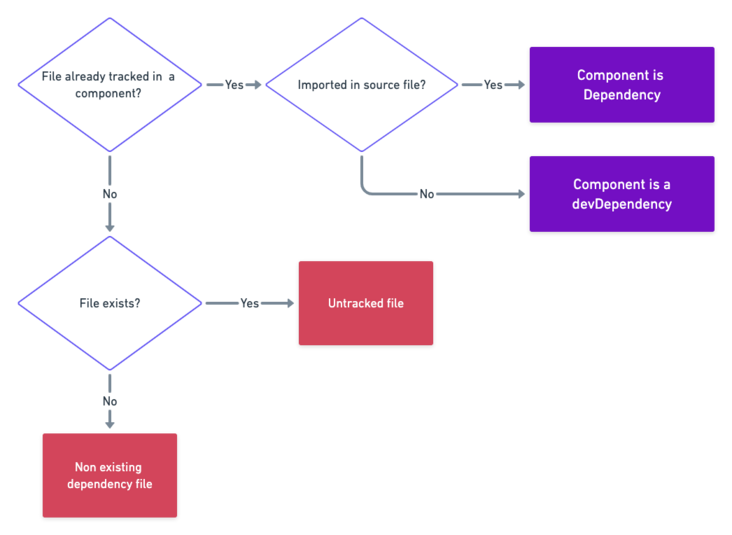
When Bit encounters a file that needs to be tracked, it tries to check that the file has been tracked in another component, in which case Bit makes another component a dependency of that component.
If the file is not tracked, Bit warns untracked file dependencies when checking component status.
Isolation issues
To solve the isolation problem, you can:
- Add untracked file dependencies to existing components
- Track files as new components
Which of the above approaches is based on the context of the file. If the file is used by multiple other components, it makes sense to put it in a separate component.
However, if this file is only an internal file of the tracked file, you can add it as a file of the component.
Files added to existing components
Run bit add to point to the Id of the component to which you want to add the file:
// Example
$ bit add src/utils/noop.js --id hello/world
Run bit status to check for success:
$ bit status
new components
    > component/hello-world... ok
Tracking files as new components
New components can be added with bit add s
// Example
$ bit add src/utils/noop.js --namespace utils
The result of execution is a new component.
Private Deployment v15
Hardware conditions
- Linux/Mac System
- Memory 4G+
Preconditions
- Docker
- Git
# Uninstall old docker
$ yum remove docker  docker-common docker-selinux docker-engine
# Install docker dependencies
$ yum install -y yum-utils device-mapper-persistent-data lvm2
# Set docker source
$ yum-config-manager --add-repo https://download.docker.com/linux/centos/docker-ce.repo
$ yum install docker-ce
# Start docker
$ systemctl start docker
# chkconfig mysqld on
$ systemctl enable docker
# Install Git
$ yum install git
Deployment process
$ git clone https://github.com/teambit/bit.git
$ cd bit/scripts/docker-teambit-bit
$ docker build -f ./Dockerfile-bit -t bitcli/bit:latest .
$ docker build -f ./Dockerfile-bit-server -t bitcli/bit-server:latest .
$ docker run -dit bitcli/bit:latest /bin/bash # Function
$ docker run -dit -p <port>:3000 bitcli/bit-server:latest
Dockerfile-bit:
- Install bvm and then use bvm to install the docker file for bit.
- This docker is often useful for running Bit commands like tag and export on a CI machine
Dockerfile-bit-server:
- A Dockerfile-bit (using from) based docker file
- The docker file creates a blank Scope and initializes the Bit server on it with bit start
Dockerfile-symphony:
- for internal use only
Related Issues
Mac computer ssh link: Permission denied
$ sudo ssh root@<ip>
WarNING warned when ssh links: REMOTE HOST IDENTIFICATION HAS CHANGE
$ sudo ssh-keygen -R <ip>
bvm install cannot install Bit
Temporarily change terminal agent
$ export http_proxy=http://127.0.0.1:1087
$ export https_proxy=$http_proxy
Be careful:
- Require VPN
- Ensure browser access to external network
- Turn on VPN, the terminal cannot be proxied even globally
Permanent Modification Agent
# Modify ~/.bashrc Settings Permanent Management Script
function proxy_on() {
    export http_proxy=http://127.0.0.1:1087
    export https_proxy=$http_proxy
    echo -e "Terminal agent is turned on."
}

function proxy_off(){
    unset http_proxy https_proxy
    echo -e "The terminal agent has been shut down."
}
Note: After modification, take effect immediately through source ~/.bashrc.
By proxy_on Start Agent, proxy_off closes the agent.
Release
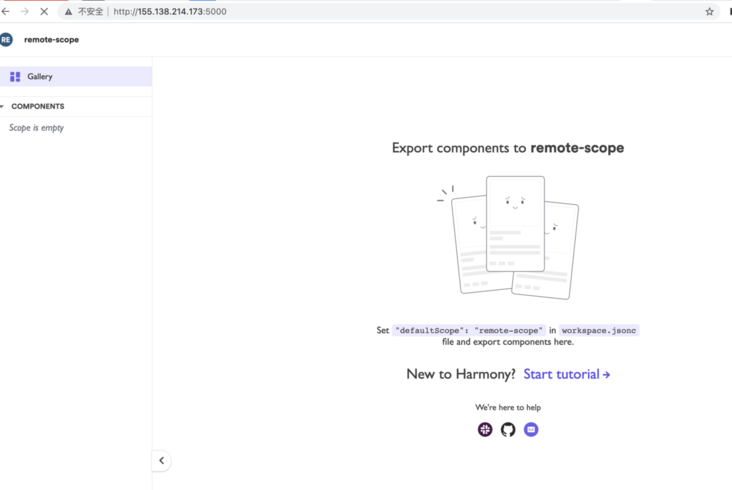
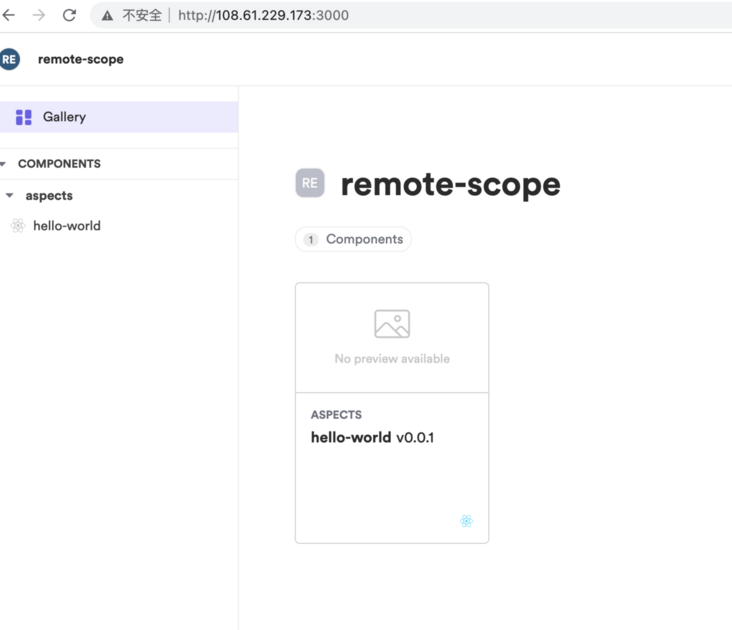
Register Remote Scope
# Client
$ cd <my-project>
$ bit init
$ bit remote add http://<host>:<port>
workspace.jsonc
Configure teambit.workspace/workspace
  "teambit.workspace/workspace": {
    /**
     * the name of the component workspace. used for development purposes.
     **/
    "name": "my-workspace-name",
    /**
     * set the icon to be shown on the Bit server.
     **/
    "icon": "https://static.bit.dev/bit-logo.svg",
    /**
     * default directory to place a component during `bit import` and `bit create`.
     * the following placeholders are available:
     * name - component name includes namespace, e.g. 'ui/button'.
     * scopeId - full scope-id includes the owner, e.g. 'teambit.compilation'.
     * scope - scope name only, e.g. 'compilation'.
     * owner - owner name in bit.dev, e.g. 'teambit'.
     **/
    "defaultDirectory": "{scope}/{name}",
    /**
     * default scope for all components in workspace.
     **/
    "defaultScope": "remote-scope"
  },
Tag
Listen for file changes to identify.
If the file does not change, it cannot be identified.
$ bit tag --all --message "first version"
Note: Independent components form a dependency network through independent "remote scope" and remote component hosting.
This dependency network enables changes to propagate a component's changes to all its dependent components. That is, changes to a component trigger the CI of the component and the CI of the component that depends on it in a cascading manner.
Give an example:
Component B depends on Component A, both of which were initially 0.0.1.
If component A is changed by 0.0.1, it will be A0.0.1-> 0.0.2 and B0.0.1-> 0.0.2 through bit tag--all.
If you continue to change component B, the version of A will not change through bit tag --all, B0.0.2-> 0.0.3.
Bit Deployment
Deployment requires a new identity, otherwise it cannot be deployed.
$ bit export
Extend Bit
We extend Bit by creating Aspect and API s that access Bit.
Extend Workspace UI
Take the new Tab as an example:
Initialize Bit Environment
$ bit init
New.bit/,.bitmap, workspace.jsonc files (folders) are created automatically.
Modify DefaultScope
{
  ...
  "teambit.workspace/workspace": {
    /**
     * the name of the component workspace. used for development purposes.
     **/
    "name": "my-workspace-name",
    /**
     * set the icon to be shown on the Bit server.
     **/
    "icon": "https://static.bit.dev/bit-logo.svg",
    /**
     * default directory to place a component during `bit import` and `bit create`.
     * the following placeholders are available:
     * name - component name includes namespace, e.g. 'ui/button'.
     * scopeId - full scope-id includes the owner, e.g. 'teambit.compilation'.
     * scope - scope name only, e.g. 'compilation'.
     * owner - owner name in bit.dev, e.g. 'teambit'.
     **/
    "defaultDirectory": "{scope}/{name}",
    /**
     * default scope for all components in workspace.
     **/
    "defaultScope": "me"
  },
  ...
}
New Aspect
$ bit create aspect aspects/hello-world
Generate directory structure:
.
└──me
  └── aspects
    └── hello-world
      ├── hello-world.aspect.ts
      ├── hello-world.main.runtime.ts
      └── index.ts
Here, the hello-world.main.runtime.ts code is as follows:
// hello-world.main.runtime.ts
import { MainRuntime } from '@teambit/cli';
import { HelloWorldAspect } from './hello-world.aspect';

export class HelloWorldMain {

  static slots = [];
  static dependencies = [];
  static runtime = MainRuntime;
  static async provider() {
    return new HelloWorldMain();
  }
}

HelloWorldAspect.addRuntime(HelloWorldMain);
Note: hello-world.main.runtime is responsible for extending workspace CLI and workspace Server.
To create a new menu on the Component Details page, we need to refer to the hello-world.main.runtime.ts file to create a new hello-world.ui.runtime.tsx file:
// hello-world.ui.runtime.tsx
import React, { useContext } from 'react';
import { UIRuntime } from '@teambit/ui';
import { ComponentUI, ComponentAspect } from '@teambit/component';
import { HelloWorldAspect } from './hello-world.aspect';

export class HelloWorldUI extends React.Component<any> {
  static slots = [];
  static dependencies = [ComponentAspect];
  static runtime = UIRuntime;
  static async provider([component]: [ComponentUI]) {
    return new HelloWorldUI();
  }
}

HelloWorldAspect.addRuntime(HelloWorldUI);
Note: ComponentAspect is introduced here, which is the core Aspect of Bit and is responsible for building all the components and operations of the page. With ComponentAspect as a dependency, we can get it in the provider and use the API it provides.
// Update hello-world.ui.runtime.tsx
// Register registerNavigation navigation
import React, { useContext } from 'react';
import { UIRuntime } from '@teambit/ui';
import { ComponentUI, ComponentAspect } from '@teambit/component';
import { HelloWorldAspect } from './hello-world.aspect';

export class HelloWorldUI extends React.Component<any> {
  static slots = [];
  static dependencies = [ComponentAspect];
  static runtime = UIRuntime;
  static async provider([component]: [ComponentUI]) {
     component.registerNavigation({
       href: '~hello',
       children: 'Hello'
     });
    return new HelloWorldUI();
  }
}

HelloWorldAspect.addRuntime(HelloWorldUI);
Here, we register navigation by relying on the registerNavigation provided by ComponentAspect, and manually switching navigation renders Hello.
// Update hello-world.ui.runtime.tsx
// Register registerRoute routing
import React, { useContext } from 'react';
import { UIRuntime } from '@teambit/ui';
import { ComponentUI, ComponentAspect } from '@teambit/component';
import { HelloWorldAspect } from './hello-world.aspect';

export class HelloWorldUI extends React.Component<any> {
  static slots = [];
  static dependencies = [ComponentAspect];
  static runtime = UIRuntime;
  static async provider([component]: [ComponentUI]) {
     component.registerRoute({
       children: () => <div>hello world</div>,
       path: '~hello'
     });
     component.registerNavigation({
       href: '~hello',
       children: 'Hello'
     });
    return new HelloWorldUI();
  }
}

HelloWorldAspect.addRuntime(HelloWorldUI);
Here, we register a route by relying on the registerRoute provided by ComponentAspect, which takes on the registered navigation described above and renders the hello world simply.
Register Custom Aspect
To configure a resolution environment for Aspect before it is executed, it translates the Aspect into browser, nodejs-recognized code.
{
  ...
  "teambit.workspace/variants": {
    "{me/aspects/*}": {
      "teambit.harmony/aspect":{}
    }
  },
  "me/aspects/hello-world": {}
  ...
}
Installation Dependency
$ bit install
bit start works without installing dependencies, but no additional UI is visible.
Effect Display
Run bit start to see the effect~
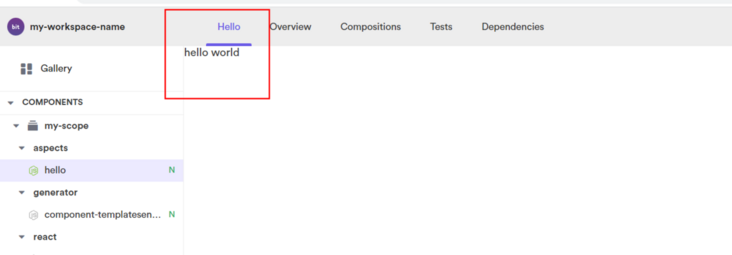
Note: To update the display, delete.Bit/, node_modules, public/, execute bit install and bit start again.
View Aspect Information
View information halfway through bit show me/aspects/hello-world
Create extensions from built-in templates
- View built-in templates through bit templates
- Through `bit create <template> <custom-name> [--scope-name]
- Install template-related dependencies through bit install
- View custom extension status through bit status
- If there is a dependency missing error, add the missing dependency to:
  "teambit.dependencies/dependency-resolver": {
    /**
     * choose the package manager for Bit to use. you can choose between 'yarn', 'pnpm'
     */
    "packageManager": "teambit.dependencies/pnpm",
    "policy": {
      "dependencies": {},
      "peerDependencies": {
        "react": "~17.0.2",
        "@testing-library/react": "~12.1.2"
      }
    }
  },
bit install supplements installation dependencies.
- Pass the bit start --dev test.