This article describes how to use bootstrap fileinput.js (the best file upload component) to display and upload pictures, including spring MVC back-end file saving.
demo


II. Introducing Plug-ins
<link type="text/css" rel="stylesheet" href="${ctx}/components/fileinput/css/fileinput.css" />
<script type="text/javascript" src="${ctx}/components/fileinput/js/fileinput.js"></script>
<script type="text/javascript" src="${ctx}/components/fileinput/js/fileinput_locale_zh.js"></script>- 1
- 2
- 3
- 1
- 2
- 3
http://plugins.krajee.com/file-input This is the official document with the download address.
3. Pages
<input type="file" name="image" class="projectfile" value="${deal.image}"/>- 1
- 1
1. type=file and class=projectfile, indicating that they are input file types.
2. name specifies the key it gets in the background.
3. value specifies the path of the image when it is displayed.
4. Execution at page loading
projectfileoptions : {
        showUpload : false,
        showRemove : false,
        language : 'zh',
        allowedPreviewTypes : [ 'image' ],
        allowedFileExtensions : [ 'jpg', 'png', 'gif' ],
        maxFileSize : 2000,
    },
// File upload box
$('input[class=projectfile]').each(function() {
    var imageurl = $(this).attr("value");

    if (imageurl) {
        var op = $.extend({
            initialPreview : [ // Settings for Preview Pictures
            "<img src='" + imageurl + "' class='file-preview-image'>", ]
        }, projectfileoptions);

        $(this).fileinput(op);
    } else {
        $(this).fileinput(projectfileoptions);
    }
});- 1
- 2
- 3
- 4
- 5
- 6
- 7
- 8
- 9
- 10
- 11
- 12
- 13
- 14
- 15
- 16
- 17
- 18
- 19
- 20
- 21
- 22
- 23
- 1
- 2
- 3
- 4
- 5
- 6
- 7
- 8
- 9
- 10
- 11
- 12
- 13
- 14
- 15
- 16
- 17
- 18
- 19
- 20
- 21
- 22
- 23
1. Adoption jQuery Get the corresponding input file, and then execute the fileinput method.
2. showUpload settings have upload buttons.
3. language designated Sinicization
4. allowedFileTypes, allowedFileExtensions don't know why they didn't work?
5. maxFileSize specifies the size of the uploaded file
form forms with file files submitted through ajax
Let's first look at the form layout with file.
<form class="form-horizontal required-validate" action="${ctx}/save?callbackType=confirmTimeoutForward" enctype="multipart/form-data" method="post" onsubmit="return iframeCallback(this, pageAjaxDone)">

    <div class="form-group">
        <label for="" class="col-md-1 control-label">Project Cover</label>
        <div class="col-md-10 tl th">
            <input type="file" name="image" class="projectfile" value="${deal.image}" />
            <p class="help-block">Support jpg,jpeg,png,gif Format, size not exceeding2.0M</p>
        </div>
    </div>
    <div class="form-group text-center ">
        <div class="col-md-10 col-md-offset-1">
            <button type="submit" class="btn btn-primary btn-lg">Preservation</button>
        </div>
    </div>
</form> - 1
- 2
- 3
- 4
- 5
- 6
- 7
- 8
- 9
- 10
- 11
- 12
- 13
- 14
- 15
- 1
- 2
- 3
- 4
- 5
- 6
- 7
- 8
- 9
- 10
- 11
- 12
- 13
- 14
- 15
- Entype= "multipart/form-data" is essential.
- onsubmit= "return iframeCallback (this, page AjaxDone)" method, submits the form through ajax (iframeCallback), and calls back function (page AjaxDone) after uploading success for the next step.
For an introduction to iframeCallback, see Data submission of form form where summernote is located There is no more introduction here.
Then let's introduce the callback function pageAjaxDone.
function pageAjaxDone(json) {
    YUNM.debug(json);
    YUNM.ajaxDone(json);

    if (json[YUNM.keys.statusCode] == YUNM.statusCode.ok) {
        var msg = json[YUNM.keys.message];
        // Pop-up message prompt
        YUNM.debug(msg);

        if (YUNM.callbackType.confirmTimeoutForward == json.callbackType) {
            $.showSuccessTimeout(msg, function() {
                window.location = json.forwardUrl;
            });
        }
    }
}- 1
- 2
- 3
- 4
- 5
- 6
- 7
- 8
- 9
- 10
- 11
- 12
- 13
- 14
- 15
- 16
- 1
- 2
- 3
- 4
- 5
- 6
- 7
- 8
- 9
- 10
- 11
- 12
- 13
- 14
- 15
- 16
Its main function is to process the error message transmitted by the server through the ajaxDone method. If the server is persuaded to operate successfully, the prompt message will be displayed, and then jump to the corresponding url.
6. Spring MVC Save Pictures
Please refer to Backend Spring MVC File Save
ps: I left a little question on the blog above, but I didn't study it until a very good buddy reminded me the following:
ihchenchen published [reply] allowedFileTypes and allowedFileExtensions at 13:42 yesterday. I know why they don't work because the fileinput() method is called twice, once in the last few lines of fileinput.js and once in your own. In fileinput.js, allowedFileTypes and allowedFileExtensions are not set. There are two ways to change this: 1. Annotate the last line calls in fileinput.js. 2. Use the method of "data_" to do it, not write (this).fileinput().
I am very grateful for ihchenchen's kind reminder. Although the explanation he provided did not solve my questions, I like this kind of interactive technical exchange. I wrote many blogs before, and seldom gave such kind and effective answers. It reminds me. Chinese Programmers and Foreign Programmers The story inside is shocking, with a little shame. So how to do "Ask" questions, get answers, no distractions." It seems particularly precious, and "ihchenchen" is full of this spirit!
6. Confusing allowedFileTypes and allowedFileExtensions
I was puzzled why bootstrap fileinput set these two attributes, but it did not work. In fact, it was my own misunderstanding. Now, after a painful understanding, I suddenly realized!
①,allowedFileTypes
allowedFileTypes
array the list of allowed file types for upload. This by default is set to null which means the plugin supports all file types for upload. If an invalid file type is found, then a validation error message as set in msgInvalidFileType will be raised. The following
types as set in fileTypeSettings are available for setup.
['image', 'html', 'text', 'video', 'audio', 'flash', 'object']
Let's start with "allowed FileTypes", which tells us the type of file we choose, so it's easy to think of such a picture: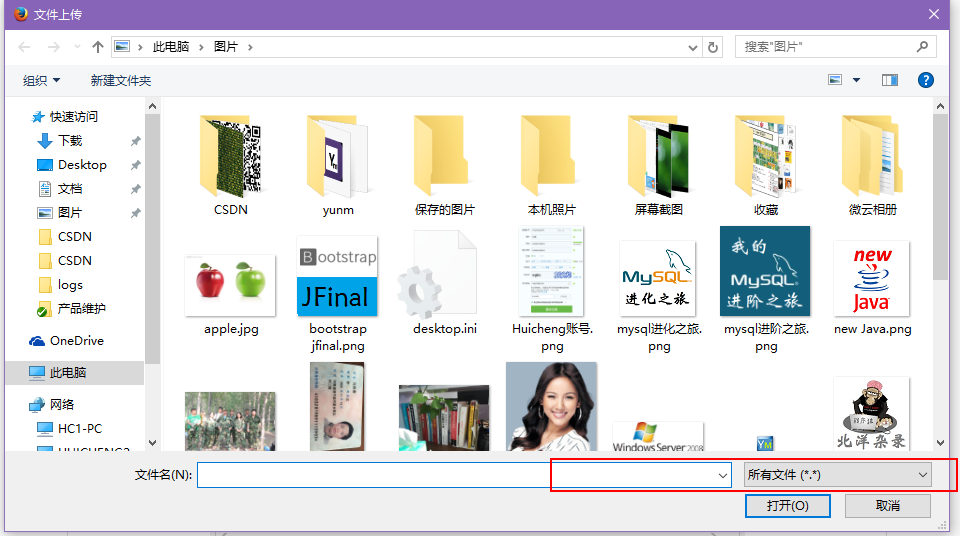
That is to say, we hope that the "all files" at this time is not "all files", but "image" and so on. Obviously this logic is not wrong, but it is not suitable for bootstrap fileinput!
Then, it's easy for me to think that "allowed FileTypes" doesn't work!
But look at the following picture:
Roar, the original type checking happened after you selected the file!
(2) The working principle of allowed FileTypes
            $(this).fileinput({
                showUpload : false,
                showRemove : false,
                language : 'zh',
                allowedPreviewTypes: ['image'],
                allowedFileTypes: ['image'],
                allowedFileExtensions:  ['jpg', 'png'],
                maxFileSize : 2000,

});- 1
- 2
- 3
- 4
- 5
- 6
- 7
- 8
- 9
- 10
- 1
- 2
- 3
- 4
- 5
- 6
- 7
- 8
- 9
- 10
With the fileinput method, we load a bootstrap fileinput component, so how does it implement allowedFileTypes internally?
By searching for the keyword "allowedFileTypes" in the fileinput.js file, we get the following code:
 var node = ctr + i, previewId = previewInitId + "-" + node, isText, file = files[i],
                    caption = self.slug(file.name), fileSize = (file.size || 0) / 1000, checkFile, fileExtExpr = '',
                    previewData = objUrl.createObjectURL(file), fileCount = 0, j, msg, typ, chk,
                    fileTypes = self.allowedFileTypes, strTypes = isEmpty(fileTypes) ? '' : fileTypes.join(', '),
fileExt = self.allowedFileExtensions, strExt = isEmpty(fileExt) ? '' : fileExt.join(', ');- 1
- 2
- 3
- 4
- 5
- 1
- 2
- 3
- 4
- 5
Then we continue to see the following code:
 if (!isEmpty(fileTypes) && isArray(fileTypes)) {
                    for (j = 0; j < fileTypes.length; j += 1) {
                        typ = fileTypes[j];
                        checkFile = settings[typ];
                        chk = (checkFile !== undefined && checkFile(file.type, caption));
                        fileCount += isEmpty(chk) ? 0 : chk.length;
                    }
                    if (fileCount === 0) {
                        msg = self.msgInvalidFileType.replace('{name}', caption).replace('{types}', strTypes);
                        self.isError = throwError(msg, file, previewId, i);
                        return;
                    }
}- 1
- 2
- 3
- 4
- 5
- 6
- 7
- 8
- 9
- 10
- 11
- 12
- 13
- 1
- 2
- 3
- 4
- 5
- 6
- 7
- 8
- 9
- 10
- 11
- 12
- 13
We can see that the check of file type happens on the checkFile method, so what exactly does the checkFile method do?
 defaultFileTypeSettings = {
        image: function (vType, vName) {
            return (vType !== undefined) ? vType.match('image.*') : vName.match(/\.(png|jpe?g)$/i);
        },
...- 1
- 2
- 3
- 4
- 5
- 1
- 2
- 3
- 4
- 5
That's what checkFile is all about.
- That is to say, when we specify allowedFileTypes: ['image'], we do type checking for images.
- Obviously, the txt file we chose does not belong to the image type, so it will not match and the above interface will appear.
- At the same time, this method tells us that when allowedFileTypes: ['image'], only allowedFileExtensions are specified: ['jpg','png'], vName. match (/. (png | jpe? G) $/ i), which is the check of the suffix type of the file, is the key point, which lays the foundation for our next introduction of "allowed File Extensions".
(3) When allowed File Extensions will come into effect
In the last section, we finished discussing "allowed File Types" with "allowed File Extensions", so how to check suffixes?
            $(this).fileinput({
                showUpload : false,
                showRemove : false,
                language : 'zh',
                allowedPreviewTypes: ['image'],
                allowedFileExtensions:  ['jpg', 'png'],
                maxFileSize : 2000,

});- 1
- 2
- 3
- 4
- 5
- 6
- 7
- 8
- 9
- 1
- 2
- 3
- 4
- 5
- 6
- 7
- 8
- 9
The fileinput component specifies the attributes as above, without "allowed FileTypes" and specifies the allowed suffix type as "['jpg','png']", that is, if we select the image of gif, an error will occur. 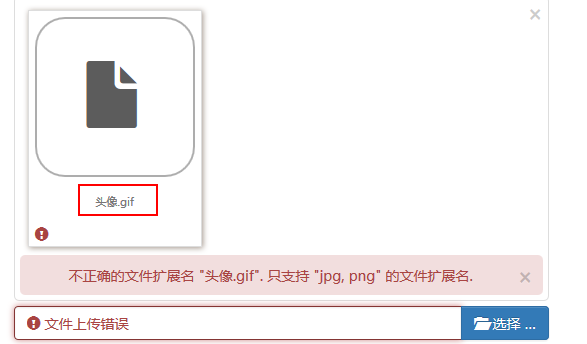
If an incorrect expectation occurs, please pay special attention to:
image: function (vType, vName) {
            return (vType !== undefined) ? vType.match('image.*') : vName.match(/\.(png|jpe?g)$/i);
},- 1
- 2
- 3
- 1
- 2
- 3
The original code in the fileinput.js file is as follows:
 image: function (vType, vName) {
            return (vType !== undefined) ? vType.match('image.*') : vName.match(/\.(gif|png|jpe?g)$/i);
},- 1
- 2
- 3
- 1
- 2
- 3
The image type suffix of course includes gif by default, I just want to illustrate that the code has been adjusted, please note!