1. Basic environment configuration
(1) Modify host name
Mycat node modify hostname command:
[root@localhost ~]# hostnamectl set-hostname mycat
[root@localhost ~]# bash
[root@mycat ~]#
db1 node modify hostname command:
[root@localhost ~]# hostnamectl set-hostname db1
[root@localhost ~]# bash
[root@db1 ~]#
db2 node modify hostname command:
[root@localhost ~]# hostnamectl set-hostname db2
[root@localhost ~]# bash
[root@db2 ~]#
(2) Edit hosts file
[root@mycat ~]# cat /etc/hosts
127.0.0.1   localhost localhost.localdomain localhost4 localhost4.localdomain4
::1         localhost localhost.localdomain localhost6 localhost6.localdomain6
10.30.59.189 mycat
10.30.59.218 db1
10.30.59.254 db2
(3) All nodes turn off firewall and iptables rules
[root@mycat ~]# systemctl stop firewalld && systemctl disable  firewalld
Removed symlink /etc/systemd/system/multi-user.target.wants/firewalld.service.
Removed symlink /etc/systemd/system/dbus-org.fedoraproject.FirewallD1.service.
[root@mycat ~]# setenforce 0
[root@mycat ~]# iptables -F
[root@mycat ~]# iptables -X
[root@mycat ~]# iptables -Z
[root@mycat ~]# iptables-save
# Generated by iptables-save v1.4.21 on Wed Jun 23 18:45:39 2021
*filter
:INPUT ACCEPT [38:3048]
:FORWARD ACCEPT [0:0]
:OUTPUT ACCEPT [19:1924]
COMMIT
# Completed on Wed Jun 23 18:45:39 2021
(4) Configure yum source
First, add / etc / yum. On the three nodes repo. Move the files in directory d to / media
[root@mycat ~]# mv /etc/yum.repos.d/C* /media/
Upload the provided gpmall repo tar package to the / opt directory of the virtual machine and set the local Yum source
[root@mycat ~]# cd /opt
[root@mycat opt]# ll
total 311360
-rw-r--r--. 1 root root 318829093 Jun 22 17:44 gpmall-repo.tar.gz
Use the network source to download unzip, and then unzip it
[root@mycat opt]# unzip gpmall-repo.tar.gz
[root@mycat opt]# ll
total 311360
drwxr-xr-x. 5 root root        53 Nov 21  2020 gpmall-repo
-rw-r--r--. 1 root root 318829093 Jun 22 17:44 gpmall-repo.tar.gz
3 virtual machines yum source configuration section (create files and mount):
[root@mycat ~]# mkdir /opt/cdrom
[root@mycat ~]# mount /dev/cdrom /opt/cdrom
mount: /dev/sr0 is write-protected, mounting read-only
[root@mycat ~]# df -h
Filesystem               Size  Used Avail Use% Mounted on
/dev/mapper/centos-root   36G  1.8G   34G   5% /
devtmpfs                 1.9G     0  1.9G   0% /dev
tmpfs                    1.9G     0  1.9G   0% /dev/shm
tmpfs                    1.9G  9.0M  1.9G   1% /run
tmpfs                    1.9G     0  1.9G   0% /sys/fs/cgroup
/dev/sda1               1014M  142M  873M  14% /boot
tmpfs                    380M     0  380M   0% /run/user/0
/dev/sr0                 4.2G  4.2G     0 100% /opt/cdrom
[root@mycat ~]# vi /etc/yum.repos.d/local.repo
[mariadb]
name=mariadb
baseurl=file:///opt/gpmall-repo
gpgcheck=0
enabled=1
[cdrom]
name=cdrom
baseurl=file:///opt/cdrom
gpgcheck=0
enabled=1
[root@mycat ~]# yum clean all
Loaded plugins: fastestmirror
Cleaning repos: cdrom mariadb
Cleaning up everything
Maybe you want: rm -rf /var/cache/yum, to also free up space taken by orphaned data from disabled or removed repos
Cleaning up list of fastest mirrors
[root@mycat ~]# yum repolist
Loaded plugins: fastestmirror
Determining fastest mirrors
cdrom                                                      | 3.6 kB  00:00:00
mariadb                                                    | 2.9 kB  00:00:00
(1/3): cdrom/group_gz                                      | 166 kB  00:00:00
(2/3): mariadb/primary_db                                  | 144 kB  00:00:00
(3/3): cdrom/primary_db                                    | 3.1 MB  00:00:00
repo id                               repo name                             status
cdrom                                 cdrom                                 3,971
mariadb                               mariadb                                 165
repolist: 4,136
(5) For convenience, other nodes can use ftp to use the yum source of mycat node. Therefore, mycat node needs to install and configure ftp service, and add anon to the configuration file_ root=/opt/
[root@mycat ~]# yum install vsftpd -y
[root@mycat ~]# vi /etc/vsftpd/vsftpd.conf

# Example config file /etc/vsftpd/vsftpd.conf
anon_root=/opt/
Then turn on ftp and set the boot auto start
[root@mycat ~]# systemctl start vsftpd
[root@mycat ~]# systemctl enable vsftpd
Created symlink from /etc/systemd/system/multi-user.target.wants/vsftpd.service to /usr/lib/systemd/system/vsftpd.service.
Configuring yum source for db1 and db2 nodes
Write yum source files (both db1 and db2)
[root@db1 ~]# vi /etc/yum.repos.d/local.repo

[cdrom]
name=cdrom
baseurl=ftp://10.30.59.189/cdrom
gpgcheck=0
enabled=1

[mariadb]
name=mariadb
baseurl=ftp://10.30.59.189/gpmall-repo
gpgcheck=0
enabled=1
Reload:
[root@db1 ~]# yum clean all
Loaded plugins: fastestmirror
Cleaning repos: cdrom mariadb
Cleaning up everything
Maybe you want: rm -rf /var/cache/yum, to also free up space taken by orphaned data from disabled or removed repos
Cleaning up list of fastest mirrors
[root@db1 ~]# yum repolist
Loaded plugins: fastestmirror
Determining fastest mirrors
cdrom                                                      | 3.6 kB  00:00:00
mariadb                                                    | 2.9 kB  00:00:00
(1/3): cdrom/group_gz                                      | 166 kB  00:00:00
(2/3): cdrom/primary_db                                    | 3.1 MB  00:00:00
(3/3): mariadb/primary_db                                  | 144 kB  00:00:00
repo id                               repo name                             status
cdrom                                 cdrom                                 3,971
mariadb                               mariadb                                 165
repolist: 4,136
(6) Install JDK environment
To deploy Mycat middleware service, you need to deploy JDK software environment with JDK version 1.7 or above. JDK version 1.8 is deployed here.
Mycat node installs Java environment:
[root@mycat ~]# yum install -y java-1.8.0-openjdk java-1.8.0-openjdk-devel
[root@mycat ~]# java -version
openjdk version "1.8.0_222"
OpenJDK Runtime Environment (build 1.8.0_222-b10)
OpenJDK 64-Bit Server VM (build 25.222-b10, mixed mode)
2. Deploy MariaDB master-slave database cluster service
(1) Install the MariaDB service (in db1 and db2), then start the MariaDB service in the two nodes, and set the startup and self startup
[root@db1 ~]# yum install -y mariadb mariadb-server
[root@db1 ~]# systemctl start mariadb
[root@db1 ~]# systemctl enable mariadb
(2) Initialize MariaDB database
[root@db1 ~]# mysql_secure_installation

NOTE: RUNNING ALL PARTS OF THIS SCRIPT IS RECOMMENDED FOR ALL MariaDB
      SERVERS IN PRODUCTION USE!  PLEASE READ EACH STEP CAREFULLY!

In order to log into MariaDB to secure it, we'll need the current
password for the root user.  If you've just installed MariaDB, and
you haven't set the root password yet, the password will be blank,
so you should just press enter here.

Enter current password for root (enter for none):
OK, successfully used password, moving on...

Setting the root password ensures that nobody can log into the MariaDB
root user without the proper authorisation.

Set root password? [Y/n] y
New password:
Re-enter new password:
Password updated successfully!
Reloading privilege tables..
 ... Success!


By default, a MariaDB installation has an anonymous user, allowing anyone
to log into MariaDB without having to have a user account created for
them.  This is intended only for testing, and to make the installation
go a bit smoother.  You should remove them before moving into a
production environment.

Remove anonymous users? [Y/n] y
 ... Success!

Normally, root should only be allowed to connect from 'localhost'.  This
ensures that someone cannot guess at the root password from the network.

Disallow root login remotely? [Y/n] n
 ... skipping.

By default, MariaDB comes with a database named 'test' that anyone can
access.  This is also intended only for testing, and should be removed
before moving into a production environment.

Remove test database and access to it? [Y/n] y
 - Dropping test database...
 ... Success!
 - Removing privileges on test database...
 ... Success!

Reloading the privilege tables will ensure that all changes made so far
will take effect immediately.

Reload privilege tables now? [Y/n] y
 ... Success!

Cleaning up...

All done!  If you've completed all of the above steps, your MariaDB
installation should now be secure.

Thanks for using MariaDB!
(3) Configure database set group master node
Edit the database configuration file of the primary node db1 virtual machine my CNF, in the configuration file my Add the following content to CNF:
[root@db1 ~]# vi /etc/my.cnf
[mysqld]
log_bin = mysql-bin              #Record operation log
binlog_ignore_db = mysql         #MySQL system database is not synchronized
server_id = 218            #Each node id in the database cluster should be different. Generally, the last segment of the IP address is used
Finish editing the configuration file my After CNF, restart the MariaDB service
[root@db1 ~]# systemctl restart mariadb
(4) Open the database permissions of the master node
Log in to the MariaDB database using the mysql command on the db1 virtual machine of the master node, authorize the user to log in to the database as root on any client machine, then create a user user to connect the slave node to db2, and grant the slave node the permission to synchronize the master node database.
Execute on db1
[root@db1 ~]# mysql -uroot -p000000
Welcome to the MariaDB monitor.  Commands end with ; or \g.
Your MariaDB connection id is 9
Server version: 10.3.18-MariaDB-log MariaDB Server

Copyright (c) 2000, 2018, Oracle, MariaDB Corporation Ab and others.

Type 'help;' or '\h' for help. Type '\c' to clear the current input statement.

MariaDB [(none)]> grant all privileges on *.* to root@'%' identified by '000000';
Query OK, 0 rows affected (0.001 sec)

MariaDB [(none)]> grant replication slave on *.* to 'user'@'db2' identified by '000000';
Query OK, 0 rows affected (0.000 sec)
(5) Configure slave node db2 to synchronize master node db1
Log in to the MariaDB database using the mysql command on the db2 virtual machine of the slave node, and configure the connection information of the slave node to the master node. master_host is the host node hostname db1, master_user is the user created in step (4), and the command is as follows:
[root@db2 ~]# mysql -uroot -p000000
Welcome to the MariaDB monitor.  Commands end with ; or \g.
Your MariaDB connection id is 9
Server version: 10.3.18-MariaDB-log MariaDB Server

Copyright (c) 2000, 2018, Oracle, MariaDB Corporation Ab and others.

Type 'help;' or '\h' for help. Type '\c' to clear the current input statement.
MariaDB [(none)]> change master to master_host='db1',master_user='user',master_password='000000';
Query OK, 0 rows affected (0.462 sec)
After configuring the connection information between the master and slave databases, start the slave node service and use show slave status\G; Command and view the slave node service status if Slave_IO_Running and slave_ SQL_ If the running status is YES, the slave node service is successfully started
MariaDB [(none)]> start slave;
Query OK, 0 rows affected (0.004 sec)

MariaDB [(none)]> show slave status\G
*************************** 1. row ***************************
                Slave_IO_State: Waiting for master to send event
                   Master_Host: db1
                   Master_User: user
                   Master_Port: 3306
                 Connect_Retry: 60
               Master_Log_File: mysql-bin.000001
           Read_Master_Log_Pos: 701
                Relay_Log_File: db2-relay-bin.000002
                 Relay_Log_Pos: 1000
         Relay_Master_Log_File: mysql-bin.000001
              Slave_IO_Running: Yes
             Slave_SQL_Running: Yes
               Replicate_Do_DB:
           Replicate_Ignore_DB:
            Replicate_Do_Table:
        Replicate_Ignore_Table:
       Replicate_Wild_Do_Table:
   Replicate_Wild_Ignore_Table:
                    Last_Errno: 0
                    Last_Error:
                  Skip_Counter: 0
           Exec_Master_Log_Pos: 701
               Relay_Log_Space: 1307
               Until_Condition: None
                Until_Log_File:
                 Until_Log_Pos: 0
            Master_SSL_Allowed: No
            Master_SSL_CA_File:
            Master_SSL_CA_Path:
               Master_SSL_Cert:
             Master_SSL_Cipher:
                Master_SSL_Key:
         Seconds_Behind_Master: 0
 Master_SSL_Verify_Server_Cert: No
                 Last_IO_Errno: 0
                 Last_IO_Error:
                Last_SQL_Errno: 0
                Last_SQL_Error:
   Replicate_Ignore_Server_Ids:
              Master_Server_Id: 218
                Master_SSL_Crl:
            Master_SSL_Crlpath:
                    Using_Gtid: No
                   Gtid_IO_Pos:
       Replicate_Do_Domain_Ids:
   Replicate_Ignore_Domain_Ids:
                 Parallel_Mode: conservative
                     SQL_Delay: 0
           SQL_Remaining_Delay: NULL
       Slave_SQL_Running_State: Slave has read all relay log; waiting for the slave I/O thread to update it
              Slave_DDL_Groups: 2
Slave_Non_Transactional_Groups: 0
    Slave_Transactional_Groups: 0
1 row in set (0.001 sec)
(6) Verify the synchronization function of the master-slave database
First, create the database test in the database of the primary node db1, create the table company in the database test, and insert the table data. After creation, view the company data table, as shown below
db1 execution
[root@db1 ~]# mysql -uroot -p000000
Welcome to the MariaDB monitor.  Commands end with ; or \g.
Your MariaDB connection id is 9
Server version: 10.3.18-MariaDB-log MariaDB Server

Copyright (c) 2000, 2018, Oracle, MariaDB Corporation Ab and others.

Type 'help;' or '\h' for help. Type '\c' to clear the current input statement.

MariaDB [(none)]> grant all privileges on *.* to root@'%' identified by '000000';
Query OK, 0 rows affected (0.001 sec)

MariaDB [(none)]> grant replication slave on *.* to 'user'@'db2' identified by '000000';
Query OK, 0 rows affected (0.000 sec)

MariaDB [(none)]> create database test;
Query OK, 1 row affected (0.002 sec)

MariaDB [(none)]> use test
Database changed
MariaDB [test]> create table company(id int not null primary key,name varchar(50),addr varchar(255));
Query OK, 0 rows affected (0.008 sec)

MariaDB [test]> insert into company values(1,"facebook","usa");
Query OK, 1 row affected (0.002 sec)

MariaDB [test]> select * from company;
+----+----------+------+
| id | name     | addr |
+----+----------+------+
|  1 | facebook | usa  |
+----+----------+------+
1 row in set (0.001 sec)
db2 verify it
MariaDB [(none)]> show databases;
+--------------------+
| Database           |
+--------------------+
| information_schema |
| mysql              |
| performance_schema |
| test               |
+--------------------+
4 rows in set (0.002 sec)

MariaDB [(none)]> select * from test.company;
+----+----------+------+
| id | name     | addr |
+----+----------+------+
|  1 | facebook | usa  |
+----+----------+------+
1 row in set (0.001 sec)
As you can see, the created in db1 will be available on db2.
3. Deploy Mycat read / write separation middleware service
(1) Install Mycat service
The binary package of Mycat service Mycat-server-1.6-release-20161028204710-linux tar. GZ upload to the / root directory of Mycat virtual machine, and unzip the software package to the / use/local directory. Give the decompressed Mycat directory permission.
[root@mycat ~]# ls
anaconda-ks.cfg  Mycat-server-1.6-RELEASE-20161028204710-linux.tar.gz
[root@mycat ~]# tar -zxvf Mycat-server-1.6-RELEASE-20161028204710-linux.tar.gz -C /usr/local
[root@mycat ~]# chown -R 777 /usr/local/mycat
Add the system variable of Mycat service in the / etc/profile system variable file and take effect
[root@mycat ~]# echo export MYCAT_HOME=/usr/local/mycat/>>/etc/profile
[root@mycat ~]# source /etc/profile
(2) Edit the logical library configuration file for Mycat
Configure the schema of Mycat service read-write separation The XML configuration file is in / usr/local/mycat/conf / directory. You can define a logical library in the file, so that users can manage the MariaDB database corresponding to the logical library through Mycat service. Here, define a logical library schema with the name of USERDB; The database corresponding to the logical library USERDB is test (installed when deploying the master-slave database); Set the database write node as the master node db1; Set the database read node to the slave node db2. (you can directly delete the original schema.xml and replace it with the following.)
Note: the IP address needs to be modified to the actual IP address
[root@mycat ~]# vi /usr/local/mycat/conf/schema.xml
<?xml version="1.0"?>
<!DOCTYPE mycat:schema SYSTEM "schema.dtd">
<mycat:schema xmlns:mycat="http://io.mycat/">
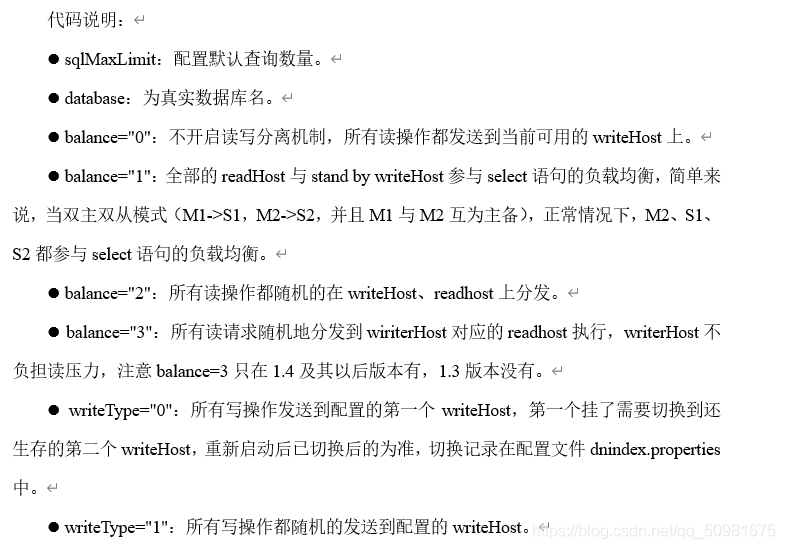
<schema name="USERDB" checkSQLschema="true" sqlMaxLimit="100" dataNode="dn1"></schema>
<dataNode name="dn1" dataHost="localhost1" database="test" />
<dataHost name="localhost1" maxCon="1000" minCon="10" balance="3" dbType="mysql" dbDriver="native" writeType="0" switchType="1" slaveThreshold="100">
<heartbeat>select user()</heartbeat> <writeHost host="hostM1" url="10.30.59.218:3306" user="root" password="000000">
<readHost host="hostS1" url="10.30.59.254:3306" user="root" password="000000"/>
</writeHost></dataHost>
</mycat:schema>
(3) Modify profile permissions
Modify schema XML. The command is as follows:
[root@mycat ~]# chown root:root /usr/local/mycat/conf/schema.xml
(4) Edit access user of mycat
Modify the server.config in the / usr/local/mycat/conf / directory XML file, modify the access password and database of root user, set the password to 123456, and the logical library to access Mycat is USERDB. The commands are as follows:
Modify it in the last part of the configuration file
<user name="root">
                <property name="password">123456</property>
                <property name="schemas">USERDB</property>
Then delete the following lines:
<user name="user">
		<property name="password">user</property>
		<property name="schemas">TESTDB</property>
		<property name="readOnly">true</property>
</user>
(5) Start Mycat service
Start the Mycat database middleware service through the command. After starting, use the netstat -ntpl command to check the opening of virtual machine ports. If ports 8066 and 9066 are open, it means that the Mycat service is successfully opened and the port query is successful.
[root@mycat ~]# /bin/bash /usr/local/mycat/bin/mycat start
Starting Mycat-server...
[root@mycat ~]# netstat -ntpl / / download
-bash: netstat: command not found
[root@mycat ~]# yum install -y net-tools
[root@mycat ~]# netstat -ntpl
Active Internet connections (only servers)
Proto Recv-Q Send-Q Local Address           Foreign Address         State       PID/Program name
tcp        0      0 127.0.0.1:32000         0.0.0.0:*               LISTEN      12808/java
tcp        0      0 0.0.0.0:22              0.0.0.0:*               LISTEN      1078/sshd
tcp        0      0 127.0.0.1:25            0.0.0.0:*               LISTEN      1325/master
tcp6       0      0 :::1984                 :::*                    LISTEN      12808/java
tcp6       0      0 :::45280                :::*                    LISTEN      12808/java
tcp6       0      0 :::8066                 :::*                    LISTEN      12808/java
tcp6       0      0 :::41577                :::*                    LISTEN      12808/java
tcp6       0      0 :::9066                 :::*                    LISTEN      12808/java
tcp6       0      0 :::21                   :::*                    LISTEN      2578/vsftpd
tcp6       0      0 :::22                   :::*                    LISTEN      1078/sshd
tcp6       0      0 ::1:25                  :::*                    LISTEN      1325/master
4. Verify the read-write separation function of database cluster service
(1) Query database information with Mycat service
First, use Yum to install MariaDB client service on Mycat virtual machine
[root@mycat ~]# yum install -y MariaDB-client
Use the mysql command on the Mycat virtual machine to view the logical library USERDB of the Mycat service. Because the logical library USERDB of Mycat corresponds to the database test (installed when deploying the master-slave database), you can view the company table that has been created in the library.
[root@mycat ~]# mysql -h127.0.0.1 -P8066 -uroot -p000000
ERROR 1045 (HY000): Access denied for user 'root', because password is error
[root@mycat ~]# mysql
ERROR 2002 (HY000): Can't connect to local MySQL server through socket '/var/lib/mysql/mysql.sock' (2)
[root@mycat ~]# mysql -h127.0.0.1 -P8066 -uroot -p123456
Welcome to the MariaDB monitor.  Commands end with ; or \g.
Your MySQL connection id is 2
Server version: 5.6.29-mycat-1.6-RELEASE-20161028204710 MyCat Server (OpenCloundDB)

Copyright (c) 2000, 2018, Oracle, MariaDB Corporation Ab and others.

Type 'help;' or '\h' for help. Type '\c' to clear the current input statement.

MySQL [(none)]> show databases;
+----------+
| DATABASE |
+----------+
| USERDB   |
+----------+
1 row in set (0.004 sec)

MySQL [(none)]> use USERDB
Reading table information for completion of table and column names
You can turn off this feature to get a quicker startup with -A

Database changed
MySQL [USERDB]> show tables;
+----------------+
| Tables_in_test |
+----------------+
| company        |
+----------------+
1 row in set (0.002 sec)

MySQL [USERDB]> select * from company;
+----+----------+------+
| id | name     | addr |
+----+----------+------+
|  1 | facebook | usa  |
+----+----------+------+
1 row in set (0.051 sec)
(2) Adding table data with Mycat service
On the Mycat virtual machine, use the mysql command to add a piece of data (2, "basketball", "usa") to the table company. After adding, view the table information.
MySQL [USERDB]> insert into company values(2,"bastetball","usa");
Query OK, 1 row affected (0.008 sec)

MySQL [USERDB]> select * from company;
+----+------------+------+
| id | name       | addr |
+----+------------+------+
|  1 | facebook   | usa  |
|  2 | bastetball | usa  |
+----+------------+------+
2 rows in set (0.003 sec)
(3) Verify that the Mycat service separates the database read and write operations
On the Mycat virtual machine node, use the mysql command to query the separation information of database read-write operations through port 9066. You can see all write operations write_ The number of loads is on the db1 primary database node, and all read operations are read_ The number of loads is on the db2 master database node. It can be seen that the database read and write operations have been separated to db1 and db2 nodes.
[root@mycat ~]# mysql -h127.0.0.1 -P9066 -uroot -p123456 -e 'show  @@datasource;'
+----------+--------+-------+--------------+------+------+--------+------+------+---------+-----------+------------+
| DATANODE | NAME   | TYPE  | HOST         | PORT | W/R  | ACTIVE | IDLE | SIZE | EXECUTE | READ_LOAD | WRITE_LOAD |
+----------+--------+-------+--------------+------+------+--------+------+------+---------+-----------+------------+
| dn1      | hostM1 | mysql | 10.30.59.218 | 3306 | W    |      0 |   10 | 1000 |      85 |         0 |          1 |
| dn1      | hostS1 | mysql | 10.30.59.254 | 3306 | R    |      0 |    7 | 1000 |      84 |         4 |          0 |
+----------+--------+-------+--------------+------+------+--------+------+------+---------+-----------+------------+
Done.