The original was published in Chinese Community of kubernetes , an original translation for the author, Original Address
More kubernetes articles, please pay more attention Chinese Community of kubernetes
Catalog
Why use Kubernetes on Windows?
Set up Docker Desktop: Enable WSL2 integration
Kind: Create a kubernetes cluster
Minikube: Create a kubernetes cluster
Minikube: Single-node kubernetes cluster
Minikube: Dashboard for Kubernetes
Why use Kubernetes on Windows?
Over the past few years, Kubernetes has become the de facto cloud-native platform for running containerized services and applications in a distributed environment.Although Kubernetes can be deployed in a cloud environment (public, private, or hybrid) or in a bare-metal environment, it is sometimes necessary to deploy and run Kubernetes locally.
Kubernetes was originally designed for deployment and use in a Linux environment.However, a large number of users use Windows OS as their daily driver.So when Microsoft releases WSL- On Linux's Windows subsystem The line between the Windows and Linux environments becomes less apparent.
In addition, WSL can be used to run Kubernetes on Windows!
WSL is not Linux running in a virtual machine.Standard Linux programs are installed and run in the WSL environment.When we run a Linux program, this process calls some Linux system function calls.WSL does provide these capabilities, but they are mapped to system function calls provided by the Windows operating system.So WSL "masks" Linux applications by wrapping a layer outside the Windows operating system kernel to make it look like the Linux operating system kernel.
Below, we will briefly describe how to install and use Kind or Minikube to run the Kubernetes cluster locally by combining WSL.
Prerequisite
- Operating System: Windows 10 version 2004, Build 19041
-
Enable WSL2
- Once WSL2 is installed, run the command in Powershell Wsl.exe--set-default-version 2, set WSL2 as default.
- If prompted "WSL 2 needs to update its kernel components."For information, please visit https://aka.ms/wsl2kernel ". Then you need to Update WSL 2 Linux Kernel
- Update the kernel and run the command again in Powershell Wsl.exe--set-default-version 2, console output "For information on major differences from WSL 2, please visit https://aka.ms/wsl2 "Means WSL2 has been set as default.
- open Windows App Store , download and install Ubuntu-18.04
- install Docker Desktop for Windows
- There is no need to configure Docker Desktop for Windows at this time, as we will describe it below.
WSL2: Combined with Ubuntu
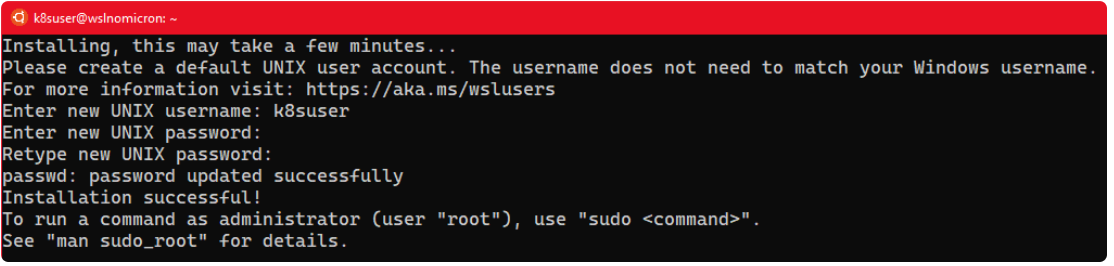
Once all the components are installed, click Ubuntu, which will launch the default Windows console with the Ubuntu bash shell running.

Like any normal Linux, you need to create a user and set a password:
[Optional] Update sudoers
Typically, when working on a local computer, it is best to update sudoers and set the group%sudo to no password:
# Edit the sudoers with the visudo command sudo visudo # Change the %sudo group to be password-less %sudo ALL=(ALL:ALL) NOPASSWD: ALL # Press CTRL+X to exit # Press Y to save # Press Enter to confirm

Update Ubuntu
Before setting up Docker Desktop, let's update the system:
# Update the repositories and list of the packages available
sudo apt update
# Update the system based on the packages installed > the "-y" will approve the change automatically
sudo apt upgrade -y

Docker Desktop
At this point, if we enter the following command:
# Try to see if the docker cli and daemon are installed
docker version
# Same for kubectl
kubectl version

It will make a mistake, how can I fix it?
Set up Docker Desktop: Enable WSL2 integration
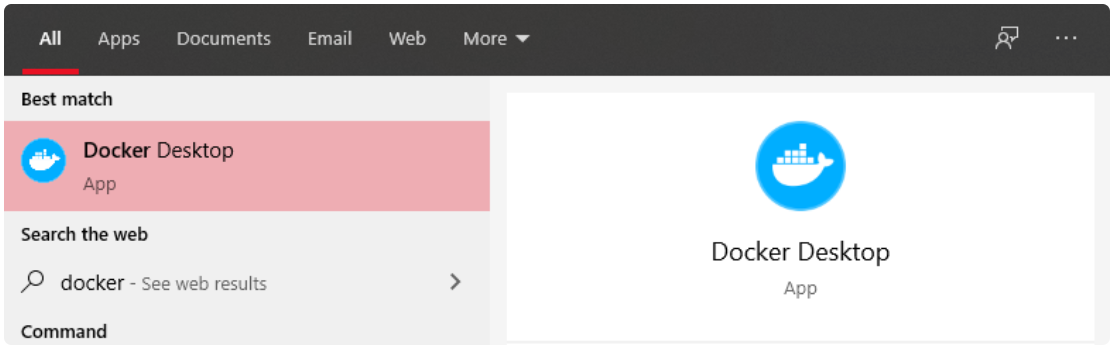
To solve these problems, you need to Start Docker Desktop for Windows.
Open the Windows Start menu, type "docker", and click the name to start the application:
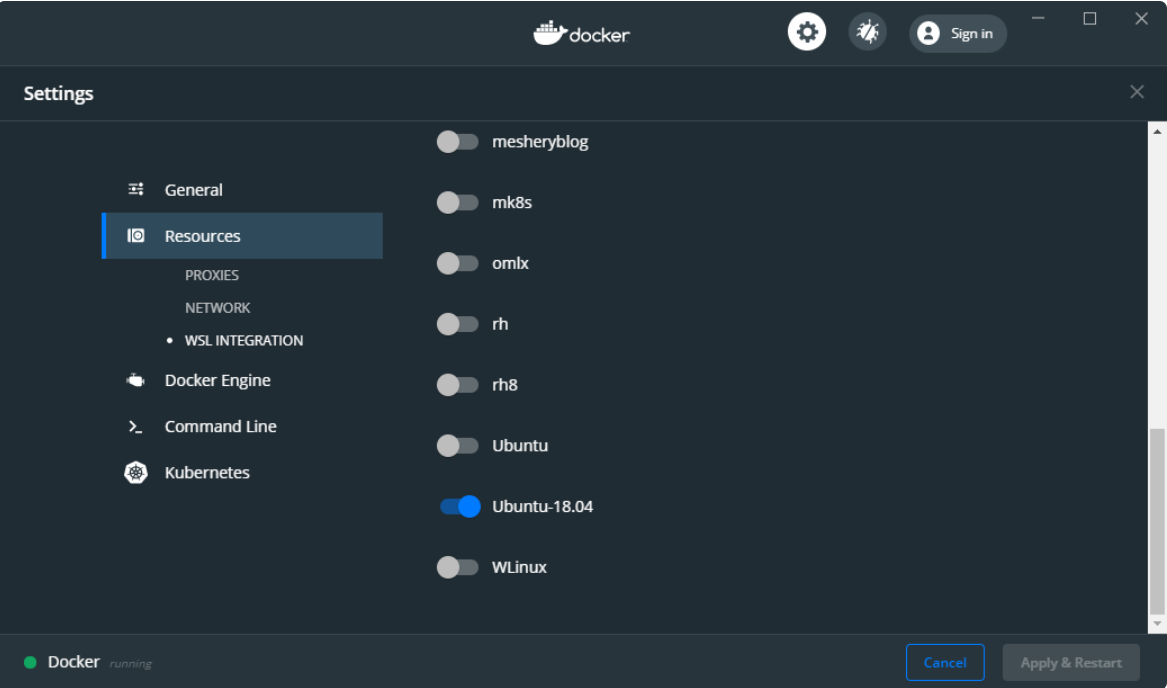
Select the settings and a new window will appear:

WSL2 integration is not enabled by default, so click Enable the experimental WSL 2 based engine, and then click Apply & Restart:

The Enable the experimental WSL 2 based engine feature creates two new releases in WSL 2 that contain and run all the required back-end sockets, daemons, and CLI tools (docker and kubectl commands).
Nevertheless, we cannot run the docker and kubectl commands at this time.
In order to finally be able to use the command, we also need to tell Docker Desktop to attach itself to our Ubuntu:
Then, let's go back to the WSL2 terminal and see if we can (eventually) launch the command:
# Try to see if the docker cli and daemon are installed
docker version
# Same for kubectl
kubectl version

Tip: If you do not output the above, restart Docker Desktop, restart the WSL process in Powershell: Restart-Service LxssManager, and then restart Ubuntu.
Now that the basic setup is complete, let's proceed with the Kind installation.
Kind: Create a kubernetes cluster
Now we have Docker installed and configured, and the tests are working.
However, using the kubectl command, it prompts that the server cannot be found.
This is normal because we have not enabled the Docker Kubernetes cluster.So let's Install Kind and create our first cluster.
# Download the latest version of Kind
curl -Lo ./kind https://github.com/kubernetes-sigs/kind/releases/download/v0.7.0/kind-$(uname)-amd64
# Make the binary executable
chmod +x ./kind
# Move the binary to your executable path
sudo mv ./kind /usr/local/bin/

Kind: Single-node cluster
We are ready to create the first cluster:
# Check if the KUBECONFIG is not set
echo $KUBECONFIG
# Check if the .kube directory is created > if not, no need to create it
ls $HOME/.kube
# Create the cluster and give it a name (optional)
kind create cluster --name wslkind
# Check if the .kube has been created and populated with files
ls $HOME/.kube

Tip: All icons are displayed to indicate that the cluster has been successfully created
Since we are using Docker Desktop, the local network can also be used.
Therefore, we can open the URL of Kubernetes master in a Windows browser:
This is the real advantage of WSL2's integration with Docker Desktop for Windows.
Kind: Multi-node cluster
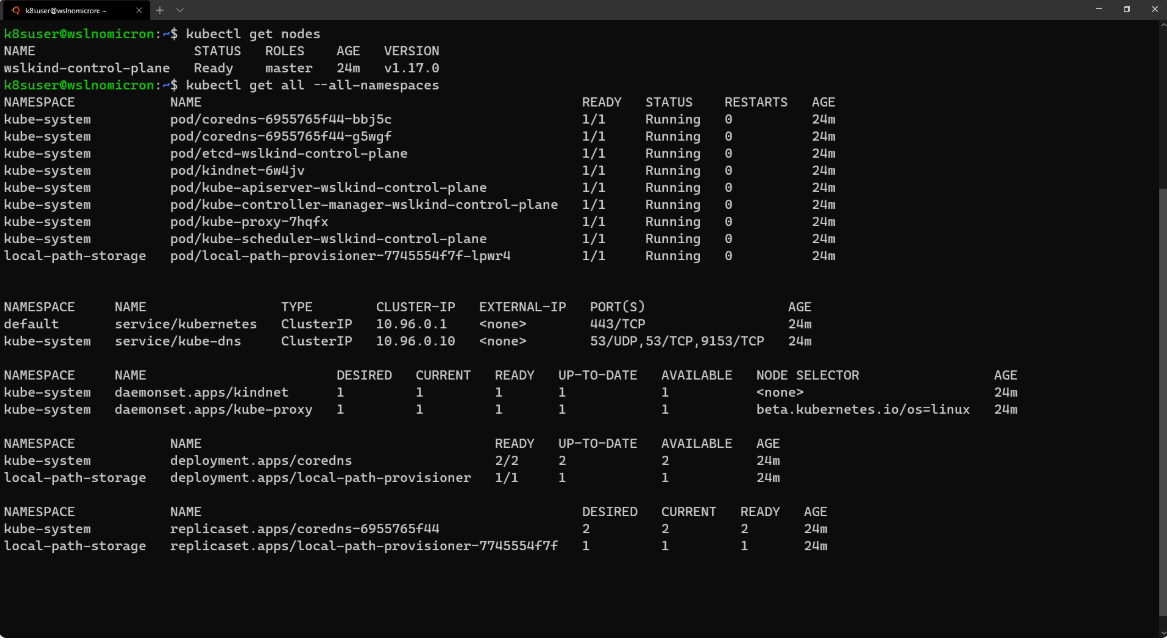
Our first cluster was created, which is a single-node cluster:
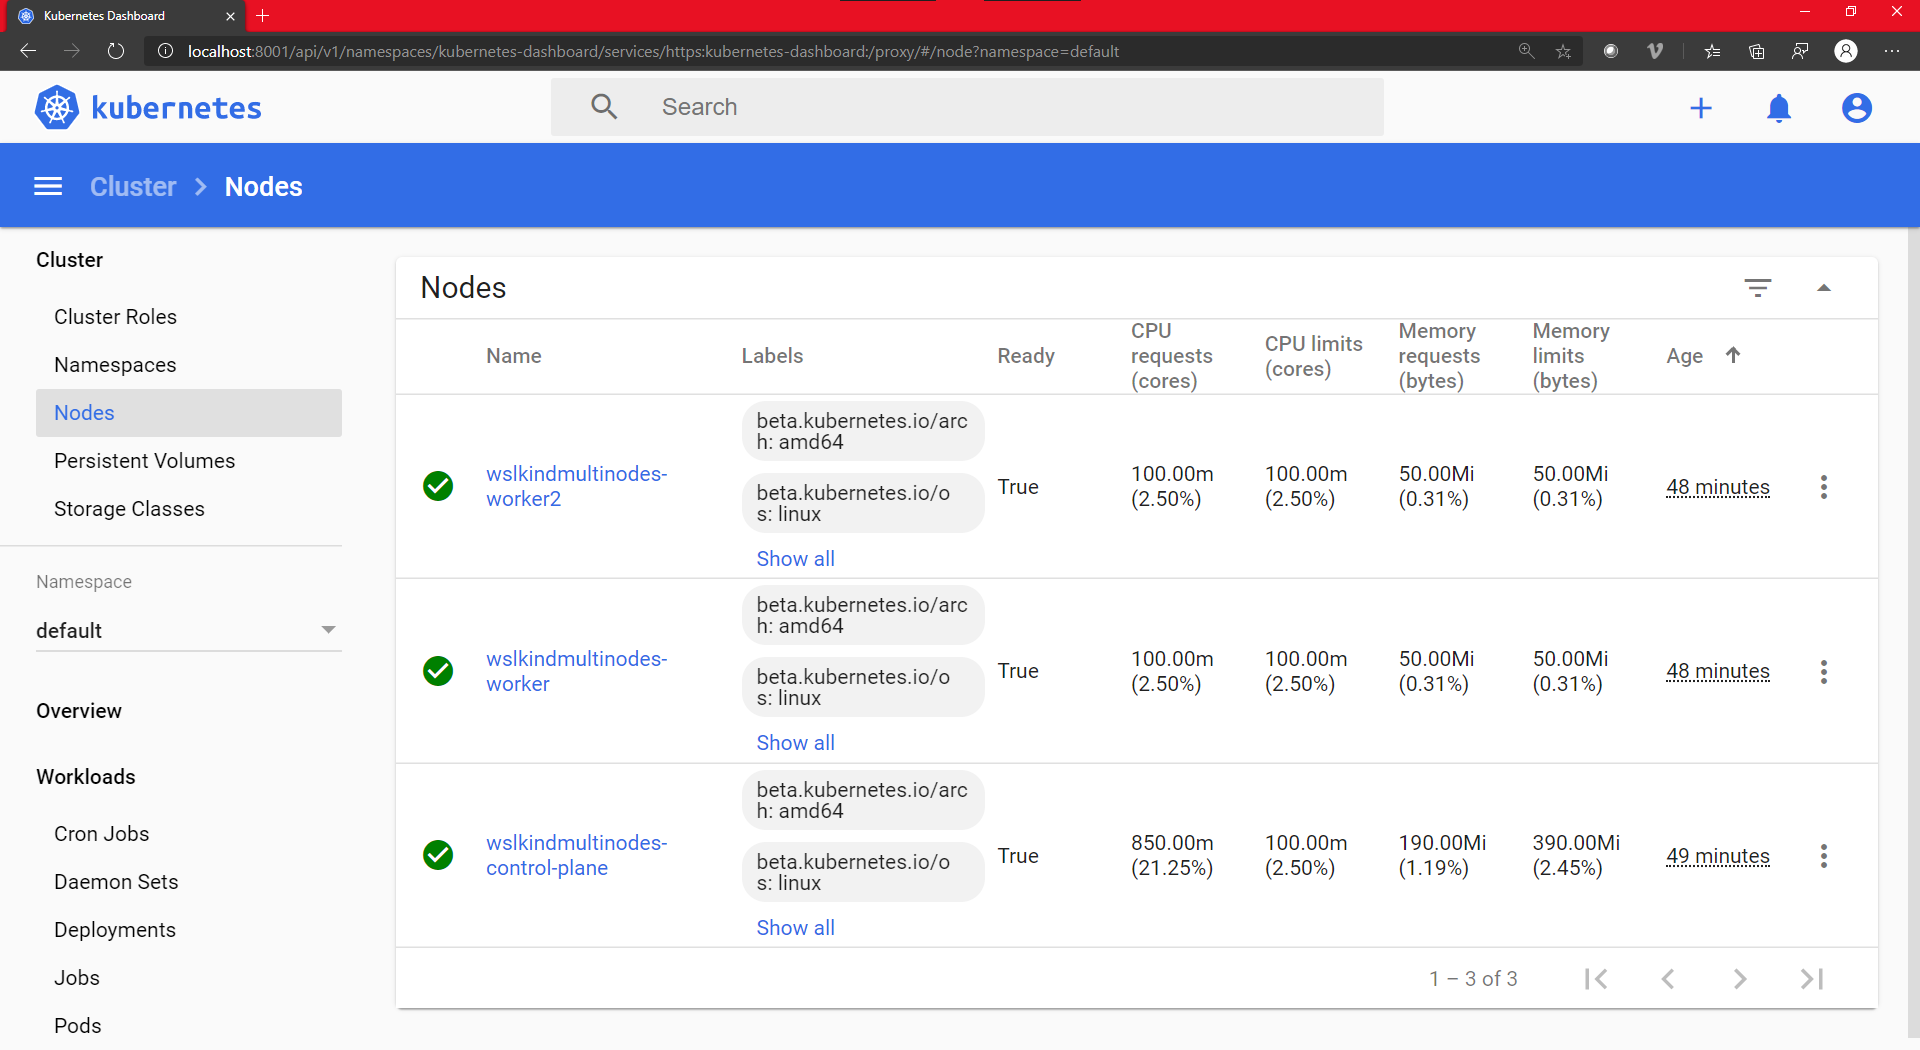
# Check how many nodes it created
kubectl get nodes
# Check the services for the whole cluster
kubectl get all --all-namespaces
Next, let's try to create a multinode cluster:
# Delete the existing cluster
kind delete cluster --name wslkind
# Create a config file for a 3 nodes cluster
cat << EOF > kind-3nodes.yaml
kind: Cluster
apiVersion: kind.x-k8s.io/v1alpha4
nodes:
  - role: control-plane
  - role: worker
  - role: worker
EOF
# Create a new cluster with the config file
kind create cluster --name wslkindmultinodes --config ./kind-3nodes.yaml
# Check how many nodes it created
kubectl get nodes
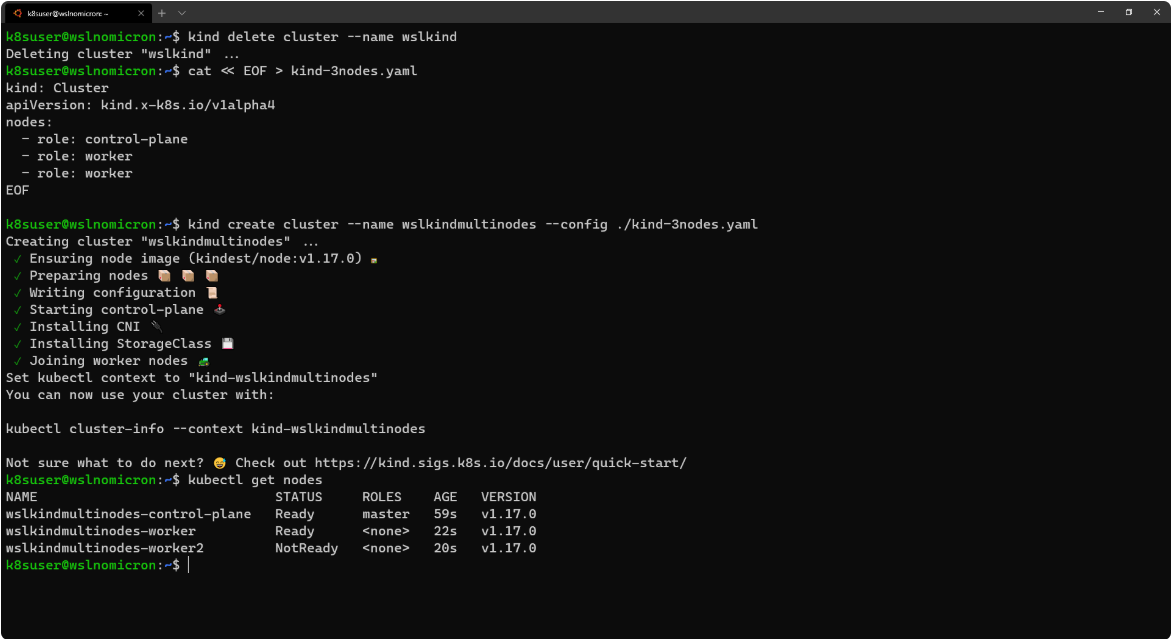
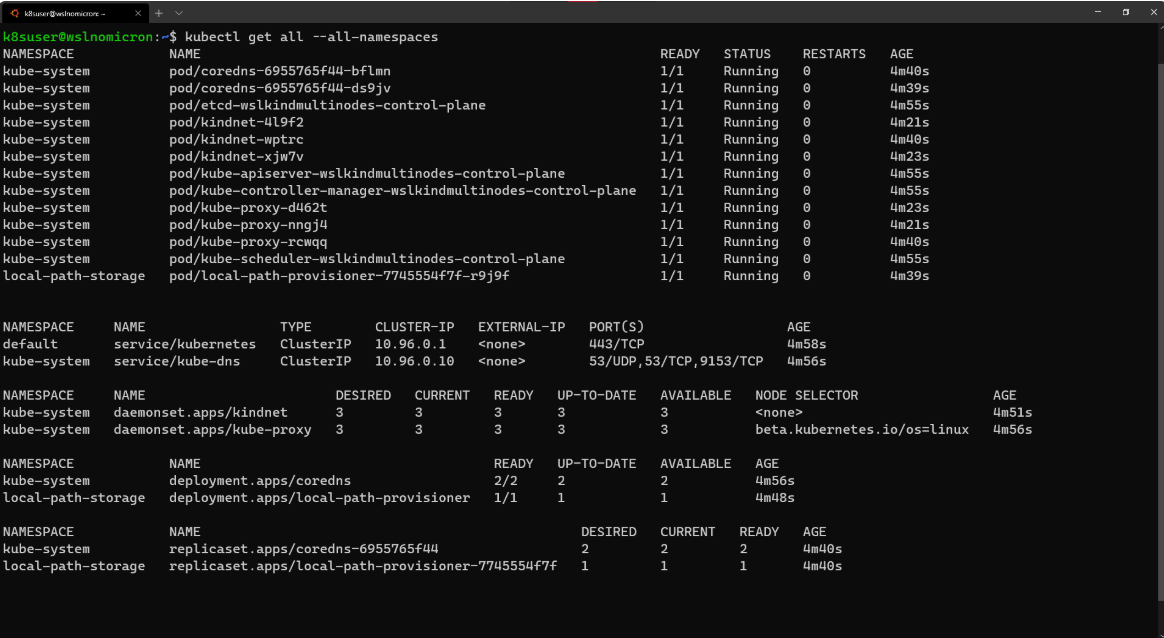
By doing this, we created a three-node cluster, and if we look at the service again, we will see a cluster with three copies:
# Check the services for the whole cluster
kubectl get all --all-namespaces
Kind: Create a dashboard
Working from the command line is a good thing.However, when working with Kubernetes, we may sometimes want an intuitive overview.
To do this, we need to create a Kubernetes Dashboard Project:
# Install the Dashboard application into our cluster
kubectl apply -f https://raw.githubusercontent.com/kubernetes/dashboard/v2.0.0-rc6/aio/deploy/recommended.yaml
# Check the resources it created based on the new namespace created
kubectl get all -n kubernetes-dashboard
among https://raw.githubusercontent.com/kubernetes/dashboard/v2.0.0-rc6/aio/deploy/recommended.yaml The translator gave the contents of the file
# Copyright 2017 The Kubernetes Authors.
#
# Licensed under the Apache License, Version 2.0 (the "License");
# you may not use this file except in compliance with the License.
# You may obtain a copy of the License at
#
# http://www.apache.org/licenses/LICENSE-2.0
#
# Unless required by applicable law or agreed to in writing, software
# distributed under the License is distributed on an "AS IS" BASIS,
# WITHOUT WARRANTIES OR CONDITIONS OF ANY KIND, either express or implied.
# See the License for the specific language governing permissions and
# limitations under the License.
apiVersion: v1
kind: Namespace
metadata:
name: kubernetes-dashboard
---
apiVersion: v1
kind: ServiceAccount
metadata:
labels:
k8s-app: kubernetes-dashboard
name: kubernetes-dashboard
namespace: kubernetes-dashboard
---
kind: Service
apiVersion: v1
metadata:
labels:
k8s-app: kubernetes-dashboard
name: kubernetes-dashboard
namespace: kubernetes-dashboard
spec:
ports:
- port: 443
targetPort: 8443
selector:
k8s-app: kubernetes-dashboard
---
apiVersion: v1
kind: Secret
metadata:
labels:
k8s-app: kubernetes-dashboard
name: kubernetes-dashboard-certs
namespace: kubernetes-dashboard
type: Opaque
---
apiVersion: v1
kind: Secret
metadata:
labels:
k8s-app: kubernetes-dashboard
name: kubernetes-dashboard-csrf
namespace: kubernetes-dashboard
type: Opaque
data:
csrf: ""
---
apiVersion: v1
kind: Secret
metadata:
labels:
k8s-app: kubernetes-dashboard
name: kubernetes-dashboard-key-holder
namespace: kubernetes-dashboard
type: Opaque
---
kind: ConfigMap
apiVersion: v1
metadata:
labels:
k8s-app: kubernetes-dashboard
name: kubernetes-dashboard-settings
namespace: kubernetes-dashboard
---
kind: Role
apiVersion: rbac.authorization.k8s.io/v1
metadata:
labels:
k8s-app: kubernetes-dashboard
name: kubernetes-dashboard
namespace: kubernetes-dashboard
rules:
# Allow Dashboard to get, update and delete Dashboard exclusive secrets.
- apiGroups: [""]
resources: ["secrets"]
resourceNames: ["kubernetes-dashboard-key-holder", "kubernetes-dashboard-certs", "kubernetes-dashboard-csrf"]
verbs: ["get", "update", "delete"]
# Allow Dashboard to get and update 'kubernetes-dashboard-settings' config map.
- apiGroups: [""]
resources: ["configmaps"]
resourceNames: ["kubernetes-dashboard-settings"]
verbs: ["get", "update"]
# Allow Dashboard to get metrics.
- apiGroups: [""]
resources: ["services"]
resourceNames: ["heapster", "dashboard-metrics-scraper"]
verbs: ["proxy"]
- apiGroups: [""]
resources: ["services/proxy"]
resourceNames: ["heapster", "http:heapster:", "https:heapster:", "dashboard-metrics-scraper", "http:dashboard-metrics-scraper"]
verbs: ["get"]
---
kind: ClusterRole
apiVersion: rbac.authorization.k8s.io/v1
metadata:
labels:
k8s-app: kubernetes-dashboard
name: kubernetes-dashboard
rules:
# Allow Metrics Scraper to get metrics from the Metrics server
- apiGroups: ["metrics.k8s.io"]
resources: ["pods", "nodes"]
verbs: ["get", "list", "watch"]
---
apiVersion: rbac.authorization.k8s.io/v1
kind: RoleBinding
metadata:
labels:
k8s-app: kubernetes-dashboard
name: kubernetes-dashboard
namespace: kubernetes-dashboard
roleRef:
apiGroup: rbac.authorization.k8s.io
kind: Role
name: kubernetes-dashboard
subjects:
- kind: ServiceAccount
name: kubernetes-dashboard
namespace: kubernetes-dashboard
---
apiVersion: rbac.authorization.k8s.io/v1
kind: ClusterRoleBinding
metadata:
name: kubernetes-dashboard
roleRef:
apiGroup: rbac.authorization.k8s.io
kind: ClusterRole
name: kubernetes-dashboard
subjects:
- kind: ServiceAccount
name: kubernetes-dashboard
namespace: kubernetes-dashboard
---
kind: Deployment
apiVersion: apps/v1
metadata:
labels:
k8s-app: kubernetes-dashboard
name: kubernetes-dashboard
namespace: kubernetes-dashboard
spec:
replicas: 1
revisionHistoryLimit: 10
selector:
matchLabels:
k8s-app: kubernetes-dashboard
template:
metadata:
labels:
k8s-app: kubernetes-dashboard
spec:
containers:
- name: kubernetes-dashboard
image: kubernetesui/dashboard:v2.0.0-rc6
imagePullPolicy: Always
ports:
- containerPort: 8443
protocol: TCP
args:
- --auto-generate-certificates
- --namespace=kubernetes-dashboard
# Uncomment the following line to manually specify Kubernetes API server Host
# If not specified, Dashboard will attempt to auto discover the API server and connect
# to it. Uncomment only if the default does not work.
# - --apiserver-host=http://my-address:port
volumeMounts:
- name: kubernetes-dashboard-certs
mountPath: /certs
# Create on-disk volume to store exec logs
- mountPath: /tmp
name: tmp-volume
livenessProbe:
httpGet:
scheme: HTTPS
path: /
port: 8443
initialDelaySeconds: 30
timeoutSeconds: 30
securityContext:
allowPrivilegeEscalation: false
readOnlyRootFilesystem: true
runAsUser: 1001
runAsGroup: 2001
volumes:
- name: kubernetes-dashboard-certs
secret:
secretName: kubernetes-dashboard-certs
- name: tmp-volume
emptyDir: {}
serviceAccountName: kubernetes-dashboard
nodeSelector:
"beta.kubernetes.io/os": linux
# Comment the following tolerations if Dashboard must not be deployed on master
tolerations:
- key: node-role.kubernetes.io/master
effect: NoSchedule
---
kind: Service
apiVersion: v1
metadata:
labels:
k8s-app: dashboard-metrics-scraper
name: dashboard-metrics-scraper
namespace: kubernetes-dashboard
spec:
ports:
- port: 8000
targetPort: 8000
selector:
k8s-app: dashboard-metrics-scraper
---
kind: Deployment
apiVersion: apps/v1
metadata:
labels:
k8s-app: dashboard-metrics-scraper
name: dashboard-metrics-scraper
namespace: kubernetes-dashboard
spec:
replicas: 1
revisionHistoryLimit: 10
selector:
matchLabels:
k8s-app: dashboard-metrics-scraper
template:
metadata:
labels:
k8s-app: dashboard-metrics-scraper
annotations:
seccomp.security.alpha.kubernetes.io/pod: 'runtime/default'
spec:
containers:
- name: dashboard-metrics-scraper
image: kubernetesui/metrics-scraper:v1.0.3
ports:
- containerPort: 8000
protocol: TCP
livenessProbe:
httpGet:
scheme: HTTP
path: /
port: 8000
initialDelaySeconds: 30
timeoutSeconds: 30
volumeMounts:
- mountPath: /tmp
name: tmp-volume
securityContext:
allowPrivilegeEscalation: false
readOnlyRootFilesystem: true
runAsUser: 1001
runAsGroup: 2001
serviceAccountName: kubernetes-dashboard
nodeSelector:
"beta.kubernetes.io/os": linux
# Comment the following tolerations if Dashboard must not be deployed on master
tolerations:
- key: node-role.kubernetes.io/master
effect: NoSchedule
volumes:
- name: tmp-volume
emptyDir: {}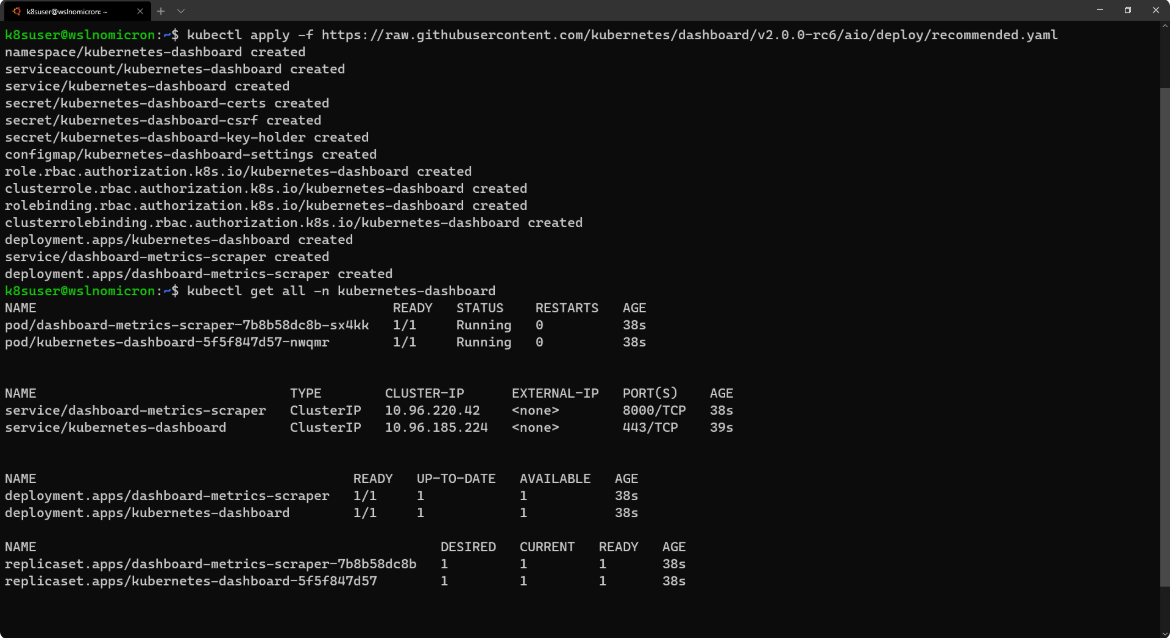
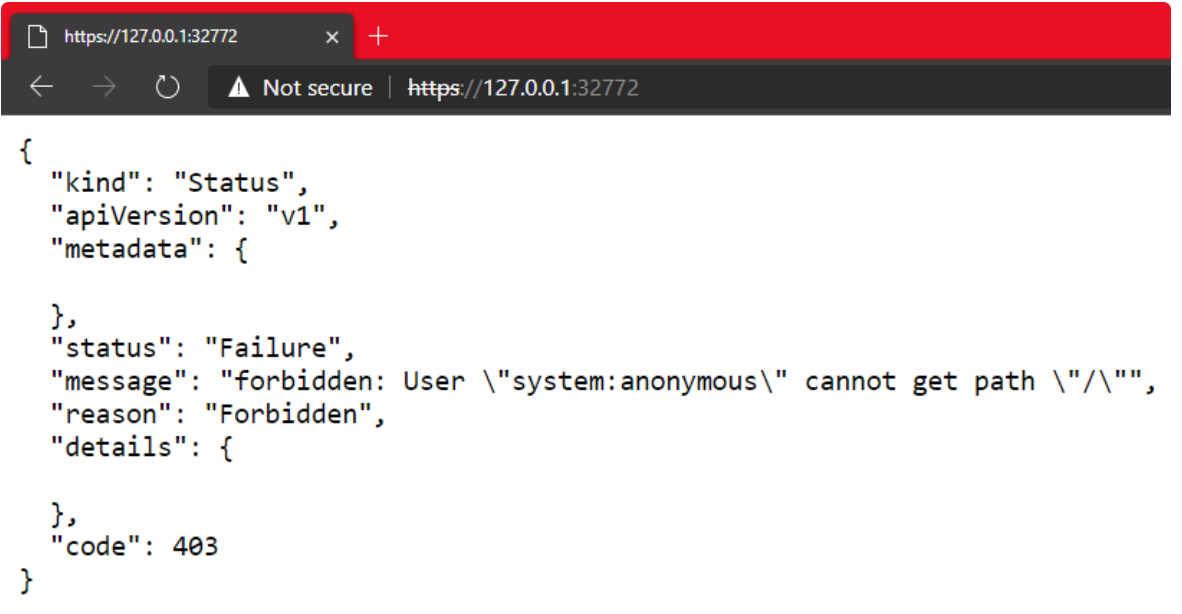
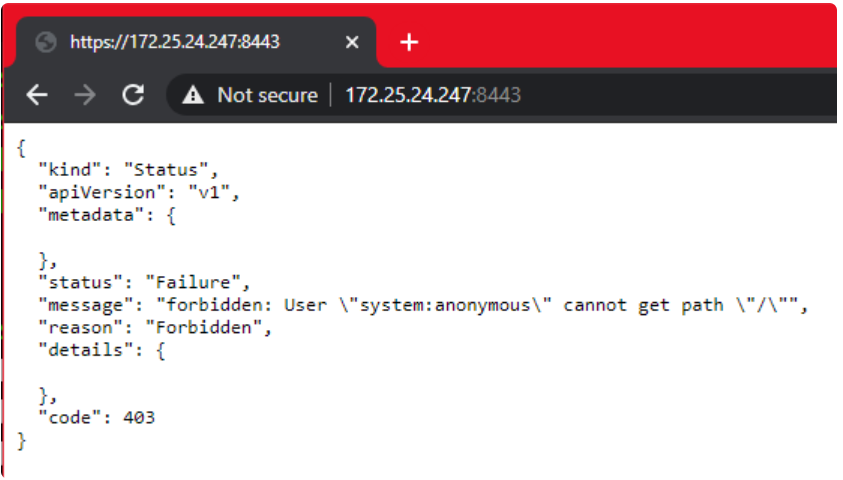
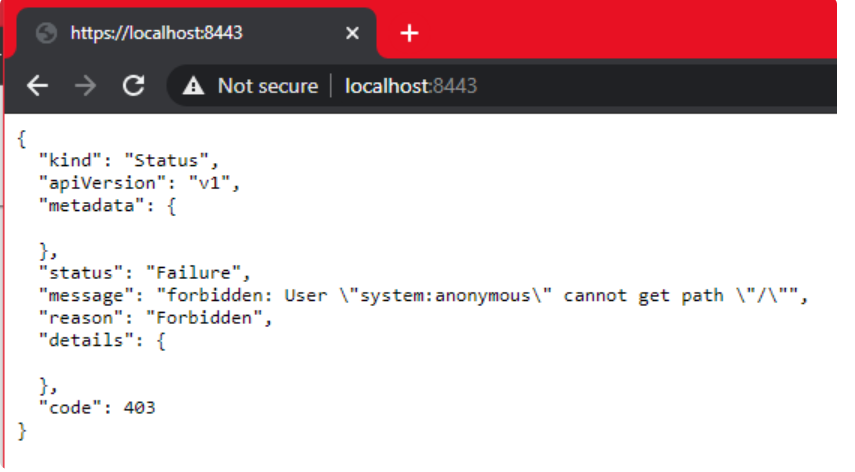
If you use ClusterIP to create a service and type a URL in a Windows browser, you will not be able to access the service:
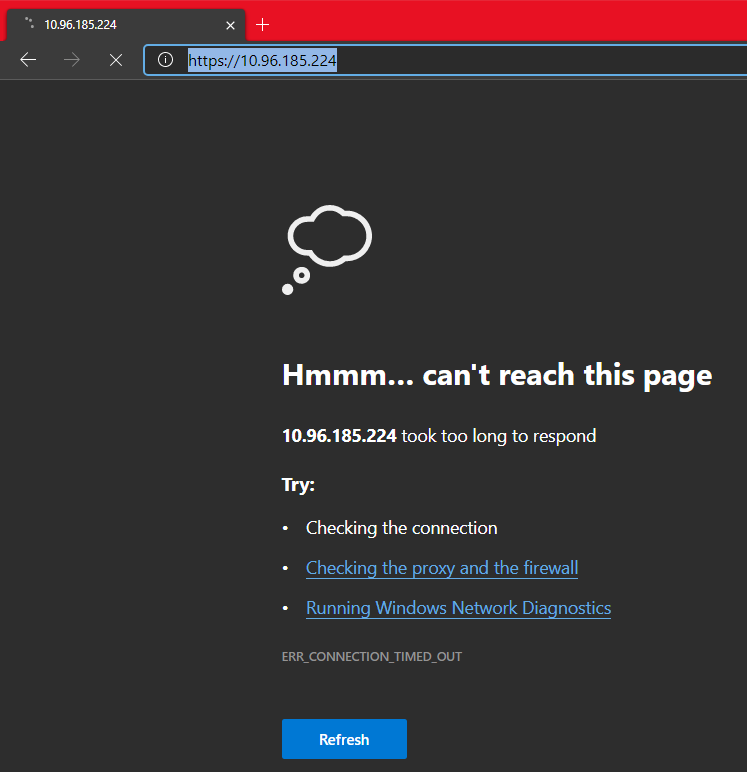
Therefore, we need to create a temporary agent:
# Start a kubectl proxy
kubectl proxy
# Enter the URL on your browser: http://localhost:8001/api/v1/namespaces/kubernetes-dashboard/services/https:kubernetes-dashboard:/proxy/
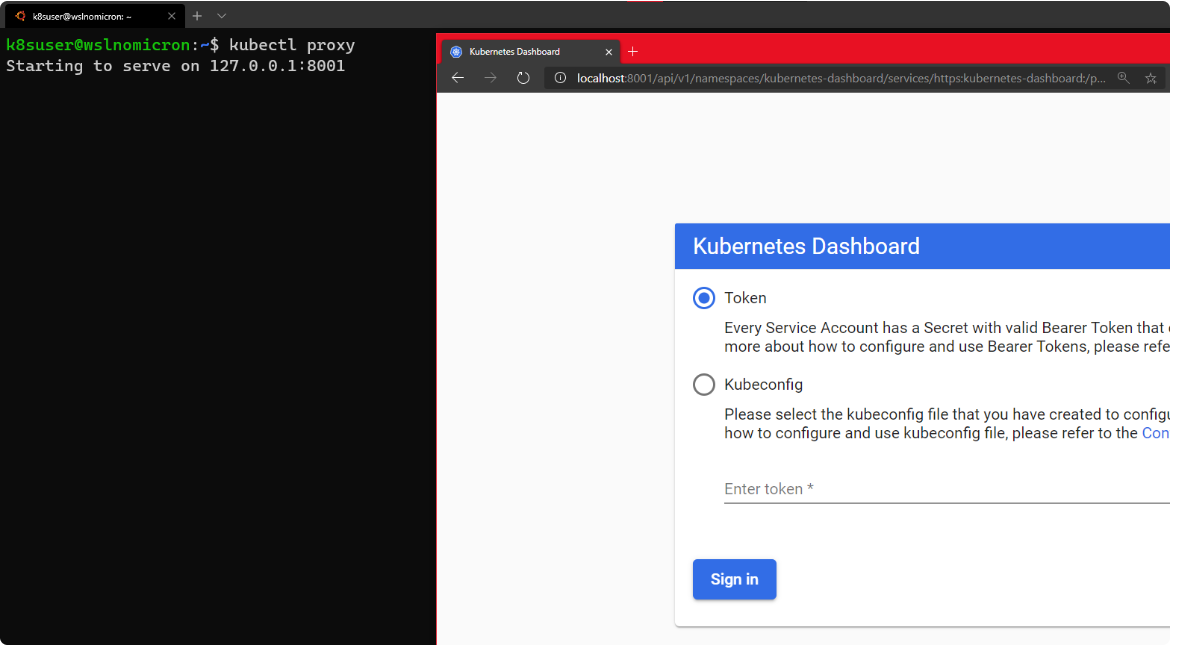
We can enter either a token or a kubeconfig file from the cluster.
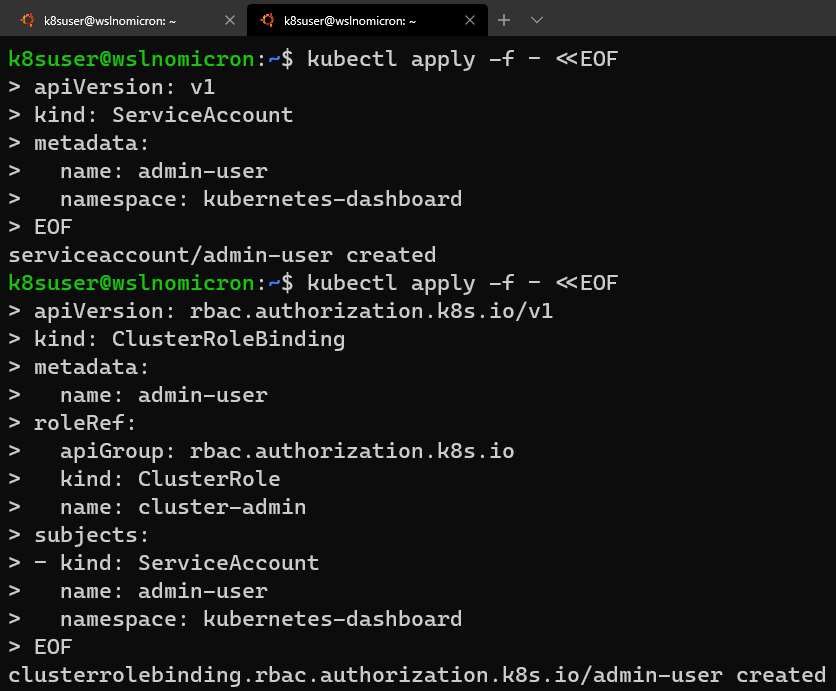
If you try to log in using kubeconfig, the error "Internal error (500): Not enough data to create auth info structure" will be displayed.This is due to a lack of credentials in the kubeconfig file.
Therefore, to avoid these errors, use Recommended RAB methods.
Let's open a new WSL2 session:
# Create a new ServiceAccount
kubectl apply -f - <<EOF
apiVersion: v1
kind: ServiceAccount
metadata:
  name: admin-user
  namespace: kubernetes-dashboard
EOF
# Create a ClusterRoleBinding for the ServiceAccount
kubectl apply -f - <<EOF
apiVersion: rbac.authorization.k8s.io/v1
kind: ClusterRoleBinding
metadata:
  name: admin-user
roleRef:
  apiGroup: rbac.authorization.k8s.io
  kind: ClusterRole
  name: cluster-admin
subjects:
- kind: ServiceAccount
  name: admin-user
  namespace: kubernetes-dashboard
EOF
# Get the Token for the ServiceAccount
kubectl -n kubernetes-dashboard describe secret $(kubectl -n kubernetes-dashboard get secret | grep admin-user | awk '{print $1}')
# Copy the token and copy it into the Dashboard login and press "Sign in"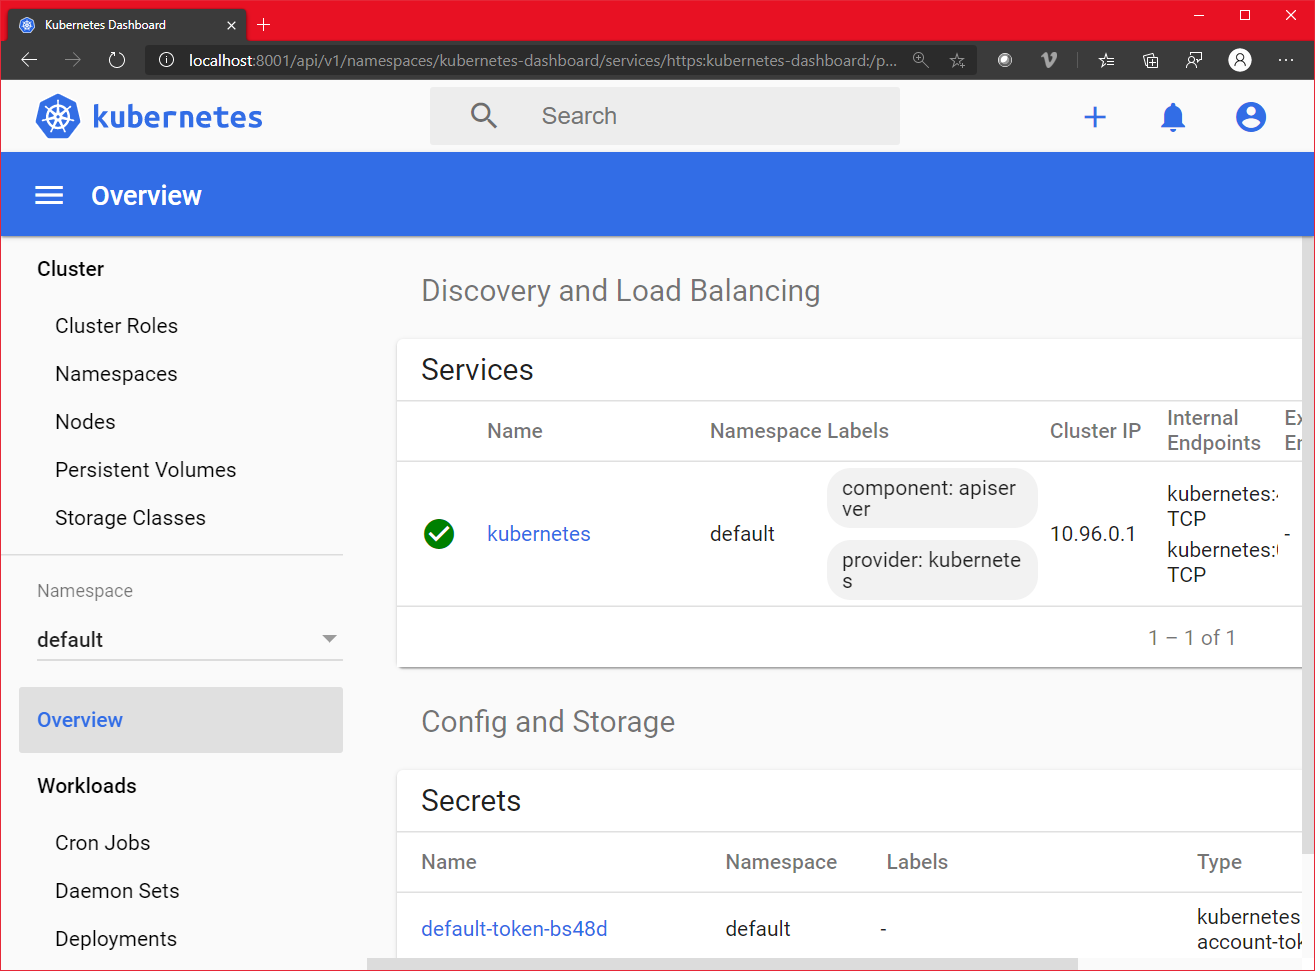
Success!The dashboard also lists our nodes:
Minikube: Create a kubernetes cluster
Let's Install Minikube and create our first cluster.
# Download the latest version of Minikube
curl -Lo minikube https://storage.googleapis.com/minikube/releases/latest/minikube-linux-amd64
# Make the binary executable
chmod +x ./minikube
# Move the binary to your executable path
sudo mv ./minikube /usr/local/bin/

Minikube: Update Host
Run Minikube on the host and Docker using --driver=none.
It is worth noting that when running Kubernetes v 1.18, we will be prompted that "conntrack needs to be installed":
# Create a minikube one node cluster
minikube start --driver=none

Solve this problem by installing missing packages:
# Install the conntrack package
sudo apt install -y conntrack
Start minikube again:
# Create a minikube one node cluster
minikube start --driver=none
# We got a permissions error > try again with sudo
sudo minikube start --driver=none
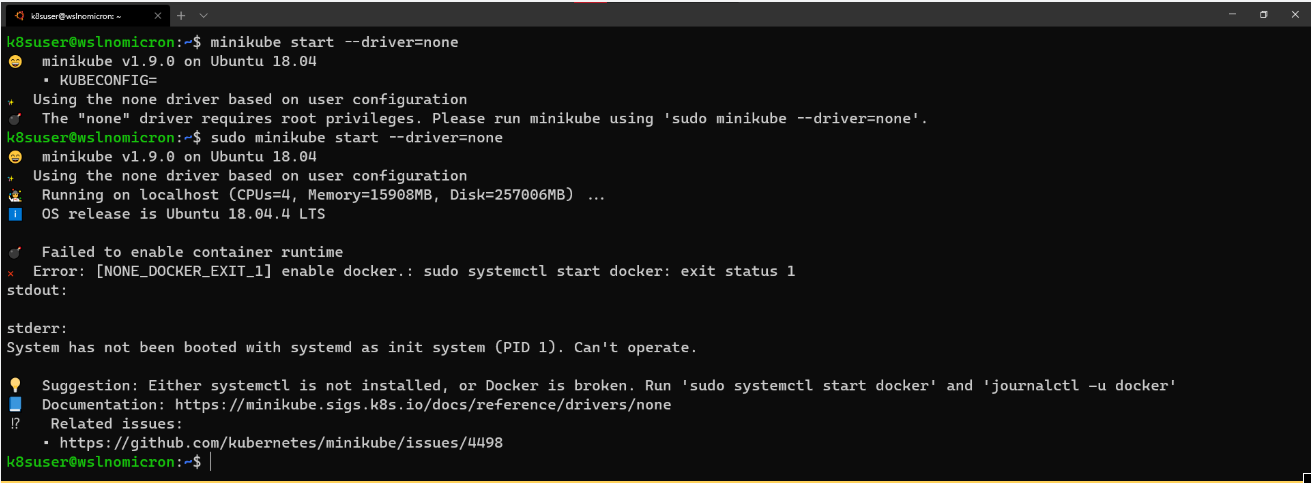
However, the error "System has not been booted with systemd..." is also reported. How to solve it?
Minikube: Enable Systemd
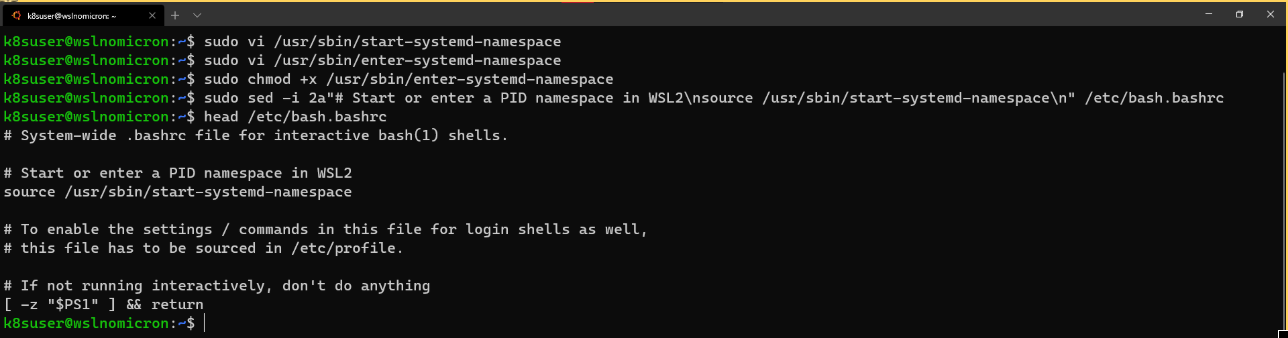
In order to make Systemd in WSL2, we will use the Daniel Lyonelin Provided Script.
Here are the commands:
# Install the needed packages
sudo apt install -yqq daemonize dbus-user-session fontconfig

# Create the start-systemd-namespace script
sudo vi /usr/sbin/start-systemd-namespace
#!/bin/bash

SYSTEMD_PID=$(ps -ef | grep '/lib/systemd/systemd --system-unit=basic.target$' | grep -v unshare | awk '{print $2}')
if [ -z "$SYSTEMD_PID" ] || [ "$SYSTEMD_PID" != "1" ]; then
    export PRE_NAMESPACE_PATH="$PATH"
    (set -o posix; set) | \
        grep -v "^BASH" | \
        grep -v "^DIRSTACK=" | \
        grep -v "^EUID=" | \
        grep -v "^GROUPS=" | \
        grep -v "^HOME=" | \
        grep -v "^HOSTNAME=" | \
        grep -v "^HOSTTYPE=" | \
        grep -v "^IFS='.*"$'\n'"'" | \
        grep -v "^LANG=" | \
        grep -v "^LOGNAME=" | \
        grep -v "^MACHTYPE=" | \
        grep -v "^NAME=" | \
        grep -v "^OPTERR=" | \
        grep -v "^OPTIND=" | \
        grep -v "^OSTYPE=" | \
        grep -v "^PIPESTATUS=" | \
        grep -v "^POSIXLY_CORRECT=" | \
        grep -v "^PPID=" | \
        grep -v "^PS1=" | \
        grep -v "^PS4=" | \
        grep -v "^SHELL=" | \
        grep -v "^SHELLOPTS=" | \
        grep -v "^SHLVL=" | \
        grep -v "^SYSTEMD_PID=" | \
        grep -v "^UID=" | \
        grep -v "^USER=" | \
        grep -v "^_=" | \
        cat - > "$HOME/.systemd-env"
    echo "PATH='$PATH'" >> "$HOME/.systemd-env"
    exec sudo /usr/sbin/enter-systemd-namespace "$BASH_EXECUTION_STRING"
fi
if [ -n "$PRE_NAMESPACE_PATH" ]; then
    export PATH="$PRE_NAMESPACE_PATH"
fi
# Create the enter-systemd-namespace
sudo vi /usr/sbin/enter-systemd-namespace
#!/bin/bash

if [ "$UID" != 0 ]; then
    echo "You need to run $0 through sudo"
    exit 1
fi

SYSTEMD_PID="$(ps -ef | grep '/lib/systemd/systemd --system-unit=basic.target$' | grep -v unshare | awk '{print $2}')"
if [ -z "$SYSTEMD_PID" ]; then
    /usr/sbin/daemonize /usr/bin/unshare --fork --pid --mount-proc /lib/systemd/systemd --system-unit=basic.target
    while [ -z "$SYSTEMD_PID" ]; do
        SYSTEMD_PID="$(ps -ef | grep '/lib/systemd/systemd --system-unit=basic.target$' | grep -v unshare | awk '{print $2}')"
    done
fi

if [ -n "$SYSTEMD_PID" ] && [ "$SYSTEMD_PID" != "1" ]; then
    if [ -n "$1" ] && [ "$1" != "bash --login" ] && [ "$1" != "/bin/bash --login" ]; then
        exec /usr/bin/nsenter -t "$SYSTEMD_PID" -a \
            /usr/bin/sudo -H -u "$SUDO_USER" \
            /bin/bash -c 'set -a; source "$HOME/.systemd-env"; set +a; exec bash -c '"$(printf "%q" "$@")"
    else
        exec /usr/bin/nsenter -t "$SYSTEMD_PID" -a \
            /bin/login -p -f "$SUDO_USER" \
            $(/bin/cat "$HOME/.systemd-env" | grep -v "^PATH=")
    fi
    echo "Existential crisis"
fi
# Edit the permissions of the enter-systemd-namespace script
sudo chmod +x /usr/sbin/enter-systemd-namespace
# Edit the bash.bashrc file
sudo sed -i 2a"# Start or enter a PID namespace in WSL2\nsource /usr/sbin/start-systemd-namespace\n" /etc/bash.bashrc
Finally, exit and start the new minikube session.Instead of stopping WSL2, a new session is sufficient:

Minikube: Single-node kubernetes cluster
We are ready to create the first cluster:
# Check if the KUBECONFIG is not set
echo $KUBECONFIG
# Check if the .kube directory is created > if not, no need to create it
ls $HOME/.kube
# Check if the .minikube directory is created > if yes, delete it
ls $HOME/.minikube
# Create the cluster with sudo
sudo minikube start --driver=none
To enable our users (not sudo) to use kubectl, Minikube recommends running the following chown command:
# Change the owner of the .kube and .minikube directories
sudo chown -R $USER $HOME/.kube $HOME/.minikube
# Check the access and if the cluster is running
kubectl cluster-info
# Check the resources created
kubectl get all --all-namespaces

The cluster was successfully created.We see that Minikube uses WSL2 IP, which is useful for several reasons, one of which is that we can open the URL of Kubernetes master in a Windows browser:
The real advantage of Minikube's integration with WSL2 is that once port 8443 is opened on WSL2, it will actually be forwarded to Windows, so instead of remembering the IP address, we can access the URL of Kubernetes master via localhost:
Minikube: Dashboard for Kubernetes
Minikube embedded Kubernetes Dashboard .With it, it's easy to run and access the dashboard:
# Enable the Dashboard service
sudo minikube dashboard
# Access the Dashboard from a browser on Windows side
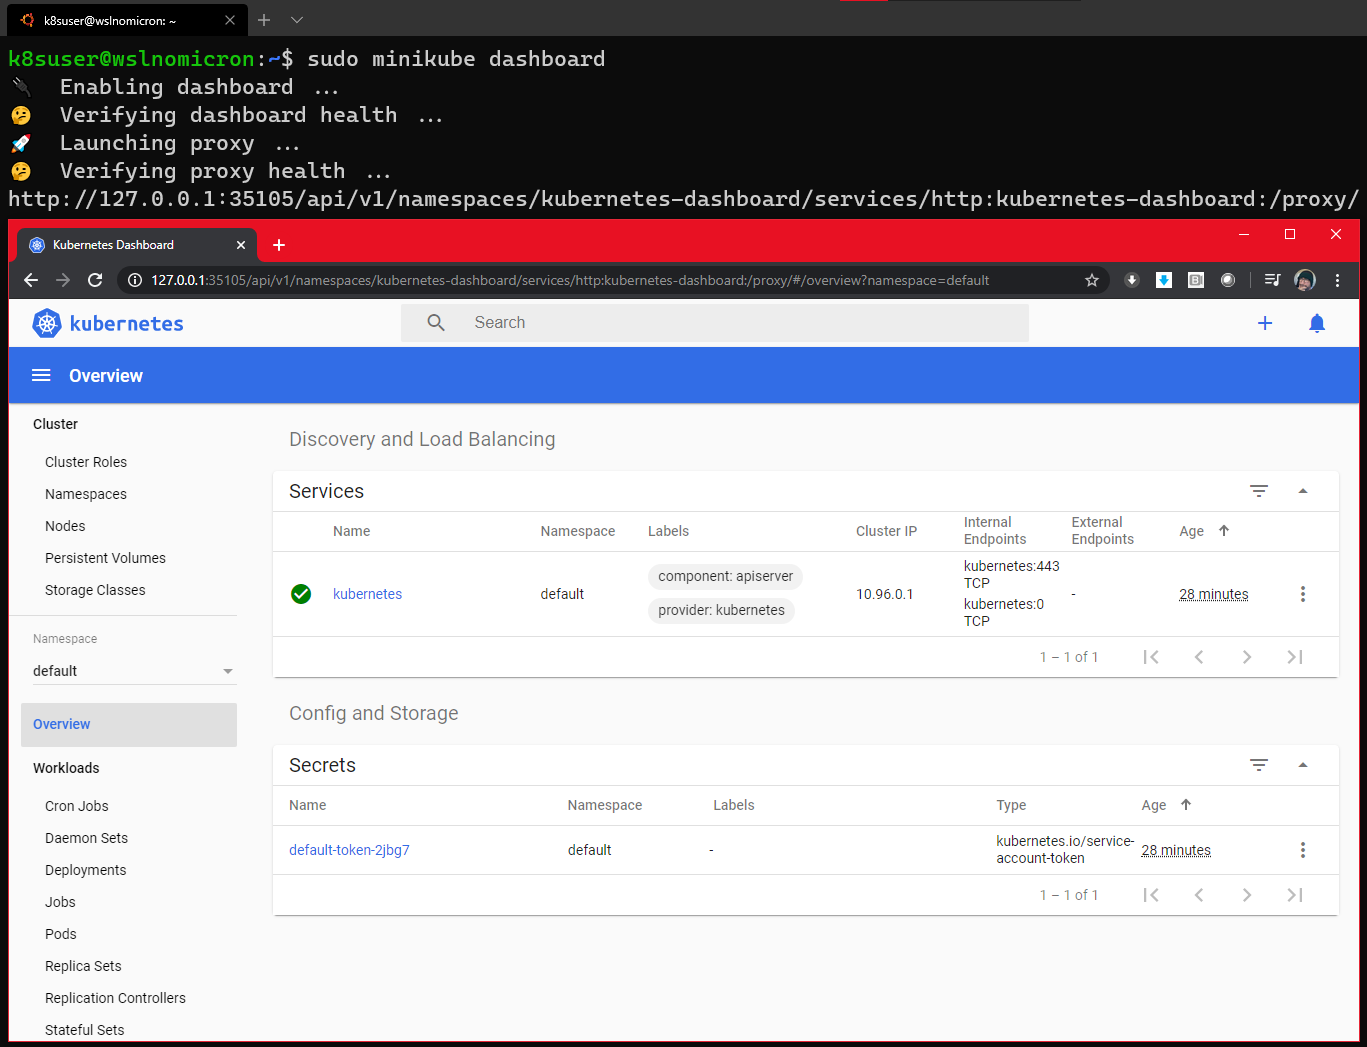
The command also creates a proxy, which means that once we press the end command, CTRL+C will no longer be able to access the dashboard.
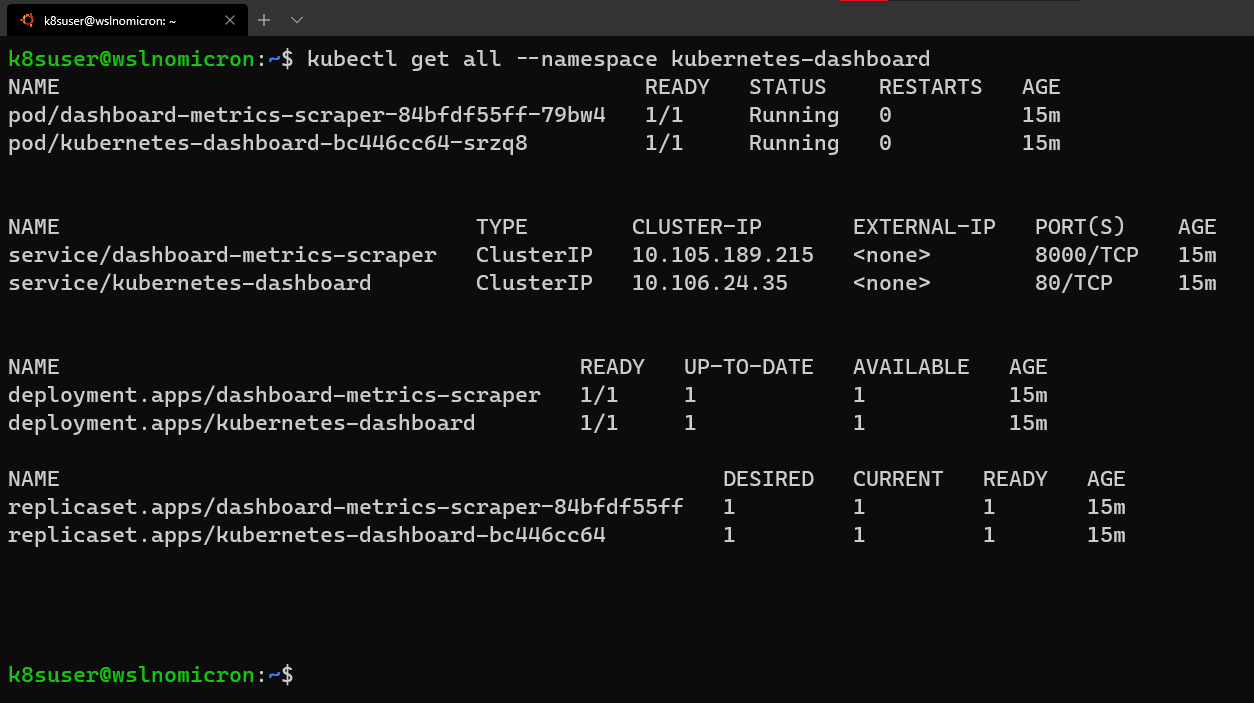
Nevertheless, if we look at the namespace kubernetes-dashboard, we will still see the services being created:
# Get all the services from the dashboard namespace
kubectl get all --namespace kubernetes-dashboard
Edit the service and change its type to LoadBalancer:
# Edit the Dashoard service
kubectl edit service/kubernetes-dashboard --namespace kubernetes-dashboard
# Go to the very end and remove the last 2 lines
status:
  loadBalancer: {}
# Change the type from ClusterIO to LoadBalancer
  type: LoadBalancer
# Save the file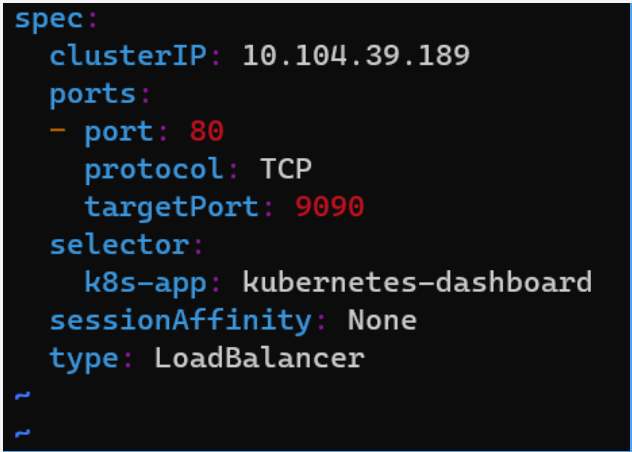
Check the Dashboard service again and let's access Dashboard through LoadBalancer:
# Get all the services from the dashboard namespace
kubectl get all --namespace kubernetes-dashboard
# Access the Dashboard from a browser on Windows side with the URL: localhost:<port exposed>

summary
| standard | Kind | Minikube |
|---|---|---|
| Install on WSL2 | Be prone to | A little complicated |
| Multi-node Cluster | Support | I won't support it |
| Plug-in unit | Manual Installation | Support |
| Persistence | Supported (but not designed for WSL2) | Support |
| Alternatives | K3d | Microk8s |
Translation Links: https://kubernetes.io/blog/2020/05/21/wsl-docker-kubernetes-on-the-windows-desktop/