Service registry Nacos
1, Introduction to Nacos registry
1. Background analysis
In microservices, the first problem we need to face is how to find services (software is a service), and the second is how to communicate between different services? How to manage each service in the application better and more conveniently, and how to establish the link between various services, so that the registration center was born (for example, Taobao sellers provide services and buyers invoke services).
Zookeeper (Yahoo, APACHE), Eureka (Netfix), Nacos (Alibaba) and Consul (Google) are commonly used registration centers in the market. What are their characteristics and how do we select them? We mainly consider community activity, stability, function and performance For this microservice study, we chose Nacos, which well supports Alibaba's double 11 activities. It can not only be used as a registration center, but also as a configuration center. It has good stability and performance
2. Nacos overview
Nacos (dynamic naming and configuration service) is a platform for service registration, discovery and configuration management. It was incubated in Alibaba and grew up in the peak test of double 11 in the past decade. It has precipitated its core competitiveness of simplicity, ease of use, stability and reliability and excellent performance. Its official website address is as follows:
https://nacos.io/zh-cn/docs/quick-start.html
2, Building Nacos services
1. Preparatory work
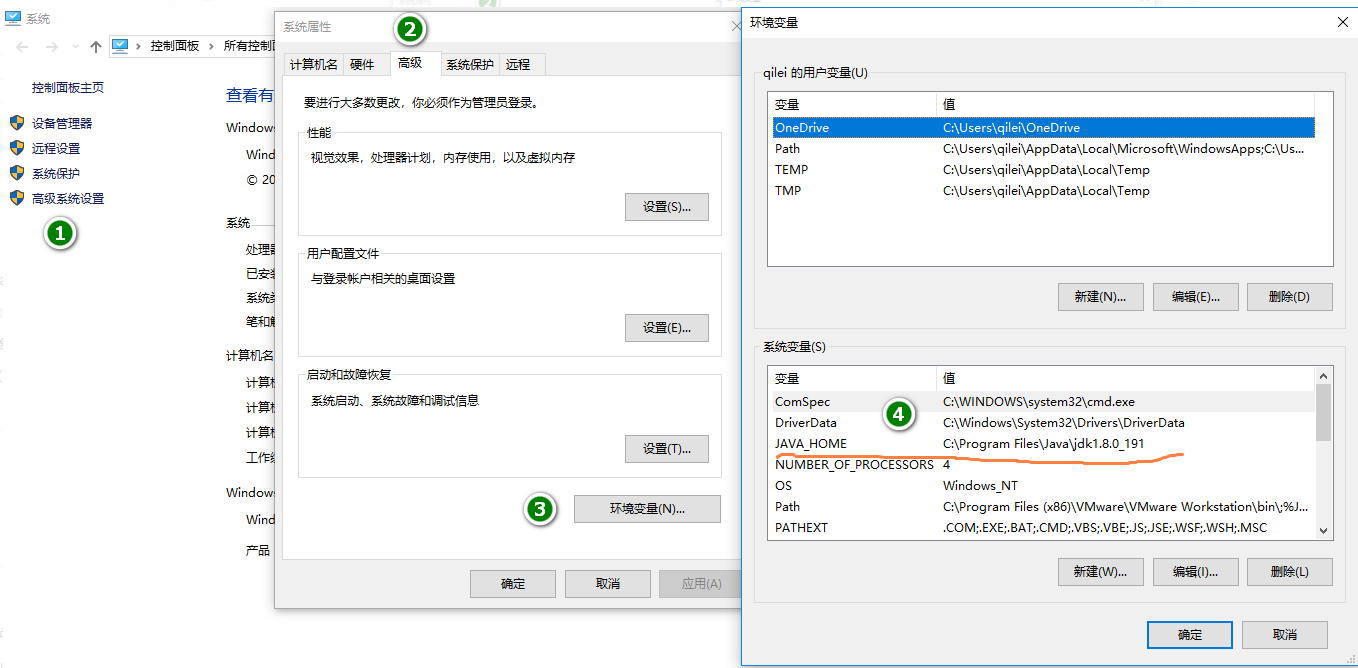
First: make sure your computer is configured with JAVA_HOME environment variable (required when Nacos is started), for example:
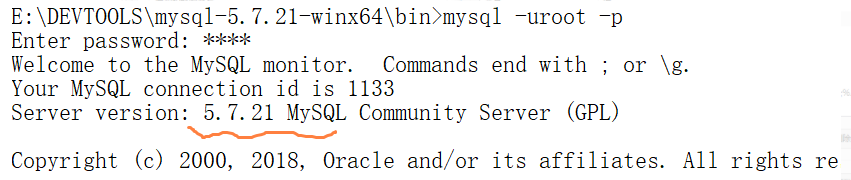
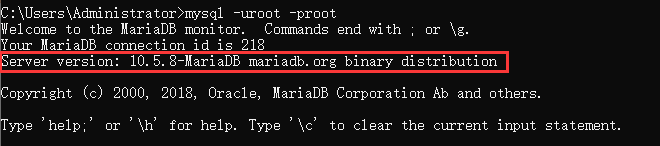
Second: make sure your MySQL version is above 5.7 (above MariaDB 10.5), for example
2. Download and install
Step 1: to download Nacos, you can directly enter the following address in the browser:
https://github.com/alibaba/nacos/releases
Step 2: select the corresponding version and download it directly, as shown in the figure:

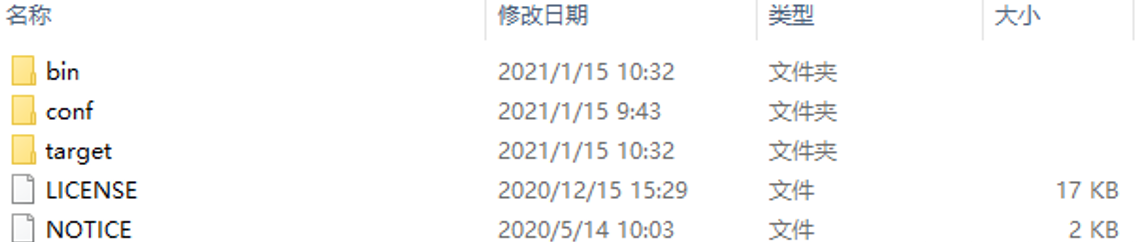
Step 3: decompress Nacos (preferably not to the Chinese directory), and its directory structure is as follows:
3. Initialize configuration
Step 1: log in to mysql and execute the sql script sent by the teacher to the students. For example, we can use the built-in client of mysql. First log in to mysql on the command line, and then execute the following instructions:
source nacos-mysql.sql
After successful execution, a Nacos will be created_ Config database. When you open the database, you will see some tables, such as:
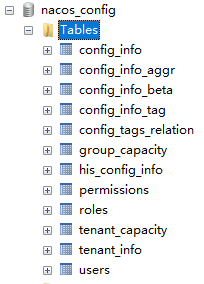
Note: when executing this file, the version of mysql must be greater than 5.7 (MariaDB is better than 10.5.11), otherwise the following error will occur:
Step 2: open / conf / application Open the default configuration in properties, configure the database to be connected based on your current environment, and the user name and password to be used when connecting to the database (if there is "#" in front, remove it):
### If use MySQL as datasource:
spring.datasource.platform=mysql

### Count of DB:
db.num=1

### Connect URL of DB:
db.url.0=jdbc:mysql://127.0.0.1:3306/nacos_config?characterEncoding=utf8&connectTimeout=1000&socketTimeout=3000&autoReconnect=true&useUnicode=true&useSSL=false&serverTimezone=UTC
db.user.0=root
db.password.0=root
4. Service startup and access
Step 1: start the Nacos service
Linux/Unix/Mac startup command (standalone stands for stand-alone mode, non cluster mode):
./startup.sh -m standalone
Windows startup command (standalone stands for stand-alone mode, non cluster mode):
startup.cmd -m standalone
Shut down the Nacos Server
Linux:
sh shutdown.sh
Windows:
cmd shutdown.cmd Or double click shutdown.cmd start-up
explain:
1)When executing the execution command, either configure the environment variable or directly nacos/bin Directory execution.
2)nacos It needs to be configured in the local environment variable during startup JAVA_HOME(corresponding jdk Installation directory for),
3)Make sure you connect to the database(nacos_config)It exists.
4)If all configurations are correct,It's not connected yet. Check how many databases you have(mysql,...)
Step 2: access the Nacos service.
Open the browser and enter http://localhost:8848/nacos Address, the following landing page appears:
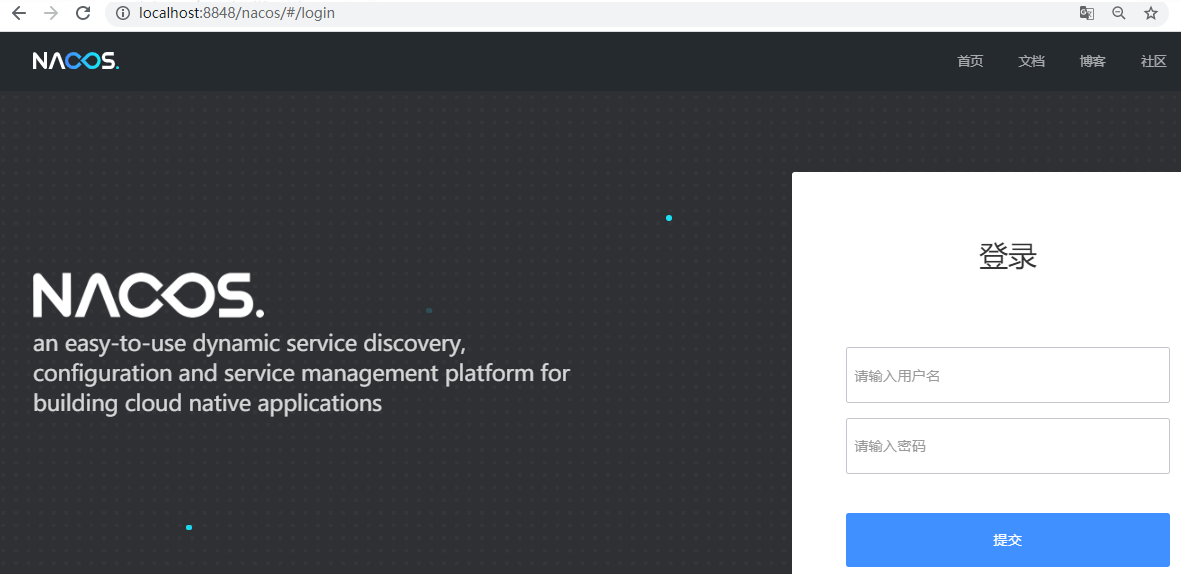
The default account password is nacos/nacos
3, Introduction to service registration and invocation (key points)
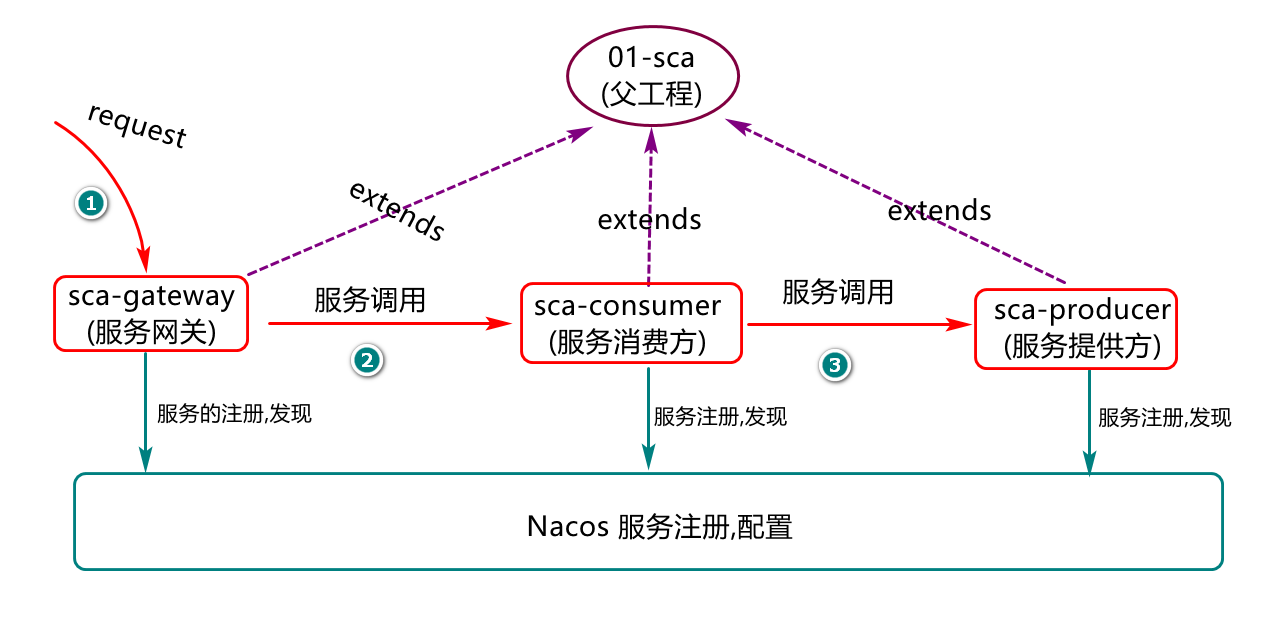
1. Business description
Create two project modules: service provider and service consumer. Both of them should be registered in the NacosServer (the server is essentially a web service, and the port is 8848 by default). Then the service provider can provide remote calling services for service consumers (for example, payment service is the service provider and order service is the service consumer), as shown in the figure:
2. Producer services creation and registration
Step 1: create a service provider project (the module name is SCA provider), inherit the parent project (01 SCA), and its POM The contents of the XML file are as follows:
<?xml version="1.0" encoding="UTF-8"?>
<project xmlns="http://maven.apache.org/POM/4.0.0"
         xmlns:xsi="http://www.w3.org/2001/XMLSchema-instance"
         xsi:schemaLocation="http://maven.apache.org/POM/4.0.0 http://maven.apache.org/xsd/maven-4.0.0.xsd">
	<parent>
		<artifactId>01-sca</artifactId>
		<groupId>com.jt</groupId>
		<version>1.0-SNAPSHOT</version>
	</parent>
	<modelVersion>4.0.0</modelVersion>

	<artifactId>sca-provider</artifactId>

	<dependencies>

		<!--Web service-->
		<dependency>
			<groupId>org.springframework.boot</groupId>
			<artifactId>spring-boot-starter-web</artifactId>
		</dependency>

		<!--Registration and discovery of services(We're going to talk about service registration nacos)-->
		<dependency>
			<groupId>com.alibaba.cloud</groupId>
			<artifactId>spring-cloud-starter-alibaba-nacos-discovery</artifactId>
		</dependency>
	</dependencies>


</project>
Step 2: create and modify the configuration file application YML (or application.properties) to realize service registration. The key codes are as follows:
server:
  port: 8081
spring:
  application:
    name: sca-provider
  cloud:
    nacos:
      discovery:
        server-addr: localhost:8848 #Service registration and discovery (registered to this address by default)
Note: do not use underscores ("") for service names, A bar ("-") should be used, which is the rule.
Step 3: create a startup class and define the control layer objects and methods for processing requests. The key codes are as follows:
package com.jt;
import org.springframework.beans.factory.annotation.Value;
import org.springframework.boot.SpringApplication;
import org.springframework.boot.autoconfigure.SpringBootApplication;
import org.springframework.web.bind.annotation.GetMapping;
import org.springframework.web.bind.annotation.PathVariable;
import org.springframework.web.bind.annotation.RestController;

@SpringBootApplication
public class ProviderApplication  {
	public static void main(String[] args) {
		SpringApplication.run(ProviderApplication.class, args);
	}

	/**Define the Controller object (this object is defined as handler in spring mvc),
	 * Process client requests based on this object*/
	@RestController
	public class ProviderController {

		//@Value reads the content configured in the project configuration file by default
		//8080 means the server is not read Port, the given default value
		@Value("${server.port}")
		private String server;

		//http://localhost:8081/provider/echo/tedu
		@GetMapping(value = "/provider/echo/{msg}")
		public String doEcho(@PathVariable String msg) {
			return "Service port:"+server+"   Say: Hello Nacos Discovery " + msg;
		}
	}
}
Step 4: start the startup class, and then brush the nacos service to check whether the service registration is successful, as shown in the figure:
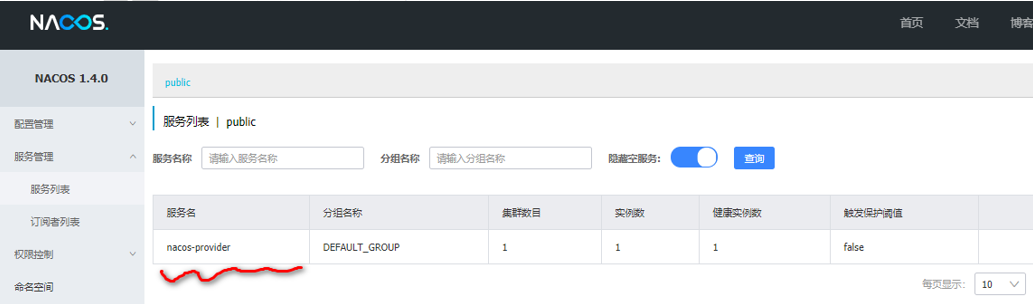
Step 5: open the browser and enter http://localhost:8081/provider/echo/msa , and then visit.

4, Consumer service discovery and invocation
Step 1: create a service consumer (the module name is SCA consumer) and inherit the parent project (01 SCA). The pom.xml file is as follows:
<?xml version="1.0" encoding="UTF-8"?>
<project xmlns="http://maven.apache.org/POM/4.0.0"
         xmlns:xsi="http://www.w3.org/2001/XMLSchema-instance"
         xsi:schemaLocation="http://maven.apache.org/POM/4.0.0 http://maven.apache.org/xsd/maven-4.0.0.xsd">
	<parent>
		<artifactId>01-sca</artifactId>
		<groupId>com.jt</groupId>
		<version>1.0-SNAPSHOT</version>
	</parent>
	<modelVersion>4.0.0</modelVersion>

	<artifactId>sca-consumer</artifactId>

	<dependencies>
		<!--Web service-->
		<dependency>
			<groupId>org.springframework.boot</groupId>
			<artifactId>spring-boot-starter-web</artifactId>
		</dependency>

		<!--Registration and discovery of services(We're going to talk about service registration nacos)-->
		<dependency>
			<groupId>com.alibaba.cloud</groupId>
			<artifactId>spring-cloud-starter-alibaba-nacos-discovery</artifactId>
		</dependency>

		<!--When based feign This dependency is required for service invocation-->
		<dependency>
			<groupId>org.springframework.cloud</groupId>
			<artifactId>spring-cloud-starter-openfeign</artifactId>
		</dependency>

	</dependencies>


</project>
Step 2: modify the configuration file application YML, the key codes are as follows:
server:
  port: 8090
spring:
  application:
    name: sca-consumer
  cloud:
    nacos:
      discovery:
        server-addr: localhost:8848 #Where to find the service
Step 3: create a startup class and realize service consumption. The key codes are as follows:
package com.jt;
@SpringBootApplication
public class ConsumerApplication {
    public static void main(String[] args) {
        SpringApplication.run(ConsumerApplication.class,args);
    }

    @Bean
    public RestTemplate restTemplate(){
        return new RestTemplate();
    }

    @RestController
    public class ConsumerController{

        @Value("${spring.application.name}")
        private String appName;

        @Autowired
        private RestTemplate restTemplate;

        @GetMapping("/consumer/doRestEcho1")
        public String doRestEcho01(){
            String url = "http://localhost:8081/provider/echo/"+appName;
            System.out.println("request url:"+url);
           return restTemplate.getForObject(url, String.class);
        }
    }
}
Step 5: start the consumer service and enter in the browser http://localhost:8090/consumer/doRestEcho1 Address. If the access is successful, it will appear, as shown in the figure:

5, Design and implementation of service load balancing (key)
1. Introductory case
A service instance can process requests is limited. If the concurrent access of a service instance is relatively large, we will start multiple service instances and let these service instances process concurrent requests with certain policy balancing (polling, weight, random, hash, etc.). How is the service load balancing (Nacos client load balancing) applied in Nacos?
Step 1: modify the ConsumerController class, inject the LoadBalancerClient object, add the dorestloadbalancerclientrecho method, and then access the service.
  @Autowired
  private LoadBalancerClient loadBalancerClient;

  @GetMapping("/consumer/doRestEcho02")
 public String doRestEcho02(){
     ServiceInstance serviceInstance = loadBalancerClient.choose("sca-provider");
     String url = String.format("http://%s:%s/provider/echo/%s",serviceInstance.getHost(),serviceInstance.getPort(),appName);
     System.out.println("request url:"+url);
     return restTemplate.getForObject(url, String.class);
     }
 }
Step 2: open the Idea service startup configuration, as shown in the figure:
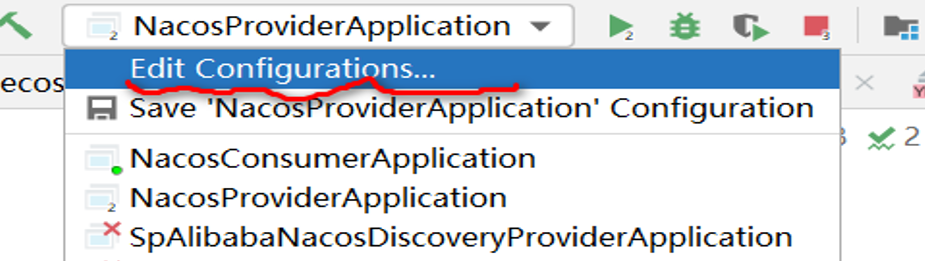
Step 3: modify the concurrent Run option (if this option is not found, we need to find the corresponding solution through the search engine based on combined query, such as searching idea allow parallel run (multiple executions are allowed), as shown in the figure:

Step 4: modify the configuration file port of SCA provider and start it in the mode of 80818082 port respectively.
server:
  port: 8081
spring:
  application:
    name: sca-provider
  cloud:
    nacos:
      server-addr: localhost:8848
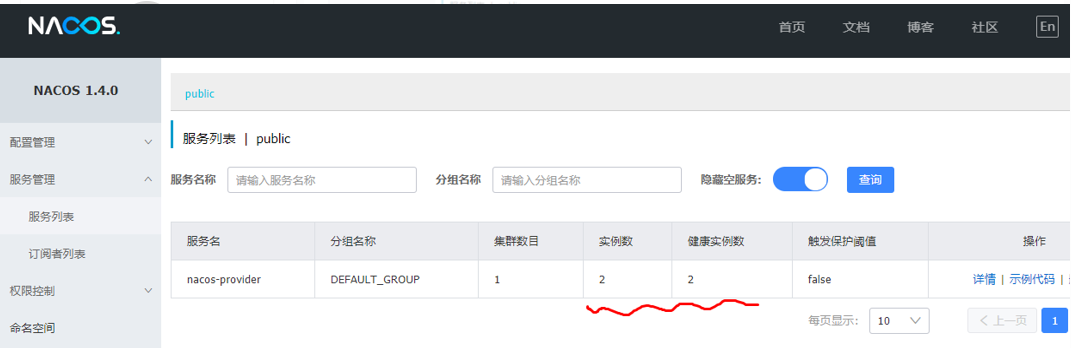
After successful startup, access the service list of nacos and check whether the service is successfully registered, as shown in the figure:
Step 5: start the SCA consumer project module, open the browser, enter the following website for repeated service access:
http://localhost:8090/consumer/doRestEcho02
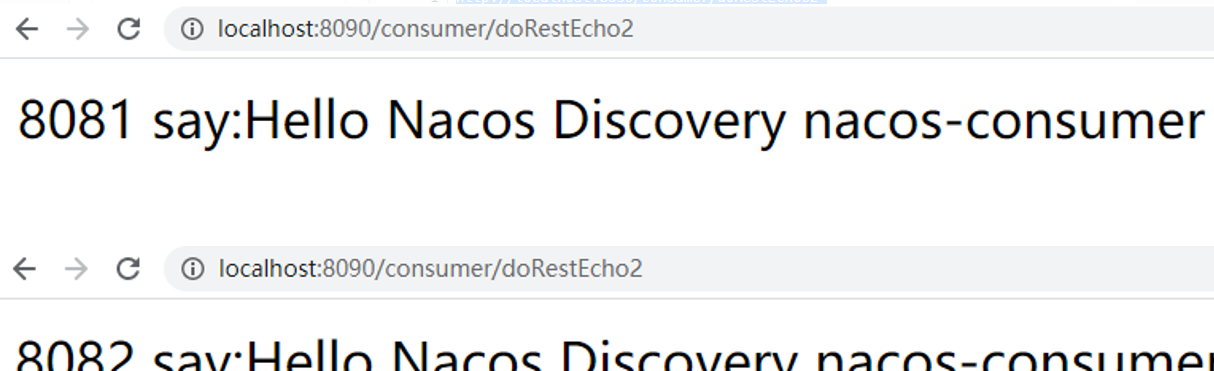
Here, multiple instances provide services concurrently by load balancing. The default implementation of load balancing here is because Nacos integrates the ribbon. The ribbon and RestTemplate can easily access services. Ribbon is one of the core components of Spring Cloud. The most important function it provides is the load balancing of the client (the client can adopt certain algorithms, such as polling access and accessing the instance information of the server). This function allows us to easily automatically convert the service-oriented REST template requests into service calls in the client load balancing mode.
2,@LoadBalanced
When using RestTemplate for remote service calls, if load balancing is required, you can use @ LoadBalanced to modify the method of building RestTemplate when building RestTemplate object, such as building RestTemplate object in ConsumerApplication:
@Bean
@LoadBalanced
public RestTemplate loadBalancedRestTemplate(){
    return new RestTemplate();
}
Dependency injection is performed where the RestTemplate is required to implement load balancing calls. For example, add the loadBalancedRestTemplate attribute in the ConsumerController class:
@Autowired
private RestTemplate loadBalancedRestTemplate;
Next, in the method of the corresponding service caller, the service can be called with the help of the service name based on RestTemplate, for example:
@GetMapping("/consumer/doRestEcho3")
public String doRestEcho03(){
    String url=String.format("http://%s/provider/echo/%s","sca-provider",appName);
    //Send an http request to the service provider to obtain the response data
    return loadBalancedRestTemplate.getForObject(
            url,//The address of the service to request
            String.class);//String.class is the response result type of the request service
}
RestTemplate will be intercepted by LoadBalancerInterceptor when sending a request. It is used for load balancing of RestTemplate. Loadbalancerinceptor gives the core logic of load balancing to loadBalancer. The core code is as follows (understand):
public ClientHttpResponse intercept(final HttpRequest request,
    final byte[] body, final ClientHttpRequestExecution execution) throws IOException {
	final URI originalUri = request.getURI();
	String serviceName = originalUri.getHost();
	return this.loadBalancer.execute(serviceName,
    requestFactory.createRequest(request, body, execution));
}
@The LoadBalanced annotation belongs to Spring, not the Ribbon. When Spring initializes the container, if it detects that the Bean is @ LoadBalanced annotated, Spring will set the interceptor of loadbalancerinceptor for it.
3. Ribbon load balancing strategy (understand)
Based on Ribbon load balancing, Netflix provides seven load balancing strategies by default. For spring cloud Alibaba solution, it also provides NacosRule strategy. The default load balancing strategy is rotation training strategy. As shown in the figure:
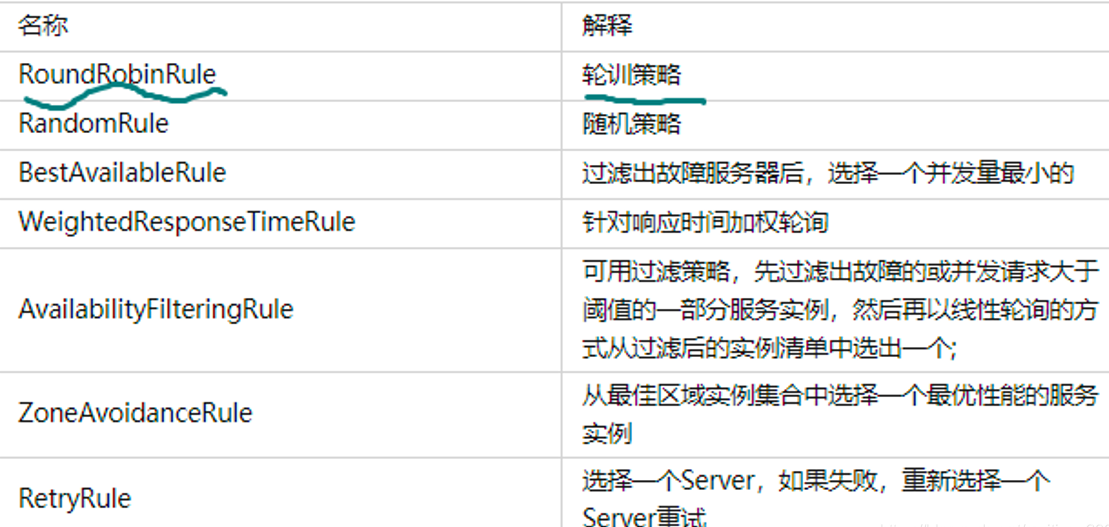
When the load balancing policy provided by the system cannot meet our needs, we can also define our own policy based on IRule interface.
4. Section interview analysis
@What is the function of bean annotation? (it is generally used to configure the interior of a class and describe relevant methods. It is used to tell spring that the return value of this method should be managed by spring. The bean name is the method name by default. If you need to specify the name, you can @ Bean("bean name"). The most common application scenario is to integrate third-party resources - objects)
@What is the role of Autowired annotations? (this annotation is used to describe attributes, construction methods, set methods, etc. it is used to tell the spring framework to perform DI operations for attributes according to certain rules. By default, the corresponding objects are found according to the attribute and method parameter types. If only one is found, it will be injected directly. When there are multiple types, it will also inject values according to the attribute name or method parameter name. If the names are also different, an error will be reported )
How is the bottom layer responsible for balancing in Nacos implemented? (through the Ribbon implementation, some load balancing algorithms are defined in the Ribbon, and then an instance is obtained from the service instance based on these algorithms to provide services for the consumption method)
What is Ribbon? (the load balancing client provided by Netflix is generally applied to the service consumption method)
What problems can Ribbon solve? (service invocation is based on load balancing policy, and all policies will implement IRule interface)
What are the built-in load policies of Ribbon? (8, which can be analyzed by viewing the implementation class of IRule interface)
@What is the role of LoadBalanced? (describe the RestTemplate object, which is used to tell the Spring framework that when a service call is made using RestTempalte, the call process will be intercepted by an interceptor, and then start the load balancing policy inside the interceptor.)
Can we define our own load balancing strategy? (policy can be defined based on IRule interface or implemented with reference to NacosRule)
5. Three ways, load balancing, complete code
package com.jt;


import org.springframework.beans.factory.annotation.Autowired;
import org.springframework.beans.factory.annotation.Value;
import org.springframework.boot.SpringApplication;
import org.springframework.boot.autoconfigure.SpringBootApplication;
import org.springframework.cloud.client.ServiceInstance;
import org.springframework.cloud.client.loadbalancer.LoadBalanced;
import org.springframework.cloud.client.loadbalancer.LoadBalancerClient;
import org.springframework.cloud.openfeign.EnableFeignClients;
import org.springframework.context.annotation.Bean;
import org.springframework.web.bind.annotation.GetMapping;
import org.springframework.web.bind.annotation.RestController;
import org.springframework.web.client.RestTemplate;

import java.util.Random;

//@The EnableFeignClients annotation describes that when a class is started, it is used to tell springboot that when it is started,
//Scan the classes in the package or sub package where the startup class is located. If there is a @ FeignClient annotation description on the interface, the
//This interface creates its implementation class and helps us make remote service calls inside the implementation class
@EnableFeignClients
@SpringBootApplication
public class ConsumerApplication {
	public static void main(String[] args) {
		SpringApplication.run(ConsumerApplication.class, args);
	}


	 /** @Bean The annotation is used to describe the method and tell the spring framework that the return value of this method should be handed over to spring management,
	 * spring By default, a bean name (key) will be given to the returned object of this method, which is the method name by default Of course
	 * Customize the name of a bean, such as @ Bean("self defined name")
	 * Thinking: why is such an annotation given in the spring framework to describe methods and build objects in methods?
	 * First: Spring is a resource integration framework
	 * Second: what are resources? (objects in memory)
	 * Third: do all objects have types?
	 * Fourth: are all object types defined by yourself? Not necessarily (own, third party)
	 * Fifth: for third-party classes, can we directly add annotation descriptions on the class (e.g. @ Component)? may not
	 */

	/**Create a RestTemplate object, and then make a remote service call based on this object*/
	@Bean
	public RestTemplate restTemplate(){
		return new RestTemplate();
	}

	@Bean
	@LoadBalanced //When this annotation describes the RestTemplate object, the system bottom layer will intercept the request of the RestTemplate object
	public RestTemplate loadBalanceRestTemplate(){
		return new RestTemplate();
	}

	@RestController
	public class ConsumerController{


		/**
		 * @Autowired When the annotation describes attributes, it will tell the spring framework to give priority to the search and injection of objects according to attribute types. If
		 * There are multiple objects of this type. At this time, they will be searched and compared according to the attribute name. If there are the same objects, they will be injected directly (DI), but not the same
		 * Of course, you can also add @ Qualifier("bean name") annotation on the attribute to specify the specific object to be injected
		 */
		@Autowired
		private RestTemplate restTemplate;

		@Autowired
		private RestTemplate loadBalanceRestTemplate;

		//Load balancing client object (based on this object, the service list can be obtained from nacos, and can be based on a certain algorithm
		//Get a service instance from the list)
		@Autowired
		private LoadBalancerClient loadBalancerClient;


		@Value("${spring.application.name}")
		private String appName;

		//Call of load balancing mode 1
		//http://localhost:8090/consumer/doRestEcho1
		@GetMapping("/consumer/doRestEcho1")
		public String doRestEcho1(){
			//Manually write the load balancing algorithm (randomly call the service object in the service list)
			//Call who? A url in SCA provider
            String url1="http://localhost:8080/provider/echo/"+appName;
            String url2="http://localhost:8081/provider/echo/"+appName;
            String url3="http://localhost:8082/provider/echo/"+appName;
            String urls[]=new String[]{url1,url2,url3};
            //Randomly obtain an integer less than the length of the urls array
            int n=new Random().nextInt(urls.length);
            System.out.println("n="+n);
            //How to call?
            return restTemplate.getForObject(urls[n],String.class);
		}

		//Call of load balancing mode 2
		@GetMapping("/consumer/doRestEcho2")
		public String doRestEcho2(){
			//Obtain service instance based on loadBalancerClient
			String serviceId="sca-provider";//This name should be in the service list of nacos
			ServiceInstance choose = loadBalancerClient.choose(serviceId);
			String ip=choose.getHost();
			int port=choose.getPort();
			//String url="http://"+ip+":"+port+"/provider/echo/"+appName;
			String url=String.format("http://%s:%s/provider/echo/%s",ip,port,appName);
			return restTemplate.getForObject(url,String.class);
		}

		@GetMapping("/consumer/doRestEcho3")
		public String doRestEcho3(){
			String serviceId="sca-provider";
			String url=String.format("http://%s/provider/echo/%s",serviceId,appName);
			return loadBalanceRestTemplate.getForObject(url,String.class);
		}
	}

}
6, Feign based remote service invocation (key)
1. Background analysis
When the service consumer requests the service of the service provider based on rest, a direct way is to splice the url, splice the parameters, and then implement the service call. However, this splicing is required for each service call. The amount of code is complex and difficult to maintain. At this time, Feign was born.
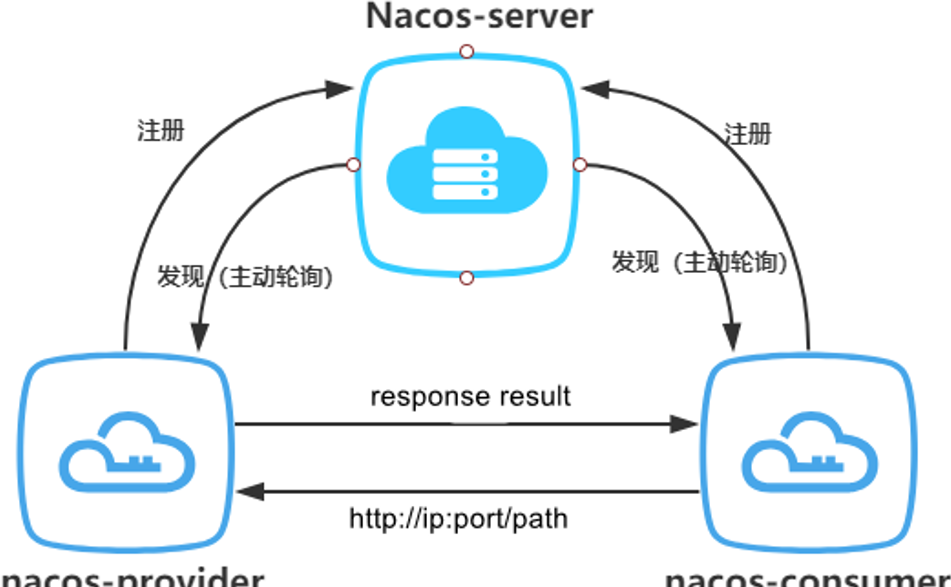
2. What is Feign
Feign is a declarative Web service client. The bottom layer encapsulates the application of Rest technology. Feign can simplify the call and implementation of remote service provider methods by service consumers. As shown in the figure:

Feign was first maintained by Netflix. Later, Netflix no longer maintained feign. Finally, feign was maintained by some communities and renamed OpenFeign.
3. Feign application practice = = (Master)==
Step 1: add project dependencies on the service consumer (the SpringCloud team has developed the starter based on OpenFeign). The code is as follows:
<!--When based feign This dependency is required for service invocation-->
		<dependency>
			<groupId>org.springframework.cloud</groupId>
			<artifactId>spring-cloud-starter-openfeign</artifactId>
		</dependency>
Step 2: add @ EnableFeignClients annotation on the startup class. The code is as follows:
@EnableFeignClients
@SpringBootApplication
public class ConsumerApplication {...}
Step 3: define the Http request API. Based on this API, access the remote service with OpenFeign. The code is as follows:
@FeignClient(name="sca-provider")//SCA provider is the name of the service provider
interface RemoteProviderService{
    @GetMapping("/provider/echo/{string}")//The premise is that the remote end needs this service
    public String echoMessage(@PathVariable("string") String string);
}
Among them, the bottom layer of the interface described by @ FeignClient will create an implementation class for it.
Step 4: create feign consumercontroller and add feign access. The code is as follows:
@RestController
@RequestMapping("/consumer/ ")
public class FeignConsumerController {
    @Autowired
    private RemoteProviderService remoteProviderService;
    /**Service invocation based on feign mode*/
    @GetMapping("/echo/{msg}")
    public String doFeignEcho(@PathVariable  String msg){
        //Remote service invocation based on feign method (provided that the service must exist)
        return remoteProviderService.echoMessage(msg);
    }
}
Step 5: start the consumer service and access it directly through the feign client in the browser, as shown in the figure (repeatedly refresh and detect the response results):
http://localhost:8090/consumer/echo/8091
