previously on
The last article has introduced the design process of the front-end project and how to use HbuilderX to run wechat applet. At the end of the article, I briefly introduced the method of requesting data from the back-end java project with ajax. Let's take a look at this article in detail!
Before reading this article, let's take a look at my last article: Building SpringBoot project from scratch (3) -- building applet uni app project
1, Preconditions
| Installation required | Download method |
|---|---|
| HbuilderX | Bring the latest version |
| Wechat developer tools | Official website download link |
| SQL script | Baidu online disk download link , extraction code: barh |
2, Import MySQL data table
First, download the SQL script in the preconditions and import it into your MySQL database
If you don't know how to create a database, you can take a look at my previous article: Building the SpringBoot project from scratch (I) -- building the development environment
Method ①: Download tb_user.sql file, create a new csdn database on Navicat, right-click the csdn database and select execute SQL file to refresh the csdn database
Method ② (recommended):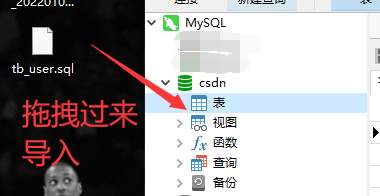
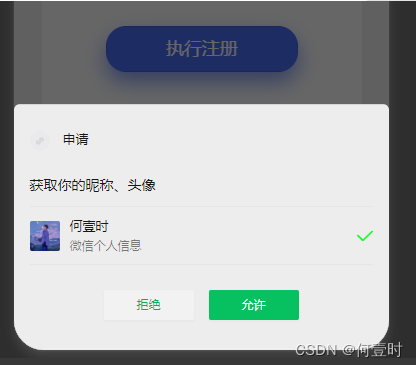
Last class, we completed the step of obtaining the basic information of wechat users 👇 Now let's store the information returned by wechat in MySQL
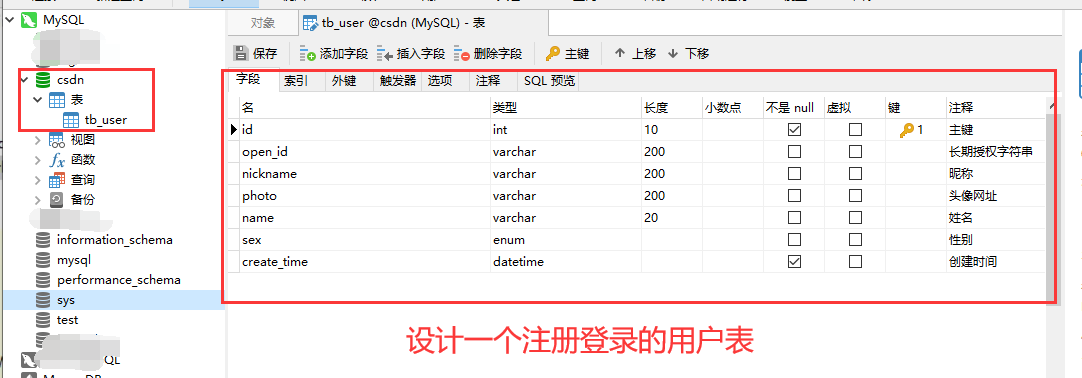
Data table structure 👇
3, Create mapper, dao, pojo files
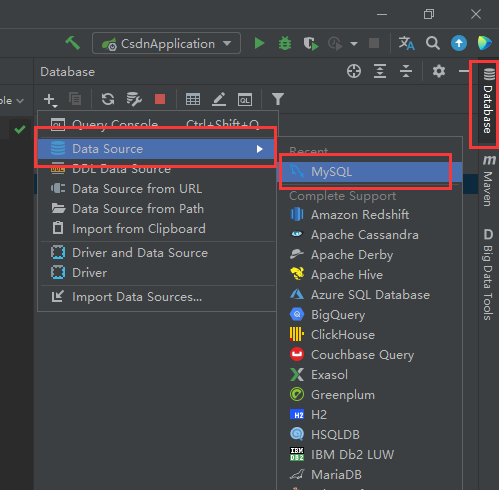
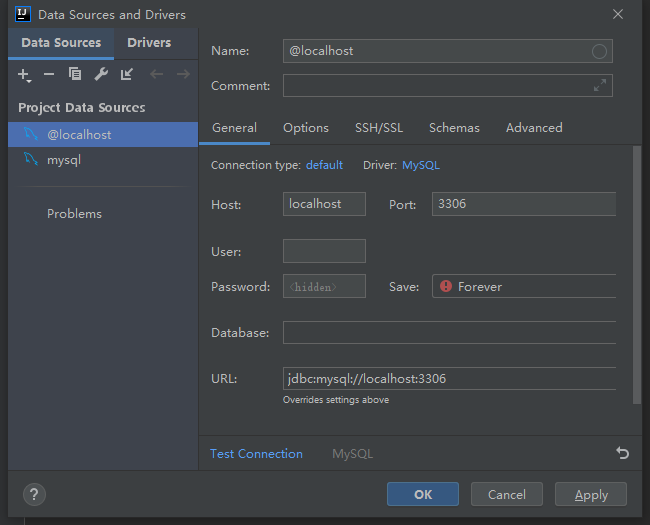
① First, create a MySQL connection 👇 Here, I introduced it in my first article, and I've just taken it here.
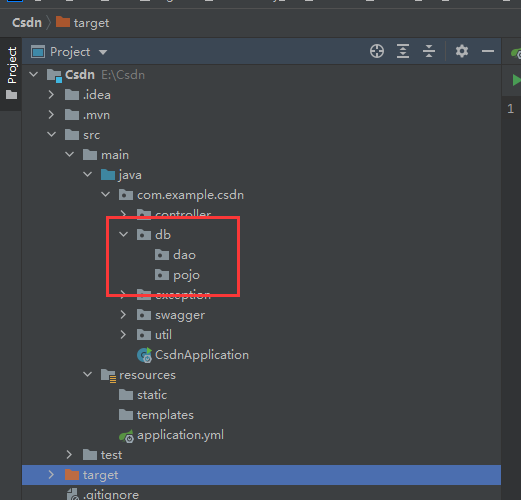
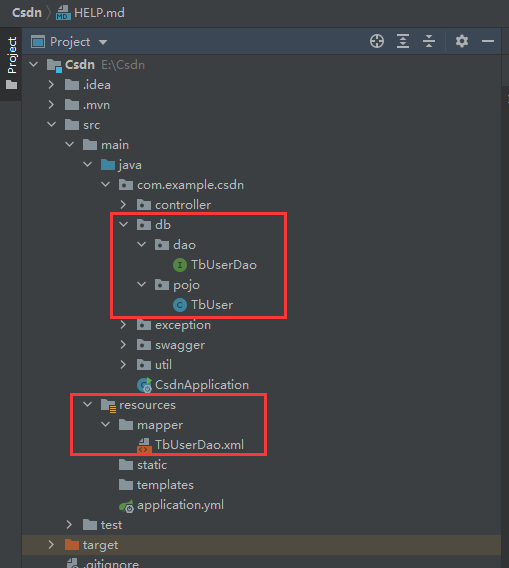
② Create a db directory in the project column, and create dao and pojo directories to store the corresponding files 👇
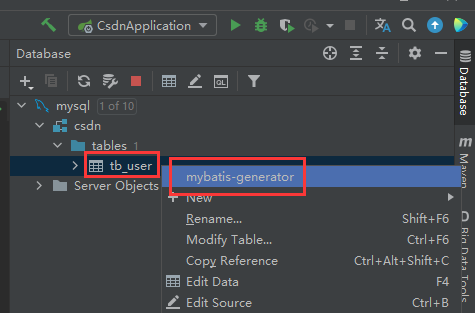
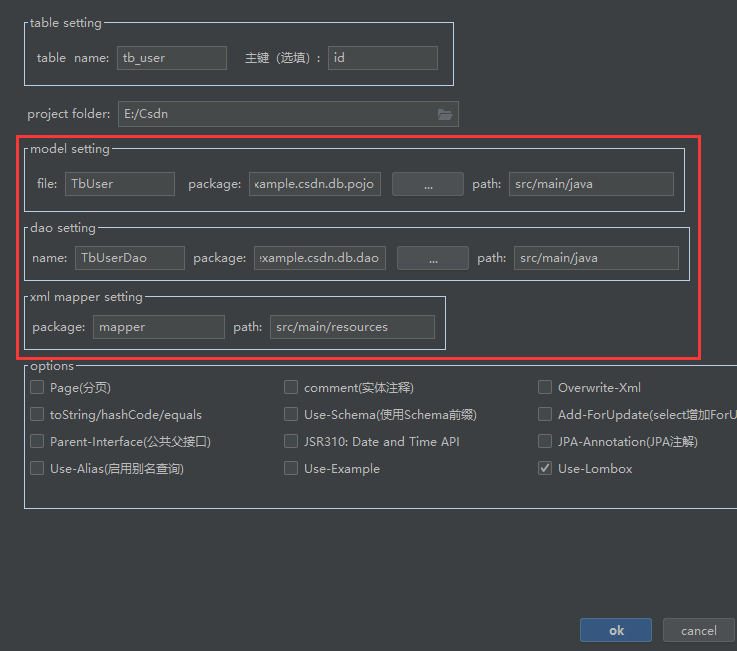
③ Use the Free Mybatis plug-in to generate mapper, dao and pojo files corresponding to the data table. This plug-in is very convenient! Just right click the data table and select the first option mybatis generator to automatically generate the corresponding file 👇
4, Configure Mybatis and log output
In POM Add the following configuration to the XML file 👇
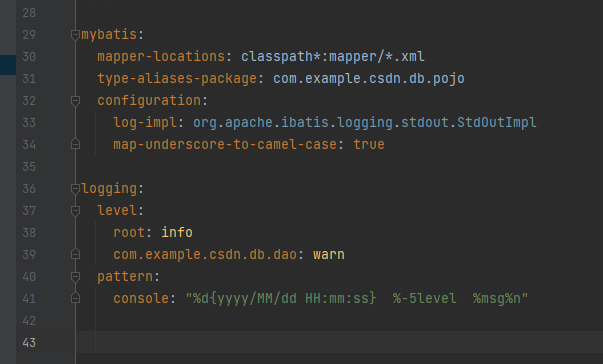
The configuration code is as follows 👇 (don't forget the format! Don't forget the format! Don't forget the format! Say important things three times!)
mybatis:
  mapper-locations: classpath*:mapper/*.xml
  type-aliases-package: com.example.csdn.db.pojo
  configuration:
    log-impl: org.apache.ibatis.logging.stdout.StdOutImpl
    map-underscore-to-camel-case: true

logging:
  level:
    root: info
    com.example.csdn.db.dao: warn
  pattern:
    console: "%d{yyyy/MM/dd HH:mm:ss}  %-5level  %msg%n"
5, Implementation registration (persistence layer)
Before writing code, let's first understand the registration process: after a new user clicks to execute registration on the registration page of the applet, the applet obtains the wechat account information of the new user, submits it to the Java background system, and then saves it to the MySQL database.
Suppose that the business layer determines that users can register, so we want to save the user's data in the user table, which requires us to write relevant SQL statements and DAO code.
1. Write code to save user records
① In tbuserdao Write the following SQL statement in the XML file 👇
<insert id="insert" parameterType="HashMap">
	INSERT INTO tb_user
    SET
    <if test="openId!=null">
    	open_id = #{openId},
    </if>
    <if test="nickname!=null">
    	nickname = #{nickname},
    </if>
    <if test="photo!=null">
    	photo = #{photo},
    </if>
    <if test="name!=null">
        name = #{name},
    </if>
    <if test="sex!=null">
        sex = #{sex},
    </if>
    create_time = #{createTime}
</insert>
② In tbuserdao Create DAO method in Java file 👇 (don't forget to add @ Mapper annotation)
@Mapper
public interface TbUserDao {
    public int insert(HashMap param);
}
2. Write code to query user ID
If a new record is inserted into the user table, because the primary key is automatically generated, we do not know the primary key value of the new record. So we need to write code to query the user ID according to OpenId.
① In tbuserdao Write the following SQL statement in the XML file 👇
<select id="searchIdByOpenId" parameterType="String" resultType="Integer">
    SELECT id FROM tb_user WHERE open_id=#{openId}
</select>
② In tbuserdao Create DAO method in Java file 👇
@Mapper
public interface UserDao {
	......
    public Integer searchIdByOpenId(String openId);
}
6, Implementation registration (business layer)
In the previous section, we encapsulated the persistence layer code of registered users. Next, we should write the business layer code. For example, we need to get OpenId before saving user records.
1. Get OpenId
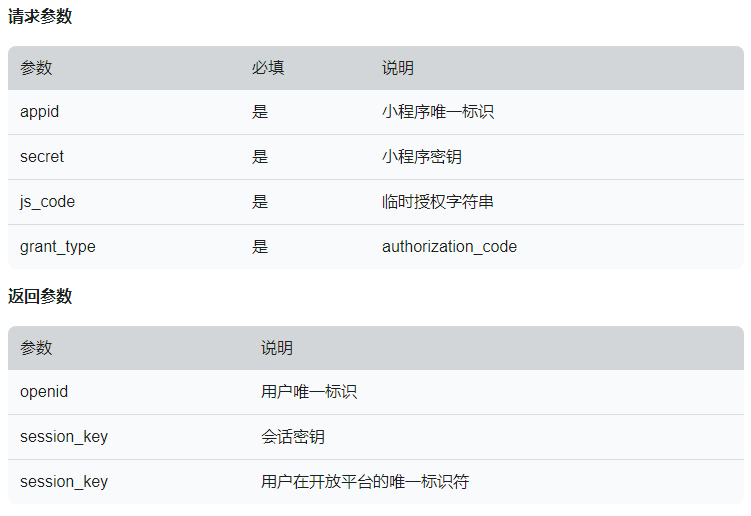
To obtain the OpenId of wechat users, the back-end program needs to send a request to the wechat platform and upload several parameters.
URL request path: https://api.weixin.qq.com/sns/jscode2session
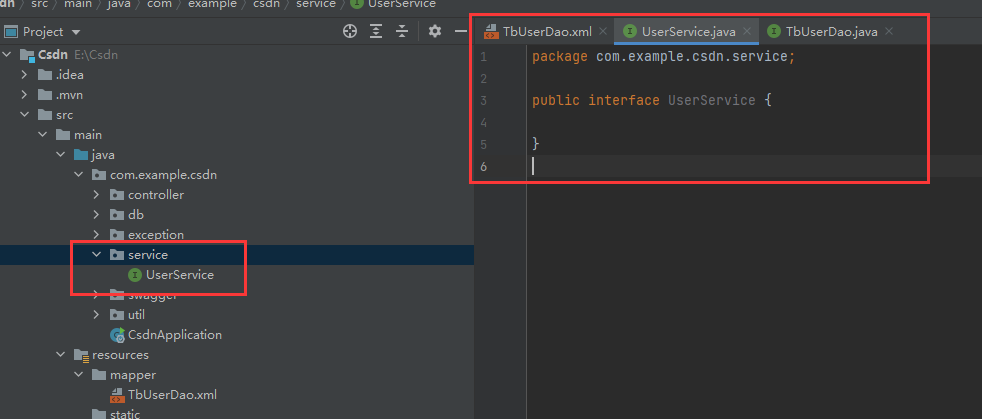
① On COM example. csdn. Create userservice in service Java interface 👇
② In application Add the wechat applet unique ID and applet key to the YML file, otherwise you cannot request the user's openId from the wechat platform 👇
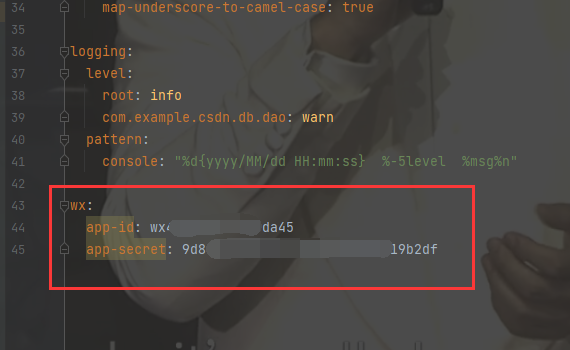
wx:
  app-id: Your applet app-id
  app-secret: Your applet app-secret
③ On COM example. csdn. Service Create userserviceimpl. In impl Java class 👇 And inherit the UserService interface 👇
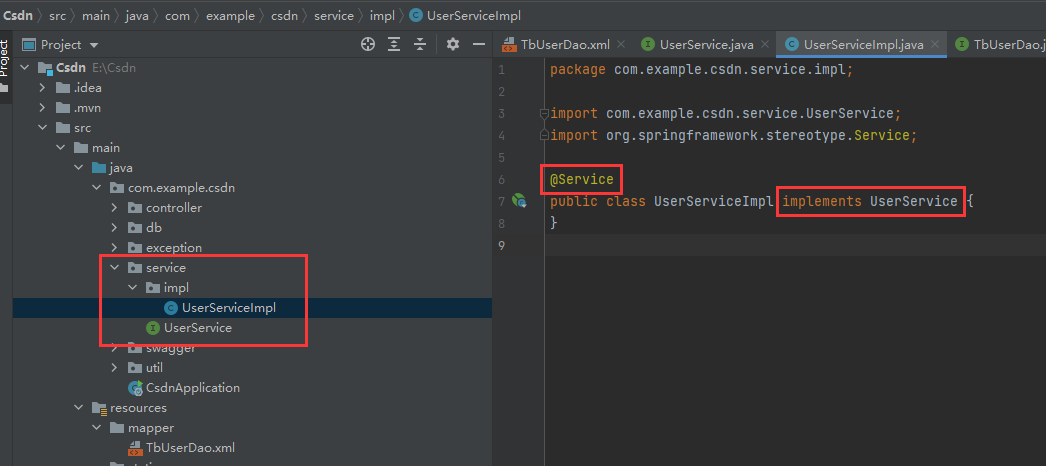
Add the following code to userserviceimpl In Java 👇
package com.example.csdn.service.impl;

import cn.hutool.http.HttpUtil;
import cn.hutool.json.JSONObject;
import cn.hutool.json.JSONUtil;
import com.example.csdn.db.dao.TbUserDao;
import com.example.csdn.service.UserService;
import lombok.extern.slf4j.Slf4j;
import org.springframework.beans.factory.annotation.Autowired;
import org.springframework.beans.factory.annotation.Value;
import org.springframework.context.annotation.Scope;
import org.springframework.stereotype.Service;
import java.util.HashMap;

@Service
@Slf4j
@Scope("prototype")
public class UserServiceImpl implements UserService {

    @Value("${wx.app-id}")
    private String appId;

    @Value("${wx.app-secret}")
    private String appSecret;

	@Autowired
    private TbUserDao userDao;

	private String getOpenId(String code) {
        String url = "https://api.weixin.qq.com/sns/jscode2session";
        HashMap map = new HashMap();
        map.put("appid", appId);
        map.put("secret", appSecret);
        map.put("js_code", code);
        map.put("grant_type", "authorization_code");
        String response = HttpUtil.post(url, map);
        JSONObject json = JSONUtil.parseObj(response);
        String openId = json.getStr("openid");
        if (openId == null || openId.length() == 0) {
            throw new RuntimeException("Temporary login voucher error");
        }
        return openId;
    }
}
2. Write the business code for registering new users
① Add the declaration of the abstract method in the UserService interface 👇
public interface UserService {
    public int registerUser(String registerCode,String code,String nickname,String photo);
}
② Implement the abstract method in the UserServiceImpl class 👇
    @Override
    public int registerUser(String registerCode, String code, String nickname, String photo) {
        // TODO, attention! Here you need to decide the judgment conditions for registration! Because openId will change, the same user can register multiple times
        String openId = getOpenId(code);
        HashMap param = new HashMap();
        param.put("openId", openId);
        param.put("nickname", nickname);
        param.put("photo", photo);
        param.put("createTime", new Date());
        userDao.insert(param);
        int id = userDao.searchIdByOpenId(openId);
        return id;
    }
7, Implement registration (WEB layer)
To receive the registration request submitted by the mobile terminal, we need to use the form class to encapsulate the data, so we create registerform Java class. Before creating it, we first create it in POM Add the dependency of validation information in the XML file 👇
<dependency>
	<groupId>org.springframework.boot</groupId>
	<artifactId>spring-boot-starter-validation</artifactId>
</dependency>
package com.example.csdn.controller.form;

import io.swagger.annotations.ApiModel;
import lombok.Data;
import javax.validation.constraints.NotBlank;

@Data
@ApiModel
public class RegisterForm {

    @NotBlank(message = "Wechat temporary authorization cannot be empty")
    private String code;

    @NotBlank(message = "Nickname cannot be empty")
    private String nickname;

    @NotBlank(message = "Avatar cannot be empty")
    private String photo;
}
8, Implementation registration (applet side)
1. Encapsulate global path
We just created the register method on the back end. When the mobile terminal sends a request, we must first fill in the URL address. In order to centrally manage the URL path on the mobile project, we can use main JS file uses the syntax of global variables to define the global URL address, which is more convenient for maintenance ↓

The code is as follows ↓
let baseUrl = "http://192.168.99.216:8080/emos-wx-api"
Vue.prototype.url = {
	register: baseUrl + "/user/register",
}
2. Encapsulating Ajax
Vue.prototype.ajax = function(url, method, data, fun) {
	uni.request({
		"url": url,
		"method": method,
		"header": {
			token: uni.getStorageSync('token')
		},
		"data": data,
		success: function(resp) {
			if (resp.statusCode == 401) {
				uni.redirectTo({
					url: '../login/login'
				});
			} else if (resp.statusCode == 200 && resp.data.code == 200) {
				let data = resp.data
				if (data.hasOwnProperty("token")) {
					console.log(resp.data)
					let token = data.token
					uni.setStorageSync("token", token)
				}
				fun(resp)
			} else {
				uni.showToast({
					icon: 'none',
					title: resp.data
				});
			}
		}
	});
}
3. Submit Ajax request
let data = {
	code: code,
	nickname: nickName,
	photo: avatarUrl,
	registerCode: that.registerCode
};
that.ajax(that.url.register, 'POST', data, function(resp) {
	//TODO jumps to the index page
	uni.switchTab({
		url: '../index/index'
	});
});