The environment of this article is Windows10, Ubuntu 20.04, nginx1 8,PHP 7.3,Mysql8.0,Redis5.0 If you don't understand, you can comment or contact me at email: owen@owenzhang.com The copyright belongs to Owen Zhang. For commercial reprint, please contact Owen Zhang for authorization. For non-commercial reprint, please indicate the source.
This article has been practiced under Ubuntu under Windows10. Don't worry about using it. If you don't understand, please contact me
What will catch fire in 2022? Ubuntu LNMPR environment!
1, SSH configuration for Ubuntu 20.04
Use the command to check whether ubuntu has ssh server installed
ps -e|grep ssh
If sshd is not displayed, ssh server is not installed
Install ssh server
sudo apt-get install openssh-server
Start ssh server
/etc/init.d/ssh start

2, Install Nginx
Update resource list first
sudo apt-get update
Now start the installation
sudo apt-get install nginx
View nginx version
nginx -v
Output:
nginx version: nginx/1.18.0 (Ubuntu)
Supplementary notes:
The directory of Nginx website is / var/www/html Put the project code in this folder (similar to apache/htdocs) The location of the Nginx website configuration file is / etc / Nginx / sites available / default
Start Nginx service
sudo service nginx start start-up
sudo service nginx status Start state
sudo service nginx enable Automatic startup after startup
sudo service nginx disable Automatic startup is prohibited
sudo service nginx stop stop it
sudo service nginx restart restart
View status with command
sudo lsof -i:80
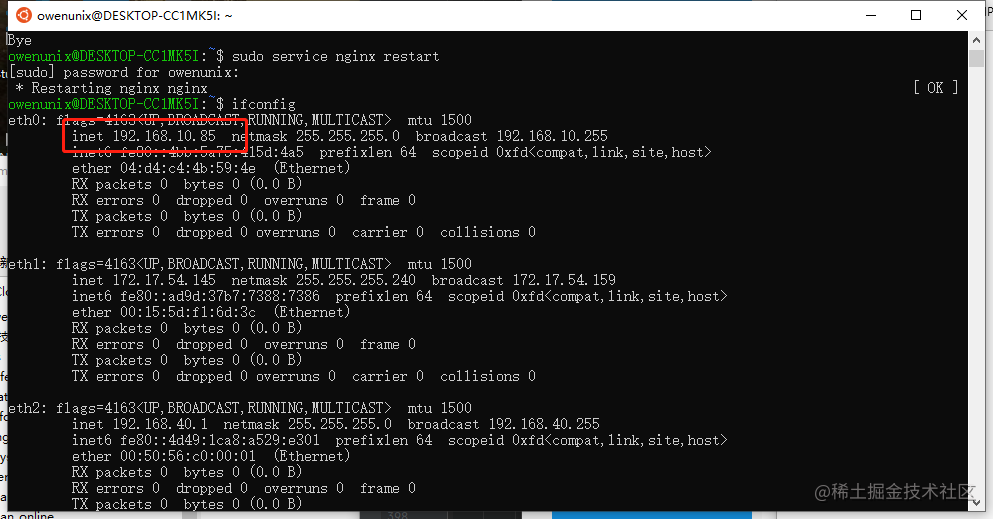
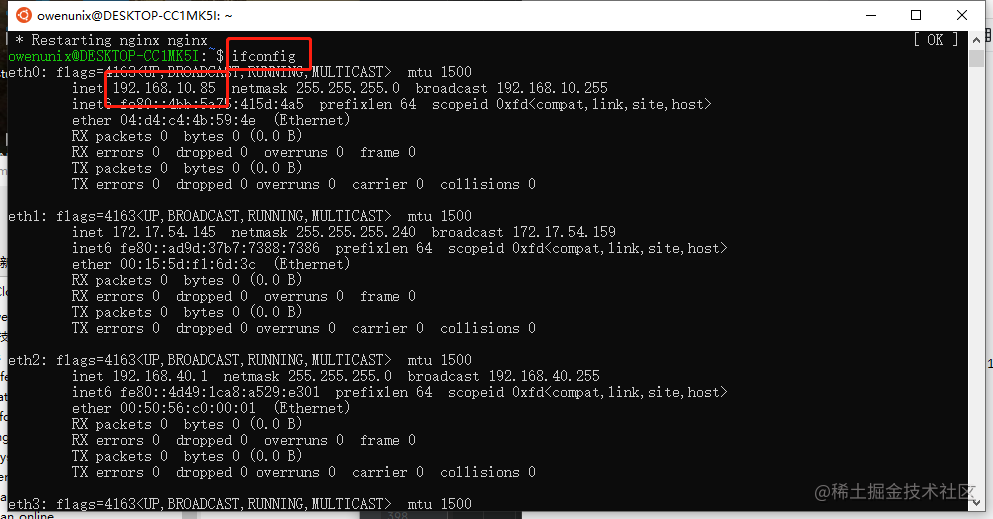
You can also enter 127.0.0.1 in the browser on the virtual machine to see the Nginx page Enter ifconfig to view the ip address. You can also see it when accessing outside the virtual machine

2, Install php7 3 and PHP extensions
Installation command
sudo apt-add-repository ppa:ondrej/php
sudo apt-get update
sudo apt-get install php7.3 php7.3-fpm
If prompted:
add-apt-repository: command not found
Then run the following command:
sudo apt-get install software-properties-common python-software-properties
View php version
php -v
Output:
owenunix@DESKTOP-CC1MK5I:~$ php -v
PHP 7.3.33-1+ubuntu20.04.1+deb.sury.org+1 (cli) (built: Nov 19 2021 06:25:05) ( NTS )
Copyright (c) 1997-2018 The PHP Group
Zend Engine v3.3.33, Copyright (c) 1998-2018 Zend Technologies
    with Zend OPcache v7.3.33-1+ubuntu20.04.1+deb.sury.org+1, Copyright (c) 1999-2018, by Zend Technologies
3, Configure Nginx and PHP FPM
There are two communication modes between PHP FPM and Nginx: One is Internet domain socket based on TCP, One is UNIX domain socket. UNIX domain socket enables two or more processes on the same operating system to communicate data. The interface of UNIX domain socket is very similar to that of Internet domain socket, but it does not use the underlying network protocol to communicate.
When the server pressure is small, the performance difference between the two methods is small, but when the pressure is full, the effect is really better by using UNIX domain socket.
Configure Nginx first
cd /etc/nginx/sites-available
sudo cp default default.bak
sudo vim /etc/nginx/sites-available/default
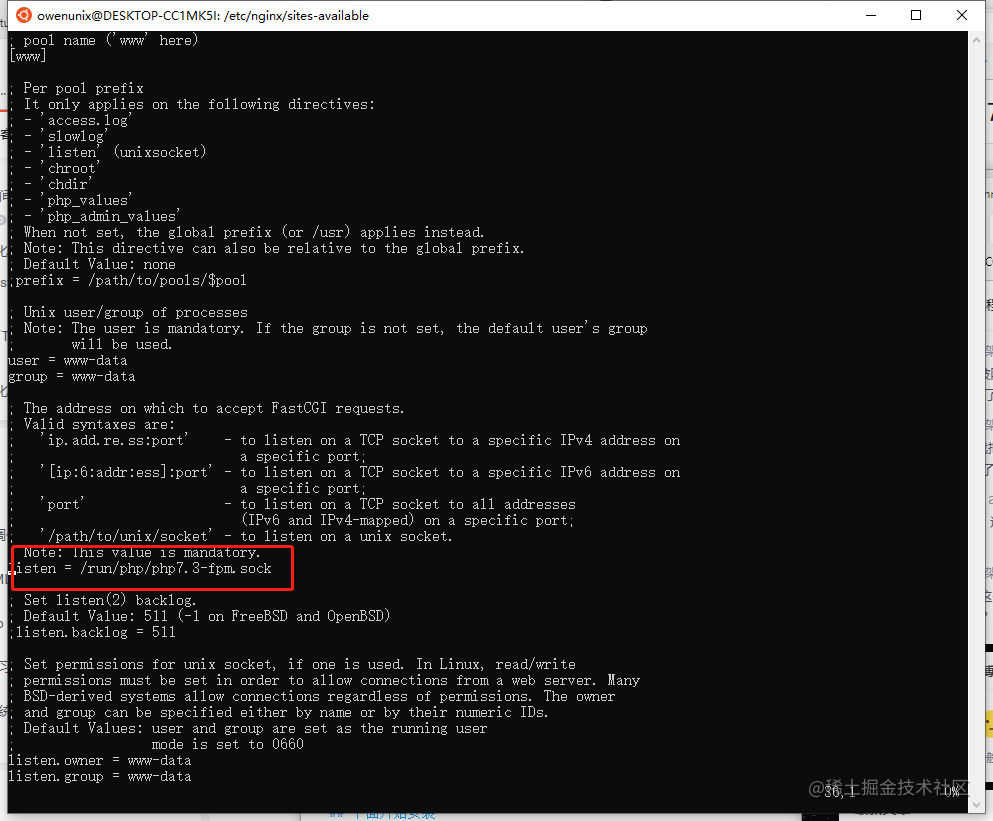
Modify the notes and 7.4 in the file to 7.3 and path, as shown in the following figure
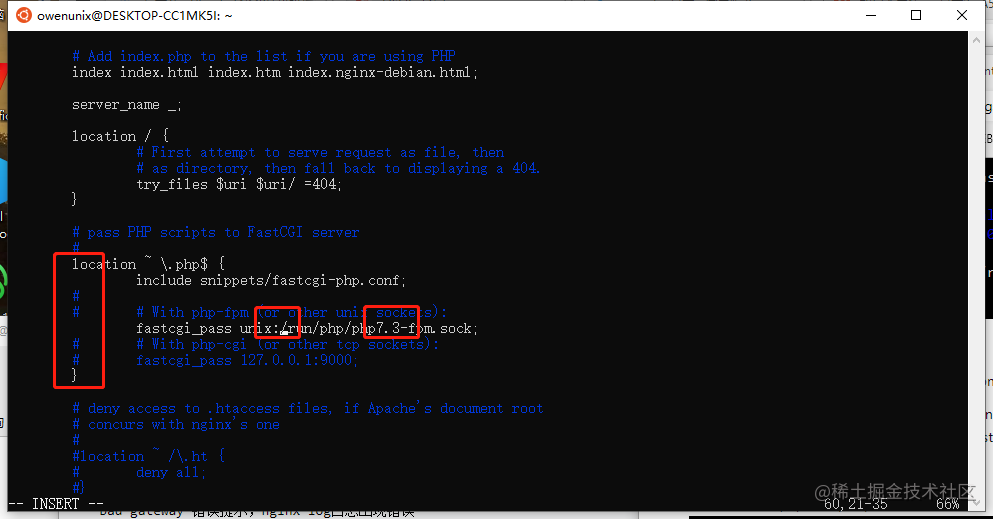
php7.3-fpm startup failed
Note: we installed php7 3, but the default value in nginx is php7 4-fpm. sock. If they are inconsistent, the PHP page cannot be parsed, and a 502 bad gateway error prompt appears in nginx, and an error appears in nginx log
sudo cat /var/log/nginx/access.log

192.168.10.85 - - [07/Jan/2022:11:08:24 +0800] "GET /test.php HTTP/1.1" 502 568 "-" "Mozilla/5.0 (Windows NT 10.0; Win64; x64) AppleWebKit/537.36 (KHTML, like Gecko) Chrome/96.0.4664.110 Safari/537.36 Edg/96.0.1054.62"
Php-fpm INI file
sudo cat /etc/php/7.3/fpm/pool.d/www.conf
Finally, start Nginx and PHP FPM respectively
sudo /etc/init.d/nginx restart
sudo /etc/init.d/php7.3-fpm start
sudo /etc/init.d/php7.3-fpm restart
Test:
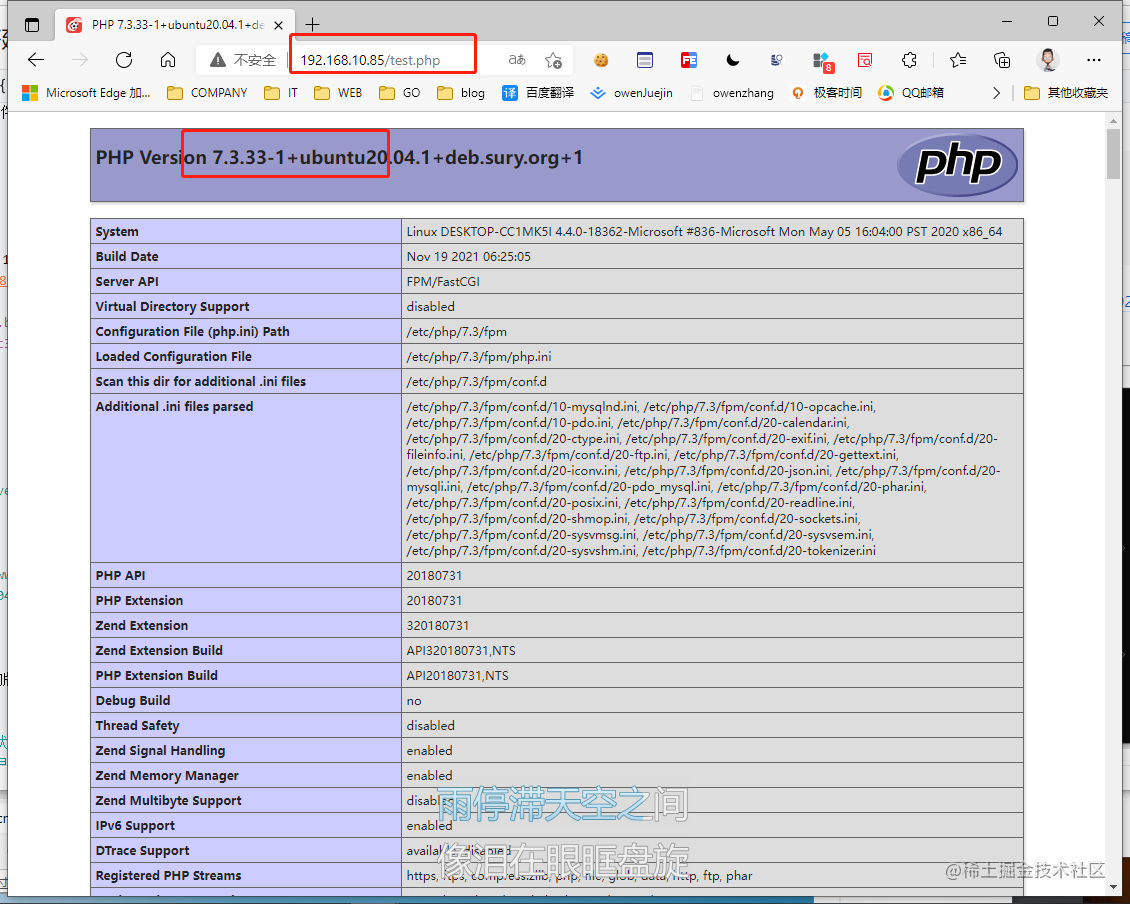
Enter the / var/www/html directory to create the file test php
cd /var/www/html
sudo vim test.php

<?php phpinfo(); ?>
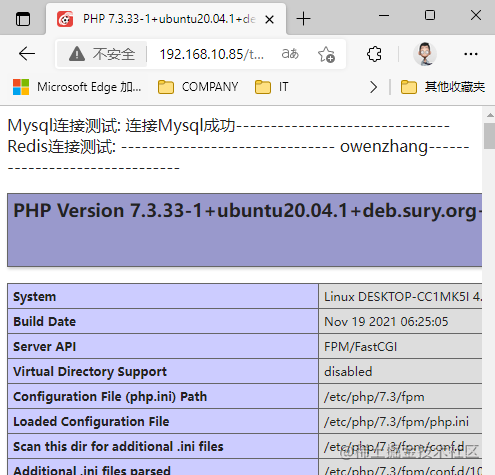
Exit after saving and visit 127.0.0.1/test.com in the browser PHP or access it outside the virtual machine http://192.168.10.85/test.php (192.168.10.85 is the virtual machine ip, enter ifconfig to view the ip)
4, Install MySQL 8 0
command
sudo apt-get install mysql-server mysql-client
View Mysql version
owenunix@DESKTOP-CC1MK5I:/var/www/html$ mysql -V
mysql  Ver 8.0.27-0ubuntu0.20.04.1 for Linux on x86_64 ((Ubuntu))
Start Mysql service
If another version is installed, you need to stop the other version service first, and then restart the 8.0 version service
sudo service mysql start start-up
sudo service mysql status Start state
sudo service mysql enable Automatic startup after startup
sudo service mysql disable Automatic startup is prohibited
sudo service mysql stop stop it
sudo service mysql restart restart
Failed to start Mysql. Problem solved
owenunix@DESKTOP-CC1MK5I:/var/www/html$ sudo service mysql status
 * MySQL is stopped.
owenunix@DESKTOP-CC1MK5I:/var/www/html$ sudo service mysql restart
 * Stopping MySQL database server mysqld
 [ OK ]
 * Starting MySQL database server mysqld
 su: warning: cannot change directory to /nonexistent: No such file or directory
[fail]
su: warning: cannot change directory to /nonexistent: No such file or directory
The solution is as follows:
sudo service mysql stop
sudo usermod -d /var/lib/mysql/ mysql
sudo service mysql start
sudo service mysql restart
Run the command to test whether mysql can run successfully.
mysql -uroot -p Your password
The first installation password should be empty
Modify root password 123456
//Open skip grant tables login without password
sudo service mysql stop
sudo vim /etc/mysql/mysql.conf.d/mysqld.cnf
skip-grant-tables
sudo service mysql restart

//Set login password 123456
mysql -uroot -p
use mysql;
flush privileges;
update mysql.user set authentication_string='', plugin='mysql_native_password' where user='root';
alter user 'root'@'localhost' identified by 'root';
set password for root@localhost = '123456';
flush privileges;
quit;
sudo service mysql restart

//Note no password skip grant tables
sudo service mysql stop
sudo vim /etc/mysql/mysql.conf.d/mysqld.cnf
#skip-grant-tables
sudo service mysql restart
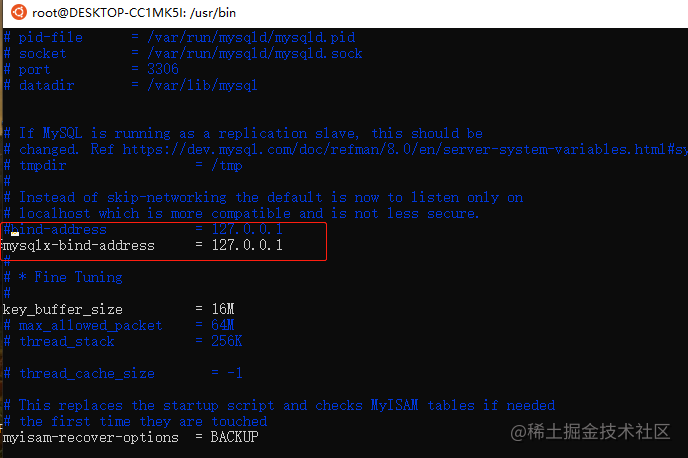
Modify the external network to connect to Mysql
sudo service mysql stop
sudo vim /etc/mysql/mysql.conf.d/mysqld.cnf
 nullify   #bind-address           = 127.0.0.1
sudo service mysql restart
View mysql log
sudo cat /var/log/mysql/error.log
##1130 host is not allowed to connect to this mysql server
5, Install the PHPmysql extension to connect to the database
command
sudo apt-get install php7.3-mysql
Write a program to test it, in the test just written PHP is followed by a section of database connection code (you can use MySQL I or PDO, but don't use mysql, because PHP 7 doesn't support MySQL)
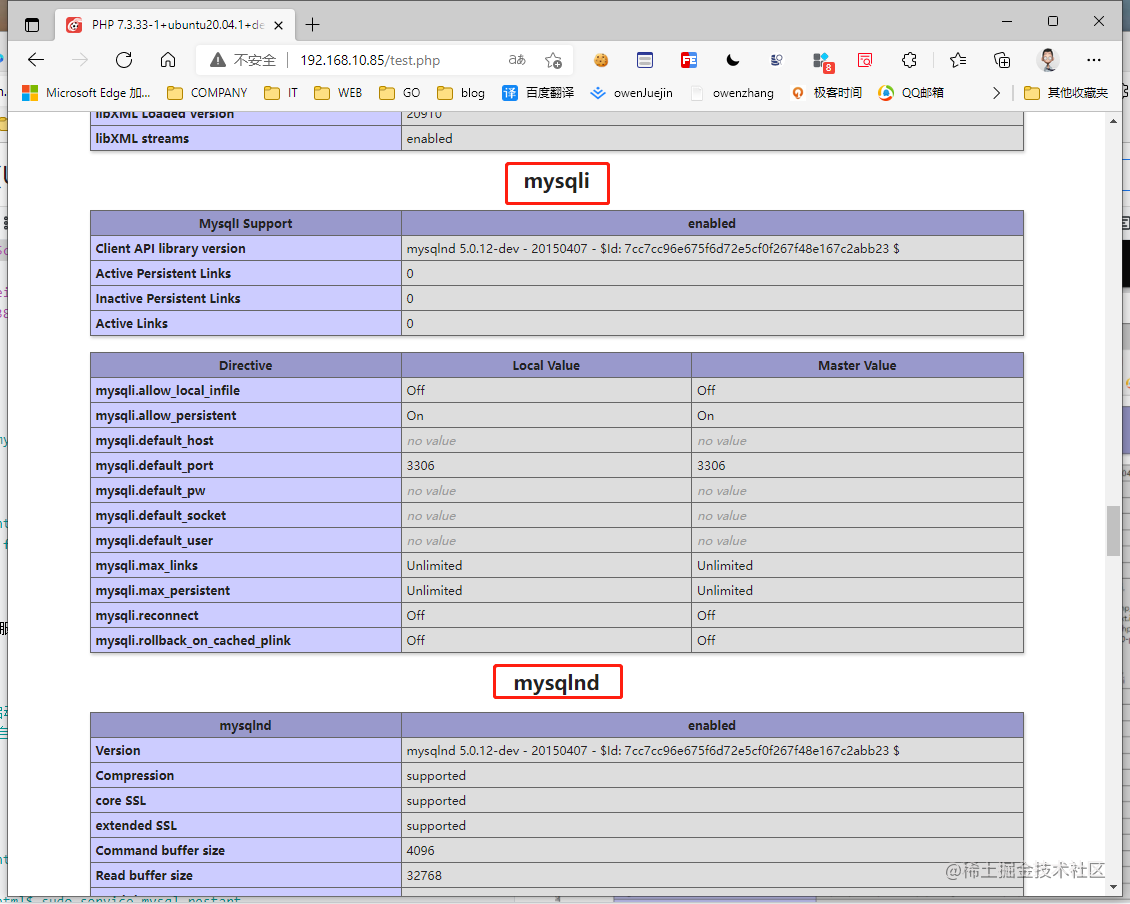
PHP extension test of Mysql
cd /var/www/html
sudo vim test.php
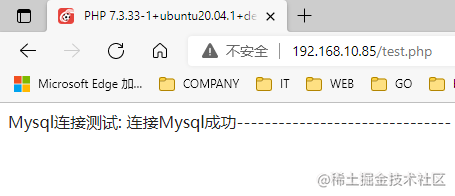
<?php
echo "Mysql Connection test: \n";
$mysql = new mysqli('127.0.0.1', 'root', '123456');
if ($mysql->connect_error) {
echo "connect Mysql fail: " . $mysql->connect_error ;
}else{
echo "connect Mysql success";
}
?>
6, Install redis5 0
command
sudo apt-get update
sudo apt-get install redis-server
View Redis version
owenunix@DESKTOP-CC1MK5I:~$ redis-server -v
Redis server v=5.0.7 sha=00000000:0 malloc=jemalloc-5.2.1 bits=64 build=636cde3b5c7a3923
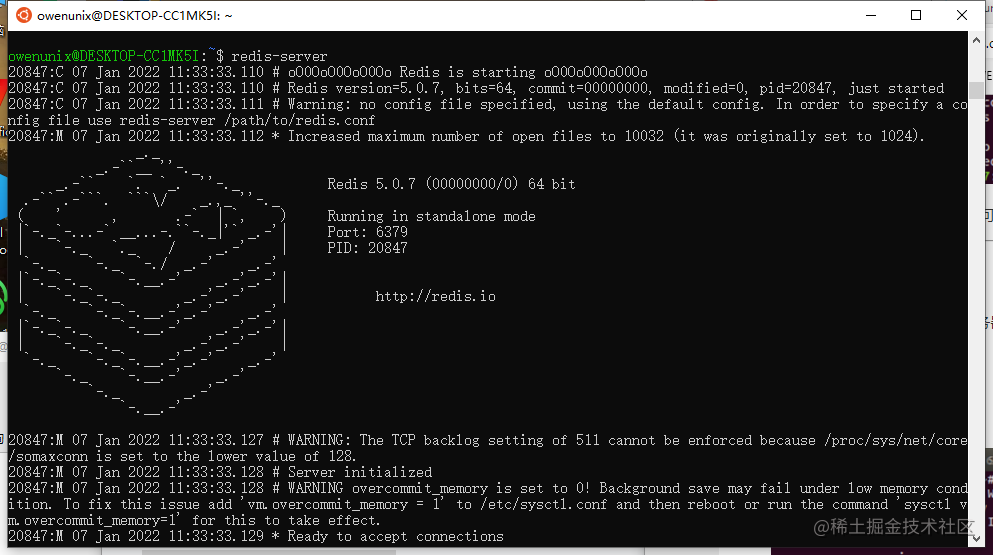
Start Redis server
redis-server
Start Redis client
The redis server is started, so you can start the redis client to communicate between them.
redis-cli

7, Install PHPredis extension to connect to Redis database
command
sudo apt-get install php7.3-redis
View and install php related packages
dpkg -l | grep 'php'

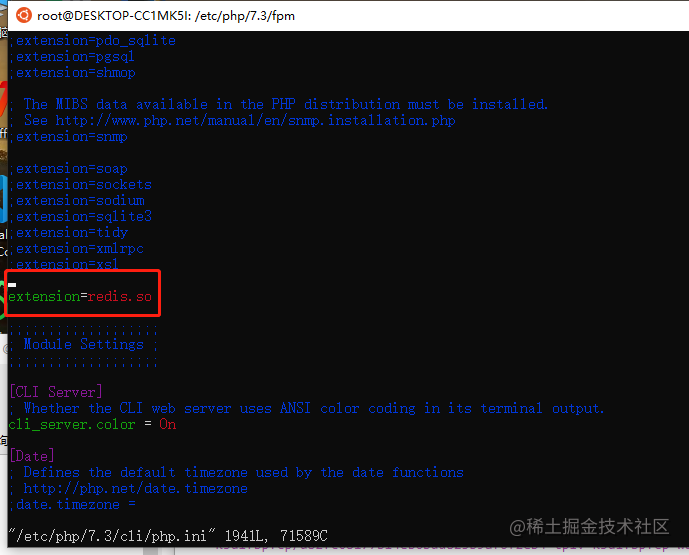
php.ini add extension file
sudo vim /etc/php/7.3/cli/php.ini

extension=redis.so
View php installed extensions
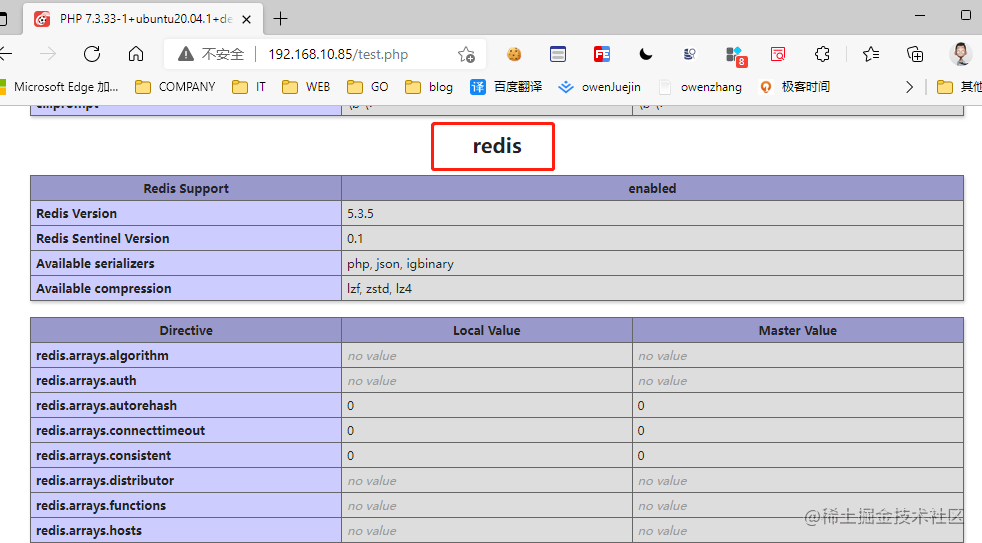
php -m
php -m | grep redis
redis
root@DESKTOP-CC1MK5I:/home/owenunix#
Restart php service
sudo /etc/init.d/nginx restart
sudo /etc/init.d/php7.3-fpm start
sudo /etc/init.d/php7.3-fpm restart
Redis PHP extension test
cd /var/www/html
sudo vim test.php


<?php

echo "Mysql Connection test: \n";
$mysql = new mysqli('127.0.0.1', 'root', '123456');
if ($mysql->connect_error) {
    echo "connect Mysql fail: " . $mysql->connect_error ;
}else{
    echo "connect Mysql success";
}

echo "-------------------------------\n";

echo "Redis Connection test: \n";
$redis = new Redis();
$redis->connect('127.0.0.1',6379);
$redis->set('owenkey2','owenzhang',60);
echo $redis->get('owenkey1');

echo "-------------------------------\n";
echo $redis->get('owenkey2');

echo "-------------------------------\n";

phpinfo();

?>