What is server-side rendering
Server Side Render (abbreviated as ssr) is a page rendering method that directly returns the rendered content from the server to the client.
Benefits of server-side rendering
- Fast first screen rendering
- Conducive to SEO
The process of server-side rendering
- When the client initiates a request, the server returns to the client by reading the file template and obtaining asynchronous data, combined with generating the first screen rendering content of the client.
- After receiving the returned content, the client directly renders the returned results, and then activates the client rendering. Take Vue as an example, that is, re render the Vue instance with $mount. Since the Vue instance has been mounted, there is no need to re render the DOM. Only the Vue instance will be generated on the client and the data will be changed into responsive data.
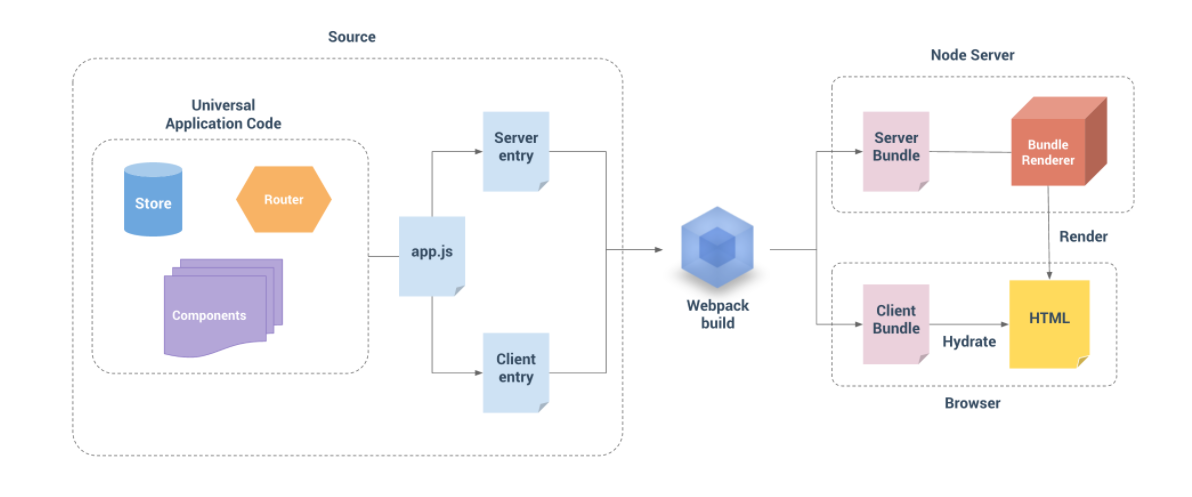
Construction process of server-side rendering
According to the process of server-side rendering, the construction of server-side rendering will have two entrances, the entrance of client-side rendering and the entrance of server-side rendering. After packaging, the portal bundle of client and server will also be generated correspondingly JS, when the rendering is triggered, execute the corresponding bundle js. The specific construction process is as follows:
Build from scratch
Basic structure of server-side rendering
-
Initialize package. In an empty folder JSON, create src file directory to store source files.
-
Installation dependency
- Production dependency:
- vue: vue.js
- vue server renderer: vue server renderer
- express: help generate web server
- Cross env: set the global environment across platforms
- Development dependency:
- Webpack packaging dependencies: webpack, webpack cli, webpack merge (merging webpack configuration), webpack node externals (excluding node modules in wbepack), friendly errors webpack plugin (packaging log friendly output).
- babel transformation related: babel loader, @ babel/core, @ babel / plugin transform runtime, @ babel / preset env.
- vue conversion related: vue loader, vue template compiler
- css and file conversion: css loader, filer loader, URL loader.
- Production dependency:
-
Create Vue instance template app in src Vue and portal template file app js.
/* App.vue */
<template>
  <div id="app">

  </div>
</template>

<script>
export default {

}
</script>

<style>

</style>
/* app.js */ /** * Generate Vue instances */ import Vue from 'vue' import App from './App' export function createApp() { const app = new Vue({ render: h => h(App) }) return { app } } -
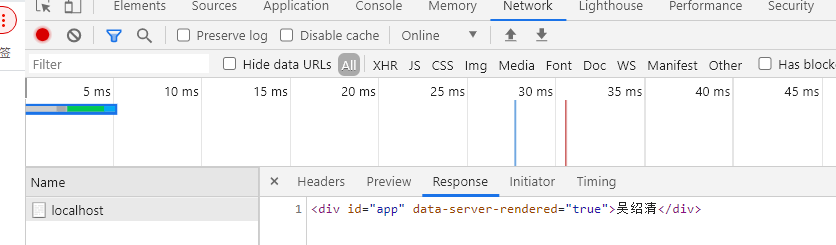
Create a server under the root directory JS, which is used to start the web service and send the content rendered by the server to the client.
// server.js // Create Vue instance const Vue = require('vue') const app = new Vue({ template: `<div id="app">{{ title }}</div>`, data() { return { title: 'Wu Shaoqing' } } }) // Create renderer const renderer = require('vue-server-renderer').createRenderer() // Create server object const server = require('express')() server.get('/', (req, res) => { res.setHeader('Content-Type', 'text/html;charset=utf-8') // Set the encoding format of the returned content. Otherwise, it is garbled // Render Vue instances as HTML strings renderer.renderToString(app, (err, html) => { if (err) return res.status(500).end(err) console.log(html); res.end(html) }) }) server.listen(8000) -
Through node server JS to start the web server and access http://localhost:8000/ You can see the content rendered by the server. In this case, the html string content of the template is returned directly.
-
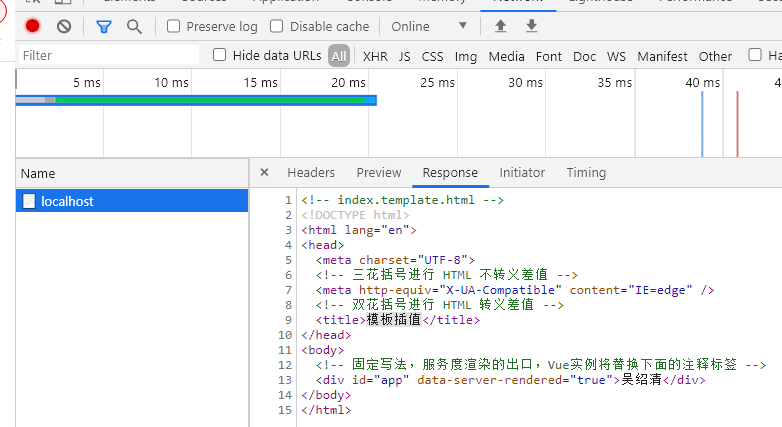
Set the template for the renderer. You need to create a template file index template. html. When you pass in the renderer, then read and. And pass in the data object as the second parameter when renderToString.
<!-- index.template.html -->
<!DOCTYPE html>
<html lang="en">
<head>
  <meta charset="UTF-8">
  <!-- Three curly braces HTML Non escape difference -->
  {{{ meta }}}
  <!-- Double curly braces HTML Escape difference -->
  <title>{{ title }}</title>
</head>
<body>
  <!-- Fixed writing, the exit of service rendering, Vue The instance will replace the annotation label below -->
  <!--vue-ssr-outlet-->
</body>
</html>
//server.js modification // Create renderer const renderer = require('vue-server-renderer').createRenderer({ template: require('fs').readFileSync('./index.template.html', 'utf-8') }) // Create server object const server = require('express')() server.get('/', (req, res) => { res.setHeader('Content-Type', 'text/html;charset=utf-8') // Set the encoding format of the returned content. Otherwise, it is garbled // Render Vue instances as HTML strings renderer.renderToString(app, { title: 'Template interpolation', meta: `<meta http-equiv="X-UA-Compatible" content="IE=edge" />` }, (err, html) => { if (err) return res.status(500).end(err) res.end(html) }) }) -
After starting the server, access http://localhost:8000/ , the combination result of template and data will be returned
Package build settings
-
Create entry client. In src directory JS and entry server JS file, as the portal file packaged by the client and server.
// entry-client.js
/**
 * Client render portal
 */
import createApp from './app'

const { app } = createApp()

// Render Vue instance in div with id app
app.$mount('#app')
// entry-server.js import createApp from './app' export default context => { const { app } = createApp() return app } -
Create the packaging configuration file webpack base. config. JS as a public packaging configuration, webpack client. config. JS as the client packaging configuration, webpack server. config. JS is packaged and configured as a server.
// webpack.base.config.js
const path = require('path')
const VueLoaderPlugin = require('vue-loader/lib/plugin')
const FriendlyErrorsWebpackPlugin = require('friendly-errors-webpack-plugin')

const resolve = file => path.resolve(__dirname, file)
const isProd = process.env.NODE_ENV === 'production'

const devToolOption = {}

if (!isProd) {
  devToolOption.devtool = 'cheap-module-eval-source-map'
}

module.exports = {
  mode: isProd ? 'production' : 'development',
  output: {
    path: resolve('../dist/'),
    publicPath: '/dist/',
    filename: '[name].[chunkhash].js'
  },
  resolve: {
    alias: {
      '@': resolve('../src/')
    },
    extensions: ['.js', '.vue', '.json']
  },
  ...devToolOption,
  module: {
    rules: [
      // Processing image resources
      {
        test: /\.(png|jpg|gif)$/i,
        use: {
          loader: 'url-loader',
          options: {
            limit: 8192
          }
        }
      },
      // Processing font resources
      {
        test: /\.(woff|woff2|eot|ttf|otf)$/,
        use: [ 'file-loader', ],
      },
      // handle. vue resources
      {
        test: /\.vue$/,
        loader: 'vue-loader'
      },
      // Handling CSS resources
      // It will be applied to ordinary css ` file
      // And ` ` < style > ` block in vue ` file
      {
        test: /\.css$/,
        use: [ 'vue-style-loader', 'css-loader' ]
      }
    ]
  },
  plugins: [
    new VueLoaderPlugin(),
    new FriendlyErrorsWebpackPlugin()
  ]
}
// webpack.client.config.js const { merge } = require('webpack-merge') const VueSSRClientPlugin = require('vue-server-renderer/client-plugin') const common = require('./webpack.base.config') module.exports = merge(common, { entry: { app: './src/entry-client.js' // Client packaging portal }, module: { rules: [ { test: /\.m?js$/, exclude: /node_modules/, use: { loader: 'babel-loader', options: { presets: ['@babel/preset-env'], cacheDirectory: true, plugins: ['@babel/plugin-transform-runtime'] } } } ] }, // Packaging Optimization: separate the webpack runtime into a boot chunk, // So that asynchronous chunk s can be injected correctly later. optimization: { splitChunks: { name: 'manifest', minChunks: Infinity } }, plugins: [ // Generate Vue SSR client manifest in the output directory json new VueSSRClientPlugin() ] })// webpack.server.config.js const { merge } = require('webpack-merge') const nodeExternals = require('webpack-node-externals') const VueSSRServerPlugin = require('vue-server-renderer/server-plugin') const common = require('./webpack.base.config') const serverConfig = merge(common, { entry: './src/entry-server.js', // Server packaging entry // This allows the webpack to handle module loading in a Node appropriate manner // And when compiling Vue components, // Tell 'Vue loader' to transport server oriented code. target: 'node', output: { filename: 'server-bundle.js', // Here, tell the server bundle to use Node style exports libraryTarget: 'commonjs2' }, // Do not pack node_modules is a third-party package, which is loaded directly in the require d mode externals: [ nodeExternals({ // The resources in the white list are still packaged normally allowlist: [/\.css$/] }) ], plugins: [ // This is a plug-in that builds the entire output of the server into a single JSON file// The default file name is ` Vue SSR server bundle json` new VueSSRServerPlugin() ] }) module.exports = serverConfig -
Modify server JS to generate a renderer through the createbundlerender, which is responsible for outputting the server rendering results and activating the client rendering on the client.
// File packaged at the server entrance const serverBundle = require('./dist/vue-ssr-server-bundle.json') // template file const template = require('fs').readFileSync('./index.template.html', 'utf-8') // Files packaged by the client portal const clientManifest = require('./dist/vue-ssr-client-manifest.json') // Create renderer const renderer = require('vue-server-renderer').createBundleRenderer(serverBundle, { template, clientManifest }) -
package. Configuration commands in JSON
"scripts": {
  "build:client": "cross-env NODE_ENV=production webpack --config build/webpack.client.config.js",
   "build:server": "cross-env NODE_ENV=production webpack --config build/webpack.server.config.js",
   "build": "rimraf dist && yarn build:client && yarn build:server",
   "start": "cross-env NODE_ENV=production node server.js",
   "dev": "node server.js"
},
Construction and optimization of development mode
The purpose of development mode is to facilitate some functions during development, such as hot update, SourceMap, etc. To realize the hot update of ssr, we need to re execute the rendering process of ssr after the file is updated.
-
First of all, we should distinguish between development mode and production mode, and make special treatment for services under development mode.
-
In the development mode, you need to monitor the file modification, then repackage and generate template, serverBundle and clientMannifest, and then call createbundlerender to generate a new renderer. Then, when returning the rendering result of the server through the renderer, you need to wait for the renderer to generate before using it.
- Consider encapsulating the process of repackaging to generate renderer as a Promise, and determine whether the whole process is completed through the state of Promise.
// server.js modification
// Create server object
const express = require('express')
const server = express()

const { createBundleRenderer } = require('vue-server-renderer')

const setupDevServer = require('./build/setup-dev-server')
const isProd = process.env.NODE_ENV === 'production'
let devServerReady
let renderer

if (isProd) {
  // File packaged at the server entrance
  const serverBundle = require('./dist/vue-ssr-server-bundle.json')
  // template file
  const template = require('fs').readFileSync('./index.template.html', 'utf-8')
  // Files packaged by the client portal
  const clientManifest = require('./dist/vue-ssr-client-manifest.json')
  // Create renderer
  renderer = createBundleRenderer(serverBundle, {
    template,
    clientManifest
  })
} else {
   // Monitor file modification in development mode - > repackage to generate file - > read file again to generate renderer
  // setupDevServer returns a Promise so that its status can be obtained externally through the Promise
  devServerReady = setupDevServer(server, (serverBundle, template, clientManifest) => {
    // Create renderer
    renderer = createBundleRenderer(serverBundle, {
      template,
      clientManifest
    })
  })
}

const render = async (req, res) => {
  // Handling static resource access to physical disks
  server.use('/dist', express.static('./dist'))
  try {
    const html = await renderer.renderToString({
      title: 'Wu Shaoqing',
      meta: `<meta http-equiv="X-UA-Compatible" content="IE=edge" />`,
    })
    res.setHeader('Content-Type', 'text/html;charset=utf-8') // Set the encoding format of the returned content. Otherwise, it is garbled
    res.end(html)
  } catch(e) {
    return res.status(500).end(e)
  }
}


server.get('*', isProd ? render : async (req, res) => {
  await devServerReady // The development environment needs to wait for the renderer to generate before calling render
  render(req, res)
})
// setupDevServer const fs = require('fs') const path = require('path') const chokidar = require('chokidar') const webpack = require('webpack') const webpackDevMiddleware = require('webpack-dev-middleware') const hotMiddleware = require('webpack-hot-middleware') const resolve = file => path.resolve(__dirname, file) module.exports = function setupDevServer(server, cb) { let ready const p = new Promise(res => ready = res) let serverBundle let template let clientManifest const update = () => { // After all three files are generated, the renderer can be regenerated if (serverBundle && template && clientManifest) { ready() // Call the resolve method to change the Promise state cb(serverBundle, template, clientManifest) } } // Monitor the changes of the template file and rebuild the template - > call update to update the renderer // Read the template file and build the template. After the file is updated, re read the template file and build the template const templatePath = resolve('../index.template.html') template = fs.readFileSync(templatePath, 'utf-8') // Monitor resource changes, using chokidar, based on FS watch fs. watchFile chokidar.watch(templatePath).on('change', () => { template = fs.readFileSync(templatePath, 'utf-8') update() }) // Monitor serverBundle file changes and rebuild serverBundle - > call update to update renderer // Building a serverBundle requires webpack packaging const serverConfig = require('./webpack.server.config') const serverCompiler = webpack(serverConfig) // webpackDevMiddleware will store the packaged files in memory and automatically run in monitoring mode without manually monitoring the changes of files through watch const serverDevMiddlerware = webpackDevMiddleware(serverCompiler) // Register a plug-in. After each build, read the build results in memory and generate serverBundle serverCompiler.hooks.done.tap('server', () => { // Reading the packaged result from memory requires the return value of webpackDevMiddleware serverDevMiddleware. context. The outputfilesystem is the same as the fs module of the node file system, and the read file address does not need to be changed const serverCompilerResult = serverDevMiddlerware.context.outputFileSystem.readFileSync(resolve('../dist/vue-ssr-server-bundle.json'), 'utf-8') // When reading the result string, it needs to be converted from js code serverBundle = JSON.parse(serverCompilerResult) update() }) // Monitor the changes of the clientManifest file and rebuild the clientManifest - > call update to update the renderer // The packaging of clientManifest is similar to that of serverBundle. Both of them need to be packaged by webpack const clientConfig = require('./webpack.client.config') // Add hot update configuration\ // 1. Add HotModuleReplacementPlugin plug-in clientConfig.plugins.push(new webpack.HotModuleReplacementPlugin()) // 2. Modify the entry and add webpack hot Middleware / client to the front of the entry array clientConfig.entry.app = [ 'webpack-hot-middleware/client?quiet=true&reload=true', clientConfig.entry.app ] // 3. Remove output chunk and webpack hot Middleware in filename need to ensure that the file names output each time are consistent. clientConfig.output.filename = '[name].js' const clientComparer = webpack(clientConfig) // Monitoring clientManifest packaging using webpack dev Middleware const clientDevMiddleware = webpackDevMiddleware(clientComparer, { publicPath: clientConfig.output.publicPath }) // Register the plug-in and execute the callback after the client file is packaged clientComparer.hooks.done.tap('client', () => { // Read the result after clientManifest package and rebuild it, then call update. clientManifest = JSON.parse( clientDevMiddleware.context.outputFileSystem.readFileSync(resolve('../dist/vue-ssr-client-manifest.json'), 'utf-8') ) update() }) // 3. Mount the plug-in in the server server.use(hotMiddleware(clientComparer, { log: false ,// Turn off the log output of hotMiddleware itself })) // Mount the clientDevMiddleware into the Express service to provide access to the data in its internal memory server.use(clientDevMiddleware) return p } -
Run the command line yarn dev to enter the development mode. After the file is modified, it will be repackaged and compiled.
SSR routing processing
Route processing using Vue router
-
Install Vue router dependency and create router / index JS file and export a function to create router.
// router/index.js import Vue from 'vue' import Router from 'vue-router' import Home from '@/pages/home.vue' Vue.use(Router) export default function createRouter () { return new Router({ mode: 'history', // Most servers do not support hash mode routing, and the front and back ends of history mode support better routes: [ { name: 'home', path: '/', component: Home }, { name: 'about', path: '/about', component: () => import('@/pages/about.vue') }, { name: 'post', path: '/post', component: () => import('@/pages/post.vue') }, { name: '404', path: '*', component: () => import('@/pages/404.vue') } ] }) } -
In Src / APP JS, and inject the router instance into the root Vue instance.
// src/app.js export default function createApp() { const router = createRouter() const app = new Vue({ router, render: h => h(App) }) return { router, app } } -
Modify server JS, execute render When rendertostring, req When the url is passed in, the subsequent server-side entry file needs to set the route of the router according to the requested url.
const html = await renderer.renderToString({ title: 'Wu Shaoqing', meta: `<meta http-equiv="X-UA-Compatible" content="IE=edge" />`, url: req.url }) -
Modify entry server JS, wait for the router to finish parsing the possible asynchronous components and hooks, and then return to the vue instance
// entry-server.js import createApp from './app' export default async context => { const { app, router } = createApp() // Set the router location on the server side router.push(context.url) // Wait for the router to parse the possible asynchronous components and hooks await new Promise(router.onReady.bind(router)) return app } -
Modify entry client JS, wait until the route is ready, render the Vue instance into the element with id app
// entry-client.js
/**
 * Client render portal
 */
import createApp from './app'

const { app, router } = createApp()

// After waiting for the route to be prepared, render the Vue instance into the element with id app
router.onReady(() => {
  // Render Vue instance in div with id app
  app.$mount('#app')
})
SSR page Head management
Page head management is to manage the contents of the head tag in the page. On the server side, you can use this$ Ssrcontext to access or set. On the client side, it is set through document. Let's first look at an official recommended practice, which is implemented by mixin.
-
First create Src / mixins / Title mixin JS file, export a titleMixin, and set the title in different ways according to different rendering ends.
// title-mixin.js function getTitle(vm) { // The component can provide a 'title' option // This option can be a string or a function const { title } = vm.$options if (title) { return typeof title === 'function' ? title.call(vm) : title } } const serverTitleMixin = { created() { const title = getTitle(this) if (title) { this.$ssrContext.title = title } } } const clientTitleMixin = { mounted() { const title = getTitle(this) if (title) { document.title = title } } } export default process.env.VUE_ENV === 'server' ? serverTitleMixin : clientTitleMixin -
Modify package JSON to set the global VUE_ENV environment variable.
"scripts": { "build:client": "cross-env NODE_ENV=production webpack --config build/webpack.client.config.js", "build:server": "cross-env NODE_ENV=production VUE_ENV=server webpack --config build/webpack.server.config.js", "build": "rimraf dist && yarn build:client && yarn build:server", "start": "cross-env NODE_ENV=production node server.js", "dev": "nodemon server.js" }, -
Add the title attribute in the specific page component.
<script> export default { title: 'Home', name: 'HomePage' } </script> -
Start the project, visit the page, and the title of the page component setting will appear in the label bar of the browser.
In addition to the above methods, you can also use the third-party plug-in Vue meta to implement.
-
Install Vue meta and install it in Src / APP JS, and then define a global mixin to set a metainfo for all Vue instances Titletemplate property to set the template of the title.
import VueMeta from 'vue-meta'; // Register plug-ins Vue.use(VueMeta) Vue.mixin({ metaInfo: { titleTemplate: '%s - wsq' } }) -
Set metainfo. In the page component Title attribute. The value of the title attribute will replace% s in the template and finally appear in the label bar.
export default {
  // title: 'About',
  metaInfo: {
    title: 'About'
  },
  name: 'AboutPage'
}
SSR data prefetching and status management
The data state of the server and the client should be consistent, otherwise the mixing will fail and the rendering result will be wrong.

Vuex is used to realize the consistency of data state between server and client.
-
Install Vuex and create Store / index JS file, register the plug-in, and export a function to create a Store instance.
// store/index.js import Vuex from 'vuex' import axios from 'axios' import Vue from 'vue' Vue.use(Vuex) export default function createStore() { return new Vuex.Store({ state: { posts: [] }, mutations: { savePosts(state, payload) { state.posts = payload } }, actions: { async getPosts({ commit }) { const { data } = await axios({ url: 'https://cnodejs.org/api/v1/topics', method: 'GET' }) commit('savePosts', data.data) } } }) } -
Modify Src / APP JS, inject the Store instance into the root Vue instance
// src/app.js export default function createApp() { const router = createRouter() const store = createStore() const app = new Vue({ router, store, render: h => h(App) }) return { store, router, app } } -
Modify entry server JS, define context The rendered method will be called after the render of the service end, and store. will be used in the method. Save state to context state. context. The state data will be inlined into the page template. The final page sent to the client will contain a script: window__ INITIAL_ STATE__ = context.state. The client will window__ INITIAL_ STATE__ Take it out and fill it into the client store container.
// It will be called after the rendering of the server, and the rendered state data of the server can be obtained inside the function context.rendered = () => { // rendered will put context Inline the state data object into the page template // The final page sent to the client will contain a script: window__ INITIAL_ STATE__ = context. state // The client will window__ INITIAL_ STATE__ Take it out and fill it in the client store container context.state = store.state } -
Modify entry client JS, the window__ INITIAL_ STATE__ Fill the store container.
// Synchronize the data set from the entry server to keep the two renderings consistent if(window.__INITIAL_STATE__) { store.replaceState(window.__INITIAL_STATE__) } -
Create Src / pages / post Vue to use the data in the store. Vue provides a special declaration cycle hook serverPrefetch for server render, which is called before the server render, and must be returned to Promise. You can asynchronously acquire data in the action during the lifecycle.
<template>
  <div>
    <ul>
      <li v-for="p in posts" :key="p.id">{{ p.title }}</li>
    </ul>
  </div>
</template>

<script>
import { mapState, mapActions } from 'vuex'

export default {
  metaInfo: {
    title: 'Post'
  },
  name: 'PostPage',
  data() {
    return {}
  },
  computed: {
    ...mapState(['posts'])
  },
  methods: {
    ...mapActions(['getPosts'])
  },
  // Server lifecycle specific lifecycle hooks will be called before rendering and must be returned to Promise.
  serverPrefetch() {
    return this.getPosts()
  }
}
</script>

<style>

</style>
summary
The basic composition of server-side rendering is that the server is responsible for processing and returning the content of the first screen rendering. Then the client takes over the rendering of the page, and finally manages the routing and data status through the plug-in of a third party to ensure the synchronization of routing and data status at both ends.