This article is an explanatory document, which does not teach you to build a background management system from scratch, but based on an actual project, has built a basic framework of the background management system, and teaches you how to quickly develop your own background management system on this basis, so that readers can start vue background development while mastering some basic knowledge. Only by contacting the project can we better understand the meaning of our knowledge and turn the dead knowledge point into a skill to learn and use.
Run first
# Clone project git clone https://Github.com/picture-dev/vue-admin-template.git# enter the directory cd vue-admin-template# installation depends on npm install --registry=https://registry.npm.taobao.org# Run npm run dev
The source code involved in this article is placed in Github[2] In fact, if you think our writing is good, I hope you can give it to me ❤️ This article points to + Github[3] warehouse plus star ❤️ Oh~
Add side navigation
-
Create a new file. In src/views/ Create a new blank folder Test to create a new file in this directory test.vue
-
Add route. open src/router/index.js, which is the background routing configuration file of the project. In the constantRoutes array, the format of adding routes is as follows:
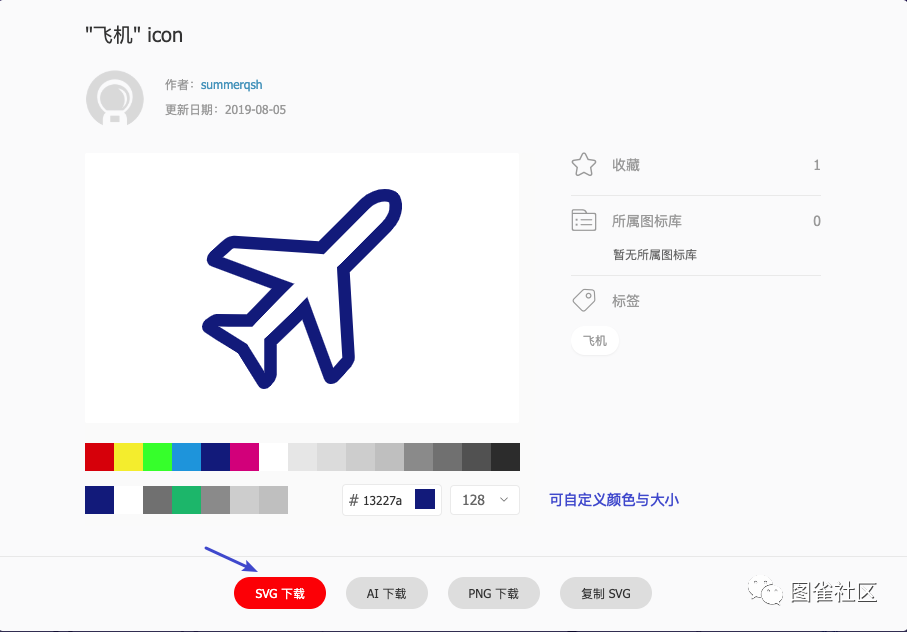
{ path: '/test', //url path component: Layout, / / don't move here. This is a globally unified layout file children: [{path: 'test', / / secondary path name: 'test', component: () = > Import ('@ / views / test / test'), / / lazy loading. Write the path of the added file here. Meta: {Title: 'test', icon:'plane' / / configuration options can configure the test name and icon} }]},We can customize the icon format file, which can be downloaded in iconfont[4], and then put into src/icons/svg Directory
The secondary navigation can be configured as follows.
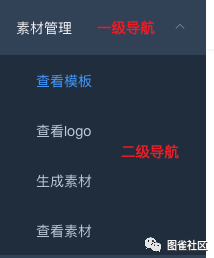
{ path: '/material', component: Layout, redirect: '/material/upload', meta: { title: 'Material management', //Meta information, first level navigation name icon: 'plane' / / meta information, navigation icon name}, children: [{path: 'check template', name: 'check template', component: () = > Import ('@ / views / material / check template'), meta: {title: 'view template',}}, {path: 'logo', name: 'logo', component: () = > Import ('@ / views / material / check logo'), meta: {Title: 'view logo',}}, {path: 'generate', name: 'generate', component: () = > Import ('@ / views / material / generate'), meta: {Title: 'generate material',}} , {path: 'check', name: 'check', component: () = > Import ('@ / views / material / check'), meta: {Title: 'view material',}},]},After this configuration is completed, the framework will automatically generate side navigation entries according to the routing configuration file. All we need to do is write vue components according to business requirements and fill the framework with content.
Using Element UI components
Element UI[5] provides many reusable components, which can fully meet the requirements of general background applications. If the personalized demand is not high, we can be a "copy and paste" engineer, also known as "CV" engineer, for rapid development.
For each component, there are effect examples and code on the document. Just select the required component, paste its code into our code file and modify it slightly.
Network request
When the whole framework is built, the main work of front-end programmers is to initiate requests and render data. Now let's go through this process completely.
Basic configuration
-
Configure the agent.
Because of the problem of cross domain resource requests, in the development stage, all network requests interacting with the back end are represented by node.js at the bottom. Related documents [6]
Open the vue.config.js file in the root directory
// Proxy all network requests starting with '/ admin': {'/ admin': {target:` http://localhost:8886/ `, / / background service address changeorigin: true, pathrewrite: {}}-
Configuration address
Production and development environments usually have different service addresses. edit . env.development as well as . env.production These two files, modify one of them VUE_APP_BASE_API Configuration item
Take the development environment as an example:
VUE_APP_BASE_API = '/admin'
-
Configuring Interceptors
Open src/utils/request.js, which encapsulates an axios request object. All network requests in the system are processed based on this object. We can do some general work before the network request is sent and after receiving the server reply. For example, judge whether the request is normal according to the status code of the server, and give corresponding prompt if it is abnormal.
service.interceptors.response.use( response => { const res = response.data // If the status code of the server is not 200, it indicates that the request is abnormal, and an error prompt shall be given. if (res.code !== 200) { Message({ message: res.msg || 'Error check your token or method', type: 'error', duration: 2 * 1000 }) return Promise.reject(new Error(res.msg || 'Error')) } else { return res } }, error => { console.log('err' + error) // for debug Message( { message: error.message, type: 'error', duration: 2 * 1000 }) return Promise.reject(error) })-
Mount request object
In src/main.js, first import the network request object and mount it to the Vue global object, so that it can be directly referenced in each component without importing again.
import request from '@/utils/request'Vue.prototype.req = request
Request and rendering
-
Build a simple node service
For tutorial instructions only
let http = require('http');let querystring = require('querystring');let my_result = [{    date: '2016-05-02',    name: 'Wang Xiaohu',    address: 'Lane 1518, Jinshajiang Road, Putuo District, Shanghai'}, {    date: '2016-05-04',    name: 'Wang Xiaohu',    address: 'Lane 1517, Jinshajiang Road, Putuo District, Shanghai'}, {    date: '2016-05-01',    name: 'Wang Xiaohu',    address: 'Lane 1519, Jinshajiang Road, Putuo District, Shanghai'}, {    date: '2016-05-03',    name: 'Wang Xiaohu',    address: 'Lane 1516, Jinshajiang Road, Putuo District, Shanghai'}]
let server = http.createServer((req, res) => {    let post = '';    req.on('data', function (chunk) {        post += chunk;    });
req.on('end', function () { res.writeHead(200, { 'Content-Type': 'application/json; charset=utf-8' }) post = querystring.parse(post); console.log('post-data:', post); if (post) { let result = { code: 200, // msg: "server error" data: my_result } res.end(JSON.stringify(result)); } Else {let result = {Code: '0', MSG: 'no data received'} result.end (JSON. Stringify (result));}});}; Server.listen (8886) / / run node server.js on the command line-
Initiate request
this.req({ url: "getInfo?id=6", // Write the URLs corresponding to different businesses here, and the framework will automatically splice them with the base url. Data: {}, method: "get"}). Then (RES = > {/ / processing console.log after the request succeeds ("res:", RES);}, err = > {/ / processing console.log after the request fails ("err:", ERR);});According to the best practice, the network requests should be uniformly separated into a single file, and then the server data should be processed on each specific page. For example, in the following form, first create the file src/api/test.js and write all the network requests needed in the test component to this file.
// src/api/test.jsimport request from '@/utils/request'
export function getList(params) {  return request({    url: 'getTableData',    method: 'get',    params  })}
Introduce the request method into the component test.vue
import { getTableData } from "@/api/test.js";......mounted: function() {// Unified processing of network requests gettabledata(). Then (RES = > {console.log ("API tabledata:", RES); this.tabledata = res.data;}, err = > {console.log ("err:", ERR);})// The network request is written directly in the file this.req ({URL: "gettabledata", data: {}, method: "get"}). Then (RES = > {console.log ("tabledata:", RES); this.tabledata = res.data;}, err = > {console.log ("err:", ERR);});},-
Network data flow
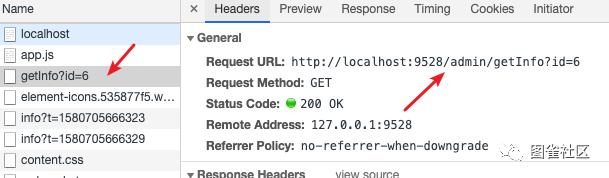
1Uif9H.png
It can be seen from the console that our request address is localhost:9528, while the address of the background service is localhost:8886. Why is it different? We illustrate with a flow chart
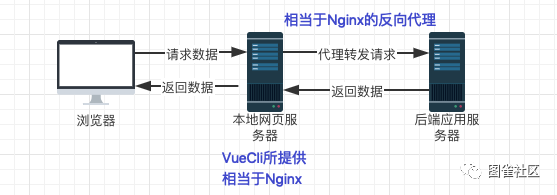
1UFtKI.png
After the application goes online, the problem of CORS cross domain resource access can be solved at the front end with a similar scheme (Nginx reverse proxy).
Hello Table
Now we write a Table data display page in test.vue using the Table component provided by the Element UI.
-
Enter Element UI Copy and paste the corresponding code in the description document of the Table[7] component. The framework has introduced the Element UI globally, so these components are ready to use. For other third-party components, we need to introduce them ourselves before using them.
<template> <el-table :data="tableData" style="width: 100%"> <el-table-column prop="date" label="date" width="180"></el-table-column> <el-table-column prop="name" label="full name" width="180"></el-table-column> <el-table-column prop="address" label="address"></el-table-column> </el-table></template>
-
Request data when component is loaded
mounted: function() { this.req({ url: "getTableData", data: {}, method: "GET" }).then( res => { console.log("tableData :", res); this.tableData = res.data // Data rendering}, err = > {console.log ("err:", ERR); / / process when business logic errors occur});},-
Actual effect
Business logic is normal

168XP1.png
When a business error occurs, the error message given by the server will pop up. The pop-up information is defined in the interceptor request.js file, which is a unified business logic error handling, or can be handled separately in each request.
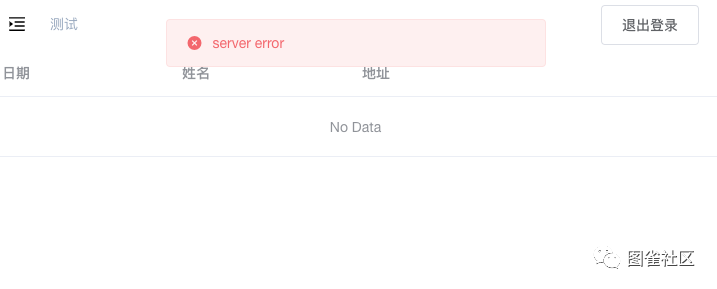
16JiOU.png
Simple authority control
This permission control mode is static, and some complex dynamic permission management are not described here. Every route jump of the framework will check the permissions through router.beforeEach. We can add configuration items here. Enter file src/permission.js, for example, only administrators can enter the user management interface:
if (to.path === '/user/user') { let id = JSON.parse(localStorage.getItem('userInfo')).id console.log(id) if (id > 2) { //ID > 2 ordinary users, not authorized to access next ({path: '/ task'}) window. Alert ('permission denied ')}}epilogue
So far, the most commonly used operations in background development have been introduced, which is more than enough for some small projects. There is no towering pine in the flowerpot, and there is no Qianlima in the courtyard. When the project is written more, a lot of things will be naturally transparent. One thousand readers have one thousand Hamlets. This is just a basic framework. In the process of development, we need to modify it ourselves to make it your most convenient framework.
This item derives from: https://github.com/PanJiaChen/vue-admin-template.git
Want to learn more wonderful practical technical tutorials? Come to Tuque community [8].
The source code involved in this article is placed in Github[9] In fact, if you think our writing is good, I hope you can give it to me ❤️ This article points to + GitHub warehouse plus stars ❤️ oh
reference material
[1]
Bright as stars: https://blog.csdn.net/crxk_
[2]
Github: https://github.com/tuture-dev/vue-admin-template
[3]
Github: https://github.com/tuture-dev/vue-admin-template
[4]
iconfont: https://www.iconfont.cn/
[5]
Element UI: https://element.eleme.cn/#/zh-CN/component/installation
[6]
Related documents: https://cli.vuejs.org/config/#devserver-proxy
[7]
Table: https://element.eleme.cn/#/zh-CN/component/table
[8]
Tuque community: https://tuture.co
[9]
Github: https://github.com/tuture-dev/vue-admin-template