1, Deploying kubernetes with kubedm
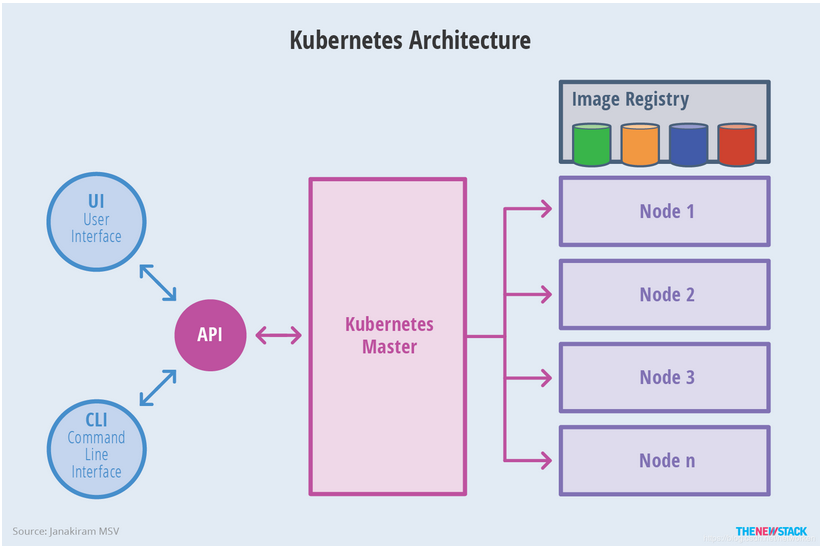
kubernetes node architecture diagram:
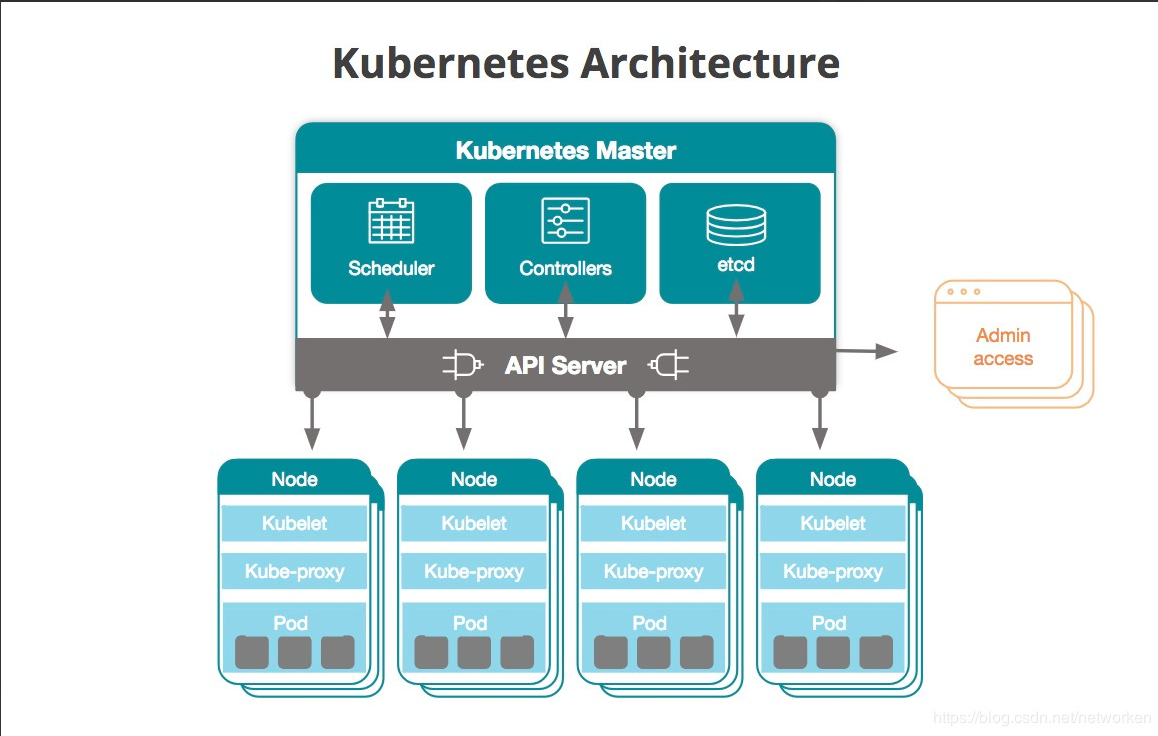
kubernetes component architecture diagram:
1. Prepare the basic environment
We will use kubeadm to deploy the Kubernetes Cluster with three nodes. The node information is as follows:
| host name | IP address | role | OS | assembly | Minimum configuration |
| master | 192.168.139.13 | master | centos7 | kube-apiserver kube-controller-manager kube-scheduler kube-proxy etcd coredns calico | 2C2G |
| node1 | 192.168.139.14 | node1 | centos7 | kube-proxy calico | 2C2G |
| node2 | 192.168.139.15 | node2 | centos7 | kube-proxy calico | 2C2G |
| node3 | 192.168.139.16 | node3 | centos7 | calico kube-proxy | 2C2G |
2. Preparations for system initialization (unless otherwise specified, the following operations must be performed at all nodes)
2.1 modify host name
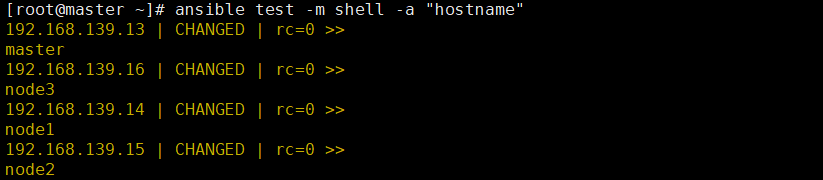
#master node:
hostnamectl set-hostname master
#node1 node:
hostnamectl set-hostname node1
#node2 node:
hostnamectl set-hostname node2
#node3 node:
hostnamectl set-hostname node3
Note: for convenience, you can use ansible to check
2.2 basic configuration
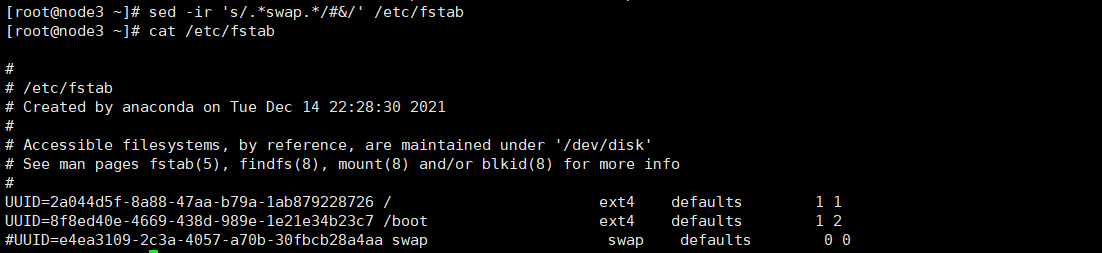
#Modify the / etc/hosts file
cat >> /etc/hosts << EOF
192.168.139.13 master
192.168.139.14 node1
192.168.139.15 node2
192.168.139.16 node3
EOF
#Turn off firewall and selinux
systemctl stop firewalld && systemctl disable firewalld
sed -i 's/^SELINUX=enforcing$/SELINUX=disabled/' /etc/selinux/config && setenforce 0
#Temporarily close swap
swapoff -a
#Permanently close swap
sed -ri 's/.*swap.*/#&/' /etc/fstab
2.3 configuring time synchronization
#Install chrony:
yum install -y chrony
#Note default ntp server
sed -i 's/^server/#&/' /etc/chrony.conf
#Specify the upstream public ntp server and allow other nodes to synchronize time
cat >> /etc/chrony.conf << EOF
server 0.asia.pool.ntp.org iburst
server 1.asia.pool.ntp.org iburst
server 2.asia.pool.ntp.org iburst
server 3.asia.pool.ntp.org iburst
allow all
EOF
#Restart the chronyd service and set it to startup:
systemctl enable chronyd && systemctl restart chronyd
#Enable network time synchronization
timedatectl set-ntp true
2.3.1 node configuration time synchronization
#Install chrony:
yum install -y chrony
#Note default server
sed -i 's/^server/#&/' /etc/chrony.conf
#Specify the intranet master node as the upstream NTP server
echo server 192.168.139.13 iburst >> /etc/chrony.conf
#Restart the service and set it to startup:
systemctl enable chronyd && systemctl restart chronyd
All nodes execute the chronyc sources command to check that there are lines beginning with ^ *, indicating that the time has been synchronized with the server
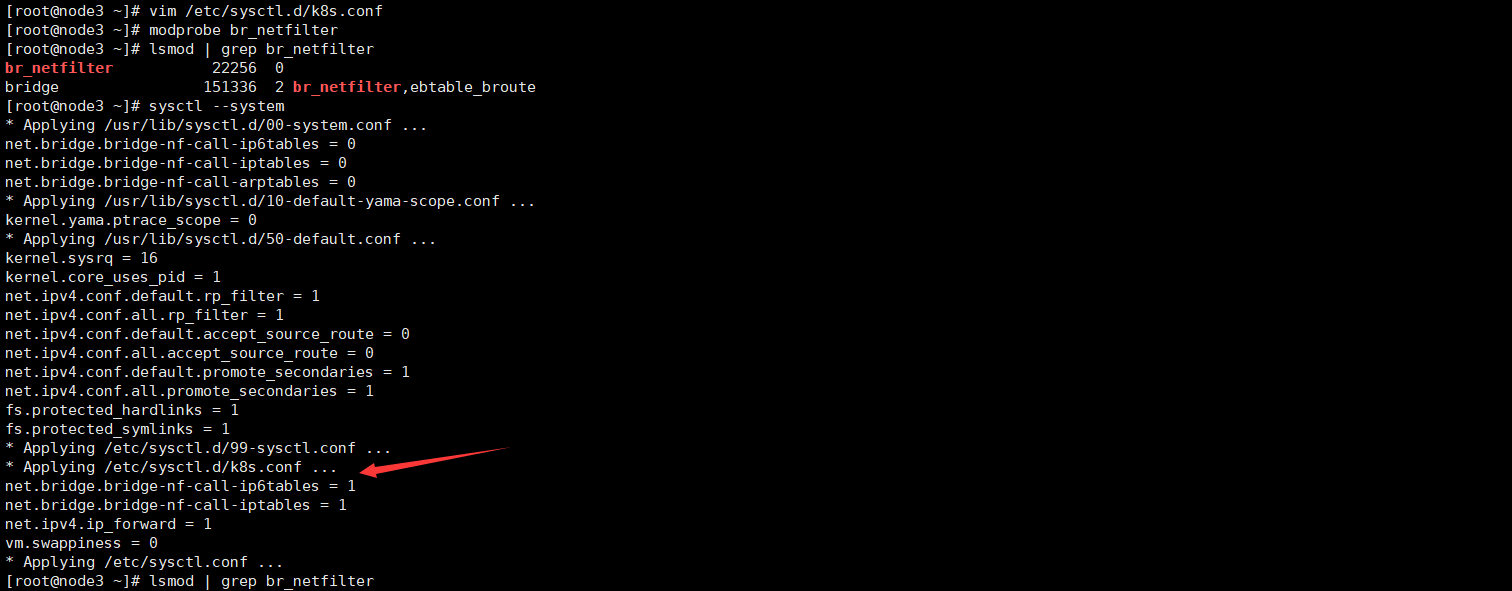
2.4 deliver bridged IPv4 traffic to iptables chain
Because bypassing iptables will lead to incorrect traffic routing, it is necessary to configure the following nodes:
cat > /etc/sysctl.d/k8s.conf << EOF
net.bridge.bridge-nf-call-ip6tables = 1
net.bridge.bridge-nf-call-iptables = 1
net.ipv4.ip_forward = 1
vm.swappiness = 0
EOF
#Load br_netfilter module
modprobe br_netfilter
#Check whether to load
lsmod | grep br_netfilter
#take effect
sysctl --system
2.5 loading ipvs related modules
To facilitate viewing the proxy rules of ipvs, install ipvs and ipset packages on all nodes
yum install -y ipvs ipset
Since ipvs has been added to the backbone of the kernel, the following kernel modules need to be loaded before starting ipvs for Kube proxy:
Execute the following script on all Kubernetes nodes:
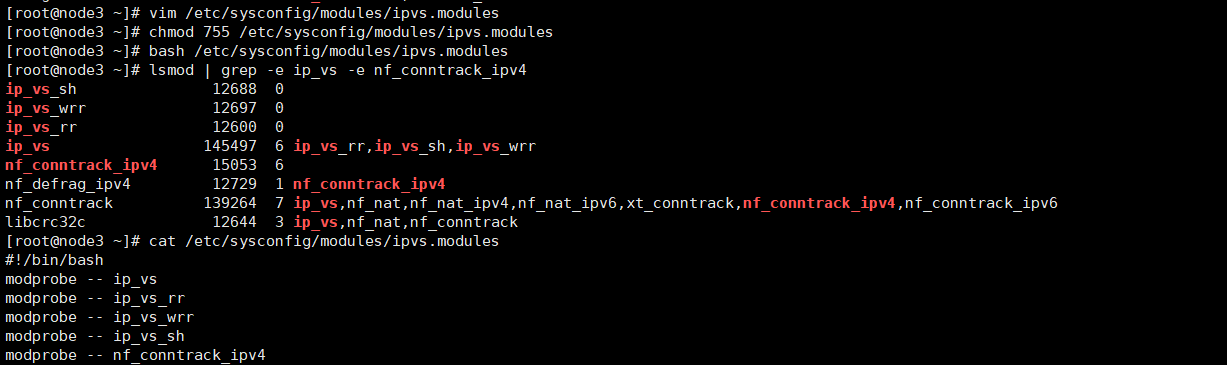
cat > /etc/sysconfig/modules/ipvs.modules <<EOF
#!/bin/bash
modprobe -- ip_vs
modprobe -- ip_vs_rr
modprobe -- ip_vs_wrr
modprobe -- ip_vs_sh
modprobe -- nf_conntrack_ipv4
EOF
#Execute script
chmod 755 /etc/sysconfig/modules/ipvs.modules && bash /etc/sysconfig/modules/ipvs.modules && lsmod | grep -e ip_vs -e nf_conntrack_ipv4
The above script creates / etc / sysconfig / modules / IPVS Modules file to ensure that the required modules can be loaded automatically after the node is restarted. Use lsmod | grep - e IP_ vs -e nf_ conntrack_ The IPv4 command checks to see if the required kernel modules have been loaded correctly.
3, Install k8s service package
The default container runtime of Kubernetes is still docker, which uses the built-in dockership CRI implementation in kubelet. Therefore, you need to install docker on all nodes first
#Configure docker yum source
yum-config-manager --add-repo http://mirrors.aliyun.com/docker-ce/linux/centos/docker-ce.repo
If the following errors occur, you need to install the yum utils installation package:

yum -y install yum-utils

1. Install and start the docker service and set it to startup
yum install -y docker &&systemctl start docker &&docker enable docker
2. Configure docker acceleration and modify the driver
Kubernetes officially suggests that the docker driver adopt systemd, which of course can not be modified, but there will be warning ([warning isdockersystedcheck]: detected "cgroups" as the docker CGroup driver. The recommended driver is "systemd". Please follow the guide at https://kubernetes.io/docs/setup/cri/ )It can be ignored. It is recommended to modify the production environment because it is more stable.
Through docker info, you can see that the default driver of docker installed is cgroupfs
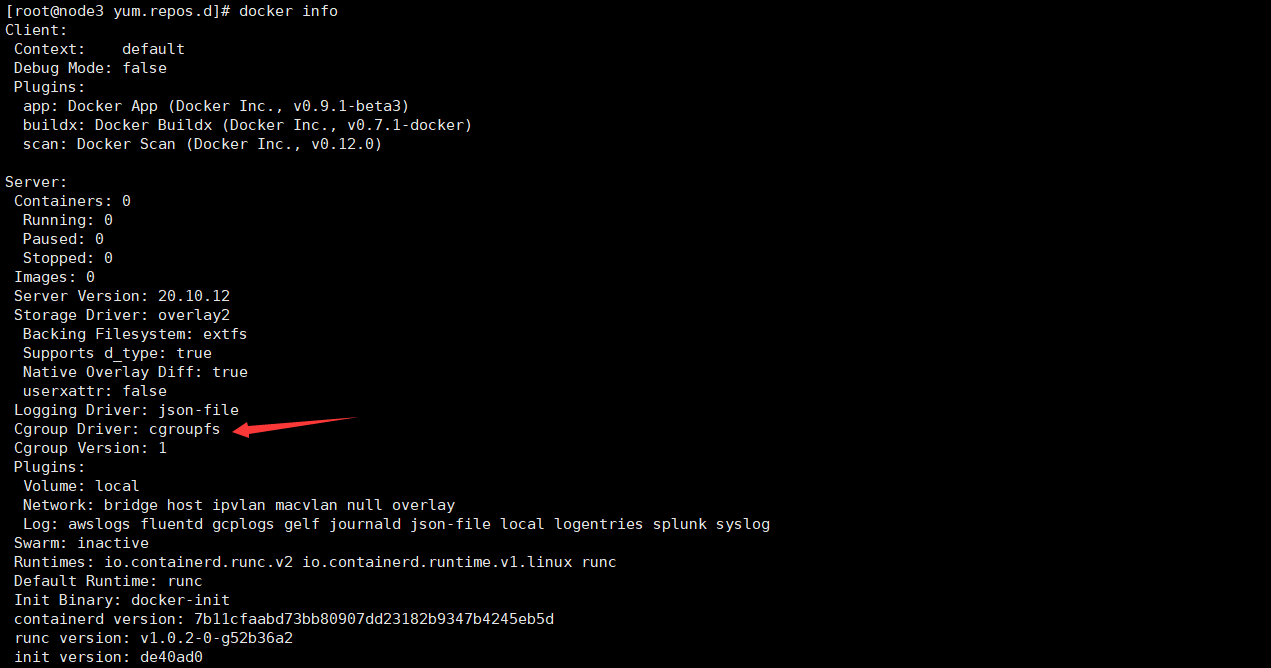
Add the following configuration acceleration on all nodes and drive the modification:

{
"exec-opts":["native.cgroupdriver=systemd"],
"registry-mirrors":["https://bsa5lza7.mirror.aliyuncs.com"]
}
systemctl daemon-reload systemctl restart docker docker info |grep "Cgroup Driver"

Note: it is not clear in the figure above how to configure docker accelerator to access Docker image acceleration rookie tutorial
3. Install kuberentes components
3.1 configuring yum source for kubernetes
1> Kubelet is the core component running on all nodes in the cluster and is used to perform operations such as starting pods and containers.
2> Kubeadm is a command-line tool for booting and starting k8s clusters, which is used to initialize clusters.
3> kubectl is the Kubernetes command line tool. kubectl can deploy and manage applications, view various resources, create, delete and update various components.
#Configure kubernetes The official source of repo cannot be accessed in China. Alibaba cloud yum source is used here
cat <<EOF > /etc/yum.repos.d/kubernetes.repo
[kubernetes]
name=Kubernetes
baseurl=https://mirrors.aliyun.com/kubernetes/yum/repos/kubernetes-el7-x86_64/
enabled=1
gpgcheck=1
repo_gpgcheck=1
gpgkey=https://mirrors.aliyun.com/kubernetes/yum/doc/yum-key.gpg https://mirrors.aliyun.com/kubernetes/yum/doc/rpm-package-key.gpg
EOF
3.2 install the specified versions of kubelet, kubedm and kubectl on all nodes
yum install -y kubelet-1.21.0-0 kubeadm-1.21.0-0 kubectl-1.21.0-0
3.3 start kubelet service
[root@master yum.repos.d]# systemctl enable kubelet && systemctl start kubelet
Created symlink from /etc/systemd/system/multi-user.target.wants/kubelet.service to /usr/lib/systemd/system/kubelet.service.
[root@master yum.repos.d]# kubelet --version
Kubernetes v1.21.0
At this time, kubelet is in the state of continuous restart because the cluster has not been initialized. Kubelet runs normally after kubedm initialization is completed.
4. Deploy K8s master
4.1 view the image required for initialization
[root@master yum.repos.d]# kubeadm config images list
I1217 18:41:32.037319 51446 version.go:254] remote version is much newer: v1.23.1; falling back to: stable-1.21
k8s.gcr.io/kube-apiserver:v1.21.8
k8s.gcr.io/kube-controller-manager:v1.21.8
k8s.gcr.io/kube-scheduler:v1.21.8
k8s.gcr.io/kube-proxy:v1.21.8
k8s.gcr.io/pause:3.4.1
k8s.gcr.io/etcd:3.4.13-0
k8s.gcr.io/coredns/coredns:v1.8.0
4.2kubeadm init introduction
To initialize the cluster, use the kubedm init command. You can specify either specific parameters or configuration file initialization.
Optional parameters:
--Apiserver advertisement address the listening address of apiserver. It needs to be specified when there are multiple network cards
(indicate which interface of the Master is used to communicate with other nodes of the Cluster. If the Master has multiple interfaces, it is recommended to specify them explicitly. If not, kubedm will automatically select the interface with the default gateway.)
--Apiserver bind port the listening port of apiserver. The default value is 6443
--ssl certificate file of cert dir communication. The default is / etc/kubernetes/pki
--The shared terminal of the control plane endpoint console plane can be a load balanced ip address or dns domain name. It needs to be added when the cluster is highly available
--Image repository pulls the image warehouse of the image. The default is k8s gcr. io
--Kubernetes version specifies the kubernetes version
(turn off version detection because its default value is stable-1, which will cause https://dl.k8s.io/release/stable-1.txt Download the latest version number and we can specify it as a fixed version (latest version: v1.21.0) to skip network requests.)
--The network segment of pod network CIDR pod resource should be consistent with the value setting of pod network plug-in
(specify the range of Pod network. Kubernetes supports a variety of network schemes, and different network schemes have their own requirements for -- Pod network CIDR)
--Network segment of service CIDR service resource
--Service DNS domain is the suffix of the full domain name of the service. The default is cluster local
4.3kubeadm specify specific parameter initialization
Because the above images need to be pulled from the official image warehouse of kubernetes and cannot be accessed in China, it is necessary to set up the domestic Alibaba image warehouse and specify it as the Alibaba cloud image address: Registry aliyuncs. com/google_ containers.
4.4 deployed k8s Master node
kubeadm init \
--apiserver-advertise-address=192.168.139.13 \
--image-repository registry.aliyuncs.com/google_containers \
--service-cidr=10.96.0.0/12 \
--pod-network-cidr=10.244.0.0/16
After successful initialization, the following information will appear
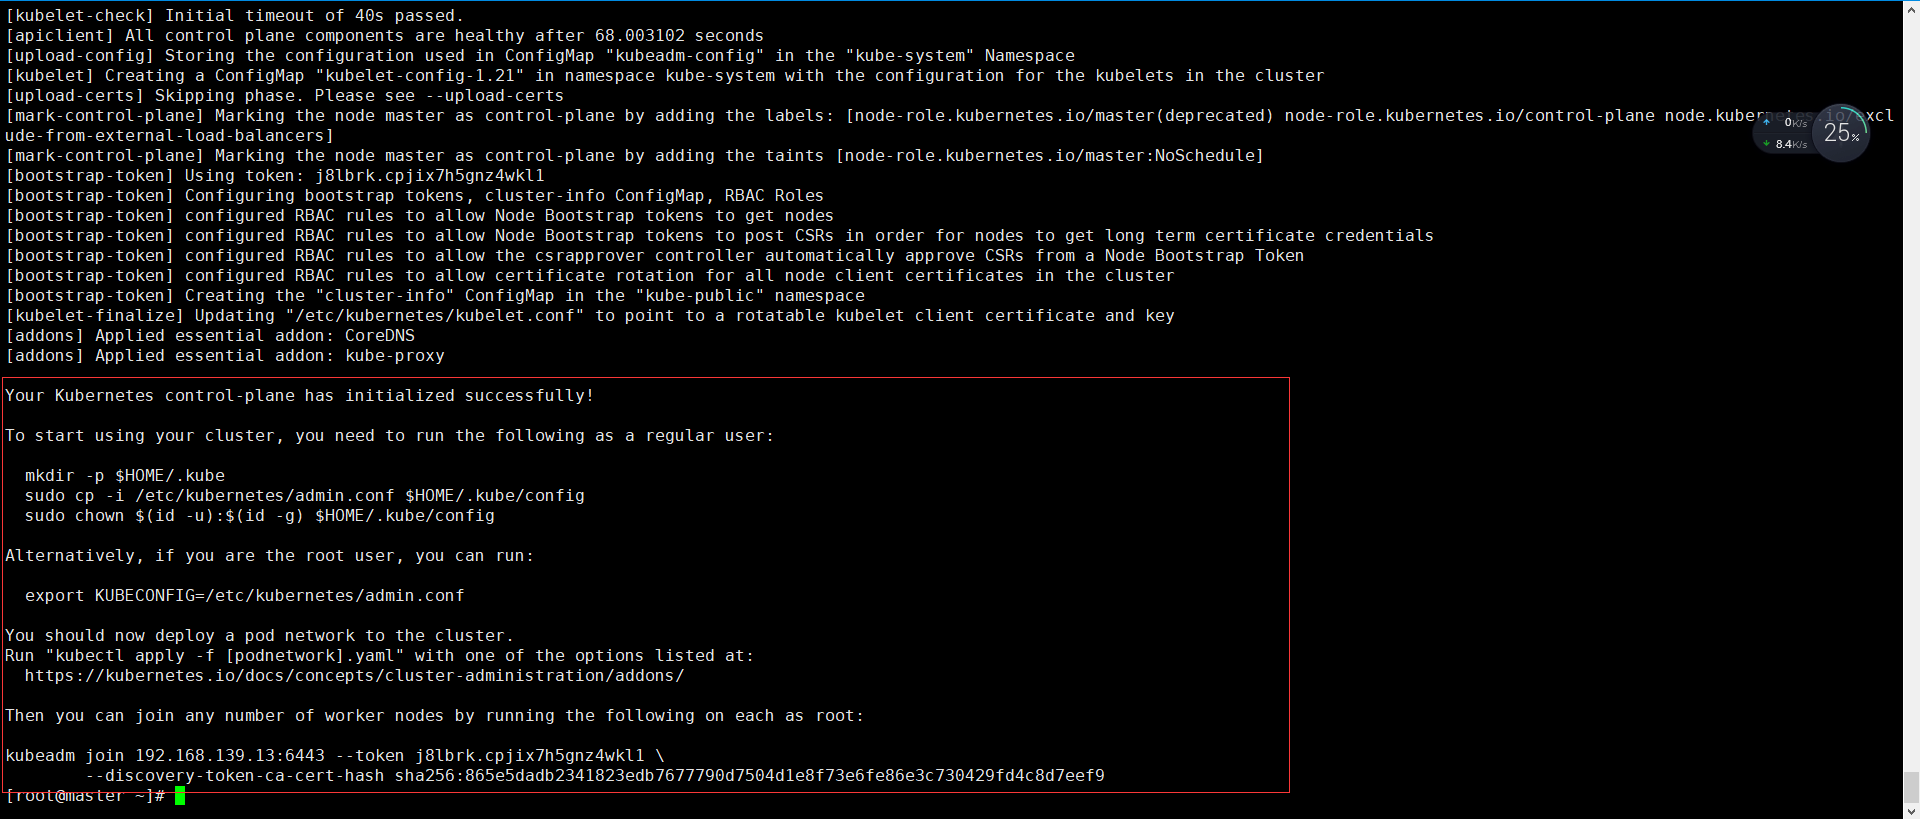
(note that record the kubedm join command in the initialization result, which will be used when deploying the worker node) as shown in the figure above
Description of initialization process:
- [preflight] kubedm performs pre initialization checks.
- [kubelet start] generate kubelet configuration file "/ var / lib / kubelet / config yaml”
- [certificates] generate various related token s and certificates
- [KubeConfig] generate KubeConfig file, which kubelet needs to communicate with the Master
- [control plane] after installing the Master component, the Docker image of the component will be downloaded from the specified Registry.
- [bootstrap token] generate a token and record it. Later, it will be used when using kubedm join to add nodes to the cluster
- [addons] install the add ons Kube proxy and Kube DNS.
- Kubernetes Master is initialized successfully, prompting how to configure regular users to use kubectl to access the cluster.
- Tips on how to install the Pod network.
- Prompt how to register other nodes to the Cluster.
4.5 according to the prompt information, use kubectl tool on the Master node
Kubectl is a command-line tool for managing Kubernetes Cluster. Previously, we have installed kubectl on all nodes. After the Master initialization is completed, some configuration work needs to be done, and then kubectl can be used.
mkdir -p $HOME/.kube
sudo cp -i /etc/kubernetes/admin.conf $HOME/.kube/config
sudo chown $(id -u):$(id -g) $HOME/.kube/config

Note: the reason why these configuration commands are needed is that the Kubernetes cluster requires encrypted access by default. Therefore, these commands are to save the security configuration file of the Kubernetes cluster just deployed to the current user Under the kube directory, kubectl will use the authorization information under this directory to access the Kubernetes cluster by default.
If we don't, we need to tell kubectl the location of this security configuration file through the export KUBECONFIG environment variable every time.
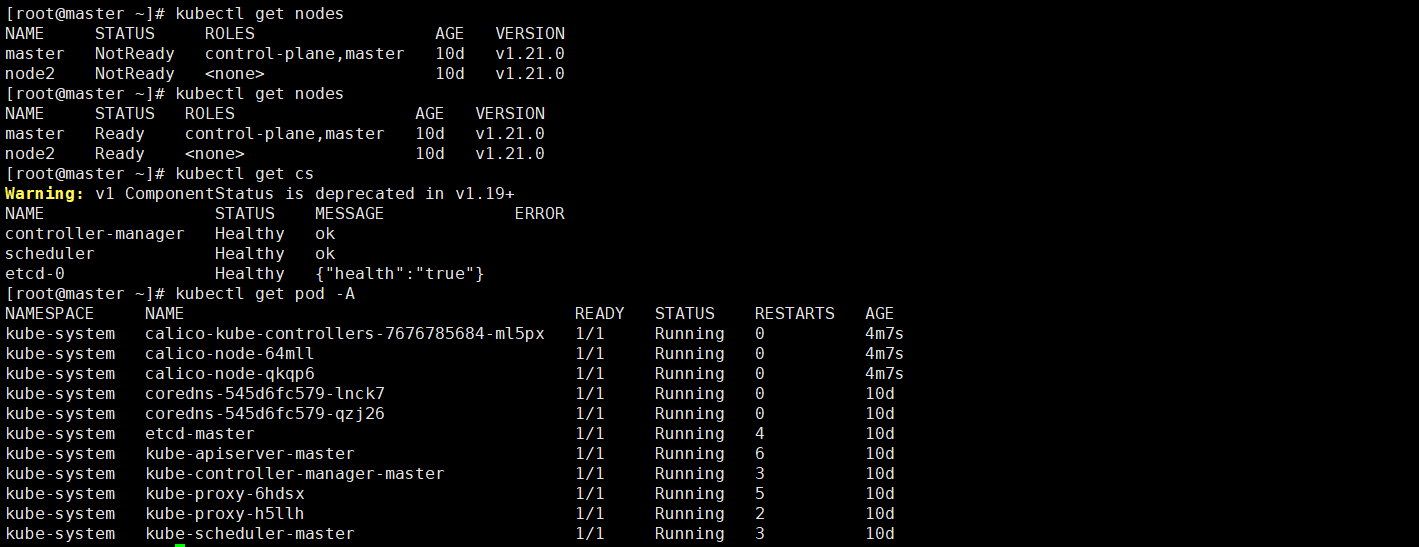
Check whether the cluster component status is normal:
[root@master yum.repos.d]# kubectl get cs
Warning: v1 ComponentStatus is deprecated in v1.19+
NAME               STATUS MESSAGE ERROR
controller-manager Healthy ok
scheduler          Healthy ok
etcd-0             Healthy {"health":"true"}
5. Add node
5.1 add the following commands on node1,node2 and node3:
kubeadm join 192.168.139.13:6443 --token irfynt.htcy2ymyoexwkgqx \
--discovery-token-ca-cert-hash sha256:865e5dadb2341823edb7677790d7504d1e8f73e6fe86e3c730429fd4c8d7eef9
After successful execution, as shown in the figure below, it means that the node has joined the cluster
[root@node3 yum.repos.d]# kubeadm join 192.168.139.13:6443 --token irfynt.htcy2ymyoexwkgqx --discovery-token-ca-cert-hash
sha256:865e5dadb2341823edb7677790d7504d1e8f73e6fe86e3c730429fd4c8d7eef9
[preflight] Running pre-flight checks [WARNING Service-Docker]: docker service is not enabled, please run 'systemctl enable docker.service'
[preflight] Reading configuration from the cluster...
[preflight] FYI: You can look at this config file with 'kubectl -n kube-system get cm kubeadm-config -o yaml'
[kubelet-start] Writing kubelet configuration to file "/var/lib/kubelet/config.yaml" [kubelet-start] Writing kubelet environment file with flags to file "/var/lib/kubelet/kubeadm-flags.env"
[kubelet-start] Starting the kubelet
[kubelet-start] Waiting for the kubelet to perform the TLS Bootstrap...

This node has joined the cluster:
* Certificate signing request was sent to apiserver and a response was received.
* The Kubelet was informed of the new secure connection details.

Run 'kubectl get nodes' on the control-plane to see this node join the cluster.

5.2 the default valid period of a token is 24 hours. When it expires, the token cannot be used. In this case, you can use the following command to create a token. Execute this command on the master
kubeadm token create --print-join-command
If you want to generate a token that never expires, execute the following command
kubeadm token create --ttl 0
5.3 deploy CNI network plug-ins
Execute kubectl get nodes on the master node to view the node status
Download and install network components locally
[root@master ~]# wget https://docs.projectcalico.org/v3.14/manifests/calico.yaml
[root@master ~]# kubectl apply -f calico.yaml
To view the progress of deploying CNI network plug-ins:
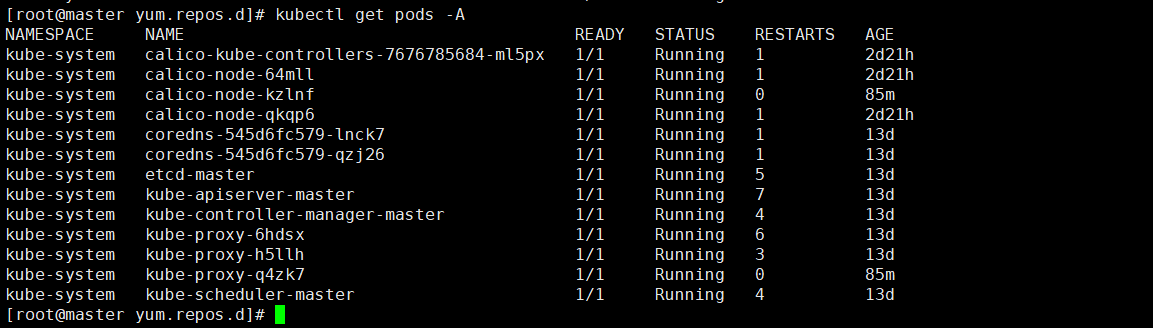
Then check the node status:

View cluster information:

Check that all pod s, nodes and components are in normal status, and the kubernetes cluster is created.