1. Introduction
When using MySQL, the number of users and data increases with time, and the number of visits increases dramatically. Finally, MySQL will reach a bottleneck, so the performance of MySQL will be greatly reduced. This result is not conducive to the promotion of software.
How to overcome this bottleneck and increase the concurrency of MySQL? There are many methods, such as distributed database, read-write separation, high availability load balancing, adding cache servers and so on. Previous articles have introduced the read-write separation scheme, and I'll explain MySQL's high availability load balancing method.
There are many ways to achieve high availability load balancing, such as LVS+keepalived combination implementation, haproxy+keepalived combination implementation and so on. Here we use haproxy+keepalived combination to achieve MySQL high availability load balancing technology.
2. Basic Environment
Four linux virtual hosts
Linux version CentOS 6.6
MySQL 5.5 (installed)
haproxy-1.5.14
keepalived-1.2.19
IP: 192.168.95.11(mysql1),192.168.95.12(mysql2),192.168.95.13(haproxy+keepalived),192.168.95.14(haproxy+keepalived),192.168.95.55(vip)
3. Configure MySQL master replication
Detailed configuration steps can be referred to in this article:
http://www.cnblogs.com/phpstudy2015-6/p/6485819.html#_label7
Here's a brief introduction to mysql's master replication:
What is master replication? It means that both mysql can read and write. Data records are transmitted to each other through binary system to maintain data consistency.
(192.168.95.11 master-slave replication + 192.168.95.12 master-slave replication==192.168.95.11, 192.168.95.12 master-slave replication)
Therefore, the problem of self-adding primary keys must be solved in master replication. If mysql1 primary key id increases to 12, then the binary data has not reached mysql2, then mysql2 just wants to insert data, then the new data primary key id is 12, that's not a mess! To solve this problem, we can directly change the configuration file in MySQL.
1) Change configuration file
--192.168.95.11: MySQL
server-id=11   #Arbitrary natural number n,Just guarantee two sets. MySQL Host does not repeat it.
log-bin=mysql-bin   #Open binary logs
auto_increment_increment=2   #Stepping value auto_imcrement. Generally there are n Platform owner MySQL Just fill in n
auto_increment_offset=1   #Start value. General Fill in n Platform owner MySQL. This is the first master. MySQL
binlog-ignore=mysql   #ignore mysql Ku [I don't usually write about it]
binlog-ignore=information_schema   #ignore information_schema Ku [I don't usually write about it]
replicate-do-db=aa   #To synchronize databases, default all databases
--192.168.95.12: MySQL
server-id=12
log-bin=mysql-bin
auto_increment_increment=2
auto_increment_offset=2
replicate-do-db=aa
Restart MySQL after configuration
2) Configuration 192.168.95.11 master-slave replication
1. Create a MySQL user in 192.168.95.11 host that can log in in in 192.168.95.12
User: mysql11
Password: mysql11
mysql>GRANT REPLICATION SLAVE ON *.* TO 'mysql11'@'192.168.95.11' IDENTIFIED BY 'mysql11';
mysql>FLUSH PRIVILEGES;
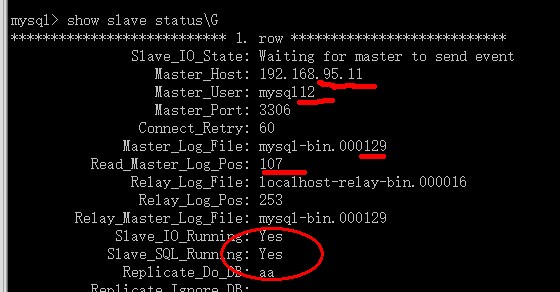
2. View 192.168.95.12 binary logs
mysql> show master status;

3. Inform the binary file name and location
mysql> change master to
    -> master_host='192.168.95.11',
    -> master_user='mysql11',
    ->master_password='mysql11',
    ->master_log_file='mysql-bin.000097',
    -> master_log_pos=107;
4. View the results
mysql> slave start;
mysql> show slave status\G

Configuration Master-Slave Replication Successful
3) Configuration 192.168.95.12 master-slave replication
Ditto
Configuration master-slave replication was successful.
4. Brief Introduction of Middleware
4.1. Introduction to Haproxy
Haproxy is an open source, high-performance reverse proxy or one of the load balancing service software. It supports the functions of dual hot standby, virtual host, application proxy based on TCP and HTTP. Its configuration is simple, and it has a good health check function for server nodes (equivalent to keepalived health check). When the back-end server of its agent fails, Haproxy will automatically remove the failed server, and when the server fails to recover, Haproxy will automatically remove the RS server.
HAProxy is especially suited to web sites that are overloaded and often require session maintenance or seven-tier processing. HAProxy runs on current hardware and can support tens of thousands of concurrent connections. And its mode of operation allows it to be easily and safely integrated into your current architecture, while protecting your web server from being exposed to the network.
Haproxy software introduces the functions of frontend and backend. Frontend (acl rule matching) can make rule matching according to any HTTP request header, and then directs the request to the relevant backend (server pools waiting for the front end to turn the request over). Through frontend and backup, we can easily implement the seven-tier proxy function of haproxy, which is a rare excellent proxy service software.
4.2. Introduction of keepalived
Keeping alived is based on VRRP protocol. VRRP is called Virtual Router Redundancy Protocol, which is called Virtual Router Redundancy Protocol.
Virtual Routing Redundancy Protocol (VRRP) can be considered as a high-availability protocol for routers, that is, N routers providing the same functions form a group of routers. There is a master and multiple backups in this group, and there is a VIP on the master which provides services to the outside world (default routes for other machines in the LAN where the router is located). For this vip, the master will multicast. When the backup can't receive the VRRP package, it will think that the master is out of order. At this time, it is necessary to elect a backup as master according to the priority of VRRP. In this way, high availability of routers can be guaranteed.
Keepalived has three main modules: core, check and vrrp. The core module is the core of keepalived, which is responsible for the initiation, maintenance of the main process and loading and parsing of the global configuration file. Check is responsible for health check-ups, including various common methods of examination. The VRRP module is used to implement the VRRP protocol.
5. Installation and configuration of middleware (haproxy, keepalived)
Baidu Cloud Download: http://pan.baidu.com/s/1qYoCjDE Password: 7cef
5.1. Install haproxy
Installation of haproxy in 192.168.95.13 and 192.168.95.14
1) Compile and install haproxy
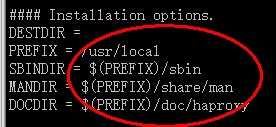
# tar -zxvf haproxy-1.5.14.tar.gz
# cd haproxy-1.5.14
# make TARGET=linux26 ARCH=x86_64
# make install SBINDIR=/usr/sbin/ MANDIR=/usr/share/man/ DOCDIR=/usr/share/doc/
Be careful:
1. Why don't you use configure? See the figure below. The Makefile file file already exists in haproxy-1.5.14.
2. When making, target and arch need to be set up according to their own linux host
3. I added some additional options to make install. This can be added or not configured by oneself. If not, it will be installed according to the default path. See the figure below.

2) Provide startup scripts
Place the haproxy startup script in the / etc/init.d / folder so that we can start it directly with service
[Note] This startup script is only suitable for my installation path above. If the installation paths are different, the corresponding modifications are needed before they can be used.
#!/bin/sh
#
# haproxy
#
# chkconfig:   - 85 15
# description:  HAProxy is a free, very fast and reliable solution \
#               offering high availability, load balancing, and \
#               proxying for TCP and  HTTP-based applications
# processname: haproxy
# config:      /etc/haproxy/haproxy.cfg
# pidfile:     /var/run/haproxy.pid

# Source function library.
. /etc/rc.d/init.d/functions

# Source networking configuration.
. /etc/sysconfig/network

# Check that networking is up.
[ "$NETWORKING" = "no" ] && exit 0

exec="/usr/sbin/haproxy"
prog=$(basename $exec)

[ -e /etc/sysconfig/$prog ] && . /etc/sysconfig/$prog

cfgfile=/etc/haproxy/haproxy.cfg
pidfile=/var/run/haproxy.pid
lockfile=/var/lock/subsys/haproxy

check() {
    $exec -c -V -f $cfgfile $OPTIONS
}

start() {
    $exec -c -q -f $cfgfile $OPTIONS
    if [ $? -ne 0 ]; then
        echo "Errors in configuration file, check with $prog check."
        return 1
    fi

    echo -n $"Starting $prog: "
    # start it up here, usually something like "daemon $exec"
    daemon $exec -D -f $cfgfile -p $pidfile $OPTIONS
    retval=$?
    echo
    [ $retval -eq 0 ] && touch $lockfile
    return $retval
}

stop() {
    echo -n $"Stopping $prog: "
    # stop it here, often "killproc $prog"
    killproc $prog
    retval=$?
    echo
    [ $retval -eq 0 ] && rm -f $lockfile
    return $retval
}

restart() {
    $exec -c -q -f $cfgfile $OPTIONS
    if [ $? -ne 0 ]; then
        echo "Errors in configuration file, check with $prog check."
        return 1
    fi
    stop
    start
}

reload() {
    $exec -c -q -f $cfgfile $OPTIONS
    if [ $? -ne 0 ]; then
        echo "Errors in configuration file, check with $prog check."
        return 1
    fi
    echo -n $"Reloading $prog: "
    $exec -D -f $cfgfile -p $pidfile $OPTIONS -sf $(cat $pidfile)
    retval=$?
    echo
    return $retval
}

force_reload() {
    restart
}

fdr_status() {
    status $prog
}

case "$1" in
    start|stop|restart|reload)
        $1
        ;;
    force-reload)
        force_reload
        ;;
    check)
        check
        ;;
    status)
        fdr_status
        ;;
    condrestart|try-restart)
        [ ! -f $lockfile ] || restart
        ;;
    *)
        echo $"Usage: $0 {start|stop|status|restart|try-restart|reload|force-reload}"
        exit 2
esac
#Give executive power
#chmod +x /etc/init.d/haproxy
3) Provide configuration files
Create directories and configuration files based on the above startup scripts
# mkdir /etc/haproxy
# mkdir /var/lib/haproxy
# useradd -r haproxy       #Create scripts to start users
# vi /etc/haproxy/haproxy.cfg
[Configuration file]
# The configuration file here is just posted for parsing.
# If you need this configuration file, it's better to delete all the comment parsing, because in the process of using, it is because of the existence of comment parsing that causes errors, and the deletion will work properly.
# You can download this configuration file for use, which is the same as the one posted below, except that there is no comment parsing.
# Baidu cloud downloads the configuration file (without comment): link: http://pan.baidu.com/s/1gfOMtKB Password: zl9o
global

    log         127.0.0.1 local2         //Log Definition Level
    chroot      /var/lib/haproxy         //Current working directory
    pidfile     /var/run/haproxy.pid     //process id
    maxconn     4000                     //maximum connection
    user        haproxy                  //Users Running Change Programs
    group       haproxy
    daemon                               //Backstage operation
    stats socket /var/lib/haproxy/stats

defaults
    mode                    tcp            //haproxy Operation mode( http | tcp | health)
    log                     global
    option                  dontlognull
    option                  redispatch     //serverId After the corresponding server hangs up,Force directing to other healthy servers
    retries                 3              //If the connection fails three times, the server will not be used.
    timeout http-request    10s
    timeout queue           1m
    timeout connect         10s            //connection timed out
    timeout client          1m             //Client timeout
    timeout server          1m             //server time-out
    timeout http-keep-alive 10s
    timeout check           10s            //runtastic Heart Rate PRO
    maxconn                 600            //maximum connection

listen stats                               //To configure haproxy Status pages (pages for viewing)
    mode http
    bind :8888
    stats enable
    stats hide-version                    //hide haproxy version number
stats uri     /haproxyadmin?stats     //It will be used to open the status page later. uri
    stats realm   Haproxy\ Statistics     //Prompt text when entering account password
    stats auth    admin:admin             //User name:Password

frontend  main
bind 0.0.0.0:3306                     //Use port 3306. Listen on front-end ports ip Accessing port 3306 forwards data in turn to mysql Server Groups]
    default_backend             mysql     //Backend server group name

backend mysql
    balance     leastconn                 //Scheduling with Minimum Connection
    server mysql1 192.168.95.11:3306 check port 3306 maxconn 300
    server mysql2 192.168.95.12:3306 check port 3306 maxconn 300
4) Start Log
# vi /etc/rsyslog.conf

#service rsyslog restart
5) Start haproxy
# service haproxy start

6) Testing haproxy
Anzhao Configuration File for Corresponding Testing

Open the browser and enter 192.168.95.13:8888/haproxyadmin?stats

After landing, as shown below, the installation of haproxy is successful.

5.2. Install keepalived
Official website download: http://www.keepalived.org/download.html
Installation of keepalived at 192.168.95.13 and 192.168.95.14
1) Solving missing software library files
[This step depends on the specific version of linux, some of which have already installed openssl. Specific cases can be executed. / configure will be able to determine the absence of software library files.)
First, we decompress keepalived-1.2.19.tar.gz, and then go to the directory. / configure to view it.
# tar -zxvf keepalived-1.2.19.tar.gz
# ./configure --prefix=/usr/local/keepalived  --sbindir=/usr/sbin/ --sysconfdir=/etc/ --mandir=/usr/local/share/man/ --with-kernel-dir=/usr/src/kernels/2.6.32-504.el6.x86_64/


The above figure shows that the installation of keepalived requires the installation of OpenSSL software first.
Without header files, you just need to install OpenSSL and openssl-devel
The simplest method is: yum-y install OpenSSL openssl-devel
Don't be afraid of friends who don't have internet. What follows is the installation of rpm method.
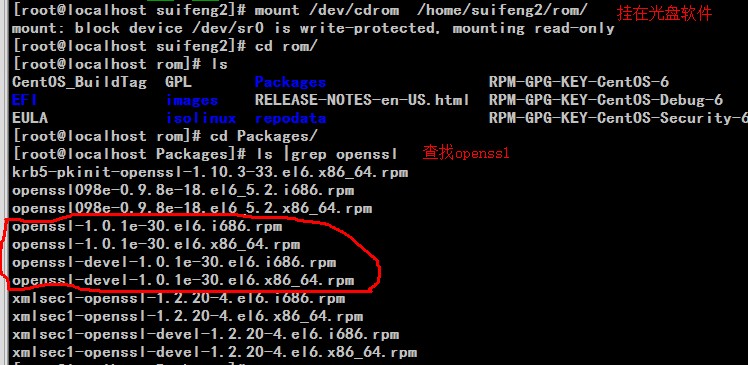
# Mount the CD and find the software in the CD. If the CD-ROM cannot be found, download it directly, and then import it to linux for installation.
# mount /dev/cdrom  /home/suifeng2/rom/
# cd rom/
# cd Packages/
# ls |grep openssl
There are all kinds of dependencies when installing keepalived software. The following is the dependency diagram that I sorted out after installing the software:
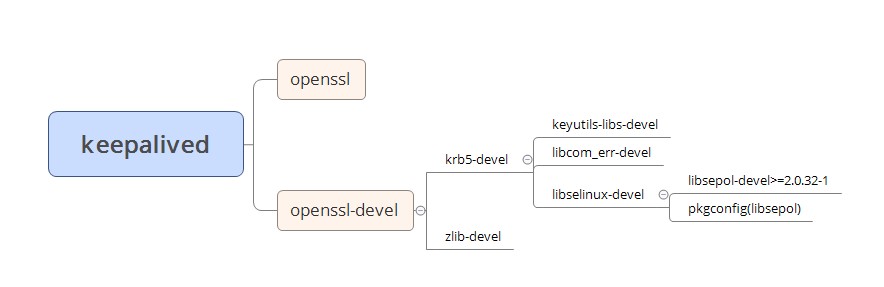
Now that you know the software dependencies, you can install them according to the last software.
(You can also start the installation from the front and view the dependencies step by step.)
1. Install openssl
# rpm -ivh openssl-1.0.1e-30.el6.x86_64.rpm

Successful installation of openssl
2. Install openssl-devel
Install libsepol-devel:
# rpm -ivh libsepol-devel-2.0.41-4.el6.x86_64.rpm

Install pkgconfig(libsepol):
# rpm -ivh pkgconfig-0.23-9.1.el6.x86_64.rpm

Install libselinux-devel:
# rpm -ivh libselinux-devel-2.0.94-5.8.el6.x86_64.rpm

Install keyutils-libs-devel:
# rpm -ivh keyutils-libs-devel-1.4-5.el6.x86_64.rpm

Install libcom_err-devel:
# rpm -ivh libcom_err-devel-141.12-21.el6.x86_64.rpm

Install krb5-devel:
# rpm -ivh krb5-devel-1.10.3-33.el6.x86_64.rpm

Install zlib-devel:
# rpm -ivh zlib-devel-1.2.3-29.el6.x86_64.rpm

Install openssl-devel:
# rpm -ivh openssl-devel-1.0.1e-30.el6.x86_64.rpm

2) Compile and install keepalived software
# cd keepalived-1.2.19
# ./configure --prefix=/usr/local/keepalived  --sbindir=/usr/sbin/ --sysconfdir=/etc/ --mandir=/usr/local/share/man/ --with-kernel-dir=/usr/src/kernels/2.6.32-504.el6.x86_64/
# make && make install

# chkconfig --add keepalived  #Add boot-up boot-up (I haven't added it yet)
# chkconfig keepalived on
[Note]
1. When installing. / configure, several choices after prefix are optional, so service can be used to start directly. It's better to add all the suggestions.
2. - with-kernel-dir is an option to fill in according to your own version of linux (you can find it in linux by using the command uname-a)

3) Create configuration files
/ The etc/keepalived/folder already has a keepalived.conf file. We rename it keepalived.conf.back and create our own keepalived.conf configuration file.

Vi/etc/keepalived/keepalived.conf (13 is the same as 14 configuration file paths)
[Following is a simple configuration file, and it's best to remove comments when using it]
Configuration file download (without comment):
192.168.95.13 Profile:
! Configuration File for keepalived
#Simple head, here can do mail notification alarm settings, etc., here is not configured for the time being;
global_defs {
        notificationd LVS_DEVEL
}
#Pre-defined a script, easy to call later, you can also define multiple, easy to choose;
vrrp_script chk_haproxy {
    script "/etc/keepalived/chk.sh"  #Specific script path
    interval 2  #Script cycle interval
}
#VRRP Virtual Routing Redundancy Protocol Configuration
vrrp_instance VI_1 {   #VI_1 Is a custom name;
    state BACKUP    #MASTER Represents a main device. BACKUP Represented as standby device [We set it as standby here because it is open and not preemptive]
    nopreempt      #Open without preemption
    interface eth0   #Appoint VIP Physical Network Cards Need Binding
    virtual_router_id 11   #VRID Virtual routing identifiers, also known as group names, require the same devices in the group
    priority 130   #Define priority 1 for this device-254;No preemption is turned on, so the priority here must be higher than that of the other one.

    advert_int 1   #The transmission interval of multicast information during survival detection is consistent within the group.
    authentication {    #Setting up validation information, consistency within groups
        auth_type PASS   #Yes PASS and AH Two, commonly used PASS
        auth_pass asd    #Password
    }
    virtual_ipaddress {
        192.168.95.55    #Appoint VIP Address, consistent within the group, you can set more than one IP
    }
    track_script {    #Using a predefined script in this domain, the
        chk_haproxy
    }

    notify_backup "/etc/init.d/haproxy restart"   #Represents when switching to backup State time,The script to execute
    notify_fault "/etc/init.d/haproxy stop"     #Scripts executed in case of failure
}
192.168.95.14 Profile:
The configuration file is almost the same as above, just changing priority 120 [just smaller than above].
4) Create script files
The script files needed to create the above configuration files (13, 14 are the same)
(Check if haproxy fails, then stop keeping alived and let vip)
# vi /etc/keepalived/chk.sh#!/bin/bash
#
if [ $(ps -C haproxy --no-header | wc -l) -eq 0 ]; then
       /etc/init.d/keepalived stop
fi
Give executive authority
# chmod +x /etc/keepalived/chk.sh

Start keepalived:
# service keepalived start

Successful installation of keepalived!
6. Functional testing
Before testing, build a MySQL user in mysql1 and mysql2, which allows 13 and 14 Linux hosts to log in:
User: jack
Password: 321
host: 192.168.95.%
mysql> GRANT ALL ON *.* TO 'jack'@'192.168.95.%' IDENTIFIED BY '321';
mysql> FLUSH PRIVILEGES;
6.1. Brief description of process
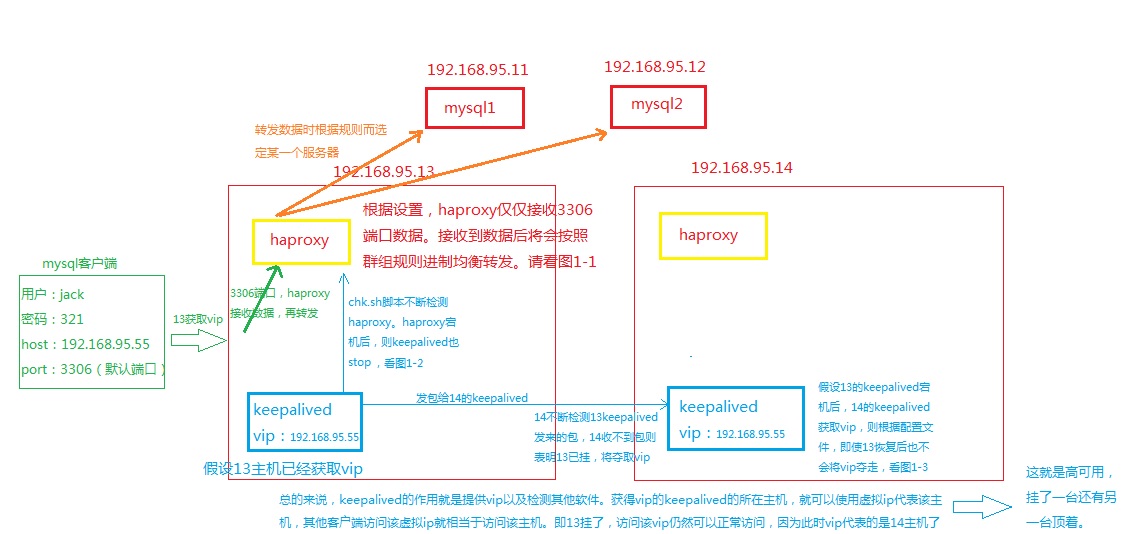
About the overall operation process:
Firstly, two 11,12 mysql and 13,14 haproxy and keepalived are started.
Keepalived obtains virtual IP in the keepalived group and detects whether haproxy is kill ed.
haproxy is responsible for forwarding incoming data to mysql 11 or 12.
The following picture is a simple understanding of my drawings: (relatively concise Kazakhstan, make-up Kazakhstan)
Next, we will test and verify each function.
6.2. Test haproxy listening front-end port 3306
1. When frontend listens on port 3306, open mysql, haproxy and keepalived
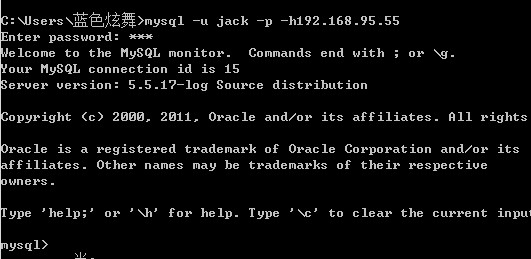
2. Log in user jack using any mysql client
Successful landing (mysql on windows)
3. Change frontend listening port to 3307 and continue to operate login test
Landing Failure

Result: Explain the usage of frontend listening port, and help us understand the usage of haproxy.
6.3. Testing High Availability + Keeping Alive does not preempt vip
You can find out who got vip through haproxy monitoring page
1. Start keeping alived and haproxy of 13 and 14 in turn (after starting keeping alived, haproxy will be automatically opened)


2. Visit http://192.168.95.55:8888/haproxyadmin?stats
13 Obtained vip

3,# kill -9 8923
Refresh http://192.168.95.55:8888/haproxyadmin?stats

14 Get vip, the machine works normally
Result: High availability was proved, and one machine was hung up and the other continued to work.
4. Restart haproxy of 13 and keep alived
And refresh http://192.168.95.55:8888/haproxyadmin?stats


Result: Vip is still in 14 hands at this time, which proves that keepalived configuration does not preempt VIP and does not waste resources to obtain vip.
6.4. Test Load Balancing
1. All start-up is normal, vip is in 14 hands at this time.
2. Open the grab bag in 11 and 12, respectively.
# tcpdump -n -i eth0 host 192.168.95.11 and 192.168.95.14
# tcpdump -n -i eth0 host 192.168.95.12 and 192.168.95.14
3. Use different clients to log in to jack users and add data to the database constantly


RESULTS: Data were sent from 14 to 11 and 12, which proved load balancing.
The balance mode in haproxy we set up is the least connection mode, if we use roundrobin mode, the test results will be more obvious.
Be careful:
When a mysql hangs, haproxy kicks it out of the mysql server group.
When a command comes in, it will be forwarded to the normal server.
When the problem mysql is restored, haproxy automatically puts it back into the mysql server group and automatically synchronizes the unsynchronized data
Test:
1. All normal start-up
mysql1 and mysql2 are normal

2. Turn mysql2 off

mysql2 has a problem, kick it out of the mysql group
3. Start mysql2

mysql2 is restored and put back into the mysql group
[When mysql 2 hangs up, if there is data insertion, it will be forwarded to mysql 1, and when mysql recovers, it will synchronize these data to mysql 2]
7. Summary and Suggestions
In this blog post, we should not only focus on the implementation of high availability load balancing in mysql, but also understand how haproxy and keepalived work. Haproxy and keepalived are powerful tools. If you understand how they are implemented, you can build a strong and robust service cluster with other servers by analogy. For example, it can be combined with apache to form a highly available load balanced web cluster.
In this article, we simply build a mysql high-availability load balancing environment, which needs to be modified according to specific projects.
Finally, my little suggestion is that after reading this blog, you can learn more about the configuration of haproxy and keepalived, and learn about LVS with similar functions as haproxy.
(These are my own opinions and summaries. If there are any shortcomings or mistakes, please point them out.)
Authors: That leaf follows the wind
Statement: The above only represent my own views or conclusions summarized during a certain period of work and study. When reprinting, please give a link to the original text in a clear place on the article page.