In the course design of unix course, I didn't want to change the system environment to write code, so I chose a topic of server construction. I thought it was very mature, but because it was too mature, no one continued to do this. The software and documents were ancient versions, and Helix didn't have an authorization key. Finally, I found this article and there was a video on station B, However, there is a time before recording. Some of the source code can't be found, some have changed the new version, collected everywhere, and finally saw their own desktop live broadcast on multiple devices. In order to record this process and thank the boss for his teaching, so as to facilitate what may be needed in the future, write the following record document according to my success process, And start to develop the good habit of writing documents!
Operating system: Kubuntu 20.04
Main reference documents: https://blog.csdn.net/u011298145/article/details/78883598
1. First download and install nginx and nginx RTMP compilation dependent tools
sudo apt-get install build-essential libpcre3 libpcre3-dev libssl-dev
2. Create a working directory and switch to the working directory
mkdir ~/working

cd ~/working
3. Download nginx and nginx RTMP source code
The original step was to install version 1.7.5, but there were many errors in make & & make install. After checking one by one, it was found that it could not be completely solved. Finally, it was found that there was a version problem, so version 1.20.0 was used
wget http://nginx.org/download/nginx-1.20.0.tar.gz
wget https://github.com/arut/nginx-rtmp-module/archive/master.zip
4. Install unzip tool and unzip the downloaded installation package
sudo apt-get install unzip
5. Unzip the nginx and nginx RTMP installation packages
tar -zxvf nginx-1.20.0.tar.gz
unzip master.zip
6. Switch to nginx directory
cd nginx-1.20.0
7. Add nginx RTMP template and compile to nginx
./configure --with-http_ssl_module --add-module=../nginx-rtmp-module-master
8. Compile and install
make && make install
9. Install nginx init script
The original code of the original document has expired and cannot be obtained. Manually create a script file to realize the self startup of nginx server
In / etc / init Write a service script under D / directory
vim /etc/init.d/nginx
Write code
#!/bin/bash
# nginx Startup script for the Nginx HTTP Server
# it is v.0.0.2 version.
# chkconfig: - 85 15
# description: Nginx is a high-performance web and proxy server.
#              It has a lot of features, but it's not for everyone.
# processname: nginx
# pidfile: /var/run/nginx.pid
# config: /usr/local/nginx/conf/nginx.conf


#Note: the three variables here need to be modified according to the specific environment.
nginxd=/usr/local/nginx/sbin/nginx
nginx_config=/usr/local/nginx/conf/nginx.conf
nginx_pid=/var/run/nginx.pid


RETVAL=0
prog="nginx"

# Check that networking is up.
[ -x $nginxd ] || exit 0
# Start nginx daemons functions.
start() {
if [ -e $nginx_pid ];then
   echo "nginx already running...."
   exit 1
fi
   echo -n $"Starting $prog: "
   $nginxd -c ${nginx_config}
   RETVAL=$?
   echo
   [ $RETVAL = 0 ]
   return $RETVAL
}
# Stop nginx daemons functions.
stop() {
  echo -n $"Stopping $prog: "
  $nginxd -s stop
  RETVAL=$?
  echo
  [ $RETVAL = 0 ] && rm -f /var/lock/subsys/nginx $nginx_pid
}
# reload nginx service functions.
reload() {
  echo -n $"Reloading $prog: "
  kill -HUP `cat ${nginx_pid}`
  RETVAL=$?
  echo
}
# See how we were called.
case "$1" in
  start)
          start
          ;;
  stop)
          stop
          ;;
  reload)
          reload
          ;;
  restart)
          stop
          start
          ;;
  status)
          status $prog
          RETVAL=$?
          ;;
  *)
          echo $"Usage: $prog {start|stop|restart|reload|status|help}"
          exit 1
esac
exit $RETVAL
Add permissions for all users
sudo chmod a+x /etc/init.d/nginx
In RC Add the following line to the end of the local file: / etc / init d/nginx start
10. Start nginx
You can use / etc / init D / nginx start or
service nginx start
You can also start it by entering the / usr/local/nginx/sbin / directory/ Nginx start nginx service
If the startup is unsuccessful, check the error. If the prompt address has been used, check the port Occupation:
netstat -apn
At / usr / local / nginx / conf / nginx Conf change the http listen address or directly kill the process occupying the port
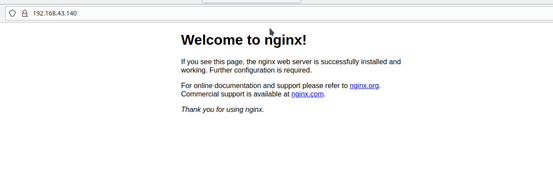
After successful startup, you can enter http: / / local ip address: 80 in the browser to enter the server, and the server displays Welcome to nginx! Welcome interface
View local ip address command: ip addr show
11. Configure nginx RTMP server
Open / usr / local / nginx / conf / nginx conf
Add the following configuration at the end
rtmp {

    server {

            listen 1935;

            chunk_size 4096;


            application live {

                    live on;

                    record off;

hls on;

hls_path /usr/share/nginx/html/hls;

hls_fragment 2s;


                    exec ffmpeg -i rtmp://localhost/live/$name -threads 1 -c:v libx264 -profile:v baseline -b:v 350K -s 640x360 -f flv -c:a aac -ac 1 -strict -2 -b:a 56k rtmp://localhost/live360p/$name;

            }

            application live360p {               #The mount point is a 360p compressed picture

                    live on;

                    record off;

        }

application hls360p {     #Personal testing, separate open rtmp+hls360p mount point and hls2 mount point 360p hls stream

                live on;

                hls on;

                hls_path /usr/share/nginx/html/hls2;

hls_fragment 2s;

            }

    }

}


#Note: you need to create the directory of hls: mkdir -p /usr/share/nginx/html/hls
12. Save the above configuration file and restart nginx service
sudo service nginx restart
13. If you use a firewall, please allow port tcp 1935,81
iptables -A INPUT -p tcp --dport 1935 -j ACCEPT

iptables -A OUTPUT -p tcp --sport 1935 -j ACCEPT

iptables -A INPUT -p tcp --dport 81 -j ACCEPT

iptables -A OUTPUT -p tcp --sport 81 -j ACCEPT
14. Install obs flow pushing tool
Official website: https://obsproject.com/zh-cn/download
The version supported by Linux is Ubuntu 14 04 or later. FFmpeg support is required. For Ubuntu 15 04 and later versions, FFmpeg is officially included:
sudo apt-get install ffmpeg
After installing FFmpeg, use the following instructions to install OBS studio version:
sudo add-apt-repository ppa:obsproject/obs-studio

sudo apt-get update && sudo apt-get install obs-studio
15. Get VLC for Ubuntu
Official website: https://www.videolan.org/vlc/#download
sudo snap install vlc
16. Using obs streaming:
Reference documents: https://zhuanlan.zhihu.com/p/144275422
Click the "+" sign of the source to test the use of screen acquisition, and click the setting of the control menu
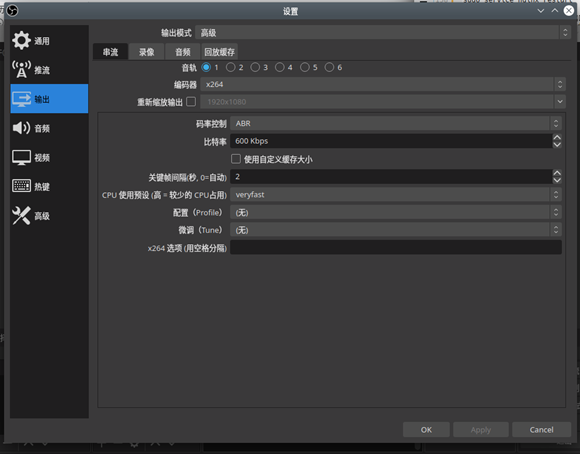
Streaming menu, service selection, customization, server filling rtmp://192.168.43.140 (fill in your nginx server IP here) / live streaming key
Output menu, output mode selection advanced, code rate control selection ABR, bit rate 600Kbps, key frame interval 2
17. Using vlc pull flow:
Click media, select network streaming, enter the address rtmp: / / server IP address / live / streaming key, and click play
18. The mobile phone uses EasyPlayer to pull streams
I found the RTMP player EasyPlayer of my mobile phone by searching
Official website: http://www.easydarwin.org/
Android RTMP version: http://app.tsingsee.com/EasyRTMPlayer
Click the + sign in the upper right corner, also enter the address rtmp: / / server IP address / live / streaming key, and click the picture on the home page to play