This note is written by myself with reference to Lin Ziyu's teaching documents. Please refer to the database Laboratory of Xiamen University for details
Personal built hadoop platform practical environment: Ubuntu 14.04 64 bit * 3, JDK1.8, Hadoop 2.6.5 (apache)
1, Hadoop preparation before installation
1. Set root
The first time you need to set the root password
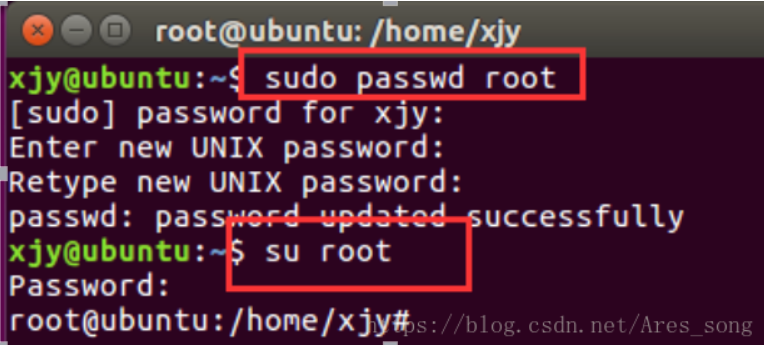
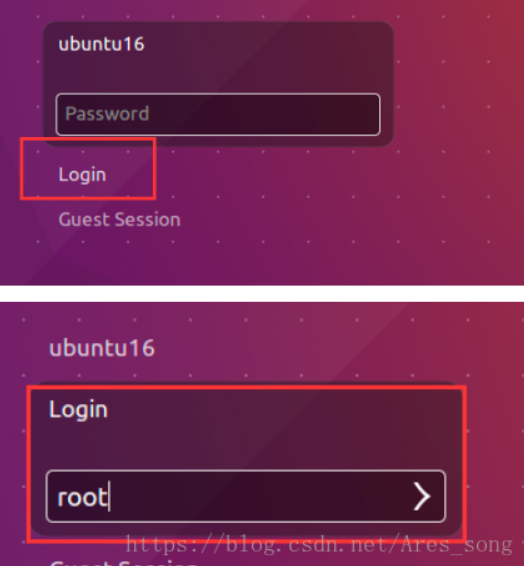
root user boot

Add the following red box content in the file:

user-session=ubuntu
greeter-show-manual-login=true
all-guest=false
Restart the machine after saving. Log in with root and password
2. Configure network
Create three Ubuntu 14.04 64 bit virtual machines, one master and two Slave under vmware. Three virtual machines are in the same network segment and ping each other.
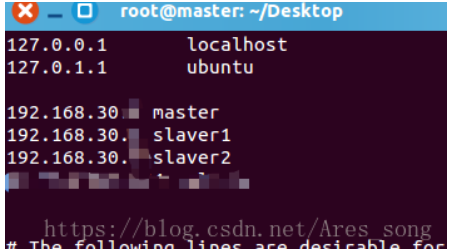
Modify the virtual machine name: ා vim /etc/hostname (vim downloads by itself)
ip mapping: ා vim /etc/hosts (host name corresponds to host ip)
3. Replace aliyuan
Step 1: enter the / etc/apt / directory
cd /etc/apt
Step 2: check the sources.list File for backup
sudo cp sources.list sources.list.bak
Step 3: modify sources.list File, replace with alicloud source
sudo vim sources.list
See the source of each version
Step 4: update source
apt-get update
4. Install SSH
1. The first step is to download ssh:
apt-get install openssh-server
After installation, you can use the following command to log in to the machine:
ssh localhost
2. Step 2: configure SSH password free login:
First, exit the ssh and return to our original terminal window. Then use ssh keygen to generate the key and add the key to the authorization:
Note: it is configured on the master
exit                           # Exit ssh localhost
cd ~/.ssh/                     # If there is no such directory, please execute ssh localhost once
ssh-keygen -t rsa              # There will be a prompt. Just press enter

ssh-copy-id -i ~/.ssh/id_rsa.pub slave1
#Copy the slave1 key. If there is a slave2, change it to slave2 and execute it again. The password of each node will be entered
3. Step 3: set Root remote login:
gedit /etc/ssh/sshd_config
Modify the content of line 28 to
#PermitRootLogin prohibit-password
PermitRootLogin yes
5. Installing the Java environment
1. Install JDK
sudo apt-get install default-jre default-jdk
2. Configure environment variables
vim ~/.bashrc
Add a separate line at the front of the file as follows (note that there can be no space before and after the equal sign "="), and then save to exit:
export JAVA_HOME=/usr/lib/jvm/default-java
Next, for the environment variables to take effect immediately, execute the following code:
source ~/.bashrc
3. Verify environment is successful
echo $JAVA_HOME     # Test variable value
java -version
2, Install Hadoop
1. Download hadoop
hadoop download address: https://mirrors.cnnic.cn/apache/hadoop/common/
Here I use 2.6.5. After downloading, it will be transferred to the master
2. Decompress hadoop
sudo tar -zxf ~/download/hadoop-2.6.0.tar.gz -C /usr/local    # Extract to / usr/local
cd /usr/local/
sudo mv ./hadoop-2.6.0/ ./hadoop            # Change folder name to hadoop
sudo chown -R hadoop ./hadoop               # Modify file permissions
3. Inspection
Hadoop can be used after decompression. Enter the following command to check whether Hadoop is available. If it succeeds, the Hadoop version information will be displayed:
cd /usr/local/hadoop
./bin/hadoop version
3, Configure Hadoop files
1, Configure PATH variable
First, execute vim ~/.bashrc to add in the first line. The path is configured according to the bin and sbin of the extracted hadoop, which is convenient for later command writing
export PATH=$PATH:/usr/local/hadoop/bin:/usr/local/hadoop/sbin
As shown in the figure:

Then source ~/.bashrc takes the configuration into effect.
2, Configure cluster environment
Cluster / distributed mode needs to modify five configuration files in / usr/local/hadoop/etc/hadoop. For more settings, click to see the official instructions. Here, only the settings necessary for normal startup are set: slaves core-site.xml,hdfs-site.xml,mapred-site.xml,yarn-site.xml .
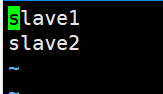
1. File slaves, which is written to the file as the host name of DataNode, one for each line. The default is localhost. The distributed configuration can keep localhost or delete it, so that the Master node can only be used as the NameNode.
In this tutorial, the Master node is only used as a NameNode, so the original localhost in the file is deleted and only two lines are added: slave1 and slave2. Here 1 and 2 are the number of nodes. If you add nodes, add slave3
If there are several nodes, they will be configured. Otherwise, the unconfigured nodes will not be able to generate related processes
2. File core-site.xml Change to the following configuration: (note that the fourth line of master is the host name you map, which is the same for the following Master)
<configuration>
        <property>
                <name>fs.defaultFS</name>
                <value>hdfs://master:9000</value>
        </property>
        <property>
                <name>hadoop.tmp.dir</name>
                <value>file:/usr/local/hadoop/tmp</value>
                <description>Abase for other temporary directories.</description>
        </property>
</configuration>
3. File hdfs-site.xml , dfs.replication Generally set to 3
<configuration>
        <property>
                <name>dfs.namenode.secondary.http-address</name>
                <value>master:50090</value>
        </property>
        <property>
                <name>dfs.replication</name>
                <value>3</value>
        </property>
        <property>
                <name>dfs.namenode.name.dir</name>
                <value>file:/usr/local/hadoop/tmp/dfs/name</value>
        </property>
        <property>
                <name>dfs.datanode.data.dir</name>
                <value>file:/usr/local/hadoop/tmp/dfs/data</value>
        </property>
</configuration>
4. File mapred-site.xml (you may need to rename it first. The default file name is mapred-site.xml.template ), and then the configuration is modified as follows:
<configuration>
        <property>
                <name>mapreduce.framework.name</name>
                <value>yarn</value>
        </property>
        <property>
                <name>mapreduce.jobhistory.address</name>
                <value>master:10020</value>
        </property>
        <property>
                <name>mapreduce.jobhistory.webapp.address</name>
                <value>master:19888</value>
        </property>
</configuration>
5. File yarn-site.xml :
<configuration>
        <property>
                <name>yarn.resourcemanager.hostname</name>
                <value>master</value>
        </property>
        <property>
                <name>yarn.nodemanager.aux-services</name>
                <value>mapreduce_shuffle</value>
        </property>
</configuration>
6. After configuration, copy the / usr/local/Hadoop folder on the master to each node.
Now compress the hadoop configured in the master:
tar -zcf ~/hadoop.master.tar.gz ./hadoop
Then use the scp command to pass the compressed hadoop to slave1 Among other nodes
scp ./hadoop.master.tar.gz Slave1:/home/hadoop
At this time, the hadoop of the master node has been completed. Next, decompress the hadoop from the master node (find the hadoop path and decompress it)
sudo tar -zxf ~/hadoop.master.tar.gz -C /usr/local
At this time, hadoop from the node is also completed. Now, start hadoop
4, Hadoop startup
1. To start for the first time, you need to perform the format of NameNode in the master node:
hdfs namenode -format # Initialization is required for the first run, not later
2. Then you can start hadoop, which needs to be started on the master node:
start-all.sh
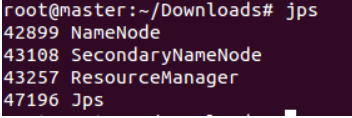
3. The command jps allows you to view the processes started by each node. If correct, you can see the NameNode, ResourceManager, and SecondrryNameNode processes on the master node
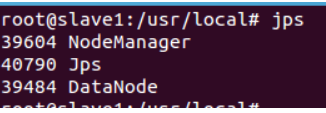
4. You can see the DataNode and NodeManager processes in the Slave1 node
5. Validate cluster
The absence of any process indicates an error. In addition, you need to use the command hdfs dfsadmin -report on the master node to check whether the DataNode starts normally. If the Live datanodes is not 0, the cluster starts successfully.
You can also view the status of DataNode and NameNode through the Web page: http://master:50070/ . If not, you can check the cause by starting the log.

At this time, the hadoop cluster is completed, and some distributed instances can be carried out below