It's approaching the winter solstice. I didn't expect that although people are in the North (near the Taihang Mountain), we still don't have snow. It's very uncomfortable.
Confined to the vast fog in winter, it's better to step on the snow and look for plum blossoms; However, I couldn't see the snow, so I had to do it on my own.
All right, all right, cut the crap and work on the principle.
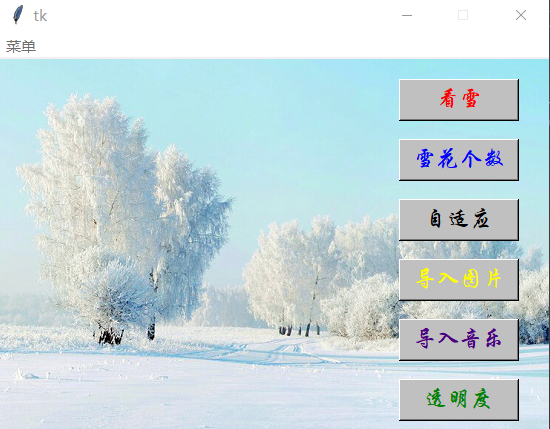
Briefly introduce my operation principle: commands Py is the function file of various buttons in the right figure, including ----------- main program, adjusting the number of snowflakes, window adaptive picture size ratio, importing other pictures, modifying picture transparency, modifying background music, repairing the registration machine (this is in the menu bar), snow_draw.py is the main program (that is, snow), main Py is a user interaction page file that integrates various programs. initialize.ini is an initialization configuration file used to adjust various settings. I won't say more about jpg and MP3 here
Upper Code:
Button function file ----- commands py
I added a registration machine to this button file for re registration in case of file reading error. In fact, it is to re write the initialization file. In addition, the modified settings of the button function need to restart the user window to work. (this is a small bug). To modify pictures, you only need to import their path. Even if there is an error, I also provide the corresponding error warning here.
# A series of button operation functions
from tkinter.messagebox import *
import tkinter
from configobj import ConfigObj, ParseError
import os
from PIL import Image, ImageTk
from tkinter.scrolledtext import ScrolledText
import sys

# Adjust the number of snowflakes button
def snow_num():
    window = tkinter.Tk()
    window.resizable(False, False)
    window.geometry('300x200')

    label = tkinter.Label(window, text='Please enter the number', bg='silver', fg='red')
    label.place(x=10, y=50)
    entry = tkinter.Entry(window)
    entry.place(x=100, y=50)

    def got():
        a = entry.get()
        try:
            if int(a):
                if 250 >= int(a) >= 50:
                    config = ConfigObj('initialize.ini', encoding='utf-8')
                    config['num'] = int(a)
                    config.write()
                    showinfo(message='Modification completed!')
                else:
                    showerror(message='The snowflake limit cannot be less than 50 or more than 250')
        except ValueError:
            e = ValueError('The number you entered is not an integer')
            showerror(message=e)

    def deleted():
        entry.delete(0, 'end')

    button = tkinter.Button(window, text='determine', bg='silver', fg='red', font=('Blackbody', 18), command=got)
    button.place(x=10, y=100)
    button1 = tkinter.Button(window, text='eliminate', bg='silver', fg='red', font=('Blackbody', 18), command=deleted)
    button1.place(x=200, y=100)
    window.mainloop()

# import picture
def import_image():
    window = tkinter.Tk()
    window.resizable(False, False)
    window.geometry('800x200')

    label = tkinter.Label(window, text='Picture path', bg='silver', fg='red')
    # E: \ pycham professional Projects \ document operation assistant \ Tkinter_for_Opening\bg.jpg
    label.place(x=10, y=50)
    entry = tkinter.Entry(window, width=70)
    entry.place(x=100, y=50)

    def got():
        e = entry.get()
        if os.path.exists(e):
            config = ConfigObj('initialize.ini', encoding='utf-8')
            # Of course, here you can flexibly adjust the ghosting effect for a variety of pictures
            config['back_image'] = e
            config['back_image2'] = e
            config.write()
            showinfo(message='Modification completed!')
        else:
            showerror(message=FileExistsError('This file cannot be found!'))
    def deleted():
        entry.delete(0, 'end')

    button = tkinter.Button(window, text='determine', bg='silver', fg='red', font=('Blackbody', 18), command=got)
    button.place(x=10, y=100)
    button1 = tkinter.Button(window, text='eliminate', bg='silver', fg='red', font=('Blackbody', 18), command=deleted)
    button1.place(x=650, y=100)
    window.mainloop()

# Picture adaptation
def fit():
    window = tkinter.Tk()
    window.resizable(False, False)
    window.geometry('800x200')

    label = tkinter.Label(window, text='Picture path', bg='silver', fg='red')
    # E: \ pycham professional Projects \ document operation assistant \ Tkinter_for_Opening\bg.jpg
    label.place(x=10, y=50)
    entry = tkinter.Entry(window, width=70)
    entry.place(x=100, y=50)

    def got():
        e = entry.get()
        if os.path.exists(e):
            config = ConfigObj('initialize.ini', encoding='utf-8')
            # Of course, here you can flexibly adjust the ghosting effect for a variety of pictures
            config['back_image'] = e
            config['back_image2'] = e
            image = Image.open(e)
            bg_image = ImageTk.PhotoImage(image)
            width = bg_image.width()
            height = bg_image.height()
            # Gain proportion
            k = width/width
            if width > 600 and height > 400:
                config['width'] = 600
                config['height'] = 400
                config.write()
                showinfo(message='Modification completed!')
            elif width < 600 and height >= 400:
                config['width'] = width
                config['height'] = int(float(width * k))
                config.write()
                showinfo(message='Modification completed!')
            elif width >= 600 and height <= 400:
                config['width'] = int(float(height * k))
                config['height'] = height
                config.write()
                showinfo(message='Modification completed!')
        else:
            showerror(message=FileExistsError('This file cannot be found!'))
    def deleted():
        entry.delete(0, 'end')

    button = tkinter.Button(window, text='determine', bg='silver', fg='red', font=('Blackbody', 18), command=got)
    button.place(x=10, y=100)
    button1 = tkinter.Button(window, text='eliminate', bg='silver', fg='red', font=('Blackbody', 18), command=deleted)
    button1.place(x=650, y=100)
    window.mainloop()

# Import music
def music():
    window = tkinter.Tk()
    window.resizable(False, False)
    window.geometry('800x200')

    label = tkinter.Label(window, text='Music path', bg='silver', fg='red')
    # E: \ pycham professional Projects \ document operation assistant \ Tkinter_for_Opening\bg.jpg
    label.place(x=10, y=50)
    entry = tkinter.Entry(window, width=70)
    entry.place(x=100, y=50)

    def got():
        e = entry.get()
        if os.path.exists(e):
            config = ConfigObj('initialize.ini', encoding='utf-8')
            # Of course, here you can flexibly adjust the ghosting effect for a variety of pictures
            config['back_music'] = e
            config.write()
            showinfo(message='Modification completed!')
        else:
            showerror(message=FileExistsError('This file cannot be found!'))
    def deleted():
        entry.delete(0, 'end')

    button = tkinter.Button(window, text='determine', bg='silver', fg='red', font=('Blackbody', 18), command=got)
    button.place(x=10, y=100)
    button1 = tkinter.Button(window, text='eliminate', bg='silver', fg='red', font=('Blackbody', 18), command=deleted)
    button1.place(x=650, y=100)
    window.mainloop()

# Modify picture transparency
def alpha():
    window = tkinter.Tk()
    window.resizable(False, False)
    window.geometry('200x200')

    label = tkinter.Label(window, text='Set transparency', bg='silver', fg='red')
    # E: \ pycham professional Projects \ document operation assistant \ Tkinter_for_Opening\bg.jpg
    label.place(x=10, y=50)
    entry = tkinter.Entry(window, width=10)
    entry.place(x=100, y=50)

    def got():
        e = entry.get()
        try:
            if int(e):
                if 0 <= int(e) <= 255:
                    config = ConfigObj('initialize.ini', encoding='utf-8')
                    config['alpha'] = e
                    config.write()
                    showinfo(message='Modification completed!')
                else:
                    showerror(message='Please enter 0~255 Integer within')
        except ValueError:
            showerror(message=ValueError('Please enter 0~255 Integer within'))
    def deleted():
        entry.delete(0, 'end')

    button = tkinter.Button(window, text='determine', bg='silver', fg='red', font=('Blackbody', 18), command=got)
    button.place(x=10, y=100)
    button1 = tkinter.Button(window, text='eliminate', bg='silver', fg='red', font=('Blackbody', 18), command=deleted)
    button1.place(x=100, y=100)
    window.mainloop()

# Reset registered machine
def reg():
    window = tkinter.Tk()
    window.resizable(False, False)
    window.geometry('200x200')
    def regs():
        try:
            config = ConfigObj('initialize.ini', encoding='utf-8')
            config['width'] = 600
            config['height'] = 400
            config['num'] = 200
            config['back_image'] = 'bg.jpg'
            config['back_image2'] = 'bg2.png'
            config['back_music'] = 'jn.mp3'
            config['alpha'] = 120
            config['snow_color'] = [192, 192, 192]
            showinfo(message='Modification completed!')
            config.write()
        except ParseError:
            config = open('initialize.ini', 'w', encoding='utf-8')
            config.write('width = 600\nheight = 400\nnum = 200\nback_image = bg.jpg\n'
                         'back_image2 = bg2.png\nback_music = jn.mp3\n'
                         'alpha = 120\n'
                         'snow_color = 192, 192, 192')
            config.close()
            showinfo(message='Modification completed!')
    button = tkinter.Button(window, text='Reset', bg='yellow', fg='indigo', font=('Blackbody', 18), command=regs)
    button.place(x=10, y=70)
    button1 = tkinter.Button(window, text='forget it', bg='silver', fg='blue', font=('Blackbody', 18), command=sys.exit)
    button1.place(x=100, y=70)
    window.mainloop()

# about
def about():
    window = tkinter.Tk()
    window.resizable(False, False)
    window.geometry('400x400')
    a = open('author.txt', 'r', encoding='utf-8')
    f = a.read()
    a.close()
    view_text = ScrolledText(window, font=('Song typeface', 12), fg='black', bg='silver')
    view_text.insert('0.0', f)
    view_text.place(x=10, y=5, height=380, width=380)
    window.mainloop()

if __name__ == '__main__':
    reg()
Main program (snow) --- snow_draw.py
The principle here is very simple, that is, the pygame module is used for production. As can be seen from the following code, I used the picture three times and placed it at different starting points. This is to produce the ghosting effect of the picture (I won't tell you the reason is that I forgot to delete a picture call to produce an unexpected aesthetic feeling), The principle of making snow to snow is very simple. I wrote it in the notes.
In addition, this snow program needs to exit with the q key, and the s key can also take a screenshot of the current snow page and save it automatically
import sys

import pygame
import random
import os.path as path
# A module that reads initialization files
from configobj import ConfigObj

# Get initialization ini file contents
config = ConfigObj('initialize.ini', encoding='utf-8')

def main():
    # Initialize pygame
    pygame.init()
    width = int(config['width'])
    height = int(config['height'])
    SIZE = width * 2, height * 2
    screen = pygame.display.set_mode(SIZE, pygame.NOFRAME)

    # Set the screen length and width according to the size of the background picture
    image = pygame.image.load(config['back_image'])
    # Picture transparency. In order to create the following ghosting effect, it is recommended to bias the transparency to a low value
    image.set_alpha(int(config['alpha']))
    image2 = pygame.image.load(config['back_image2']).convert()
    image2.set_colorkey((255, 255, 255))

    # Snowflake list
    snow_list = []


    # Initialize Snowflake: (x coordinate, y coordinate), X-axis speed, Y-axis speed
    for i in range(int(config['num'])):
        x = random.randrange(0, SIZE[0])
        y = random.randrange(0, SIZE[1])
        # Let the snow have two falling trends - lower left or lower right
        speed_x = random.randint(-1, 1)
        speed_y = random.randint(1, 4)
        snow_list.append([x, y, speed_x, speed_y])
    # Refresh frame rate, control speed
    clock = pygame.time.Clock()

    # background music
    pygame.mixer.init()
    pygame.mixer.music.load(config['back_music'])
    pygame.mixer.music.play()
    # Game main loop
    while True:

        screen.fill((0, 0, 0))

        # Ghosting effect
        screen.blit(pygame.transform.scale(image2, SIZE), (-width/2, 0))
        screen.blit(pygame.transform.scale(image, SIZE), (0, 0))
        screen.blit(image, (0, 0))

        # event detection
        for event in pygame.event.get():
            if event.type == pygame.QUIT:
                sys.exit()
            if event.type == pygame.KEYDOWN:
                # Press q to exit
                if event.key == event.key == pygame.K_q:
                    sys.exit()
                # Press the s key to take a screenshot
                if event.key == pygame.K_s:
                    list_file = []
                    list_ooo = list(range(1000))
                    for num_in in list_ooo:
                        if path.isfile('picture/picture' + str(num_in) + '.jpg'):
                            continue
                        else:
                            list_file.append(num_in)
                    pygame.image.save(screen, 'picture/picture' + str(list_file[0]) + '.jpg')

        # Random snow
        for i in range(len(snow_list)):
            a = config['snow_color']
            pygame.draw.circle(
                # display
                screen,
                # colour
                [int(f) for f in a],
                # Landing point
                snow_list[i][:2],
                # Snowflake radius
                snow_list[i][3],
                # Enrich snowflake particles
                0
            )

            # Move snowflake position (next cycle takes effect)
            snow_list[i][0] += snow_list[i][2]
            snow_list[i][1] += snow_list[i][3]

            # If the snow falls off the screen, it can keep falling
            if snow_list[i][1] > SIZE[1]:
                snow_list[i][1] = random.randrange(-50, -10)
                snow_list[i][0] = random.randrange(0, SIZE[0])

        # Refresh screen
        pygame.display.flip()
        clock.tick(20)

if __name__ == '__main__':
    main()
User (integration) panel - main py
I won't say more about this
# User window
import tkinter
from PIL import ImageTk,Image
import snow_draw
import commands

root = tkinter.Tk()
size = 500, 400
root.geometry(f'{size[0]}x{size[1]}')
root.resizable(False, False)
# root.config(bg='silver')

# We will define the following functions: start, adjust the number of snowflakes, window adaptive picture size ratio, import other pictures, modify picture transparency, modify background music, and repair the registration machine
# If the above function is triggered by the button event, the button adaptation will change with the change of the window (because the source code is open source, the user may consider modifying the size of the user interface, so I'm flexible here)

# Import the interface background picture first
image = Image.open('snow.jpg')
bg_image = ImageTk.PhotoImage(image)
width = bg_image.width()
height = bg_image.height()
root.geometry('%dx%d+0+0' % (width, height))
background_label = tkinter.Label(root, image=bg_image)
background_label.place(x=0, y=0, relwidth=1, relheight=1)

# Make button
# Start button
button10 = tkinter.Button(root, text='Look at the snow', font=('Chinese block letters', 14),
                         bg='silver', fg='red', width=int(float(size[0] * 0.02)), height=int(float(0.0025 * size[1])),
                          command=snow_draw.main)
button10.place(x=int(float(size[0] * 0.8)), y=int(float(0.05 * size[1])))

# Adjust the number of snowflakes button
button11 = tkinter.Button(root, text='Number of snowflakes', font=('Chinese block letters', 14),
                         bg='silver', fg='blue', width=int(float(size[0] * 0.02)), height=int(float(0.0025 * size[1])),
                          command=commands.snow_num)

button11.place(x=int(float(size[0] * 0.8)), y=int(float(0.20 * size[1])))

# Snowflake window picture adaptive picture button
button12 = tkinter.Button(root, text='self-adaption', font=('Chinese block letters', 14),
                         bg='silver', fg='black', width=int(float(size[0] * 0.02)), height=int(float(0.0025 * size[1])),
                          command=commands.fit)
button12.place(x=int(float(size[0] * 0.8)), y=int(float(0.35 * size[1])))

# Import another picture
button13 = tkinter.Button(root, text='import picture', font=('Chinese block letters', 14),
                         bg='silver', fg='yellow', width=int(float(size[0] * 0.02)), height=int(float(0.0025 * size[1])),
                          command=commands.import_image)
button13.place(x=int(float(size[0] * 0.8)), y=int(float(0.5 * size[1])))

# Import another background music
button14 = tkinter.Button(root, text='Import music', font=('Chinese block letters', 14),
                         bg='silver', fg='indigo', width=int(float(size[0] * 0.02)), height=int(float(0.0025 * size[1])),
                          command=commands.music)
button14.place(x=int(float(size[0] * 0.8)), y=int(float(0.65 * size[1])))

# Modify picture transparency
button15 = tkinter.Button(root, text='transparency', font=('Chinese block letters', 14),
                         bg='silver', fg='green', width=int(float(size[0] * 0.02)), height=int(float(0.0025 * size[1])),
                          command=commands.alpha)
button15.place(x=int(float(size[0] * 0.8)), y=int(float(0.8 * size[1])))

# menu
menu = tkinter.Menu(root)
root['menu'] = menu
f1 = tkinter.Menu(menu, tearoff=False)
f1.add_command(label='Reset registered machine', command=commands.reg)
f1.add_command(label='about', command=commands.about)
menu.add_cascade(label='menu', menu=f1)
root.mainloop()
The most basic initialization file --- initialize ini
This kind of file is very easy to use. You can dynamically modify the call by yourself. There is no need to modify the call in the code, and then package and package
The built-in configobj module can be used to operate the ini file. The configobj class in the module is called to generate a dictionary. From my source code above, it can be seen that most button operations are actually operations on the dictionary.
Here is a brief introduction to the functions of key value pairs:
Width = default width of 600 # snow screen (max. 600)
Height = default height of 400 # snow screen (max. 400)
num = 200 # default number of snowflakes (50 to 250)
back_image = bg.jpg # snow screen background picture 1
 back_image2 = bg2.png # snow screen background picture 2
 back_music = jn.mp3 # background music
 Alpha = transparency of 120 # snow screen background picture 2 (0 to 255)
snow_color = 192, 192, 192 # snowflake color (all three values are 0 to 255), because it is displayed on the screen. In order to be more realistic, the default value is silver RGB value
In addition, I added the RGB value modification of snowflake color in this initialization file, but did not provide the relevant procedures for operation. Users only need to modify the above key values manually. In case of error, don't worry about the above commands Py provides a re registration machine. In one step, you can see the snow again
width = 600
height = 400
num = 200
back_image = bg.jpg
back_image2 = bg2.png
back_music = jn.mp3
alpha = 120
snow_color = 192, 192, 192
Finally, let's look at the effect:
 Uh... It's a little unclear here
OK, I'll explain it in detail here (of course, I don't provide relevant materials here). If you don't run successfully in your environment, you can download it through the link I provide below. If you need to reprint, please provide the reprint address. If you have any questions, please leave a message below. Please give me more advice.
Finally, I'd like to share my personal communication group with you here. You are welcome to join the group at all stages to discuss and communicate together. There will be resource sharing and lucky draw from time to time in the group. The following is the QQ group number: 719560645
GitHub link: https://github.com/PythonnotJava/snow.git https://github.com/PythonnotJava/snow.git
Note here: alicloud disk is an installation package (in full form). If the link fails, please leave a message or send a private letter.