In C #, a message has two directions, one to Message and one to INotify. This is mainly about INotify.
INotify is also called a notice. Whether it is called a message or a notice, it means to convey information.
Definition of message
The INotify message is actually an interface called INotify Property Changed. The interface is defined as follows:
 //Notify the client that a property value has changed.
 public interface INotifyPropertyChanged
 {
     //Occurs when the property value is changed.
     event PropertyChangedEventHandler PropertyChanged;
 }
The definition is simple. We can see that this interface defines only one event attribute, PropertyChanged. So this Property Changed is the core of the message.
The way to learn how to apply messages is to create a class that inherits the INotifyPropertyChanged interface and then implement PropertyChanged within the class.
Application of message
The message described above is used to convey information. Then some students may be curious, can not the object of reference type encapsulate and transmit information? Why use news?
Because some data is stored in objects of non-reference type. For example, strings, or numbers.
In order that the modification of data such as strings and numbers can be passed back to the source as well as the reference type, messages need to be used.
Let's look at the basic usage of messages.
First, we create a project using WPF, and then create a page named Windows Notify, which is edited as follows:
<Window x:Class="WpfApplication.WindowNotify"
        xmlns="http://schemas.microsoft.com/winfx/2006/xaml/presentation"
        xmlns:x="http://schemas.microsoft.com/winfx/2006/xaml"
        Title="WindowNotify" Height="120" Width="200">
    <Grid>
        <StackPanel>
            <TextBox Name="txtName" VerticalAlignment="Top" Height="24" ></TextBox>
            <TextBox Name="txtNameNotify" VerticalAlignment="Top"  Height="24" ></TextBox>
            <Button Click="Button_Click" Height="30" Content="View results"></Button>
        </StackPanel>
    </Grid>
</Window>
Next, edit Xaml for the cs file, as follows:
public partial class WindowNotify : Window
{
    private string _KName = "Kiba518";
    public string KName
    {
        get { return _KName; }
        set { _KName = value; }
    }
    WindowNotifyViewModel vm;
    public WindowNotify()
    {
        InitializeComponent();
        vm = new WindowNotifyViewModel();
        Binding bding = new Binding();
        bding.Path = new PropertyPath("KName");
        bding.Mode = BindingMode.TwoWay;
        bding.Source = vm;
        txtNameNotify.SetBinding(TextBox.TextProperty, bding);
        txtName.Text = KName;
        txtNameNotify.Text = vm.KName;
    }
    private void Button_Click(object sender, RoutedEventArgs e)
    {
        MessageBox.Show("[txtName:" + KName + "]     |    [txtNameNotify:" + vm.KName + "]");
    }
}
public class WindowNotifyViewModel : INotifyPropertyChanged
{
    public event PropertyChangedEventHandler PropertyChanged;
    private string _KName = "Kiba518Notify";
    public string KName
    {
        get { return _KName; }
        set
        {
            _KName = value;
            if (this.PropertyChanged != null)
            {
                this.PropertyChanged(this, new PropertyChangedEventArgs("KName"));
            }
        }
    }
}
Here we create a View Model, Windows Notify View Model. We let the VM inherit INotifyProperty Changed, then define a KName attribute, and define the location where the Property Changed event triggers.
Some students may wonder when the Property Changed event was assigned. Don't worry. Please look down patiently.
After the ViewModel definition is complete, let's look at the cs file corresponding to Xaml. Here we also define a KName attribute. Then, when initializing, KName of cs file and KName of VM are assigned to two TextBox controls defined by the foreground respectively.
When assigning values with the KName attribute of vm, it's a little special. I'll talk about it later.
Then we run the page and modify the values in the two text boxes. Then click the View Results button. The interface is as follows:
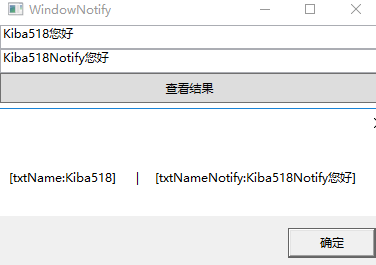
As you can see from the figure, the interface modifies the Text attribute of TextBox, and the KName attribute of Windows NotifyViewModel synchronizes the modified value, while the KName of Windows Notify does not.
After looking at the results, let's look back at the strange assignment of VM's KName. Let's start with the first sentence:
Binding bding = new Binding();
Binding here means binding, and this line of code is clearly used to define a binding.
Binding is a difficult word to understand. How do we understand it?
Simply, we can understand binding as lasso, since it is lasso, then there should be two attributes, one is a lasso, the other is a lasso.
After the Lasso is declared, we need to assign the end of the lasso, that is, the data source.
In the code, we use Binding's Path and Source to set the attributes of the data source and the data source binding at the end of the cable. After that, we also set the binding mode to be two-way binding, that is, both modifications will be carried out data transfer.
After setting the lasso, we let the TextBox control roll itself into the lasso and set the properties bound by the TextBox control. The code is as follows:
txtNameNotify.SetBinding(TextBox.TextProperty, bding);
When our TextBox control goes into the socket itself, it assigns the Property Changed of the data source, so that we can transfer the string data.
Of course, this assignment looks awkward. So is there a simpler way?
The answer, of course, is yes.
Basic Application of MVVM
The above code has already implemented the ViewModel, so as long as it is optimized on this basis, the simplest MVVM application can be realized.
Optimize the Xaml code as follows:
<StackPanel>
    <TextBox Name="txtNameNotify" Text="{Binding KName}" VerticalAlignment="Top"  Height="24" ></TextBox>
    <Button Click="Button_Click" Height="30" Content="View results"></Button>
</StackPanel>
Optimize the Xaml.cs code as follows:
 public partial class WindowNotify : Window
 {
     public WindowNotify()
     {
         InitializeComponent();
         this.DataContext = new WindowNotifyViewModel();

     }
     private void Button_Click(object sender, RoutedEventArgs e)
     {
         var vm = this.DataContext as WindowNotifyViewModel;
         MessageBox.Show("[txtNameNotify:" + vm.KName + "]");
     }
 }
 public class WindowNotifyViewModel : INotifyPropertyChanged
 {
     public event PropertyChangedEventHandler PropertyChanged;
     private string _KName = "Kiba518";
     public string KName
     {
         get { return _KName; }
         set
         {
             _KName = value;
             if (this.PropertyChanged != null)
             {
                 this.PropertyChanged(this, new PropertyChangedEventArgs("KName"));
             }
         }
     }
 }
From the above code, we can see that in the Xaml file, the Text attribute can use the abbreviated mode {Binding KName} to implement the complex binding assignment just now.
In the Xaml.cs file, we assign the VeiwMode to the DataContext data context, and then we see that the front end directly uses the attributes in the VM.
This simple MVVM is implemented.
Concise ViewModel
We saw the creation and use of the ViewModel above, but it's a little uncomfortable that every property in the ViewModel has to be set in such a complex form.
So let's continue to simplify the ViewModel with CallerMemberName.
The optimized code is as follows:
public class WindowNotifyViewModel : BaseViewModel
{
    private string _KName = "Kiba518";
    public string KName
    {
        get { return _KName; }
        set
        {
            _KName = value;
            OnPropertyChanged();
        }
    }
}
public class BaseViewModel : INotifyPropertyChanged
{
    public event PropertyChangedEventHandler PropertyChanged;
    protected void OnPropertyChanged([CallerMemberName]string propertyName = "")
    {
        if (PropertyChanged != null)
        {
            PropertyChanged(this, new PropertyChangedEventArgs(propertyName));
        }
    }
}
As shown above, we define a BaseViewModel, define the method OnPropertyChanged in BaseViewModel, and implement the trigger definition of event PropertyChanged in it.
Finally, we use the CallerMemberName feature to get the name of the attribute that triggered the method in the method OnPropertyChanged.
Then we implemented the simpler ViewModel.
PS: CallerMemberName is used as a param parameter, as long as it is written in as shown above.
epilogue
At this point, the application of the message is finished. Messages are undoubtedly the core technology of MVVM. Learn the message to understand MVVM better.
And learning news can also help us better understand the MVVM of the popular front-end JS. Although the way of realization is different, but the truth is the same.
C# Grammar: Various Applications of Generics
C# Grammar: The Correct Opening Way of await and async
C# Grammar Events, Big Brother who is gradually marginalized.
----------------------------------------------------------------------------------------------------
Note: This article is original. Welcome to reprint it. Please give a link to this article in the obvious place on the article page.
If you think this article is good, please click on the recommendation in the lower right corner. Thank you very much.
If you think this article is helpful to you, you might as well give Alipay a little reward.