01 start project
- Open Visual Studio
- Create a new WPF application named "Caliburn.Micro.Hello"
- Add to Caliburn Reference to micro nuget package, the latest version is 4.0.173, updated on May 9, 2021 (2021 / 5 / 9)
- Delete MainWindow.xaml and remove StartupUri from App.xaml as follows:
<Application x:Class="Caliburn.Micro.Hello.App"
             xmlns="http://schemas.microsoft.com/winfx/2006/xaml/presentation"
             xmlns:x="http://schemas.microsoft.com/winfx/2006/xaml"
             xmlns:local="clr-namespace:Caliburn.Micro.Hello">
    <Application.Resources>

    </Application.Resources>
</Application>
Since Caliburn Micro prefers the ViewModel first approach. Let's start here.
① Create the first ViewModel, create a new class and call it "ShellViewModel".
② Open shellviewmodel CS and implement it with the following code:
using System.Windows;

namespace Caliburn.Micro.Hello.ViewModels
{
    public class ShellViewModel : PropertyChangedBase
    {
        string name;

        public string Name
        {
            get { return name; }
            set
            {
                name = value;
                NotifyOfPropertyChange(() => Name);
                NotifyOfPropertyChange(() => CanSayHello);
            }
        }

        public bool CanSayHello
        {
            get { return !string.IsNullOrWhiteSpace(Name); }
        }

        public void SayHello()
        {
            MessageBox.Show(string.Format("Hello {0}!", Name)); //Don't do this in real life :)
        }
    }
Note that the ShellViewModel inherits from PropertyChangedBase. This is a base class that implements the infrastructure for property change notification and automatically performs UI thread marshaling. It will come in handy:)
Now that we have the ViewModel, let's create a bootstrap. The bootstrap configures the framework and tells it what to do.
Create a new class called "hellobotstrapper". You can use the following short piece of code:
namespace Caliburn.Micro.Hello {
    public class HelloBootstrapper : BootstrapperBase {
        public HelloBootstrapper() {
            Initialize();
        }

        protected override void OnStartup(object sender, StartupEventArgs e) {
            DisplayRootViewFor<ShellViewModel>();
        }
    }
}
Bootstrapper allows you to specify the type of root view model using displayroutviewfor < tviewmodel > (). The root view model is Caliburn Micro instantiates and displays the view model of the application.
Next, we need to implement "Hello bootstrapper" so that it runs at startup. To do this, update app Xaml, add the bootstrap to your resource as follows:
02WPF
<Application xmlns="http://schemas.microsoft.com/winfx/2006/xaml/presentation"
             xmlns:x="http://schemas.microsoft.com/winfx/2006/xaml"
             xmlns:local="clr-namespace:Caliburn.Micro.Hello"
             x:Class="Caliburn.Micro.Hello.App">
    <Application.Resources>
        <ResourceDictionary>
            <ResourceDictionary.MergedDictionaries>
                <ResourceDictionary>
                    <local:HelloBootstrapper x:Key="bootstrapper" />
                </ResourceDictionary>
            </ResourceDictionary.MergedDictionaries>
        </ResourceDictionary>
    </Application.Resources>
</Application>
All we have to do is put a Caliburn in the application Micro bootstrap. Resources and it will do the rest. Now, run the application. You should see the following:

Caliburn.Micro created the ShellViewModel, but didn't know how to render it without a view. So, let's create a view and let it find.
Create a new user control (WPF) named "ShellView". Use the following xaml:
<UserControl x:Class="Caliburn.Micro.Hello.ShellView"
xmlns="http://schemas.microsoft.com/winfx/2006/xaml/presentation"
xmlns:x="http://schemas.microsoft.com/winfx/2006/xaml"
Height="450" Width="800">
<StackPanel>
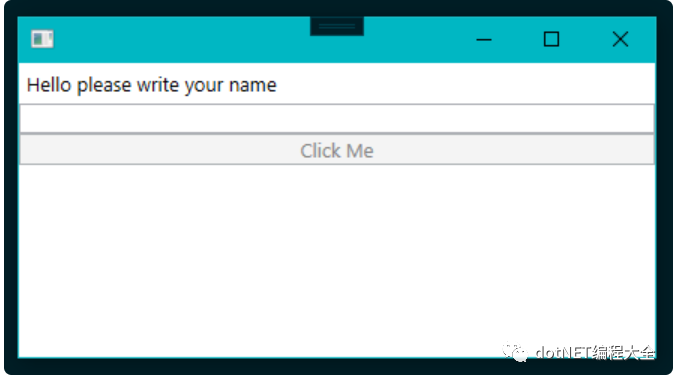
<Label Content="Hello please write your name" />
<TextBox x:Name="Name" />
<Button x:Name="SayHello"
Content="Click Me" />
</StackPanel>
</UserControl>Run the application again. You should now see the UI:
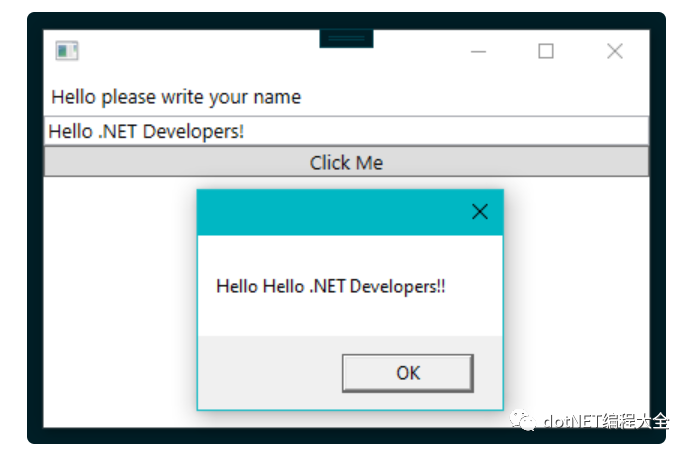
Typing in the text box enables the button, and clicking the button displays a message:
03 working principle
Caliburn.Micro uses a simple naming convention to locate the view of ViewModels. Essentially, it accepts the full name and removes "Model" from it.
Therefore, given: myapp ViewModels. MyViewModel
It will look for: myapp Views. MyView
When you view the view and ViewModel side by side, you can see that the text box with x:Name = "Name" is bound to the "Name" property on the ViewModel. You can also see that the button with x:Name = "SayHello" is bound to a method with the same Name on ViewMModel. The CanSayHello property protects access to SayHello operations by disabling buttons. These are Caliburn Micro's ActionMessage and Conventions functions are the foundation.
There's still a lot to show. Next, we can integrate an IoC container, such as MEF.
Original title: Caliburn Micro Xaml made easy
Original link: https://caliburnmicro.com/documentation/configuration
dotnet programming Encyclopedia