Canokeys
F2A
Canokey uses Yubikey Authenticator to manage F2A.
Download Yubikey Authenticator. The following is the official download website of Yubikey Authenticator
https://www.yubico.com/products/yubico-authenticator/#h-download-yubico-authenticator
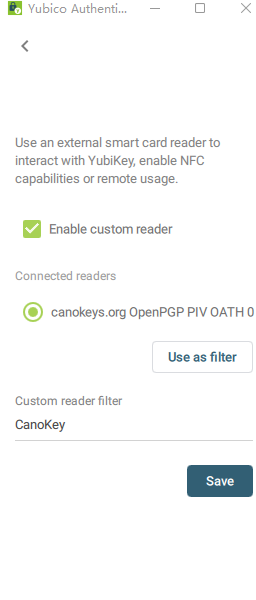
Run Yubikey Authenticator
Enter the custom reader and fill in the CanoKey in the custom reader filter
Add account in the upper right corner adds F2A

Issuer: Note optional
Account name : User name is required
Secret Key : Hotp or Totp of key Required
OpenPGP
Install GPG
Windows users can download Gpg4Win , Linux/macOS users can use the corresponding package management software to install
Generate master key
gpg --expert --full-gen-key #Generate GPG KEY
ECC algorithm is recommended
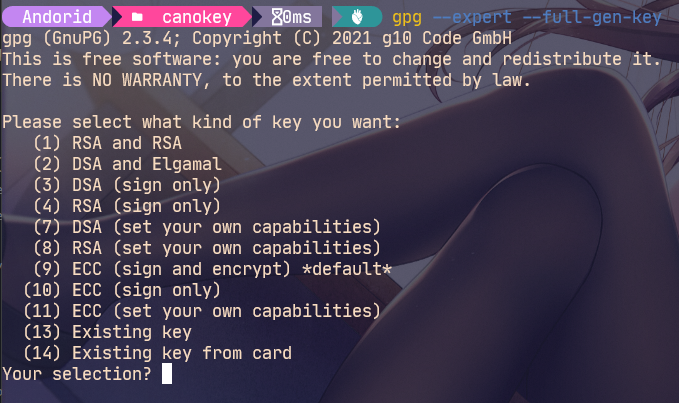
choice(11) ECC (set your own capabilities) # Set your own function master key, only keep the certificate function, and other functions (Encr,Sign,Auth) use the sub key
# The sub key is divided into three parts to obtain three different functions
# encr decryption function
# sign signature function
# auth login verification function
Select first (S) Toggle the sign capability
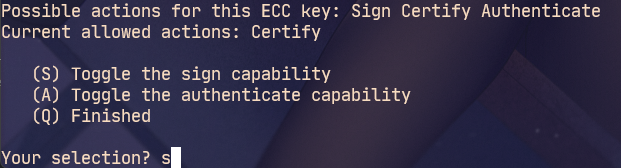
Enter after q sign out
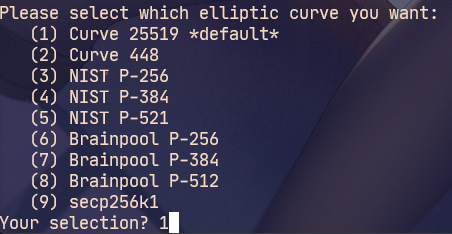
Type 1 to select the default algorithm
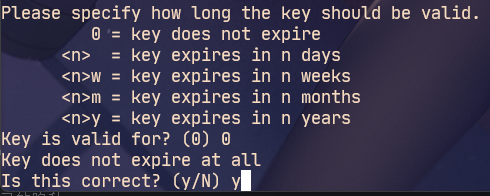
Set master key never to expire
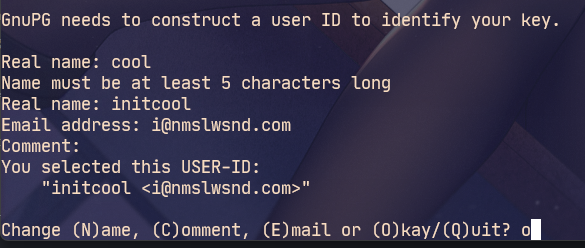
Fill in the information according to the actual situation
Windnows A pop-up window will pop up to enter the password. Be sure to keep it!!!
# The revocation certificate will be automatically generated and saved in a safe place
gpg: AllowSetForegroundWindow(22428) failed: �ܾ����ʡ�
gpg: revocation certificate stored as 'C:\\Users\\Andorid\\AppData\\Roaming\\gnupg\\openpgp-revocs.d\\<Private key here>.rev'
# The above REV file is the certificate of revocation
public and secret key created and signed.
pub   ed25519 2022-01-02 [SC]
      <Here is Pub>
uid                      <Here is Name> <Here is email>
Generate subkey
gpg --fingerprint --keyid-format long -K
Sub keys of different functions are generated below, where < fingerprint > is the key fingerprint output above, which is the private key in this example. The last 2y is the key expiration time, which can be set by yourself. If it is not filled in, it will never expire by default.
gpg --quick-add-key <fingerprint> cv25519 encr 2y
gpg --quick-add-key <fingerprint> ed25519 auth 2y
gpg --quick-add-key <fingerprint> ed25519 sign 2y
Looking at the current private key again, you can see that it already contains these three sub keys.
gpg --fingerprint --keyid-format long -K
The sub keys (SSBs) of the three functions are generated above, which are encryption (E), authentication (A) and signature (S), corresponding to the three slots in the OpenPGP Applet. Due to the implementation of ECC, the algorithm of encryption key is different from other key algorithms.
Encryption keys are used to encrypt files and information. The signature key is mainly used to sign your own information to ensure that it really comes from my information. The authentication key is mainly used for SSH login.
Backup GPG
# Public key
gpg -ao public-key.pub --export <ed25519/16 position>
# Master key, please keep it!!!
# Note the following after the key id!, It means that only one private key is exported. If not, all private keys are exported by default.
gpg -ao sec-key.asc --export-secret-key <ed25519/16 position>!
# sign subkey
gpg -ao sign-key.asc --export-secret-key <ed25519/16 position>!
gpg -ao auth-key.asc --export-secret-key <ed25519/16 position>!
gpg -ao encr-key.asc --export-secret-key <ed25519/16 position>!
Import Canokey
# View smart card device status
gpg --card-status
# Write GPG
gpg --edit-key <ed25519/16 position> # SEC key above
# Select the first subkey
key 1
# Write to smart card
keytocard
# Enter again to deselect
key 1
# Select second subkey
key 2
keytocard
key 2
key 3
keytocard
# Save changes and exit
save

#Check the device status again. You can see that the sub key identifier is SSB >, which means that there is only one pointer to the Card No: f1d0 XXXXXXXX smart card locally, and there is no private key. Now you can delete the master key. Please confirm that you have backed up the master key safely.
gpg --card-status
Delete local key
gpg --delete-secret-keys <ed25519/16 position> # SEC key above
To ensure security, you can also directly delete the working directory of gpg:% APPDATA%\gnupg, Linux / MacOS: ~ / gunpg.
Use Canokey
At this point, switch back to the daily environment and import the public key first
gpg --import public-key.pub
Then set the subkey to point to Canokey
gpg --edit-card
gpg/card> fetch
At this point, when you view the local private key, you can see that it has pointed to Canokey
gpg --fingerprint --keyid-format long -K
Configure gpg path
git config --global gpg.program "C:\Program Files (x86)\GnuPG\bin\gpg.exe" --replace-all
Git Commit signature
First, ensure that the Git local configuration and the mailbox information in GitHub are included in the UID, and then set Git to specify to use the signature (S) key in the sub key.
git config --global user.signingkey <ed25519/16 position> # Sign key for above
Then add the - S parameter to git commit to use gpg for signature. Automatic gpg signature can also be set in the configuration. It is not recommended to enable this option globally here, because some scripts may use commands involving commit such as git am, which will cause problems if it is enabled globally.
git config commit.gpgsign true
If you submit to GitHub, go to GitHub SSH and GPG keys Add public key. After adding here, you can directly obtain the public key through the corresponding GitHub ID: https://github.com/ <yourid>. gpg
PIV
First, add your private key to the smart card on the Web side, and then go to WinCrypt SSH Agent Download and run. At this time, view the public key information read by SSH agent and add the output public key information to ~ /. Of the server ssh/authorized_keys
# Set environment pool
$Env:SSH_AUTH_SOCK="\\.\pipe\openssh-ssh-agent"
# View ssh list
ssh-add -L
Connect SSH at this time user@host , a page will pop up to prompt you to enter the PIN. Note that the PIV Applet PIN is entered at this time. After entering, you can successfully connect to the server.
tips: Insufficient permissions may occur,Need to disable Windows service OpenSSH Authentication Agent
Finally, you can add the program shortcut to the startup directory% AppData%\Microsoft\Windows\Start Menu\Programs\Startup for direct use.