CANopen migration steps and ESD editor installation method
preface
With reference to the way online, I sorted out my personal practical steps!
1, Environment construction
Download the CANFestival source code and object dictionary tool, which can be downloaded from the official website or from various forums. All the things I need are packaged in my online disk for easy download
Link: https://pan.baidu.com/s/1ee5PeAU23vLV0dZP_oE91Q
Extraction code: 1234
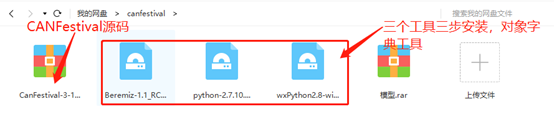
1.1 installation sequence
(1)python-2.7.3
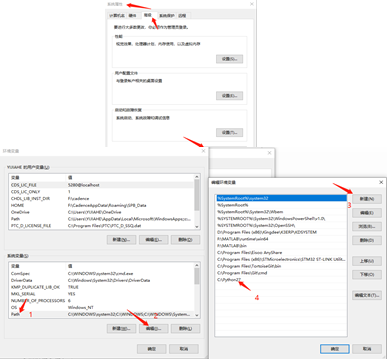
After the default installation step, start to create environment variables,
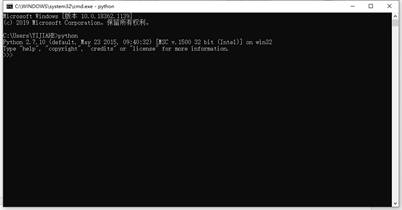
Among them, 4 is the path of python installation. It is not recommended to install the software directly by default. After setting the environment variable, open the command running window instead (shortcut key WIN+R) and input CMD.
Then enter python in the window, and the interface shown in the figure (prompt python version) indicates that the environment variable is created successfully.
(2)wxPython2.8
(3)beremiz
When installing, choose Disk C (the default path).
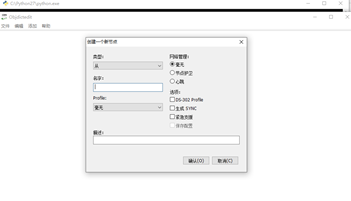
Then install beremiz. After that, find the C: \ program files (x86) \ beremiz \ canfestival-3 \ objdictgen \ objdictedit in the festival-3 in the beremiz folder Double click the PY file, and the interface is as shown in the figure.
So far, the object dictionary has been installed. How to use it will be explained later.
2, CANfestival migration steps
1. Step 1
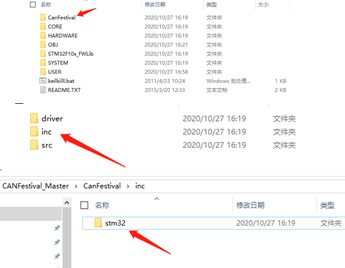
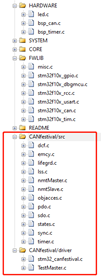
Create or find the simplest history code of STM32, open it, create CanFestival folder, then create dirver, inc and src folders under CanFestival folder, and continue to create STM32 folder under inc folder
2. Step 2
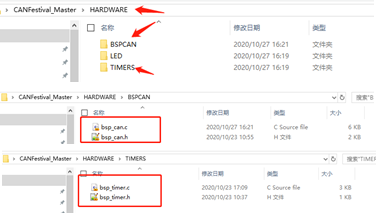
Find the TIM bottom configuration and CAN bottom configuration. The bottom configuration needs to be changed to bsp ******************************************************, Because it will be connected with CAN in CANFestival later C conflict.
3. Step 3
Copy the files in the CANFestival source code we need to create under our new folder.
(1) Put DCF. In the CanFestival-3-10\src directory c,emcy.c,lifegrd.c,lss.c,nmtMaster.c,nmtSlave.c,objacces.c,pdo.c,sdo.c,states.c,sync.c,timer.c a total of 12 files are copied to the # CanFestival\src directory.
(2) All the files in the CanFestival-3-10\include directory will be deleted h file, a total of 19 files, all of which are copied to CanFestival\inc directory, and then objdict in CanFestival-3-10\examples\AVR\Slave directory h files are copied to the CanFestival\inc directory, a total of 20;
(3) Put applicfg. In CanFestival-3-10\include\AVR directory h,canfestival.h,config.h,timerscfg.h a total of 4 header files are copied to the Canfestival\inc\stm32 directory;
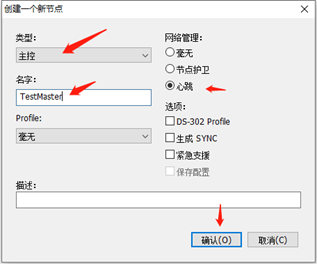
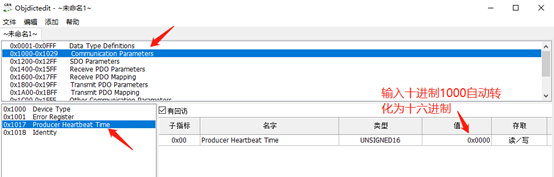
(4) Create a new STM32 in this directory_ canfestival. C and stm32_canfestival.h documents. Open Dictionary (obj: \ program. Obj \ dict) Py (do the simplest heartbeat message test first) other follow-up studies. Click create new node as shown in the figure below.
Click OK - then click file - save as (. od file) and save it on the desktop.
Continue to click on file - create Dictionary - and save it on the desktop (. c file), but it will actually generate two files, one now
There are three files in total on the desktop testmaster c,TestMaster.h,TestMaster.od.

Copy these three files to C: \ users \ Yijiahe \ desktop \ canfestival_ There are five files in the master \ canfestival \ driver folder. (the three files created from the slave station are the same. When creating with the object dictionary editor, change the name to TestSlave.c)
If the slave device is implemented, then testslave. In the canfestival\driver directory C file is added to the project. If the main device is implemented, testmaster C file is added to the project.
4. Step 4
Open the project file and save it Add the c file to the project, and then set the file path. In stm32_canfestival.c contains the header file #include "canfestival.h"
(1) Edit stm32_canfestival.c the documents are as follows:
#include "stm32_canfestival.h"
#include "bsp_can.h"
unsigned int TimeCNT=0;//Time counting
unsigned int NextTime=0;//Next trigger time count
unsigned int TIMER_MAX_COUNT=70000;//Maximum time count
static TIMEVAL last_time_set = TIMEVAL_MAX;//Last time count
void setTimer(TIMEVAL value)
	 {
		 NextTime=(TimeCNT+value)%TIMER_MAX_COUNT;
	 }
TIMEVAL getElapsedTime(void)
{
	int ret=0;
ret = TimeCNT> last_time_set ? TimeCNT - last_time_set : TimeCNT + TIMER_MAX_COUNT - last_time_set;
         return ret;
}
 unsigned char canSend(CAN_PORT notused, Message *m)
{
uint32_t  i;
    CanTxMsg  TxMessage;
    CanTxMsg *ptx_msg=&TxMessage;
    ptx_msg->StdId = m->cob_id;
    if(m->rtr)
    ptx_msg->RTR = CAN_RTR_REMOTE;
    else
    ptx_msg->RTR = CAN_RTR_DATA;
    ptx_msg->IDE = CAN_ID_STD;
    ptx_msg->DLC = m->len;
    for(i = 0; i < m->len; i++)
    ptx_msg->Data[i] = m->data[i];
    if( CAN_Transmit( CAN1, ptx_msg )==CAN_NO_MB)
    {
        return 0xff;
    }
    else
    {
        return 0x00;
    }
}
void timerForCan(void)
{
		TimeCNT++;
		if (TimeCNT>=TIMER_MAX_COUNT)
		{
		TimeCNT=0;
		}
		if (TimeCNT==NextTime)
		{
			last_time_set = TimeCNT;
			TimeDispatch();
		}
}
(2)canfestival.h the documents are as follows:
#ifndef __STM32_CANFESTIVAL_H
#define __STM32_CANFESTIVAL_H
#include "canfestival.h"
void setTimer(TIMEVAL value);
TIMEVAL getElapsedTime(void);
unsigned char canSend(CAN_PORT notused, Message *m);
void timerForCan(void);
#endif
(3) Turn on can interrupt, and in BSP_ can. Add callback function to C file
//Interrupt service function

void USB_LP_CAN1_RX0_IRQHandler(void)

{

//       CanRxMsg RxMessage;

//        int i=0;

//    CAN_Receive(CAN1, 0, &RxMessage);

//        for(i=0;i<8;i++)

//        printf("rxbuf[%d]:%d\r\n",i,RxMessage.Data[i]);

 u32 i;

   Message m;

   CanRxMsg RxMessage;

   CAN_Receive(CAN1, CAN_FIFO0, &RxMessage);


   m.cob_id=RxMessage.StdId;

   if(RxMessage.RTR == CAN_RTR_REMOTE)

   m.rtr=1;

   else if(RxMessage.RTR == CAN_RTR_DATA)

   m.rtr=0;

   m.len=RxMessage.DLC;

   for(i = 0; i < RxMessage.DLC; i++)

   m.data[i] = RxMessage.Data[i];

   canDispatch(&TestMaster_Data, &m);

}
Through the above steps, all the files are ready, but there will be errors in compilation, comment or delete config H file, open def C file delete two inline keywords
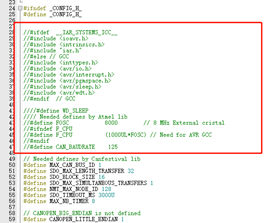
The other is the problem contained in the file. Continue to work on it after it is solved.
MS_TO_TIMEVAL and us_ TO_ The two macro definitions of timeval need to be modified to the corresponding interrupt time, otherwise it will affect the ms and US units of the dictionary configuration parameters
  // The timer is incrementing every 1 ms.
  #define MS_TO_TIMEVAL(ms) ((ms) * 1)
  #define US_TO_TIMEVAL(us) ((us) / 1000)
5. Step 5
CAN, TIM initialization and CANFestival are added to the main function code as follows:
CAN_Mode_Init(CAN_SJW_1tq,CAN_BS2_6tq,CAN_BS1_7tq,6,CAN_Mode_Normal);
	setNodeId(&TestMaster_Data, nodeID);
	setState(&TestMaster_Data, Initialisation);
	setState(&TestMaster_Data, Operational);
	TIM3_Int_Init(1000-1,84-1);
And join Can_Send_Msg(canbuf,8); To test whether the bottom layer is correct,
Compile the header file, fix all errors and continue. Here, if all the problems Can be solved, the code transplantation is completed. Next, use a Can card to test, using Guangcheng ECANTools software and USBCAN-II Pro.
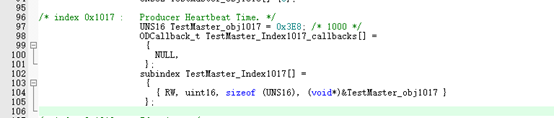
/*This will cause code to fly and hardware error*/
const indextable * TestMaster_scanIndexOD (UNS16 wIndex, UNS32 * errorCode, ODCallback_t **callbacks)
{
	int i;
	*callbacks = NULL;
	switch(wIndex){
		case 0x1000: i = 0;break;
		case 0x1001: i = 1;break;
		case 0x1017: i = 2;*callbacks = TestMaster_Index1017_callbacks; break;
		case 0x1018: i = 3;break;
		default:
//			*errorCode = OD_NO_SUCH_OBJECT;
			return NULL;
	}
	*errorCode = OD_SUCCESSFUL;
	return &TestMaster_objdict[i];
}
At this point, the code migration is completed.
Trace setstate (& objdict_data, initialization); Then it will automatically jump to Pre_operational state, which supports {0, 1, 1, 1, 0, 1}; In switchcommunicationstate(), StartOrStop(csLifeGuard,lifeGuardInit(d),lifeGuardStop(d)) will be executed, lifeGuardInit(d) will be executed, and heartbeat init (d) will be executed; When the timing time expires, the producer heartbeatalarm() will be executed, and the function will call the underlying CAN sending function cansend (D - > canhandle, & MSG); Send heartbeat message with frame ID 0x701.
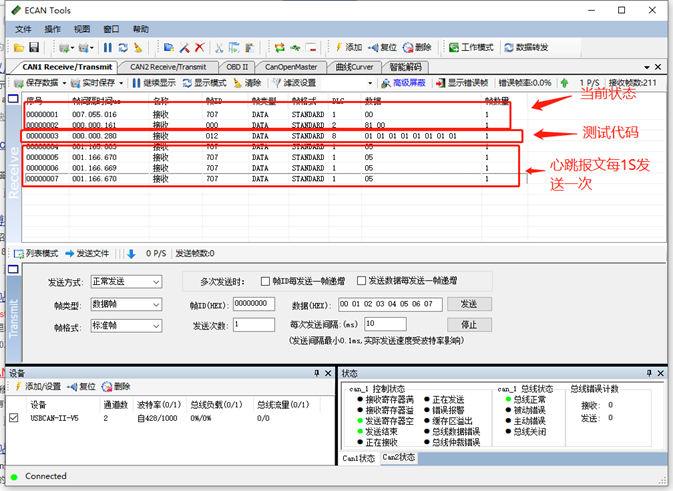
summary
After testing, the CANFestival heartbeat function is normal, which indicates that the bottom layer of CANopen is successfully connected with the application layer, and other functions need to be developed.