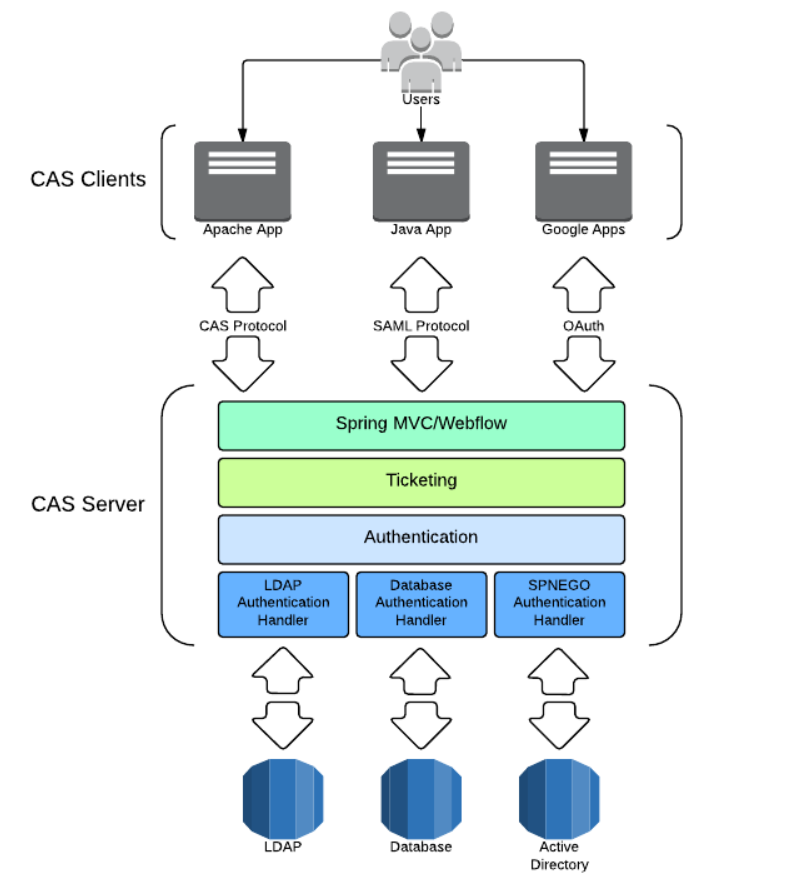
CAS (Central Authentication Service): a set of solutions for SSO, that is, unified identity authentication service or central identity server, which is composed of server and client, which is easy to integrate enterprise applications.
CAS principle
- framework
- The most basic protocol process of CAS
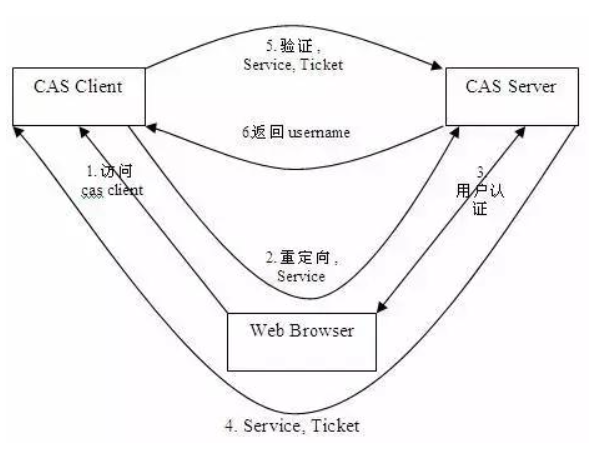
- Access service: the SSO client sends a request to access the service resources provided by the application system.
- Directional authentication: the SSO client redirects the user request to the SSO server.
- User authentication: user identity authentication.
- Issue ticket: the SSO server will generate a random Service Ticket.
- Verify ticket: the SSO server verifies the validity of the ticket Service Ticket. After verification, the client is allowed to access the service.
- Transmit user information: after the SSO server verifies the ticket, it transmits the user authentication result information to the client.
CAS Server deployment
-
Build war package
-
CAS overlay template project download address: https://github.com/apereo/cas-overlay-template , select the required version and download it locally. The new version needs to build its own war package.
git clone -b Branch name https://github.com/apereo/cas-overlay-template.git
-
After the initial construction of the project is completed, execute the command according to the prompt in README. cas.war can be found in the build/libs / directory.
-
If you want to configure by yourself, you can execute the. / gradlew[.bat] explodeWar command to decompress the war package, copy the extracted CAS Resources folder to the src/main / directory, and then modify the relevant files. The main configuration file src/main/resources/application.properties needs to be built again after modification to make the latest configuration effective.
-
-
cas needs to use https to access, so it needs to generate certificates and keys. Here, use the data certificate management tool keytool provided by Java
-
Generate key (alias, key and certificate name should be consistent)
keytool -genkey -alias castest -keyalg RSA -keystore Corresponding path/keystore/castest
-
Export certificate (issue certificate to castest here)
keytool -export -trustcacerts -alias castest -file Corresponding path/keystore/castest.cer -keystore Corresponding path//keystore/castest
-
Import the certificate into the JDK certificate Library (default password: changeit)
keytool -import -trustcacerts -alias castest -file Corresponding path/keystore/castest.cer -keystore "jdk route/jdk-11/lib/security/cacerts"
-
Configure tomcat https access, find conf/server.xml in the tomcat installation directory, add https configuration, and configure the generated key and the password set when generating the key into the file.
<Connector port="8443" protocol="org.apache.coyote.http11.Http11AprProtocol" maxThreads="150" SSLEnabled="true" scheme="https" secure="true" clientAuth="false" sslProtocol="TLS" keystoreFile="D:\CAS\keystore\castest" keystorePass="123456"> </Connector> -
Find the hosts file in the C:\Windows\System32\drivers\etc directory, add the configuration, and point the domain name issued by the certificate to 127.0.0.1
127.0.0.1 castest
-
-
Put the constructed war package into the webapps directory of Tomact, and start tomcat to automatically decompress and deploy the war package.
- If it starts normally, access https://castest:8443/cas/login You can access the default login page of CAS.
- The default static authentication method is adopted, with user name casuser and password Mellon.
-
We generally do not use static authentication in our actual development. We can configure database authentication as needed. MySQL database is used here.
-
Introduce relevant dependencies in build.gradle and pay attention to your own MySQL version
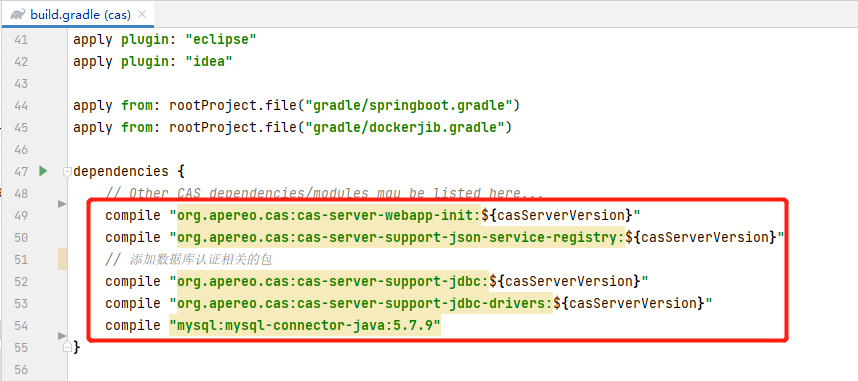
dependencies { // Other CAS dependencies/modules may be listed here... compile "org.apereo.cas:cas-server-webapp-init:${casServerVersion}" compile "org.apereo.cas:cas-server-support-json-service-registry:${casServerVersion}" // Add package related to database authentication compile "org.apereo.cas:cas-server-support-jdbc:${casServerVersion}" compile "org.apereo.cas:cas-server-support-jdbc-drivers:${casServerVersion}" compile "mysql:mysql-connector-java:5.7.9" // compile "org.jasig.cas:${casServerVersion}" } -
Comment out the previous static authentication configuration in src/main/resources/application.properties and add the database authentication configuration.
- The default password encryption method of CAS is MD5. If the password in the database is not encrypted, you need to manually generate the corresponding MD5 value to pass the verification. However, I use the online tool to generate MD5 encryption password, and the verification has not passed. The general reason for consulting the data is that the MD5 algorithm used by CAS is different from that used by us. You can implement PasswordEncoder yourself, The configuration uses its own implementation to verify the password (not implemented here).
- If it is not configured, the plaintext mode is used. Here, the plaintext mode is used.
##
# CAS Authentication Credentials
#
#cas.authn.accept.users=casuser::Mellon
#cas.authn.accept.name=Static Credentials
cas.jdbc.showSql=true
cas.authn.jdbc.query[0].dialect=org.hibernate.dialect.MySQL5Dialect
cas.authn.jdbc.query[0].url=jdbc:mysql://localhost:3306/hibernate_demo01?useUnicode=true&characterEncoding=utf8&zeroDateTimeBehavior=convertToNull&useSSL=true&serverTimezone=GMT%2B8
cas.authn.jdbc.query[0].user=root
cas.authn.jdbc.query[0].password=root
cas.authn.jdbc.query[0].sql=select user_passwd from d_user where user_name=?
# Password field name in database
cas.authn.jdbc.query[0].fieldPassword=user_passwd
# com.mysql.cj.jdbc.Driver: MySQL connector java version 6 has more time zone settings than version 5
cas.authn.jdbc.query[0].driverClass=com.mysql.cj.jdbc.Driver
#cas.authn.jdbc.query[0].passwordEncoder.type=DEFAULT
#cas.authn.jdbc.query[0].passwordEncoder.characterEncoding=UTF-8
#cas.authn.jdbc.query[0].passwordEncoder.encodingAlgorithm=MD5
Here, we can start tomcat and log in to CAS Server through the user name and password in the database.
-
-
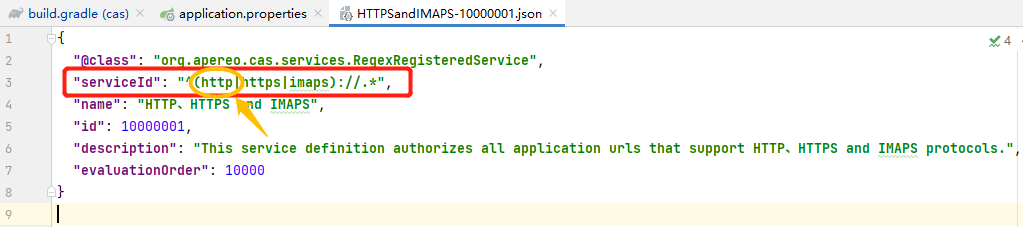
Add http access configuration in src/main/resources/services/HTTPSandIMAPS-10000001.json
{
  "@class": "org.apereo.cas.services.RegexRegisteredService",
  "serviceId": "^(http|https|imaps)://.*",
  "name": "HTTP,HTTPS and IMAPS",
  "id": 10000001,
  "description": "This service definition authorizes all application urls that support HTTP,HTTPS and IMAPS protocols.",
  "evaluationOrder": 10000
}
-
Add http access configuration in src/main/resources/application.properties
# Set http access
# json configuration file path for service registration
cas.serviceRegistry.json.location=classpath:/services
# Set security to false
cas.tgc.secure=false
# *******The setting cannot be correctly resolved when tomcat automatically deploys cas.war*******
# Open the json file for recognition. The default value is false
#cas.serviceRegistry.initFromJson=true
CAS Client Deployment
-
The client here is built based on spring MVC. You can build two modules under one project to facilitate subsequent testing of single sign on and logout. Deploy the two modules to tomcat and set different ports, such as http://localhost:18081/ , http://localhost:18082/ At the same time, it can be accessed normally.
-
Add cas client dependency in pom.xml
<!-- CAS Client related dependencies--> <dependency> <groupId>org.jasig.cas.client</groupId> <artifactId>cas-client-core</artifactId> <version>3.6.2</version> </dependency> -
Configure the relevant filters in src/main/webapp/WEB-INF/web.xml
- Note that localhost cannot be used as the access address of CAS Server and client, otherwise an error will be reported. I understand that it may be from CAS Server
<!-- Responsible for user authentication, must be enabled -->
<filter>
    <filter-name>CASFilter</filter-name>
    <filter-class>org.jasig.cas.client.authentication.AuthenticationFilter</filter-class>
    <!-- cas server Server of IP -->
    <init-param>
        <param-name>casServerLoginUrl</param-name>
        <param-value>https://castest:8443/cas/login</param-value>
    </init-param>
    <!-- cas client Client for IP -->
    <init-param>
        <param-name>serverName</param-name>
        <param-value>http://castest:18081</param-value>
    </init-param>
</filter>
<filter-mapping>
    <filter-name>CASFilter</filter-name>
    <url-pattern>/*</url-pattern>
</filter-mapping>
<!-- be responsible for Ticket The verification of must be enabled --> <filter> <filter-name>CAS Validation Filter</filter-name> <filter-class>org.jasig.cas.client.validation.Cas20ProxyReceivingTicketValidationFilter</filter-class> <!-- cas server Server of IP --> <init-param> <param-name>casServerUrlPrefix</param-name> <param-value>https://castest:8443/cas</param-value> </init-param> <!-- cas client Client for IP --> <init-param> <param-name>serverName</param-name> <param-value>http://castest:18081</param-value> </init-param> </filter> <filter-mapping> <filter-name>CAS Validation Filter</filter-name> <url-pattern>/*</url-pattern> </filter-mapping><!-- The filter is responsible for the implementation HttpServletRequest Requested package, if available SSO Login user name --> <filter> <filter-name>CAS HttpServletRequest Wrapper Filter</filter-name> <filter-class>org.jasig.cas.client.util.HttpServletRequestWrapperFilter</filter-class> </filter> <filter-mapping> <filter-name>CAS HttpServletRequest Wrapper Filter</filter-name> <url-pattern>/*</url-pattern> </filter-mapping> <filter> <filter-name>CAS Assertion Thread Local Filter</filter-name> <filter-class>org.jasig.cas.client.util.AssertionThreadLocalFilter</filter-class> </filter> <filter-mapping> <filter-name>CAS Assertion Thread Local Filter</filter-name> <url-pattern>/*</url-pattern> </filter-mapping> -
After configuration, restart the client to access http://localhost:18081/ At this time, you will be directly redirected to the login authentication page of CAS. Enter the correct user name and password to access the startup page, and then visit again http://localhost:18082/ You will directly access the startup page without logging in, which is single sign on.
-
Single sign out
- Configure relevant filters and listeners in src/main/webapp/WEB-INF/web.xml
<!-- Listener and filter for single sign out --> <listener> <listener-class>org.jasig.cas.client.session.SingleSignOutHttpSessionListener</listener-class> </listener> <filter> <filter-name>CAS Single Sign Out Filter</filter-name> <filter-class>org.jasig.cas.client.session.SingleSignOutFilter</filter-class> </filter> <filter-mapping> <filter-name>CAS Single Sign Out Filter</filter-name> <url-pattern>/*</url-pattern> </filter-mapping>- Write the logout method and redirect to the logout method of CAS Server. You can add a suffix service after the redirect url to indicate that you will return to the page specified by the service after logout.
@RequestMapping(value = "logout", method = {RequestMethod.GET, RequestMethod.POST}) public String logout (HttpSession session) { session.invalidate(); return "redirect:https://castest:8443/cas/logout?service=https://castest:8443/cas/login"; }- In index.jsp, you can add a login button to obtain the current login user and other information.
<%@page contentType="text/html; charset=utf-8" language="java" %>> <html> <body> <div style="text-align: right"> <a href="/logout">Logout</a> </div> <h2>Hello World!</h2> <%=request.getRemoteUser()%> </body> </html>- Restart the client to access http://localhost:18081/ , enter the correct user name and password to access the startup page, and then visit http://localhost:18082/ Then click log out and go back to http://localhost:18081/ The startup page refreshes the interface. At this time, the page will become the login page, that is, if you log out at 18082, then 18081 will also log out, that is, single sign out.
Here, the CAS Client is deployed.