CDH is the most complete and tested popular distribution of Apache Hadoop and related projects. CDH provides the core elements of Hadoop (scalable storage and distributed computing), as well as Web-based user interface and important enterprise functions.
Installing virtual machine CentOs
I installed the version of CentOs7 myself. There are image files, VM virtual machines and other files that may be useful to you in the following resources.
Link: https://pan.baidu.com/s/1rXpV1UyuL-Im5gSFiAOdUg
Extraction code: j20w
Related configuration
network configuration
This step is mainly to build three virtual machines in the same LAN and directly copy the one just installed. In the virtual machine setting section, pay attention to selecting NAT mode for network connection.
At the same time, the subnet of VMnet8 can also be set in the virtual machine network setting part. I use the 192.168.169.0 network segment.
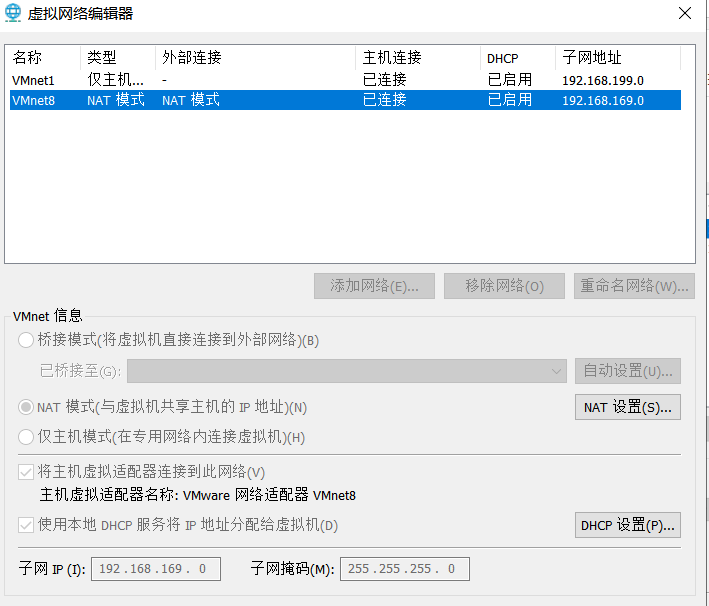
Of course, just use the default one directly. You can check the ip after starting up.
ifconfig
time synchronization
If the time of the machines in the cluster is not synchronized, it will bring some problems to our tasks. Therefore, we need to configure the time synchronization service for all the machines in the cluster.
yum install -y ntp
systemctl start ntpd.service
After starting the synchronization service, check whether it is in synchronization status.
ntpstat
Modify host name
This step of configuration allows the machines in the cluster to communicate with each other.
vi /etc/hosts
# File content
127.0.0.1   localhost localhost.localdomain localhost4 localhost4.localdomain4 Node 1 name
::1         localhost localhost.localdomain localhost6 localhost6.localdomain6
192.168.169.x Node 1 name
192.168.169.x Node 2 name
192.168.169.x Node 3 name
After setting, ping each other to test whether they can communicate with each other
ping Node name
Close SElinux
SELinux defines everyone's access rights to applications, processes and files on the system. It uses security policies (a set of rules that tell SELinux what can and cannot be accessed) to enforce the access allowed by the policy.
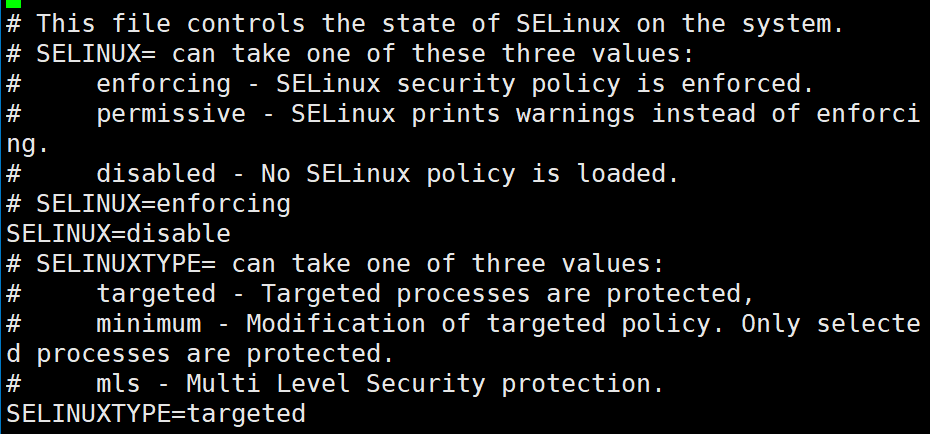
CDH needs to be closed, because opening it will affect file management. Modify the configuration file to set SELINUX to disable.
vi /etc/selinux/config
After modification, view the status through the following command.
getenforce
Turn off firewall
Turn off the firewall and turn off the firewall boot.
systemctl stop iptables.service
systemctl disable iptables.service
Password free login
After password free login is configured, hosts can log in to each other directly through su + host name. Here, the public and private keys are generated through rsa. The public key is sent to other hosts, and the private key is kept by itself. When verifying, use your own private key to encrypt the identity information, and the other party can log in after successfully decrypting and verifying the public key.
# Generate public-private key
ssh-keygen -t rsa
# Send public key to other hosts
ssh-copy-id Node 1 name
ssh-copy-id Node 2 name
ssh-copy-id Node 3 name
JAVA installation
Check for residual jdk s before installation.
rpm -qa | grep java
# If yes, execute the following command to delete
rpm -e -nodeps xx
The resource link at the beginning of the article contains the jdk package, which is uploaded through xshell and decompressed. Modify the configuration file after decompression.
tar zxvf jdk Package name -C /usr/java
# Modify profile
vi /etc/profile
# Add at the end of the file
# Java Home
export JAVA_HOME=/usr/java/jdk name
export PATH=$PATH:$JAVA_HOME/bin
# View java after configuration
java -version
CDH local warehouse construction
Because CDH is currently closed, there will be some problems downloading the CDH installation package. After a long search, we finally found a suitable solution.
(1) Create a file named cloudera-cdh5.repo in the / etc/yum.repos.d/ directory.
(2) The content of the modified file is as follows. It took a lot of effort to find the source of. In this way, yum can use the source of cloudera.
[cloudera-cdh5]
# Packages for Cloudera's Distribution for Hadoop,Version 5,on RedHat or CentOS 6 x86_64name=cloudera's Distribution for Hadoop,Version 5
baseurl=https://ro-bucharest-repo.bigstepcloud.com/cloudera-repos/cdh5/redhat/6/x86_64/cdh/5/
gpgkey =https://ro-bucharest-repo.bigstepcloud.com/cloudera-repos/cdh5/redhat/6/x86_64/cdh/RPM-GPG-KEY-cloudera
gpgcheck = 1
(3) Download two tools for building local sources later.
yum install -y yum-utils createrepo
(4) Download the CDH file locally. (very time consuming)
reposync -r cloudera-cdh5
(5) Install the https service, create the HTTP directory, and transfer the CDH file to the directory. Also modify baserurl=http: / / node1 name / cdh5 in the / etc/yum.repos.d/cloudera-cdh5.repo file.
# Install https
yum install -y httpd
systemctl start httpd.service
systemctl enable httpd.service
# Create directory and copy
mkdir -p /var/www/html/cdh5
cp -r cloudera-cdh5/RPM /var/www/html/cdh5/
cd /var/www/html/cdh5/
# Provide index for external use
createrepo .
Zookeeper installation
Hadoop depends on Zookeeper, so install Zookeeper first.
# Download zookeeper
yum install -y zookeeper zookeeper-server
# Specify the id, which can only be a number. In my configuration, node-1 is 1, node-2 is 2, and node-3 is 3
service zookeeper-server init --myid==1
# Modify profile
vi /etc/zookeeper/conf/zoo.cfg
# Add the following at the end of the configuration file
server.1=Node 1 name:2888:3888
server.2=Node 2 name:2888:3888
server.3=Node 3 name:2888:3888
In the above zoo.cfg file, 2888 represents the port number for exchanging information with the leaders in the cluster, and 3888 represents that it is assumed that the Leader server in the cluster needs a port for election after hanging up. This port is used for mutual communication between servers during election.
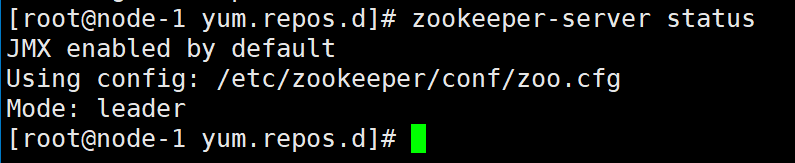
# Start zookeeper
service zookeeper-server start
# View cluster status after successful startup
zookeeper-server status

You will find that node-1 is the leader node and the other two are the follower nodes.
Hadoop installation
The master node is node-1, and the slave nodes are node-2 and node-3.
# Installing Hadoop
# Master node
yum -y install hadoop hadoop-yarn-resourcemanager hadoop-yarn-nodemanager hadoop-hdfs-secondarynamenode hadoop-hdfs-namenode hadoop-hdfs-datanode hadoop-mapreduce hadoop-mapreduce-historyserver hadoop-client
# Slave node
yum -y install hadoop hadoop-yarn-nodemanager hadoop-hdfs-datanode hadoop-mapreduce hadoop-client
# Configure hdfs
# Enter the configuration folder and copy conf (keep the original file)
cd /etc/hadoop
cp -r conf.empty conf.itcast
# Create a soft connection and assign priority
alternatives --install /etc/hadoop/conf hadoop-conf /etc/hadoop/conf.itcast 50
# Determine association
alternatives --set hadoop-conf /etc/hadoop/conf.itcast
# View Hadoop conf Association
alternatives --display hadoop-conf
# Go to conf.itcast and modify the configuration file
cd conf.itcast
vi core-site.xml
# Add content
<property>
    <name>fs.defaultFS</name>
    <value>hdfs://node-1:8020</value>
</property>

vi hdfs-site.xml
# Add content
<property>
    <name>dfs.namenode.name.dir</name>
    <value>file:///var/lib/hadoop-hdfs/cache/hdfs/dfs/name</value>
</property>
<property>
    <name>dfs.datanode.data.dir</name>
    <value>file:///var/lib/hadoop-hdfs/cache/hdfs/dfs/data</value>
</property>
<property>
    <name>dfs.permissions.superusergroup</name>
    <value>hadoop</value>
</property>
<property>
    <name>dfs.namenode.http-address</name>
    <value>node-1:50070</value>
</property>
<property>
    <name>dfs.permissions.enabled</name>
    <value>false</value>
</property>
# Create the required directory
mkdir -p /var/lib/hadoop-hdfs/cache/hdfs/dfs/name
mkdir -p /var/lib/hadoop-hdfs/cache/hdfs/dfs/data
# Specify permissions
chown -R hdfs:hdfs /var/lib/hadoop-hdfs/cache/hdfs/dfs/name
chown -R hdfs:hdfs /var/lib/hadoop-hdfs/cache/hdfs/dfs/data
chmod 700 /var/lib/hadoop-hdfs/cache/hdfs/dfs/name
chmod 700 /var/lib/hadoop-hdfs/cache/hdfs/dfs/data
# Master node format namenode
sudo -u hdfs hdfs namenode -format
# Master node startup
service hadoop-hdfs-namenode start
service hadoop-hdfs-secondarynamenode start
# Start from node
service hadoop-hdfs-datanode start
# Modify and configure Yarn and Mapreduce
vi /etc/hadoop/conf.itcast/mapred-site.xml
<property>
    <name>mapreduce.framework.name</name>
    <value>yarn</value>
</property>
<property>
    <name>mapreduce.jobhistory.address</name>
    <value>node-1:10020</value>
</property>
<property>
    <name>mapreduce.jobhistory.webapp.address</name>
    <value>node-1:19888</value>
</property>
<property>
    <name>hadoop.proxyuser.mapred.groups</name>
    <value>*</value>
</property>
<property>
    <name>hadoop.proxyuser.mapred.hosts</name>
    <value>*</value>
</property>
<property>
    <name>yarn.app.mapreduce.am.staging-dir</name>
    <value>/user</value>
</property>

vi /etc/hadoop/conf.itcast/yarn-site.xml
<property>
    <name>yarn.resourcemanager.hostname</name>
    <value>node-1</value>
</property>
<property>
    <name>yarn.application.classpath</name>
    <value>
        $HADOOP_CONF_DIR,
        $HADOOP_COMMON_HOME/*,$HADOOP_COMMON_HOME/lib/*,
        $HADOOP_HDFS_HOME/*,$HADOOP_HDFS_HOME/lib/*,
        $HADOOP_MAPRED_HOME/*,$HADOOP_MAPRED_HOME/lib/*,
        $HADOOP_YARN_HOME/*,$HADOOP_YARN_HOME/lib/*
    </value>
</property>
<property>
    <name>yarn.nodemanager.aux-services</name>
    <value>mapreduce_shuffle</value>
</property>
<property>
    <name>yarn.nodemanager.local-dirs</name>
    <value>file:///var/lib/hadoop-yarn/cache/${user.name}/nm-local-dir</value>
</property>
<property>
    <name>yarn.nodemanager.log-dirs</name>
    <value>file:///var/log/hadoop-yarn/containers</value>
</property>
<property>
    <name>yarn.log.aggregation-enable</name>
    <value>true</value>
</property>
<property>
    <name>yarn.nodemanager.remote-app-log-dir</name>
    <value>hdfs:///var/log/hadoop-yarn/apps</value>
</property>

# Create the data directory required by Yan
mkdir -p /var/lib/hadoop-yarn/cache
mkdir -p /var/log/hadoop-yarn/containers
mkdir -p /var/log/hadoop-yarn/apps
# Grant Yarn user rights
chown -R yarn:yarn /var/lib/hadoop-yarn/cache /var/log/hadoop-yarn/containers /var/log/hadoop-yarn/apps

# Preparing directories on HDFS for MapReduce
sudo -u hdfs hadoop fs -mkdir /tmp
sudo -u hdfs hadoop fs -chmod -R 1777 /tmp
sudo -u hdfs hadoop fs -mkdir -p /user/history
sudo -u hdfs hadoop fs -chmod -R 1777 /user/history
sudo -u hdfs hadoop fs -chown mapred:hadoop /user/history

sudo -u hdfs hadoop fs -mkdir /user/$USER
sudo -u hdfs hadoop fs -chown $USER /user/$USER

# Start Yarn
service hadoop-yarn-resourcemanager start
service hadoop-mapreduce-historyserver start

service hadoop-yarn-nodemanager start
MySQL installation
Use with Hive.
# Download yum source configuration
wget http://repo.mysql.com/mysql-community-release-el7-5.noarch.rpm
rpm -ivh mysql-community-release-el7-5.noarch.rpm
# Install mysql
yum install -y mysql-server
# Start service
systemctl start mysqld.service
# Turn off strong password verification for your convenience. Not used in actual work
vi /etc/my.cnf
# Add on the last line
validate_password=OFF
# Restart mysql
systemctl restart mysqld.service
# Set password
mysql_secure_installation
Hive installation
Hive needs to use MySQL as the metabase, so you need to create users and corresponding tables for hive in MySQL.
(1) Install Hive package
yum install -y hive hive-metastore hive-server2
# Give hive a jdbc package of mysql, and hive can use mysql as the metabase
yum install -y mysql-connector-java
# Create a soft connection to hive
ln -s /usr/share/java/mysql-connector-java.jar  /usr/lib/hive/lib/mysql-connector-java.jar
(2) Add Hive user in MySQL
# Login database
mysql -u root -p
# Create a metastore database for hive
CREATE DATABASE metastore;
USE metastore;
# Create a hive user, @ '%' means that you can log in at all locations. If you log in locally, it is @ 'localhost'
CREATE USER 'hive'@'%' IDENTIFIED BY 'hive';
# Empowerment
REVOKE ALL PRIVILEGES, GRANT OPTION FROM 'hive'@'%';
GRANT ALL PRIVILEGES ON metastore.* TO 'hive'@'%';
FLUSH PRIVILEGES;
(3) Configure Hive
vi /etc/hive/conf/hive-site.xml
# configuration file
<!-- /usr/lib/hive/conf/hive-site.xml -->
<property>
    <name>javax.jdo.option.ConnectionURL</name>
    <value>jdbc:mysql://node-1/metastore</value>
</property>
<property>
    <name>javax.jdo.option.ConnectionDriverName</name>
    <value>com.mysql.jdbc.Driver</value>
</property>
<property>
    <name>javax.jdo.option.ConnectionUserName</name>
    <value>hive</value>
</property>
<property>
    <name>javax.jdo.option.ConnectionPassword</name>
    <value>hive</value>
</property>
<property>
    <name>datanucleus.autoCreateSchema</name>
    <value>false</value>
</property>
<property>
    <name>datanucleus.fixedDatastore</name>
    <value>true</value>
</property>
<property>
    <name>datanucleus.autoStartMechanism</name>
    <value>SchemaTable</value>
</property>
<property>
    <name>hive.metastore.uris</name>
    <value>thrift://node-1:9083</value>
</property>
<property>
    <name>hive.metastore.schema.verification</name>
    <value>true</value>
</property>
<property>
    <name>hive.support.concurrency</name>
    <description>Enable Hive's Table Lock Manager Service</description>
    <value>true</value>
</property>
<property>
    <name>hive.support.concurrency</name>
    <value>true</value>
</property>
<property>
    <name>hive.zookeeper.quorum</name>
    <value>node-1</value>
</property>
(4) Initialize the table structure of Hive in MySQL
# Initialize the database for hive and create the necessary tables and schemas
/usr/lib/hive/bin/schematool -dbType mysql -initSchema -passWord hive -userName hive -url jdbc:my sql://node-1/metastore
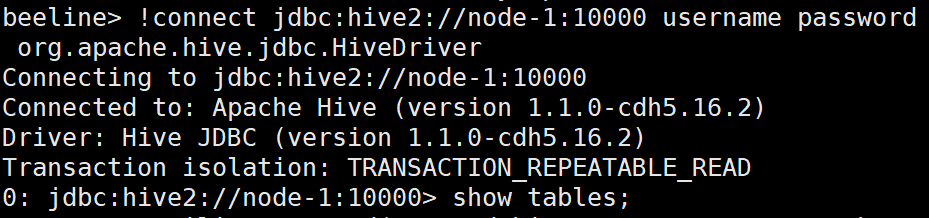
(5) Start Hive
service hive-metastore start
service hive-server2 start
# Check the connection status through beeline
beeline
!connect jdbc:hive2://node-1:10000 username password org.apache.hive.jdbc.HiveDriver