Installing Cent OS7 System Installation Steps Skipped
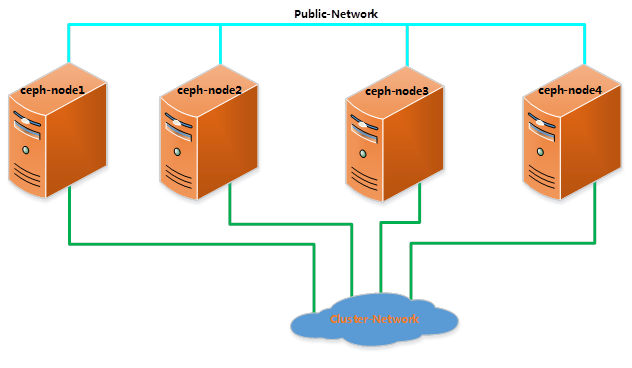
Topological connection:
Preparations before installation
1. Modify the host name; change the host name to the corresponding host name in the figure above.
[root@localhost ~]# vim /etc/hostname

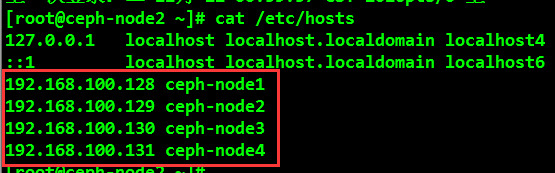
2. Update the hosts file on the host and parse the host name with the following IP.
192.168.100.128 ceph-node1
192.168.100.129 ceph-node2
192.168.100.130 ceph-node3
192.168.100.131 ceph-node4
[root@localhost ~]# vim /etc/hosts
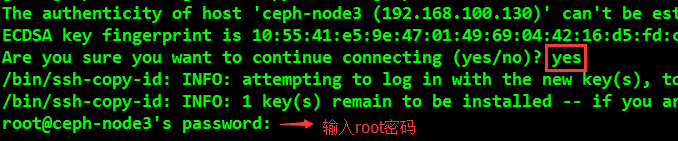
3. Generate root SSH key; copy SSH key to ceph-node 2 and ceph-node 3 and ceph-node 4. In this way, secret-free login between nodes can be realized.
[root@ceph-node1 ~]# ssh-keygen//Enter all the way
[root@ceph-node1 ~]# ssh-copy-id root@ceph-node2

[root@ceph-node1 ~]# ssh-copy-id root@ceph-node3
[root@ceph-node1 ~]# ssh-copy-id root@ceph-node4
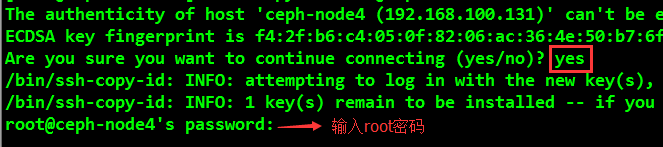
To realize all nodes'secret-free login, it is necessary to operate once on each node.
4. Configure firewalls; (Turn off the lab environment and open the ports on demand is recommended in the production environment)
Rough resolution:
[root@ceph-node1 ~]# System CTL stop firewalld.service//stop firewall
[root@ceph-node1 ~]# System CTL disable firewalld. service // disable firewall boot
Open the corresponding port:
[
root@ceph-node1 ~]# firewall-cmd --zone=public --add-port=6789/tcp --permanent
[root@ceph-node1 ~]# firewall-cmd --zone=public --add-port=6800-7100/tcp --permanent
[root@ceph-node1 ~]# firewall-cmd --reload
All other nodes execute the above commands.
[root@ceph-node1 ~]# firewall-cmd --zone=public --list-all
5. Disable SELINUX on all nodes
[
root@ceph-node1 ~]# setenforce 0
[root@ceph-node1 ~]# sed -i s'/SELINUX.*=.*enforcing/SELINUX=disable'/g /etc/selinux/config
[root@ceph-node1 ~]# cat /etc/selinux/config | grep -i =disable
6. Install and configure NTP on all nodes
[root@ceph-node1 ~]# yum install ntp ntpdate –y
[root@ceph-node1 ~]# vim /etc/ntp.conf

[root@ceph-node1 ~]# systemctl restart ntpdate
[root@ceph-node1 ~]# [root@ceph-node2 ~]# ceph -s
[root@ceph-node1 ~]# systemctl enable ntpd
[root@ceph-node1 ~]# systemctl enable ntpdate
7. Replace all node CentOS domestic source, add domestic Ceph installation source and update yum
Replace CentOS domestic sources:
[root@ceph-node1 yum.repos.d]# rm -rf *
[root@ceph-node1 yum.repos.d]# wget -O /etc/yum.repos.d/CentOS-Base.repo http://mirrors.aliyun.com/repo/Centos-7.repo
[root@ceph-node1 yum.repos.d]# yum clean all && yum makecache
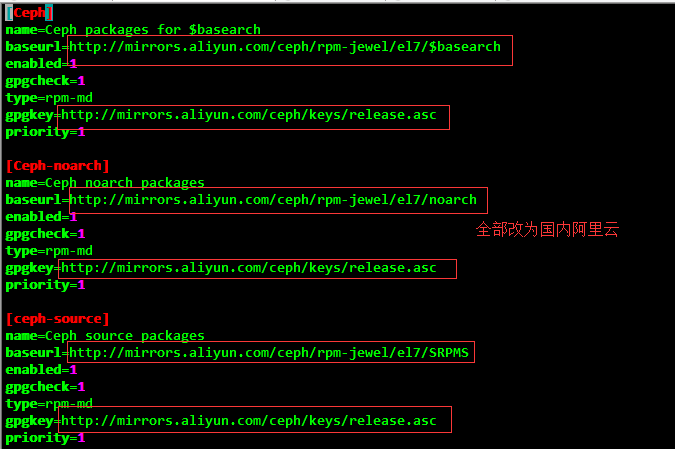
Add Ceph Domestic Installation Source
[root@ceph-node1 ~]# rpm -Uvh http://mirrors.aliyun.com/ceph/rpm-jewel/el7/noarch/ceph-release-1-1.el7.noarch.rpm
[root@ceph-node1 yum.repos.d]#vim ceph.repo
[Ceph]
name=Ceph packages for $basearch
baseurl=http://mirrors.aliyun.com/ceph/rpm-jewel/el7/$basearch
enabled=1
gpgcheck=1
type=rpm-md
gpgkey=http://mirrors.aliyun.com/ceph/keys/release.asc
[Ceph-noarch]
name=Ceph noarch packages
baseurl=http://mirrors.aliyun.com/ceph/rpm-jewel/el7/noarch
enabled=1
gpgcheck=1
type=rpm-md
gpgkey=http://mirrors.aliyun.com/ceph/keys/release.asc
[ceph-source]
name=Ceph source packages
baseurl=http://mirrors.aliyun.com/ceph/rpm-jewel/el7/SRPMS
enabled=1
gpgcheck=1
type=rpm-md
gpgkey=http://mirrors.aliyun.com/ceph/keys/release.asc
[root@ceph-node1 ~]#yum update –y
Start installing Ceph
Use the ceph-deploy tool to install and configure Ceph on all nodes; ceph-deploy is used to facilitate configuration management of Ceph storage clusters.
1. Install ceph-deploy on ceph-node 1
[root@ceph-node1 ~]# yum install ceph-deploy –y
2. Create a CEPH directory; and create a Ceph cluster with ceph-deploy
[root@ceph-node1 ~]# mkdir /etc/ceph ; cd /etc/ceph
[root@ceph-node1 ceph]# ceph-deploy new ceph-node1
A default new cluster can be deployed through the subcommand new of ceph-deploy, and it can generate cluster configuration files and key files.
Under / etc/ceph, you can see the relevant files with ls command:
[root@ceph-node1 ceph]# pwd
/etc/ceph
[root@ceph-node1 ceph]# ls

3. Install CEPH on all nodes using ceph-deploy
[root@ceph-node1 ceph]# ceph-deploy install ceph-node1 ceph-node2 ceph-node3 ceph-node4
The Ceph-deploy tool first installs the dependency packages; waits for the command to execute successfully; if the error terminates halfway, you can re-execute the above command to continue the installation.
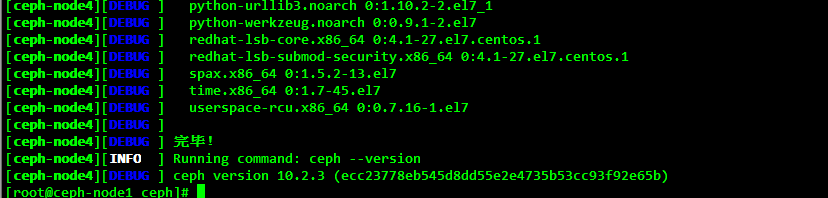
Check the Ceph version and health on all nodes after installation:
[root@ceph-node1 ~]# ceph -v
ceph version 10.2.3 (ecc23778eb545d8dd55e2e4735b53cc93f92e65b)
4. Create a Monitor on ceph-node 1
[root@ceph-node1 ceph]# ceph-deploy mon create-initial
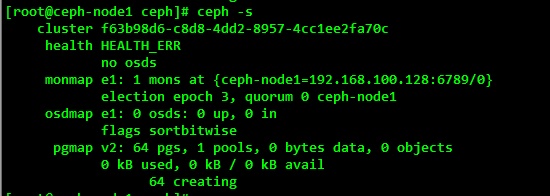
After successful creation, you can check the health of ceph, and through the ceph - s command you can see that the current cluster is not normal.
5. Create OSD on Ceph-node 1
(1) List all available disks on this node
[root@ceph-node1 ceph]# ceph-deploy disk list ceph-node1

Select the disks listed above as OSD, except operating system disks, the general operating system disk is sda.
(2) Clear partitions and disk contents by command
[root@ceph-node1 ceph]# ceph-deploy disk zap ceph-node1:/dev/sdb ceph-node1:/dev/sdc ceph-node1:/dev/sdd
(3) Create an OSD; the osd create command formats the selected disk with an XFS file system, and then activates the disk partition.
[root@ceph-node1 ceph]# ceph-deploy osd create ceph-node1:/dev/sdb ceph-node1:/dev/sdc ceph-node1:/dev/sdd
(4) After the creation of OSD, you can see the status of the cluster at this time, which mainly depends on whether the added OSD is up; the cluster status is still in an abnormal state, and further configuration is needed to make it normal.
[root@ceph-node1 ceph]# ceph -s

[root@ceph-node1 ~]# lsblk

3. Expanding ceph cluster
Through the above installation process, the Ceph cluster has been run on the ceph-node 1 node, which currently has 1 Mon and 3 OSDs; next, all the remaining nodes will be added to the Ceph cluster by extending the cluster, and there will be 3 Mon and 12 OSDs.
There is at least one Monitor cluster in a Ceph cluster to run, but for the high availability of the cluster, three to five Monitors in a Ceph cluster are usually required to rely on more than odd monitors to form arbitration. In a Ceph cluster, Paxos algorithm is used to ensure consistency of arbitration.
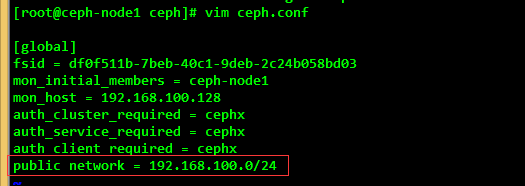
(1) Add a Public network to the CEPH configuration file; use vim to edit / etc/ceph/ceph.conf
[root@ceph-node1 ceph]# vim ceph.conf
(2) Create two more Monitor s
[root@ceph-node1 ceph]# ceph-deploy mon create ceph-node2 ceph-node3
After successfully adding two new Monitors, check the current cluster status and Monitor status:
[root@ceph-node3 ~]# ceph –s
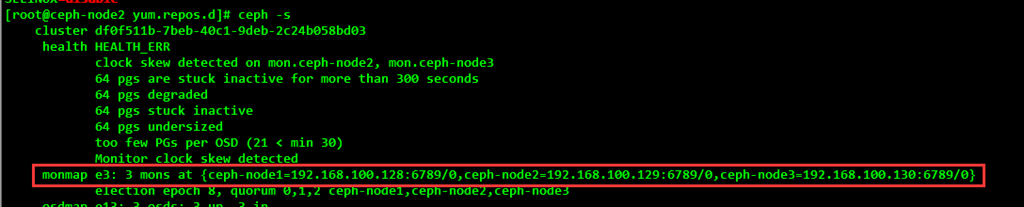
[root@ceph-node3 ~]# ceph mon stat

Issuing the current cluster by executing commands is still not a normal state, because all the node disks except node1 node with OSD are not added to the ceph cluster. By default, the data will be replicated three times in the cluster and placed on different OSDs on different nodes.
(3) Adding all the remaining node disks to the ceph cluster
List all available disks for the remaining nodes:
[root@ceph-node1 ceph]# ceph-deploy disk list ceph-node2 ceph-node3 ceph-node4
Clear node disk partitions and information:
[root@ceph-node1 ceph]# ceph-deploy disk zap ceph-node2:/dev/sdb ceph-node2:/dev/sdc ceph-node2:/dev/sdd
[root@ceph-node1 ceph]# ceph-deploy disk zap ceph-node3:/dev/sdb ceph-node3:/dev/sdc ceph-node3:/dev/sdd
[root@ceph-node1 ceph]# ceph-deploy disk zap ceph-node4:/dev/sdb ceph-node4:/dev/sdc ceph-node4:/dev/sdd
Create OSD for the remaining node disks:
[root@ceph-node1 ceph]# ceph-deploy osd create ceph-node2:/dev/sdb ceph-node2:/dev/sdc ceph-node2:/dev/sdd
[root@ceph-node1 ceph]# ceph-deploy osd create ceph-node3:/dev/sdb ceph-node3:/dev/sdc ceph-node3:/dev/sdd
[root@ceph-node1 ceph]# ceph-deploy osd create ceph-node4:/dev/sdb ceph-node4:/dev/sdc ceph-node4:/dev/sdd
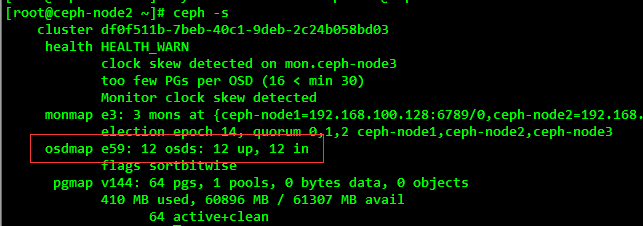
Execute commands to check the number and status of OSD s after all the remaining node disks are successfully added to the ceph cluster:
[root@ceph-node2 ~]# ceph –s
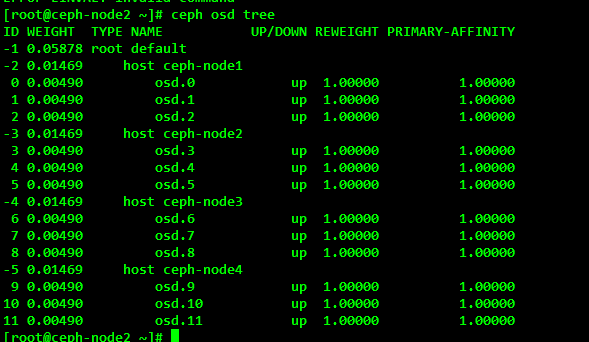
[root@ceph-node2 ~]# ceph osd tree
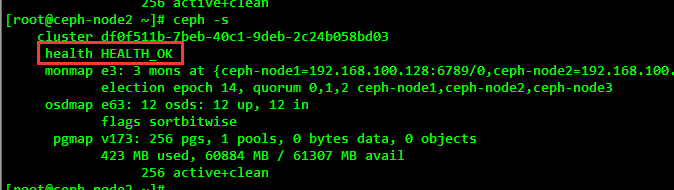
(4) After adding many OSDs to the ceph cluster, the values of pg_num and pgp_num need to be set. This is the fundamental reason why the cluster has added multiple OSD clusters and is still in an abnormal state.
[root@ceph-node1 ceph]# ceph osd pool set rbd pg_num 256

[root@ceph-node2 ~]# ceph –s
Common Operations and Maintenance Commands
1. Check the health status of ceph cluster
[root@ceph-node2 ~]# ceph –s
[root@ceph-node2 ~]# ceph status
[root@ceph-node2 ~]# ceph health
[root@ceph-node2 ~]# ceph health detail // View health details; this command works well when cluster health is abnormal
2. Observing the real-time situation of cluster
[root@ceph-node 2 ~]# ceph-w// / Real-time read-write IO can be seen, but not as a performance reference index
3. View Ceph Moniter Arbitration Status
[root@ceph-node1 ceph]# ceph quorum_status -f json-pretty
Command parameters:
[Contacting monitor, timeout after 5 seconds]
quorum_status report status of monitor quorum
[-f {json,json-pretty,xml,xml-pretty,plain}]
4. Export Ceph Cluster Monitor Information
[root@ceph-node1 ceph]# ceph mon dump
5. View the usage of ceph cluster space
[root@ceph-node1 ~]# ceph df
6. View Monitor, OSD, PG group status
Monitor status:
[root@ceph-node1 ~]# ceph mon stat
OSD status:
[root@ceph-node1 ~]# ceph osd stat
[root@ceph-node1 ~]# ceph osd tree //
With this command, you can see the detailed OSD status, and troubleshooting is common.
PG status:
[root@ceph-node1 ~]# ceph pg stat
7. List the details of PG
[root@ceph-node1 ~]# ceph pg dump
8. List storage pools in clusters
[root@ceph-node1 ~]# ceph osd lspools
9. Listing Cluster Authentication Key
[root@ceph-node1 ~]# ceph auth list