
Preface
Looking at the learning video these days, I see a very interesting thing Jupyter Notebook, but the video is installed locally.So I thought that if the server I bought was idle, I would take it out to install one so that it could be used in the cloud.
0. Installation Page
I use pyenv's virtual environment directly to install here, and I've written about installing pyenv with Centos 7.4 and using it before.Anyone you don't know can check out this article Centos 7.4 Multi-Version Python and Virtual Environment Installation.
Create a virtual environment first
Create a Python v3.6.9 virtual environment and enter it.Go straight to the command:
# Establish
pyenv virtualenv 3.6.9 Jupyter_3.6

# Get into
pyenv activate Jupyter_3.6
Then there's a simple and rough installation:
pip install ipython

pip install jupyter
Actually, the installation process here should be about the same, but it needs to be configured to run.
Below is a screenshot of the installation:
ipython installation

jupyter installation

1. Configuration Paper
Generate Configuration File
#Add--allow-root if it is root
jupyter notebook --generate-config --allow-root

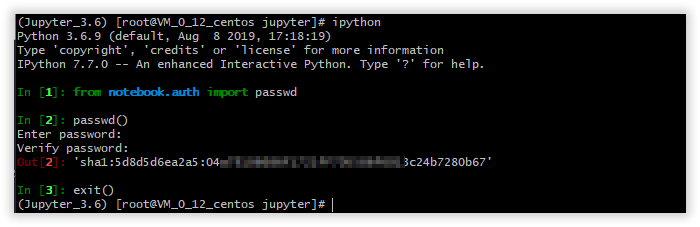
Here we use ipython to generate a secret key:
# Enter ipython
ipython

# This is the system output after entering ipython
Python 3.6.9 (default, Aug  8 2019, 17:18:19)
Type 'copyright', 'credits' or 'license' for more information
IPython 7.7.0 -- An enhanced Interactive Python. Type '?' for help.

# In is input and Out is output
# Guide Pack
In [1]: from notebook.auth import passwd
In [2]: passwd()
Enter password:
Verify password:
# Remember this secret key
Out[2]: 'sha1:5d8d5d6ea2a5:04a*************************3c24b7280b67'
# Sign out
In [3]: exit()
Modify the configuration file below:
# ip for external access
c.NotebookApp.ip = '0.0.0.0'
# Port for external access
c.NotebookApp.port = 37197
# Start without opening the browser
c.NotebookApp.open_browser = False
# Key generated above
c.NotebookApp.password = 'sha1:5d8d5d6ea2a5:04a*************************3c24b7280b67'
# Set jupyter Startup Default Folder
c.NotebookApp.notebook_dir = u'/root/jupyter/jupyter_dir'
# Allow root user to execute
c.NotebookApp.allow_root = True
Install plug-ins, use themes
pip install jupyter_contrib_nbextensions
jupyter contrib nbextension install --user
pip install jupyterthemes  # install
jt -t chesterish  # Use chesterish theme (jupyter may need to be restarted)
jt -r  # Restore Default Theme
Function
jupyter notebook
Now that it's working properly, you can turn on the IP:PORT of the server and see how it works:

Then sign in with the password we just set, of course not the secret key, but the password you entered twice before turning into the secret key.
There's a New in the upper right corner that creates a new file and then chooses Python 3.
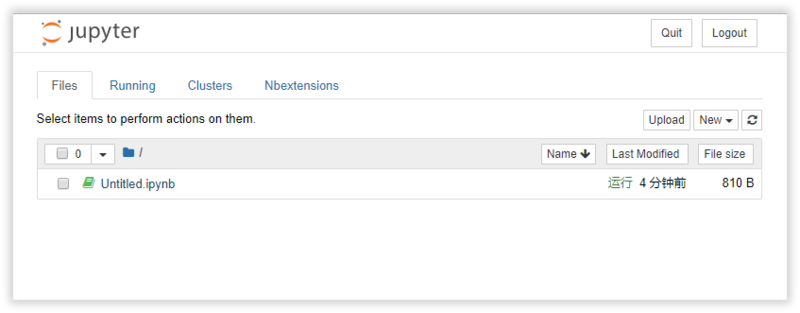
Installation is done here. Eat it safe!
Background running
But you'll find that it's not allowed to run in the background, and you won't be able to access it after you quit.
At this point a command can help you solve the problem.
# The configuration file that just started after cofing
nohup jupyter notebook --config=/root/.jupyter/jupyter_notebook_config.py  > /dev/null 2>&1 &
2. TensorFlow Installation Page
This is easier
pip install tensorflow
There will be an error after loading on my machine. The error information is as follows:
FutureWarning: Passing (type, 1) or '1type' as a synonym of type is deprecated; in a future version of numpy
Looking for some data seems to be a problem with the high numpy version.So uninstall and install a lower version.
pip uninstall numpy
pip install numpy==1.1.3
So I can run on my Centos 7.4 and see that the version number is 1.3.0!

Refuse to delay (thank you for your concern)
Public number: front end said
Public ID: js-say
ps: yes (yu fan) not (ri)
