I. Preparations
1. Preparing the CentOS 7 System Environment
Because it was installed in silent mode, without using a graphical interface, I chose the smallest installed server version of entOS 7. After installation, only the command line interface is available.
2. Download Oracle 11g
(1) Oracle's official website: http://www.oracle.com/technetwork/database/enterprise-edition/downloads/index.html My machine is equipped with a CentOS 7 64-bit system, so the downloaded Oracle version is also 64-bit.
Special note: Oracle version 11.2.0.2.0 zlinux64 is installed on IBM servers, and CentOS 7 is not installed.
(2) After downloading, there are two compressed files.
Linux.x64_11gR2_database_1 of 2.zip and linux.x64_11gR2_database_2 of 2.zip
3. Upload compressed files to / db via Xftp/
4. Install dependency packages. Before installing dependency packages, I suggest to change yum source to aliyun source, download faster, and execute the following commands:
cd /etc
mv yum.repos.d yum.repos.d.bak
mkdir yum.repos.d
wget -O /etc/yum.repos.d/CentOS-Base.repo http://mirrors.aliyun.com/repo/Centos-7.repo
yum clean all
yum makecache
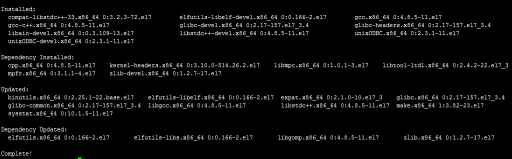
5. After successful modification, install the following dependency packages:
yum -y install binutils \
compat-libstdc++-33 \
elfutils-libelf \
elfutils-libelf-devel \
expat \
gcc \
gcc-c++ \
glibc \
glibc-common \
glibc-devel \
glibc-headers \
libaio \
libaio-devel \
libgcc \
libstdc++ \
libstdc++-devel \
make \
pdksh \
sysstat \
unixODBC \
unixODBC-devel
6. After installation, the following interface will be displayed
7. Use the following commands to check whether the dependencies are installed properly
rpm -q \
binutils \
compat-libstdc++-33 \
elfutils-libelf \
elfutils-libelf-devel \
expat \
gcc \
gcc-c++ \
glibc \
glibc-common \
glibc-devel \
glibc-headers \
libaio \
libaio-devel \
libgcc \
libstdc++ \
libstdc++-devel \
make \
pdksh \
sysstat \
unixODBC \
unixODBC-devel | grep "not installed"
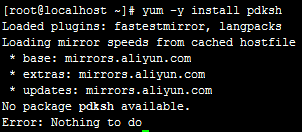
8. It was found that pdksh was not installed

9. Execute yum-y install pdksh and find that no relevant installation packages are available for CentOS 7
10. Download the rpm package of pdksh directly through the wget command, and I downloaded it to / tmp/
wget -O /tmp/pdksh-5.2.14-37.el5_8.1.x86_64.rpm http://vault.centos.org/5.11/os/x86_64/CentOS/pdksh-5.2.14-37.el5_8.1.x86_64.rpm
After downloading, enter / tmp/
cd /tmp/
rpm -ivh pdksh-5.2.14-37.el5_8.1.x86_64.rpm
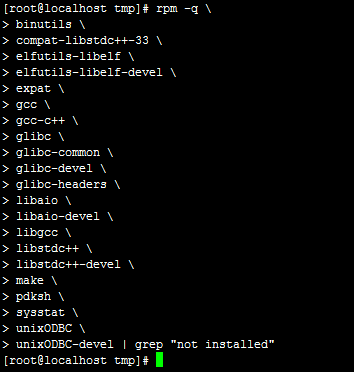
11. Check again whether the dependent packages are fully installed
rpm -q \
binutils \
compat-libstdc++-33 \
elfutils-libelf \
elfutils-libelf-devel \
expat \
gcc \
gcc-c++ \
glibc \
glibc-common \
glibc-devel \
glibc-headers \
libaio \
libaio-devel \
libgcc \
libstdc++ \
libstdc++-devel \
make \
pdksh \
sysstat \
unixODBC \
unixODBC-devel | grep "not installed"
Dependent package installation is complete at this point
12. Add oracle user groups and users
groupadd oinstall
groupadd dba
groupadd asmadmin
groupadd asmdba
useradd -g oinstall -G dba,asmdba oracle -d /home/oracle
13. After adding, view oracle users
id oracle
14. Initialize oracle user's password
passwd oracle
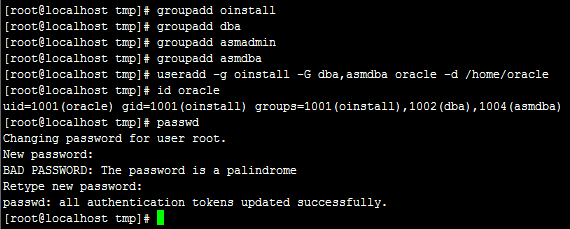
Note: The password needs to be entered twice, indicating that if the password strength is not managed, it will be set successfully after two identical times.
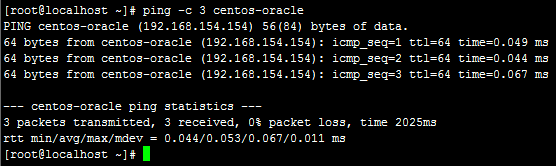
15. Configure hostname (native IP mapping)
vim /etc/hosts
192.168.154.154 centos-oracle
16. Test hostname
ping -c 3 centos-oracle
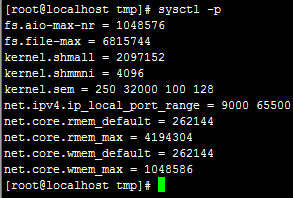
17. Optimize OS kernel parameters, and set the kernel.shmmax parameter to half of physical memory
vim /etc/sysctl.conf
fs.aio-max-nr=1048576
fs.file-max=6815744
kernel.shmall=2097152
kernel.shmmni=4096
kernel.shmmax = 1073741824
kernel.sem=250 32000 100 128
net.ipv4.ip_local_port_range=9000 65500
net.core.rmem_default=262144
net.core.rmem_max=4194304
net.core.wmem_default=262144
net.core.wmem_max=1048586
18. Make the parameters effective
sysctl -p
19. Restrict shell permissions for oracle users
vim /etc/security/limits.conf
oracle              soft    nproc   2047
oracle              hard    nproc   16384
oracle              soft    nofile  1024
oracle              hard    nofile  65536
vim /etc/pam.d/login
session  required   /lib64/security/pam_limits.so
session  required   pam_limits.so
vim /etc/profile
if [ $USER = "oracle" ]; then
if [ $SHELL = "/bin/ksh" ]; then
ulimit -p 16384
ulimit -n 65536
else
ulimit -u 16384 -n 65536
fi
fi
20. Create oracle installation directory
mkdir -p /db/app/oracle/product/11.2.0
mkdir /db/app/oracle/oradata
mkdir /db/app/oracle/inventory
mkdir /db/app/oracle/fast_recovery_area
chown -R oracle:oinstall /db/app/oracle
chmod -R 775 /db/app/oracle
21. Configure oracle user environment variables
su - oracle
vim .bash_profile
umask 022
export ORACLE_HOSTNAME=centos-oracle
export ORACLE_BASE=/db/app/oracle
export ORACLE_HOME=$ORACLE_BASE/product/11.2.0/
export ORACLE_SID=ORCL
export PATH=.:$ORACLE_HOME/bin:$ORACLE_HOME/OPatch:$ORACLE_HOME/jdk/bin:$PATH
export LC_ALL="en_US"
export LANG="en_US"
export NLS_LANG="AMERICAN_AMERICA.ZHS16GBK"
export NLS_DATE_FORMAT="YYYY-MM-DD HH24:MI:SS"
22. After the above configuration is completed, I suggest restarting the system.
reboot
23. Decompress oracle compressed file to / db
cd /db/
unzip linux.x64_11gR2_database_1of2.zip -d /db
unzip linux.x64_11gR2_database_2of2.zip -d /db
24. After decompression is completed
mkdir /db/etc/
cp /db/database/response/* /db/etc/
vim /db/etc/db_install.rsp
oracle.install.option=INSTALL_DB_SWONLY
DECLINE_SECURITY_UPDATES=true
UNIX_GROUP_NAME=oinstall
INVENTORY_LOCATION=/db/app/oracle/inventory
SELECTED_LANGUAGES=en,zh_CN
ORACLE_HOSTNAME=centos-oracle
ORACLE_HOME=/db/app/oracle/product/11.2.0
ORACLE_BASE=/db/app/oracle
oracle.install.db.InstallEdition=EE
oracle.install.db.isCustomInstall=true
oracle.install.db.DBA_GROUP=dba
oracle.install.db.OPER_GROUP=dba
2. Start installation
1. Switch to oracle users
su - oracle
# First cd to / db/database / directory and then execute
./runInstaller -silent -ignorePrereq -responseFile /db/etc/response/db_install.rsp
2. During installation, you can use tail command to monitor the oracle installation log
tail -f /db/app/oracle/inventory/logs/installActions2019-09-03_19-48-29PM.log
Installation completed, prompt Successfully Setup Software.
3. Complete the configuration according to the prompt
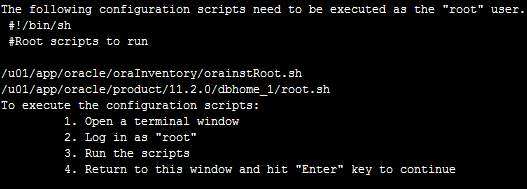
su root
sh /db/app/oracle/inventory/orainstRoot.sh
sh /db/app/oracle/product/11.2.0/root.sh

4. Configuration of silent listening
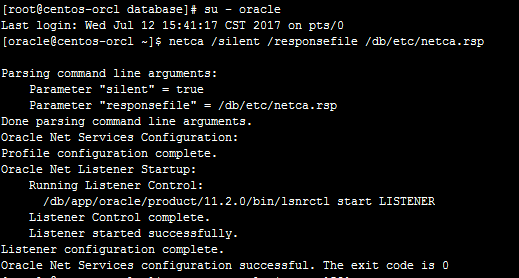
su - oracle
netca /silent /responsefile /db/etc/netca.rsp
5. View listening ports

netstat -tnulp | grep 1521
6. Create database silently. Set TOTALMEMORY to 80% of total memory
vi /db/etc/dbca.rsp
GDBNAME = "orcl"
SID = "orcl"
SYSPASSWORD = "oracle"
SYSTEMPASSWORD = "oracle"
SYSMANPASSWORD = "oracle"
DBSNMPPASSWORD = "oracle"
DATAFILEDESTINATION =/db/app/oracle/oradata
RECOVERYAREADESTINATION=/db/app/oracle/fast_recovery_area
CHARACTERSET = "AL32UTF8"
TOTALMEMORY = "1638"
7. Implement Silent Library Construction
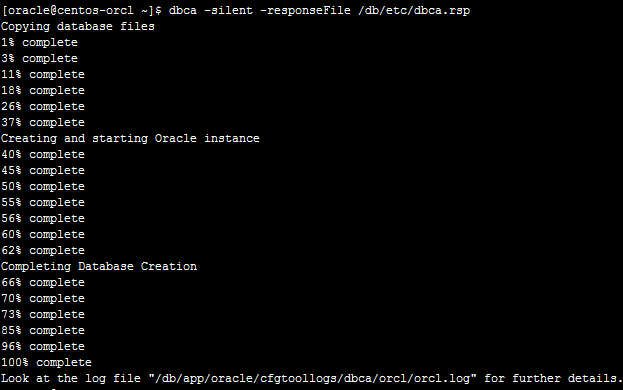
dbca -silent -responseFile /db/etc/dbca.rsp
8. View the oracle instance process
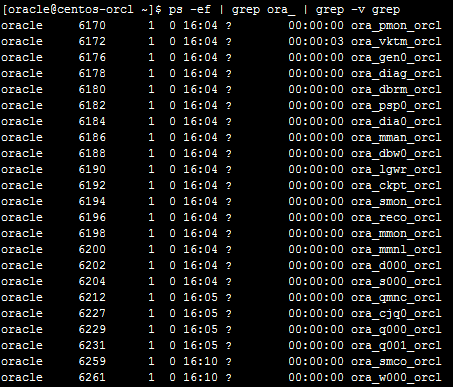
ps -ef | grep ora_ | grep -v grep
9. View the listening status
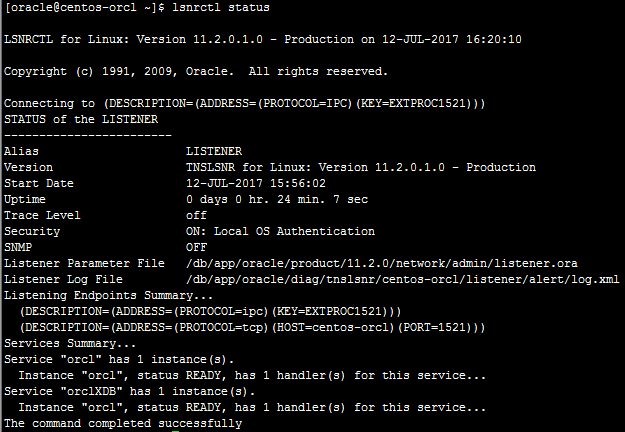
lsnrctl status
10. Switch to an oracle user, log in to sqlplus, and view the status of the instance
su - oracle
sqlplus / as sysdba
select status from v$instance;
Note: Errors will be reported here
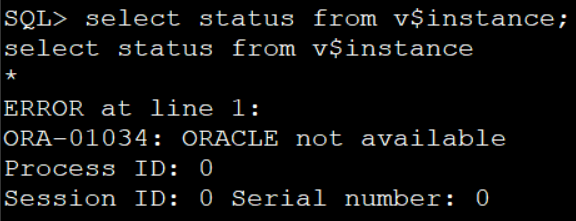
Solution: Enter the command startup
startup
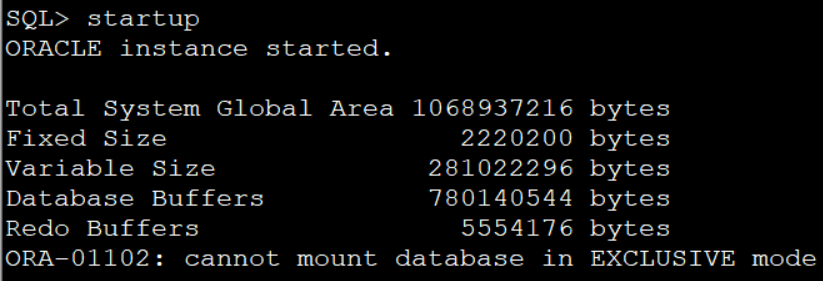
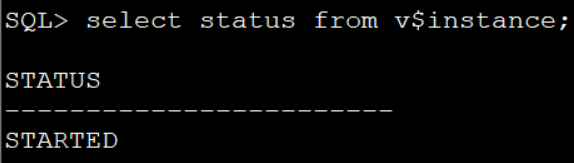
Query again and display normally
(1) View database coding
select userenv('language') from dual;
(2) View database version information
select * from v$version;
(3) Activate scott users
alter user scott account unlock;
alter user scott identified by tiger;
select username,account_status from all_users;
11.Navicat Remote Connection Oracle
(1) Open port 1521
firewall-cmd --zone=public --add-port=1521/tcp --permanent
firewall-cmd --reload
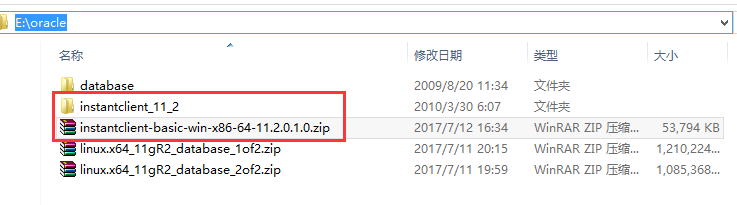
(2) Official website http://www.oracle.com/technetwork/database/features/instant-client/index-097480.html
Download instantclient-basic to decompress the compressed file
(3) Download Navicat
http://pan.baidu.com/s/1c2GP9U4
Open Navicat, Tool Options
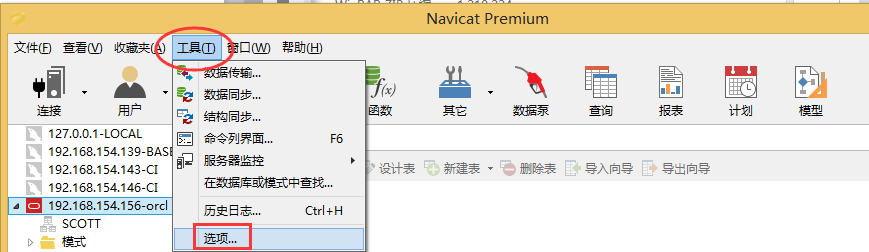
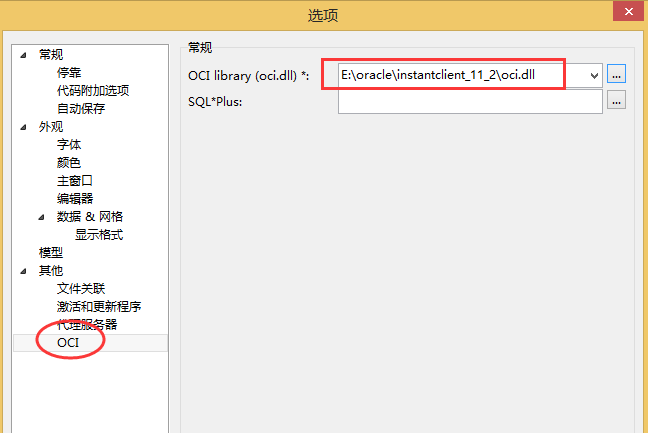
Open the OCI interface, select oci.dll in the instantclient-basic decompression directory in the OCI library column on the right, and then click OK.
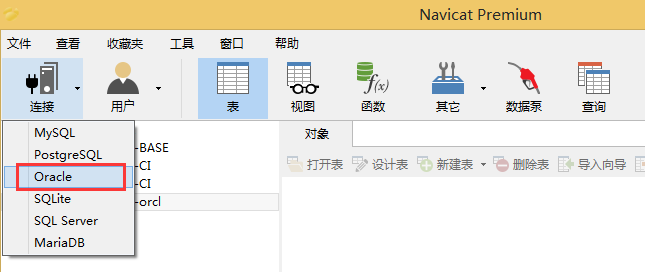
Restart Navicat, click Connect, and select Oracle
IP is the IP address of the Oracle server and the instance name of the service is Oracle. Neglectable case

select instance_name from v$instance;
The user name is scott, which has just been activated, and the password is tiger. After filling in the above information, click on the connection test.
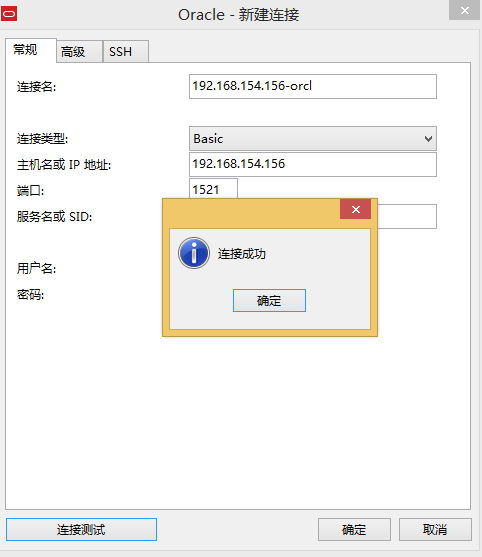
At this point, Navicat successfully remotely connected to Oracle database
12. Set Oracle boot-up
#Possible problems oracle ORA-12547: TNS:lost contact
cd /db/app/oracle/product/11.2.0/bin/
chmod 6751 oracle
vi /db/app/oracle/product/11.2.0/bin/dbstart
# Find and set values
ORACLE_HOME_LISTNER=$ORACLE_HOME
vi /db/app/oracle/product/11.2.0/bin/dbshut
#Find and set values
ORACLE_HOME_LISTNER=$ORACLE_HOME
vi /etc/oratab
# Change N to Y by default
orcl:/db/app/oracle/product/11.2.0:Y
vi /etc/rc.d/init.d/oracle
(1) Note: This file is not available by default. Copy the following to the open whiteboard interface
#! /bin/bash

# oracle: Start/Stop Oracle Database 11g R2
#
# chkconfig: 345 90 10
# description: The Oracle Database is an Object-Relational Database Management System.
#
# processname: oracle
. /etc/rc.d/init.d/functions
LOCKFILE=/var/lock/subsys/oracle
ORACLE_HOME=/db/app/oracle/product/11.2.0
ORACLE_USER=oracle
case "$1" in
'start')
if [ -f $LOCKFILE ]; then
echo $0 already running.
exit 1
fi
echo -n $"Starting Oracle Database:"
su - $ORACLE_USER -c "$ORACLE_HOME/bin/lsnrctl start"
su - $ORACLE_USER -c "$ORACLE_HOME/bin/dbstart $ORACLE_HOME"
su - $ORACLE_USER -c "$ORACLE_HOME/bin/emctl start dbconsole"
touch $LOCKFILE
;;
'stop')
if [ ! -f $LOCKFILE ]; then
echo $0 already stopping.
exit 1
fi
echo -n $"Stopping Oracle Database:"
su - $ORACLE_USER -c "$ORACLE_HOME/bin/lsnrctl stop"
su - $ORACLE_USER -c "$ORACLE_HOME/bin/dbshut"
su - $ORACLE_USER -c "$ORACLE_HOME/bin/emctl stop dbconsole"
rm -f $LOCKFILE
;;
'restart')
$0 stop
$0 start
;;
'status')
if [ -f $LOCKFILE ]; then
echo $0 started.
else
echo $0 stopped.
fi
;;
*)
echo "Usage: $0 [start|stop|status]"
exit 1
esac
exit 0
(2) Authorization
chmod 750 /etc/rc.d/init.d/oracle
(3) Check that the script is executed correctly.
cd /etc/rc.d/init.d
./oracle start
./oracle stop
(4) Join the auto-start column and execute the following commands:
ln -s /etc/rc.d/init.d/oracle /etc/rc2.d/S61oracle
ln -s /etc/rc.d/init.d/oracle /etc/rc3.d/S61oracle
ln -s /etc/rc.d/init.d/oracle /etc/rc4.d/S61oracle
ln -s /etc/rc.d/init.d/oracle /etc/rc0.d/K61oracle
ln -s /etc/rc.d/init.d/oracle /etc/rc6.d/K61oracle
chkconfig --level 234 oracle on
chkconfig --add oracle
Note: The last line command is valid when the oracle service state stops (. / oracle stop)
Normal connection can be made after restart.