catalogue
1.2 install docker / kubedm / kubelet [all nodes]
1.4 add Node nodes to the current cluster
1.5 deployment container network (CNI)
1.7 deploying Web UI (Dashboard)
| role | IP address |
|---|---|
| k8s-master | 192.168.237.5 |
| k8s-node01 | 192.168.237.15 |
| k8s-node02 | 192.168.237.25 |
1.1 close SWAP partition
# Turn off firewall $ systemctl stop firewalld.service $ systemctl disable firewalld.service # Close SELinux $ sed -i.bak -r 's@(SELINUX=)enforcing@\1disabled@' /etc/selinux/config # permanent $ setenforce 0 # temporary # Close SWAP partition $ swapoff -a # temporary $ vim /etc/fstab # permanent # Set host name $ hostnamectl set-hostname <hostname> # Add hosts in master $ cat >> /etc/hosts <<EOF 10.0.0.20 k8s-master 10.0.0.21 k8s-node01 10.0.0.22 k8s-node02 EOF # The chain that passes the bridged IPv4 traffic to iptables $ cat > /etc/sysctl.d/k8s.conf <<EOF net.bridge.bridge-nf-call-ip6tables = 1 net.bridge.bridge-nf-call-iptables = 1 EOF $ sysctl --system # take effect # time synchronization $ yum install ntpdate -y $ ntpdate time.windows.com # Set operating system time zone $ ll /etc/localtime lrwxrwxrwx. 1 root root 38 Jul 11 08:51 /etc/localtime -> ../usr/share/zoneinfo/America/New_York $ ln -svf /usr/share/zoneinfo/Asia/Shanghai /etc/localtime '/etc/localtime' -> '/usr/share/zoneinfo/Asia/Shanghai' $ date Tue Sep 21 12:54:40 CST 2021
CentOS7 ==> firewalld ; Centos6 = = > iptables (a tool in user status)
1.2 install docker / kubedm / kubelet [all nodes]
By default, the CRI (container runtime) of kubernetes is Docker, so Docker is installed first
1.2.1 setting the Yum source
 $ wget -O /etc/yum.repos.d/CentOS-Base.repo https://mirrors.aliyun.com/repo/Centos-7.repo
 $ wget -O /etc/yum.repos.d/epel.repo http://mirrors.aliyun.com/repo/epel-7.repo
1.2.2 installing Docker
 $ wget https://mirrors.aliyun.com/docker-ce/linux/centos/docker-ce.repo -O /etc/yum.repos.d/docker-ce.repo
 $ yum install -y docker-ce
 $ systemctl enable --now docker
To configure the image download accelerator and set up the cgroupdriver engine:
$ sudo mkdir -pv /etc/docker
# "Exec opts": ["native. Cgroupdriver = systemd"] the new version of Kubernetes uses the cgroupdriver of systemd by default, so it is necessary to modify the engine of Docker's default cgroupdriver from cgroupfs to systemd
$ sudo tee /etc/docker/daemon.json << 'EOF'
{
"registry-mirrors": ["https://po13h3y1.mirror.aliyuncs.com"],
"exec-opts": ["native.cgroupdriver=systemd"]
}
EOF
$ sudo systemctl daemon-reload
$ sudo systemctl restart docker
$ docker info1.2.3 add alicloud Kubernetes Yum software source
# Configure Kubernetes software source $ cat <<EOF > /etc/yum.repos.d/kubernetes.repo [kubernetes] name=Kubernetes baseurl=https://mirrors.aliyun.com/kubernetes/yum/repos/kubernetes-el7-x86_64/ enabled=1 gpgcheck=1 repo_gpgcheck=1 gpgkey=https://mirrors.aliyun.com/kubernetes/yum/doc/yum-key.gpg https://mirrors.aliyun.com/kubernetes/yum/doc/rpm-package-key.gpg EOF $ yum install -y kubelet kubeadm kubectl $ systemctl enable kubelet && systemctl start kubelet
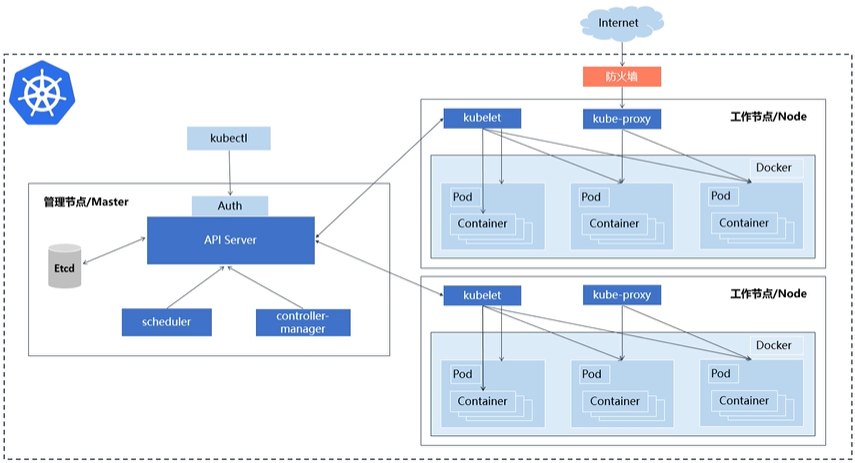
Master nodes: apiserver, Kube scheduler, Kube controller manager, etcd
Slave node: kubelet (non containerization), Kube proxy
Kubedm not only simplifies the deployment of K8S clusters, but also deploys K8S components in a container manner
kubelet adopts non container deployment
1.3 create a Master node
Creating clusters with kubedm | Kubernetes
At 192.168.237.5 (executed by Master)
 $ kubeadm init \
 --apiserver-advertise-address=192.168.237.5 \
 --image-repository registry.aliyuncs.com/google_containers \
 --kubernetes-version v1.22.2 \
 --service-cidr=10.96.0.0/12 \
 --pod-network-cidr=10.244.0.0/16 \
 --ignore-preflight-errors=all
-
--Apiserver advertisement address: cluster advertisement address
-
--Image repository: since the default pull image address k8s.gcr.io cannot be accessed domestically, the alicloud image repository address is specified here
-
--Kubernetes version: k8s version, consistent with the one installed above
-
--Service CIDR: cluster internal virtual network, Pod unified access portal
-
--Pod network CIDR: pod network, which is consistent with the CNI network component yaml deployed below
-
--Ignore preflight errors: errors can be ignored during pre inspection, such as IsPrivilegedUser, Swap, etc
If an error is reported:
The HTTP call equal to 'curl -sSL http://localhost:10248/healthz' failed with error: Get http://localhost:10248/healthz: dial tcp [::1]:10248: connect: connection refused. # resolvent: $ mkdir -pv /etc/systemd/system/kubelet.service.d/ $ vi /etc/systemd/system/kubelet.service.d/10-kubeadm.conf The contents are as follows: # Note: This dropin only works with kubeadm and kubelet v1.11+ [Service] Environment="KUBELET_KUBECONFIG_ARGS=--bootstrap-kubeconfig=/etc/kubernetes/bootstrap-kubelet.conf --kubeconfig=/etc/kubernetes/kubelet.conf" Environment="KUBELET_CONFIG_ARGS=--config=/var/lib/kubelet/config.yaml" # This is a file that "kubeadm init" and "kubeadm join" generates at runtime, populating the KUBELET_KUBEADM_ARGS variable dynamically EnvironmentFile=-/var/lib/kubelet/kubeadm-flags.env # This is a file that the user can use for overrides of the kubelet args as a last resort. Preferably, the user should use # the .NodeRegistration.KubeletExtraArgs object in the configuration files instead. KUBELET_EXTRA_ARGS should be sourced from this file. EnvironmentFile=-/etc/default/kubelet ExecStart= ExecStart=/usr/bin/kubelet $KUBELET_KUBECONFIG_ARGS $KUBELET_CONFIG_ARGS $KUBELET_KUBEADM_ARGS $KUBELET_EXTRA_ARGS $ systemctl daemon-reload $ systemctl restart kubelet
Kubedm init initialization
1. [preflight]: environment check and pull image kubedm config images pull
2. [certs]: generate k8s certificate and etcd certificate / etc/kubernetes/pki
3. [kubeconfig]: generate kubeconfig file
4. [kubelet start]: start the kubelet service and generate the configuration file / var/lib/kubelet/config.yaml
5. [control plane]: deploy the management node components and start the container kubectl get Pods - n Kube system with the image
6. [etcd]: deploy etcd database and start container with image
7. [upload config] [kubelet] [upload certs]: upload configuration files to k8s
8. [mark control plane]: add a label node-role.kubernets.io/master = '' to the management node, and then add a stain [node-role.kubernets.io/master: noschedule]
9. [bootstrap token]: automatically issue certificates for kublet (client)
10. [addons]: deploy plug-in coredns Kube proxy
11. Finally, copy the authentication file connected to k8s cluster to the default path
12. Can refer to Installing Addons | Kubernetes Install the network components and generate the configuration of the Master of the Node joining kubernetes
 Run "kubectl apply -f [podnetwork].yaml" with one of the options listed at:
   https://kubernetes.io/docs/concepts/cluster-administration/addons/

 kubeadm join 192.168.237.5:6443 --token cnblld.gbhjbgufpdrglady \
     --discovery-token-ca-cert-hash sha256:b9df12811b44f2cb6756ffd33e7c579ba951e0aa8a56a6da89d63cdca57d4a37
Or use the configuration file to boot:
$ mkdir -pv /var/lib/kubelet
mkdir: created directory '/var/lib/kubelet'
$ cat > /var/lib/kubelet/config.yaml <<EOF
apiVersion: kubelet.config.k8s.io/v1beta1
kind: KubeletConfiguration
cgroupDriver: systemd
EOF

$ systemctl restart kubelet
$ kubeadm init --config kubeadm.conf --ignore-preflight-errors=all
Copy the connection k8s authentication file used by kubectl to the default path: (corresponding to step 11)
mkdir -p $HOME/.kube
sudo cp -i /etc/kubernetes/admin.conf $HOME/.kube/config
sudo chown $(id -u):$(id -g) $HOME/.kube/config

$ kubectl get node
NAME         STATUS     ROLES                  AGE   VERSION
k8s-master   NotReady   control-plane,master   73m   v1.22.2
Example: related kubectl command line operations
[root@k8s-master ~]#kubectl get node
NAME         STATUS     ROLES                  AGE   VERSION
k8s-master   NotReady   control-plane,master   76m   v1.22.2
[root@k8s-master ~]#kubectl get pods -n kube-system
NAME                                 READY   STATUS    RESTARTS   AGE
coredns-7f6cbbb7b8-672w6             0/1     Pending   0          75m
coredns-7f6cbbb7b8-fjhtp             0/1     Pending   0          75m
etcd-k8s-master                      1/1     Running   0          76m
kube-apiserver-k8s-master            1/1     Running   0          76m
kube-controller-manager-k8s-master   1/1     Running   0          76m
kube-proxy-tkdj2                     1/1     Running   0          75m
kube-scheduler-k8s-master            1/1     Running   0          76m
[root@k8s-master ~]#kubectl get pod -A
NAMESPACE     NAME                                 READY   STATUS    RESTARTS   AGE
kube-system   coredns-7f6cbbb7b8-672w6             0/1     Pending   0          76m
kube-system   coredns-7f6cbbb7b8-fjhtp             0/1     Pending   0          76m
kube-system   etcd-k8s-master                      1/1     Running   0          76m
kube-system   kube-apiserver-k8s-master            1/1     Running   0          76m
kube-system   kube-controller-manager-k8s-master   1/1     Running   0          76m
kube-system   kube-proxy-tkdj2                     1/1     Running   0          76m
kube-system   kube-scheduler-k8s-master            1/1     Running   0          76m
1.4 add Node nodes to the current cluster
Execute at 192.168.237.15/192.168.237.25 (Node)
Add a new node to the cluster and execute the kubedm join command output in kubedm init:
# If relevant errors are reported, use the option -- ignore preflight errors = all
$ kubeadm join 10.0.0.20:6443 --token 7ey31d.6ouv4qpcn1e8vqgn \
--discovery-token-ca-cert-hash sha256:156bdbb66dd7fc2f049bb06f0621d4229b43eb05afc83de61186e4c53353afd2

# If there is a problem with address resolution, you can add it to / etc/hosts
The default token is valid for 24 hours. When it expires, the token will not be available. In this case, you need to re create the token, as follows:
$ kubeadm token create
$ kubeadm token list
$ openssl x509 -pubkey -in /etc/kubernetes/pki/ca.crt | openssl rsa -public der 2> /dev/null | openssl dgst -sha256 -hex | sed 's@^.* @@'
156bdbb66dd7fc2f049bb06f0621d4229b43eb05afc83de61186e4c53353afd3
# Take the latest token and certificate
$ kubeadm join 10.0.0.20:6443 --token 7ey31d.6ouv4qpcn1e8vqgm \
--discovery-token-ca-cert-hash sha256:156bdbb66dd7fc2f049bb06f0621d4229b43eb05afc83de61186e4c53353afd3
Or directly generate a quick command: kubedm token create -- print join command
1.5 deployment container network (CNI)
Creating clusters with kubedm | Kubernetes
Note: only one of the following needs to be deployed. Calico is recommended
Calico is a pure three-tier data center network solution. Calico supports a wide range of platforms, including Kubernetes, OpenStack, etc.
Calico implements an efficient virtual router (vRouter) in each computing node using Linux Kernel to be responsible for data forwarding, and each vRouter is responsible for transmitting the routing information of its workload to the whole calico network through BGP protocol.
In addition, Calico project also implements Kubernetes network policy and provides ACL function
Quickstart for Calico on Kubernetes
Network error will be reported:
$ journalctl -u kubelet
Container runtime network not ready: NetworkReady=false reason:NetworkPluginNotReady message:docker: network plugin is not ready: cni config uninitialized
$ wget https://docs.projectcalico.org/manifests/calico.yaml
After downloading, you also need to modify the Pod network (CALICO_IPV4POOL_CIDR) defined in it, which is the same as that specified in kubedm init
$ vim calico.yaml
- name: CALICO_IPV4POOL_CIDR
  value: "10.244.0.0/16"		# This corresponds to the -- pod network CIDR parameter (container network) during cluster deployment
Application list after modification:
$ kubectl apply -f calico.yaml
$ kubectl get pods -n kube-system
Example: deploy container network
[root@k8s-master ~]# cat calico.yaml | grep image
          image: docker.io/calico/cni:v3.20.1
          image: docker.io/calico/cni:v3.20.1
          image: docker.io/calico/pod2daemon-flexvol:v3.20.1
          image: docker.io/calico/node:v3.20.1
          image: docker.io/calico/kube-controllers:v3.20.1
# If the download is slow, you can manually install calico components on each Node: a total of 4 images
[root@k8s-master ~]#docker pull calico/cni:v3.20.1
[root@k8s-master ~]#docker pull calico/pod2daemon-flexvol:v3.20.1
[root@k8s-master ~]#docker pull calico/node:v3.20.1
[root@k8s-master ~]#docker pull calico/kube-controllers:v3.20.1

[root@k8s-master ~]# kubectl apply -f calico.yaml
[root@k8s-master ~]# kubectl get pods -A
NAMESPACE     NAME                                       READY   STATUS    RESTARTS   AGE
kube-system   calico-kube-controllers-855445d444-9xn9z   1/1     Running   0          31m
kube-system   calico-node-h94ns                          1/1     Running   0          31m
kube-system   calico-node-nkxlr                          1/1     Running   0          31m
kube-system   calico-node-x4zlb                          1/1     Running   0          31m
kube-system   coredns-6d56c8448f-l9ksb                   1/1     Running   0          34m
kube-system   coredns-6d56c8448f-lsljv                   1/1     Running   0          34m
kube-system   etcd-k8s-master                            1/1     Running   0          34m
kube-system   kube-apiserver-k8s-master                  1/1     Running   0          34m
kube-system   kube-controller-manager-k8s-master         1/1     Running   0          34m
kube-system   kube-proxy-qp9qm                           1/1     Running   0          34m
kube-system   kube-proxy-v6f9p                           1/1     Running   0          33m
kube-system   kube-proxy-vstpj                           1/1     Running   0          33m
kube-system   kube-scheduler-k8s-master                  1/1     Running   0          34m
[root@k8s-master ~]#kubectl get nodes
NAME         STATUS   ROLES                  AGE    VERSION
k8s-master   Ready    control-plane,master   140m   v1.22.2
k8s-node01   Ready    <none>                 47m    v1.22.2
k8s-node02   Ready    <none>                 47m    v1.22.2
1.6 testing Kuberntes cluster
-
Verify Pod operation
-
Verify Pod network communication
-
Verify DNS resolution
Create a Pod in the Kubernetes cluster and verify that it works properly:
$ kubectl create deployment nginx --image=nginx
$ kubectl expose deployment nginx --port=80 --type=NodePort
$ kubectl get pod,svc
Access address: http://NodeIP:Port
1.7 deploying Web UI (Dashboard)
Execute kubectl apply -f recommended.yaml on the Master node
$ wget https://raw.githubusercontent.com/kubernetes/dashboard/v2.0.3/aio/deploy/recommended.yaml
The default Dashboard can only be accessed inside the cluster. Modify the Service to NodePort type and expose it to the outside:
$ vim recommended.yaml
...ellipsis...
kind: Service
apiVersion: v1
metadata:
  labels:
    k8s-app: kubernetes-dashboard
  name: kubernetes-dashboard
  namespace: kubernetes-dashboard
spec:
  ports:
    - port: 443
      targetPort: 8443
  selector:
    k8s-app: kubernetes-dashboard
  # Add the following
  type: NodePort
...ellipsis...

$ kubectl apply -f recommended.yaml
$ kubectl get pods -A
NAMESPACE              NAME                                         READY   STATUS              RESTARTS   AGE
default                nginx-6799fc88d8-tpvxh                       1/1     Running             0          14m
kube-system            calico-kube-controllers-855445d444-9xn9z     1/1     Running             0          77m
kube-system            calico-node-h94ns                            1/1     Running             0          77m
kube-system            calico-node-nkxlr                            1/1     Running             0          77m
kube-system            calico-node-x4zlb                            1/1     Running             0          77m
kube-system            coredns-6d56c8448f-l9ksb                     1/1     Running             0          80m
kube-system            coredns-6d56c8448f-lsljv                     1/1     Running             0          80m
kube-system            etcd-k8s-master                              1/1     Running             0          80m
kube-system            kube-apiserver-k8s-master                    1/1     Running             0          80m
kube-system            kube-controller-manager-k8s-master           1/1     Running             0          80m
kube-system            kube-proxy-qp9qm                             1/1     Running             0          80m
kube-system            kube-proxy-v6f9p                             1/1     Running             0          79m
kube-system            kube-proxy-vstpj                             1/1     Running             0          79m
kube-system            kube-scheduler-k8s-master                    1/1     Running             0          80m
kubernetes-dashboard   dashboard-metrics-scraper-7b59f7d4df-bmvdx   0/1     ContainerCreating   0          43s
kubernetes-dashboard   kubernetes-dashboard-5dbf55bd9d-rgtfw        0/1     ContainerCreating   0          44s
$ kubectl get pods -n kubernetes-dashboard
NAME                                         READY   STATUS    RESTARTS   AGE
dashboard-metrics-scraper-7b59f7d4df-bmvdx   1/1     Running   0          2m10s
kubernetes-dashboard-5dbf55bd9d-rgtfw        1/1     Running   0          2m11s
Example: testing the Kubernetes cluster
[root@k8s-master ~]# kubectl get pods,svc -n kubernetes-dashboard
NAME                                             READY   STATUS    RESTARTS   AGE
pod/dashboard-metrics-scraper-7b59f7d4df-bmvdx   1/1     Running   0          4m42s
pod/kubernetes-dashboard-5dbf55bd9d-rgtfw        1/1     Running   0          4m43s

NAME                                TYPE        CLUSTER-IP      EXTERNAL-IP   PORT(S)         AGE
service/dashboard-metrics-scraper   ClusterIP   10.98.127.228   <none>        8000/TCP        4m43s
service/kubernetes-dashboard        NodePort    10.100.37.12    <none>        443:31744/TCP   4m43s
Access address: https://NodeIP:30001
Create a service account and bind the default cluster admin administrator cluster role:
# Create user
$ kubectl create serviceaccount dashboard-admin -n kube-system
# User authorization
$ kubectl create clusterrolebinding dashboard-admin --clusterrole=cluster-admin --serviceaccount=kube-system:dashboard-admin
# Get user Token
$ kubectl describe secrets -n kube-system $(kubectl -n kube-system get secret | awk '/dashboard-admin/{print $1}')
Log in to the Dashboard using the output token
2. Related error reporting
-
1. Clear the current initialization environment
-
Solution: kubedm reset
-
-
2. calico pod not ready
-
resolvent:
-
$ grep image calico.yaml
$ docker pull calico/xxx(cni:v3.20.1,pod2daemon-flexvol:v3.20.1,node:v3.20.1,kube-controllers:v3.20.1)
-
-
3. Error execution phase kubelet start: error uploading Cookie: timed out waiting for the condition
-
resolvent:
-
error execution phase kubelet-start: error uploading crisocket: timed out waiting for the condition
To see the stack trace of this error execute with --v=5 or higher
-
$ swapoff -a
$ kubeadm reset
$ systemctl daemon-reload
$ systemctl restart kubelet
$ iptables -F && iptables -t nat -F && iptables -t mangle -F && iptables -X
-