Installation and configuration of Apache server
Environment centos8 5 (this version is the latest version at present, and other versions should be the same)
Apache Apache )It is the world's No. 1 Web server software. It can run on almost all widely used Computer platform In fact, because of its Cross platform And security are widely used. It is one of the most popular Web server-side software. It is fast, reliable and can be extended through a simple API Perl/Python etc. interpreter Compile into the server.
Note that the comments in all configuration files should not appear in the configuration process, otherwise an error may be reported (the comments in this article are only for your understanding)
Install apache
Install apache using yum or up2date
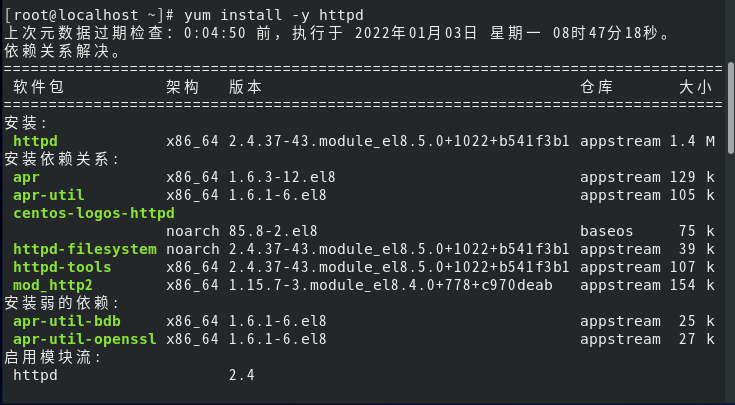
yum install -y httpd
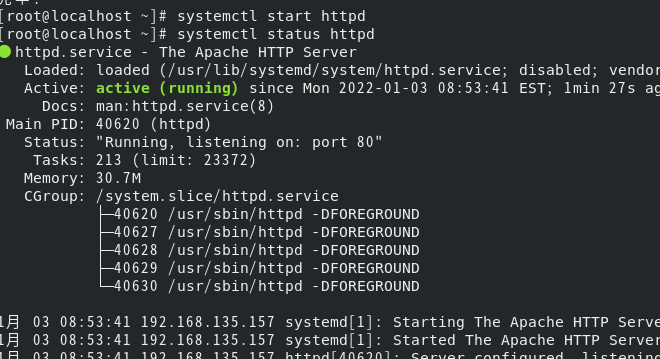
systemctl start httpd # service httpd start
systemctl status httpd # View httpd services
Firewall management
At this time, check the status of the firewall (if you do not turn off the firewall, you cannot use the browser to access the web server)
systemctl status firewalld.service
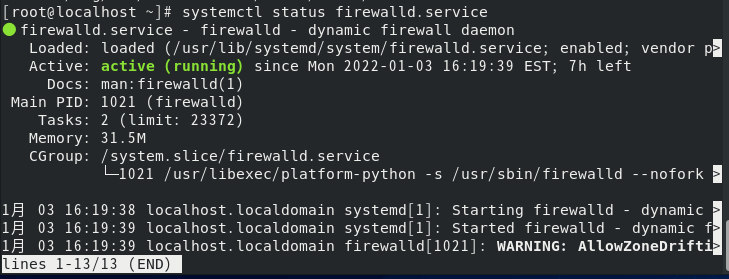
(active (running)) indicates that the firewall is active
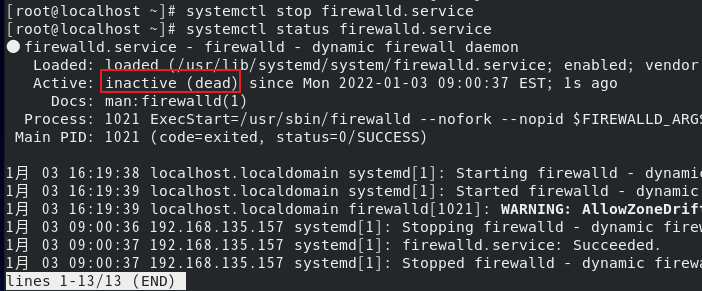
systemctl stop firewalld.service #Execute the stop firewall command
systemctl status firewalld.service
In box (inactive (dead)), the firewall process is inactive and the service is stopped successfully
Other commands of firewall
systemctl disable firewalld.service #Disable firewall self startup
systemctl start firewalld.service  #Turn on the firewall
systemctl enable firewalld.service #The firewall starts with the system
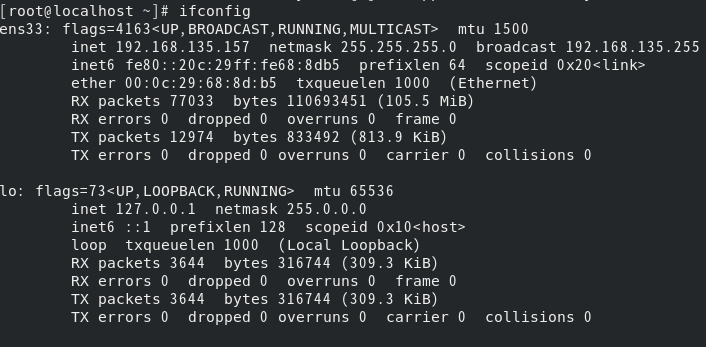
View centos ip
ifconfig
Access with browser
Introduction to Apache configuration file
The default configuration file for httpd is: / etc / httpd / conf / httpd Conf, which mainly includes three parts, as follows:
[root@localhost~]# grep '\<Section\>' /etc/httpd/conf/httpd.conf -n
33:### Section 1: Global Environment
245:### Section 2: 'Main' server configuration
977:### Section 3: Virtual Hosts
Where: 1) Global Environment - global configuration, which determines the global parameters of Apache server.
Where: 1) Global Environment - global configuration, which determines the global parameters of Apache server.
2) Main server configuration - main service configuration, which is equivalent to the default web site of Apache. If there is only one site in our server, we only need to configure it here.
3) Virtual Hosts - Virtual Hosts. Virtual Hosts cannot coexist with the Main Server. When Virtual Hosts are enabled, the Main Server cannot be used.
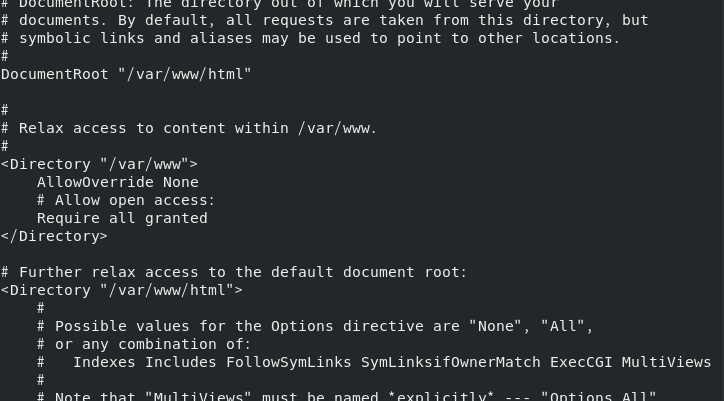
ServerRoot "/ etc/httpd" is used to specify the running directory of Apache
Listen 80 listening port
DocumentRoot "/ var/www/html" web page file storage directory
 <Directory "/var/www/html">
    Require all granted    Custom directory permissions
 </Directory>
ErrorLog "logs/error_log" error log storage location
DirectoryIndex index.html default home page name
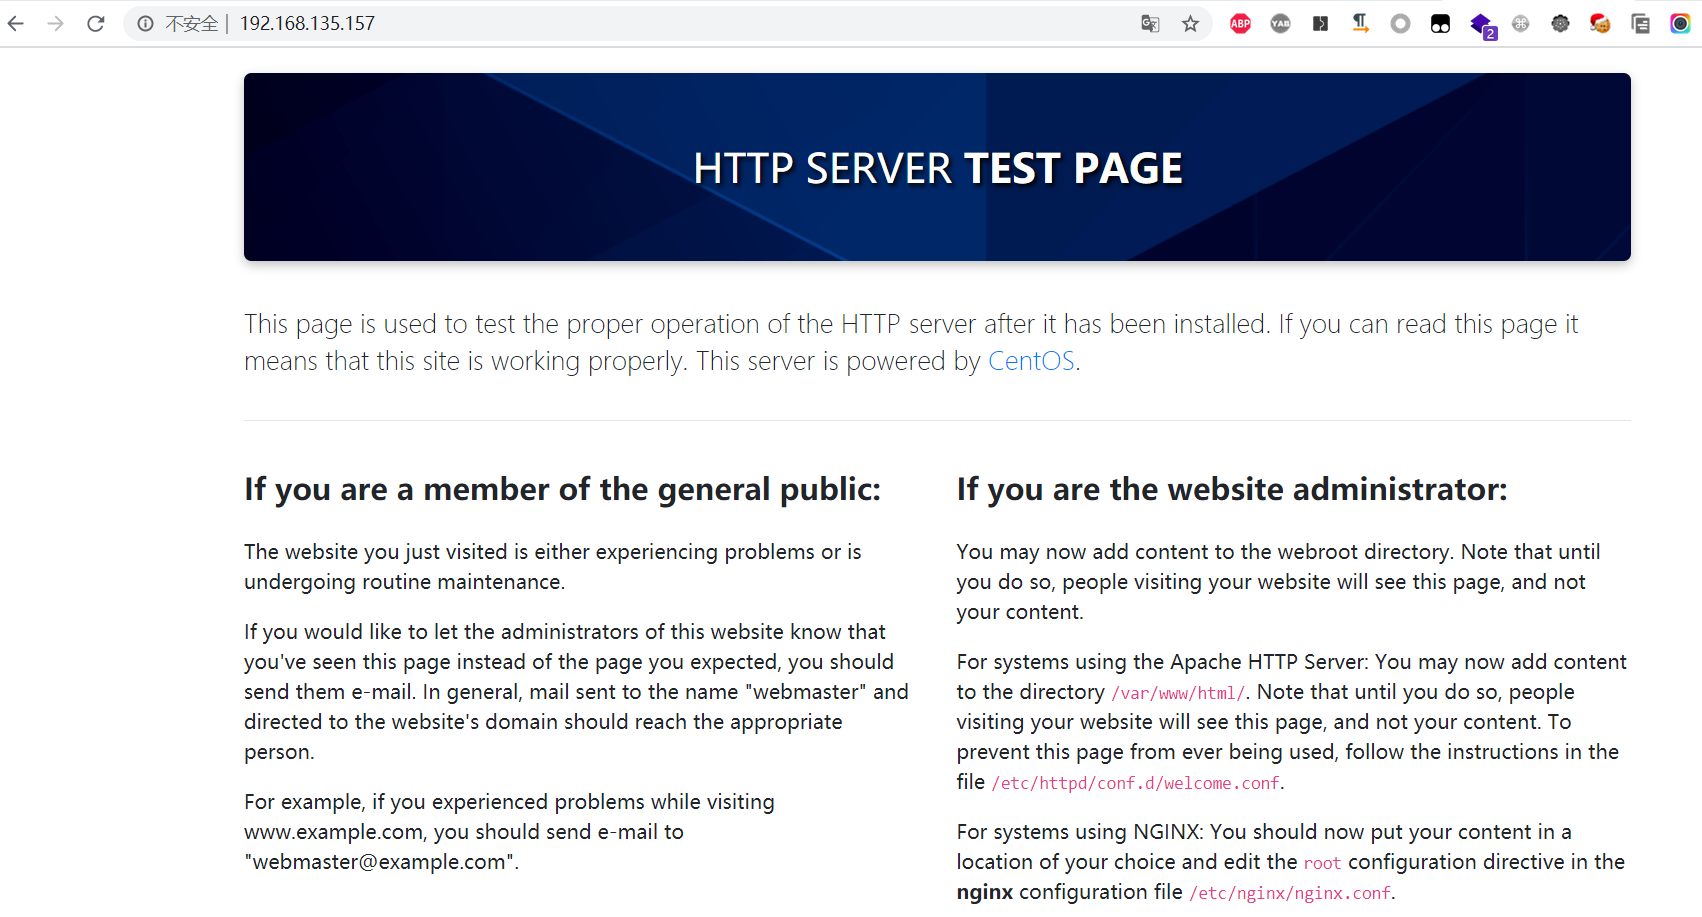
Test: publish a test page locally and test it in the browser
Create a new index in / var/www/html / HTML and edit:
hello world

Browser Test

Test successful
Virtual host configuration
Virtual Host, also known as virtual server, host space or web space, is a network technology that allows multiple host names to operate on a single server, and can support each single host name separately. A Virtual Host can run multiple websites or services. Virtual does not mean that it does not exist, but that the space is extended from the physical server, and its hardware system can be based on a server cluster or a single server. Its technology is a technology used by Internet servers to save the cost of server hardware. Virtual Host technology is mainly used in HTTP, FTP, EMAIL and other services. One or all service contents of a server are logically divided into multiple service segments, which are externally represented as multiple servers, so as to make full use of server hardware resources—— Explanation of Virtual Host in Wiki.
There are three main ways to implement virtual host: name based method, IP based method and port based method. The following will explain various configurations and application scenarios of virtual hosts in combination with apache configuration.
Domain name based multi site configuration
Write / etc / httpd / conf.d/domain1 conf
<VirtualHost 192.168.135.157:80>
ServerName www.domain1.com         # domain name
DocumentRoot "/var/www/domain1/html"  # The path of the web page (all comments should not appear in the configuration file. They are added here for ease of understanding)
customlog "logs/domain1.log" combined
</VirtualHost>
<directory /var/www/domain1/html>
    require all granted
</directory>
At / var / www / domain1 / HTML / index HTML write test page

Write / etc / httpd / conf.d/domain2 conf
<VirtualHost 192.168.135.157:80>
ServerName www.domain2.com
DocumentRoot "/var/www/domain2/html"
customlog "logs/domain2.log" combined
</VirtualHost>
<directory /var/www/domain2/html>
    require all granted
</directory>
At / var / www / domain2 / HTML / index HTML write test page

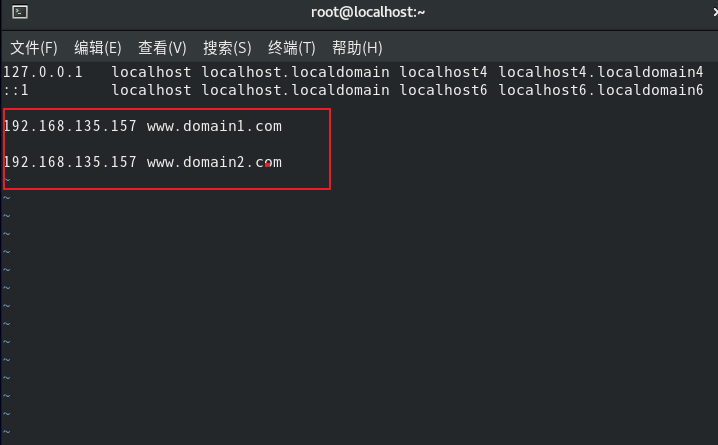
Edit the local domain name resolution file / etc / hosts (the DNS resolution process is to access the local hosts file first, then the local DNS server, and finally the remote DNS server. Because we have not built a DNS server at this time, we first modify the hosts to make the DNS resolution effective. The DNS resolution process is not described here, and we can supplement this knowledge by ourselves)
vim /etc/hosts
Add these two sentences
After modifying the configuration file, restart apache to make the configuration file take effect
systemctl restart httpd
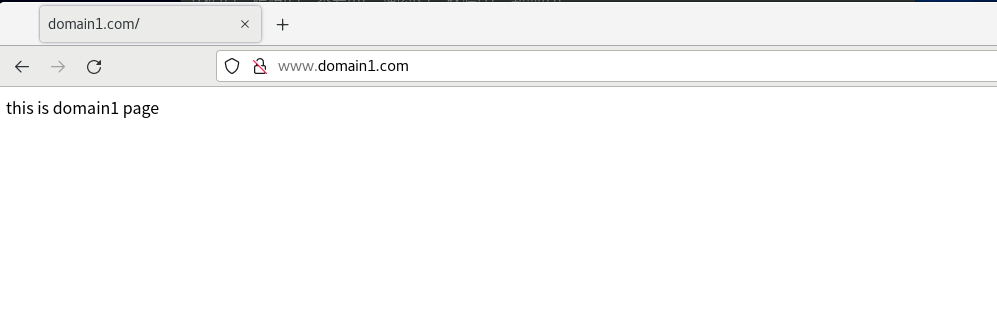
Open the browser of the virtual machine and enter www.domain1 COM and www.domain2 com

If this happens when apache restarts, enter httpd -t to check the cause of the error. The cause of the error is usually the problem of the configuration file. Check whether the configuration file is in the wrong format

ip based multi site configuration
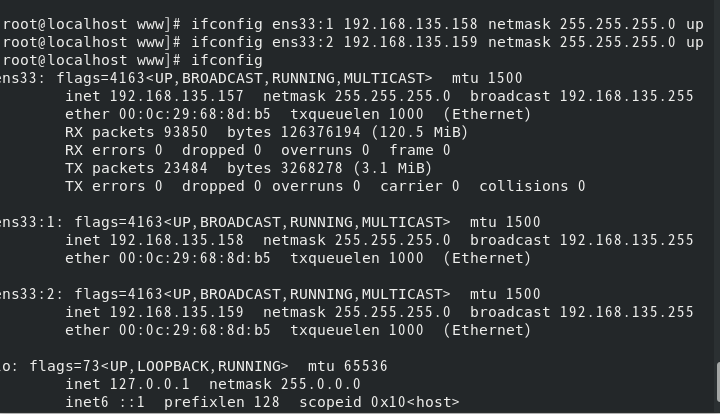
Add temporary ip
[root@localhost www]# ifconfig ens33:1 192.168.135.158 netmask 255.255.255.0 up
[root@localhost www]# ifconfig ens33:2 192.168.135.159 netmask 255.255.255.0 up
Write / etc / httpd / conf.d/ip1 conf
<VirtualHost 192.168.135.158:80>
DocumentRoot "/var/www/ip1/html"  # Path to web page
customlog "logs/ip1.log" combined
</VirtualHost>
<directory /var/www/ip1/html>
    require all granted
</directory>
At / var / www / IP1 / HTML / index HTML write test page

Write / etc / httpd / conf.d/ip2 conf
<VirtualHost 192.168.135.159:80>
DocumentRoot "/var/www/ip2/html"  # The path of the web page (note that these comments do not appear in the configuration file, otherwise an error will be reported)
customlog "logs/ip2.log" combined
</VirtualHost>
<directory /var/www/ip2/html>
    require all granted
</directory>
At / var / www / IP2 / HTML / index HTML write test page

Restart Apache to make the configuration file effective systemctl restart httpd
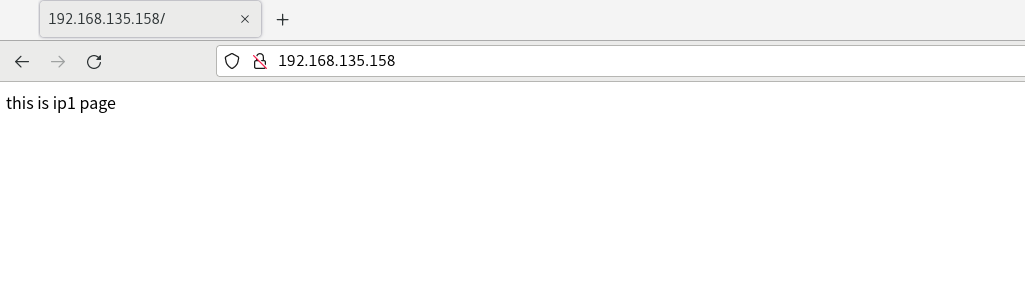
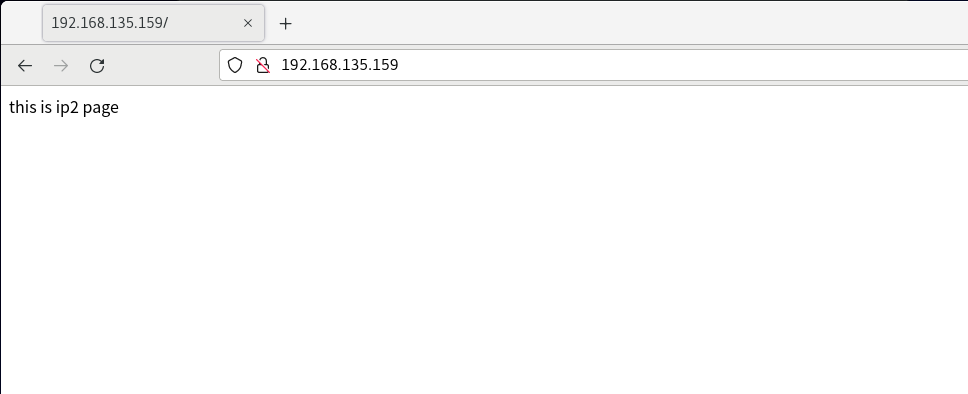
Visit 192.168.135.158 and 192.168.135.159 respectively (these two IPS are the temporary ip we added)
Port based multisite configuration
We use ports 8080 and 8081 as the ports of the website
Write / etc / httpd / conf.d/port1 conf
Listen 8080
<VirtualHost 192.168.135.157:8081>
DocumentRoot "/var/www/port1/html"
customlog "logs/port1.log" combined
</VirtualHost>
<directory /var/www/port1/html>
    require all granted
</directory>
At / var / www / port1 / HTML / index HTML write test page

Write / etc / httpd / conf.d/port2 conf
Listen 8081
<VirtualHost 192.168.135.157:8081>
DocumentRoot "/var/www/port2/html"
customlog "logs/port2.log" combined
</VirtualHost>
<directory /var/www/port2/html>
    require all granted
</directory>
At / var / www / port2 / HTML / index HTML write test page

If we restart Apache at this time, an error may be reported, which may not be due to the error of the configuration file.
In the process of monitoring ports, due to the Selinux mechanism in CentOS 8, the operating system may not allow us to monitor some specific ports, so we need to turn them off
sentenforce 0 #Temporary shutdown, restart and recovery

restart
systemctl restart httpd
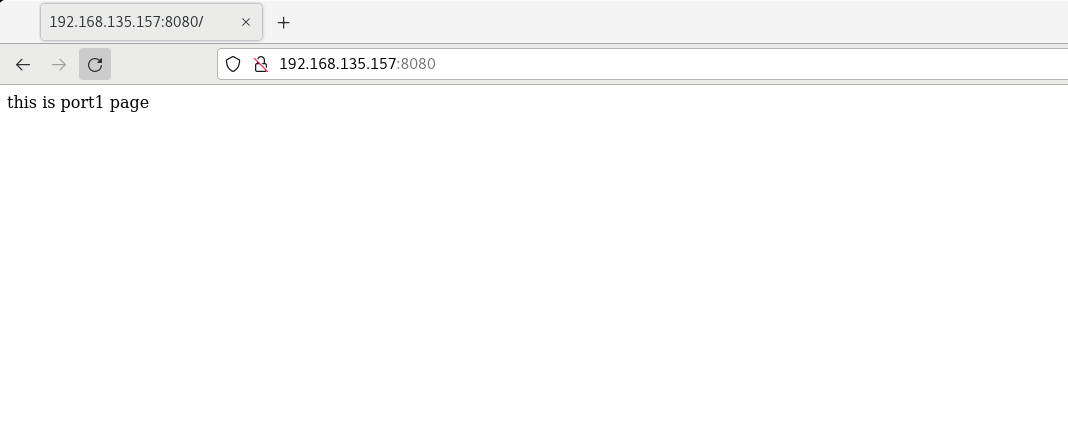
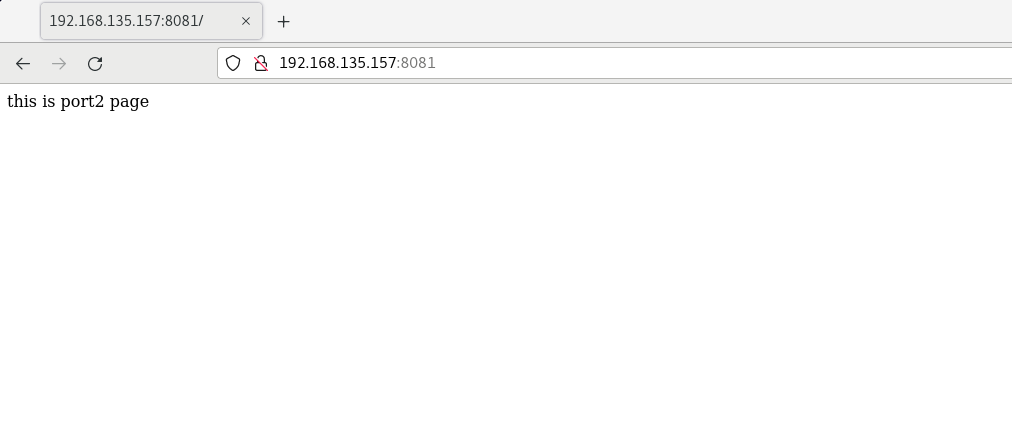
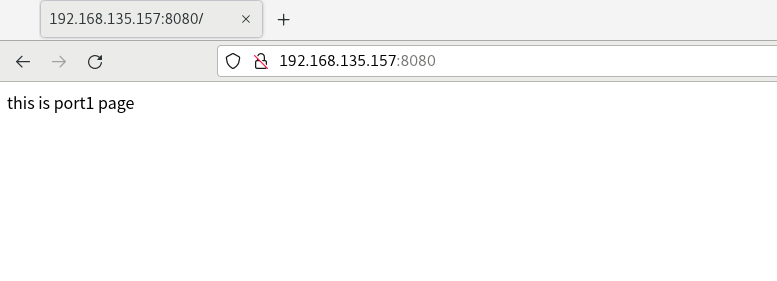
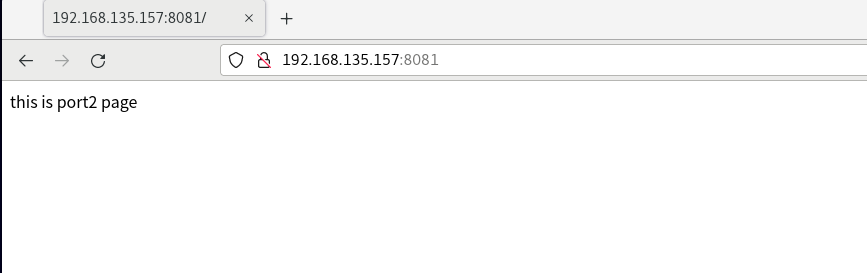
Visit separately http://192.168.135.157:8080/ And http://192.168.135.157:8081/
Installation and configuration of Nginx server
Installing nginx
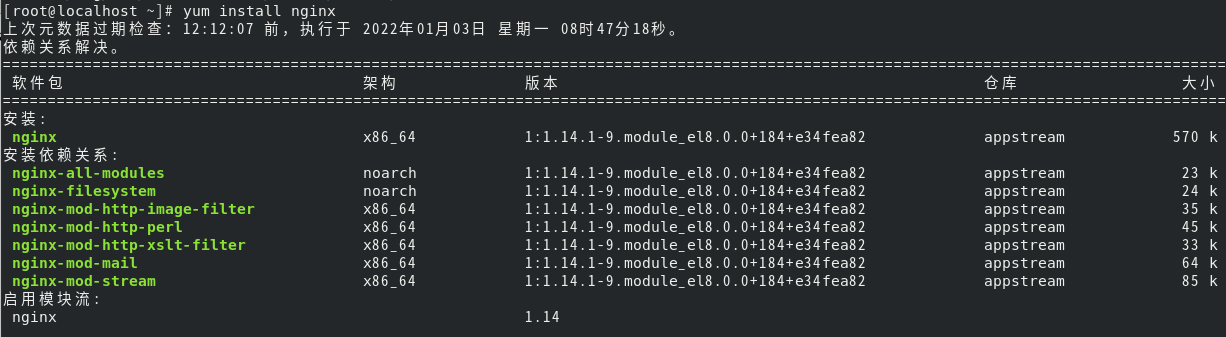
[root@localhost ~]# yum install nginx
View nginx version
nginx -v

/etc/nginx/conf.d/ default configuration directory
The default path of the website is / usr/share/nginx/html
Error log / var / log / nginx / error log
Access log / var / log / nginx / access log
Virtual host configuration
Domain name based multi site configuration
Create / etc / nginx / conf.d/domain1 Conf and write
server {
    listen      80;
    server_name  www.domain1.com;

    #charset koi8-r;
    #access_log  /var/log/nginx/host.access.log  main;

    location / {
        root   /usr/share/nginx/domain1;  #Location of the site
        index  index.html index.htm; #Website default home page
    }
    }
Create / etc / nginx / conf.d/domain2 Conf and write
server {
    listen      80;
    server_name  www.domain2.com;

    #charset koi8-r;
    #access_log  /var/log/nginx/host.access.log  main;

    location / {
        root   /usr/share/nginx/domain2;  #Location of the site
        index  index.html index.htm; #Website default home page
    }
    }
/Modify the etc/hosts file

Restart nginx to make the configuration file effective
systemctl restart nginx
And create indexes in / usr/share/nginx/domain1 and / usr/share/nginx/domain2 respectively HTML test web page, accessed with browser


Multi site configuration based on multi ip
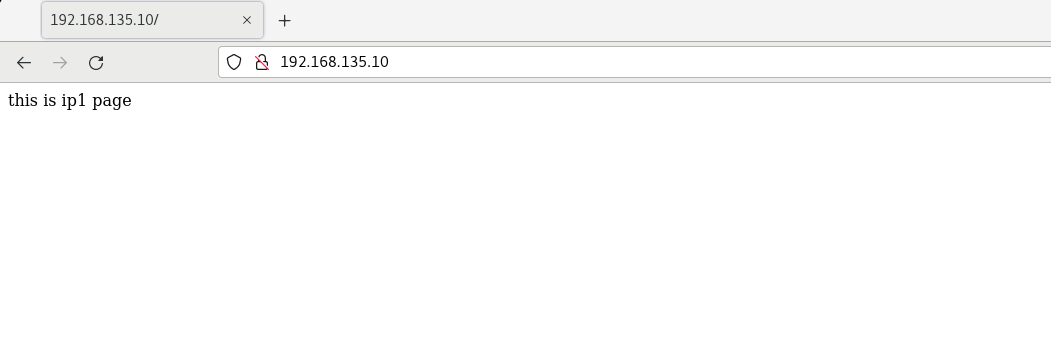
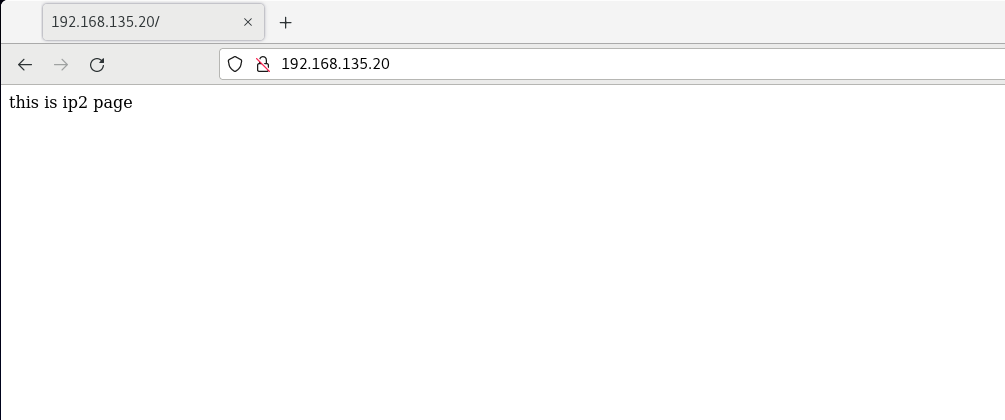
Add virtual ip
ifconfig ens33:1 192.168.135.10 netmask 255.255.255.0 up
ifconfig ens33:2 192.168.135.20 netmask 255.255.255.0 up
Create / etc / nginx / conf.d/ip1.0 Conf and write
server {
    listen      192.168.135.10:80;
    #charset koi8-r;
    #access_log  /var/log/nginx/host.access.log  main;

    location / {
        root   /usr/share/nginx/ip1;  #Location of the site
        index  index.html index.htm; #Website default home page
    }
    }
Create / etc / nginx / conf.d/ip2.0 Conf and write
server {
    listen      192.168.135.20:80;
    #charset koi8-r;
    #access_log  /var/log/nginx/host.access.log  main;

    location / {
        root   /usr/share/nginx/ip2;  #Location of the site
        index  index.html index.htm; #Website default home page
    }
    }
Restart nginx to make the configuration file effective
systemctl restart nginx
And create indexes in / usr/share/nginx/ip1 and / usr/share/nginx/ip2 respectively HTML test web page, accessed with browser
Multiport based multisite configuration
Use 8080 and 8081 as the ports of nginx server
Create / etc / nginx / conf.d/port1 Conf and write
server {
    listen      192.168.135.157:8080;

    #charset koi8-r;
    #access_log  /var/log/nginx/host.access.log  main;

    location / {
        root   /usr/share/nginx/port1;  #Location of the site
        index  index.html index.htm; #Website default home page
    }
    }
Create / etc / nginx / conf.d/port2 Conf and write
server {
    listen      192.168.135.157:8081;

    #charset koi8-r;
    #access_log  /var/log/nginx/host.access.log  main;

    location / {
        root   /usr/share/nginx/port2;  #Location of the site
        index  index.html index.htm; #Website default home page
    }
    }
And create indexes in / usr/share/nginx/port1 and / usr/share/nginx/port2 respectively HTML test web page, accessed with browser