Installation steps:
1. Update the software warehouse and use domestic sources: configure and use Ali's open source image in CentOS
1) Back up the original file / etc / yum.com repos. d
2) Download the repo file of the corresponding version of the system from the Alibaba open source image site:
#CentOS8
[root@VM-0-8-centos yum.repos.d]# wget http://mirrors.aliyun.com/repo/Centos-8.repo
vim Centos-8.repo changes all enabled=0 to enabled=1, that is, all software warehouses inside are used.
3) Configure Qinghua source (you can add several sources, such as Qinghua source, Netease source, etc.):
$ vi /etc/yum.repos.d/CentOS-cnnic.repo

#Tsinghua source is configured as follows. Here, enabled in centosplus CNNIC and powertools CNNIC is turned on as required;
[BaseOS-cnnic]
name=CentOS-$releasever-Base-cnnic
baseurl=https://mirrors.cnnic.cn/centos/$releasever/BaseOS/$basearch/os/
gpgcheck=1
enabled=1
gpgkey=https://mirrors.cnnic.cn/centos/RPM-GPG-KEY-CentOS-Official

[AppStream-cnnic]
name=CentOS-$releasever-AppStream-cnnic
baseurl=https://mirrors.cnnic.cn/centos/$releasever/AppStream/$basearch/os/
gpgcheck=1
enabled=1
gpgkey=https://mirrors.cnnic.cn/centos/RPM-GPG-KEY-CentOS-Official

[extras-cnnic]
name=CentOS-$releasever-Extras-cnnic
baseurl=https://mirrors.cnnic.cn/centos/$releasever/extras/$basearch/os/
gpgcheck=1
enabled=1
gpgkey=https://mirrors.cnnic.cn/centos/RPM-GPG-KEY-CentOS-Official

[centosplus-cnnic]
name=CentOS-$releasever-Plus-cnnic
baseurl=https://mirrors.cnnic.cn/centos/$releasever/centosplus/$basearch/os/
gpgcheck=1
enabled=0
gpgkey=https://mirrors.cnnic.cn/centos/RPM-GPG-KEY-CentOS-Official

[PowerTools-cnnic]
name=CentOS-$releasever-PowerTools-cnnic
baseurl=https://mirrors.cnnic.cn/centos/$releasever/PowerTools/$basearch/os/
gpgcheck=1
enabled=0
gpgkey=https://mirrors.cnnic.cn/centos/RPM-GPG-KEY-CentOS-Official
4) Clear the system yum cache and regenerate the new yum cache
dnf -y install epel-release
dnf clean all
dnf makecache
dnf repolist
If only Ali source is added, execute dnf repolist and the results are as follows:

2. Install ffmpeg
reference resources: https://blog.csdn.net/qq_38631503/article/details/80007128
3. Compile and install opencv
1) Install required and dependencies
sudo dnf install epel-release git gcc gcc-c++ cmake3 qt5-qtbase-devel python3 python3-devel python3-pip cmake python3-devel python3-numpy gtk2-devel libpng-devel jasper-devel openexr-devel libwebp-devel libjpeg-turbo-devel libtiff-devel tbb-devel libv4l-devel eigen3-devel freeglut-devel mesa-libGL mesa-libGL-devel boost boost-thread boost-devel gstreamer1-plugins-base
2) Download OpenCV source code and OpenCV contrib source code
Create a new folder to store the downloaded opencv File: mkdir ~/opencv_build
cd ~/opencv_build
git clone https://github.com/opencv/opencv.git
git clone https://github.com/opencv/opencv_contrib.git
I have opencv 4.1 installed here 0 and opencv_contrib 4.1.0, provide a quick download:
3) Start compilation
Create a temporary build directory build: mkdir build
Enter the build directory: CD/ Build and execute
cmake3 -D CMAKE_BUILD_TYPE=RELEASE -D CMAKE_INSTALL_PREFIX=/usr/local -D INSTALL_C_EXAMPLES=ON -D INSTALL_PYTHON_EXAMPLES=ON -D OPENCV_GENERATE_PKGCONFIG=ON -D OPENCV_EXTRA_MODULES_PATH=~/opencv_build/opencv_contrib/modules -D BUILD_EXAMPLES=ON -D WITH_FFMPEG=ON ..
There will be some errors in this process, such as
Download ippicv timeout:
This is the reason why the network cannot download. The following methods can be used to solve it:
<1>. Enter the source directory opencv-3.4 8/3rdparty/ippicv
<2>. Manually modify ippicv Cmake file, delete the download link and point to ippicv_2019_lnx_intel64_general_20180723.tgz directory, the file download address, because the network download is very slow, you can download the link here
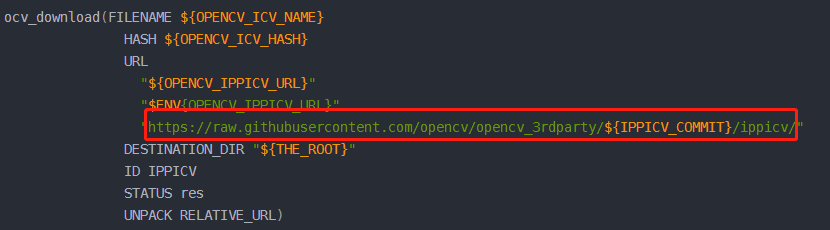
Replace the link above with the following. Be careful not to add the file name XXXXX Tgz, just specify the directory
"file:///root/kkk/"
Re execute the above command: camke3 -D
Download XXX I timeout:
You can view the log file cmakedownloadlog. In the build folder Txt in the log file cmakedownloadlog Txt has the corresponding XXX that describes the failure I's download address, copy the address to the browser, open it, then copy the contents to the new file, save and name the file with the same name, and put it in opencv_contrib/modules/xfeatures2d/src /.
The following files are missing and need to be copied:
boostdesc_bgm.i
boostdesc_bgm_bi.i
boostdesc_bgm_hd.i
boostdesc_lbgm.i
boostdesc_binboost_064.i
boostdesc_binboost_128.i
boostdesc_binboost_256.i
vgg_generated_120.i
vgg_generated_64.i
vgg_generated_80.i
vgg_generated_48.i
Files can be downloaded here: xxxxxx
4) After executing the cmake above, the printed content will appear. Focus on:
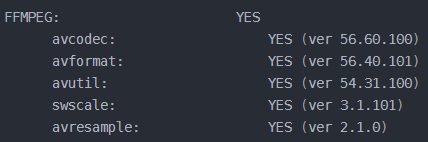
If cmake is successful, the final printed content should be:

5) compile and install opencv
make #If the computer configuration is high, multiple cores can be compiled at the same time: make -j8 note: - j the following 8 is the number of processor cores, which can be viewed by typing nproc command
Install the opencv Library: sudo make install
Create a symbolic link opencv4 PC submits the / usr/share/pkgconfig directory and executes ldconfig to rebuild the library cache:
sudo ln -s /usr/local/lib/pkgconfig/opencv4.pc /usr/share/pkgconfig/
sudo ldconfig
Of course, pkgconfig may also be installed under lib64 according to your own changes.
6) Check whether the installation is successful
pkg-config --modversion opencv4
When the version number appears, the installation is successful.
7) Verify that opencv can open the video
Create a new test cpp
#include <opencv4/opencv2/opencv.hpp>
#include <iostream>
using namespace cv;

int main()
{
    VideoCapture capture;
    Mat frame;
    frame= capture.open("./1.mp4");
    if(!capture.isOpened())
    {
        printf("can not open ...\n");
        return -1;
    }
    //namedWindow("output", CV_WINDOW_AUTOSIZE);

    while (capture.read(frame))
    {
        imshow("output", frame);
        waitKey(10);
    }
    capture.release();
    return 0;
}
Compile the cpp file
g++ test.cpp -I /usr/local/include/opencv4 -L /usr/local/lib -lopencv_core -lopencv_highgui -lopencv_imgproc -lopencv_imgcodecs -lopencv_calib3d -lopencv_features2d -lopencv_videoio -std=gnu++11
After successful compilation, a.out will be generated
Execute the file:/ a.out
Running the video successfully means that opencv is successfully installed.