Catalog
2. Active and passive modes of ZABBIX
Configuration of server
First configure the zabbix server side
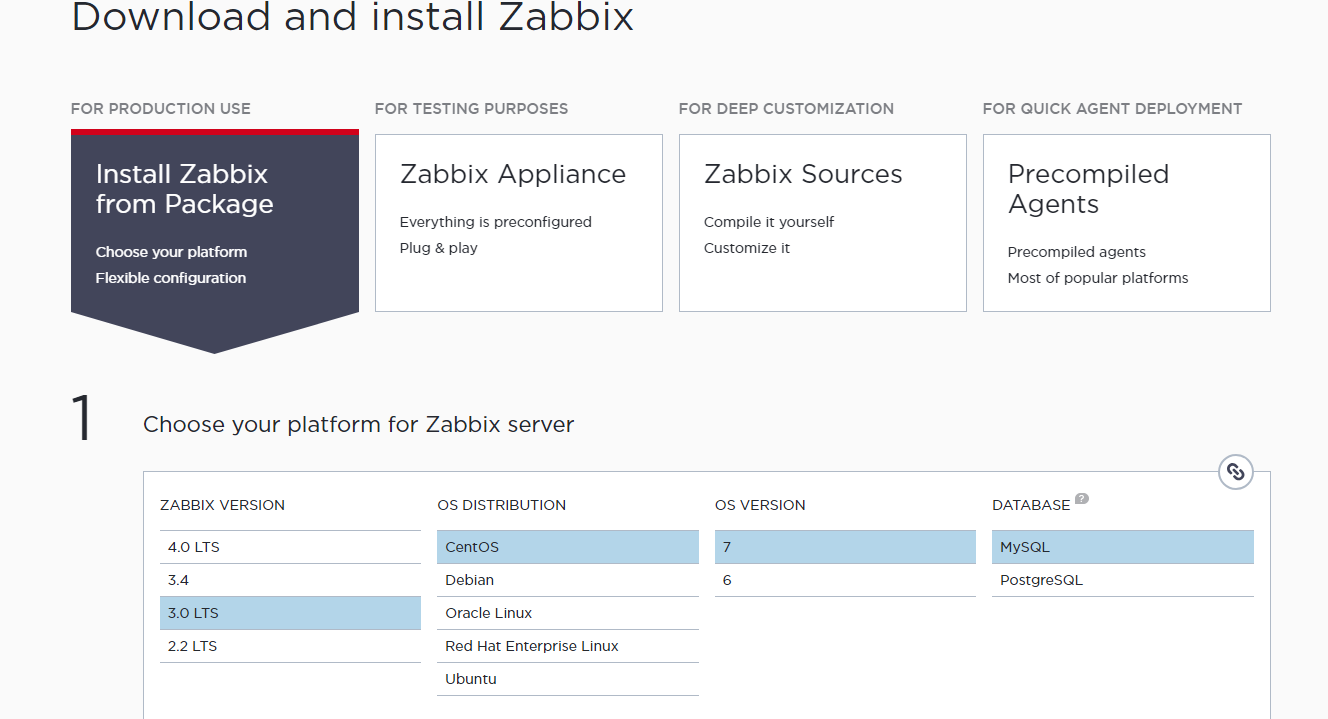
1. go zabbix official website Choose install zabbix from package mode, and then select the corresponding version, operating system, database according to their own needs

2. Then follow the steps of the official website and install it downwards.
Zabbix-server-mysql (it should be noted that the role of zabbix-server-mysql is to realize the connection between ZABBIX and MySQL, not to install MySQL client on the server, so you need to install MySQL before that)
zabbix-web-mysql (providing zabbix web pages)
zabbix-agent (agent configuring zabbix)

# rpm -ivh https://repo.zabbix.com/zabbix/3.0/rhel/7/x86_64/zabbix-release-3.0-1.el7.noarch.rpm
# yum install zabbix-server-mysql zabbix-web-mysql zabbix-agent -y
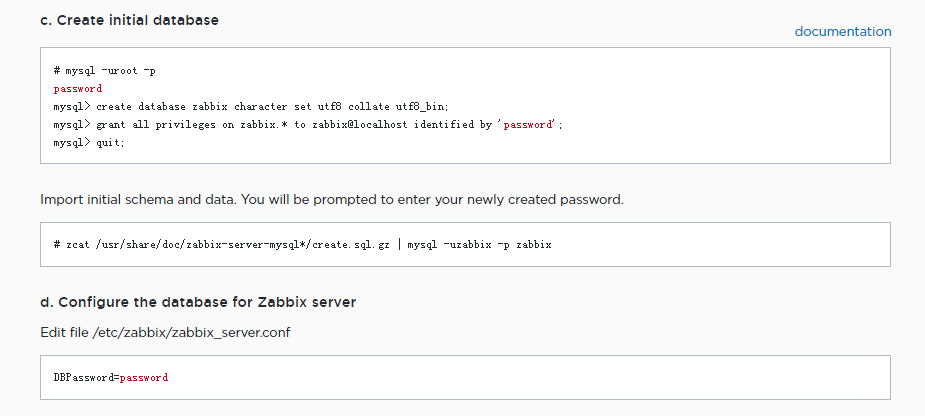
3. Create and initialize zabbix database, modify database password of configuration file

mysql> create database zabbix character set utf8 collate utf8_bin;
mysql> grant all privileges on zabbix.* to zabbix@localhost identified by 'zabbix_password';
mysql> quit;

# zcat /usr/share/doc/zabbix-server-mysql*/create.sql.gz | mysql -uzabbix -p zabbix
#vi /etc/zabbix/zabbix_server.conf
#DBHost=localhost   #Remote MYSQL can be configured, currently operated with local MYSQL, without modification.
DBName=zabbix
DBUser=zabbix
DBPassword=zabbix_password
4. Configure the time zone of ZABBIX front-end PHP page, restart zabbix-server and zabbix-agent after completion, and set up boot-up.

#vi /etc/httpd/conf.d/zabbix.conf
php_value date.timezone Asia/Shanghai

# systemctl restart zabbix-server zabbix-agent httpd
# systemctl enable zabbix-server zabbix-agent httpd
5. Visit the front-end page of zabbix http://server_ip_or_name/zabbix To configure, the specific process can refer to the official website https://www.zabbix.com/documentation/3.0/manual/installation/install#installing_frontend
II. Configuring Agents
After the server is arranged, the agent needs to be set up on the monitored server.
1. Install the zabbix-agent package
# rpm -ivh https://repo.zabbix.com/zabbix/3.0/rhel/7/x86_64/zabbix-release-3.0-1.el7.noarch.rpm
# yum install zabbix-agent -y
2. Configure/etc/zabbix/zabbix_agent d.conf, modify and open the service, and set it to boot.
# vi /etc/zabbix/zabbix_agentd.conf

Server=172.16.3.152               #zabbix server
ServerActive=172.16.3.152         #Use of zabbix server when submitting monitoring data on its own initiative
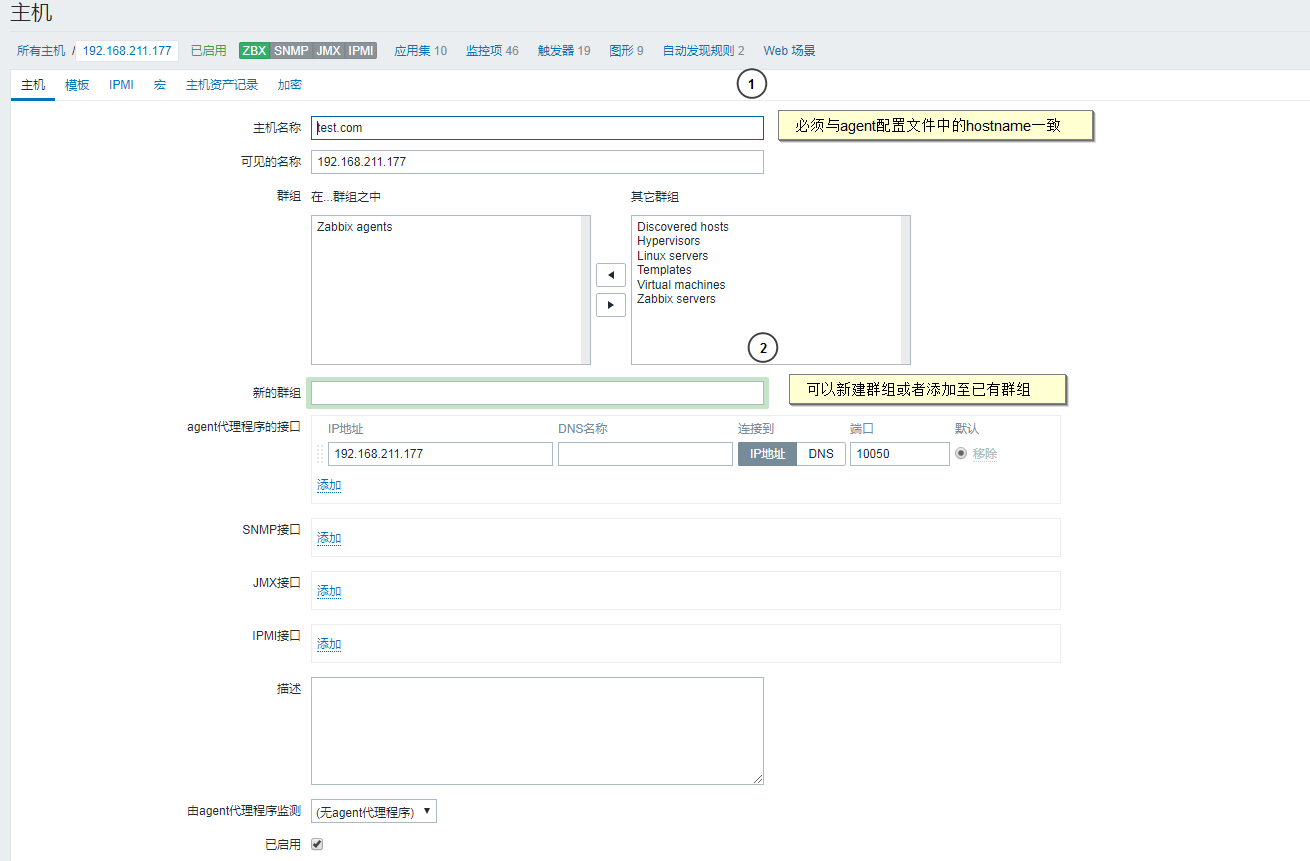
Hostname=test.com                 #The zabbix-agent identity can be the same as the host name
RefreshActiveChecks=60            #Re-submission time between failures of active refresh submission data
BufferSize=1000                   #Cache size
MaxLinesPerSecond=200             #When processing log and eventlog logs, the agent sends the maximum number of rows per second by default of 100.
Timeout=30                        #timeout
UnsafeUserParameters=1            #Allow parameters of all characters to be passed to user-defined parameters


#systemctl start zabbix-agent
#systemctl enable zabbix-agent
View agent status: system CTL status zabbix-agent
Check whether the agent listens on the port: netstat-lntp | grep zabbix_agent
View the zabbix_agent log: tail-f/var/log/zabbix/zabbix_agent D.Log
And you can judge whether the server has successfully listened to the agent by ping Hostname on the server side.

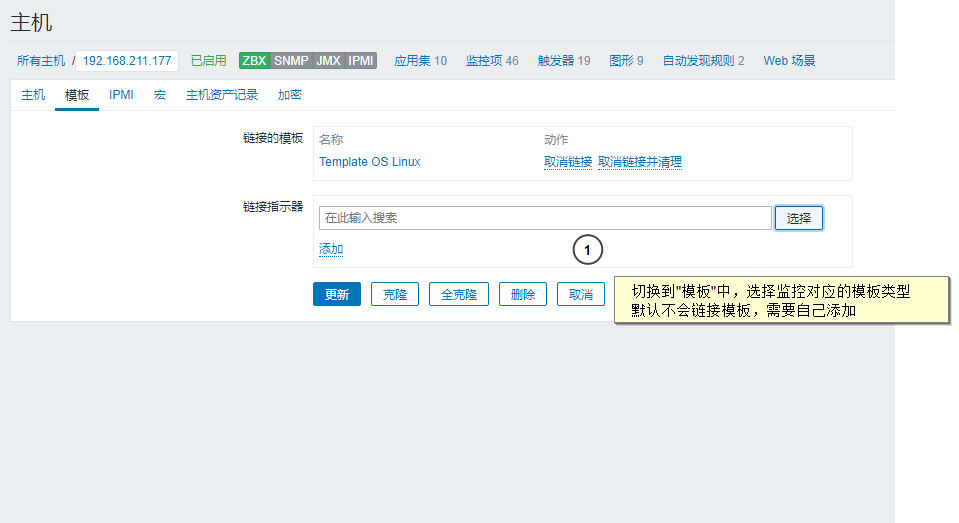
3. After configuring and monitoring successfully, go to the web page to administer, log in to the administrator account, configure > host > create host


4. Add hosts after all configurations have been completed and wait for a period of time. When the ZBX in the availability column of the host list is shown as green, it indicates the success of the nanotube.

3. Notes:
1. Ports are not accessible
There are two kinds of situations in this situation. One is that the ports are not open. It may be because the firewall is not closed or the corresponding ports are not added to the iptables. The solution is to close the firewall and open the corresponding ports.
#vim /etc/sysconfig/iptables

-A INPUT -m state --state RELATED,ESTABLISHED -j ACCEPT
-A INPUT -p icmp -j ACCEPT
-A INPUT -i lo -j ACCEPT
-A INPUT -p tcp -m state --state NEW -m tcp --dport 22 -j ACCEPT
-A INPUT -p tcp -m state --state NEW -m tcp --dport 80 -j ACCEPT     #New row
-A INPUT -p tcp -m state --state NEW -m tcp --dport 3306 -j ACCEPT   #New row
-A INPUT -j REJECT --reject-with icmp-host-prohibited
-A FORWARD -j REJECT --reject-with icmp-host-prohibited


#systemctl restart iptables

//Or close the server firewall

#systemctl stop iptables
#systemctl disable iptables
#systemctl stop firewall
#systemctl disable firewall

//Close SELINUX
#vi /etc/selinux/config

#SELINUX=enforcing #Annotate
#SELINUXTYPE=targeted #Annotate
SELINUX=disabled #Add (e opens, d closes)


#setenforce 0 #Make the configuration take effect immediately
The other is that the port is occupied by other processes, which need to find out the process occupying the port first, and then modify the port of the process or kill the process directly.
#ps -ef |grep 80

//perhaps

#netstat -anp |grep :80

//perhaps

#lsof -i:80
2. Active and passive modes of ZABBIX
zabbix monitoring devices are divided into active and passive modes. The difference between them is that in passive mode, agents send data only when the server sends requests, while in active mode, agents actively send data to the server. So when the number of zabbix monitoring devices is too large, passive mode requires too much performance of the server, and can be replaced by active mode, thus reducing. Less server pressure.
3. Incorrect alarm time
When configuring server and agent, time synchronization measures are needed to improve the accuracy of alarm data.
4. Reference:
http://blog.51cto.com/dyc2005/1971212
https://www.jianshu.com/p/688da06320e8